1
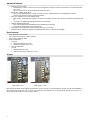
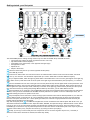
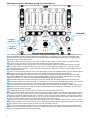
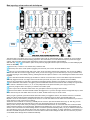
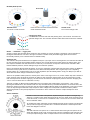
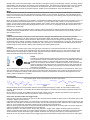
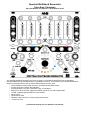
Spectral Multiband Resonator
from 4ms Company
Eurorack Module User Manual v1.0.1b (October 2015)
The Spectral Multiband Resonator from 4ms Company is a versatile resonant filter with six bandpass
resonators/filters having variable frequency quantized to scales or 1V/oct tracked, and variable Q/resonance.
Stereo inputs/outputs and a host of unique features allows for many uses:
• Create beautiful moving chord structures, quantized to selectable scales
• Process audio like a classic filter bank/EQ
• Pluck/ping/strike to ring like a marimba, gong, or membrane
• Beat-sync to an audio track, triggering modular sounds in sync with original audio
• Vocode, outputting spectral data to a second SMR
• Re-mix tracks
• Harmonize to audio
• Quantize audio to built-in or custom programmed scales
• ...and much more
Check 4msCompany.com for updates to the manual
Basic features:
•
•
•
•
•
•
•
•
•
•
•
•
•
•
•
•
•
Six resonator/filter channels
Variable "Q" (Resonance) ranges from classic band-pass to highly resonant ringing
Ring of 20 full-color lights displays the channel frequency
Channel frequencies move about the scale using Rotation and Spread
° Rotation "spins" the frequencies around the scale
° Spread controls the gap between neighboring bands
Morph creates a variable speed cross-fade when the channels are rotated or spread
Lock buttons prevent each channel from changing in frequency (resonance can also be locked)
Freq Nudge knobs create de-tuning effects, or are useful for picking out a precise frequency
Frequency CV input (1V/octave) for even and odd bands (flip switch selects single or multiple channel control)
Stereo inputs and outputs stagger the bands into evens/odds for an immersive stereo field
Spectral content outputs for each channel (Env Out jacks) allow for vocoding (spectral transfer)
° Switch selects Fast or Slow tracking speeds, or trigger outputs
° Trigger output mode fires a trigger when envelope crosses a threshold: useful for extracting a beat from music
Sliders and CV jacks control each filter's level
Slew switch applies slew-limiting to the CV level jacks, which prevents clicking from clocks or triggers
Each bank has 11 scales of 20 frequencies/notes each
Scale banks for Western, Shrutis (India), Chromatic, Diatonic, Micro-tonal 17-note/octave, Gamelan (Pelog and
Slendro), Bohlen-Pierce 13-note tritave, Wendy Carlos's Alpha and Gamma scales. Both equal tempered and just
intonation tunings
Rotation/Spread moves about an entire bank, or can be limited to a single scale
White noise is normalized to the inputs, so the SMR can be used without an external signal
Settings and LED color scheme can be saved and recalled in multiple banks
Controls and jacks:
•
•
•
•
•
•
•
•
•
•
•
•
•
•
•
Filter channel level
° Six sliders set the level of each filter
° White light on each slider indicates filter level (flashes for clipping)
° Six CV inputs for level of each filter. (0 to +5V). Slider attenuates CV on jack
Twenty full-color LEDs indicate which filters are assigned to which channel
° Colors on light ring match colors of Env Out LEDs
° Brightness of each light shows level of each filter
Resonance (Q)
° Res (Q) CV jack (0 to +5V)
° Knob (offsets CV jack)
Stereo input and output (divided into even/odd bands)
° Odd input jack and Even output jack serve as Mono in/out
° Clipping LED between IN jacks flickers when input is clipping (about 20Vpp or +/-10V)
Rotation shifts frequency pattern up or down
° Rotate Clockwise trigger input (2V threshold)
° Rotate Counter-clockwise trigger input (2V threshold)
° Rotate CV jack maps any waveshape to a rotation pattern (0 to +5V)
Spread sets the interval (spacing) between channels
° Spread CV input jack (0 to +10V)
° Knob (offsets CV value)
Morph sets speed of cross fading rotating, spreading, or scale selection
° Morph CV input jack (0 to +10V)
° Knob (offsets CV jack)
Scale CV input jack selects scale from current bank (0 to +5V)
Six Env Out jacks: CV outputs that follow envelope of frequency content per band
° Fast | Slow switch selects envelope tracking speed, or Trigger output mode
° Pre/Post switch selects whether Env Out jacks track the filter before or after the slider attenuates
° 0 to +8V output
Six Lock buttons lock the frequency of each channel
° Button is lit when locked
° Rotation, Spread, Freq Nudge, Scale, and Bank will not change when locked
° Turning Q knob while holding a lock button also locks the Q value (button flashes to indicate Q-lock)
° Lock jack: locks/unlocks even or odd channels when triggered (2V threshold)
Freq jacks: 1V/oct frequency input jacks for even and odd channels (10 octave range, 0 to +10V)
135 | 1 switch selects if Freq jack, Freq Nudge knob, and Lock jack control all odd channels (1/3/5) or just channel 1
246 | 6 switch selects if Freq jack, Freq Nudge knob, and Lock jack control all even channels (2/4/6) or just channel 6
Slew switch enables slew-limiting of incoming CV on the level CV jacks (click and pop prevention)
° Amount of slew limiting is proportional to Morph setting at the time the switch is flipped on.
Scale Rotation switch enables channels to rotate into the next/previous scale each time they rotate fully around
Note: The active voltage range for each jack is given. All jacks are tolerant of signals from -12V to +12V, but signals outside
the active range are clipped to the active range. For example, on a jack with an active range of 0 to +5V, a voltage of -4V is
seen by the SMR as 0V, and +8V is seen as +5V.
2
Advanced features:
•
•
•
•
•
•
Program your own scale:
° The frequency of each of the 20 notes can be assigned by setting the octave, the semi-tone, and coarse and fine
micro-tone.
° Up to 11 scales can be saved permanently in the user bank
Adjust color scheme of the lights:
° Pick a pre-programmed color scheme or create your own using the sliders to set red/green/blue values.
° Custom color schemes can be saved permanently
Save your settings in one of six Settings Slots.
° Note position, scale and bank selection, Q value, lock settings and color scheme can be saved and recalled on the
fly.
° On startup, the SMR loads settings from the last saved bank.
Optional alternative filter type
° More exponential decay and different timbral qualities when plucked.
° Freq jacks no longer track 1V/oct in this mode
Slider LEDs can be selected to display clipping and level, or just level
Firmware can be updated by playing encoded audio files from a computer into the SMR
Specifications
•
•
•
•
26 HP Eurorack format module
16-to-16pin eurorack power cable (included)
0.95” (24mm) maximum depth
Power consumption:
◦ +12V rail:
▪ 86mA max (jumper set to 5V)
▪ 110mA max (jumper set to 12V)
◦ -12V rail: 28mA max
◦ +5V rail:
▪ 25mA (jumper set to 5V)
▪ 0mA (not used when jumper set to 12V)
Jumper
VSEL jumper: +5V
VSEL jumper: +12V
Most modern modular power supplies provide power on the +5V rail. It's recommended to use the +5V rail when available. If
your system does not provide +5V, or if your +5V rail is noisy, the SMR can be set to generate an internal 5V from the +12V
rail by moving the jumper to +12V as shown above.
3
Getting started: your first patch
TO MIXER
The easiest SMR patch is making droning chords. Only one cable is needed! Set up the SMR as shown:
• Turn all the Lock buttons off (press any button that's lit to turn it off)
• Flip Scale Rotation switch off (down)
• Freq Nudge to 0% (both knobs, in the upper left and upper right)
• Res (Q) knob to 100%
• Spread to 0%
• Morph to about 50%
Patch the black OUT jack into your mixer (unpatch all other jacks).
Turn RES (Q) to 100%
There are six sliders. Each one controls the volume of a filter/resonator channel. Push down all six sliders, then slide
each one up, one at a time. You should hear a pitch fade up in volume. Each slider controls a different frequency.
As you adjust the slider, watch the light ring. Each slider is associated with a color. The color gets brighter on the light ring
as the slider moves up and down. Each of the 20 spots on the light ring is associated with a pitch (a frequency, or a musical
note).
Turn the ROTATE knob one click to the right. Hear how the pitches shift up and the lights rotate one step clockwise. Click
the ROTATE knob down, hear how the pitches shift down and the lights rotate counter-clockwise. Keep spinning the knob so
that the lights move past 12:00 (due north, marked by a tick mark on the light ring). Notice how the pitches go to the top and
then start at the bottom. By rotating and pushing different sliders up and down, you can make different chords.
Play with Morph as you continue to turn the ROTATE knob. Morph sets the speed at which rotation happens. With Morph
at 100%, when you turn the ROTATE knob the SMR will slowly fade from one position to the next. With Morph at 0%, the
SMR will instantly jump from one position to the next.
Play with Spread, which controls the number of empty spots in between each channel. With Spread at 0%, the channels
occupy adjacent spots on the light ring. As you turn Spread up slowly, the channels will jump to having one spot between
them, then two spots, then three, etc... As the spacing increases, the channels will get pushed around and eventually the
highest channel will wrap around the lowest.
Play with the Q (Res) knob
. The SMR has a digital noise source normalized to the audio IN jacks. With Q set to 0%, you
should hear a filtered version of this noise. Adjust the sliders, ROTATE, and Spread to bring in different bands of noise. Notice
how as you turn up Q, the output slowly changes from filtered noise towards pure sine waves. This is the effect of a tight
bandwidth (Q) or resonance: only very select frequencies from the noise source are allowed to pass to the output. If you have
a favorite noise module (or any complex sound source), try running it into the input jack(s).
Finally, try running a 1V/oct melody line from a sequencer into one or both Freq jacks. Flip the 135 | 1 and 246 | 6
switches to select which channels are tracked, and which stay steady.
4
Patching percussion: Marimbas, gongs, and wood blocks
TO MIXER
Trigger
source #1
Trigger
source #2
This is a great patch for creating resonant percussive sounds. You need a trigger or gate source. A clock module such as the
Quad Clock Distributor (QCD) or RCD or SCM from 4ms works well. In a live setting, you could use manual trigger/gate
sources such as the FSR-4 from Synthwerks, or the Pressure Points from Makenoise. Another option is a trigger recorder
such as the Tri-ger from Qu-Bit Electronix.
Patch the black “evens” OUT jack into your mixer (un-patch all other jacks). For stereo output, also patch the white
“odds” OUT jack into your mixer and pan it to the left. Pan the black “evens” signal to the right.
Patch your trigger sources into the IN jacks. Two sources with different rhythmic content is ideal, however if you only
have one trigger source, just patch into the “odds” jack. To start, have the triggers firing about once or twice per second.
The odds IN jack goes to channels 1, 3, and 5. The evens IN jack goes to channels 2, 4, and 6. So each trigger source can
strike a chord of three notes.
Listen to how the channels resonate when struck with a trigger or gate, they should sound like a gong or marimba. Adjust
the Q (Res) knob to change how “ringy” the sound is: low Q is like a wood block, high Q is like a large bell.
The amplitude of the triggers also effects the sound, try attenuating or boosting the triggers before they reach the SMR.
Notice that the SMR will be struck on both the rising and falling edge of a gate, so two sounds will be heard for every gate.
Triggers will cause only one sound since the rising and falling edges are very close together.
Adjust ROTATE and Spread to change the pitches of the notes, and play with the sliders to adjust the level of each note.
Input another trigger source into Rotate Trig → or Rotate Trig ←. If you don't have another trigger source, you could input
an LFO or envelope (0 to +5V) into Rotate CV In and the rotation will track the waveshape of the incoming CV.
Play with slowing down the rotation from the external triggers by turning up Morph. Try setting the rotation trigger source
super fast and then turning Morph up and down to adjust the speed of the motion. Morph is a powerful way to limit musical
movement (and it can be CV controlled).
The ROTATE knob is also a button: push and release it, and you will enter SCALE mode.
Notice how the LEDs change: the bottom six LEDs are one color and there should be one LED that's slowly blinking colors in
the top half of the ring. This is SCALE mode. Turn the ROTATE knob and the blinking LED will move: each position in the top
half of the ring represents a different scale (there are eleven). Listen to how each scale is different. You may want to click the
ROTATE knob again to go back to Rotate mode so you can rotate the channels around to hear how the scale sounds. If you
like, patch CV into the Scale CV jack to control the scale selection with another module.
Run CV into the Level CV jacks. Gates from a QCD work great, and you can flip the CV Slew switch to the left to smooth
out the click that happens when a gate snaps up or down. Setting Morph higher when you flip the Slew switch will cause more
slewing to happen, which means very fast CV in the Level CV jacks will be rolled off.
Try running a fast decaying envelope into one or both Freq jacks. Time it to the trigger sources to get membrane drum
sounds. Or try a 1V/oct melody line from a sequencer to track the pitches. Flip the 135|1 and 246|6 switches to select which
channels are modulated/tracked, and which stay steady.
5
Filtering audio: basic re-mixing
TO MIXER
Audio
track
Re-mixing audio tracks often involves highlighting certain instrumentation and getting rid of others. This can be done by
boosting and cutting frequency bands with the SMR. Note that if you're using a line level signal, you need to first boost it to
modular level.
Input a modular level audio signal into the IN jacks (use the odds jack for mono, or both jacks for stereo).
Take the output from the OUT jacks to your mixer (use the evens jack for mono, or both jacks for stereo).
Turn RES (Q) all the way down. Unlock any Lock button that's lit by tapping the button.
Hold down the ROTATE knob while you turn it. The bottom six LEDs should change color, each color represents a
different bank. Keep holding down and turning until the you've selected the deep blue bank. Any bank will work, but the deep
blue bank is nice for re-mixing because the scales are set to common graphic EQ frequencies.
Slide channel 1's slider up and the rest of the sliders down. Turn the ROTATE knob to rotate channel 1 while you listen to
the audio. (If you're in scale mode, click the ROTATE button once to switch to rotate mode – see Rotation section on page 10
for details). Keep rotating until you find a frequency band you want to boost. Adjust the RES (Q) knob to narrow the band and
add resonance if you wish.
You may also want to adjust the left Freq Nudge pot to fine-tune the frequency.
When you find the frequency setting you want, tap the channel's Lock button. This will lock the rotation as well as the
Freq Nudge setting. If you also want to lock the Resonance setting, wiggle the RES (Q) knob while holding down the Lock
button. The Lock button will be lit if the channel is locked, and also flicker if it's Q-locked. If you don't lock the Q, then the
channel's resonance will be controlled by the RES (Q) knob and jack along with all the other channels with unlocked Q.
Repeat this process (steps 5-7) for channels 2-6. Note that for channels 2, 4, and 6 the Freq Nudge knob on the right is used,
while for channels 1, 3, and 5, the Freq Nudge knob on the left is used. Make sure the 135 | 1 switch is set to 135, and the
246 | 6 switch is set to 246 (otherwise the respective Freq Nudge knobs will only control channels 1 and 6).
After setting all the channels to a useful frequency, adjust the mix of the six sliders. Play with adjusting the Q of each channel
(you can hold the Lock button and re-adjust the Q knob to change a Q-locked channel). You can range from essentially a reEQ'ed track to harmonizing, resonant bowl sounds. Since each channel has a different Q value, both sounds can co-exist.
To take the next step, consider running LFOs, envelopes, or clock gates into the Level CV jacks.
Consider rotating some channels while keeping others still. One technique is to manually unlock channels, apply rotation, and
then re-lock them. To maintain the Q-lock setting while unlocking rotation, hold the Lock button for 2 seconds to unlock.
When one or more channel is unlocked, turn the ROTATE knob or use a trigger into the Rotate Trig jacks. The trigger could
even be synchronized with the signals you're running into the Level CV jacks. Or run an LFO or envelope into the Rotate CV
jack. Play with Morph to make the rotation slower or faster. Another idea is to run a slow LFO into the Freq jacks, to create a
filter sweep effect.
Keep this patch going, and continue on to the next patch idea...
6
Beat syncing: advanced re-mix techniques
Audio
track
TO MIXER
This patch idea is a powerful way to sync your modular system with an external audio source-- whether it's a pre-recorded
track or a feed from other instruments being played live. The basic idea is to convert different frequency bands into trigger
outputs, with the rhythm of the triggers matching the rhythm of the original audio's instrumentation.
Start with step
to
of the Re-mix patch on the previous page (patch audio inputs and outputs, turn down RES [Q] and
select the EQ bank).
Set the 135 | 1 switch to 135, and the 246 | 2 switch to 246.
Set Fast | Slow to the center position (triggers), and set Post | Pre to Post. Set Scale Rotation down.
Let's say you have a dance track with a kick, snare, hi-hat, and some melody lines happening. You can use the SMR to
convert each kick drum hit into a trigger output, which you can use to trigger your own kick drum (or clock your master clock,
or trigger anything on the modular). Start by patching the ENV OUT jack for channel 1 into something that makes sound when
triggered.
Turn down all the sliders and bring up the slider for channel 1 to around 50%. Listen to the SMR's output as well as the
externally triggered module. You might want to monitor the input audio, too (use a mult or splitter before the SMR).
There are four parameters to play with to get beat-synced trigger outputs: Rotation, Freq Nudge, Q, and Level (steps 9-12):
Turn ROTATE so that channel 1 is triggering the external module whenever the kick drum hits. Probably for a typical kick
drum, channel 1 should be on the 2nd, 3rd, or 4th note (it depends on the pitch of the kick you're trying to tune into).
Set Freq nudge to dial in a frequency in between two rotation spots.
Turn Q up to narrow the band. Around 50% is a good place to start for syncing to drum sounds.
Set the Level slider to set the threshold at which the trigger fires. If you set it too high, the Env Out light will stay on, and it
it's too low it'll stay off. If the slider seems to have no effect, double-check Post | Pre is set to Post.
When you get a good lock, press and hold the lock button while you wiggle the Q knob, the release. Press the Lock button
again. Now the channel should be locked and Q-locked. Its Lock button will be on with a quick periodic flicker off.
Repeat 9-12 for the next channel, perhaps do the snare or a hi-hat next. Make sure the channel is locked before you move to
a new channel, or else you'll lose your settings.
Advanced: Use an external CV source (try a SISM) into the Level CV jack with the slider all the way up. This way you can
mute/unmute a channel using the slider and not lose your level setting (since it's set on the SISM).
When you like what you hear, save your settings. Hold the ROTATE button down for 5 seconds until the Lock buttons flash
and an animation appears on the slider LEDs. Release the ROTATE button. If you want, you can spin the ROTATE knob to
choose a new color scheme for these settings. Each Lock button represents a Settings Slot (1-6). If you wanted to load a slot
you could tap any of the Lock buttons. But in this case we want to save our settings, so press and hold any Lock button for 2
seconds. The SMR will pause for a fraction of a second while it saves all the settings into that slot. The next time you power
on the SMR, these settings will be loaded automatically.
7
Vocoding and other spectral transfers
Speech
(modulator)
To mixer
(monitor)
VCO
(carrier)
To mixer
(main out)
Using two SMR's, you can create spectral transfer effects. One type of spectral transfer is known as Vocoding, which is
classically used with human speech and a sawtooth oscillator.
Patch a human speech audio signal into the first SMR's odds IN. Use a vocal sample, or a microphone with an audio
input module. You are not limited to just using human speech, but it's a great way to start playing with this technique.
Patch the carrier signal into the second SMR's odds IN. Use a sawtooth VCO, or perhaps an FM'ed VCO. You also could
use another sample or a complex sound from another patch.
Patch the second SMR's evens OUT to your mixer so you can listen. You also may wish to patch the first SMR's evens
OUT to the mixer for monitoring the modulating signal.
Flip Post | Pre to Post on the first SMR
Patch all six Env Outs jacks on the first SMR to the six Level CV jacks on the second SMR. If this is your first time, keep
them in the same order (1->1, 2->2...)
Play with the rotation, spread, scale and bank of both SMRs. You might want to start in the blue bank (graphic EQ) and
with the channels positioned as shown in the diagrams above.
Play with the RES (Q) of both SMRs
To fine-tune the patch, follow the technique outlined in the Re-mix patches, setting the note, scale, bank, and resonance of
each channel on both SMRs.
Usage
Channels: Six resonant filters
The core of the SMR is six resonant band-pass filters. The six channels take their inputs from the audio IN jacks, and their
outputs are mixed together using the sliders and Level CV jacks. The mix is then fed to the audio OUT jacks. The audio IN
jacks are normalized to a digital noise source, so no input is necessary.
Channel color
Each channel is given a color. By default, channel 1 is blue, channel 2 is cyan, channel 3 is green, channel 4 is pearl, channel
5 is orange, and channel 6 is rose. The colors can be changed by editing the Color Scheme (see Advanced Features). The
color is shown on the light ring and also on the Env Out lights. The easiest way to see the color of a channel is to glance at its
Env Out light's color. Another way is to slide its slider up and down and see which light on the light ring is going dim and bright
(you must be in Rotate mode).
Digital noise source
A digital noise source is normalized to the odds IN jack. With nothing plugged into the odds IN jack, the SMR will
filer/resonate this digital noise source. The noise source repeats its pattern, and the frequency content fluctuates.
Stereo/mono operation
For mono operation, patch into the IN and OUT jacks circled in black (odds IN, evens OUT).
8
The evens IN jack is normalized to the signal on the odds IN jack. When just the odds IN jack is patched, it feeds all six
channels. When both jacks are patched, the odds jack feeds channels 1, 3, and 5, while the evens jack feeds channels 2, 4,
and 6.
The odds OUT jack is normalized to the signal on the evens OUT jack. When just the evens OUT jack is patched, all six
channels are heard. When both jacks are patched, channels 1, 3, and 5 feed the evens OUT jack, and channels 2, 4, and 6
feed the odds OUT jack.
Frequency
Each channel is a band-pass filter with a center frequency. The frequency is controlled by several things:
• Note on the scale, shown by the light ring and controlled by Rotation and Spread
• Scale and bank selection
• Freq Nudge knob
• Freq jack (1V/octave)
Each of these elements is discussed in detailed below.
Notes, scales, and the light ring
The light ring displays what frequency (or note in the current scale) each
channel is assigned to. Notice there are 20 spots on the light ring. Each
spot represents a particular frequency, or note. The entire ring of 20 notes is
called a scale. A mark at the top center (12:00) indicates the first note,
which is typically the lowest pitch. The frequencies typically increase as you
rotate clockwise. (We say “typically” because you can create a custom scale
that places any frequencies in any order)
The diagram on the left is an example scale that ranges from a low A note
to an E note about ten and a half octaves higher. Channel 1 is set to 55Hz,
channel is set to 82.5Hz, channel 3 is set to 110Hz, etc.
This happens to be the default scale when the SMR is first run. The SMR
has many other scales representing a variety of musical types, both modern
and historical, common and esoteric, and custom. See the next page for
how to change the current scale and bank.
One feature of the SMR is that the six filters always are assigned to unique
channels. That is, two channels cannot occupy the same spot on the light ring. This is an intentional feature because richer
sounds result from mixing together filters of different frequencies. However, if you want two channels to be at the same
frequency (for instance with a stereo input where you want the same filtering to happen to both left and right) you can rotate
them to adjacent spots on the light ring and turn Freq Nudge all the way up for the lower channel. Alternatively, you can
program a custom scale with duplicate frequencies.
Freq Nudge knobs
There are two Freq Nudge knobs, one for the odd channels, and one for the even channels. A switch selects whether the
Freq Nudge knob controls all the odd (even) channels or just channel 1 (6). Freq Nudge's default position is at 0%, this
means the frequency is not nudged and the notes in the current scale will be unaffected. Thus if you wish to keep the
channels in tune with the scale as it was programmed, keep the Freq Nudge knobs all the way down. As you turn Freq Nudge
up, the frequency will bend towards the next note in the scale. At 100%, the frequency will be the same as the next spot on
the light ring. Thus, you can dial in any frequency between two notes on the scale. Note: There is a hidden 21st note in each
scale, so nudging a channel at note 20 will bend it up towards note 21, not down to note 1.
Locking a channel also locks the Freq Nudge setting. So you can nudge a channel up to an exact frequency and then lock it,
continuing to use Freq Nudge to nudge other channels without effecting the locked channel.
Freq jacks
There are two Freq jacks for controlling the frequency of the channels. Each one is tuned to 1V/octave.
Note: in Firmware version 1 (shipped prior to October 3, 2015), the response is 1.5V/octave. Firmware version 2 and
later is 1V/octave.
Like Freq Nudge, a switch selects whether the jack controls all odd (or even) channels or just one channel (1 or 6).
The jacks have a 10 octave range, so a voltage range of 0V to +10V is accepted. Since negative voltage on this jack does
nothing, the Freq jack only makes the pitch go up, it will not lower the pitch. Thus, the note and scale setting for each channel
defines the lowest pitch.
In most cases, you should be able to passively mult a 1V/octave signal into both Freq jacks (it depends on the module
supplying the 1V/octave signal).
In order to increase stability, the Freq input rolls off high-frequencies. Some classic FM sounds can be achieved by inputting
low audio rate signals into the Freq jack, but as the frequency increases the effect decreases.
9
Q (Resonance)
FFT (Spectral Plot) of SMR output with white noise input
Narrow Q: RES knob at 100%
Wide Q: RES knob at 10%
Each channel has a resonance setting (Q). When the Q/resonance parameter is set high, the six channels act more like
resonators rather than what we normally think of as “filters”, in that they produce a somewhat pure tone or pitch in the
presence of even a tiny bit of that frequency on the audio input. The digital noise signal that's normalized to the input contains
all frequencies, so no matter what note is assigned to a channel, it will output sound.
Interestingly, a trigger or gate also contains all frequencies, so sending a pulse into the audio input causes all channels to
make a sound. Varying the Q value changes the clicky-ness and ringy-ness of the sound, as well how rapidly the resonant
sound decays (see scope shots below). If the pitches of the six channels are tuned to different notes in a scale, chords can be
played (See Scales and Banks, below). If the pitches are controlled using the 1V/octave inputs, then the SMR acts like a sixvoice VCO.
Trigger fed into SMR audio input (purple trace). Resonant sound at output (blue trace).
Gate fed into SMR
RES (Q) at 40%
RES (Q) at 75%
RES (Q) at 100%
Both rising and falling edges
of gate signal causes a
resonant sound on the output
When a channel is tuned to a particular frequency, the SMR will be quiet until that frequency appears on the input, at which
point it will make a resonant sound exactly at the tuned frequency. Try running a sine-wave output of a VCO into the SMR and
sweeping the VCO pitch up and down. As the VCO pitch comes close to the frequency of any of the channels, that channel
will ring and continue ring for a bit after the VCO has left that frequency.
When the resonance is low, the six channels act more like band-pass filters. Each slider controls the volume of that band. If
the bands are spaced evenly across the range of human hearing then the SMR will function like a graphic EQ. If the bands
are rotated or swept up and down in frequency, then the SMR will function somewhat like a traditional band-pass VCF.
Rotation
Rotation is a major feature of the SMR. The light ring is important to watch when learning about rotation. Rotation can happen
in one of two directions: clockwise or counter-clockwise. When rotated, all six channels move in the same direction, and the
six lights on the light ring will fade to the next adjacent spot. If a channel is locked, it won't rotate (see Locks, below). If a
channel is rotated such that it would land on top of a locked channel or another channel moving in the opposite direction, then
it will move through the locked or moving channel and stop on the other side.
Rotation is closely linked to Morph, which sets how quickly (or slowly) rotation can happen (see Morph section below). No
matter how much rotation you tell the SMR to do, it will only go as fast as the Morph setting allows. Rotation is also queued,
so if you quickly turn the ROTATE knob ten notches to the right and have a very slow Morph setting, the SMR will start
rotating all the channels one step at a time until it's rotated a total of ten times. Each of the ten rotations will happen at the
Morph speed. Reversing direction clears the queue, so if you want the SMR to stop rotating, you can turn the ROTATE knob
one click in the other direction. The SMR will forget the remaining rotations in the queue and just rotate once in the new
direction.
10
ROTATE (SCALE) knob
Push knob
ROTATE mode:
Turn knob to rotate channels
Press the button to switch between ROTATE
mode and SCALE mode
SCALE mode:
Turn knob to change scale
Changing the Bank:
Push ROTATE knob down and while still pressing down, turn the knob. The bottom six
lights will change color. The new bank selection takes effect when the button is released.
Rotate → and Rotate ← trigger jacks
A trigger on either jack will rotate the channels one step clockwise or counter-clockwise, respectively. This is equivalent to
turning the ROTATE knob one click to the right or left when in Rotate mode (the Rotate trigger jacks have the same
functionality whether you're in SCALE mode or ROTATE mode).
Rotate CV jack
The rotation of the jacks will follow the CV applied to this jack. If you input a 0V to 5V triangle wave, the channels will rotate all
the way around through all 20 possible rotation positions, then reverse direction and rotate back to the starting place, and
then repeat. A sawtooth wave will cause them to rotate only in one direction. A step wave will cause the channels to fade
between different positions, without rotating through the in-between positions.
Keep in mind that the Morph speed still applies, so if the CV waveshape changes faster than the Morph setting, the SMR will
do its best to keep up with the CV, but will never move faster than Morph allows. This is a great way to turn a repeating
rhythmic pattern (e.g. a triangle wave) into a new, less repetitious (but still related) pattern: simply turn Morph up so that it's
slower than the rate of change of the Rotate CV signal.
There are 20 possible rotation positions, and the jack is active in the range of 0V to 5V, so each rotation step has a window of
0.25V. Applying 0.25V will cause the channels to rotate one step clockwise. Dropping back to 0V will cause them to rotate
back one step counter-clockwise. Applying 1.0V will result in the channels morphing four positions clockwise. Dropping from
1.0V to 0.75V will cause them to rotate back one step.
This kind of rotation is different than the ROTATE knob or the trigger jacks. With triggers on the Rotate → jack or when
spinning the ROTATE knob, the channels rotate one step at a time until they reach their destination. On the other hand, with
Rotate CV, rotating more than one step at a time will cause the SMR to Morph directly to the destination. This type of rotation
is nice for sequencing the SMR with a step-sequencer. Each voltage level corresponds to a different rotation position.
Sequencing Rotate CV and perhaps Spread CV and Scale CV at the same time creates a complex hexaphonic chord
machine!
Scales and Banks
A scale is a set of 20 notes or frequencies, represented by the 20 spots on the light ring.
There are 11 scales in each bank. Each channel can be in any scale. All the channels can be
in the same scale, or each can be in a different scale, or some can be in the same scale and
others in different scales.
To visualize the scales and banks, tap the ROTATE (SCALE) knob to change to Scale mode.
The top half of the light ring represent the 11 scales and the bottom 6 LEDs represent the
banks. See diagram on the left.
Scale mode shows the current
banks and scales
11
Scales
The LED at the left-most point is the 1st Scale and the LED at the right-most point is the 11th
Scale (see diagram at left). Each channel's scale is shown by displaying that channel's color
on the spot representing its scale. If multiple channels are in the same scale, the LED will
flash between all the colors of the channels assigned to that scale.
When in Scale mode, turning the ROTATE (SCALE) knob will change the scale of all the unlocked channels. Turning it one
click to the right moves all unlocked channels up one scale, and when they hit the 11th Scale, they stay there. Turning it one
click to the left moves all unlocked channels down one scale, and when they hit the 1st Scale, they stay there. If you lock a
channel, it won't move, so you can set each channel to a different scale by locking one channel, turning the SCALE knob,
locking another channel, turning SCALE again, locking a third channel, etc. Then if you unlock all the channels, they will stay
in their formation as you turn the SCALE knob up or down. To force all the channels back to being in the same scale, unlock
all the channels and then spin the SCALE knob up or down until all the channels are at the 1st Scale or the 11th Scale.
Banks
A bank is a collection of eleven scales. Banks have a theme, typically they represent a system of tuning with eleven variations
or eleven parts of the frequency spectrum. For instance, the white bank is a collection of eleven scales with each scale built
on a different interval found in western music (major 3rds, fifths, minor 6ths, etc). They are tuned using just intonation and
each scale has a range of 10 octaves. On the other hand, the yellow bank is a collection of micro-tonal scales tuned to 17
equally tempered notes per octave. Since each scale has 20 notes, each one ranges just over one octave, with the first scale
starting around 20Hz and the last scale ending over 20kHz. See the end of the manual for a table of all pre-programmed
banks.
In Scale mode, the bottom six lights on the light ring show the banks the channels are assigned to. The six lights correspond
to the six channels, in order from left to right. (See the diagram on the previous page). By default, the white bank is selected,
so all six LEDs on the bottom will be white. If you hold down the ROTATE (SCALE) knob and turn it while still holding it down,
all unlocked channels will change their bank. The bank does not become active until you release the knob. This is useful for
live performance, allowing you to select the bank you want without having each bank in between become audible.
In same way you can put each channel into a different scale by locking channels as you change the scale, you also can put
each channel in a different bank. Try locking just one a channel and then changing the bank. Five of the bottom six LEDs will
change color but one will stay the same. If you unlock that channel, it will keep the same bank, but when you change the bank
again, it will join the same bank as the rest of the unlocked channels.
Scale CV
The scale can be changed via CV using the Scale CV jack. Voltages in the range of 0 to +5V are accepted. Since there are 11
scales in each bank, a voltage increase of 0.45V causes all unlocked channels to move to the next scale. Likewise, a voltage
decrease of 0.45V causes them to move to the previous scale. The scale can also be set manually using the ROTATE
(SCALE) knob (see above section). If enough voltage is applied to the Scale CV jack such that the scale would move past the
11th scale, it will simply stay at the 11th scale and ignore all additional voltage. The Scale CV jack works just like manual
control of scale by keeping the moving each unlocked channel up or down the same amount and keeping their relative
positions.
Scale Rotation switch
When the Scale Rotation switch is up, the channels will move into the next or previous scale when rotated past the zero point
(due north) on the light ring. This can happen whether a channel is rotated manually or with triggers, or crosses the zero point
due to Spread. Some banks, such as 17-note/octave, have the eleven scales arranged in a specific order, so rotating with
Scale Rotation on will sweep the frequencies the full spectral range.
Spread
Spread=0
Spread=1
Spread=2
Spread=3
Spread=4
(continues to Spread=16)
The Spread parameter controls the spacing between channels. Like Rotation, Spread is subject to the Morph speed and has
no effect on locked channels. Spread picks a center point and pushes the channels outward from that point until the desired
spacing is achieved. Some channels move CW, some move CCW. In firmware version 1.0 (build 2015-07-15), channel 3 is
taken as the center point, so it is the anchor around which the other channels are spread.
When turned all the way down, the channels will line up side-by-side. Make sure all the channels are unlocked and then turn
Spread to 0. Turning Spread up a hair will make the channels space themselves out with one empty spot in between each
channel. Turning Spread up a bit more causes two empty spots between each channel. A little more causes three empty
spots, etc. At a certain amount of Spread, the first channel spreads around the light ring past the last channel and the
channels start to overlap on themselves. Thus the “empty” spots between two adjacent channels might be filled by other
channels. The maximum Spread value is 16, so lots of overlapping can occur.
If the Scale Rotation switch is flipped on, then as a channel is spread past the top point of the light ring, it will move into the
next or previous scale in the bank, depending on if it's moving clockwise or counter-clockwise.
12
Spread is also used to reset the position of the channels on the light ring. During normal usage of locking, unlocking, rotating
and spreading, the channels can be mixed up in any imaginable order. The easiest way to get them back to a known starting
place is to unlock them all and turn the Spread knob. The Spread CV jack can be used as “Reset position” jack: giving a
trigger into this jack will reset the unlocked channels' positions to the Spread pattern set by the Spread knob.
Morph
Morph is another central feature of the SMR. Anytime the channels are rotated or spread, the SMR performs a cross-fade
from the current spot to the new spot. Morph controls the duration of the cross-fade. At minimum, the cross-fade is almost
instant, a few microseconds. At maximum, the cross-fade is one second long. Thus rotating all the way around the light ring
would take 20 seconds.
Morph is real-time, so adjusting it in the middle of a cross-fade immediately changes the speed of the cross-fade. Thus, if you
have a slow Morph time and queued a dozen or so rotations, if you don't want to wait a dozen or so seconds for them to
happen, you can just turn Morph down and they'll happen much quicker. Another trick with Morph is to send a rapid stream of
triggers into the Rotate trig jack while adjusting Morph knob or CV. As more CV is applied, the rotation will slow down, and
with less CV it will speed up.
Morph also controls the cross-fade time when changing scales. This applies to changing scales with the Scale CV jack, or by
manually turning the ROTATE knob in scale mode. Morph controls the amount of slew when the CV Slew switch is thrown
(See CV Slew section).
Locking
Locking is a powerful way to keep one or more channels from changing, while allowing other channels to by dynamic.
To lock a channel, tap the Lock button above that channel's slider. When the channel is locked, the button will be lit.
Tap the button again and the channel will unlock. When locked, a channel will not change its center frequency. The channel
will be impervious to rotating, spreading, changing the scale or bank, or the Freq Nudge knob or Freq jack. The slider and the
Level CV jack will still control the channel's output level, and if the channel is not Q-locked then the RES (Q) knob and jack
will still change how the channel is filtering and resonating. See below regarding Q-lock.
Lock jack
You also can lock a channel using a gate or trigger signal. There are two Lock jacks located near the 135 | 1 and 246 | 2
switches. Like the Freq jack and Freq Nudge knob, the channels that are effected by the Lock jack can be selected using
these switches. The rising edge of a gate or trigger signal will cause the selected channels to invert their lock state. Thus,
locked channels will unlock and unlocked channels will lock.
Q-lock
Q-locking is an advanced feature that locks the channel's Q or resonance setting. To
Q-lock a channel, hold the Lock button down while you turn the RES (Q) knob. When
the RES (Q) knob is where you want the channel to be locked, release the Lock
button. The Lock button will now flicker to indicate it's Q-locked. If the channel is also
frequency locked (normal locking) then the Lock button will be mostly bright and will
flicker off periodically. If the channel is not frequency locked then it will be mostly off
and flicker on periodically.
To turn off Q-lock for a channel, tap the Lock button to frequency lock it, and then tap again to unlock frequency and Q. If the
channel is frequency locked and Q-locked, and you just want to clear the frequency lock, hold the Lock button down for two
seconds. To change the Q setting of a Q-locked channel, hold the Lock button down and turn the RES (Q) knob to a new
position and then release the Lock button.
+
Env Out jacks
Env Out jack signal, at the three positions of the Fast | Slow switch
Fast envelope
Trigger
Slow envelope
Each channel has an Env Out jack which outputs a CV that tracks the frequency content. This is useful for beat-syncing,
vocoding, spectral transfer, or controlling other modules with triggers or CV based on the frequency (spectral) content of an
audio signal.
Next to each Env Out jack is an LED that shows the signal present on the jack. A brighter light indicates more signal. The
color of the Env Out jack also matches the channel's color on the light ring.
Fast | Slow: Envelope modes and Trigger mode
The three-way Fast | Slow switch to the right of the Env Out jacks selects whether the jacks output CV envelopes (fast or slow
tracking) or triggers (center position).
In Envelope mode, the jacks output a CV whose level is proportional to the amount of that channel's frequency present on the
audio input. For example, if the channel is set to 440Hz, any time the input signal contains 440Hz, the Env Out jack will output
some CV: more voltage when the 440Hz is louder and less voltage when it's less present.
When the switch is set to Fast (left), the signal is tracked rapidly and small nuances are output. With it set to Slow (right), the
output is averaged such that small variations are smoothed out.
When the switch is in the center position, the Env Out jacks are in Trigger mode. Trigger mode also tracks the frequency
content of the audio input signal, but it outputs triggers instead of CV. Whenever the amount of frequency present exceeds a
certain threshold, the jack will send a trigger. The jack will remain high as long as the frequency content stays above the
threshold. This is very useful for beat-syncing or triggering external modules that track percussive content of an audio signal
13
(see example patch). It's also useful for patching the SMR to itself (Env Out → Rotate Trigger jacks and Lock jacks)
Pre | Post
The Pre | Post switch selects whether the signal to be analyzed is taken from the raw audio input, or if it's attenuated by the
channel's slider.
When the switch is set to Pre, the Env Out jacks will respond to the frequency content of the input signal and not be effected
by the sliders or Level CV jacks. This is useful in cases where you want to use the Env Out jacks to control or modulate other
things in your patch, while also using the sliders to control the mix on the SMR's audio outputs.
When the switch is set to Post, the Env Out jacks will act as if the frequency content of the channel was attenuated by the
slider and Level CV jack. Therefore in Post mode, the Env Out jack will output zero when the slider is all the way down (and
no Level CV is applied). With Fast | Slow set to Trigger (center position), the slider effectively sets the threshold level for
which is a trigger is fired. This is crucial for advanced beat-syncing (see example patch).
CV Slew
CV Slew is a switch that smooths out rapid changes on the Level CV jacks, allowing you to use gates and clocks into the
Level CV jacks without hearing pops and clicks. This is useful for patching a QCD, RCD, or SCM directly into the SMR.
To use CV Slew, flip it to the left. Any sharp transition on the Level CV jacks will be smoothed out.
The amount of smoothing is controlled by the position of the Morph knob at the moment that CV Slew switch is flipped on. So
if Morph is all the way up when the CV Slew switch is thrown, more smoothing will be applied than if the Morph knob was all
the way down when the switch is thrown.
Advanced Features
Updating firmware with the Audio Bootloader
The SMR contains a bootloader that is used to update the firmware by playing an audio file into odds IN jack.
Firmware audio files can be downloaded at http://4mscompany.com/smr.php
1. To enter bootloader mode, power off the SMR and connect a computer or smart phone audio output to the odds IN
jack. Either a stereo or mono cable is fine. Plug the evens OUT jack to an amp/speakers so you can listen.
Remove your phone case, it may be preventing the cable from fully plugging in.
2. Set the computer/phone's volume is at 100% and the audio player software is also at 100% volume. Turn off all
audio and vibrate notifications (use Airplane mode).
3. Hold the ROTATE button down while powering the SMR on. Keep holding it down, and release the button when you
see just a single light on, slowly changing color. The SMR is ready to receive firmware.
4. Begin playing the file. Immediately you should see the slider LEDs do a sequential animation, and the light ring slowly
filling up with lights, and then clearing, then filling up again. Do not interrupt the process! You can monitor the audio by
listening to the evens Lock jack or the audio OUT jacks.
5. If at any time two of the Lock lights turn on (channels 2 and 3, or channels 2 and 4) and the other lights stop
animating, then an error has occurred. Verify the cable is not loose, all sounds/vibrate/notifications are off, and that
you have downloaded the audio file completely (avoid streaming or playing from the browser). Check the volume is at
100%. Remove the protection case from your smart phone. Stop the audio file, reset it back to the start, and tap the
ROTATE button to reset. The single flashing light should come on and the Lock lights should turn off. Play the file from
the beginning again.
The open-source licensed files for the firmware can be found at https://www.github.com/4ms/SMR
Firmware Version
To view the firmware version, tap the ROTATE button 10 times rapidly to enter “Custom Scales” mode. Starting with Firmware
version 2, the Blue/Green/Red elements of the Env. Outs LEDs read as a binary code of the firmware version number, with
Channel 1 Red being the least significant bit, and Channel 6 Blue being the most significant bit.
Firmware version 1: All Env Out LEDs normal colors (no binary code)
Firmware version 2: Channel 1 Green
(000 000 000 000 000 010)
(Ch6 Ch5 Ch4 Ch3 Ch2 Ch1)
(BGR BGR BGR BGR BGR BGR)
Future firmware versions will follow the same format:
Firmware version 3: Channel 1 Yellow
(000 000 000 000 000 011)
Firmware version 4: Channel 1 Blue
(000 000 000 000 000 100) etc...
Custom Scales
Tap the ROTATE button 10 times rapidly. All the Lock lights will illuminate, and only one light in the light ring will turn on. This
is Custom Scale Edit mode. There is one Custom Bank, containing 11 Custom Scales. You can choose which Custom Scale
in the bank you are editing by tapping the Rotate button to select the scale, just like you do in normal operation. Tap it again to
return to selecting the note. Each note in the scale can be assigned a frequency. To choose the note for which you want to
change the pitch, turn the ROTATE knob and the light will move around the light ring, indicating which of the 20 notes you are
currently editing.
To edit the pitch of a note you just selected, press any Lock button. This will unlock the note, and allow the pitch to be
changed. You may want to turn up Res (Q) so you can hear the pitch, or you can keep Res (Q) turned down and run audio
into the SMR to select a frequency based on what it filters out.
Slide the sliders to edit the pitch:
• Slider 1: Octave select (10 octaves)
• Slider 2: Semi-tone select (12 notes within the octave)
• Slider 3: Micro-tone select (52 micro-tones within the semi-tone)
• Slider 4: Nano-tone select (Fine tuning micro-tone control)
• Sliders 5 and 6: not active
14
When you've set the pitch you want, press any lock button to lock it, or turn the ROTATE knob to select a new note and it will
be automatically locked. You can rotate around all the notes to verify the scale sounds how you like it. When you want to save
your changes, press and hold the ROTATE button for five seconds. You will hear a beep indicating the Custom Bank was
saved. To access the Custom Bank, select the grey (pearl, or dim white) bank in the same way you normally select banks.
The Custom Bank functions in the same way as pre-programmed banks.
System Mode
To enter System Mode, hold the ROTATE (SPREAD) button down for five seconds without turning it. The Lock buttons will
start flashing, an animation will appear on the slider lights, and all the Env Out lights will stay steadily lit.
To exit System Mode without changing anything, tap the ROTATE (SPREAD) button quickly.
There are several things you can do in System Mode:
Color Schemes
Each channel is given a color, which is shown on the light ring to indicate which note and scale the channel is assigned to. It's
also shown on the channel's Env Out LED. These six colors are arbitrary and there are 14 preset color schemes that can be
selected. For instance you might want all your LEDs to be red, or to be white. Or you might prefer pastel colors or a gradient
between blue and orange. You also can create a custom color scheme with any six colors you want.
To change the color scheme, enter System Mode. Then turn the ROTATE knob to cycle through the color schemes. Some of
the color schemes may be gray, which means they are an empty slot that can be programmed with a custom color scheme.
When you find a color scheme you like, you can try it out by tapping the ROTATE button once. Or, if you want to see this color
scheme by default every time you power the SMR on, then you can save it in the current settings slot by holding down the
steadily lit Lock button for five seconds. See Saving and Recalling Settings below for details.
Custom Color Schemes
You can also edit a color scheme or create your own.
Enter System Mode as described above. Turn the ROTATE knob to select the color scheme you want to edit, or select one of
the grey color schemes to create your own. Now press and hold the ROTATE button again for another five seconds. You've
now entered Custom Color Scheme Mode. The first three sliders will be flashing, and the last three will off. The six Lock
buttons will be steadily lit.
The sliders represent Red, Green, and Blue respectively. The Lock buttons select which channel you're currently editing.
Start by tapping the first Lock button so that Channel 1 is unlocked. Play with the first three sliders as you watch the Env Out
light and/or the light ring. The first slider controls the amount of red, the second slider controls the amount of green, and the
third slider controls the amount of blue. Billions of colors can be chosen with these three sliders. When you find a color you
like, lock the channel and unlock the next channel you want to edit.
You also can edit multiple channels at once by unlocking them all while adjusting the sliders. This is a quick way to set all the
channels to the same color if you want a mono-chromatic color scheme. From there you could make fine adjustments to one
channel at a time so that there's some variation between channels.
When you're done editing, press and hold the ROTATE button for five seconds and the color scheme will be saved, even after
the SMR is turned off. If you're saving and recalling settings in the settings slots (see next section), it might be helpful to know
that saving a color scheme in this way saves it to the currently active settings slot. To try out your changes, tap the ROTATE
button once quickly and nothing will be saved permanently, but you will be able to try out the new color scheme. If you don't
like it, power the SMR off and back on to clear it or re-load the current Settings Slot. If you do like it, save it to a Settings Slot.
Slider LED mode
The Slider LEDs normally display clipping on the channels by flickering when the channel's contribution to the output mix
approaches the clipping level. To toggle between the two settings, slide channel 1's slider up and down 5 times rapidly when
in System Mode.
You can tell which setting you're in by watching the animation on the slider LEDs when in System Mode:
• One slider LED is on at a time (Night-Rider): sliders show clipping and level
• Five slider LEDs are on at a time (inverse Night-Rider): sliders show level only
Filter Type
Experimental feature that uses a different algorithm for the filter. The timbre is subtly different, and the decay when struck with
a trigger is more exponential. However, the alternative filter type cannot be tracked 1V/octave. Thus the Freq jacks mimic the
Freq Nudge knobs when using this filter type.
To change filter types, turn the Freq Nudge knob up and down 5 times from 0% to 100% when in System Mode. Make sure
you are listening to the output, because you will hear a change in sound when the filter type changes. The filter type is saved
with each setting slot.
Factory Reset
To reset all SMR settings, enter System Mode and hold down all six Lock buttons and the ROTATE button for 3 seconds.
Saving and Recalling Settings – “Settings Slots”
All of the internal settings of the SMR can be saved and recalled, even after powering the SMR off. There are six “Settings
Slots” for you to save and recall settings. When powering the SMR on, the slot that was most recently saved into will be
recalled. The settings that are saved and recalled in each setting slot are the following:
• Channel note
• Channel scale
• Channel bank
• Channel Res/Q setting (if q-locked)
• Channel lock status
• Channel Q-lock status
15
• Channel Freq Nudge setting
• Color Scheme selection
• Filter type
•
Additionally, the following global settings are saved whenever a setting slot is saved:
• Default Settings Slot (which Slot the SMR starts up in)
• Custom scales
• Color schemes
• Slider LED mode
The six Settings Slots are represented by the six Lock buttons. When you enter System Mode, the Lock buttons will flash in a
way to tell you their status:
• Dimly flashing: Settings Slot is empty
• Brightly flashing: Settings Slot is full
• Lit solidly (not flashing): Settings Slot is currently selected
Recall Settings
To recall settings from a Slot, enter System Mode and then tap one of the brightly flashing Lock buttons. The settings from
that Slot will be loaded and you will instantly exit System Mode.
Saving Settings
To save the current settings into a Slot, enter System Mode and then hold down one of the Lock buttons for three seconds.
The SMR will beep for a fraction of a second. The next time you power the SMR on, it will boot into the last saved Slot.
Recalling a slot and then saving it is the way to set a default startup slot without changing any settings.
Table of Scales and Banks
See Scales and Banks section, and ROTATE (SCALE) knob section (page 10) for details on how to change scales and
banks. The order of the banks is this table is left to right, then top to bottom.
1. Western scale (white)
2. Indian pentatonic (green)
Just intonation. Each scale contains
a root note and one interval,
repeated over 10 octaves. Each
scale uses a different interval (m2 to
M7) and spans 27.5Hz to 15kHz
Scales 1-8 have five notes per
octave, spanning four octaves. Each
is one octave above the previous.
Scales 9-11 contain selected notes.
5. Gamma scale, selected
notes (orange)
6. 17-note per octave (yellow)
7. Chromatic (purple)
8. Diatonic 1/2 (magenta)
The first scale starts at 13.75Hz and
each note is equally tempered to a
17-note octave. Each scale is one
octave above the previous.
The first scale starts at E2 (82.4Hz)
and each note is one semi-tone
above the previous. Each scale
spans an octave and a half and is
six semi-tones above the previous.
Each scale is a diatonic scale
spanning almost three octaves. The
first two scales start on A, the next
two start on A#, then B, C, C#, D. In
each pair, the second scale is two
octaves above the first.
Each scale contains intervals
selected from Wendy Carlos's nonoctave repeating Gamma scale,
spanning roughly 20Hz to 20kHz.
9. Diatonic 2/2 (rose)
3. Alpha scale, selected notes
(lavender). Each scale contains
4. Alpha scale, selected notes
(cyan). More variations. All intervals
intervals from Wendy Carlos's micro- are multiples of 78.0 cents (perfect
tonal scale, spanning roughly from
fifth split into nine equal parts), so
20Hz to 20kHz
there are no octaves, yet rich
harmonies.
10. Western dual-interval (light 11. Mesopotamian (Red)
Various ancient scales from
green). Each scale starts on G1
(49Hz), followed by two intervals.
The triad is repeated across seven
octaves, an octave higher each time.
The pair of intervals varies per scale:
M2/P5, M3/flat5, m3/M5, M4/P5,
m3/#5, P4/P5, M3/M6, m3/flat6,
M3/#5, m3/m7, P5/M7
Mesopotamia. Scales 1, 3, 5, 7, 9,
and 11 have six notes starting on A2
(55Hz), and then repeats over 3
octaves. The remaining scales are
copies of the previous scale, but
three octaves higher.
12. Shrutis, Indian scales
(Yellow-green). Uses 20 notes
from a 22-note octave, so each
scale spans one octave and is one
octave higher than the previous
scale.
13. Graphic EQ (blue)
14. Gamelan (azure)
15. Bohlen-Pierce (Lime)
16. Custom scales (gray/pearl)
These are common frequencies in
Eqs. The first scale is 20Hz, 40, 60,
80, 100, 150, 250, 350, 500, 630,
800, 1k, 1.3k, 1.6k, 2k,
2.6k,3.5k,5k,8k,10k. Each scale is
the same as the previous scale,
shifted up about 3%
Scales 1 and 2 are the Gamelan
Pelog (5-note) scale repeated over 4
octaves. Scales 3, 4, and 5 are
Slendro (7-note) scales spanning 3
octaves each. Scales 6-11 are a
selection of five notes from the
Slendro scale.
Instead of octaves, the BP scale is
based on the tritave (triple the root
frequency), with thirteen notes per
tritave. Each scale starts on C1 and
contains four selected notes per
tritave, spanning five tritaves
These are user-programmable
scales. See section above for how to
write and save your own scales. By
default, they are chromatic scales
Continuation of previous bank,
starting at D#, E, F, F#, G, G#
16