1
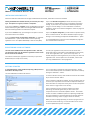
NXPOWERLITE USER MANUAL
TM
DESKTOP EDITION, VERSION 3.5
Introduc�on ......................................................................................................................................................................................... page 1
System Requirements .......................................................................................................................................................................... page 1
Installing NXPowerLite ......................................................................................................................................................................... page 2
Registering NXPowerLite ..................................................................................................................................................................... page 2
Ge�ng Started .................................................................................................................................................................................... page 2
Fla�ening Embedded Documents ....................................................................................................................................................... page 3
Compression Levels ............................................................................................................................................................................. page 3
Custom Compression Se�ngs ............................................................................................................................................................. page 4
Batch Processing .................................................................................................................................................................................. page 4
The Results Window ............................................................................................................................................................................ page 5
Addi�onal Op�ons ............................................................................................................................................................................... page 5
Outlook Integra�on ............................................................................................................................................................................. page 6
Further Support ................................................................................................................................................................................... page 6
Other NXPowerLite Products ............................................................................................................................................................... page 6
Index .................................................................................................................................................................................................... page 7
INTRODUCTION
Good content takes up space. Even in small companies, large
Microso�® Office files can cause significant storage, backup and
transfer problems. In larger organiza�ons, these problems quickly
scale up to become major issues.
Tradi�onal compression methods, such as
zipping, have li�le effect on image-heavy files,
which is where NXPowerLite really excels.
And with NXPowerLite, there’s no need to
unzip your files before using them.
NXPowerLite radically reduces the size of Word, Excel® and
PowerPoint® files in seconds, with no discernible loss of quality making them easier to use, store and share. It does this by removing
any excess baggage and conver�ng embedded graphics to the most
appropriate file format and resolu�on.
Files remain in their original format and retain all their func�onality,
so they can be opened and edited by anybody with a copy of
Microso�® Office. File recipients do not need to have NXPowerLite
on their machines.
SYSTEM REQUIREMENTS
NXPowerLite can op�mize files saved in Microso�’s® new Open XML
formats (such as DOCX, XLSX and PPTX), as well as files saved in the
‘tradi�onal’ Microso�® Office formats (such as DOC, XLS and PPT).
NXPowerLite is compa�ble with PCs running Microso�® Windows®
(Windows® 2000 onwards).
It op�mizes Word documents, Excel® spreadsheets and PowerPoint®
presenta�ons created with any version of Microso�® Office, from
Office 97 to Office 2007 (or any other applica�on that can save to
Microso� Office file formats, such as Google DocsTM, StarOfficeTM or
OpenOffice.org).
It does not require Microso�® Office to be installed. However, be�er
results will be achieved with some Word documents if Microso�®
Word is installed.
Op�onal Microso�® Office integra�on requires Office 2000 or above.
1
INSTALLING NXPOWERLITE
Please note that these instruc�ons do not apply to NXPowerLite Stand-Alone, which doesn’t need to be installed.
Ini�ally, the NXPowerLite installer will ask you to choose your setup
type. The op�ons are ‘Typical’, ‘Custom’ or ‘Complete’.
If you install Outlook® Integra�on, Outlook® will ask if you want
to op�mize any a�ached Word, Excel® or PowerPoint® files before
sending. If you choose ‘Yes’, they will be automa�cally op�mized
using your current se�ngs. For more informa�on on Outlook®
Integra�on, please see the ‘Outlook Integra�on’ sec�on on page 6 of
this user manual.
If you choose ‘Typical’ or ‘Complete’ setup, the NXPowerLite program
will be installed, along with Add-Ins that integrate NXPowerLite with
Microso�® Office applica�ons and Windows® Explorer.
If you choose ‘Custom’ setup, you will be given the op�on to choose
which of the Add-Ins are installed.
If you install Explorer Integra�on, you will be able to op�mize a Word,
Excel® or PowerPoint® file from within Windows® Explorer by rightclicking on it and selec�ng the ‘Op�mize with NXPowerLite...’ op�on.
If you install Word, Excel® or PowerPoint® Integra�on, an ‘Op�mize
with NXPowerLite...’ op�on will be added to the corresponding
applica�on’s ‘File’ menu (Office 2000-2003) or ‘Add-Ins’ tab (2007).
To uninstall NXPowerLite, select it from the ‘Add/Remove programs’
list in the Windows Control Panel.
REGISTERING YOUR SOFTWARE
To enter your registra�on code, either click on the ‘Enter Code...’
bu�on that appears at the bo�om of the NXPowerLite splash screen,
or the ‘Enter registra�on code...’ op�on in the ‘Help’ menu. A
window will appear containing boxes for you to enter your name and
registra�on code. If these op�ons are not available, it means that
your copy of NXPowerLite is already registered.
The trial version of NXPowerLite will op�mize ten files. A�er this,
you will need to enter your 25-character registra�on code to unlock
the full version of the so�ware.
You will have received your registra�on code when you purchased
NXPowerLite (it is usually sent via email).
GETTING STARTED
To start NXPowerLite, simply double-click (or drag a Word, Excel® or
PowerPoint® file onto) its icon.
You can select files to op�mize by clicking the ‘Add Files...’ bu�on.
You can select all Word, Excel® or PowerPoint® files within a folder by
clicking the ‘Add Folder...’ bu�on.
The main NXPowerLite window looks like this:
To remove a file from the list, select the file and either hit the ‘Delete’
key or click the ‘Remove’ bu�on.
If you’ve selected a single file to op�mize, the only remaining steps are
to choose your compression level and click the ‘Op�mize’ bu�on (for
more informa�on on compression levels, please see the ‘Compression
Levels’ sec�on on page 3 of this user manual).
If you’ve selected more than one file to op�mize, the ‘Batch
Processing’ window will appear a�er you have chosen your
compression level and clicked the ‘Op�mize’ bu�on. This window
contains a number of addi�onal op�ons for op�mizing mul�ple files
(for more informa�on on the ‘Batch Processing’ window, please see
the ‘Batch Processing’ sec�on on page 4 of this user manual).
While your files are being op�mized, you will see a progress bar and
an es�mate of �me remaining. The ‘Cancel’ bu�on can be used to
cancel the op�miza�on process at any �me.
2
FLATTENING EMBEDDED DOCUMENTS
Fla�ening embedded documents will reduce the size of your file
considerably, but the embedded documents can no longer be doubleclicked and edited in the applica�on that created them.
If you are op�mizing a single file and NXPowerLite finds embedded
documents within it, it will ask you if you want to fla�en them:
There is also a security benefit to fla�ening embedded objects.
When you embed a document in an Office file, anybody looking at
that file can access the en�re embedded document, not just the area
that is visible. So if you embed just one cell of an Excel spreadsheet,
people can s�ll look at the en�re spreadsheet - which could contain
confiden�al data. Fla�ening embedded documents prevents this
situa�on occurring.
Embedded documents are items created by another applica�on
that have been embedded within a document, spreadsheet or
presenta�on.
Checking the ‘Don’t ask me this ques�on again’ box will prevent
NXPowerLite from asking you whether you want to fla�en embedded
objects in future. NXPowerLite will remember whether you selected
‘Yes’ or ‘No’ and use this as the default se�ng. You can change the
default se�ng at any �me by selec�ng ‘Op�ons’ from NXPowerLite’s
‘Tools’ menu.
For example, if you paste a chart from Excel® into PowerPoint®, the
Excel® chart document is embedded within your presenta�on.
Double-clicking on an embedded document will allow you to edit it
with the applica�on in which it was created.
If you are op�mizing mul�ple files, the op�on to fla�en embedded
documents will appear in the ‘Batch Processing’ window instead (for
more informa�on on the ‘Batch Processing’ window, please see the
‘Batch Processing’ sec�on on page 4 of this user manual).
NXPowerLite is able to fla�en embedded documents by conver�ng
them into pictures.
COMPRESSION LEVELS
The compression level can be selected by clicking on the drop-down
list in the ‘Compression level’ sec�on of the main window:
The default compression level is ‘Normal compression’. This works
well when a file is to be viewed on screen. Files op�mized using
normal compression will look great on most types of display, but may
not be suitable for very large displays or high quality prin�ng.
Choose ‘Extra compression’ if your files need to be even smaller
- to fit on a floppy disk or to email to somebody with a dial-up
connec�on. While this compression level produces the smallest file
sizes, pictures may look less sharp on larger displays.
If you expect your files to be printed in full colour and need
pictures to look their best, you might want to select ‘High quality
compression’. This prevents NXPowerLite from resizing any pictures.
The downside is that the compression will be less effec�ve than with
the other compression levels.
If your file is to be viewed on a mobile device such as a telephone or
PDA, you can choose ‘Mobile device compression’. This will achieve
very high compression rates by op�mizing for the small screen of a
mobile device. This se�ng is useful when sending files to a mobile
device, which will typically have a much slower connec�on to the
Internet (and possibly an expensive data rate). However, the quality
of any pictures will appear poor on larger displays.
3
CUSTOM COMPRESSION SETTINGS
For even more control over NXPowerLite’s behaviour, you can choose
‘Custom compression’. When this op�on is selected, the ‘Se�ngs’
bu�on next to the ‘Compression level’ drop-down list becomes
ac�ve. Clicking this bu�on opens the ‘Compression Se�ngs’ window:
If you use the ‘crop’ feature in Microso�® Office, the whole of
your original picture, including any por�ons that you have cropped
off, is s�ll stored within the file. ‘Allow image cropping’ enables
NXPowerLite to remove any por�ons of pictures that you have
cropped. This will reduce the size of your file, but bear in mind
that the removed por�ons of pictures will not be recoverable in the
op�mized file.
In Microso�® Office it’s possible to import a very large picture
and scale it down to size. When this occurs, Office s�ll stores all
the details of the large picture. ‘Allow image resizing’ enables
NXPowerLite to resize large pictures to the size that they are actually
being used at, significantly reducing the size of the resul�ng file.
The ‘Op�mize images for display at:’ drop-down list should display
the screen resolu�on that you expect your file to be viewed at. The
default resolu�on of 1024 x 768 pixels is suitable for most purposes,
but resized pictures may look blurred when viewed at higher
resolu�ons or printed. If your preferred resolu�on is not shown
in the list, the ‘Custom...’ bu�on will allow you to enter a custom
resolu�on.
If ‘Allow JPEG compression’ is enabled, NXPowerLite will use JPEG
compression wherever it is appropriate to do so. Generally speaking,
any photographs in your file should be compressed using this
method. If your presenta�on contains this type of image, turning
JPEG compression off may result in a much larger file.
Adjus�ng the JPEG quality will affect the size of your files, but also
the quality of the JPEG pictures contained in them (higher quality will
generally result in a larger file size, but be�er looking pictures). We
find that the default JPEG quality se�ng of ‘6’ offers the best tradeoff between size and quality.
The ‘Op�mize Word and Excel® images for:’ drop-down list should
display the number of dots per inch (DPI) of your output device.
Most screens display around 75 dots per inch and the majority of
printers print at least 300 dots per inch.
BATCH PROCESSING
‘Overwrite op�mized files if they already exist’, if checked, will
automa�cally overwrite any already op�mized versions of files in
your batch.
If you have selected more than one file to op�mize, the ‘Batch
Processing’ window will appear a�er you have clicked ‘Op�mize’:
‘Save op�mized files in:’ lets you choose whether to save op�mized
files in the same folder as the originals, or in a single new folder.
If you choose ‘Single folder’, the ‘Copy files that don’t op�mize
to this folder’ op�on becomes ac�ve. Check this op�on to
automa�cally copy any files that did not op�mize successfully to the
new folder. This will ensure that the new folder contains a copy of
every file in your batch, whether it op�mized successfully or not.
If you choose ‘Single folder’, the ‘Save op�mized files with the same
name as original’ op�on also becomes ac�ve. Check this op�on to
give your op�mized files exactly the same names as the original files.
‘Fla�en embedded documents’, if checked, will fla�en any embedded
documents contained within your files (for more informa�on
on fla�ening embedded documents, please see the ‘Fla�ening
Embedded Documents’ sec�on on page 3 of this user manual).
4
THE RESULTS WINDOW
A green �ck in the right-hand column means that a file was op�mized
successfully. An icon that consists of two overlapping documents
means that NXPowerLite was unable to op�mize the file (usually
because it was already fully op�mized, or because it contained no
graphics or embedded documents). A red cross means that an
error occurred. For more informa�on, select the file and click the
‘Details...’ bu�on. This displays addi�onal informa�on about a file.
When NXPowerLite has finished op�mizing your files, you will be
shown a summary of the results, including the reduc�on in file size
that has been achieved:
When you select one or more files, a number of op�ons become
available (hold down the ‘Shi�’ or ‘Control’ key to select mul�ple
files). The ‘Perform on’ drop-down box enables you to perform any of
the following ac�ons on the original files, the op�mized files or both.
‘Open’ opens the original/op�mized files in your default office
applica�on suite.
‘Delete’ deletes the original/op�mized files.
‘Email’ a�aches the original/op�mized files to a blank email in your
default email program.
‘Zip & Email’ zips the original/op�mized files and a�aches the
resul�ng zip file to a blank email.
ADDITIONAL OPTIONS
You can choose whether to always fla�en embedded documents,
never fla�en them or ask every �me (for more informa�on on
fla�ening embedded documents, please see the ‘Fla�ening
Embedded documents’ sec�on on page 3 of this user manual).
You can access addi�onal NXPowerLite op�ons by selec�ng
‘Op�ons’ from NXPowerLite’s ‘Tools’ menu:
You can also edit the text that is automa�cally added to the names
of your op�mized files. By default, NXPowerLite adds the word
‘NXPowerLite’ in brackets a�er the original filename.
Addi�onally, you can choose to ‘preserve original file’s date and
�me’. This will give your op�mized file the same date and �me
informa�on as the original, rather than the date and �me that the
original was op�mized.
5
OUTLOOK® INTEGRATION
Please note that Outlook® Integra�on will only be enabled if you selected ‘Typical’ or ‘Complete’ setup when you installed NXPowerLite (or
�cked the ‘Outlook® Integra�on’ box during a ‘Custom’ setup). Outlook Integra�on is not available for users of NXPowerLite Stand-Alone.
Whenever you a�ach Word, Excel® or PowerPoint® files to an email,
Outlook® will ask if you want to op�mize them with NXPowerLite
before sending the email:
You can change the behavior of the of the Add-In to always op�mize
a�achments , never op�mize them or ask every �me by selec�ng
‘Op�mize a�achments with NXPowerLite’ from Outlook’s® ‘Tools’ menu:
If you choose ‘Yes’, the files will be automa�cally op�mized using
your current NXPowerLite compression se�ngs. The op�mized
versions of the files will then be a�ached to your email, replacing the
originals. Checking the ‘Don’t ask me this ques�on again’ box will
ensure that email a�achments are always op�mized, without you
being asked.
If you choose ‘No’, the files will not be op�mized. Checking the
‘Don’t ask me this ques�on again’ box in this instance will prevent
Outlook® from asking this ques�on in future.
FURTHER SUPPORT
If the problem s�ll occurs with the latest version, please report it
using the form at www.nxpowerlite.com/company-contact.php. We
will endevour to solve any problems as quickly as possible.
If you need further help, please visit our online Support Center at
www.nxpowerlite.com/support-center.php.
If you experience a problem with NXPowerLite, please ensure that
you are running the latest version, which can be downloaded from
www.nxpowerlite.com/product-update.php.
A list of currently known problems and recent bug fixes can be found
at www.nxpowerlite.com/support/releasehistory.php.
OTHER NXPOWERLITE PRODUCTS
• Quick and simple to deploy
NXPowerLite File Server Edi�on enables organiza�ons to reclaim
vast amounts of server storage, reduce network traffic and shorten
backup windows.
• No end-user training or involvement required
• Reclaims vast amounts of exis�ng server storage
• Reduces network traffic and data transfer costs
The File Server Edi�on is designed to run periodically on the file
servers, a�er the monthly backup for example. It searches the
servers for un-op�mized files, op�mizes them and then replaces the
originals with the op�mized versions.
• Saves money on hardware upgrades
• Lowers backup media requirements and shortens backup windows
• Contributes to a greener storage strategy
6
INDEX
‘Add Files...’ bu�on ............................................................................. 2
Mobile device compression ............................................................... 3
‘Add Folder...’ bu�on .......................................................................... 2
Normal compression .......................................................................... 3
‘Add text’ op�on ................................................................................ 5
NXPowerLite Server Edi�on ............................................................... 6
Add-Ins ......................................................................................... 2 & 6
NXPowerLite Stand-Alone ........................................................... 2 & 5
Batch processing ...................................................................... 2, 3 & 4
Office integra�on ............................................................................... 1
‘Cancel’ bu�on ................................................................................... 2
‘Open’ bu�on ..................................................................................... 5
Complete setup ........................................................................... 2 & 5
Open XML formats .............................................................................. 1
Compression level ................................................................... 2, 3 & 4
‘Op�mize’ bu�on ........................................................................... 2, 4
Compression se�ngs ......................................................................... 4
‘Op�mize a�achments before sending’ op�on .................................. 5
‘Copy files that don’t op�mize to this folder’ op�on ......................... 4
‘Op�mize images for display at:’ list ................................................... 4
Custom compression ......................................................................... 4
‘Op�mize Word and Excel® images for:’ list ....................................... 4
‘Custom’ bu�on ................................................................................. 4
‘Op�ons’ window .......................................................................... 3 & 5
Custom setup .............................................................................. 2 & 5
Outlook® integra�on ................................................................... 2 & 5
‘Delete’ bu�on ................................................................................... 5
‘Overwrite op�mized files if they already exist’ op�on ...................... 4
‘Details...’ bu�on ................................................................................ 5
‘Perform on’ list ................................................................................ 5
‘Don’t ask me this ques�on again’ op�on ................................... 2 & 6
PowerPoint® integra�on .................................................................... 4
Dots per inch (DPI) ............................................................................. 4
‘Preserve original file’s date and �me’ op�on .................................... 5
Embedded documents ................................................................ 3 & 4
Progress bar ....................................................................................... 2
Email ............................................................................................ 5 & 6
Registra�on ........................................................................................ 2
‘Email’ bu�on .................................................................................... 5
‘Remove’ bu�on ................................................................................ 2
‘Enter Code...’ bu�on ........................................................................ 2
Results ................................................................................................ 5
‘Enter registra�on code...’ op�on ..................................................... 2
‘Save op�mized file in:’ op�on ........................................................... 4
Excel® integra�on .............................................................................. 2
‘Save op�mized files with the same name as original’ op�on ............ 4
Explorer integra�on ............................................................................ 2
Screen resolu�on ........................................................................ 3 & 4
Extra compression ............................................................................. 3
Security .............................................................................................. 3
File formats ........................................................................................ 1
‘Se�ngs’ bu�on ................................................................................. 4
Fla�en embedded documents ................................................. 3, 4 & 5
‘Single folder’ op�on ......................................................................... 4
High quality compression ................................................................... 3
Support Center .................................................................................. 6
Image cropping .................................................................................. 4
System requirements ......................................................................... 1
Image resizing .............................................................................. 3 & 4
Trial version ........................................................................................ 2
Installer ............................................................................................... 2
Typical setup ................................................................................ 2 & 5
JPEG compression .............................................................................. 4
Uninstall ............................................................................................. 2
JPEG quality ....................................................................................... 4
Word integra�on ................................................................................ 2
Main NXPowerLite window ............................................................... 2
‘Zip & Email’ bu�on ........................................................................... 5
User Manual last updated 15th January 2008
Copyright © 2001-2008 Neuxpower Solu�ons Ltd, Studio 400 Highgate Studios, 53-79 Highgate Road, London NW5 1TL, United Kingdom. Tel: +44 (0)207 424 8700 Fax: +44 (0)207 424 8701
Registered in England, number 3372843. Registered Office: 98 Walton Street, Aylesbury, Bucks HP21 7QP, United Kingdom.
NXPowerLite is a trademark of Neuxpower Solu�ons Ltd.
Microso�, Excel, Outlook, PowerPoint and Windows are registered trademarks of Microso� Corpora�on in the United States and/or other countries.
Google Docs is a trademark of Google Inc.
StarOffice is a trademark of Sun Microsystems Inc.
7