1
KTELNET
Version 2.00
Beta
2000-03-12
Table Of Contents
Copyright notice
iv
Introduction to KTelnet
Some words about Kerberos and Tickets
Year 2000
1
1
2
Installation
Instructions
3
3
Quick guide to KTelnet
Starting KTelnet
Opening a session
Telnet session
Authentication
Serial port
FTP session
Closing session
Showing tickets
Mail support
4
4
4
5
6
6
6
6
7
8
Graphical FTP
General
Operation
Starting a session
Tickets
File transfer
Links
9
9
9
9
9
10
10
Reference guide
Command line, KTelnet
Ticket Manager
Bring up Connect to dialog box
Start Telnet session
Start serial connection
Start FTP session
No options
Command line, KPopProxy
11
11
11
11
11
12
12
12
12
i
Menus
KTelnet menus
Ticket manager menus
KPopProxy menus
Program Properties
Main properties
Pop Proxy properties
Manager properties
Send properties
Printer properties
Krb.realms properties page
Krb.config properties page
Krb.extra properties page
FTP commands
ASCII
AFSLOG [cell]
BINARY
BYE
CD [directory]
CWD [directory]
DELETE filename
DIRECTORY [path [localfile]]
EXIT
GET remotefile [localfile]
HASH
HELP
KAUTH [principal]
KDESTROY
KLIST
LDIRECTORY [path]
LCD [directory]
LCWD [directory]
LOCALDIRECTORY [path]
LOCALCD [directory]
LOCALCWD [directory]
LS [path [localfile]]
MGET wildcard
13
13
15
16
17
17
19
20
21
22
24
25
26
27
27
27
27
27
27
27
27
27
27
27
27
27
27
27
27
27
28
28
28
28
28
28
28
ii
MKDIR path
MPUT wildcard
PASSIVE
PROMPT
PUT localfile [remotefile]
PWD
QUIT
RENAME oldname newname
RM remotefile
RMDIR path
TENEX
Supported XTERM commands
Definitions
Supported sequences
Running through NAT and firewalls
NAT (Network Address Translation)
Using Firewalls
Problems with firewalls and NAT
Using profiles
Edit Profile
Keymap
Translation tables
Changing password
iii
28
28
28
28
28
28
28
28
29
29
29
30
30
30
33
33
33
34
35
35
36
37
38
Copyright notice
Copyright © 1998, 1999, 2000 Thomas Nyström, Datorföreningen Stacken
(Stacken Computer Club, Royal Institute of Technology, Stockholm, Sweden).
All rights reserved.
Redistribution and use in binary forms, with or without modification, are permitted provided that the
following conditions are met:
1. Redistributions in binary form must reproduce the above copyright notice, this list of conditions and
the following disclaimer in the documentation and/or other materials provided with the distribution.
2. All advertising materials mentioning features or use of this software must display the following
acknowledgment:
This product includes software developed by the Stacken Computer Club and its contributors.
3. Neither the name of the Computer Club nor the names of its contributors may be used to endorse or
promote products derived from this software without specific prior written permission.
THIS SOFTWARE IS PROVIDED BY THE COMPUTER CLUB AND CONTRIBUTORS ``AS IS'' AND
ANY EXPRESS OR IMPLIED WARRANTIES, INCLUDING, BUT NOT LIMITED TO, THE IMPLIED
WARRANTIES OF MERCHANTABILITY AND FITNESS FOR A PARTICULAR PURPOSE ARE
DISCLAIMED. IN NO EVENT SHALL THE COMPUTER CLUB OR CONTRIBUTORS BE LIABLE
FOR ANY DIRECT, INDIRECT, INCIDENTAL, SPECIAL, EXEMPLARY, OR CONSEQUENTIAL
DAMAGES (INCLUDING, BUT NOT LIMITED TO, PROCUREMENT OF SUBSTITUTE GOODS OR
SERVICES; LOSS OF USE, DATA, OR PROFITS; OR BUSINESS INTERRUPTION) HOWEVER
CAUSED AND ON ANY THEORY OF LIABILITY, WHETHER IN CONTRACT, STRICT LIABILITY,
OR TORT (INCLUDING NEGLIGENCE OR OTHERWISE) ARISING IN ANY WAY OUT OF THE
USE OF THIS SOFTWARE, EVEN IF ADVISED OF THE POSSIBILITY OF SUCH DAMAGE.
The software described in this document is based on and uses parts of software where the
following copyright notice is applicable:
Copyright © 1995, 1996, 1997, 1998, 1999 Kungliga Tekniska Högskolan
(Royal Institute of Technology, Stockholm, Sweden).
All rights reserved.
Redistribution and use in source and binary forms, with or without modification, are permitted
provided that the following conditions are met:
1. Redistributions of source code must retain the above copyright notice, this list of conditions and the
following disclaimer.
2. Redistributions in binary form must reproduce the above copyright notice, this list of conditions and
the following disclaimer in the documentation and/or other materials provided with the distribution.
3. All advertising materials mentioning features or use of this software must display the following
acknowledgment:
This product includes software developed by the Kungliga Tekniska Högskolan and its contributors.
4. Neither the name of the Institute nor the names of its contributors may be used to endorse or promote
products derived from this software without specific prior written permission.
THIS SOFTWARE IS PROVIDED BY THE INSTITUTE AND CONTRIBUTORS ``AS IS'' AND ANY
EXPRESS OR IMPLIED WARRANTIES, INCLUDING, BUT NOT LIMITED TO, THE IMPLIED
WARRANTIES OF MERCHANTABILITY AND FITNESS FOR A PARTICULAR PURPOSE ARE
DISCLAIMED. IN NO EVENT SHALL THE INSTITUTE OR CONTRIBUTORS BE LIABLE FOR ANY
DIRECT, INDIRECT, INCIDENTAL, SPECIAL, EXEMPLARY, OR CONSEQUENTIAL DAMAGES
(INCLUDING, BUT NOT LIMITED TO, PROCUREMENT OF SUBSTITUTE GOODS OR
iv
SERVICES; LOSS OF USE, DATA, OR PROFITS; OR BUSINESS INTERRUPTION) HOWEVER
CAUSED AND ON ANY THEORY OF LIABILITY, WHETHER IN CONTRACT, STRICT LIABILITY,
OR TORT (INCLUDING NEGLIGENCE OR OTHERWISE) ARISING IN ANY WAY OUT OF THE
USE OF THIS SOFTWARE, EVEN IF ADVISED OF THE POSSIBILITY OF SUCH DAMAGE.
Copyright © 1989 by the Massachusetts Institute of Technology
Export of this software from the United States of America is assumed to require a specific license from
the United States Government. It is the responsibility of any person or organization contemplating
export to obtain such a license before exporting.
WITHIN THAT CONSTRAINT, permission to use, copy, modify, and distribute this software and its
documentation for any purpose and without fee is hereby granted, provided that the above copyright
notice appear in all copies and that both that copyright notice and this permission notice appear in
supporting documentation, and that the name of M.I.T. not be used in advertising or publicity
pertaining to distribution of the software without specific, written prior permission. M.I.T. makes no
representations about the suitability of this software for any purpose. It is provided "as is" without
express or implied warranty.
v
Introduction to KTelnet
KTelnet is an implementation of Kerberos versions of Telnet and FTP running on Windows 95,
Windows 98 and Windows NT. Kerberos is a security system featuring encrypted
authentication and transmission of data. With Kerberos no password is ever sent clearly over a
network connection session. Telnet is the basic remote terminal protocol used on Internet (based
on TCP/IP). FTP is used for transferring file between computer system on Internet.
KTelnet also features a local daemon that will permit a standard mail reader (for example
Netscape Communicator or Microsoft Outlook) to take advantage of Kerberos authentication
for mail receiving via POP.
When KTelnet is installed on a computer system it consists of two application programs and
several Dynamic Link Libraries (DLL). Some of the DLL’s can be used without KTelnet if the
functionality of Kerberos is needed in some other application. The API and usage of these
DLL’s is not described in this document.
Some words about Kerberos and Tickets
For authentication Kerberos is using a data block called 'Ticket'. When an authentication is to
take place the client part of Kerberos asks the server for a granting ticket. The granting ticket is
encrypted with a key based on the users password, this key is stored in a databases maintained
by the Kerberos server. The client receives the encrypted ticket and tries to decrypt it with a key
created from a password supplied by the user. After the decryption of the ticket the client
verifies the contents of the ticket and if the ticket seems to be reasonable it accepts the ticket. If
the ticket can't be decrypted the password is assumed to be wrong and the Kerberos client can
give a diagnose message about this. The client can only validate parts of the ticket, one part of
the ticket is still encrypted and can only be decrypted by the server. This first retrieved ticket is
called a 'Ticket Granting Ticket'. This ticket is only valid for a limited time and only from a
specific IP-address.
This 'Ticket Granting Ticket' is hereafter used when a specific ticket for a specific service is
needed.
All computers that share the same Kerberos database is said to belong to the same REALM. The
Kerberos client will automatically decide which realm a specific computer belongs to based on
its full name, for example the machine 'sundance.stacken.kth.se' belongs to the realm
'STACKEN.KTH.SE'. A realm name is usually written with capital letters. A computer may
1
belong to a realm with a name that differs from the name of the computer, for example
'foxglove.pdc.kth.se' belongs to the realm 'NADA.KTH.SE'. The Kerberos client maintains a
list of computers or domains and which realm it should be associated with.
Year 2000
KTelnet have been tested to work into the 21'st century.
2
Installation
KTelnet is installed on Windows 95, 98 or NT based systems by running its installation
program. The installation program will copy several files to a directory (selectable by the user),
no files are copied into the windows directories. The installation program will also install some
defaults for the program in the registry (all can later be changed by the user in KTelnet).
Instructions
Start the installation program (usually named 'KTW32.EXE').
Follow the instructions on the screen and KTelnet will be installed on you computer.
If you want to uninstall KTelnet it can be done by opening the control panel and starting the
add/remove program utility. Select KTelnet from the list that is displayed and all files belonging
to KTelnet and its registry entries will be removed.
3
Quick guide to KTelnet
Starting KTelnet
After KTelnet is installed on your computer you can start it in the Start menu-> Program->
Kerberos Telnet->Kerberos Telnet. This will bring you into an empty screen. If this is the first
time you are running KTelnet it will be pretty small and centered on the display. If you enlarge
the window or move it on the screen KTelnet will remember the size and placement of the
window and the next time you are starting KTelnet it will open up its window with this size and
placement. KTelnet will emulate a subset of a xterm window.
Opening a session
To begin a session with KTelnet you will need to have an active connection to the network,
either through remote connection by modem or by direct connection to a network (for example
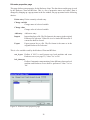
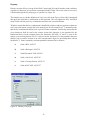
by Ethernet or Token Ring). Select 'Connection'->'Open' in the upper left menu. This will bring
up a dialog box where you can select the type and destination of your session (see figure 1). The
displayed dialog box have three pages: 'Telnet', 'Serial port' and 'FTP', the type of session is
selected with these three pages.
In the first page (figure 1) a Telnet session is selected. You must supply the name of the host you
want to connect to. Type in the name of the system or select one of the earlier systems you have
connected (KTelnet remembers the last 10 system you have been connected to). Usually the
Figure 1: Connect to Telnet session
Figure 2: Connect to serial port.
4
fields 'User' and 'Port' can be left unaltered, they are used if you want to login as a different user
from who you are authenticating as or if you want to connect to a specific port on the host. If
KTelnet have been enabled for firewalls (see page 33) two more fields will be visible on the
dialog ('Ticket to use' and 'Use HTTP-PROXY'). Normally 'Ticket to use' is left empty and 'Use
HTTP-PROXY' should only be checked when you are connection through a firewall. If you
have created several profiles then the field 'Use profile' is visible (see page 35 for usage of
profiles).
The second page (figure 2) is used if you want to use KTelnet as a terminal talking with some
system or unit that is directly connected to a serial port on your local computer. In this page you
select the serial port and communication parameters for that port.
If you want to run FTP you bring up the third page (figure 3). You select the host to connect to
and the user in same way as for Telnet (this page uses a different history for hosts). User can
normally be left unaltered.
After you have selected the type of session, host and other parameters you click on OK and the
session will start.
Figure 3: Connect to FTP session.
Figure 4: User data
Telnet session
KTelnet will now try to verify the name of the host and translate it into its generic name. The
generic name of the host is needed by Kerberos. If the name could be verified a connection is
opened to the host. If the host runs the Kerberos system it will automatically request Kerberos
authentification to take place. If you don't have any tickets KTelnet will request your username,
password and some other data (see figure 4). Fill in your user name and password. The fields
'Instance' and 'Realm' are normally not changed. When you type your password it will be shown
as '*' in the dialog box. After you have supplied the necessary information you click OK. The
Kerberos client will now request the necessary tickets and send the needed tickets to the host. If
the host accepts the ticket it will log you in to the host and you can use that computer. During this
login sequence encryption will be turned on (you can see this in the status line in bottom of the
KTelnet window).
5
Authentication
If you already have tickets for the realm KTelnet will try to use these tickets during the
authentication. If these tickets are not accepted KTelnet will give an error message. If the 'No
warning box' flag (see page 18) is not set KTelnet will ask if it should delete the tickets for the
required realm and request new tickets. If the flag is set KTelnet will destroy the tickets and ask
for new user data (figure 4). The same procedure will be taken if wrong password is given.
Because the Kerberos authentication only can be tried one time the connection will be closed
and then reopened if new tickets are required.
If you for some reason wants to disable the Kerberos authentication sequence you can put a
single '\' in front of the host name, this will disable Kerberos for this session. If you write the
hostname as an IP-number (for example 130.237.234.41), this IP-number will be translated to
the generic name of the host and Kerberos authentification will take place. If you precede an
IP-number with a single '\' both the verification of the hostname and the Kerberos
authentification is disabled.
Serial port
This will connect you to the selected serial with the selected communication parameters.
FTP session
This implementation of the FTP client uses a command line interface, this command line
interface is running in a KTelnet window. After you have started the FTP session KTelnet will
contact the selected server and tries to authenticate you by the Kerberos system. If the host
doesn't support Kerberos KTelnet will prompt you for an ordinary user and password (both
which will be sent clearly over the connection). If you don't have any tickets the Kerberos client
will show the same dialog box as for Telnet (figure 4), supply you user name and password and
click OK. The Kerberos client will request the necessary tickets for you and log you into the
remote system. You have been logged into the system when you see the command prompt
'FTP>'. When Kerberos authentication has been done only the control channel is encrypted, not
the data channel.
You can now start giving FTP commands to transfer files etc between you computer and the
host. The supported FTP commands are described on page 27. Depending on your host you
might have to give the command 'KAUTH' to get tickets locally on the FTP host, especially if
you will access files on an AFS file system.
Closing session
When you have finished the session you can close KTelnet in a normal Windows way, if the
session is still active you will get a question if you really wants to close the session. An
alternative to closing KTelnet is to select the menu choice 'Connection'-> 'Close'. This will close
the connection but leave KTelnet running on you local computer.
6
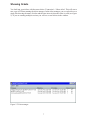
Showing tickets
You look into your tickets with the menu choice 'Connection'-> 'Show ticket'. This will start a
new copy of KTelnet running the ticket manager. In the ticket manager you see each ticket as a
single line showing the name of ticket and the time interval when the ticket is valid (see figure
5). If you are running multiple sessions you will see several tickets in the window.
Figure 5: Ticket manager
7
Mail support
The program KPopProxy is used when a standard mail reader (for example Netscape
Communicator or Microsoft Outlook) is to be used for reading mail and receive mail through
the POP3 protocol. It is possible to use a variant of POP3 which will take advantage of Kerberos
authentication, this protocol is called KPOP. The program KPopProxy is started on you local
computer and will listen for POP3 connections from the local computer. When such a
connection is established KPopProxy will bridge the normal POP3 protocol into KPOP and
connect to the desired KPOP host.
KPopProxy is meant to be started automatically and will reside on the system tray. During
installation you were asked it you wanted to use KPopProxy and if it should be automatically
started, if you answered yes to this question a shortcut were created in you autostart folder on
your start menu.
After KPopProxy have been started you will need to make some changes in your mail reading
program (the exact procedure for this change is not the topic of this manual). You will have to
change the following settings:
POP3 server
localhost
Here you shall give the name of the POP3 server, in this case it should be the
word localhost, this will direct your mailreader to connect to your local machine.
POP3 user name
user/host
Here you shall give your user name and the host where the KPOP server exists
separated by a slash, for example thn/pop.stacken.kth.se. You can also use a
percent sign (’%’) or a commercial at sign (’@’) as a separator between the
username and the KPOP server host.
POP3 password
kerberos
The single word kerberos (all lower or uppercase).
When you are trying to fetch mail and you don't have any tickets for the realm where your mail
account resides KPopProxy will bring up the dialog box (see figure 4) asking for user data for
the realm. Fill in the required information and click OK, tickets will be created and the
communication will proceed.
8
Graphical FTP
General
This is a FTP client with a graphical interface similar to the explorer interface. With this FTP
client you can transfer files between you local system and a remote system. You can also
perform some other tasks on the remote system (creating directories, deleting files etc.).
Please note that this is a BETA version of the graphical FTP client and it have several limitations.
Currently the client is only capable of talking to a UNIX and VMS servers depending of the nonstandard
format of directory listings.
Planned features for this FTP client is drag-and-drop support and transfer of a file tree.
This description of the client is not a complete description.
Operation
Starting a session
When the FTP client (KFTP) is started it will show up its main window, this windows is divided
in four main areas: The navigation bar (on top of the main window), the tree window (to the
right), the file window (to the left) and the log window (at the bottom).
To connect to a remote system use the menu 'Connection, Open' and fill in the name of the
remote system to connect to and the user name on the remote system. A connection will be
established to the selected remote system, if tickets needs to be created the normal dialog box for
user data will appear (figure 4).
When connection have been established the FTP client will automatically issue a directory
listing of the remote system and fill in the information in the tree and file window. Navigation
takes place in the tree in the usual way by double click a directory or clicking on the plus or
minus signs in the tree window.
Tickets
If you needs to have tickets on the remote system (the remote system used AFS) you can create
these tickets by the 'FTP, Remote Tickets, Authenticate' menu choice.
9
File transfer
To download one (or several files) mark then in the file window, and press the right mouse
button to bring up a pop up menu and select 'Download' from this menu. If you were going to
download a single file you will have a normal 'Save As' dialog box selecting the destination of
the file on you local system. In the same dialog box you also have the option of selection the type
of transfer to use (Binary, Ascii or Tenex). If you selected several files for download you will
see another type of dialog box where you instead select the destination directory for the files,
you also get the option of selecting the transfer type.
To upload one (or several files) you mark the destination directory in the tree window and press
the right mouse button. Select the 'Upload' menu choice. A standard 'Open file' dialog box
appear and you can in this dialog box select one (or more) files for uploading. The transfer
method for the files can also be set here.
If a manual update of the file window is necessary it could be performed by pressing F5 or
activating the 'FTP, Refresh' menu choice.
In the navigation bar there exists three buttons: Create directory, Go up one level and a Stop
button. The Stop button is only available when a operation is in progress against the remote
system. the right of the buttons is a field showing which directory is selected on the remote
system. The contents of the field could be edited and when Enter is pressed in this field the
shown directory for the remote system is changed.
Links
If the remote system supports links the links will have a special handling in the FTP client. All
links will be shown with a part of chain against it in the file window. The FTP client can't know
if a link points to a file or if it points to another directory.
If a link is double clicked a file transfer of the link will be attempted. If the link is not a ordinary
file the attempted file transfer will fail. To open the link as a directory, mark it, press the right
mouse button and select 'Open' from the menu choice. If it was a link to a directory this directory
will be opened (and shown in the file window), the directory will also be added to the tree
window.
10
Reference guide
Command line, KTelnet
KTelnet may be started with arguments on the command line. This is used to start the Ticket
manager of KTelnet or directly create a session to another host. For all variants below the switch
'-i profile' can also be given, where profile is a name of a defined profile (see page 35 about
profile usage). KTelnet accepts the following variants on the command line:
Ticket Manager
KTELNET -m
This will start KTelnet in Ticket Manager mode (see page 7).
Bring up Connect to dialog box
KTELNET -o [-i profile]
This will bring up the 'Connect to' dialog box (see page 4) to open a new session.
Start Telnet session
KTELNET [-l user -p user[.instance][@realm]] host [port]
[-i profile]
This form is used to open a new telnet connection.
-l user Optional argument giving the user name to be logged in as.
-p user.instance@realm
Optional argument giving the user name, instance and realm to be used for
authentication. If realm is left out it is taken from realm for connected
host.
host
Name of host to connect to. This parameter must be given.
11
port
Optional argument giving the port name (or number) of the port to connect
to.
Start serial connection
KTELNET -s [port]
-s
Start a serial connection
port
Argument specifying witch port to connect to. If this parameter is not
given the 'Connect to' dialog box for serial port (see figure 2) will be
shown.
Start FTP session
KTELNET -f [-l user -p user[.instance][@realm]] [host]
-f
Start a FTP-session.
-l user Optional argument giving the user name to be logged in as.
-p user.instance@realm
Optional argument giving the user name, instance and realm to be used for
authentication. If realm is left out it is taken from realm for connected
host.
host
Name of host to connect to. If this parameter is not given the 'Connect to'
dialog box for FTP (see figure 3) will be shown.
No options
KTELNET
Start KTelnet without opening any connections.
Command line, KPopProxy
KPopProxy doesn't accept any arguments on the command line.
KPOPPROXY
This will start KPopProxy. If the normal window of KPopProxy is shown it will display a log of
different activities during the operation of KPopProxy. This window is normally not used.
12
Menus
KTelnet menus
The menus in KTelnet is used to activate different
types of functions. There are four main menus,
each having different sub menus (see figure 6).
Connection
Show tickets Start (or activate) the ticket Figure 6: Menus in KTelnet.
manager.
New
Start a new copy of KTelnet and bring up the 'Connect to' dialog.
Open
Open a new connection in the current window. Only available of no
connection is available in the current window.
Close
Close the connection in the current window.
Properties
Set properties for KTelnet and Kerberos.
Exit
Exit KTelnet (and close session in current window).
Edit
Copy
Copy current text selection to the clipboard. Only available if some
text is selected in current window.
Paste
Paste text from clipboard into current window as if it had been typed
on the keyboard.
Print selected
Send to selected text to the defined printer in KTelnet (see page 22).
Select all
Select all text in current window for copy.
Options
Terminal
Change parameters for terminal.
Edit Profile
Edit profiles (see page 35).
Set default profile
Clear current profile and load default settings.
Import profile
Read in profile from a file. Asks if current profile shall be cleared
before loading.
Export profile
Exports profile to file. Exporting and importing profiles is not
guaranteed to work between different versions of KTelnet.
Reset terminal
Reset terminal emulator (no text is cleared).
13
Serial port settings
Change settings for serial port. Only available when serial
connection is active.
Send
Sends several telnet specification codes. Only available when a
telnet session is active.
Are you there
Interrupt Process
Abort Output
Erase Character
Erase Line
Break
Text
Commands for sending and capturing text
Capture text
Capture all received characters to a local diskfile
End capture
Ends above capture function
Send text
Sends text from a local file as it was typed on the keyboard. Brings
up a file browser to select the name of the file to be sent. In the same
dialog the mode of character conversion can be selected.
Printer
Functions to control printer.
Eject page
Eject page (or sends a Form Feed) to selected local printer.
Help
About
Shows the about box with copyright and version information
14
Ticket manager menus
The menus in Ticket Manager is used to manage the
tickets. There are two main menus (see figure 7) and a
popup menu when the ticket manager is active on the
system tray.
Ticket
Figure 7: Menus in Ticket Manager
New connection
Starts a KTelnet and opens a new
connection.
Refresh
Redraw the contents of the ticket window.
Properties
Set properties for KTelnet and Kerberos
Login
Login into a new realm.
Change password
Change password for a user in a realm.
Destroy tickets
Destroys all tickets (after confirmation).
Close window
Close down window (doesn't exit program if Ticket Manager exists
on System Tray).
Exit ticket manager
Exit Ticket Manager.
Help
About
Shows the about box with copyright and version information
System Tray
Left click
Bring up the ticket window.
Right click
Bring up a menu.
15
KPopProxy menus
The menus in KPopProxy is used to activate different
types of functions. There are three main menus, each
having different sub menus (see figure 8) and a popup
menu when KPopProxy is active on the system tray.
Connection
Show tickets Start (or activate) the ticket
manager.
Properties
Figure 8: Menus in KPopProxy
Set properties for KPopProxy and Kerberos.
Close window
Close down window (doesn't exit program if KPopProxy exists on
System Tray).
Exit
Exit KPopProxy.
Edit
Select all
Select all text in current window for copy.
Delete all
Delete all text in logwindow.
Save as
Save text in logwindow into a file.
Copy
Copy current text selection to the clipboard. Only available if some
text is selected in current window.
Help
About
Shows the about box with copyright and version information
System Tray
Left click
Bring up the main (log) window.
Right click
Bring up a menu.
16
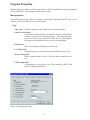
Program Properties
With the 'Properties' choice in 'Connection' menu or 'Ticket' menu different types of properties
are set for KTelnet, Ticket Manager and Kerberos Client.
Main properties
The main properties page (figure 9) contains several flags for KTelnet and FTP, font size for
window, cursor style and size of scroll back buffer.
Flags
Auto wrap
Enables automatic wrap of long lines in terminal window.
Paint if scroll needed
If checked the whole window is redrawn if a scroll is needed. When
running a serial session with high speed (> 9600 bps) characters
may be lost due to some behavior of video drivers. Checking this
flag bypasses the problem but slows down screen updating.
Enable notes
Show notes during establishing of connections.
Use FTP passive
Default flag is passive mode shall be used for FTP transfers or not.
Show # during FTP
Shows a number sign for every 1024 bytes that is transferred of a
file.
FTP Prompt mode
A confirmation is needed for every file to transfer in MPUT and
MGET commands during FTP.
Figure 9: Main properties page.
17
No warning box
Disables the warning box when closing KTelnet and a session is
open. Also disables the dialog shown when bad tickets are
encountered assuming that the tickets shall be destroyed and that
new tickets shall be created (see page 6).
Goto password
Defines behavior of dialog box when asking for user name and
password. If username and realm is given (or known) the password
field is activated when dialog is shown.
Screen font and size
Shows the currently selected screen font and size. The 'Select Font'
button brings up a Windows Font Selection Dialog. Only fixed pitch
fonts are shown in dialog.
Cursor style
Allows change of cursor style between 'Vertical bar' (Windows
normal), 'Block' and 'Underline'.
Scroll back
Sets the size of scroll back buffer. Maximum size is 500 lines.
KTelnet must be restarted for this option to take effect if it is
changed.
18
Pop Proxy properties
The Pop Proxy properties page (figure 10) contains several flags for KPOPPROXY.
Flags
Echo
Echo commands back to POP3 channel. Only used during debug. If
this flag is enabled during normal operation the communication
with the local mail reader will fail.
On startup
Normal Window
Start a normal window when KPOPPROXY is started.
Icon on system tray
Start KPOPPROXY as an icon on the system tray.
Figure 10: Pop proxy properties page.
19
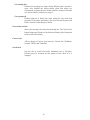
Manager properties
The manager properties page defines the name and behavior of the Ticket manger.
Ticket manager command line
This specifies the name of the Ticket Manager EXE-file and
command line arguments. If KTelnet is used as ticket manager this
fields shall contain the absolute path of the KTelnet EXE-file and
the argument '-m' to start KTelnet as Ticket Manager (see page 12
for explanation of command line parameters).
On startup
Normal window
Start Ticket manger with a normal window.
Icon on system tray
Start Ticket manager as an icon on the system tray.
Auto start ticket manager
Let Kerberos libraries start the ticket manager if someone is
requesting use of the Kerberos Client.
Figure 11: Manager properties page
20
Send properties
The send properties defines properties for sending a file with the menu choice 'Option'-> 'Text'
-> 'Send text' (see page 14).
Default character conversion
Defines the default character conversion for sending a text file.
Figure 12: Send properties page
21
Printer properties
Defines the properties for local printer. The local printer (if defined) can be activated by host
during a telnet session with special character sequences. This printer is also used when printing
selected text.
Output
Selects the printer type, setup for printer and font.
Disk file
Received print data is written to a file. The 'Setup' button brings up a
file browser for selection of file.
Windows printer
Received data is sent to a windows printer. KTelnet simulates a
dumb printer acting only on Carriage Return, Line Feed, Horizontal
TAB and Formfeed. The 'Setup' button is used to select which
Windows printer to use. 'Select Font' is used to select which font
(and size) to be used during printing.
Direct to COM1, COM2, COM3, COM4
Send data to serial printer attached to selected serial port. The
'Setup' button lets you select speed and other characteristics of the
serial port.
Direct to LPT1, LPT2, LPT3
Send data to printer attached to selected printer port.
Options
Show text during print
If checked all characters sent to printer is shown on screen.
Figure 13: Printer properties page.
22
Append formfeed on print end
If checked the current printed page is printed out when a print
sequence is ended.
23
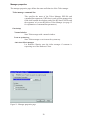
Krb.realms properties page
This page defines realm names for hosts and domains. The data shown on this page is used by
the Kerberos Client. This is a list of host or domain names, for each entry a realm is assigned.
Data is changed by bringing up a pop up menu in the list window, the pop up menu has the
following choices:
Delete entry Delete currently selected entry.
Change domain/node
Change name of selected domain or node.
Change realm
Change name of realm for selected entry.
Add entry
Add a new entry.
Import
Import data from a file. The file format is the same as in the original
Kerberos file 'krb.realms'. When file is to be loaded KTelnet asks if
current list shall be cleared.
Export
Export current list to a file. The file format is the same as in the
original Kerberos file 'krb.realms'.
Figure 14: Kerberos realms properties page.
24
Krb.config properties page
This page defines the default realm and servers for realms. This list is used by the Kerberos
Client. Every entry consists of one realm, a server name and service properties for that server.
An entry need only be put into this list if the Kerberos server has a nonstandard name. Data is
changed by bringing up a pop up menu in the list window, the pop up menu has the following
choices:
Delete entry Delete currently selected entry.
Change default realm.
Change the name of the default realm.
Change server/service
Change name of server or services for selected realm.
Add realm
Add a new realm.
Add server Add a new server for selected realm.
Import
Import data from a file. The file format is the same as in the original
Kerberos file 'krb.config'. When file is to be loaded KTelnet asks if
current list shall be cleared.
Export
Export current list to a file. The file format is the same as in the
original Kerberos file 'krb.config'.
Figure 15: Kerberos configuration properties page
25
Krb.extra properties page
This page defines extra properties for the Kerberos client. The data shown on this page is used
by the Kerberos Client and KTelnet. This is a list of properties names and values. Data is
changed by bringing up a pop up menu in the list window, the pop up menu has the following
choices:
Delete entry Delete currently selected entry.
Change variable
Change name of selected variable.
Change value
Change value of selected variable.
Add entry
Add a new entry.
Import
Import data from a file. The file format is the same as in the original
Kerberos file 'krb.extra'. When file is to be loaded KTelnet asks if
current list shall be cleared.
Export
Export current list to a file. The file format is the same as in the
original Kerberos file 'krb.extra'.
This is a few variables used by the Kerberos Client and KTelnet:
nat_in_use
Defines if NAT is used between our local machine and some
Kerberos server (see page 33). Value 'Yes' or 'No'.
kdc_timesync
Defines if automatic compensation of time difference between local
machine and Kerberos server shall be performed. Value 'Yes' or
'No'.
Figure 16: Kerberos extra properties page
26
FTP commands
When a FTP session is active the FTP client in KTelnet accepts the following commands:
ASCII
Select ASCII mode transfer of files.
AFSLOG [cell]
Create AFS tokens on FTP server (KAUTH command must first be
given).
BINARY
Select BINARY mode for transfer of files.
BYE
Close down FTP session
CD [directory]
Change directory on FTP server.
CWD [directory]
Change director on FTP server.
DELETE filename
Delete file on FTP server.
DIRECTORY [path [localfile]]
List directory on FTP server. If 'localfile' is given output from directory
listing is written to this file.
EXIT
Close down FTP session.
GET remotefile [localfile]
Get file from FTP server. If 'localfile' is given file is written to that name,
otherwise 'remotefile' is used as local filename.
HASH
Toggle printing of a number sign ('#') for every 1024 transferred byte.
HELP
Show a list of available commands.
KAUTH [principal]
Start authentication sequence on FTP server to create tickets on FTP
server.
KDESTROY Destroy tickets on FTP server.
KLIST
List tickets on FTP server.
LDIRECTORY [path]
List directory on local machine.
27
LCD [directory]
Change current directory on local machine.
LCWD [directory]
Change current directory on local machine.
LOCALDIRECTORY [path]
List directory on local machine.
LOCALCD [directory]
Change current directory on local machine.
LOCALCWD [directory]
Change current directory on local machine.
LS [path [localfile]]
List directory on FTP server. If 'localfile' is given output from directory
listing is written to this file.
MGET wildcard
Get multiple files from FTP server in one operation. If prompting is on a
confirmation is needed for every file.
MKDIR path
Create directory on FTP server.
MPUT wildcard
Send multiple files to FTP server in one operation. If prompting is on a
confirmation is needed for every file.
PASSIVE
Toggle passive mode. Note that if Kerberos authentication (and
encryption) and NAT is used passive mode must be enabled to allow file
transfer. KTelnet automatically detects this situation and enables passive
mode.
PROMPT
Toggle prompt mode during transfer of multiple files (MGET and
MPUT).
PUT localfile [remotefile]
Send local file to FTP server. If 'remotefile' is given file is written with this
name on FTP server.
PWD
Print name of current directory on FTP server.
QUIT
Close down FTP session.
RENAME oldname newname
Rename a file on FTP server.
28
RM remotefile
Delete file on FTP server.
RMDIR path
Delete a directory on FTP server.
TENEX
Enable BINARY and TENEX mode on FTP server.
29
Supported XTERM commands
The ANSI emulator in KTELNET supports a subset of XTERM and ANSI control sequences.
The following list is only shown as a reference of which control character and sequences
KTELNET accepts.
Definitions
c
The literal character c.
C
A single (required) character.
Ps
A single (usually optional) numeric parameter, composed of one of more digits.
Pm
A multiple numeric parameter composed of any number of single numeric
parameters, separated by ; character(s).
Pt
A text parameter composed of printable characters.
Supported sequences
BEL
Bell (Ctrl-G), makes a standard Windows beep.
BS
Backspace (Ctrl-H).
TAB
Horizontal Tab (HT, Ctrl-I).
LF
Line Feed or New Line (NL, Ctrl-J).
CR
Carriage Return (Ctrl-M).
ESC # 8
Fill screen with the character ‘E’.
ESC 7
Save Cursor.
ESC 8
Restore Cursor.
ESC =
Application Keypad.
ESC >
Normal Keypad.
ESC <
ANSI mode.
ESC D
Index (Cursor down).
ESC E
Next Line.
ESC H
Tab Set at current column.
30
ESC M
Reverse Index (Cursor up).
ESC Z
Return Terminal ID: ESC [ ? 1 ; 2 c
ESC [ Ps @
Insert Ps Character(s) (default = 1).
ESC [ Ps A
Cursor Up Ps Times (default = 1).
ESC [ Ps B
Cursor Down Ps Times (default = 1).
ESC [ Ps C
Cursor Forward Ps Times (default = 1).
ESC [ Ps D
Cursor Backward Ps Times (default = 1).
ESC [ Ps ; Ps H
Cursor Position [row;column] (default = [1,1]).
ESC [ Ps J
Erase in Display (ED)
Ps = 0 -> Clear Below (default).
Ps = 1 -> Clear Above.
Ps = 2 -> Clear All.
ESC [ Ps K
Erase in Line (EL)
Ps = 0 -> Clear to Right (default).
Ps = 1 -> Clear to Left.
Ps = 2 -> Clear All.
ESC [ Ps L
Insert Ps Line(s) (default = 1).
ESC [ Ps M
Delete Ps Line(s) (default = 1).
ESC [ Ps P
Delete Ps Character(s) (default = 1).
ESC [ Ps c
Send Device Attributes
Ps is ignored, always answer ESC [ ? 1 ; 2 c
ESC [ Ps ; Ps f
Horizontal and Vertical Position [row;column] (default = [1,1]).
ESC [ Ps g
Tab Clear.
Ps = 0 -> Clear Current Column (default).
Ps = 3 -> Clear All.
ESC [ Ps h
Set Mode
Ps = 4 -> Insert Mode
ESC [ Ps i
Start/Stop Printer
Ps = 5 -> Print start.
Ps = 4 -> Print end.
31
ESC [ Pm l
Reset Mode
Ps = 4 -> Replace Mode.
ESC [ Pm m Character Attributes
Ps = 0 -> Normal (default).
Ps = 1 -> Bold.
Ps = 4 -> Underscore.
Ps = 5 -> Blink (appears as Reverse).
Ps = 7 -> Inverse.
ESC [ Ps n
Ps ignored, always return cursor position as ESC [ r ; c R
ESC [ Ps ; Ps r
Set Scrolling Region [top;bottom] (default = full size of window).
ESC [ ? Pm h
DEC Private Mode Set
Ps = 1 -> Application Cursor Keys.
Ps = 6 -> Origin Mode.
Ps = 7 -> Wraparound Mode.
ESC [ ? Pm l
DEC Private Mode Reset
Ps = 1 -> Normal Cursor Keys.
Ps = 6 -> Normal Cursor Mode.
Ps = 7 -> No Wraparound Mode.
ESC ] Ps ; Pt BEL
Set Text Parameters
Ps = 0 -> Change Icon Name and Window Title to Pt.
Ps = 2 -> Change Window Title to Pt.
ESC c
Full Reset.
32
Running through NAT and firewalls
NAT (Network Address Translation)
NAT is a technique to allow several local system share the same IP-address at the same time
when they connect to Internet or an Intranet, for example when an ISDN connection is used to
Internet from a small LAN. The ISP supplies only on IP-address for the connection and the local
ISDN router rewrites all packets that is routed between the local network and Internet. The
computers on local network usually uses addresses from the 10.0.0.0 net. This may also be
called PAT (Port Address Translation) or ‘Single User Account’.
During a telnet session this is not a problem but for FTP and for password change KTelnet and
the Kerberos Client must be aware of this, in some cases the Kerberos Client must supply its
own IP-address to the server in a Kerberos packet, the address supplied must be the same
address that the Kerberos Server sees the client as. The Kerberos Client supplied with KTelnet
can handle this. For efficiency this must be enabled in the Kerberos Client, this is done with the
'nat_in_use' property. This property is set in the 'krb.extra' properties page (see page 26).
Using Firewalls
There exists many types of firewalls depending on how they filters out different types of traffic,
even NAT can be seen as a simple firewall. A more rigorous firewall will not allow any kind of
routing between the inside and the outside, all traffic must pass through some kind of proxy
function. If this proxy function is a HTTP proxy supporting the CONNECT option it might be
possible for KTelnet to pass out through this firewall. Even if the firewall supports the
CONNECT option the setup of the firewall might only allow connections to some specific ports
on the outside (typically port 443 used for Secure HTTP). The best way to see if KTelnet is
possible to use it to try to use it through the firewall.
For KTelnet to be able to pass a firewall several settings must be done:
1
NAT should be turned on (the 'nat_in_use' property must be set to 'Yes', see
above).
2
The name of the proxy server (the firewall) must be set to KTelnet. This is done
by the property 'krb4_proxy' in the krb.extra properties page (see page 26). The
value of the property should be an URL (including port number) for the proxy
server, for example: http://fw-ext.some-company.com:80.
3
The kerberos server for the realms must be defined with an URL. This is done in
the krb.config page (see page 25). The URL must be given with portnumber, this
portnumber is usually 750. For the kerberos server att Stacken the following
values will be used:
Realm
Server
Service
STACKEN.KTH.SE
http://kerberos.stacken.kth.se:750
admin server
33
When a telnet session is to be opened through a firewall the 'Use HTTP-PROXY' option must be
enabled (this option is only available when the 'krb4_proxy' property is present) in the 'Connect
to' dialog box (see page 4) or by the '-h' flag on the command line (see page 12).
Problems with firewalls and NAT
The connections through NAT or a firewall might fail sometimes and the system claims that the
ticket is invalid (usually saying that the IP address is invalid), this could occur if the server sees
you from two different address: One address when you are getting your tickets and another
address when you are trying to use them. When you are using NAT or a firewall this system
might have several IP addresses on the outside and you can't tell for sure which address you will
have when you establish a connection. If this occurs to you the only thing you can do is to retry
the connection (including getting new tickets) until you get your tickets issued for the same
address that you are using for the telnet session.
34
Using profiles
Profiles is a way to have different settings for different connections with KTelnet. In the profile
the following settings is assigned:
•
•
•
•
Terminal font and terminal ID
Keymap
Input Translation table
Output Translation table
Profiles is handled by the Options -> Terminal sub menu:
Edit Profile
Select, Edit, Create and Delete profiles (see below).
Set default profile
Clear current profile and load default settings.
Import profile
Read in profile from a file. Asks if current profile shall be cleared
before loading.
Export profile
Exports profile to file. Exporting and importing profiles is not
guaranteed to work between different versions of KTelnet.
Edit Profile
In the first page the current profile can be selected. The Delete and New buttons is used to delete
the current profile or make a copy of the current profile and give it a new name. If the profile is
changed and one or more changes have been made to the original profile a question is asked of
the settings should be save before the profile is changed.
The Select font button will allow you to select a
specific font and character encoding for this
profile. Which fonts and encodings you can
select depends on what combinations you have
available on you computer. If you select a
character encoding other then the Western
character set you might also have to add
translation tables to get the characters right. In
the 'Etc' directory where you installed KTelnet
you can find several keymaps to help you to use
different character encodings.
The field Reported terminal type is used to give
the name of the reported terminal type. A
change of this field will not affect the terminal
emulator in any way, only the reported name.
Figure 17: Edit profile
35
Keymap
During a session all keys (except for the Shift, Control and Alt) can be bound to send a arbitrary
sequence of characters or to perform a command inside KTelnet. The exact action of every key
is defined through the Keymap page of a profile (see figure 18).
The simplest way to edit the definition of a key is to click in the 'Press to Select Key' button and
then press the desired key combination on the keyboard. This will update the 'Key' and 'Shift
status' fields with the press key combination and show the current definition.
'Windows' means that the key combination is handled by windows and may generate a character
to be sent to the remote system (this is the normal case for all 'normal' keys). 'Command' means
that the key combination shall activate a given KTelnet command. 'Send string' means that the
given characters shall be send to the remote system (the character is not translated by the
translation tables). In the example shown the characters ESCAPE, 'O' and 'P' is sent to the
remote system when function key F1 is pressed on the keyboard. If a non printable character
shall be sent it could be written as an octal constant (three digits) be preceding them with an
backslash ('\'). Some commonly used non printable characters has a shortcut:
\a
Send a BEL, ASCII 7.
\b
Send a Backspace, ASCII 8
\t
Send Horizontal TAB, ASCII 9
\n
Send a Line Feed, ASCII 10
\r
Send a Carriage Return, ASCII 13
\e
Send an ESCAPE, ASCII 27
Figure 18: Editing of keymap
36
Translation tables
When characters are received (input table) or sent (output table) they can be translated
according to the translation tables. A character that is not listed in the table will not be translated.
Only the character for a translation is made is shown in the table.
To insert a translation for a character click the Add button, this will bring up a dialog where you
give a pair of values, from and to. The values can be given in several ways: Decimal (65), Octal
(0101), Hexadecimal (0x41) or as a character ('A').
To delete a translation, select the translation in the table and click the Delete button. A
confirmation needs to be given before the character is deleted.
To change a translation, select the translation in the table and click the Change button. A dialog
appears (same as for add) and you can change the value.
The contents of the table is always sorted on the 'Translate from' value. The format of the
presented value in the table can be changed by clicking the column header in the table. Every
click rotates one step between the available radixes.
Figure 19: Editing of translation table
37
Changing password
It is possible to change the password in a realm from the Ticket Manager. The menu choice
'Ticket'-> 'Change password' will bring up a dialog box (see figure 20), fill in all data in this
dialog box and press 'OK'. During the sequence of changing password the normal tickets will be
replaced by some special tickets for password change. After the password change is completed
or aborted the normal tickets is restored. It is only possible to change the password for yourself.
Figure 20: Change of password
38


![20 [7] Don Libes, “Using expect to Automate Systems Administration](http://vs1.manualzilla.com/store/data/005773716_1-68a79e060d9ea16881001f4ab808f924-150x150.png)