1
Advanced Client EASYCOM/400
for Visual Basic
The Perfect Add-on for
USER Manual
Ref: VBMURG
12/97
User License
OW N E R S H I P O F T H E S O F T W A R E
1. The Advanced Client Easycom/400 software programs (« Software ») and accompanying written materials (the
« Documentation ») are owned by MIS Systems and AURA Equipements (« Licensors ») and are protected by International
copyright laws and by international treaties. The Easycom engine is a product that is the sole propriety of AURA
Equipements.
DE F I N I T I O N S
2. End User: The End user is either the natural person or the legal subject that bought the license or that uses an Evaluation
Version.
3. Evaluation Version: Your use of the software is for the purpose of evaluating whether to purchase an ongoing license to
the Software. You use an Evaluation Version when you install the Software without the appropriate serialization code (which
takes the form of a serial number) to be install system. When you use an Evaluation Version, as soon as the DLL files in the
Software are called upon, will be prompted before a dialog box appears explaining that you are running an Evaluation
Version of the Software. You will then receive about twenty minutes of time to use the product by a similar dialog box every
minute after one hour of use. The total number of time you can use the DLL is limited to 100. Anyhow the case the evaluation
period for use is limited to 15 days.
4. Software: Software is the right to use the software-product "EASYCOM Server" and the Advanced Client /400 a direct
level access for a PC Side for one development tool.
(a) Installation: The " Advanced Client Easycom/400" software, includes two parts: the client part and the server part. The
client part is to be installed on the PC which one is linked to the AS/400. The server part is to be installed on the AS/400.
(b) You can install the server part only once at a time one a specific AS/400 machine. (The software activation key is
calculated by using the AS/400 serial number). In case, the software is to access to several AS/400, you have to purchase a
license for each AS/400.
(c) The client part can be installed on as many PC's you want. But only as many PC's as the number of users of the license
will be able to access the AS/400 at a time. (The activation key is calculated by using the number of users too)
(d) The evaluation version includes only one server part, one client part with one single connection.
4.1 The " Advanced Client Easycom/400 developer" gives to the developer all the functions requested for the development of
an application.
4.2 The " Advanced Client Easycom/400 runtime" gives to the user the possibility to execute the application which has been
developed with " Advanced Client Easycom/400 developer". You can not develop any application with " Advanced Client
Easycom/400 runtime".
4.3 The evaluation version is " Advanced Client Easycom/400 developer" limited for a period of time.
5. Maintenance release: shall mean corrections of errors and minor additions or improvements of functions in the software
that are released to the public by Licensor from time to time at its sole discretion. A new maintenance release is identified by
a modification of the product numbering to the right of a decimal point (e.g., a released labeled « 4.1 » would be a
maintenance release of version 4 or 4.0 of the software).
6. New Version: shall mean important additions of improvements of functions or modules in the software that are released to
the public by Licensor from time to time at its sole discretion. A New Version is identified by a modification of the product
numbering to the left of decimal point (e.g., a move from « 4.1 » to « 5.0 »). Licensor maintains full discretion as to whether
and when to issue a new release of the Software and whether to classify a new release as a « Maintenance Release »or
« New Version ».
GR A N T
OF
LI C E N S E
7. License for Evaluation: You may use the Evaluation Version of the Software and Documentation in accordance with the
terms of this Agreement (except that you will not benefit from the rights set forth in sections 9,18,22 and 23 below)andsolely
for the purpose of deciding whether to purchase a full License to the Software. You may also reproduce and distribute,
including by means of posting on an Internet forum, the un-installed Evaluation Version of the Software known as the « install
disks », provided you do not modify or delete this agreement, any copyright or trademark notices or any portion of the
Software. You shall be solely responsible for any costs or liabilities arising from any such reproduction or distribution.
8. Acquisition of Full License: If you have an Evaluation Version of the Software and wish to benefit from the rights set
forth in sections 9,18,22 and 23 below, you must obtain a serialization code, which will disable the evaluation dialog prompt
cycle described in section 3 above. A Serialization code may be obtained, in exchange for the applicable Licensee fee,
simply by contacting Licensors or any authorized AURA Equipements distributors, the coordinates of which are set forth
below.
9. License: In consideration for the payment of the License fee and your agreement to abide by the terms of this agreement,
Licensor grants non exclusive License to use the Software and the documentation depending on (i) number of Client
Licenses bought (ii) the price paid Software Development and/or Software Run Time, connected to a single server.
26. Governing Law: This agreement shall be governed by the laws of the United states and all the signature of
the international copyright treaties.
TABLE OF CONTENTS
The Goal of the product.......................................................................................................9
The Integration......................................................................................................................9
The performance.................................................................................................................10
The Simplicity of use..........................................................................................................10
System Requirements........................................................................................................13
AS/400 System Requirements................................................................................13
PC System Requirements........................................................................................13
Product features ........................................................................................................13
Client/Server Development, but of course, it’s simple..................................................13
Installation............................................................................................................................17
On the PC side:.........................................................................................................17
On the AS/400 ...........................................................................................................17
Requirement to install........................................................................................................17
Installation of ACE/400 for VB ..........................................................................................18
Installation...................................................................................................................18
Installing the samples.........................................................................................................19
Using the Wizard.................................................................................................................23
Start the wizard..........................................................................................................23
Main Selection screen..............................................................................................23
Managing files in a project.......................................................................................24
Defining a master/detail relationship......................................................................26
Generating forms.......................................................................................................27
Creating a project with EASYCOM Wizard for VB ........................................................28
The main module.......................................................................................................30
The relational layout module...................................................................................31
Code attached to the forms generated.................................................................32
Text and Label Controls...................................................................................... 32
CheckBox Controls ............................................................................................. 32
Radio Button Control........................................................................................... 33
DBGrid Control.................................................................................................... 33
Navigation Buttons.............................................................................................. 33
Functions to automatically manage controls ..................................................................34
Updating a form with data from AS/400 files....................................................... 34
Updating files with data entered on the form....................................................... 35
Managing the Navigation Buttons ....................................................................... 35
Functions assoc iated with a grid......................................................................... 36
Using a project generated by Easycom wizard..............................................................39
Opening a new project with EASYCOM for VB .................................................................39
Adding EASYCOM for VB to an existing project.................................................................39
Connection...........................................................................................................................43
Disconnect...........................................................................................................................43
Opening and closing files ..................................................................................................47
Establish a Master/Detail relation.....................................................................................47
File properties......................................................................................................................47
Sequential and index file access......................................................................................51
Field access functions........................................................................................................51
Field properties ...................................................................................................................51
Adding record......................................................................................................................51
Modifying a record..............................................................................................................52
Deleting records ..................................................................................................................52
Filtering and accessing subset of data............................................................................53
Using bookmarks ................................................................................................................53
RPC / DTAQ Configuration ...............................................................................................65
Program description ...........................................................................................................66
Using AS/400 programs with VB ......................................................................................68
1 ] RPC With I/O parameters...................................................................................68
2 ] RPC Without Input parameters..........................................................................69
DataQueue Description.....................................................................................................70
Using DataQueues with VB...............................................................................................72
Dataqueue access (without a key) ........................................................................72
Keyed dataqueue access.........................................................................................73
Verify ACE/400 installation.................................................................................................77
Acces using 16 bits with either: NetSoft Router, Client Access, Netware for
SAA, ...........................................................................................................................77
Access using 32 bits with either: NetSoft Router, Client Access, Netware for
SAA, ...........................................................................................................................77
Access in 16 or 32 bits router using SNA Server.................................................78
TCP/IP natif access..................................................................................................78
Verify the middleware installation....................................................................................78
Technical Support
Advanced Client Easycom/400....................................................82
CHAPTER 1
INTRODUCTION
ACE/400 for Visual Basic
INTRODUCTION – EASYCOM POUR VB
Advanced Client Easycom/400 for VB is a complete and powerful
AS/400 development tool. It is a high level performance middleware
to access interactively all AS/400 resources and services in a native
mode, including files, programs, AS400 commands.
The Goal of the product
The complete integration of the EASYCOM engine in the Visual basic
development platform. The access to the AS/400 resources is done
using the standard Visual Basic components.
ACE/400 for VB was a result of the integration of the EASYCOM
technology, that was designed specifically to connect Pc based
application to the full enterprise information systems on the AS/400.
ACE/400 for VB is a software interface middleware that makes
positioning the AS/400 as both an application server and a data
server for all Visual basic client applications a success, further
it ensures the portability of the application regardless of the
application server.
The Integration
While designing ACE/400 for VB, our Research and development
team maintained simplicity of use as the tool major target. The
integration facilitates using each one of the two platforms (Client side
on the PC and server side on the AS/400), to accomplish what it can
do best. It ensures maintaining the data on the most efficient
platform, avoids duplicating the data, and displays the data in a
graphic interface.
ACE/400 for VB is a complete interface of communication between
the AS/400 and Visual basic. So, the EASYCOM server functions
manages all the communications between the AS/400 and the PCs.
While all the functions ACE/400 are perfectly integrated in VB, they
do access equivalent functions on the AS/400 Easycom server.
ACE/400 for VB is a complete communication middleware that
opens the access to the AS/400 data to the VB developers in native
access mode and in real time.
EASYCOM POUR VB
Chapitre 1 – Page 9
INTRODUCTION – EASYCOM POUR VB
The performance
The client stations under Windows using Visual Basic have with
ACE/400 all the advantages inherited from the strength of Visual
Basic as a development environment and the native access to the
AS/400 data.
Further, ACE/400 opens many other options to the developers:
•
•
Immediate communication to the AS/400.
No code is g enerated on the AS/400.
•
Data integrity constraints are fully respected.
•
•
Access to transaction commitment control.
File sharing and record level locking.
•
•
Record level Access at lightning speed.
Retrieve the description of the AS/400 data files.
•
Read the file field description (DDS).
•
•
Read, Modify, Add, and Delete records on AS/400 files from VB.
Perform optimized read and write operations by using buffers.
•
•
Seek and access files by key,
Automate showing the links between files.
•
Define the filter range for a file access to be a subset of a file.
•
•
Use Data Queues.
Execute Cl programs on the AS/400 from within VB.
•
Call RPG, Cobol, Or C programs on the AS/400 and pass
parameters.
The Simplicity of use
Using ACE/400 for VB is largely simplified because of the availability
of a standard VB wizard. This simplifies creating prototypes and
optimizing the developed programs at a late stage.
This Wizard maintains a list of all AS/400 files used by the application
and their relationships, and access path.
EASYCOM POUR VB
Chapitre 1 – Page 10
CHAPTER 2
System Requirements
System Requirements
AS/400 System Requirements
•
•
Any AS/400 series except the initial B series.
OS/400 version 2.2 or later
•
PC connections through an Ethernet, Token Ring, Twinax or
SDLC network, with each PC having a single connection point
PC System Requirements
•
•
•
•
386/25 or better processor
TCP/IP protocol or one of the following APPC Router:
PCS , Client Access or NS Router
Eicon
Netware for SAA
Microsoft Client SNA
Microsoft SNA Server
Windows 3.x, Windows NT or Windows 95
16- or 32-bit Delphi Developer or Client/Server Edition.
Product features
•
Functions library (DLL),
•
Objects library on the AS/400 (EASYCOM Technology),
•
•
Examples of applications,
User guide
Client/Server Development, but of course, it’s simple.
Once the Easycom engine is installed on the AS/400 side, no other
operation is required on the AS/400 side.
The AS/400 components are loaded in a library of objects that
manages the protocol of communication APPC and IP. It does not
require any specific programming tasks to initiate it.
The performance of Pc based applications are comparable to other
applications accessing data on Pcs or network servers.
ACE/400 can access files, whether physical, logical, joint, 36 format,
as could any application written in RPG or Cobol.
ACE/400 converts all AS/400 field format to equivalent PC format .
ACE/400 has access in real time to the file and field descriptions.
All the security restraints of the AS/400 are complied with, whether
on data file access, program access, or on commitment control level.
So, all applications can lock records for open files in read/write mode
based on the rules for record locking, management and record
conflict established by the AS/400 operating system, without affecting
other applications accessing the same data files.
The security and data integrity of the AS/400 is not compromised in
any way, offering the VB developer a secure and reliable high
capacity data server.
The applications developed in VB could issue a variety of AS/400
commands. for example:
•
•
Manage the files accessed using OVRDBF, or OPNQRYF before
issuing the file access command in ACE/400 for VB.
Change the properties of the AS/400 access session.
•
•
Allocate objects.
Delete, copy, move objects..
CHAPTER 3
Installation Steps
Caution remark :
Some applications that manage AS/400 security can stop the
successful installation of the EASYCOM engine on the AS/400, as
they cease accepting any data from outside the AS/400 world. In this
case, deactivate the security wall prior to the installation procedure.
PROCEDURE D’INSTALLATION
Installation
The installation procedure for ACE/400 for VB is performed from a
PC and it has two different parts:
•
•
The installation of the PC side.
The installation of the server side on the AS/400.
The AS/400 server side is to be installed once only per AS/400. The
following steps will be performed during each side of the installation :
On the PC side:
•
•
Creating an '\ACE400' directory.
Adding a sub directory for the examples.
•
Copy all required files.
On the AS/400
•
•
Creating an library, default name is 'EASYCOM',
Creating a variety of files in this library.
Requirement to install
The PC station has to be connected to the AS/400 by either an
APPC router session ( (PCS, Client ACCESS, NETSOFT,...), or by
an access TCP/IP to the AS/400.
For the installation only, the user profile using the AS/400 connection
has to be of type ‘QSECOFR' security officer. It is possible to set that
profile during the installation steps.
Prior to installing the server side of Ace/400, The user has to know
the type of connection to the AS/400.
• Type of connections :
WINAPPC: Microsoft SNA Server,
EHNAPPC: Client Access, NetSoft, …
TCP/IP:
Sans routeur
•
Access at 16 or 32 bits,
•
•
Default user profile,
Name of the AS/400 or its IP address.
EASYCOM POUR VB
Chapitre 3 – Page 17
PROCEDURE D’INSTALLATION
Installation of ACE/400 for VB
The installation is divided in seperate independent segments;
updating the client side on the PC, setup the example programs,
setup the demos, and the setup of the server side on the AS/400.
The AS/400 server side is to be installed once only per AS/400.
During the installation of the server side, ACE/400 generates a temporary
access key for 30 days or 100 connections. When the product is purchased
and the registration card is received, a permananent key to the software is
generated.
Installation
If Visual Basic is running, close it, the run INSTALL.EXE from the
CD.
ΠFill up the appropriate information and follow the menu options.
•
If the server side of the ACE/400 install is initiated, fill up the
information regarding this site. After validation of the connection,
the install will transfer the server side to the AS/400.
In case of a failure to complete this step, the user can transfer the
server side by selecting the icon from the newly created user
group under Windows;, either « Easycom Server Installation 16
Bits » or « Easycom Server Installation 32 Bits ».
Ž After the installation of the server side, the user can run the
'ACE/400 configuration', to verify the connection.
Notes :
Œ
•
EASYCOM POUR VB
The time of the installation of the server side could vary from 5 to
30 minutes based on the configuration of the AS/400.
If the Job issued on the AS/400 during the installation is in a
status SFW (Save File Wait) during a long time, it is normal, just
continue to wait.
Chapitre 3 – Page 18
PROCEDURE D’INSTALLATION
Installing the samples
Short cuts to the samples are created in the new Ace/400 user group
during the installation.
The examples will be in the directory ‘Samples’ under the Ace400 for
VB directory.
Because of portability between versions of Visual basic 4 or 5, the
major samples are in a VB 4.0 format, but they can be perfectly used
in VB 5.0. Some specific samples for Visual Basic 5.0 are also
installed.
Refer to the ‘readme.txt’ file in the directory ‘Samples’ for more
details.
After a successful installation of ACE/400, you can test the native
access to your AS/400 data files in Visual Basic. All the samples
included can be modified to further accomplish the tasks at hand.
EASYCOM POUR VB
Chapitre 3 – Page 19
CHAPTER 4
VB Wizard
With the ACE/400 wizard for VB, a developer can do the following:
• Create a complete form with the associated fields and controls.
•
•
Create a navigation button attached to the file.
Add/ delete fields from a preexisting project.
•
•
Create a grid to display data from a file.
Create a Master Detail grid form.
•
Manage the files accessed in a project.
This wizard was designed to work under Visual Basic 5.0. Users of
Visual Basic 4.0 can skip to the next chapter.
ASSISTANT
Using the Wizard
Start the wizard
To start using the ACE/400 wizard for VB, it is recommanded to
begin with an empty project for the first few trials. But, it is also
possible to use the Wizard with a preexisting VB project.
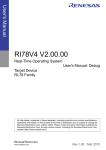
Having installed ACE/400 for VB, the EASYCOM wizard was added
to the Add-Ins menu option in Visual Basic under the name
EASYCOM Wizard.
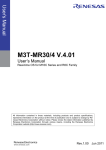
After selecting this option, the following screen will be displayed:
Main Selection screen
Push the ‘Next’ button to select the appropritae option.
EASYCOM POUR VB
Chapitre 4 – Page 23
ASSISTANT
Create controls:
1. In a brand new form
2. In the current form
3. No controls to be
created
Créer : :
Create
4. Data
Des contrôles
stan1.
access controls
dard
sursingle
un fichier
for
one
file
5.
de données
2. Une
Gridgrille
access
format
6. A
Une
grillegrid
de données
3.
Detail
‘détail’
component
Managing files in a project
In the following screen, the developer selects the files to be used in
the project.
When the wizard is started a second time, all previous selections in
the project will be displayed and available to be modified.
EASYCOM POUR VB
Chapitre 4 – Page 24
ASSISTANT
The first list contains the name of the ALIAS used in this project. An
Alias is a name used to refer to each file accessed on the AS/400. All
the Alias names are distinct names given to each accessed file.
Add an Alias : use the ‘Add File’ button.
A dialog box will be displayed : Select a name of a library on the
AS/400, then select a file from the displayed list of files in the library.
Add a program or a DataQueue : use the button ‘Add Program’.
The user will find themselves accessing screens in the
RPC/Dataqueue configuration module described in detail in the
chapter ‘PROGRAMMES and DATAQUEUES’
On the previous screen, the alias name can be modified. Bboth the
file name and the library name can be changed.
The name of the files and libraries are defined as literals between
quotation marks. If the quotation marks are deleted, then the label of
the file or library is considered a variable. Those variables will have
to be defined in a module as a global variable. This functionality is
used to use the name of the files and libraries in a generic way.
A handle name is automatically created and assigned to each alias.
This name is declared as a global variable accessible from anywhere
in the project. This handle name can be used directly by the
developer in all file access functions.
The wizard does not generate any code using the handle name.
Read_Only : This option is selected to open the file in read mode
only. Otherwise, the file is open in « Read/Write » mode.
Warning, the option « Read Only » must not be selected, if you will
use the navigation buttons to edit the file.
AutoOpen : This option indicates that the file is to be opened at the
startup of the application.
By unchecking this option, the programmer could initiate the file open
command in the code when needed instead of an automated open at
the start of the application. ( for example, if you like to open the file,
only when the file access is needed).
EASYCOM POUR VB
Chapitre 4 – Page 25
ASSISTANT
Defining a master/detail relationship
At this stage, it is also possible to define the Master/Detail
relationship that govern access to the files.
Perform the following steps:
1.
Select the alias corresponding to the detail file.
2.
Push the «set master table» button, a new screen will be
displayed.
3.
On the new screen, select the combo box « Master Table » to
set the name of the alias corresponding to the master file.
4.
Select a key field from the ‘détail’ file and a corresponding field
on the le ‘master’ file, and push the ‘Add’ button.
The developer is reminded of the relationship fields and their
links by the window labeled ‘Linked Fields’.
5.
Push the OK button when the relationships are correctly defined.
If you recall this screen by pushing the ‘set master table’ button
again, the relationships defined previously will reappear.
EASYCOM POUR VB
Chapitre 4 – Page 26
ASSISTANT
Generating forms
Select the alias corresponding to the data you wish included in a
form.
The mode of file accessed depends on the selection made in stage
1.
So, if you selected « single record », you could select any file access
type (Master,Detail, Without link )
If you opted for a grid ( option « Grid (Datasheet) »), you will have to
select a file without link option.
Finally, if you selected the « Detail grid », it is required to select a
detail file.
If you are not in one of the three previous cases, the « Next » button
will show up grayed. In that case, you will have the options to return
back and modify/complete your selection.
The next few screens are used to select fields and the type of control
used for each field. You can also add navigation buttons.
Note : To make a form with many files (linked by many Master/Detail
relationships or not), it is necessary to start the wizard for each file.
On the last screen entitled ‘Finished’, Click on the ‘Finish’ button to
Intiate the update of the code, and the creation and modification of
the form.
The application is now ready to be executed.
To add files or controls to a form restart the wizard.
EASYCOM POUR VB
Chapitre 4 – Page 27
ASSISTANT
Creating a project with EASYCOM Wizard for VB
The structure of a project created or updated with the EASYCOM
wizard for VB is simple.
A project generated by the EASYCOM Wizard for VB is devided in 4
parts :
EASYCOM POUR VB
Chapitre 4 – Page 28
ASSISTANT
The parts are the following:
1 - One or many forms to access data
2 - The added EASYCOM module EAC32VBA.BAS.
3 - A main module that has the function ‘Sub Main’ and initiates the
open file functions implemented in the following module.
4 - A module that contains both the function to manage connectivity,
and functions to manage files. This module is called a
« Relational Module ». Il contains three functions EASYCOM for
VB :
•
•
Connection to the AS/400.
Opening files.
•
Closing Files.
This module is used by the wizard to recall the selection made by the
developer. This module could be a common module used by
multiple projects, and be even multiple applications.
This part reflects the list of files used and their relationships selected
under the wizard.
To ensure a good operating system, these four distinguished parts
must be kept in tha applications, even though the 1st and 3rd parts
could be modified to meet application needs. Th e modification of
parts 1 and 3 do not interfer or prevent you from evoking the wizard
to update the project (Adding controls, forms, or files to access).
EASYCOM POUR VB
Chapitre 4 – Page 29
ASSISTANT
The main module
The main module is the one that contains the procedure ‘Sub Main’.
When using the wizard with a new project, this module is named
‘Module1’.
On the other hand, if the wizard is used with a preexisting project that
contains a procedure ‘Sub Main’, no other module is created, and the
existing ‘Sub Main’ procedure is used.
The following instructions are added to the end of the procedure ‘Sub
Main’ :
EACVBWizardOpenTables
Form1.Show 1
EACVBWizardCloseTables
These instructions proceeds opening all the files, updating their links
to each other (see Relationnel Module), and even opening the main
form (for example ‘Form1’).
In the case of a preexisting project, it may be necessary to move
these calls of procedures inside the ‘Sub Main’ procedure.
EASYCOM POUR VB
Chapitre 4 – Page 30
ASSISTANT
The relational layout module
A relational module is associated with every database Client-Server
application solution.
The wizard has the task of simplifying the tasks of selecting the files
used in a project by interactively choosing files and relationships.
These files and relationships are grouped in this module.
This module contains the following information :
The list of files used in the project, and those open at the project startup.
The list of Master/Detail relationships between files.
A function named ‘EACVBWizardOpenTables’ that proceeds both
establishing the connection to the AS/400, opening all files and setting up
the relationships between files.
A function named ‘EACVBWizardCloseTables’ that proceeds closing those
same files, and disconnecting from the as/400.
The code of this module is completely managed by the wizard.
So;
It is not recommanded to modify this module on your own.
Do not add additional functions to this module : they could be lost.
All modifications in this module only will be disregarded at the next time
the EASYCOM wizard is used with this project.
Each file is defined and determined in the following way::
Alias
Complete name of the file (format Library/File)
Name of the handle used : could be used be other modules.
Name of either a library or a variable containing a library name (external to
this module).
Name of either a file or a variable containing a file name (external to this
module).
File access mode (Read only or Read/Write mode)
Automated file open at the application statup or not.
All these properties are modifiable by the Wizard.
Each relationship is composed of:
The Alias name of the detail file
The Alias name of the master file
The name of the fields in the master file that are used in the key.
EASYCOM POUR VB
Chapitre 4 – Page 31
ASSISTANT
Code attached to the forms generated
The forms generated by the wizard EASYCOM for VB contain
standard components.
However, the value of the property « Tag » is used to distinguish the
AS/400 data controls from the standard VB controls. The properties
« Data Source » and « Data Field » are not used.
The property Tag has the following format :
*EAC | ALIAS | INFO
*EAC is an indicator to recognize ACE/400 modified controls.
ALIAS is an Alias name pointing to an AS/400 file (for a review of the
notion of alias, see the function SetAliasName ). This value is
equivalent to the standard « Data Source » property.
INFO is the part that describes the control directly.
Text and Label Controls
Property ‘Tag’ has the following format :*EAC | ALIAS | FIELDNAME
FIELDNAME is a the field name from the AS/400 file
The value of the property C
‘ aption’ is set to the long heading
description associated with a field. So, it is simple to find and
recogize each field created by the wizard.
CheckBox Controls
The property ‘Tag’has the following format:
*EAC | ALIAS | FIELDNAME | CHECKEDVALUE | UNCKECKEDVALUE
FIELDNAME is the name used to refer to the field.
CHECKEDVALUE is the value of the field when the checkbox is
selected.
UNCHECKEDVALUE is the value of the field when the checkbox is
unchecked.
Notes :
While executing the application, if the value of a field associated with
a checkbox control does not correspond to the CHECKEDVALUE or
the UNCHECKEDVALUE, then the control will have a status of
undetermined.
The property ‘caption’ of the control automatically holds the column
heading description on the AS/400 for the field.
EASYCOM POUR VB
Chapitre 4 – Page 32
ASSISTANT
Radio Button Control
The property ‘Tag’has the following format:
*EAC|ALIAS|FIELDNAME|TRUEVALUE
FIELDNAME is the field name
TRUEVALUE the value of the field when the radio button is selected.
The radio control buttons are automatically grouped in frames to
simplify generating multiple groups of radio buttons in the same form.
DBGrid Control
The property ‘Tag’has the following format:
*EAC|ALIAS|*AutoRefresh
*AutoRefresh is an optional value for the tag property. It controls the
automated refresh of a detail grid. It is usefull in the case of a MasterDetail grids.
The title of each grid column is the value associated with the column
of the AS/400 field, and the field name is in the entry ‘FieldName’.
Two events are added to simplify using the component and
automatically filling up the grid.
Navigation Buttons
The Easycom wizard can generate navigation buttons automatically:
These navigation buttons are directly linked to a file, and they are
used to perform standard file access operations. Including adding ,
deleting, and modifying records on the AS/400 files.
These buttons are presented in a table format ‘CommandButton’.
The property ‘Tag’ of the first button contains the following value:
*EAC|ALIAS
An event is automatically triggered when the navigation button is
clicked to accomplish the file access operation requested.
EASYCOM POUR VB
Chapitre 4 – Page 33
ASSISTANT
Functions to automatically manage controls
A project generated by the EASYCOM for VB wizard has many
specific functions that use the distinct modifications applied to the
created controls (like the Tag Property).
To create those functions, a project generated by the wizard contains
a ‘Reference’ section (see the Easycom Toolkit menu option under
‘Project/References’) menu.
This EasyCom Toolkit includes the functions used to automatically
manage the access to files:
• Updating a form with data from AS/400 files.
•
•
Updating files with data entered on the form.
Navigation buttons
•
Database Grid
Updating a form with data from AS/400 files
The procedure EACVBBufferToScreen updates automatically the
controls with data from the current active record.
Note : For a control to get updated by this function, the property ‘tag’
must have been completed as indicated in the section « Contance of
the forms generated ».
The controls updated are the control of type ‘Label’, ‘Text’,
‘CheckBox’ and ‘RadioButton’.
If an object of type ‘DBGrid’ has an option ‘*AutoRefresh’ in its Tag
property, then an automatic refresh is done for such an object.
Function EACVBBufferToscreen
Parameter
Pform
EASYCOM POUR VB
Form containing the controls to update
Chapitre 4 – Page 34
ASSISTANT
Updating files with data entered on the form
The function EACVBScreenToBuffer updates the current record field
buffers with the data contained on the form (but the record is not
written to the file).
Note : For a control to get updated by this function, the property ‘tag’
must have been completed a s indicated in the section « Contance of
the forms generated ».
The controls affected are the controls of type ‘Label’, ‘Text’,
‘CheckBox’ and ‘RadioButton’.
Function EACVBScreentoBuffer
Paramètre
Pform
Form containing the controls used by the
update operation
Remark : A control associated with a field that could be NULL will be
stored on file as the value « ».
Managing the Navigation Buttons
The procedure EACVBNavigator has for goal to simplify the file
access, and modifications. The file access operation performed
depend on which button was selected.
Function EACVBNavigator
Parameters
Navig
Index
File Navigation button
Action to perform
Actions to be performed are:
EACVBNAV_FIRST
EACVBNAV_PREV
EACVBNAV_NEXT
EACVBNAV_LAST
EACVBNAV_EDIT
EACVBNAV_POST
EACVBNAV_INSERT
EACVBNAV_DELETE
EACVBNAV_CANCEL
EASYCOM POUR VB
Read the first record
Read the previous record
Read the next record
Read the last record
Select the Edit record mode
Post modifications to file
Select the Add record mode
Delete a record
Cancel the Edit or Add record modes.
Chapitre 4 – Page 35
ASSISTANT
•
Editing a record : position the record pointer on the targeted
record, push the button
button
•
, modify the fields and push the
.
Adding a record: Push the button
, enterd the data in the
appropriate fields and push the button
•
Deleting a record : Push the button
.
.
Functions associated with a grid
These functions manage exclusively the operations associated with
an objet DBGrid.
Note : For a control to get updated by this function, the property ‘tag’
must have been completed as indicated in the section « Contance of
the forms generated ».
Further, the property « Data Mode » must be set to « 1– Unbound »
Three functions are used to manage the access to the object DBGrid:
EACVBDBGridUnboundReadData
EACVBDBGridUnboundGetRelativeBookmark
EACVBDBGridUnboundWriteData
The two first functions are used to fill up the grid, they must be called
by the following two events; UnboundReadData and the
UnboundGetRelativeBookmark associated with the DBGrid object.
The last function is used when the displayed records on the grid are
modified. It must be called by the event UnboundWriteData
associated with the DBGrid object.
The calls issued to these functions in the events triggered by the
object ’DBGrid’ are automatically done by the Easycom wizard.
EASYCOM POUR VB
Chapitre 4 – Page 36
CHAPTER 5
Using Easycom in a VB project
UTILISER EASYCOM DAN S UN PROJET VB
Using a project generated by Easycom wizard
The projects generated by the Wizard have direct access to all the
functions Easycom for VB. No additional changes are required.
Opening a new project with EASYCOM for VB
Start Visual Basic 4 or 5.
With VB4 :
• Select the menu option File …New project
• Select the menu option File …Add File
•
Select the file EACVB4.BAS
With VB5 :
• Choose the menu option File …New project
•
•
Select Standard EXE
Choose the menu option Project…Add File
•
Select the file EACVBA32.BAS
The functions of the library EASYCOM for VB are accessible just like
any other standard library.
Adding EASYCOM for VB to an existing project
Start Visual Basic 4 or 5, and open the existing project.
With VB4 :
• Choose the menu option File…Add File
•
Choose the file EACVBA4.BAS
With VB5 :
• Choos e the menu option Project…Add File
• Select the file EACVBA32.BAS
The functions of the library EASYCOM for VB are accessible just like
any other standard library.
EASYCOM POUR VB
Chapitre 5 – Page 39
CHAPTER 6
Managing The Connections
GESTION DES CONNEXIONS
Connection
Connection is established by the function EACVBStartConnection.
The default parameters associated with the connection are defined in
the file EASYCOM.INI.
The target AS/400 is selected by the entry location, the default user
Id used to connect is defined by the entry uid and pwd.
These three entries are in the General section of EASYCOM.INI file.
However, it is possible to dynamically assign in the program the
target AS/400 machine, and the user Id and password by using the
commands EACVBSetMachineName and EACVBSetUser. These
functions
must
be
called
before
the
function
EACVBStartConnection.
Disconnect
In a normal utilization mode, the disconnection is made automatically
when the executable application is closed. In a development
environment closing the connection is not performed until an explicit
call to close the connection is done, or when closing Visual Basic.
In a program, it may be useful to issue a disconnect request, to
reconnect under a different user profile, or to a different AS/400
machine. Disconnecting from the AS/400 causes all open files to be
closed.
This action is performed by the function EACVBStopConnection.
EASYCOM POUR VB
Chapitre 6 – Page 43
CHAPTER 7
Managing Files
GESTIONS DE FICHIERS
Opening and closing files
Before opening a file, verify that the connection to the AS/400 has
been established.
The function EACVBOpenFile is used to open a file by simply
providing the name and the library of the object. This function returns
a handle used by all subsequent function calls using the open file.
The function EACVBClose closes the AS/400 file.
All the open AS/400 files can be closed in one operation by issuing
the command EACVBCloseAllFiles.
Establish a Master/Detail relation
It is frequently required to establish a Master/Detail link between two
files with a one to many relationship.
The function EACVBDefineLink is used to Define the links in order to
setup the Master-Detail relation between two files.
The function EACVBEnableLink is used to establish the link.
A read to the master file triggers an automatic read to the detail file.
This file access could be disabled by issuing a call to the function
EACVBDisableAutoRead. On the other hand, reactivating the
automated read of the detail file can be accomplished by a call to the
function EACVBEnableAutoRead.
File properties
The function EACVBGetFormatInfo is used to get all the attributes of
the file, like a record size, number of fields, key definition, etc.
The function EACVBGetRecordCount retrieves the number of
records in the file.
EASYCOM POUR VB
Chapitre 7 – Page 47
CHAPTER 8
Record access functions
FONCTIONS DE MANIPULATION
Sequential and index file access
Sequential or indexed file access is done by the function
EACVBRead. Following the operation requested the read operation
is either by key or by sequential read access.
Field access functions
To read the contance of the current record, the developer can use
the function EACVBGetFieldValue, and supply either the field name
or the sequence number of the field.
The function EACVBPutKeyValue is used to set the value of a keyed
field.
The function EACVBPutFieldValue is used to set the value of a field
prior to an update.
Field properties
It is possible to retrieve the definition of a field by using the function
EACVBGetFieldInfo.
One could get the local size of a field, or the AS/400 size, the field
type on the PC or the AS/400, the heading of the field, name (by
giving the field sequence number) , etc.
Adding record
Adding a field is performed in two steps.
In a first step, set the data access mode to be « Add» mode by
calling the function EACVBAddNew.
Note, the file can not be in ReadOnly mode.
In a second stage, set the values of the fields using the fu nction
EACVBPutFieldValue.
The added record is inserted in the file by a call to the function
EACVBUpdate.
Cancelling the add record operation is done by a call to a function
EACVBCancelEdit
EASYCOM POUR VB
Chapitre 8 – Page 51
FONCTIONS DE MANIPULATION
Modifying a record
To modify a record, the data access mode must be set to «Edit»
mode by calling the function EACVBEdit.
Note : The file must be open and accessible in write mode.
When this function is called, it locks the cureant record on the
AS/400 during this operation.
The function EACVBPutFieldValue is used to set the new values of
fields.
Applying the modifications to the file is done by calling the function
EACVBUpdate.
The command EACVBCancelEdit is issued to exit the «Edit» mode.
Deleting records
To modify a record, the data access mode must be set to «Edit»
mode by calling the function EACVBEdit.
Note : The file must be open and accessible in write mode.
Deleting the current record is performed by issuing a call to the
function EACVBDelete.
EASYCOM POUR VB
Chapitre 8 – Page 52
FONCTIONS DE MANIPULATION
Filtering and accessing subset of data
The following functions could be used to filter and reduce the number
of records available from a file.
The function EACVBPutKeyValue is used to set the filtering to a
specific key value to seek.
The function EACVBSetRange is used to set the filtering range
interval applied to the file including the min value, the max value, or
both simulataneously.
The functions EACVBDisableRange/EACVBEnableRange are used
to deactivate a range interval filter, or activate a new filter
temporarily.
Example
This example illustrates using the function EACVBSetRange with a
min value and a max value simultaneously :
In Visual Basic :
Dim ret As EACVBERR
Dim hdl As Long
…
ret = EACVBPutKeyValue(hdl, "KEY", "MinValue")
ret = EACVBSetRange(hdl, 8, EACVBBOUND_LOWER)
…
ret = EACVBPutKeyValue(hdl, "KEY", "MaxValue")
ret = EACVBSetRange(hdl, 8, EACVBBOUND_UPPER)
…
' Read the record with key greater or equal to "MinValue"
ret = EACVBRead(hdl, EACVBREAD_FIRST)
…
Using bookmarks
A specific record can be tagged with a bookmark. The bookmark
could be used to return and reposition the file pointer to that record
immediately at any time.
The function EACVBGetBookmark is used to a define a bookmark on
the current record. The function EACVBGotoBookmark is used to
reposition the file pointer to a previously defined bookmark.
EASYCOM POUR VB
Chapitre 8 – Page 53
CHAPTER 9
Managing transactions
GESTION DES TRANSACTIONS
Securing data access by using transaction control is completely
supported, however, the files to be defined are journaled on the
AS/400.
A beginning of a transaction is initiated by a call to the function
EACVBCommit.
The function EACVBCommit is used to apply the modifications
performed since the last EACVBCommit or EACVBRollBack.
The function EACVBRollBack is used to cancel the mofications
made since the last EACVBCommit or EACVBRollBack.
Each call to EACVBCommit or EACVBRollBack terminates the
current transaction and initiate a new transaction.
The transaction control mode is permanent and applies to all
journaled files.
Example of steps of transaction control :
Début Transaction 1
Ouverture de fichier
Etat x
Traitements
A
Les traitements A se terminent avec succès
Début Transaction 2
EACVBCommit
Etat y: Traitements A validés
Traitements
B
Les traitements échouent, annulation nécessaire
Début Transaction 3
EASYCOM POUR VB
EACVBRollback
Retour Etat y: Traitements B annulés
Chapitre 9– Page 57
CHAPTER 10
Remote acess commands
LE « REMOTE COMMAND »
The remote access commands are AS/400 comands executed in a
NON INTERACTIVE mode ( without screen display or keyboard
interaction) on the AS/400, with a returned confirmation of execution,
and the complete execution of the command.
This action is performed with the function EACVBRemoteCommand
Execution of the comamnd is done in three stages:
•
•
•
Send the command to the AS/400.
Execute the command on the AS/400 ; The client station is
waiting for the process to complete.
The returned response of the execution (success or not) is
returned to the client station.
The notion of executing commands on the AS/400 complements the
call to RPC (Remote Procedure Call), that is used to access
programs on the AS/400. For further details on using programs on
the AS/400 refer to the chapter ‘PROGRAMS and DATAQUEUES’.
EASYCOM POUR VB
Chapitre 10 – Page 61
CHAPTER 11
Programs and Dataqueues
Preliminary notions :
Unlike a file, the AS/400 programs and DataQueues do not have an
external description.
A program expects input parameters and returns results by modifying
the received parameters. The number of parameters and their data
type is only defined inside a program.
A DataQueue contains a file of messages (just like a program, the
size and the type of fields in the record in only defined inside the
DataQueue).
For EASYCOM to be able to convert data between the AS/400 and
the PC, it is necessary to define the structure accessed. The notion
of stored procedure is used to allow the client application to access
that structure .
PROGRAMME ET DATAQUEUES
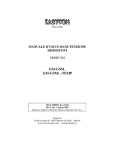
RPC / DTAQ Configuration
l
l
Procedure identifier
l
l
Local program or
DataQueue on the
AS/400
l
l
Type (Program or
DataQueue)
l
l
List of fields
EASYCOM POUR VB
l
l
List of procedures
already created
l
l
List of programs, ou
DataQueues, that have
a procedure attached
l
l
Field usage mode
l
l
Type of field
l
l
Detail field
definition on the
AS/400 and on the
PC side
Chapitre 11 – Page 65
PROGRAMME ET DATAQUEUES
Program description
Procedures can be created to access programs written in RPG,
COBOL, CL, C, ...
The only restriction is that the program does not perform any screen
I/O or keyboard entry.
Œ Start the « Easycom Stored Proc Configuration » (32 bits router :
Easycom Stored Proc Configuration 32 bits) located in the
program group « EASYCOM »,
• In the dialog box « Stored Procedure configuration », push the
« New Procedure » button,
Ž Fill up the dialog box « Procedure definition » :
•
•
Procedure Name : as known by the the client station only,
Description : program description,
•
AS/400 Progam Name : complete AS/400 program name
including full path (<Library>/<Program>) .
Program/DataQueue :select program at this option.
•
• Describe one by one the parameters expected by the program.
By using the « + », « - » or « M » buttons, to add, delete, and
modify parameters.
As a parameter could be a Data Structure, all the elements must be
described one by one, and it must be indicate d for each field whether
it is a single parameter field or a first element of a data structure.
EASYCOM POUR VB
Chapitre 11 – Page 66
PROGRAMME ET DATAQUEUES
Fill up the dialog box « Parameter field edit » as follows:
•
Field Name : virtual name given to a field,
•
Field usage : indicate if the value expected is an input value (IN),
or output (OUT), or both (IN/OUT). Generaly the parameters are
used as IN/OUT mode.
This field is a parameter or the 1st of a Data Structure : must
be unchecked only if this field is not in the first position in the list
of fields making up the data structure.
AS/400 format : exact AS/400 field definition of the parameter
expected by the program (field type, number of digits, and
number of decimals),
PC format : description of the PC format used to view the AS/400
data on the PC.
•
•
•
Many programs could be described with procedures, and even many
procedures could be described for the same program. So, the
parameter of a program could be a variable data structure, that has a
variable format, depending on the values of input variables. in which
case, one could create as many description as there is formats
available.
The procedures created could be modified by clicking on the button
« Edit Procedure », or deleted by clicking on the button « Remove
Proc. ».
EASYCOM POUR VB
Chapitre 11 – Page 67
PROGRAMME ET DATAQUEUES
Using AS/400 programs with VB
Calling procedures on the AS/400 is similar to the read or write
operation on a file.
1 ] RPC With I/O parameters
Executing a procedure is performed in four steps :
• Open the procedure as a file with the command EACVBOpenFile.
One open statement is necessary for several consecutive calls.
• Set the input parameters and the I/O parameters with the function
EACVBPutKeyValue. The Input and I/O parameters will appear
then as keys.
• Executing the procedure by a call to the function EACVBRead.
Use the read option EACVBREAD_KEYEQ.
• Retrieve the eventual Output or I/O parameters by issuing calls to
the function EACVBGetFieldValue. The Output and I/O parameters
are considered and used as fields .
Note that the approach is the same as reading a file by key. The
Input and I/O parameters are simply used as key values.
Example
In Visual Basic :
Dim ret As EACVBERR
…
‘ open file
ret = EACVBOpenFile("*PGM/RPCSAMPLE",
EACVBOPEN_READWRITE, hdl)
…
‘ Setup input parameters
ret = EACVBPutKeyValue (hdl, "PARAMIN", InValue, 4)
‘ Initiate a program call
ret = EACVBRead (hdl, EACVBREAD_KEYEQ, 0)
‘ Read of Output parameters
ret = EACVBGetFieldValue (hdl, "PARAMOUT", OutValue)
…
EASYCOM POUR VB
Chapitre 11 – Page 68
PROGRAMME ET DATAQUEUES
2 ] RPC Without Input parameters.
Without input parameters, we can not access records by key:
The approach to RPC can be done in the following step (five steps) :
• Open the procedure as a file with the command EACVBOpenFile.
One open statement is necessary for several concecutive calls.
• Call the function EACVBAddNew to set the access mode to edit.
• Call EACVBUpdate to Initiate the execution of a program.
•
Call EACVBRead in mode NEXT or FIRST.
•
Eventualy issu the call EACVBGetFieldValue to retrieve the
returned parameters of the program.
Note : This method of access could be used to receive input
parameters that would be set by a call to the function
EACVBPutFieldValue prior to issuing an EACVBUpdate request.
Example
In Visual Basic :
Dim ret As EACVBERR
…
ret
=
EACVBOpenFile("*PGM/RPCSAMPLE",
EACVBOPEN_READWRITE, hdl)
…
‘ Edit mode
ret = EACVBAddNew(hdl)
‘ In stead of the Input parameters
…
‘ execute the procedure
ret = EACVBUpdate(hdl)
‘ retrieve the results
ret = EACVBRead(hdl, EACVBREAD_NEXT, 0)
ret = EACVBGetFieldValue(hdl, "PARAMOUT", OutValue)
…
EASYCOM POUR VB
Chapitre 11 – Page 69
PROGRAMME ET DATAQUEUES
DataQueue Description
All data queue types on the AS/400 can be accessed by procedures.
From the simple FIFO dataqueue to the KEYED access dataqueue.
The procedure ‘DTAQ_FIFO’ is an example of access to a simple
procedure, and the procedure ‘DTAQ_KEY’ is an example of access
of a keyed procedure.
Œ Start « Easycom Stored Proc Configuration » located in the
program group « EASYCOM »,
• In the dialog box « Stored Procedure configuration », push the
« New Procedure » button,
Ž Fill up the dialog box « Procedure definition » :
•
Procedure Name : as known by the client station only.
•
•
Description : Dataqueue description.
AS/400 Progam Name : Complete AS/400 name including full
path of the DataQueue (<Library>/ <Program>) .
Program/DataQueue : Select DataQueue at this option.
•
• Describe one by one the fields of the DataQueue. By using « + »,
« - » or « M » buttons to add, delete, or modify the parameters.
In the description of the format of the DataQueue, it is required to
eneter three fields that are not part of the data, but they will be used
by VB for field access.
• TIMEOUT : type ‘String’, size 6
time out to read (time)
• FILER
: type ‘String’, size 2
future use,
•
•
ORDER : type ‘String’, size 4
Type
of
associated with the key (DataQueue KEYED),
operation
The fourth field is a key field, if the DataQueue is keyed.
The following fields describ the data fields.
EASYCOM POUR VB
Chapitre 11 – Page 70
PROGRAMME ET DATAQUEUES
Fill up as follows the dialog bix options: « Parameter field edition » :
• Field Name : Virtual name of a field.
•
•
•
•
Field usage : Unrelated information when it comes to
DataQueue.
This field is a parameter or the 1st of a Data Structure : this
field is not significant foe a datya queue.
AS/400 format : exact AS/400 field definition of the parameter
expected by the program (field type, number of digits, and
number of decimals),
PC format : description of the PC format used to view the AS/400
data on the PC.
Many dataqueues could be described with procedures, and even
many procedures could be described for the same dataqueue.
The procedures created could be modified by clicking on the button
« Edit Procedure », or deleted by clicking on the button « Remove
Proc. ».
EASYCOM POUR VB
Chapitre 11 – Page 71
PROGRAMME ET DATAQUEUES
Using DataQueues with VB
Before using a dataqueue, it must be open, just like a file by issuing
the function EACVBOpenFile.
The opened object must be of type *DTAQ/PROC wehere PROC is
the name of a procedure selected by the RPC/DATAQUE
configuration (see the begining of the chaptre ‘PROGRAMS AND
DATAQUEUES’).
Dataqueue access (without a key) .
Reading records from a dataqueue with ACE/400 for VB is identical
to file keyed access without specifying an operation.
The fields ‘TIMEOUT’, ‘FILER’ and ‘ORDER’ are key factors.
However, The ‘TIMEOUT’ parameter is the only one used.
The read operation is done in 3 steps:
•
Set the timeout value with the function EACVBPutKeyValue.
•
•
Use EACVBRead to read an entry by key.
Use EACVBGetFieldValue to retrieve the fields targeted.
The write operation is done in 3 steps too :
•
Use EACVBAddNew,
•
•
Use EACVBPutFieldValue to update the value of the fields.
Use EACVBUpdate to post the data to the dataqueue.
EASYCOM POUR VB
Chapitre 11 – Page 72
PROGRAMME ET DATAQUEUES
Example
In Visual Basic :
Dim ret As EACVBERR
Dim hdl As Long
...
‘ Open a file
ret = EACVBOpenFile("*PGM/DTAQ_FIFO",
EACVBOPEN_READWRITE, hdl)
...
‘
‘ Write data
ret = EACVBAddNew(hdl)
ret = EACVBPutFieldValue(hdl,"DATA",MyData)
ret = EACVBUpdate(hdl)
…
‘ Read data
‘ One second timeout
ret = EACVBPutKeyValue (hdl, "TIMEOUT",1)
‘ Read dataqueue
ret = EACVBRead (hdl, EACVBREAD_KEYEQ, 0)
‘ Retrieve fierld
ret = EACVBGetFieldValue (hdl, "DATA", OutValue)
…
Keyed dataqueue access
The keyed dataqueue access is identical to the access without a key,
except for the fact that this time the operation performed must be
supplied in addition to the field value.
The operation performed in stored in the field (ORDER in the
example procedure) of type string, and its value is the following:
•
‘EQ’ for a read to fetch records equal to a key.
•
•
‘GT’ for a read to fetch records greater than a key.
‘GE’ for a read to fetch records Greater or equal to a key.
•
‘LT’ for a read to fetch records less then a key.
•
•
‘LE’ for a read to fetch records less or equal to a key.
‘NE’ for a read to fetch records not equal to a key.
EASYCOM POUR VB
Chapitre 11 – Page 73
PROGRAMME ET DATAQUEUES
The read operation is done in 3 steps:
•
•
•
Set the timeout value, of the acess type (ORDER), and the value
of the key for the function EACVBPutKeyValue.
Use EACVBRead to read record by key.
Use EACVBGetFieldValue to retrieve the fields targeted.
The write operation is done in 3 steps too :
•
•
•
Use EACVBAddNew,
Use EACVBPutFieldValue to update the value of the fields, and
the value of the key field.
Use EACVBUpdate to post the data to the dataqueue.
Example
In Visual Basic :
' Open File
lret
=
EACVBOpenFile("*DTAQ/DTAQ_KEY",
EACVBOPEN_READWRITE, hdlDTAQ_KEY)
lret = EACVBSetAliasName(hdlDTAQ_KEY, "DTAQ_KEY")
mydata = "COUCOU LES COPAINS"
'
' Write data
ret = EACVBAddNew(hdlDTAQ_KEY)
' Set the value of the fields and the key
ret = EACVBPutFieldValue(hdlDTAQ_KEY, "DATA", mydata)
ret = EACVBPutFieldValue(hdlDTAQ_KEY, "KEY", "ABC")
ret = EACVBUpdate(hdlDTAQ_KEY)
' Read a Data element
' Une seconde de ‘timeout’
ret = EACVBPutKeyValue(hdlDTAQ_KEY, "T_OUT", 1)
' Read by key 'ABC'
ret = EACVBPutKeyValue(hdlDTAQ_KEY, "KEY", "ABC")
' Operation key Equal
ret = EACVBPutKeyValue(hdlDTAQ_KEY, "OP", "EQ")
' Read dataqueue
ret = EACVBRead(hdlDTAQ_KEY, EACVBREAD_KEYEQ, 0)
' Retrieve results
ret = EACVBGetFieldValue(hdlDTAQ_KEY, "DATA", OutValue)
EASYCOM POUR VB
Chapitre 11 – Page 74
CHAPITRE 12
Frequently Asked Questions
SUPPORT TECHNIQUE
Verify ACE/400 installation
•
•
•
In 16 bits, the following DLLs EASYCOM.DLL, EASY16VBA.DLL
are in a directory included in the « PATH », or in the subdirectory
« \WINDOWS\SYSTEM ».
In 32 bits, The following files l EASYCO32.DLL, EAC32VBA.DLL
are n a directory included in the « PATH », or in the subdirectory
« \WINDOWS\SYSTEM ».
The APPC router either 16 or 32 bits, is correctly installed and
configured on the Pc. If you are using an SNA Server, verify both
the server side and the client of SNA Server topography.
Acces using 16 bits with either: NetSoft Router,
Client Access, Netware for SAA, ...
•
•
•
The file « EHNAPPC.DLL » of the correct router used must be
either in a directory included in the path or in the subdirectory
« \WINDOWS\SYSTEM ».
A default profile has been set, and its parameters are defined to
establish a connection top th e AS/400.
The entry « NETWORK= » of the section « [GENERAL] » in the
file « EASYCOM.INI » (directory C :\WINDOWS) doe not exist, or
it indicates a value of « EHN ».
Access using 32 bits with either: NetSoft
Router, Client Access, Netware for SAA, ...
•
The file « E32APPC.DLL » of the correct router used must be
either in a directory included in the path or in the subdirectory
« \WINDOWS\SYSTEM ».
•
A default profile has been set, and its parameters are defined to
establish a connection top the AS/400.
The entry « NETWORK= » of the section « [GENERAL] » in the
file « EASYCOM.INI » (directory C :\WINDOWS) doe not exist, or
it indicates a value of « EHN ».
•
EASYCOM POUR VB
Chapitre 12 – Page
77
SUPPORT TECHNIQUE
Access in 16 or 32 bits router using SNA Server.
•
The files « WINAPPC.DLL » (16 bits), or « W32APPC.DLL » (32
bits), of the correct router used must be either in a directory
included
in
the
path
or
in
the
subdirectory
« \WINDOWS\SYSTEM ».
•
The entry « NETWORK= » of the section « [GENERAL] » in the
file « EASYCOM.INI » (directory C :\WINDOWS) indicates a
value of « SNA ».
The entry « LU= » of the section « [SNA] » in the file
« EASYCOM.INI », must indicate the alias of a Local L.U.
The entry « LOCATION= » of the section « [GENERAL] » in the file
« EASYCOM.INI », must indicate the alias of the Remote L.U.
AS400.
•
•
TCP/IP natif access.
•
•
•
TCP/IP is running on both the PC side and the AS/400.
The entry « network + » in the section « [GENERAL] » of the file
« EASYCOM.INI » (directory ‘c:\WINDOWS’) indicates the value
«tcp».
The entry « location » of the section « [GENERAL] » in the file
« EASYCOM.INI » (directory ‘c:\WINDOWS’) indicates the IP
address of the AS/400.
Verify the middleware installation
•
The AS/400 operating system number is correct.
•
The information in the dialog box « Server Installation » (server
name, LU name) are correct,
• The router access mode either 16 or 32 bits, is correct,
The user profile used by the router to connect to the AS/400 has the
appropriate rights to read/write records to the AS/440 library.
EASYCOM POUR VB
Chapitre 12 – Page
78
SUPPORT TECHNIQUE
EASYCOM POUR VB
Chapitre 4 – Page
79
SUPPORT TECHNIQUE
CHAPITRE 13
Technical Support
EASYCOM POUR VB
Chapitre 4 – Page
80
SUPPORT TECHNIQUE
EASYCOM POUR VB
Chapitre 4 – Page
81
SUPPORT TECHNIQUE
Technical Support
Advanced Client Easycom/400
In North and South America
MIS Systems Corp
208 Third Ave North #200
Nashville, TN 37201 USA
Phone (615) 248-0079
Fax
(615) 248-8079
Email : [email protected]
Web : www.missystems.com
MIS
In Europe and Asia
AURA Equipements
Z.A DE COURTABOEUF
10, Avenue du Québec - BP 519
F - 91946 LES ULIS CEDEX
FRANCE
Phone :
33 1 69 07 01 45
Fax : 33 1 64 46 29 06
Web:
www.easycomaura.com
EASYCOM POUR VB
Chapitre 4 – Page
82
INDEX
DataQueue...................................................................................................................... 70
Dataqueues avec clé..................................................................................................... 73
Dataqueues sans clé..................................................................................................... 72
EACVBAddNew.............................................................................................................. 51
EACVBBufferToScreen................................................................................................. 34
EACVBCancelEdit...................................................................................................51, 52
EACVBClose................................................................................................................... 47
EACVBCloseAllFiles...................................................................................................... 47
EACVBCommit............................................................................................................... 57
EACVBDBGridUnboundGetRelativeBookmark........................................................ 36
EACVBDBGridUnboundReadData ............................................................................. 36
EACVBDBGridUnboundWriteData.............................................................................. 36
EACVBDefineLink.......................................................................................................... 47
EACVBDelete ................................................................................................................. 52
EACVBDisableAutoRead.............................................................................................. 47
EACVBDisableRange.................................................................................................... 53
EACVBEdit...................................................................................................................... 52
EACVBEnableAutoRead............................................................................................... 47
EACVBEnableLink......................................................................................................... 47
EACVBEnableRange..................................................................................................... 53
EACVBGetBookmark.................................................................................................... 53
EACVBGetFieldInfo ....................................................................................................... 51
EACVBGetFieldValue ................................................................................................... 51
EACVBGetFormatInfo ................................................................................................... 47
EACVBGotoBookmark.................................................................................................. 53
EACVBNavigator............................................................................................................ 35
EACVBOpenFile............................................................................................................. 47
EACVBPutFieldValue..............................................................................................51, 52
EACVBPutKeyValue................................................................................................51, 53
EACVBRead................................................................................................................... 51
EACVBRecordCount..................................................................................................... 47
EAC VBRemoteCommand............................................................................................ 61
EACVBRollBack............................................................................................................. 57
EACVBScreenToBuffer................................................................................................. 35
EACVBSetMachineName............................................................................................. 43
EACVBSetRange........................................................................................................... 53
EACVBSetUser.............................................................................................................. 43
EACVBStartConnection................................................................................................ 43
EACVBStopConnection................................................................................................ 43
EACVBUpdate..........................................................................................................51, 52
EACVBWizardCloseTables .......................................................................................... 31
EACVBWizardOpenTables........................................................................................... 31
Easycom Stored Proc.................................................................................................... 66
Easycom Toolkit............................................................................................................. 34
RPC.................................................................................................................................. 65
Tag ................................................................................................................................... 32