1
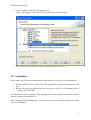
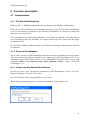
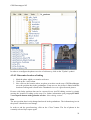
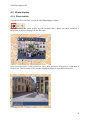
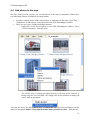
GPS Photomapper NG
User Manual
alta4 Geoinformatik AG
Frauenstraße 8-9
54290 Trier
Germany
Fon: +49.651.96626-0
Fax: +49.651.96626-26
www.alta4.com
[email protected]
Copyright © 2005 alta4 Geoinformatik AG
All rights reserved.
We have compiled the following texts and illustrations with the greatest care.
Nevertheless, mistakes can never be completely ruled out. alta4 can assume neither
juristic responsibility nor any kind of liability for faulty information and its consequences.
We are grateful for suggestions for improvement and indications of mistakes.
ESRI, ArcGIS, ArcView, ArcMap and ArcReader are registered trademarks of ESRI Inc.
RICOH and Caplio 500SE are registered trademarks of RICOH Company Ltd.
All other hardware- and software designations as well as company names used in this
manual are also registered trademarks of the respective owners and should be
considered as such. In the product descriptions we use generally the producers' spelling.
GPS Photomapper NG
Contents
1 Introduction......................................................................... 3 1.1 1.2 How does GPS PhotoMapper help me with my work? ............................................... 3 Operations layout......................................................................................................... 4 2 Installation and licensing .................................................... 5 2.1 System requirements.................................................................................................... 5 2.1.1 Installation of the .Net-Framework ...................................................................... 6 2.1.2 Installation of the .NET support for ArcGIS........................................................ 7 2.2 Installation ................................................................................................................... 8 2.3 Licensing ..................................................................................................................... 9 2.4 Loading PhotoMapper in ArcMap............................................................................... 9 2.5 Deinstallation............................................................................................................. 10 3 What's new in GPS PhotoMapper NG? ............................ 11 4 Function description ......................................................... 14 4.1 Geodatabases ............................................................................................................. 14 4.1.1 File-Based Geodatabase ..................................................................................... 14 4.1.2 Personal Geodatabase......................................................................................... 14 4.1.3 Create new File-Based Geodatabase .................................................................. 14 4.1.4 Add new feature class to existing File-Based Geodatabase............................... 15 4.1.5 Open feature class of an existing geodatabase ................................................... 15 4.1.6 Shapefile............................................................................................................. 15 4.1.7 Import from GPS PhotoMapper 2.0 ................................................................... 15 4.2 Loading the digital pictures in ArcMap..................................................................... 16 4.2.1 Loading individual pictures................................................................................ 18 4.2.2 Loading entire folders ........................................................................................ 19 4.2.3 Add with drag & drop ........................................................................................ 20 4.2.4 Adding unreferenced pictures ............................................................................ 21 4.2.4.1 Select directory ........................................................................................... 21 4.2.4.2 Determine location of taking ...................................................................... 22 4.2.5 Settings ............................................................................................................... 23 4.2.5.1 Absolute / Relative paths ............................................................................ 24 4.2.5.2 Embedding EXIF information .................................................................... 24 4.2.5.3 Use EXIF direction of taking...................................................................... 24 4.2.6 Dislocation of photos and map projection.......................................................... 26 4.2.6.1 Projection, datum, ellipsoid, coordinate systems........................................ 26 4.2.6.2 Coordinate systems in ArcGIS.................................................................... 26 4.2.6.3 Datum transformation for position correction of the GPS photos .............. 26 4.3 Photo display ............................................................................................................. 29 4.3.1 Photo hotlink ...................................................................................................... 29 4.3.2 Symbols.............................................................................................................. 30 4.3.3 Orientate ............................................................................................................. 30 4.4 Add photos to the map............................................................................................... 31 4.5 View........................................................................................................................... 32 4.5.1 Actions ............................................................................................................... 32 5 GPS PhotoMapper service functions ................................ 34 5.1 Report GPS PhotoMapper bugs................................................................................. 34 5.1.1 Sign up................................................................................................................ 34 1
GPS Photomapper NG
5.1.2 Login .................................................................................................................. 36 5.1.3 Report bugs ........................................................................................................ 36 5.2 Info menu................................................................................................................... 36 5.2.1 Change license.................................................................................................... 36 5.2.2 Update check ...................................................................................................... 36 6 Use ArcGIS functionality with GPS PhotoMapper .......... 37 6.1 Edit photos................................................................................................................. 37 6.1.1 Move annotation photos ..................................................................................... 37 6.1.2 Change size ........................................................................................................ 37 6.2 Start editing session ................................................................................................... 37 6.3 Attribute tables .......................................................................................................... 38 6.4 Layout view ............................................................................................................... 38 6.5 Print ........................................................................................................................... 38 7 Versions ............................................................................ 39 7.1 7.2 7.3 7.4 Commercial Version.................................................................................................. 39 Demo version............................................................................................................. 39 Campus version ......................................................................................................... 39 EDU version .............................................................................................................. 39 2
GPS Photomapper NG
1 Introduction
1.1 How does GPS PhotoMapper help me with my work?
Images say more than words. But how can I organize picture libraries with thousands of
digital photos?
The solution is linking images with the position where they were taken using the GPS-capable
digital camera Caplio 500 SE from RICOH, with integrated or extern GPS and the software
GPS PhotoMapper.
In many fields of application of object documentation and management, geo referencing of
takings is absolutely necessary. Up to now, this had to be carried out in a time-consuming
post-processing, which now becomes superfluous. Already when the picture is taken, the site
coordinates are determined with GPS and saved in the picture's header.
The GIS PhotoMapper software enables you to make use of this information and embed it in
the geographic information system ArcGIS from ESRI. The GIS-user can simply access the
photos and manage them without any major effort. The ThumnailViewer facilitates finding
photos with preview images, makes it possible to zoom in on a selected photo and marks
pictures without position data.
Older data inventories can be referenced retroactively with GIS PhotoMapper.
3
GPS Photomapper NG
The possible applications are manifold, reaching from disaster control – where staff members
can document the situation exactly on the spot with marks of time and location, making it thus
possible for the control center to literally get a picture of the situation – to classical
documentation functions in environmental protection or object documentation, e.g. in real
estate business, tourism industry or for police and Health and Safety.
GPS PhotoMapper is an extension for ESRI’s ArcGIS 9.2 and cannot be used as a stand alone
module. Because of the implementation of the File-Based Geodatabase, the latest version
GPS PhotoMapper NG is only executable under ArcGIS 9.2!
1.2 Operations layout
First switch on the GPS device and your camera. For the initial startup, please observe the
short instruction in the appendix.
Take photos with the Caplio 500SE from RICOH. With the pluggable GPS or an extern
Bluetooth GPS, the exact time of taking and the geographic coordinates are saved
automatically.
First load the digital images from the camera onto your PC and save the data on the hard disk.
You can link the camera to your PC with the provided USB cable or use the W-LAN
functionality of the camera.
With GIS PhotoMapper you can access all digital pictures and work with them in the
geographic information system ArcGIS 9.2.
In order to do this, a reference is written into a File-Based Geodatabase, Personal
Geodatabase or in a file in the Shapefile format. This reference can either be relative or
absolute.
From the coordinates of the location of the taking, a point layer is created. The pictures are
linked with these taking points.
Besides, an annotation group can be created with the pictures, whose characteristics can be
defined by the user.
4
GPS Photomapper NG
2 Installation and licensing
2.1 System requirements
Free disc space
10 MB for the extension GPS PhotoMapper.
Operating system Microsoft Windows XP/2003/Vista
GIS Software
ArcGIS 9.2 (ArcView, ArcEditor or ArcInfo) by ESRI.
The extension does not work with ArcGIS 8.x, 9.0 or 9.1
Image formats
All .jpg files
. NET Framework . NET Framework 2.0
. NET-Support for ArcGIS
To be able to use PhotoMapper NG as an extension in ArcGIS, in addition to the original
.NET Framework 2.0 by Microsoft, the .NET-Support by ArcGis must also be installed.
If the .NET Framework already exists when installing ArcGIS, the NET-Support is also
installed automatically.
5
GPS Photomapper NG
2.1.1 Installation of the .Net-Framework
In order to be sure the .NET Framework 2.0 is installed on you computer, you proceed as
follows (.NET is always installed on computers with Microsoft Vista):
1. Open the Windows Start Menu and select “Settings” > “Control Panel” > “Software”.
2. Look for the entry “Microsoft .NET Framework 2.0".
3. If this entry does not exist, you have to install the .NET-Framework yourself. You can
find an active link to the .NET Framework download under:
http://www.alta4.com/eng/produkte/im/index.php
(You need administrator rights to install)
After that, you can continue the installation of .NET-Support for ArcGIS.
6
GPS Photomapper NG
2.1.2 Installation of the .NET support for ArcGIS
To install ArcGIS .NET-Support belatedly, proceed as follows:
(in order to do this, you need administrator rights and the .NET-Framework 2.0 has
to be installed already)
1. First of all, end ArcGIS if necessary.
2. Then open the Windows Start Menu and select “Settings” > “Control Panel” >
“Software”.
3. Select the entry “ArcGIS Desktop” and click “Change/Remove”
7
GPS Photomapper NG
4. Choose “Modify” and press the button “Next”.
Click ".NET Support” and select “Will be installed on local hard drive”.
5. Click “Next” and confirm the next entry mask with “Next” as well.
2.2 Installation
Please make sure you have the administrator rights which are necessary for the installation.
1. Start the MSI file with a double click. The installation mask starts automatically after
that.
2. Read the license agreement and accept it. In order to do this, set a checkmark next to
“I accept” and click “OK”.
The installation is now completed. If any problems have occurred, please contact the technical
support of alta4 Geoinformatik AG.
When starting the GPS PhotoMapper, you can load your licensing file. Read the next chapter
for more information.
8
GPS Photomapper NG
2.3 Licensing
If you do not have a licensing file yet, a demo version of the GPS PhotoMapper NG will be
loaded.
After purchasing a commercial license, you can convert the software to the full version with
all functions without a new installation. As soon as you start ArcMap with a GPS
PhotoMapper demo version, the following window opens:
Click “change license” to load your licensing file (*.lic) and change to a commercial license
with full functional range.
If you want to continue using the demo version, click “OK”. Then ArcMap will be opened.
2.4 Loading PhotoMapper in ArcMap
Start the software ArcMap 9.2. Select the option “Extensions“ in the "Tools" menu.
1. Activate the checkbox for GPS PhotoMapper NG.
2. If the GPS PhotoMapper NG toolbar does not appear automatically, you can display it
manually. In order to do this, select “Toolbars” in the “View” menu and activate "GPS
PhotoMapper NG Toolbar”. The GPS PhotoMapper toolbar opens:
3. If the GPS PhotoMapper NG window is not displayed, click on the button “GPS
PhotoMapper NG” in the GPS PhotoMapper NG toolbar.
The GPS PhotoMapper NG window is dockable and can be integrated into the
ArcMap environment. In order to do this, click on the title bar of the window and
move it to the desired position.
9
GPS Photomapper NG
2.5 Deinstallation
GPS Photo Mapper can be deinstalled like any other Windows software using the control
panel.
1. First of all, end ArcGIS.
2. Then open the Windows Start Menu and choose “Settings” > “Control Panel” >
“Software”.
3. Select GPS PhotoMapper NG from the list and click on “Change/Remove”
10
GPS Photomapper NG
3 What's new in GPS PhotoMapper NG?
With GPS PhotoMapper NG, the alta4 developers start into the next generation of
GeoImaging.
The change to the modern .net-technology is not the only thing that is new. With revised
control elements, the new GPS PhotoMapper NG has clearly gained more clarity and
usability. Besides, the developers tie up to the standard of ArcGIS 9.2 with the new data
format File-Based Geodatabase.
The data management and photo handling in the Table of Content have been facilitated
considerably. The photo display with MouseOver functionality and the tool control with a
context menu facilitate the handling and make it more intuitive.
New user interface
The entire graphical interface has been reworked and the control elements have been
simplified and reduced in number. The tool bar now only contains three elements. The
program is largely controlled through windows context menus, which makes handling very
simple and intuitive.
11
GPS Photomapper NG
Add photos by drag & drop
The image management in GPS PhotoMapper NG is automatic. Photos can simply be added
to a project using drag & drop. In order to do this, select the photos in any file explorer and
then drag them into the ThumbnailViewer of the GPS PhotoMapper NG. By erasing a picture
in the ThumbnailViewer, the complete dataset is removed.
Display of the photos by MouseOver function
The new MouseOver function makes working with the map even faster and more
comfortable. When moving the mouse over the location of a picture in the map, the images
are displayed dynamically.
Adopting attribute data selectively out of the EXIF header
12
GPS Photomapper NG
The EXIF header of a picture contains much information, not all of which is needed by every
user or for every project. For the sake of clarity, the GPS PhotoMapper NG makes it possible
to select the data fields to be adopted during the data import.
File-Based Geodatabase instead of Personal Geodatabase
The storage format used by the GPS PhotoMapper NG is the File-Based Geodatabase
introduces with ArcGIS 9.2. Unlike the Access-based Personal Geodatabase used up to now,
the File-Based Geodatabase is set in a file structure, which means, the File-Based
Geodatabase is a directory in which the data layers are saved as files.
The new data format offers a higher performance, does not depend on the operating system
and allows a much bigger file size than the Personal Geodatabase. Besides, it is possible to
compress and encode the files. The Personal Geodatabase continues to be supported.
Adding photos to existing File-Based Geodatabases
The EXIF header of a picture contains much information, not all of which is needed by every
user or for every project. For the sake of clarity, the GPS PhotoMapper NG makes it possible
to select the data fields to be adopted during the data import.
13
GPS Photomapper NG
4 Function description
4.1 Geodatabases
4.1.1 File-Based Geodatabase
With ArcGIS 9.2, ESRI has introduced a new geodatabase: the File-Based Geodatabase.
Unlike the Access-based Personal Geodatabase used up to now, the File-Based Geodatabase
is set in a file structure, which means, the File-Based Geodatabase is a directory in which the
data layers are saved as files.
The advantages over the Personal Geodatabase are the higher performance, the independence
of an operating system, the possibility to compress and encrypt the contents and the bigger
maximum file size.
For the future, ESRI recommends using the File-Based Geodatabase rather than the Personal
Geodatabase.
4.1.2 Personal Geodatabase
The previous version of GPS PhotoMapper used the Personal Geodatabase as storage format.
This Access-based geodatabase continues to be supported by GPS PhotoMapper NG. If you
would like to import the Feature Classes of your old databases from the previous version, read
paragraph Fehler! Verweisquelle konnte nicht gefunden werden. “Import from GPS
PhotoMapper 2.0".
4.1.3 Create new File-Based Geodatabase
In order to create a new File-Based Geodatabase in GPS PhotoMapper, select “New FileBased Geodatabase” from the “File” menu.
Enter the directory where the geodatabase is to be stored.
Then a feature class can directly be created in this database. Enter a name for it.
14
GPS Photomapper NG
4.1.4 Add new feature class to existing File-Based Geodatabase
If you would like to create an additional feature class within an existing File-Based
Geodatabase, select “Add new feature class to existing File-Based Geodatabase” in the “File”
menu. First open the desired database, and then enter a name for the feature class.
4.1.5 Open feature class of an existing geodatabase
In order to use a feature class, for instance from another GPS PhotoMapper project, load it
with “File” > “Open feature class” First select the geodatabase (File-Based Geodatabase or
Personal Geodatabase) and then the feature class.
4.1.6 Shapefile
The popular file format ESRI Shapefile, which contains only one feature class, is also offered
as a means of storing your data.
With “File” > “New Shapefile” you create a file in the Shapefile format as a layer.
4.1.7 Import from GPS PhotoMapper 2.0
In order to continue working with your old files in GPS PhotoMapper NG, you can import
your old inventory.
Just click on “Import PhotoMapper v2.0 Feature Class” in the “File” menu.
In GPS PhotoMapper 2.0 feature classes were saved in a Personal Geodatabase. So first select
the database file (*.mdb) from the file dialog and then the feature class.
15
GPS Photomapper NG
Then select the File-Based Geodatabase where you would like to save the imported feature
class and enter a name for it.
4.2 Loading the digital pictures in ArcMap
Start ArcMap 9.2. For a better visualization we recommend opening a background map
containing the location where your pictures were taken. For this purpose, open for instance
16
GPS Photomapper NG
“Search for maps” in the star window and open a map from your hard disk. If the GPS
PhotoMapper tool bar or the GPS PhotoMapper window is not displayed, load them as
described in paragraph Fehler! Verweisquelle konnte nicht gefunden werden.”Loading
PhotoMapper in ArcMap”.
Select the feature class of a geodatabase or a Shapefile with die selection menu in the menu
bar. You must have created or loaded these feature classes before, as described in paragraph
Fehler! Verweisquelle konnte nicht gefunden werden. “Geodatabases”.
The photos are loaded into the selected feature class.
17
GPS Photomapper NG
4.2.1 Loading individual pictures
In order to load individual pictures in the GPS PhotoMapper, click on “File” > “Add photos”
in the menu of your GPS PhotoMapper window. Now select the directory where your pictures
were saved. Now you can open an individual picture – or several, if you have selected more
then one with the “Ctrl” button pressed.
The photos are added to the selected feature class. A loading bar represents the current
progress.
18
GPS Photomapper NG
4.2.2 Loading entire folders
In the GPS PhotoMapper window, under “File” > “Add photos from folder” you can open all
pictures from one folder. If you would like to open the photos in the subdirectories as well,
confirm the query “Include subdirectories?” with “Yes”.
GPS PhotoMapper searches the selected folders for photos in the .jpg format. In the query that
opens now you can decide whether you want to add the photos which were found to the
Shapefile or discard the search.
19
GPS Photomapper NG
4.2.3 Add with drag & drop
In GPS PhotoMapper NG it is possible to add photos from any file explorer window with drag
& drop.
In order to do this, mark one or several photos in a file explorer and drag them into the GPS
PhotoMapper window with the mouse button pressed.
20
GPS Photomapper NG
4.2.4 Adding unreferenced pictures
Photos without any GPS information can be referenced retroactively using the GPS
PhotoMapper.
4.2.4.1 Select directory
In order to do this, click on "Add unreferenced photos" in the "File" menu. In the GPS
PhotoMapper window, the display changes to a file selection with photo preview.
Select the folder. On the bottom left, the photos in the selected directory are displayed.
If you want to display whether or not the photos listed in the overview are georeferenced,
click on the "Evaluate EXIF" selection box (for directories which have already been loaded,
click on the “Refresh” button. Now, when accessing a directory, the EXIF headers of the
photos will be searched for GPS coordinates and the result is displayed in the "GPS-EXIF"
column of the picture list.
21
GPS Photomapper NG
In order to reconfigure the photo overview of a directory, click on the "Update" symbol.
4.2.4.2 Determine location of taking
1. Mark the photo which you wand to reference
2. Click on the “Add” button.
3. Now click on the location where on photo was taken on the map. GPS PhotoMapper
saves the position data in the geodatabase. From now on, the picture is linked with this
location of taking and is listed in the Thumbnail view was a georeferenced picture.
Pictures with faulty position data can be corrected in an ArcGIS editing session by simply
moving the location of taking on the map. For further information read paragraph Fehler!
Verweisquelle konnte nicht gefunden werden. “Start editing session”.
Hint
The new position data is only changed and saved in the geodatabase. The information given in
the picture’s header does not change.
In order to end the georeferencing, click on the “Close” button. The list of photos in the
currently selected layer opens again.
22
GPS Photomapper NG
4.2.5 Settings
You can find the settings menu under “Tools” > “Options”.
Here you can determine which data fields from the EXIF header of your photos shall be saved
in the database.
23
GPS Photomapper NG
4.2.5.1 Absolute / Relative paths
You can save the path names belonging to the loaded photos as relative paths in the
geodatabase. The advantage of this is that entire projects (Shape file / geodatabase + photos)
can be relocated retroactively provided that the directory structure stays the same.
Hint
Please notice that the use of relative paths is not possible if shape file / geodatabase and the
photos are on different hard disks.
Select the desired mode in the settings under "Extended import settings”.
Hint
The changes in the settings are not retroactive, i.e. the path statements of already pasted
photos are not adapted to the new settings.
4.2.5.2 Embedding EXIF information
The EXIF information can be added selectively to the attribute table of the feature class.
The parts of EXIF information selected here are taken from the photos' headers and
transferred into the geodatabase.
Hint
If the EXIF settings are changed before importing into an existing feature class, the newly
selected categories will be added to the attribute table. Deselected categories remain in the
attribute table, the values, however, are no longer transferred from the EXIF header.
4.2.5.3 Use EXIF direction of taking
In the picture’s EXIF header, the direction in which the picture was taken can be saved. It can
be registered by the GPS device in two different ways:
1. Using a GPS receiver with an integrated digital compass:
In this case, the direction of taking is registered by the digital compass, communicated
to the camera and saved in the moment the picture is taken into the header. The
direction of taking is indicated in degrees, north corresponding to 0°, east to 90° and
so on.
24
GPS Photomapper NG
Up to now, a Bluetooth-capable device with integrated digital compass does not exist.
The alternative is a GPS device transferring data via cable connection to the camera.
2. Using an ordinary GPS receiver:
With a GPS receiver like the Fortuna Slim GPS recommended by us, the direction of
taking can be construed from the last registered position data. The photographer has to
make sure that the moving direction shortly before the taking is the same as the
direction of sight. The change in position should be at least 3 meters.
But the direction of taking can also be corrected using the software functionality of the
GPS PhotoMapper NG, see paragraph Fehler! Verweisquelle konnte nicht gefunden
werden. „Orientation“
The loading module of GPS PhotoMapper offers the possibility of adopting the saved
direction of taking by activating the checkbox “Image direction” in the “GPS” index tab. This
is the standard setting.
25
GPS Photomapper NG
4.2.6 Dislocation of photos and map projection
It may happen that the photos are not displayed in their correct position in the map. The
reason for this lies frequently in the used coordinate systems and projections. With the wrong
settings, a dislocation of about 180 meters is typical. In this chapter, we will explain the
causes and describe which settings you have to select in order to make map and photo fit each
other exactly.
4.2.6.1 Projection, datum, ellipsoid, coordinate systems
In order to display the curved earth surface (“terrestrial globe”) in a map, map projections are
used. There are numerous projections with different characteristics and for different areas of
the earth surface. The real shape of the earth is hereby approached by a so-called ellipsoid (=
mathematical description of the 3-dimensional earth) and the exact position of the ellipsoid
defined with the so-called datum.
Hint: In some cases, “datum” is also used as a collective term for ellipsoid and datum.
Coordinate systems are used to specify an exact position in a map or on the real earth surface.
For the illustration in a map, projected coordinate systems are used, i.e. a combination of
projection (including ellipsoid and datum) and a coordinate system. In Germany, GaußKrüger is often used for instance, which applies DHDN (Deutsches Hauptdreiecksnetz;
German Main Triangle Net).
4.2.6.2 Coordinate systems in ArcGIS
All layers used in a data frame are displayed in exactly one coordinate system, namely the
coordinate system of the data frame.
If the layers have different coordinate systems, ArcMap will convert them into the coordinate
system of the data frame. ArcMap converts the projected coordinate systems automatically.
If the ellipsoid/datum of a layer differs from the ellipsoid/datum of the data frame, however, a
so-called datum transformation has to be carried out. ArcMap cannot decide autonomously
which datum transformation is to be used. This is where you, the user, have to take action.
4.2.6.3 Datum transformation for position correction of the GPS photos
The GPS photos are taken by the RICOH Caplio 500SE in the coordinate system WGS 1984,
which uses WGS 1984 as ellipsoid/datum. If you use background map in the data frame with
other coordinate systems, e.g. Gauß-Krüger, there will be a spatial displacement of the
locations of taking of about 180 meters. This is caused by the Gauß-Krüger coordinate system
using DHDN as ellipsoid/datum. So you have to select in ArcMap which datum
transformation is to be used.
In order to display the GPS photos correctly in the Gauß-Krüger coordinate system as well,
proceed as follows:
26
GPS Photomapper NG
1. Click with the right mouse button on the data frame in the table of contents and select
"attributes”. Here you can make the settings for the entire data frame.
2. Click on the index tab “Coordinate system”.
3. Select the desired coordinate system.
For a display in the Gauß-Krüger system zone 2 follow this path: Predefined/Projected
Coordinate
Systems/
National
Grids/
Germany
Zone
2
27
GPS Photomapper NG
4. Click on the “Transformations…” button.
5. Select the following parameters:
Transform from: GCS_WGS84
into: GCS_Deutsches_Hauptdreiecksnetz
using: DHDN_to_WGS_1984_2
6. If you should use another system than Gauß-Krüger, modify the details in “into:” and
“using”.
7. Confirm all windows with “OK”.
Now the locations of taking of the GPS photos are displayed correctly.
28
GPS Photomapper NG
4.3 Photo display
4.3.1 Photo hotlink
Activate the "Preview/Edit" tool in the GPS PhotoMapper toolbar.
If you now move the mouse pointer over the location where a photo was taken, a preview of
the picture is displayed along with the file name.
If the locations of two or more photos are close, these photos are displayed as a slideshow in
the preview. The file name of the currently displayed picture is superimposed top left.
29
GPS Photomapper NG
4.3.2 Symbols
GPS PhotoMapper allows you to assign symbols indicating the direction of taking to the
positions of taking in the map.
Just click on “Edit” > “Add symbols with indication of direction” Now all positions of taking
of the selected layer are marked with a black arrow.
4.3.3 Orientate
With the “Orientate” function you can change the direction of view at the location of taking in
the map.
1. Activate the “Preview/Edit” tool in the GPS PhotoMapper toolbar.
2. Select the photo you would like to edit by clicking on its location of taking in the map.
Or mark the photo in the GPS PhotoMapper window. The location of taking will be
highlighted in the map with a green dot.
3. Right-click on any part of the map or select “Modify direction” from the menu.
4. Now a compass is displayed over the point where the photo was taken. Edit the
direction of sight by clicking on the compass and drag the compass needle to the
desired direction with the mouse button kept pressed. Alternatively, you can use the
control bar under the compass for the setting.
5. Confirm the direction of sight with “OK” or if you would like to discard the
modification, cancel by clicking on “Close”.
You can repeat this process anytime, thus correcting the direction of sight.
30
GPS Photomapper NG
4.4 Add photos to the map
Just like in the previous version, you can add photos to the map as annotation. Either all or
just individual pictures are added to the map content.
•
•
In order to add all photos of the selected layer as annotation to the map, select "Edit" >
"Add photos as annotations" from the menu in the GPS PhotoMapper window.
There are two ways of adding individual pictures:
o Right-click on the desired photo in the GPS PhotoMapper window. Select
“Add as annotation” from the menu.
o
The second way is marking the photo directly in the map at the location of
taking using the “Preview/Edit” tool. Right-click on the location of taking and
select “Add as annotation”.
You can also move the added photos later, or change the size. You find information on this
subject in paragraph Fehler! Verweisquelle konnte nicht gefunden werden. „Edit photos“
31
GPS Photomapper NG
4.5 View
GPS PhotoMapper offers two different views for the management of your photos: a thumbnail
and a list view.
You can choose between these two possibilities in the GPS PhotoMapper window by
selecting the menu item "View".
4.5.1 Actions
If you right-click on a photo in the GPS PhotoMapper window, a menu with the photo
management functions will open.
32
GPS Photomapper NG
The following functions are available:
•
•
•
•
•
•
Open: Opens the photo with the standard application you have defined.
Pan to: Centers the selected photo maintaining the zoom level.
Zoom to: Zooms in on the location of taking of the selected photo.
Identify: Displays information concerning the picture entry in the layer.
Add as annotation: Adds the picture to the map, see paragraph Fehler! Verweisquelle
konnte nicht gefunden werden. „Add photos to the map“.
Delete: Erases the photo from the layer.
33
GPS Photomapper NG
5 GPS PhotoMapper service functions
You can reach the GPS PhotoMapper service functions by entering the service menu. Click
on the question mark in the menu bar.
5.1 Report GPS PhotoMapper bugs
If you remark possible bugs in the software, please notify us. This way, we can correct the
error faster and offer you a bug free product. In order to do this, click on the point “Report
bug” in the service menu. You will be forwarded to the alta4 bug tracking system.
5.1.1 Sign up
To be able to use the full extent of our bug tracking system we beg you to sign up.1 If you
already have an account for our system, for instance from an earlier version or another
software from alta4, you can log on directly, see paragraph Fehler! Verweisquelle konnte
nicht gefunden werden. „Login”.
In order to sign up, please click on the link “Sign up for a new account”.
1
If you do not want to sign up, you can log in as an anonymous user. Use the user name “Anonymous” and the
password “anonymous”.
34
GPS Photomapper NG
Please enter a user name and your e-mail address and confirm by clicking on the “Signup”
button.
A validation e-mail will be sent to this e-mail address.
Please open this e-mail and click on the link there.
The profile of your newly established user account will be displayed. Please enter a password
now with which you can log in again later. Click on the button “Update User” to save your
settings.
If you want to go on to switch the language to German, or configure the GPS PhotoMapper as
your standard project, access these settings using the link “Preferences”.
35
GPS Photomapper NG
Adapt the settings and save with “Update Prefs”.
5.1.2 Login
If you are not logged in yet, enter your user name and password into the log in mask and click
on the “Login” button.
5.1.3 Report bugs
Select the link “Enter problem” in the alta4 bug tracking system menu. Now you can enter the
error you have encountered. Please specify also the GPS PhotoMapper version, the used
ArcGIS version and also the operating system. We welcome it if you would like to add files
which are helpful for describing the bug.
Save your error description with "Send report”.
By clicking on “Display problems” you get a list of all open and eliminated bugs. Here you
can check the status of your bug entry. But you will also be notified by e-mail, if there is any
news concerning a bug you reported.
5.2 Info menu
5.2.1 Change license
Click on the point “Registration” in the service menu in order to change your license type.
Load your license file (*.lic) by clicking on the button “Change license”. The license change
takes immediate effect without a program restart.
5.2.2 Update check
GPS PhotoMapper checks for updates every time it is started. If there is any, it will offer to
you downloading and installing the patch.
36
GPS Photomapper NG
6 Use ArcGIS functionality with GPS PhotoMapper
6.1 Edit photos
6.1.1 Move annotation photos
In order to position the pictures more exactly, select the "Select elements" tool from the
ArcMap symbol bar and mark the picture with it.
Then move the pictures to the desired location using the drag & drop operation.
6.1.2 Change size
You can change the size of the annotation photos later by right-clicking on the picture with
the “Select elements” tool and then selecting the option “Attributes”. Here you can specify the
size of the picture.
After selecting the picture the size can also be adjusted with the “Resize anchor” points in the
corners of the annotation.
6.2 Start editing session
Start an editing session in ArcMap, for instance to move the position of a location of taking or
to make modifications in the attribute table.
To that purpose, select “Start editing” from the Editor menu in the Editor toolbar.
37
GPS Photomapper NG
6.3 Attribute tables
Just like in every other layer, you can also view and edit the attribute table for the photos
loaded into the program. Right-click on the layer in the content window and select “Open
attribute
table”.
Here you can find e.g. your entries concerning the memo functions of the GPS camera, the
exact position data, time of taking, number of satellites and much more.
The direction of sight is contained in the field _imgdirection. 0 means the direction of sight is
north, 90 represents east. In order to make modifications, start an editing session in ArcMap.
For instance, you can completely remove the direction of sight.
6.4 Layout view
The annotation photos can also be seen with their labels in the layout view. This function is
very convenient for creating reports for your customers.
6.5 Print
If you would like to print photos, you have to add and display them first as an annotation
group.
Then you can print the photos from the data view as well as from the layout view.
38
GPS Photomapper NG
7 Versions
7.1 Commercial Version
The commercial version offers the full scope of operation.
In addition, we recommend using the PhotoMapper maintenance license. In this case, you are
entitled to all patches, updates and new product versions.
7.2 Demo version
Your demo version of the GPS PhotoMapper is valid for 30 days. This time limit starts the
day you have downloaded the GPS PhotoMapper. During this period, your demo version is
subject to the following limitations:
•
•
With the demo version, can import 20 pictures per layer at maximum.
Every 10th picture is replaced by the alta4 logo.
7.3 Campus version
The campus version offers the full scope of operation of a commercial GPS PhotoMapper
license. The use is limited to 12 months.
7.4 EDU version
The EDU version offers the full scope of operation of a commercial GPS PhotoMapper
license. However, the use is permitted for non-commercial purposes only.
39


![ArcMap [v10.0- v.10.2] User manual](http://vs1.manualzilla.com/store/data/005724954_1-1f5d2da94c774511c91b8b97dbbbcd93-150x150.png)


![Intergraph Geomedia [6.1-2013] User manual](http://vs1.manualzilla.com/store/data/005689587_1-58c82d14f3ba8ebe92b5c45af00d079c-150x150.png)


![MapInfo [v9.5 - v10.0] User manual PDF](http://vs1.manualzilla.com/store/data/005662542_1-c58f11f989f54f88b5c049879cd1b1b4-150x150.png)