1
Midi/Audio control surface
with motorized faders for production
N16549
Important Safety Instructions
1. Read this manual thoroughly before using this unit.
2. Keep this manual for future reference.
3. Take notice of and comply with all warnings included in the user's manual or indicated
on the appliance.
4. Follow all instructions included in this manual.
5. Do not expose this unit to rain or moisture. Avoid having water or other liquids spilled
on this unit.
6. When cleaning the cabinet or other parts of this appliance, use only a dry or slightly
damp soft cloth.
7. Do not block any ventilation openings or interfere with the proper ventilation of this unit.
Install in accordance with the manufacturer's instructions.
8. Do not use or store near any heat sources such as radiators, heat registers, stoves, or
other heat-producing appliances.
9. Do not interfere with the safety purpose of the polarized or grounding-type plug. A
polarized plug has two blades with one wider than the other. A grounding-type plug h
as two blades and a third grounding prong. These are designated for your safety. If the
provided plug does not fit into your outlet, consult an electrician.
10. Protect the power cord from being walked on or otherwise damaged by items placed
on or against them. Particular attention should be given to the plugs, receptacles, and
the point where the cord exits the appliance.
11. To avoid the risk of electrical shock, do not touch any exposed wiring while the unit is
in operation.
12. Only use attachments/accessories specified by the manufacturer.
13. Unplug this unit and all connected electrical equipment during lightning storms or when
left unused a long period of time.
14. Refer all servicing to qualified service personnel. Servicing is required when the
appliance has been damaged in any way or fails to operate normally.
WARNING: To reduce the risk of fire or electric shock, do not expose this unit to
rain or moisture
Contents
Introduction
What's in the package
1
1
Features
2
Top Panel Layout
3-5
Front Panel Layout
6
Rear Panel Layout
6
Getting Started
Connecting your Qcon controller
7
Qcon Connections
8
Qcon Connections(Umix Satellite 1008 installed)
9
Specifications
10
Services
11
Introduction
Thank you for purchasing the ICON Qcon Midi/Audio control surface. We sincerely trust this
product will provide years of satisfactory service, but if anything is not to your complete
satisfaction, we will endeavor to make things right.
In these pages, you'll find a detailed description of the features of the Qcon, as well as a
guided tour through its front and side panels, step-by-step instructions for its setup and
use, and full specifications.
You'll also find a warranty card enclosed - please don't forget to fill it out and mail it so that
you can receive online technical support at: www.icon-global.com. And so we can send you
updated information about these and other ICON products in the future. As with most
electronic devices, we strongly recommend you retain the original packaging. In the
unlikely event the product must be returned for servicing, the original packaging (or
reasonable equivalent) is required.
With proper care and adequate air circulation, your Qcon will operate without any trouble
for many years. We recommend that you record your serial number in the space provided
below for future reference.
Please write your serial number here for future reference:
Purchased at:
Date of purchase:
What's in the package?
QCon USB-MIDI Controller x 1pc.
Software CD / User’ Manual x 1
Quick Start Guide x 1
USB2.0 Cable x 1
AC adaptor x 1pc
1
Features
8 touch-sensitive motorized channel faders
1 touch-sensitive motorized fader for master channel
8 encoder knobs
Large backlit LCD to display channel name, control values etc. for each channel
Jog wheel shuttle for fast search and control
Illuminated buttons for each channel including Rec-enable, Solo, Mute, Select and Monitor
6 illuminated transport buttons including Play, Stop, Rec, Rewind, Fast forward and Loop
Illuminated zoom key with 4 direction keys
16 illuminated assignable MIDI function buttons
Expansion slot for ICON's “Umix” series USB audio interface card
User A & User B RCA connectors for connecting with pedals
Class-compliant with Windows XP, Vista (32-bit), Windows 7 (32-bit & 64-bit), and Mac OS
X (IntelMac)
USB 2.0 high speed connectivity
Mackie control build-in for Cubase, Nuendo, Samplitude, Logic Pro and Abelton Live.
Template labels are included for difference popular DAW such as Cubase, Nuendo,
Samplitude, Logic Pro and Abelton Live .
Robust aluminum and metal casing with Kensington lock port
2
Top Panel Layout
Note: Function operates slightly difference between DAWs. Please refer to your DAW
manual for each function and overlap the provided labeling template according to your
current using DAW. The following description is based on the functions that operate in
Steinberg Cubase.
1
5b
4
5f
7
5a
6c
5e
2
1. LCD backlit display
3 6a 6b 5c
5d
The two-line backlit LCD display shows the parameter values as you adjust them and also
provides feedback about channel selections, operating modes, and more.
2. Channel faders
The eight 100mm motorized faders are generally used for controlling the track volume of
your DAW. Depending on your DAW, you may use the “Flip” button to switch the function
of these faders to change other settings. They are all touch sensitive to allow override
automation the moment you touch a fader. Also, they are motorized; they will
automatically move to reflect the current level of the selected channels in your DAW
application. Any automation recorded in a project will be reflected by the fader positions.
Any parameter adjustments made with these faders will be displayed directly above on
the LCD display.
3. Master fader
This 100mm motorized fader operates the same as the other 8 faders. It controls your
DAW software's master channel fader. Any parameter adjustments made with this fader
will be displayed directly above on the LCD display.
4. Knobs
The eight rotary encoder knobs are generally used for controlling the track pan position,
aux send levels and EQ of your DAW. You may also preset them to adjust specific
parameters within plug-ins and virtual instruments. Any parameter adjustments made
with these encoder knobs will be displayed directly above on the LCD display.
3
Top Panel Layout(Continue)
5. Control buttons
5a) Recording channel control buttons section
REC buttons - Activate and deactivate the recording state of the associated channel.
The switch will light red when the channel is armed.
SOLO buttons - Turn On and Off the solo state of the associated channel. The switch
will light green when the channel solo state is on and other channels will be muted.
You could solo multiple channel by pressing SOLO buttons on additional channels.
MUTE buttons - Activate and deactivate the mute state of the associated channel.
The switch will light blue when the channel is muted. Mute the channel.
SEL buttons - The SEL buttons activate the associated channels in the DAW software
in order to perform a specific operation (for example, when adjusting EQ with the
ASSIGNABLE ENCODERS, the SEL switch will be used to choose the channel you want
to adjust). When a channel is selected, the associated SEL switch's red LED will light up.
MONITOR buttons - Activate and deactivate monitor function of the associated
channel at your DAW.
5b) Motorized fader control buttons section
LOCK button - Activate to lock all motorized faders.
FLIP button - Press the FLIP button to swap the parameter settings of the motorized
faders and the rotary encoder knobs.
UP button - Shift “one” channel up for all faders (except the master channel).
DOWN button - Shift “one” channel down for all faders (except the master channel).
BANK UP button - Shift “eight” channels up for all faders (except the master channel).
BANK DOWN button - Shift “eight” channels down for all faders (except the master
channel).
MOTOR button - Disable the synchronization of all motorized faders with DAW's faders.
5c) Zoom control buttons section
ZOOM button - The ZOOM button is typically used in conjunction with the ARROW
buttons described below to zoom in and out within windows in the DAW application.
UP button - The UP button is used to navigate (up movement) through the Graphical
User Interface (GUI) of the DAW application.
DOWN button - The DOWN button is used to navigate (down movement) through
the Graphical User Interface (GUI) of the DAW application.
LEFT button - The LEFT button is used to navigate (left movement) through the
Graphical User Interface (GUI) of the DAW application.
RIGHT button - The RIGHT button is used to navigate (right movement) through the
Graphical User Interface (GUI) of the DAW application.
5d) Jog wheel section
Jog wheel -The jog wheel is used for various purposes specific to the DAW
application, including shuttle and scrubbing functions.
Scrub button - The SCRUB button is typically used in conjunction with the jog wheel
to scrub selected audio tracks for editing and auditioning purposes.
5e) Transport control buttons section
PLAY button - Activate the play function of the DAW.
STOP button - Activate the stop function of the DAW.
REC button - Activate the record function of the DAW.
REWIND button - Activate the rewind function of the DAW.
FAST FORWARD button - Activate the fast forward function of the DAW.
LOOP button - Activate the loop function of the DAW.
4
Top Panel Layout(Continue)
5f) DAW Selector section
Qcon has built-in Mackie Control protocols for different DAW such as CubaseTM,
SamplitudeTM, Abelton LiveTM and Logic ProTM. By selecting the correct DAW and
Mackie control protocol, Qcon has automatically mapped the major functions and
work seamlessly with that DAW.
< / > buttons - These arrow buttons are used to scroll through the DAW list. The
name of the DAW will display on the LCD.
DAW button - Press to enter the DAW selection.
To change your Qcon DAW mode, turn off and on the power switch to enter the
DAW selection mode. Select your desired DAW from the list with the “<<” / “>>”
buttons.
Tips: DAW button could not be activated if a DAW software is running.
(Note: We will update Qcon firmware from time to time to support additional DAW apart
from the current existing list. Please check our official website to download and upgrade
your Qcon firmware).
6. Sub-control buttons
This section of control buttons varies in different DAWs. Qcon is based on
CubaseTM and NunedoTM for the settings.
(Note: For different DAWs the labeling may not be perfectly matched.)
6a) File section
SAVE button - Press the SAVE button to activate the save function of the DAW to
save your project.
READ button - Press the READ button to activate the read function of the current
audio track.
WRITE button - Press the WRITE button to activate the write function of the current
audio track.
6b) Marker section
PREV/NEXT buttons - The PREV/NEXT buttons are normally mapped to the DAW
application's left and right locate points. In most cases, pressing the PREV button
will move the transport to the left or first locate point, while pressing the NEXT
button will move the transport to the right or second locate point.
ADD button - Pressing the ADD button will store a new locate point at the
transport's current location.
6c) Effect section
EFFECT button - Press this button to launch the effect window of the DAW.
MIXER button - Press this button to launch the mixer window of the DAW.
PAN/EQ/INS/MASTER/FXSEND buttons These buttons are used to activate the corresponding effect function of the DAW.
They are typically used in conjunction with the rotary encoder knobs. Press the
button, its light will turn on, and then rotate the rotary encoder knob to adjust the
value, which will display on the LCD directly above.
↑/↓buttons - These arrow buttons are used to scroll through the individual effect
settings after a particular effect is in use.
7. User define control buttons
This section of control buttons is user-defined in Mackie control mode. You may set
their parameters according to your personal needs. PVC labeling mask is included for
noting the set parameters.
5
Front Panel Layout
1
2
1. Monitor HP 1 / HP 2 headphone outputs
Each of these output jacks accepts a standard 1/4" stereo TRS headphone connector.
2. Monitor HP 1 / HP 2 headphone level controls
Each of these potentiometers controls the output level of its associated headphone
output.
(Note: These outputs and control knobs will not be functioned unless Umix 1008 Satellite
USB2.0 audio interface add-in card installed.)
Rear Panel Layout
4 2
3
1
1. Umix1008 Satellite 10x8 (24-bit/192KHz) USB2.0 High-speed audio interface
add-in card slot
Expansion slot for connecting Umix 1008 Satellite 10x8 (24-bit/192KHz) USB2.0
High-speed audio interface add-in card.
2. User A / User B RCA connectors
These RCA connectors are able to connect to foot pedals to activate your selected
functions. To set their parameters, select USER A and USER B parameters at Mackie
control mode.
3. USB port
Connect your Qcon to your Mac/PC via this USB port.
4. 12V/5A power adaptor
Connect the provided power adaptor here.
(Note: Qcon is not able to work without the provided power adaptor connected. The USB-bus
power is not able to provide sufficient power supply for Qcon)
6
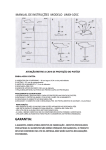
Getting Started
Connecting your Qcon controller
1. Connect the Qcon to your Mac/PC via the USB port.
Choose a USB port on your Mac/PC and insert the wide (flat) end of the USB cable.
Connect the cable's other end to the Qcon. Your Mac/PC should automatically “see” the
new hardware and notify you that it is ready to use.
USB
Esc
F1
!
~
`
Tab
CapsLook
F2
··
1
2
Q
W
A
F3
F5
F4
#
3
6
5
R
F7
F6
F8
T
7
Y
D
F
G
C
V
B
F12
*
—
Power Adaptor
Z
Alt
N
M
AltGr
Del
Lns
Home
Backspace
}
[
|
]
Pgup
|
PgDN
:
>
pause
Break
=
{
P
L
<
Prtsc
sysrq
+
-
0
O
K
F11
#)
9
I
J
F10
#)
78
U
H
F9
*
%
¥
4
E
S
X
Enter
;
Shift
Ctrl
?
Ctrl
End
Shift
$
Computer(MAC or PC)
2. Press </> to scroll through the DAW list after pressed the “DAW” button to” make the
selection.
3. Setup your DAW
Activate the ICON Qcon controller in your
DAW or MIDI software using “MIDI setup”
or “MIDI devices”.
For CubaseTM and NuendoTM, choose Mackie
Control at the “Device List”.
(Note: Every application does this a little
differently, so refer to your software user
manual for the settings.)
7
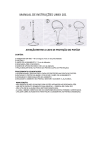
Qcon Connections
Monitors
Computer(MAC or PC)
USB Interface
F1
!
F2
··
1
2
Q
W
A
F3
F5
F4
#
3
6
5
R
F7
F6
F8
T
7
Y
D
F
G
C
V
B
F12
*
—
Alt
N
M
AltGr
Del
Lns
Home
Backspace
}
[
|
]
Pgup
|
USB 2
PgDN
:
>
pause
Break
=
{
P
L
<
Prtsc
sysrq
+
-
0
O
K
F11
#)
9
I
J
F10
#
)
78
U
H
F9
*
%
¥
4
E
S
X
Enter
;
Z
MIDI I/O
S/PDIF
Esc
~
`
Tab
CapsLook
Shift
Ctrl
USB
?
Ctrl
End
Shift
MIX
$
COMP
HP
MONITOR
USB 1
DIRECT
OUT
Microphones
Guitar
Headphones
User A
User B
8
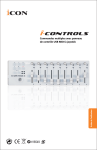
Qcon Connections(Umix 1008 Satellite installed)
Microphones
Guitar
User B
Computer(MAC or PC)
User A
Esc
F1
!
~
`
Tab
CapsLook
F2
··
1
2
Q
W
A
F3
F5
F4
#
3
6
5
R
F7
F6
F8
T
7
Y
D
F
G
C
V
B
F12
*
—
Z
Alt
N
M
AltGr
Home
|
]
Pgup
|
PgDN
Enter
?
End
Shift
Ctrl
USB
Monitors
Power Adaptor
Headphones
9
Del
Lns
Backspace
}
[
:
>
pause
Break
=
{
P
L
<
Prtsc
sysrq
+
-
0
O
K
F11
#)
9
I
J
F10
#
)
78
U
H
F9
*
%
¥
4
E
S
X
;
Shift
Ctrl
$
Specifications
Connector:
Power supply:
Current consumption:
Qcon only
Qcon with Umix Satellite audio interface
Weight:
Dimensions:
USB connector (standard type)
12V/5A DC
3A or less
5A or less
7.5kg (16.5lb)
535(L) X 482(W) X 82(H)
21.06”(L) x 18.98”(W) x 3.23”(H)
10
Service
If your Qcon needs servicing, follow these instructions.
1. Ensure the problem is not related to operation error or external
system devices.
2. Keep this owner's manual. We don't need it to repair the unit.
3. Pack the unit in its original packaging including end card and box. This
is very important. If you have lost the packaging, please make sure you
have packed the unit properly. ICON is not responsible for any damage
that occurs due to non-factory packing.
4. Ship to the ICON tech support center or the local return authorization.
U.S. OFFICE:
ICON Digital Corp.
2222 Pleasant View Road Suite #1
Middleton, WI 53562 USA
Tel: 608-829-3450
Fax: 608-829-1972
[email protected]
ASIA OFFICE:
ICON International Digital Limited
Suite Nos. 7-10,
8th Floor, Sunley Centre,
No.9 Wing Yin Street,
Kwai Chun. N.T.
Hong Kong
Tel: 852-2398-2286 Fax: 852-2789-3947
[email protected]
5. For additional update information please visit our website at:
www.icon-global.com
11
QCON PD3V100-E