1
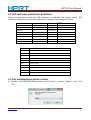
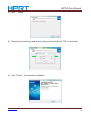
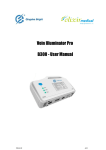
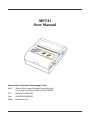
MPT-II
User Manual
Xiamen Hanin Electronic Technology Co.Ltd.
ADD:
Room 305A,Angye Building,Pioneering Park,
Torch High-tech Zone,Xiamen,China 361009
Tel.: +86-(0)592-5885993
Fax:
Web:
+86-(0)592-5885992
www.hprt.com
MPT-II User Manual
REVISION RECORDS
REV.
DATE
1.0
2013.11.28
DESCRIPTION
Drawn
Chen weihua
Checked Approved
Lin yang
Ren xiaowei
www.hprt.com
2
MPT-II User Manual
Statement
This manual content may be altered without permission, and Xiamen Hanin
Electronic Technology Co., Ltd. reserves the rights to make changes without notice in
technology, spare parts, hardware and software of the products. If more information
is needed about the products, please contact Xiamen Hanin Electronic Technology
Co., Ltd. Without any written permission from the company, any section of this
manual is prohibited to be copied or transferred in any form.
Copyright
This manual is printed in 2013, the copyright belongs to Xiamen Hanin Electronic
Technology Co. Ltd.
Printed in China
1.0 Version
Warnings :
This must be complied with in order to avoid any damage to the human body
and to the equipment.
This is showing the important information and tips for the printer operating.
www.hprt.com
3
MPT-II User Manual
Contents
Statement ···················································································································· 3
Precautions ·················································································································· 5
1.Safety Precautions ····························································································· 5
2. Operation Precautions······················································································ 5
3. Storage Precautions·························································································· 6
4. Battery Safety Precautions ··············································································· 6
Chapter 1 Brief Introduction ························································································ 8
1.1Appearance ····································································································· 8
1.2 Accessories ····································································································· 9
Chapter 2 Specifications····························································································· 10
2.1 Printing specifications ·················································································· 10
2.2 Physical specifications ·················································································· 10
2.3 Environment specifications ·········································································· 10
2.4 Other specifications······················································································ 10
Chapter 3 Operation Methods···················································································· 12
3.1 Preparation before using ·············································································· 12
3.1.1 Li-ion battery installation ··································································· 12
3.1.2 Paper loading····················································································· 12
3.2 Basic Function ······························································································ 13
3.2.1 Printer on ·························································································· 13
3.2.2 Printer off ·························································································· 13
3.2.3 Self-test ····························································································· 13
3.2.4 Paper loading····················································································· 13
3.2.5 Battery Charging ················································································ 13
3.3 Interface and printing ··················································································· 14
3.3.1 Serial Interfaces ················································································· 14
3.3.2 Infrared ray (IR) & IrDA interface ······················································· 14
3.3.3 Bluetooth··························································································· 14
3.4 LED indicator and Buzzer definition ······························································ 15
3.5 The installation of printer driver ··································································· 15
Chapter 4 Other information······················································································ 17
4.1 Printer technical manual ·············································································· 17
4.2 Preprinted black mark specification ····························································· 17
www.hprt.com
4
MPT-II User Manual
Precautions
1.Safety Precautions
1) Be sure to use the specified battery and power source provided by our company.
2) Connection to an improper power source may cause fire, explosion or damage to
the printer.
3) Don’t put the battery into the fire or water, don’t disassemble or modify the
battery, don’t be short circuit, otherwise may result in injury or fire even
explosion.
4) If the printer would not be used for a long time, be sure to take off the battery,
otherwise the battery may leak liquid which is corrosive, if improper operation
causes battery leak, and the liquid is spattered on the skin or clothes, please wash
it with water, if spattered in the eyes, please rinse them with water thoroughly
and see a doctor.
5) Please do not open the paper case cover when it is printing or just when printing
is over, do not touch the print head with hand or body, overheat may cause scald.
2. Operation Precautions
Be sure not to print continuously over 1 meter, otherwise may cause damage to the
print head.
1) Water or other liquid should not spill into the printer, also the printer should not
be appeared in the rain, or else may cause printer damage.
2) Please do not open the paper case cover when it is printing, otherwise the printer
may work improperly.
3) If print with serial interface, should not unplug the interface cable in the course of
printing, or else some printing data may be lost.
4) When print in Ir or IrDA mode, be sure the Ir window of the host equipment face
rightly the Ir window of the printer, the distance should be within the range of
50cm, and the angle should be within the range of 30o.
5) When print with Bluetooth interface, the communication distance should be
within 10 meters, otherwise the printer doesn’t print or prints rubbish codes.
6) Too high 50℃ or too low -10℃ ~temperature and too high (85 )or too
low (20 )relative humidity both effect the print quality.
7) The print paper in poor quality or stored for too long time also may reduce the
print quality even damage the printer.
8) In the black mark detecting mode, the printer requires that the preprinted black
mark is accordant with the black mark specifications (details please refer to 4.2),
otherwise the black mark can not be detected correctly.
www.hprt.com
5
MPT-II User Manual
9) Be sure to use up the power of the battery before charge it, as it can ensure the
using life of the battery.
3. Storage Precautions
1) The printer should be placed in such an environment that the temperature is
between-20℃ and 70℃, and the relative humidity is between 5% and 95%.
2) If the printer will be stored for a long time, please be sure to take out the battery,
otherwise may damage the battery and printer.
3) Normal thermal paper can’t be kept too long, if you need to keep the receipt for a
long period, please choose long term effective thermal paper.
4) The print paper should be keep away from high temperature environment and
point-blank sunshine.
4. Battery Safety Precautions
1) Be sure to carefully read the user manual before using the product.
2) Ignore the following instructions may cause battery overheating, fire, explosion,
damage and / or performance, and reduced product life.
3) Do not allow water, sea water from entering or leaking into the battery inside. If
the batteries internal safety device burn, when charging it, it may produce any
abnormal current and / or voltage, and cause any abnormal chemical reaction,
then may cause the battery overheating, fire and / or explosion.
4) Do not use or place the battery nearby the stove or other high temperature
places. Excessive heat maybe damage the resin shell and / or the insulation
materials, thereby cause short-circuit inside the battery, then the battery
may be caused overheating, burning and / or explosion.
5) When charging, use a specified charger. Other conditions (high temperature, high
pressure / high current, using the modified battery charger, etc.) excluded here
may result in over-charging the battery and abnormal current and / or voltage,
cause abnormal chemical reaction, and may cause the battery overheat, light and
/ or explosion.
6) Battery clearly marks with positive and negative. When connect the battery with
the charger and / or printer, be sure to verify the correct battery orientation.
Reverse insertion will cause the reverse charging and may cause abnormal
chemical reaction, and then may cause the battery overheat, ignite, and / or
explosion.
7) Do not make the battery contact with the power outlet and / or car cigarette
lighter socket. This may cause high pressure and excessive current, and lead to
the battery overheat, burning and / or explosion.
8) Do not heat the battery or put the battery into fire. This may melt insulation
www.hprt.com
6
MPT-II User Manual
material and/ or damage safety devices or safety equipment, then ignite
electrolytic solution, and cause the battery overheat, burning and / or explosion.
9) Do not use the battery with contrary
(+) and (-) Location. In the charging
process, this will cause the reverse charging and may cause abnormal chemical
reaction. During use, may appear unpredictable current exception, and cause the
battery overheat, ignite, and / or explosion.
10) Do not make the battery (+) and (-) contact with any metal. Also, do not carry
along or store batteries with metal objects, such as necklaces, hair clips and so on.
Battery internal short circuit may cause excessive current, and lead to the battery
overheat, ignite, and / or explosion and the adjacent metal objects (necklaces,
hairpins, etc.) may be overheating.
11) Do not throw or heavy attack the battery. If internal safety device of the batteries
burn, the battery charging may cause any abnormal current and / or voltage, and
abnormal chemical reaction, and lead to the battery overheat, ignite, and / or
explosion.
www.hprt.com
7
MPT-II User Manual
Chapter 1 Brief Introduction
1.1Appearance
1)
2)
3)
4)
5)
6)
7)
8)
9)
Feed button
Status indicator
RS232 serial socket
Infrared ray (IR) interface
Top cover
Power on/off
Charging indicator
Power input
Li-ion battery cover
Notice:
Two LED indicators are under button with different definition by red and blue two
color.
www.hprt.com
8
MPT-II User Manual
1.2 Accessories
Standard accessories
Li-ion battery
Power Adapter
Paper
USB cable
Optional accessories
Leather case
Serial interface cable
www.hprt.com
9
MPT-II User Manual
Chapter 2 Specifications
2.1 Printing specifications
1)
2)
3)
4)
5)
6)
7)
8)
Printing method: Line thermal
Paper width: 56mm
Paper thickness: 60 ~80μm
Valid printing width: 48 mm
Resolution: 8 dot/mm (230 dpi)
Dot /line: 384 dots
Printing speed: 50-80 mm/s
Printing content:GB18030 character set, ASCII characters, user defined
characters, bar codes CODE39, EAN13, EAN8, CODABAR, CODE93, ITF, bitmaps.
2.2 Physical specifications
1)
2)
3)
4)
Outer dimension: 92.5 x 75 x38mm
Weight: 205g(excluding paper roll)
Paper Diameter: 30mm
Interface: Original IR( RAW_IR), VIR, IrDA ( IrCOMM), RS232 serial, Bluetooth
Interfaces varied with different models.
2.3 Environment specifications
1)
2)
3)
4)
Operation temperature: -10
~50 ~
Operation humidity: 20% ~85%~
Storage temperature : -20 ~ ~70 ~
Storage humidity: 5% ~95%~
2.4 Other specifications
1) Paper loading method: drop-in easy loading
2) Black mark detection: available (details please see 4.2 preprinting black mark
specification).
3) Paper out detection: when paper is out, the Mode indicator blinks, and the buzzer
rings twice.
4) Print commands: ESC/POS compatible command set.
5) Power supply: 1500mAh rechargeable polymer lithium battery.
6) Low power alarm: when the battery is low, the power indicator blinks and the
buzzer rings 2 times; and if the user doesn’t charge, it will intervaly beep to inform
the user to charge.
www.hprt.com
10
MPT-II User Manual
7) Battery full charge time: 2 to 4 hours.
8) Battery duration: under 12.5% print density, at least 100 to 200 meters, under
25% print density, at least 80 to 100 meters, the standby time is over 15 days.
www.hprt.com
11
MPT-II User Manual
Chapter 3 Operation Methods
3.1 Preparation before using
3.1.1 Li-ion battery installation
1) Refer to the picture, put the battery in the battery slot, pls pay attention to the
correct positive and negative.
2) Close the battery case.
3.1.2 Paper loading
Operation methods:
1) Use two fingers to press the place showed in the picture and open the upper
cover.
2) Put the paper into the paper case, pay attention to the direction of the paper. If
loaded reversely, it won’t print.
3) Pull paper out of paper case.
4) Make sure paper in the center then close upper cover.
www.hprt.com
12
MPT-II User Manual
3.2 Basic Function
3.2.1 Printer on
The printer is powered on by pressing the power button; the power indicator is on
with red color whenever the printer is on.
Notice: when the batter is almost exhausted, the power indicator blinks with blue
color, in this case, you must charge the battery by using the adaptor. The method of
charging the battery, please refer to 3.2.5.
3.2.2 Printer off
The printer is off after hold down the power button for 2 seconds. All the indicators
are off whenever the printer is off.
3.2.3 Self-test
The self-test checks the printer’s current settings, status and whether the printer has
any problems. Hold down the FEED button while press Power button about 3 seconds,
the self-test begins.
The printer is ready to receive data as soon as it completes the self-test.
3.2.4 Paper loading
When standby, push FEED button, start feeding, will stop when feeding 50mm paper.
User can change the feeding length according to software MPTTools in computer.
Feeding length is 0mm, must push FEED button for continuous feeding, stop feeding
once loosen button.
If there is the black mark (the detecting mark) recognized by printer on roll paper,
printer will stop printing when meeting black mark. If feeding paper length is 0mm,
feeding will not be effected by black marks.
3.2.5 Battery Charging
When li-ion battery runs out of power, blue LED indicator flash slowly and buzzer will
give out warning. It will power off automatically when continues printing. If you want
to go on, please charge it.
Charging method:
Plug in socket ( 220V, 50Hz) with power adapter.
Power-off charging LED light will always indicate blue color and goes off when fully
charged.
Power-on charging
LED light will keep blinking in blue color, and goes off when
fully changed.
Printer could be in use when charging.
www.hprt.com
13
MPT-II User Manual
NOTE:
Please use the manufacturers supplied battery and power adapter , otherwise cause
to printer damage and battery leakage, light and/or explosion.
3.3 Interface and printing
3.3.1 Serial Interfaces
This model of printer uses DB-9 serial interface cable (one end is D model standard
serial interface socket, connected to host computer, the other end is PS/2 socket,
connected to printer)
3.3.2 Infrared ray (IR) & IrDA interface
MPT-II can be connected to your main device through IR, RAW-IR and IrDA can not be
available at the same time. Reset the printer if it is not the model you want.
When printing through RAW-IR and IrDA, make infrared ray of main device right
towards to infrared ray window of printer, distance should be less than 50mm (varies
with main device), angel should be less than 30°.~
3.3.3 Bluetooth
PDA with Bluetooth interface, laptop and other information terminals can drive the
mobile thermal printer MPT-II. Instructions as follows:
1. Power on printer
2. Main device search for outer Bluetooth devices.
3. If there are some outer Bluetooth devices, choose MPT-II.
4. Enter password”0000”
5. Finish matching
Detailed pairing methods, please refer to main devices Bluetooth Names. In pairing,
mobile thermal printer MPT-II must be turn on.
Note: when pairing, do not set many printers on, otherwise it can‘t figure out which
one succeeds in pairing.
Having finished pairing, other main devices (main devices) still can pair with mobile
thermal printer. The max main devices of each printer are 8. If more than 8, the
earliest ones will be deleted from printer paring list automatically. If you these
earliest main devices want to drive printer to print and need pairing again.
After pairing, main devices with virtual Bluetooth interface
smart phone , pocket
PC, palm, notebook
can drive mobile thermal printer MPT-II to printer through
such virtual
Bluetooth interface. If there is no virtual Bluetooth interface on main devices, please
turn to these suppliers for more information
www.hprt.com
14
MPT-II User Manual
3.4 LED indicator and Buzzer definition
There are one buzzer and two LED indicators to indicate the printer status. LED
indicators indicate current status and buzzer indicates the changes of status.
LED indicator (red
Status
Remarks
Flash quickly
Dark
Charging
Power-on charging
Continuously bright
Dark
Charging
Power-off charging
Flash slowly
Dark
Out of power
Continuously bright
Dark
Charging end
Power-on charging end
Dark
Dark
Charging end
Power-off charging end
Dark
Bright continuously
Working
Flash slowly
Flash slowly
Paper end
Dark
Flash slowly
Standby
LED indicator
blue
Buzzer
Status
Once
Power on at normal conditions
Twice
Power off at normal conditions
Once
Connect USB
Twice
USB disconnected
Once
Press FEED KEY after power on
Once
Connect charger
Three times
Power-on charging end
Three times
Enter to the parameter setting mode
Three times
Download the Font library
Twice
Out of power (the printer will shut down automatically after buzzing )
3.5 The installation of printer driver
1) Double click“HPRTMPTPrinterDriver-v-1.0.1.2.exe”
“OK”.
choose “English” and click
www.hprt.com
15
MPT-II User Manual
2) Click
Install
.
3) Choose the printer port and printer type you need and click “OK” to next step.
4) Click “Finish” . A successful installation
www.hprt.com
16
MPT-II User Manual
Chapter 4 Other information
4.1 Printer technical manual
Pls refer to MPT-II technical manual.
4.2 Preprinted black mark specification
If user wants to locate receipt by detecting preprinted black mark, shall accord to the
following specification for the black mark. Otherwise it may cause printer can’t
recognize the black mark.
1) Printing position: black mark shall preprint at the left side of receipt.
2) Width rang ≥7mm
3) Height 4mm≤height≤6mm
4) Reflection rate to IR <10% reflection rate to the black mark on paper >65%
5) Hps Hps indicates the distance from down edge of detecting mark from
beginning line.(0mm≤Hps≤1mm)
www.hprt.com
17