1
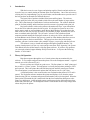
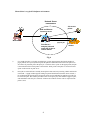
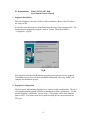
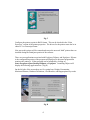
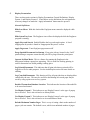
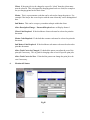
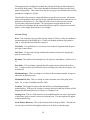
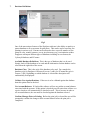
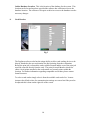
POP QUEST
User’s Manual
V 2.4.0
Table Of Contents
Pg.
1.
Introduction
3
2.
Theory Of Operation
3
3.
PopQuest Installation
5
4.
PopQuest Configuration
5
5.
Display Presentation
7
6.
Monitored Printers
11
7.
Database Definitions
13
8.
Card Readers
14
9.
Inappropriate Keywords
15
2
1.
Introduction
With the increase in costs of paper and printing supplies, libraries and universities are
in need of ways to control printing to eliminate print waste and abuse. One of the easiest ways
of doing this is by implementing a pay for print solution, and Iteam Resources provides one of
the best products on the market to facilitate this need.
The Quest Suite of products includes Print Quest and Pop Quest. The software
captures print jobs before they are printed to inform users the total number of pages and the
cost. This is done through a combination of software and hardware. The software holds the
print job for final printing, and the hardware provides a means of payment for the print job.
Pop Quest software resides on the patron workstation and “Pops” up an information
box on the screen when the patron decides to print. It is designed to operate in one of two
modes, money mode or account balance mode. Money Mode displays a box that shows the
name of the job, the cost per page, the total job cost, number of pages, and allows the user to
enter a username and/or password. The job can be “released” from a dedicated kiosk
computer terminal running the Print Quest software by using coin, bill or cash/debit card.
Account Balance mode connects Pop Quest to a patron or other database that allows users to
charge their prints to their account balance. This popup box shows the job description,
username, password, various matter codes, number of pages, cost per page and total job cost.
This software is easy to install and configure through its graphical interface. By
creating virtual printers it is also very secure and prevents users from “bypassing” the system.
This manual describes all the features of the Pop Quest software. If you have any questions
you can reach technical support Monday-Friday from 8:00 am – 5:-00 pm at the following
number: 678-261-4002
2.
Theory Of Operation
Print Quest operates through the use of virtual printers that are monitored by the
software. To see sample configured networks please refer to the PrintQuest manual. A typical
network-server lab is shown (Fig A).)
First two printers are created on a print server. The first printer is a “hold” printer and
the second is a “release” printer. The hold printer is a locally shared printer pointing to LPT1
and is paused. This is the printer that will hold the print jobs until the patron pays for them.
The second printer is a normal network printer that will print as soon as a job is sent.
A local hold printer is also created on the user workstation that points to LPT1 and is
paused. The PopQuest software monitors this printer and displays a box when the patron
prints showing job cost, username and password information, and a job description. When the
patron prints a document the job is transferred from the local workstation hold queue to the
print server hold queue. At this point the patron would proceed to the dedicated print release
station and select their job. The PrintQuest software would deduct the necessary charges then
release the job to the printer.
3
Shown below is a typical PrintQuest environment.
Network Server
Environment
Job sent to
printer
Hold and Release
Queue on server
Workstation
User selects and
pays for job
Print Server –
analyzes jobs and
sends list of jobs to
release station
Print Release
Station
Fig A
i)
User sends print jobs to a locally created printer; a popup menu appears showing the number of
pages printed, cost of print job and requests the patron’s identification/user name. The patron can
also choose to password protect the print job. User then selects “print” on the popup menu, and job
is then transferred from local printer to the network “hold” printer. Print jobs are stored on a hold
queue on the network or print server.
ii)
Print jobs are released from a centrally located print release station by inserting a debit card into the
card reader. A popup window appears asking for patron identification/username. Once entered, a
list of that particular patron's print jobs appears on the screen. Individual or multiple print jobs can
be selected to print. The software provides a total cost for print jobs, total number of pages to print,
and card balance after the job is released. Software also indicates if more value is required on the
patron’s card.
4
PC Requirements:
Win9x, NTWS, ME, 2000
Local Paused Printer (Virtual)
3. PopQuest Installation
Insert the PopQuest CD in the CD drive of the workstation. Browse the CD and run
the setup.exe file.
It will ask you to choose the location (destination directory) for the program files. The
location may be changed by using the “browse” button. The default folder is
“c:\PopQuest”. (Fig B)
Fig B
Selecting Next will show the destination program group that will store the program.
Continuing to press Next will show installation information. Choosing “finish” will
complete the installation process.
4. Pop Quest Configuration
The first step to implementing PopQuest is to create a locally paused printer. This is a
virtual printer that the patrons will print to and that the software will monitor. Use the
normal Windows “Add Printer” process. (Fig C) The printer will be local with and
point to LPT1. The printer must also be paused so that jobs are not spooled out the
LPT port.
5
Fig C
Configure the printer to print in RAW format. This can be checked in the “Print
Processor” section of the printer properties. The drivers for the printer must also be in
either PCL or Postscript format.
Jobs sent to this printer will be counted and sent to the network “hold” printer that was
installed during the PrintQuest portion of the software
There are two applications associated with PopQuest, DQuest, and PopQuest. DQuest
is the configuration portion of the program and PopQuest is the actual program that
monitors the printer(s). Either program can be launched by clicking on
Start>Programs>Quest Desktop>DQuest or PopQuest. Launching DQuest will
display the following application box. (Fig D)
On the left side of the screen there are five option bars; Display Presentation,
Monitored Printers, Database Definitions, Card Readers, and Inappropriate Keywords.
Fig D
6
5.
Display Presentation
There are three main sections in Display Presentation: General Definitions, Display
Format 1, and Display Format 2. Listed below are the definitions for each parameter.
After any changes are made the “Apply information” button must be pressed.
General Definitions
Hide Icon Menu. With this checked the PopQuest menu cannot be displayed while
running.
Hide Sytem Tray Icon. The PopQuest icon will not be displayed while the PopQuest
program is running.
Apply Keyword Search. Enable/Disables the keyword search option. A list of
inappropriate keywords is found in “Inappropriate Keyword” section.
Apply Pagecount. Turns PopQuest pagecount on/off.
Purge Spooled Documents On Startup. If any print jobs are located in the “hold”
printer during a computer restart then the job will be purged form the print Queue.
Operate In Silent Mode. This is a feature for running the PopQuest in the
background without a popup box appearing. This is useful for tracking printing in
order to determine how much printing is taking place.
Log Printed Documents. This indicates that all print jobs that are printed will be
logged in a file for audit purposes. See the Audit Report section for more details on
auditing.
Log Cancelled Documents. This function will log all print jobs that are displayed but
cancelled by the user. This may be useful for determining how much paper may be
saved by using a print cost recovery system.
Detailed Transaction Database Location. This indicates the location of the audit file
to be stored and named.
Use Display Format 1. This indicates to use Display Format 1 as the type of popup
box to be used. This is also referred to as Money Mode.
Use Display Format 2. This indicates to use Display Format 2 as the type of popup
box to be used. This is also referred to as Account Balance Mode.
Default Maximum Number Pages. This is a way of setting a limit on the number of
pages a job can contain. The default is zero, which is an unlimited number of pages.
7
Default Maximum Printed File Size. This is limit on the size of the file. (in MB)
Maximum Printers to Monitor. This is a way of setting a limit on the number of
printers the Popup can monitor for each workstation.
Inactivity Timeout Value In Minutes. The amount of time to wait before canceling
print job if no activity is performed.
System Message File. This is the location for the system messages to be found.
Display Format 1
Display Format 1 (Fig. E) is the general look of the popup that will be displayed if this
format is selected. It is also referred to as “Money Mode”
Fig E
To change any of the description or client fields, click on the individual field and a box
will appear and allow changes to the field. (See Fig F)
8
Fig F
Description. This is the job description of the document being printed. For example
if MS-Word it would read as follows: Microsoft Word – Document1.
Client ID. This is the owner name of the document. It will default to either the login
name or the computer name. This ID can be changed by the user to “personalize” the
job to make it unique to them. This is recommended so the job is easy to find when
they are attempting to print it out.
Password. This is the field for the patron to enter a password to protect their print job.
This is useful for institutions that are concerned with privacy. This can be turned
off/on to best suit the institutions needs. This can also be configured to force the
patron to enter a password if desired.
Policy Button. If the institution would like to display a policy concerning printing
this can be included within this button.
Cancel Print. This is the look of the button for canceling a print job. Clicking on this
button will show a box that will let you configure the font, color, justification and
wording of this function.
Print Document. This is the look of the button for printing a job. Again clicking on
this button will allow changes to the display of this button.
Pages. This displays the number of pages in the document to be printed.
Cost Per Page. Displays the cost per individual page of the document.
Total Cost. Displays the total cost of the print job.
Allow Job Description Change. Allow the user to have the ability to change the job
description.
Do Not Allow User Id Change. A check in this box will not allow patrons to change
the description of the user id.
9
User Id Required. If checked the patron must enter their own unique user id to print
the job.
Clear User Id Each Time. This will clear any user id in this field. The user should
then enter their own unique name.
Remember Last User Id. This will input the last know user id in the User Id field.
Use Computer Name As User Id. This will automatically insert the computer name
into the User Id field.
Password Required. If checked the patron must enter information into the password
field in order to print the job.
“Apply Information” must be selected in order for any changes to take place.
Display Format 2
Display Format 2 is the general look of the popup that will be displayed if this format
is selected. It is also referred to as “Account Balance mode”.
Fig G
As above to make any changes to any of the fields in Fig G, click desired field and
make changes to the box that appears.
Description, Client Id, and Password is the same as in Display Format 1
10
Client. If the print job it to be charged to a specific “client” then they client name
must be selected. This is designed for charging prints back to a client, for example a
lawyer charging prints back to their client.
Matter. This is a preset matter code that can be selected to charge the print to. For
example if the lawyer has several topics with the same client they can be distinguished
here.
Sub Matter. This can be set up as yet another subtopic within the client.
Allow Description Change – Password Required same as Display format 1.
Client Code Required. If checked then a client code must be selected to print the
document.
Matter Code Required. If checked then a matter code must be selected to print the
document.
Sub Matter Code Required. If checked then a sub matter code must be selected to
print the document.
Allow Total Cost to be Changed. If checked the patron can adjust the cost of the
print job if necessary. This is good for charging extra or less for specific print jobs.
Allow Total Cost to be Zero. If checked the patron can change the print job to be
zero if necessary.
6.
Monitored Printers
Fig H
11
The popup must be configured to transfer the print job from the local hold printer to
the network hold printer. This is done through the Monitored Printers section of the
popup configuration. This is also where the price per page, auto deletion time and free
printing are configured. (Fig H)
The left side of the screen is a normal Windows network browse screen. All printers
on the local machine will be listed at the top, and shared printers from other servers or
domains are listed below it. The right side of the screen is split into two sections,
Local Printers and Network Printer. The local printer being monitored must be
selected as a local printer and the network hold printer must be selected as a network
printer. Select Apply Information to save changes.
General Pricing
Price. This is the price per page that is being charged. If there is only one method of
payment then this is the default price. If there are multiple methods of payment, ie
cash vs card, then this would be the card price.
Coin Price. If a coin/bill device is to be used as a method of payment then the price
per page is entered here.
Unit Price. If a unit card is being used then the number of units to be charged per
print is to entered here.
Decimals. The number of decimal places to be shown is entered here. (Choice of 2 or
3)
Free Print. If free printing is desired then this option can be switched from No to
Yes. A card or money may still be necessary to display print jobs, but no money will
be deducted.
Maximum Pages. This is a setting to set a limit to the maximum number of pages to
allowed to be printed per job.
Maximum File Size. This is a setting to set the maximum size of the print job in
bytes. Ex, a value of 1000000 would be 1Mb.
Location. The PopQuest software has the ability to track printing through a
transaction log. If the specific location is entered in this area then the location will be
displayed in this transaction log. Ie Library or Computer Lab.
Costing Area. This is a field where the system administrators can enter a description
of the printer queue to make it easier to track print jobs. This description will appear
in the transaction log.
Local Printer Directory. This is the location of the local spool folder. This must be
set correctly in order for the PopQuest software to be able to count the pages.
12
7.
Database Definitions
Fig I
One of the most unique features of the PopQuest software is the ability to attach to a
patron database to set up accounts for print users. This can be used to set allow free
printing in various ways. Patrons can be allowed to have a specific number of free
prints in a day, month, semester, year or just about any way your institution wishes.
PopQuest can import different types of databases including its own format, the
CybraryN database, and PCounter.
Available Database Definitions. This is the type of database that is to be used.
Simply check off the database to be used and the information for that database can be
selected on the right side of the screen.
Database Class. This is the style of the database to be used. For example the
database style for PopQuest is Microsoft Access (*.mdb), for PCounter the style is
Foxpro (*.dbf) Depending on which database is selected the description will
automatically be displayed.
Validate User Against Database. If the user is to be validated against the database
then this option must be checked.
Use Account Balances. If checked the software will use any online account balances
associated with the account. If this option is checked you will notice that validate user
against database will automatically be checked as well. This is because in order to
use account balances, the user must be checked against the database selected.
Confirm Changes Prior to Printing. Before the print job is released the user will be
prompted to confirm the change to their account balance before the print job is
completed.
13
Online Database Location. This is the location of the database for the system. This
location can be located anywhere provided the software has sufficient access to the
database location. The software will require read/write access to the database to make
necessary changes.
8.
Card Readers
Fig J
The PopQuest software also has the unique ability to allow card reading devices to be
directly attached to the user workstation for direct printing from the workstation.
Before the print job is released the card would be inserted and the cost of the print job
would be removed directly from the card. The print job would then be released to
either a local printer attached to the workstation or a network printer within the
location. For further information regarding compatible card readers please contact
Iteam Resources.
To select a card reader simply select it from the available card reader list. In most
instances the default values for communication settings are correct but if they need to
be adjusted this is done on the right side of the screen.
14
9.
Inappropriate Keywords
Fig K
In some instances it may be necessary to configure the PopQuest software to reject
certain keywords deemed inappropriate for their institutions. A list of these words can
be specified in the inappropriate keywords list as seen in Fig K. Simply enter the
words deemed inappropriate in the list and save apply the information. These words
will be rejected if they are included in either the print job description or the user name
in any way, even if they are only part of another word. For example if someone tried
to submit a job called “darnit”, it would be rejected since the word darn is an
inappropriate keyword.
15