1
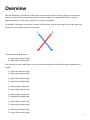
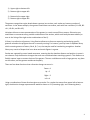
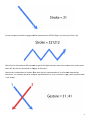
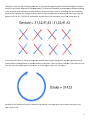
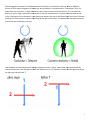
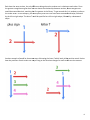
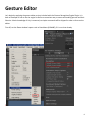
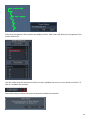
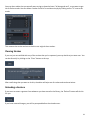
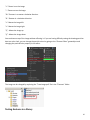
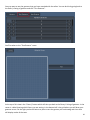
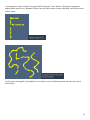
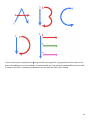
Drawing Engine
v 1.0
echo17.com
1
Overview
Gesture recognition is the ability to take input from some object (like a mouse or finger) and analyze the
pattern, trying to match it to a known library of strokes. Strokes are a single fluid movement, such as a
downward swipe or circular swirl. A gesture is a collection of strokes.
For example, the gesture of the letter X consists of two strokes, one from the upper-left to lower-right, and
the other from the upper-right to the lower left:
The strokes would be shown as:
1) Upper-left to bottom-right
2) Upper-right to bottom-left
This is actually an over-simplification, since the x can be formed from the following eight combinations of
strokes:
1) Upper-left to bottom-right
2) Upper-right to bottom-left
1) Upper-left to bottom-right
2) Bottom-left to upper-right
1) Bottom-right to upper-left
2) Upper-right to bottom-left
1) Bottom-right to upper-left
2) Bottom-left to upper-right
1) Upper-right to bottom-left
2) Upper-left to bottom-right
1) Bottom-left to upper-right
2) Upper-left to bottom-right
2
1) Upper-right to bottom-left
2) Bottom-right to upper-left
1) Bottom-left to upper-right
2) Bottom-right to upper-left
The gesture recognition engine breaks down a gesture into strokes, each stroke can have any number of
variations. In the above example, the x gesture would have two strokes, each with four variations (UL->BR, BR>UL, UR->BL, and BL->UR).
Variations allow us to store permutations of the gesture in a much more efficient manner. Otherwise you
would have to enumerate every possible combination of the strokes, which could easily become tedious (as
seen in the listing of the eight stroke combinations of the X).
A library is a collection of gestures. Using libraries allows us to focus on capturing and analyzing specific
gestures related to the program the user is currently running. For instance, you may have an alphabet library
which contains gestures of letters, like A, B, C, etc, that may be used for handwriting recognition. Another
library may consist of shapes that let us draw and match figures in a game.
Strokes are captured by vector-based movement, meaning that the absolute distance and position in space is
not relevant. Only the direction changes that occur are considered when matching a gesture. This allows us to
flexibly capture input no matter the size of the gesture. The user could draw a small or large gesture, any place
on the screen, and the gesture would match equally.
There are four base directions that a direction change can occur in:
Down = 1
Up = 2
Right = 3
Left = 4
Using a combination of these directions gives us a stroke. For a stroke that moves from upper-left to bottomright, the direction change representation would be shown as 31 (3 meaning right, and 1 meaning down):
3
mplex stroke like a zigzag could be represented as 321212 (Right, Up, Down, Up, Down, Up):
A more complex
Notice that in this stroke we did not need to specify the Right direction more than once since the stroke never
went Left. We are only interested in changes of dir
directions.
Gestures are combinations of strokes. Data
Data-wise,
wise, they are represented as a list of strokes separated by
semicolons. For example, the letter X may be represented as 31 ; 41 (First Stroke = Right, Down; Second Stroke
= Left, Down):
4
Since this is only
nly one way of drawing the letter X, this particular gesture would only be matched if you drew it
exactly in the manner depicted in the image above. To allow more flexibility and encompass different drawing
styles, we have what is known as stroke variation
variations.
s. Stroke variations are a list of strokes that are acceptable,
separated by commas. For example you may want to show all eight ways of drawing the letter X by using the
gesture 31,32,41,42 ; 31,32,41,42 (each stroke has the same list of variations in the case of the letter X):
In the case of the letter X, there are only eight possible way
wayss to draw the gesture, but some gestures can be
more complex, yielding almost an infinite number of variations. Take a circle for example. If you start the circle
from the top, you could represent the stroke as 31423 (Right, Down, Left, Up, Right):
But what if you wanted to start the circle from the bottom? You might have the stroke as 42314 (Left, Up,
Right, Down, Left):
5
You can start to see that
hat this might bloom into too many variations to handle, especially if you take into
consideration that that gesture might be drawn counter
counter-clockwise
clockwise as well. For cases such as these, it might be
prudent to enforce a starting point and draw direction. You might tell your users that they have to start at a
certain point and draw clockwise for a circle, for instance. In this example, if you were to use these
restrictions, you may have a gesture as something like 31423,321423,314231 (only one stroke, three
variations,
iations, all starting at the top and moving clockwise). Of course, this is entirely up to you. You may wish to
capture as many variations of the circle as possible and let the user choose where to start the shape and which
direction to draw.
If you choose to restrict your gesture strokes to particular starting points and directions, you may want to
provide a guide for your users so that they are not frustrated that their method of drawing is not being
recognized. For instance, if you enforced the X gesture as 31 ; 41 (only allowing the first stroke from upper-left
upper
to bottom-right
right and the second stroke from upper
upper-right to bottom-left),
left), then any other method of drawing
the X would not match. Some users may choose to draw the X differently and would never get a match. In this
case it would be wise to let them know that X will only be matched with the two strokes you’ve specified. A
graphical guide may help in this scenario.
6
Restricting gesture strokes to a limited number of variations has its benefits. You may wish for different
actions to occur when the gesture is drawn one way and when it is drawn another. For example, if the X is
drawn from top to bottom, it might indicate the user wants to enter the actual letter X. If it is drawn from
bottom to top, it might
ht indicate the user wishes to perform a delete action. Another example could be the
circle. Drawing the circle clockwise in your game may teleport the user to a different part of the level, whereas
drawing the circle counter-clockwise
clockwise may bring up a shiel
shield
d on the player. The possibilities are endless and the
restrictions are completely up to you.
One drawback to capturing direction changes without anchors in space, means that some gestures will be
treated as identical, even though they may look different to us. For instance, consider the two gestures below,
the plus sign and the letter T.
7
Both have the same strokes, the only difference being where the strokes are in relation to each other.
other Since
the gesture recognition engine does not care about the relationship between strokes,, these two gestures
would be treated identical,, matching the first gesture in the library
library.. To get around this, it is prudent to enforce
the stroke order. In this example, you could specify that the cross starts with the downward swipe,
s
followed
by the left-to-right
right swipe. The letter T could be specified as a left
left-to-right
right swipe, followed by a downward
swipe.
d a positive match. Notice
Another example of would be these two ways of drawing the letter E which both yield
how the positions of each stroke can vary as long as the direction changes for each stroke remain constant.
8
Gesture Editor
Let’s begin by exploring the gesture editor project included with the Gesture Recognition Engine Plugin. It is
both an example of how to use the engine as well as a convenient way to create and modify gestures and their
libraries. A basic knowledge of Unity is assumed, so simple commands will be skipped in order to focus on the
editor.
First off, set the Game window’s aspect ratio to Standalone (640x480), if it is not that already.
v
9
You will also need to add the scenes in your “Build Settings”.
When you open up the project, you’ll notice that there are three scenes. The main scene that you should start
with is the “LibraryBrowser” scene.
Running the “LibraryBrowser” scene will show you something similar to this:
10
This is the main window, listing all the libraries that you can modify. The “New Library” button allows you to
create a new, empty gesture library file. Clicking on the “Rename” buttons next to each of the libraries lets you
change the name of the files. The “X” buttons are used to delete a library. You will be prompted before
deleting to make sure you didn’t accidentally click the button.
To begin, click on the “Alphabet” library. You will be taken to the gesture browsing view.
11
From this view, you can select, rearrange, create, and delete gestures. You can also go back to your libraries
and test the gestures in this library. Clicking on the “Libraries” button will take you back to your libraries view.
Clicking on “Test Gestures” will take you to the gesture testing scene discussed later on. Clicking on “New
Gesture” will create a new, empty gesture for this library. The up and down buttons next to each gesture allow
you to rearrange the ordering of the gestures in the library. The “X” buttons next to each gesture allow you to
delete a gesture from the library. You will be prompted before deletion in case you accidentally clicked the
button.
To begin, let’s select an existing gesture. Click on the “A” gesture and you will be taken to the
“GestureEditor” scene.
12
The editor allows you to modify a gesture’s name, its number of strokes, and the variations of each stroke.
The top menu bar is used to control the following features:
“Library”: Used to go back to the library screen listing all the gestures
“Image”: Used to toggle on and off an image for tracing
“Clear”: Used to remove all the strokes and their variations from the gesture
“Reload”: Used to overwrite the current list of strokes and their variations with the gesture stored in the
library file
The name button is used to change the name of the gesture:
The Gesture Strokes section shows the listing of this gesture’s variations of strokes.
13
The number of strokes is displayed next to the “Gesture Strokes” text in parentheses. Each stroke is separated
by a box. The box contains all of the strokes variations. Each variation and stroke can be deleted by clicking on
the “X” next to them. Deleting a stroke will delete all of its variations as well. Inserting strokes should only be
used if you want to modify how many strokes a gesture has. For example, if you started with the letter O and
wanted to make it into a Q, you could insert a stroke at the end of the stroke list since the letter O has one
stroke and the letter Q has two strokes. We’ll cover these more as we go on.
The only way to insert variations is by drawing them, which is what you’ll do in a later section. The drawing
grid allows you to create new variations to this gesture.
At this time, you aren’t going to modify the letter A, so you’ll go back to the library by clicking on the “Library”
button.
14
Creating a Gesture
You are going to start with a fresh gesture, so let’s click on “New Gesture”
This will take us back to the editor using the new gesture you just created. Keep in mind, this gesture is only in
memory at the moment and won’t be written to the library until you make a change and save it.
Let’s start by naming this gesture “F”. Click on the button labeled “New Gesture”:
Type in F and click OK
Names are case sensitive, so you could have different gestures for f and F, for example.
You’ll notice that the gesture name has changed and the “Save” button is now visible and blinking.
Go ahead and click on the “Save” button to create this gesture in the library.
Note: comments in the data file will be overwritten when saving, so it is a good idea to add comments
when you are completely done creating gestures.
Note: The editor does not check for duplicate names. Having multiple gestures with the same name
can be a problem as it might be confusing which gesture was matched, but this is up to you. It may be
desirable to have multiple gestures come back with the same name (just a different index). If you
want to enforce unique gesture names, you’ll need to add some type of check on the entry field before saving
the gesture name.
Now let’s draw the letter F. Since there are many ways this letter can be drawn, you’ll simplify it by only
allowing the following strokes:
15
Begin by drawing the letter in the grid space, clicking on the left mouse button to start a stroke, and releasing
the button to end thee stroke. You should have something similar to this:
You’ll also notice a new box popped up showing you the strokes for this gesture
Each stroke is separated by a comma, so the first downward stroke is 413, the second stroke from is 31, and
the last is 3. Your results may be different depending on how you draw the F. If you are satisfied with how
your letter looks, click on the add button in the current strokes box
This will add the strokes to the letter F’s variations
16
You can see you have three strokes, each with just one variation since this is the first time you’ve drawn.
Try drawing the F again, varying your angle a bit on the strokes, like so:
You can see that the strokes look a bit different in the current strokes box, angling slightly from the vertical
and horizontal
Your results may be different, but that is actually a good thing. The whole point of variations is that people
draw gestures differently. The purpose of this exercise is to try to draw as many variations as possible so that
when your users interact with your application or game, they will more likely get a match on the library.
17
Click on the add button. If you varied your gesture the second time, you’ll notice that there are now variations
in the “Gesture Strokes” box
You’ve effectively told the library that the first stroke of F can be drawn like 413 or like 31. The second stroke
can be drawn like 31 or 32, etc. Again, your values may be different depending on how you draw.
Keep drawing and adding the letter F. You’ll eventually reach a point where you are drawing the gesture
exactly like you did before. The library will find a match and the following message will appear at the bottom
of the screen:
If you are repeatedly getting this message and no new strokes are being added, then you have probably
covered all the possibilities of drawing this gesture. This means you are done with this gesture.
You’ll notice that as you make changes, the “Save” button will appear. It is a good idea to save when you’ve
reached a good stopping point or your changes will be lost when the program is stopped.
Editing a Gesture
The gesture editor allows you to remove unwanted strokes and stroke variations if you so choose. Let’s say for
instance that you accidentally draw a stroke wrong and added it to the list of strokes. You can go back and
remove this stroke variation by clicking on the “X” next to the variation you want to remove.
Let’s try this out. Draw the letter F again, but this time purposefully mess up one of the strokes
18
You can see this gesture’s first stroke is too wobbly. Click on “Add” and it will show up in the gesture’s first
stroke variation list:
You then realize that this variation on the first stroke is probably not correct, so you decide to click the “X”
next to it to delete the variation.
You will be asked to confirm that you truly do want to delete this variation
19
Go ahead and click “Yes”. You’ll see that this variation is now gone from the first stroke’s list
Extra Information
As you draw a gesture, you’ll notice that the “Current Strokes” window is constantly updating. This tells you
the motion of your mouse. When you reach the stroke count for the gesture you are editing, the “Add” button
will appear. If you draw too many strokes, it will inform you of this. Try drawing the letter F with too many
strokes.
Adding a Stroke
A gesture must have the same number of strokes for every variation. You cannot have a gesture that
sometimes has two strokes and sometimes has three, for instance. If you realize that you actually left out a
stroke and need to add it in, you can click any of the insert stroke buttons found between each stroke in the
“Gesture Strokes” window
20
Which button you press will determine where the stroke is inserted. For instance, if you select the first “Insert
Stroke” button, you will add a stroke before all of the others. The second button will add a stroke after the
first stroke and before the second.
A practical example of how this might be used is if you suddenly realize you meant to be drawing an E, which
has four strokes instead of an F, which has three strokes. You can scroll to the end of the list and click the
“Insert Stroke” button at the bottom.
You’ll notice that the stroke count jumps from (3) to (4) and a new stroke is added to the list. This new stroke
will be empty of variations.
21
Now when you draw, the editor is expecting four strokes, so draw the letter E
Adding it will now populate the last stroke with a variation
Deleting a Stroke
22
You may then realize that you actually were trying to draw the letter F all along and not E, so you want to get
rid of the last stroke. You can delete a stroke and all of its variations simply by clicking on the “X” next to the
stroke.
This removes the stroke and sets us back to our original three strokes.
Clearing Strokes
If you are just not satisfied with any of the strokes that you’ve captured, you may decide to just start over. You
can do this easily by clicking on the “Clear” button at the top.
After confirming that you want to do this, the editor will wipe out all strokes and stroke variations.
Reloading a Gesture
If you want to restart a gesture from whatever you have stored in the library, the “Reload” button will do this
for you.
If you have unsaved changes, you will be prompted before the reload occurs.
23
Tracing an Image
You may find it easier to draw gestures if you have an image to trace. Keep in mind, if your gesture is so
complex that it requires an image to trace then your users will probably need an image to trace as well. This
could actually be a part of the game or application if the point is accuracy at tracing an image.
To toggle on and off the trace image, click the “Image” button.
The default image will appear full size on the drawing grid
You’ll also notice that several new buttons appear above the drawing grid. These buttons control the image.
“Reset”: Returns the image back to its original scale, position, and rotation
“Fit”: Scales the image proportionally so that it fits entirely within the drawing area
24
“+”: Zooms in on the image
“-“: Zooms out on the image
“R+”: Rotates in a counter-clockwise direction
“R-“: Rotates in a clockwise direction
“<”: Moves the image left
“>”: Moves the image right
“/\”: Moves the image up
“\/”: Moves the image down
You can draw on top of the image without affecting it. If you are having difficulty seeing the drawing particles
due to a color clash, you can change the particle colors by going to the “Gesture Editor” gameobject and
changing the particleColor property in the editor.
The image can be changed by replacing the “TraceImage.psd” file in the “Textures” folder.
Testing Gestures in a library
25
You may want to test the gestures that you have recorded with the editor. You can do this by going back to
the library’s listing of gestures and click “Test Gestures”.
You’ll be taken to the “TestGestures” scene.
At the top of this view is the “Library” button which will take you back to the library’s listing of gestures. In the
center is a label showing which library you are testing. In the bottom left is the grid where you will draw your
gestures to test. On the right you have a button to press to test the gesture you are drawing and a box that
will display results of the tests.
26
Try drawing your newly created F in the grid and then press the “Test” button. If the gesture recognition
engine finds a match in the “Alphabet” library, then you will be shown success, otherwise it will tell you there
was no match.
Try the letters A through E of the alphabet. For simplicity, only the following strokes were set up for these
other letters:
27
If you find that you are repeatedly not getting matches on any gestures, try going back into the editor on the
gesture and adding new stroke variations. It’s quite possible you are drawing the gesture differently than what
is stored in the library. By adding more variations you will mak
make the library more robust.
bust.
28
Data
Gestures are stored in the library as newline delimited text files. Each gesture in the library has the format:
<Gesture_Name> : <Stroke_1_Variation_1> , <Stroke_1_Variation_2> , … ; <Stroke_2_Variation_1>,
<Stroke_2_Variation_2>, … ; …
The ordering of the gestures is important in that the index of a gesture is its corresponding zero-based line
number. The first gesture is index zero, the second is index 1, etc.
Example “Alphabet”
Text file data:
A:321,2314,32142,231,23142,3214;32,3,31,3212,312
B:13,1,41,3142,14,31,314,1324,1342,134,312,132;314342,3214342,31434,3143423
C:4213,4132,42132,421324
D:31,1,14,314,3142,41;314,32142,3142,3214
E:1,31,13,41,14;32,3,31,312;31,32,3;3,312,32,31
F:13,14,413,31,142;31,32;32,312,31,3
Each line consists of a single gesture. For example, the gesture “A” looks like:
A:321,2314,32142,231,23142,3214;32,3,31,3212,312
The first element of the line is the name of the gesture. The name of the gesture is “A” (without quotes).
The stroke variation lists are separated by a semicolon, so for “A” there are two stroke variation lists:
Stroke 1 variation list: 321,2314,32142,231,23142,3214
Stroke 2 variation list: 32,3,31,3212,312
Each variation in the stroke variation lists is separated by a comma, so for “A”, stroke 1 has six variations and
stroke 2 has five variations.
Comments and White Space
You can have comments in your library files. The first character of the line must be ’ (apostrophe). You can also
have empty lines. The engine will ignore both comments and empty lines.
29
Note: The editor will overwrite any comments when saving, so it is best to leave commenting as a
last step in the gesture creation process.
30
Usage
Using the gesture recognition in your project can be achieved with little code. For a complete working
example of this, the “TestGestures” scene in the Gesture Editor shows how a gesture can be captured and
tested. The input method for this project is crude, relying on the mouse location within boundaries. You can
include whatever input method you choose in your own project, whether that is by ray collision testing, or
using customized GUI buttons from third party applications.
The main section you should notice in the “TestGestures.cs” class is in the #Region labeled "Gesture
Recognition Functions". There are three functions here that handle the setup, capture, and testing of gestures
(InitializeGestureRecognition, TouchPadDelegate, and TestGesture, respectively). The editor classes are all
fully documented, but below is an overview of the important pieces of the “TestGestures.cs” class that you
may wish to reuse in your own project.
Initialization
The class in which you want to set up gesture recognition should contain a reference to a GREngine object.
The GREngine class is not derived from MonoBehaviour, so you have to instantiate it manually. You can load a
library from a file path or by passing in a string of newline delimited data (such as from a TextAsset).
Example (loading from path):
private GREngine _grEngine;
.
.
.
_grEngine = new GREngine();
_grEngine.LoadLibraryFromPath(libraryPath);
Example (loading from Text Asset):
private GREngine _grEngine;
public TextAsset gestureLibrary;
.
.
.
_grEngine = new GREngine();
_grEngine.LoadLibraryFromPath(gestureLibrary.text);
31
Capturing and Matching Gestures
Gestures are recorded using the following operations:
1)
2)
3)
4)
5)
6)
7)
8)
Reset the Gesture
Start a new stroke
Move stroke
… Repeat #3 as necessary
End stroke
… Repeat #2 - #5 as necessary
Match gesture
Go back to #1
You can see in the “TestGestures.cs” class, “TouchPadDelegate” function where this process is being handled.
When the left mouse button is pressed down, the “Touchpad.cs” class calls the “TouchPadDelegate” delegate
with a TouchDown event. This starts a new stroke (step #2).
When the mouse is moved, the delegate is called with a TouchMove event (step #3).
If the mouse continues to move, the TouchMove event is registered again and again (step #4).
When the left mouse button is released, the TouchUp event is called, ending the stroke (step #5).
If the mouse button is pressed again, the mouse moved, then the button released again and again, more
strokes will be captured (step #6).
When the user clicks on the “Test” button, the TestGesture function is called and the gesture is finally
matched (step #7).
The gesture is then reset (step #1).
This is a very basic example, and should only be taken at an instructional level. Your own app can be much
more elaborate in that your interface may change as you begin or end strokes. You may not want a particle
engine following your pointer around, but instead some kind of object, or nothing at all in the case of menu
manipulation, for example.
Input
Gestures are not input dependant, meaning that anything can drive the recognition engine. You can follow
mouse movements, follow finger swipes, follow characters, follow objects, provide the strokes through data
assignment, or enter the movements programmatically.
The latter case would be useful if you have an AI controlling a gesture engine. You could monitor the AI’s
movements and then test them against the library.
Matching
32
In the Gesture Editor and the Gesture Testing scenes, the gesture is matched after the user clicks “Add” or
“Test”, respectively. This is good for cases where you want to user to explicitly state they are done drawing
and are ready to test their gesture.
But what if your project design doesn’t fit with having the user press a button? Perhaps the gesture should
match automatically. This could be done by providing a timer or countdown. When the user ends a stroke, the
countdown would be started. If the user starts a new stroke, the countdown is stopped. If the user doesn’t
start a new stroke, the countdown will run out and the gesture would be matched.
This countdown method is good for some cases, but it has its drawbacks. If the user is too slow to start the
next stroke, the countdown will expire and the engine will try to match against their incomplete gesture and
fail. If the user moves on to the next gesture too quickly, then the engine will think the strokes are all part of
the same gesture and will fail.
Determining when to explicitly match a gesture and when to automatically match is up to you and most likely
will depend on how the engine is used in your project.
33
Real World Example
(Shameless plug)
A real world example of the gesture recognition engine being used can be found in the game “Wizard Arena”
by echo17 for iOS devices. The game is an arcane, gladiator style hack-and-slash where you control a wizard
that must fight off waves of enemies in an arena. Instead of just selecting spells to cast, you must first draw
the spells with your finger and store them in spell slots.
Some screenshots:
A page from the spell book showing the user how to draw the “Dragon’s Breath” spell:
34
Page from the spell book showing the user how to cast spells:
Drawing the “Fireball” spell in the game:
35
Successful drawing of the “Fireball” spell:
Using the “Fireball” spell on an enemy:
36
All the spells from the spell book:
You can find a video of this game in action at echo17’s website: echo17.com. The game is available on the
iTunes store for iOS devices.
37