1
CONNECTIONS
The cable should be attached to the 25 pin male connector on the Intermec Barcode printer. The other
end of the cable should be plugged into the selected communications port defined in the Media Client
Barcode configuration on the host computer.
PRINTER DEVICE SETTINGS
The printer needs to be configured properly according to the materials used and the way the labels are
to be printed out. This is done using the control panel and LCD display on the front of the printer.
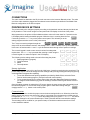
When powered on, the printer will first initialize and then a timer will count down for 5 seconds on the
LCD display before loading the default program. While the timer is counting down the first
Enter
5 seconds, press the Enter key on the printer control panel. This will take you to the
startup program selection screen in the printer setup.
F1
F2
F3
F4
F5
The F-keys are used to navigate through the
setup menu to select different sections, and settings. The F1 and F2 buttons move up and down a level
in the menu of sections while F4 and F5 cycle forward and back through a list of options or settings.
The numeric keypad is used to enter numeric values for settings that
require them. The Enter key is pressed after entering a value using the
numeric keypad or to select an option in the LCD display.
The following device settings need to be set before using the printer:
1. Startup application (program)
2. Communications
3. Media
4. Feed adjustment
7
8
9
4
5
6
1
2
3
.
0
C
Startup Application
The startup application can only be set from the initial setup (pressing enter during the countdown). The
printer setup may be entered to change the other settings at any time by pressing the setup key (as long
as the application supports this capability).
• To use the default barcode printing capabilities provided by Media Client, select the Direct
Protocol as the startup program. (nearly all users will use this option)
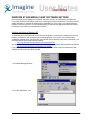
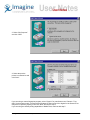
• To use a special program for custom printing jobs select the appropriate fingerprint program
(ie. Imagine Communications.prg) See the Loading A Custom Print Program section for more
details.
Once the startup program is selected the LCD screen leaves the setup screen and automatically loads
the selected program. To re-enter the setup program again to make other setting changes,
Setup
simply press the Setup button on the control panel.
Communications
The printer needs to be set with the proper communications settings before use. When the printer first
starts it checks the ports to see which one is active. In the setup menu the detected or default port will
be displayed (ie. ser-com, uart1). To check the settings of the port, press F2 or Enter. This will list
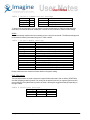
the different settings for the communications port. Table 2) lists the default communication settings.
These settings can be modified for your personal setup. It should be noted that some form of flow
control should be enabled.
© Imagine Communications Corp.
2