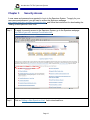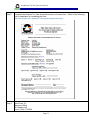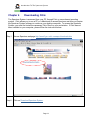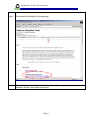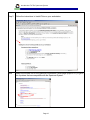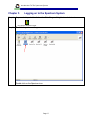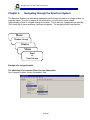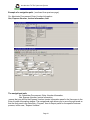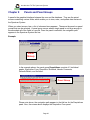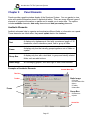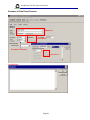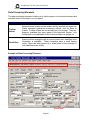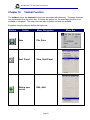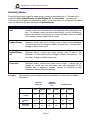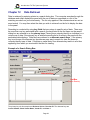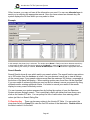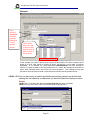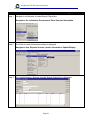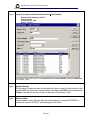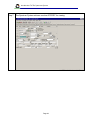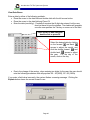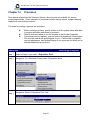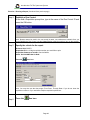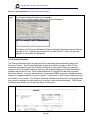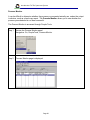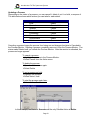
1
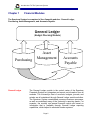
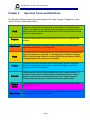
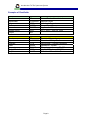
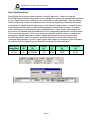
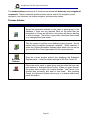
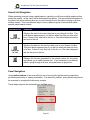
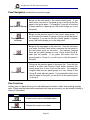
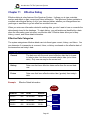
Introduction To The Spectrum System
Financial Training User Manual
PeopleSoft Financials
Version 7.5
Revised January 2006
Page 1
Introduction To The Spectrum System
TABLE OF CONTENTS
Chapter 1
Financial Modules………………………………………………....Page 5
Chapter 2
Spectrum Terms & Definitions…………………………………....Page 7
Chapter 3
Security Access………………………………………………..…Page 12
Chapter 4
Downloading Citrix…………………………………………….…Page 14
Chapter 5
Logging on to the Spectrum System…………………………...Page 17
Chapter 6
Navigating through the Spectrum System……………………..Page 20
Chapter 7
Windows………………………………………………………..…Page 23
Chapter 8
Panels & Panel Groups………………………………………….Page 26
Chapter 9
Panel Elements…………………………………………………...Page 27
Chapter 10
Toolbar Function………………………………………………….Page 31
Chapter 11
Effective Dating…………………………………………………...Page 36
Chapter 12
Data Retrieval…………………………………………………….Page 38
Chapter 13
Data Entry………………………………………………………....Page 45
Chapter 14
Processes…………………………………………………..……..Page 47
Appendix A
Keyboard Functions…………………………………………...…Page 52
Page 2
Introduction To The Spectrum System
Overview
The Board of Regents purchased PeopleSoft software in July 1997 as the new information
system for the entire University System of Georgia. The system includes both financial and
human resources applications. The software is aimed at enhancing functionality, improving
business processes, and providing a superior reporting system. Georgia State University was
the pilot for the financial applications and went "live" on July 1, 1999.
The implementation of PeopleSoft resulted in the development of the Spectrum System Office.
The office is a unit of the Finance & Administration Division of Georgia State University. The
Finance & Administration Division's site contains links to other units in the division, with the
division's mission statement and organization chart being found on the Office of the Vice
President's page.
The Spectrum System
The Spectrum System is Georgia State University’s state-of-the-art financial applications
system. Georgia State University was the pilot for the financial applications for the University
System of Georgia.
The Spectrum System was implemented on July 1, 1999, and upgraded the system to version
7.5 of PeopleSoft Financials on December 4, 2000. Several of the important functional
improvements that were realized with the implementation of the Spectrum System include:
Electronic generation of purchase requisition, purchase order, travel, and consultant forms.
Shift in financial management responsibility from central offices to end-users.
Automatic budget checking.
On-line real time processing of transactions.
Enhanced end-user report writing capabilities.
Use of ‘Query’ tools for retrieving data.
Page 3
Introduction To The Spectrum System
Course Objectives
Understand Basic Spectrum Terms and Definitions
Request Security Access
Download Citrix
Logon to the Spectrum System
Navigate through menus, windows and panels
Use Search
Enter and view data
Run and view reports
Page 4
Introduction To The Spectrum System
Chapter 1
Financial Modules
The Spectrum System is comprised of four financial modules: General Ledger,
Purchasing, Asset Management, and Accounts Payable.
General Ledger
(Budget Checking Module)
Purchasing
General Ledger
Asset
Management
Accounts
Payable
The General Ledger module is the control center of the Spectrum
Financials System as it integrates and reports on information from all
modules. The University's chart of accounts, budgets, journals, and
actuals are all maintained through General Ledger module activities.
The Spectrum System consolidated numerous business processes,
as well as centralized many of the University's reporting needs. For
example, the monthly and annual financial reports are based on
information that is available through General Ledger reporting
capabilities, which helped to eliminate shadow systems.
Page 5
Introduction To The Spectrum System
Purchasing
The Purchasing module is used to process requisitions and purchase
orders for the procurement of goods and services from suppliers
external to the University, excluding purchases acquired using the
PCard or Petty Cash. The Purchasing module in the Spectrum
System is totally integrated with the General Ledger and Accounts
Payable modules. This makes it possible for the end user to have
up-to-date information at their desktop on budgets, requisitions,
purchase orders, and receiving and payment activities.
Asset Management
The Asset Management module maintains capitalized assets
as well as non-capitalized inventory items. Assets may be
added manually or can be fed through an interface with the
Accounts Payable module. This module is used to add, adjust,
transfer, and retire capitalized assets and non-capitalized
inventory items.
Accounts Payable
The Accounts Payable module includes processing and managing
vouchers and processing payments. This module interfaces with the
Asset Management and General Ledger modules. Disbursements is
responsible for the printing and disbursement of checks to tender
payment to vendors for goods and services purchased by the various
departments. The department also tenders payroll checks for the
Human Resources department, as well as refund/loan checks for the
Student Accounts department. These responsibilities are performed
using the Accounts Payable module.
Page 6
Introduction To The Spectrum System
Chapter 2
Spectrum Terms and Definitions
The Spectrum System chart of accounts consists of the Fund, Program, Department, Class,
Project, Account, and Budget Period.
Fund
A fund is an entity with a self-balancing set of accounts for recording assets,
liabilities, fund balance, and changes in the fund balance. Examples of the new
funds include 10 for current unrestricted funds, 20 for current restricted funds,
and 50 for capital projects.
Program
A chartfield which tracks the functional purpose or activity of expenses and
revenues.
Department
A costcenter which tracks academic and administrative units within GSU’s
organizational hierarchy. It is a 9-digit field
Class
The appropriation or subclassification field represents the type of funds that are
either being received or expended. For example, general funds are coded as
11000, special funding initiative is coded as 13000, lottery funds are 14000,
and departmental sales and services are 41001.
Project
The project field has 5 characters and includes capital projects, sponsored
projects, continuing education projects, as well as contingency and other
miscellaneous university projects.
Account
A 6-digit chartfield which is used to capture the nature of the transaction. It
includes all asset (1xxxxx), liability (2xxxxx), fund balance (3xxxxx), revenue
(4xxxxx), personal service expenditures (5xxxxx), travel (6xxxxx), supplies
(7xxxxx), equipment (8xxxxx), and indirect cost (9xxxxx) object codes.
Budget
Period
A 4-digit chartfield that represents the year from which the funds are being
expended or obligated.
Code Block
A string of chartfields which includes the account, fund, department, program,
class, budget period, and project number.
Page 7
Introduction To The Spectrum System
Examples of Chartfields:
Fund
Department
Program
Class
Account
Budget Period
Project
10
612250000
1620
11000
714100
2006
N/A
Fund
Department
Program
Class
Account
Budget Period
Project
20
142000000
1110
64000
744110
2000
ALY34
General Fund – Unrestricted
Spectrum Office
Institutional Support
General Operations
Supplies and Materials
July 1, 2005 – June 30, 2006
Restricted General
Educational Policy Studies
Instructional – General Academic
Sponsored - Private
Computer purchases < $3,000
July 1, 1999 – June 30, 2000
Educational Foundation Grant
Page 8
Introduction To The Spectrum System
SpeedType/SpeedChart
SpeedTypes are used on numerous panels to simplify data entry. When you type the
SpeedType key, chartfield values that you have assigned to the key are automatically populated
for you. SpeedTypes can be defined for any combination of valid chartfields. They are utilized
within the Spectrum System to enable the user to enter the SpeedType rather than the actual
combination of chartfield values during input on the General Ledger module. A similar function
known as SpeedChart exists on the Purchasing and Accounts Payable modules. The same
values will be used for both SpeedTypes and SpeedCharts. These values, when entered into
the system, will translate and automatically fill in the corresponding predefined chartfield values.
Then, users will only need to fill out any remaining chartfield values in order to complete their
transactions. SpeedTypes can be used for budget adjustments and journal entries, while
SpeedCharts can be used for vouchers, purchase requisitions, travel authorizations and
consultant authorizations. In order to have system-wide usage of a consistent value throughout
all modules, both the SpeedType and SpeedChart values must be established.
SpeedType/
SpeedChart
SPEC
ALY34
Fund
(2)
10
20
Dept ID
(9)
612250000
142000000
Program
(4)
1620
1110
Page 9
Class Budget Period
(5)
(4)
11000
2006
64000
2000
Proj/Grant
(5)
N/A
ALY34
Introduction To The Spectrum System
Budget Structure
Georgia State University operates primarily on funds appropriated by governmental bodies or
donated by private entities and uses a method of accounting called fund accounting. Fund
accounting is designed to separate revenues and expenses by fund to enable an institution to
track and report activity for a particular purpose.
PeopleSoft Financials consists of 4 types of budgets: Appropriation, Organization, Revenue
Estimate Budget, and Project/Grant.
Appropriation Budget
An appropriation is the highest level of budgeting in PeopleSoft. An appropriation establishes a
budget authorized for expenditures for a specific purpose during a specific period of time. The
appropriation budget allocates monies at 2 levels; Personal Services and Non-Personal
Services. Georgia State University’s appropriation budget is composed of all the Colleges and
VP Units. Examples of appropriation budgets are the College of Arts and Sciences, J Mack
Robinson College of Business, School of Policy Studies, Vice-President for Finance and
Administration, and Vice-President for Development.
Organization Budget
Each organization budget is linked to an appropriation budget. An organization budget tracks or
controls spending of a budget at a lower level of detail than an appropriation. The organization
budget allocate monies at detail levels such as Faculty Salaries, Staff Salaries,
Graduate Assistants, Part-Time Instructors, Travel, Supplies, and/or Equipment. Departments at
GSU comprise the organization budgets. Some examples include Biology, Marketing,
Kinesiology and Health, Accounting Services, Registrar, Student Center, Purchasing, and
Facilities Planning.
Revenue Estimate
A revenue estimate budget tracks revenues recognized and cash collected against estimated
revenues. Some examples include departmental sales & services or sponsored research.
Project/Grant Budget
A project/grant budget is independent in that it is not linked to an existing appropriation or
organization budget. It tracks or controls spending of a budget at a detail level. Funds are
budgeted in different categories such as Faculty, Staff, Miscellaneous, Travel, Supplies, and/or
Equipment. Examples of Project/Grant Budgets include Capital, Sponsored Research, and
Continuing Education.
Page 10
Introduction To The Spectrum System
Sample Budgets
University
Sample University Operating Budget
University Personal Services
University Non Personal Services
Total University Budget
$240,874,061.00
$179,926,194.00
$420,800,255.00
College/VP Units
Sample Appropriation Budget
Fund – College/VP Unit – Class – Personal Services
Fund – College/VP Unit – Class – Non Personal Services
Example: College of Arts and Sciences
10 11A000000 11000 P00000 $55,930,746.00
10 11A000000 11000 N00000 $ 5,572,521.00
Total Appropriation
$61,503,267.00
Departments
Sample Organization Budget
Fund – Program – Department – Class – Personal Services
Fund – Program – Department – Class – Travel
Fund – Program – Department – Class – Supplies
Fund – Program – Department – Class – Equipment
Example: Biology Department
10 1110 110600000 11000 PSS000
$ 812,326.00
10 1110 110600000 11000 PSF000
$3,044,579.00
10 1110 110600000 11000 TR0000
$ 47,198.00
10 1110 110600000 11000 SP0000
$ 88,859.00
10 1110 110600000 11000 EQ0000
$ 20,000.00
Total Organization
$4,012,962.00
Page 11
Introduction To The Spectrum System
Chapter 3
Security Access
A user name and password are required to log in to the Spectrum System. To apply for your
user name and password, you will need to access the Spectrum webpage
http://www2.gsu.edu/~wwwspc/Forms/index.htm and follow the instructions for downloading the
‘Adding a New Spectrum User’ form.
Step 1
To apply for security access to the Spectrum System, go to the Spectrum webpage
http://www2.gsu.edu/~wwwspc/Forms/index.htm.
Step 2
Click on ‘Adding a New Spectrum User’ link to download form.
Page 12
Introduction To The Spectrum System
Step 3
Complete the Request For User Access/Correction of Access form. Refer to the following
link for assistance in completing the form
http://www2.gsu.edu/~wwwspc/Training/securityprocedure.pdf
Step 4
Send Form To:
Spectrum Office
401 Sparks Hall
Fax to (404) 413-3034
Page 13
Introduction To The Spectrum System
Chapter 4
Downloading Citrix
The Spectrum System is accessed from your PC through Citrix, a server-based operating
system. Citrix allows you to use a PC or a Macintosh to access Spectrum and does not require
the Spectrum System software to reside on your desktop computer. To access the Spectrum
System, you must first install the necessary Citrix Client on your workstation. If Citrix has not
been installed on your computer, please follow the instruction below:
Step 1
Access Spectrum webpage http://www2.gsu.edu/~wwwspc/downloads.htm
Step 2
Click on Download Spectrum System.
Page 14
Introduction To The Spectrum System
Step 3
The system will display the following page.
Step 4
Go to the Links section, click on the software you will be using for Accessing the
Spectrum System, and review instructions.
Page 15
Introduction To The Spectrum System
Step 5
Follow the instructions to Install Citrix on your workstation.
Note
Select the Printers link on the Spectrum Information Center page (steps 2 & 3) to get a
list of printers that are compatible with the Spectrum System.
Page 16
Introduction To The Spectrum System
Chapter 5
Step 1
Logging on to the Spectrum System
On your desktop, double click on the Citrix Program Neighborhood shortcut.
Citrix Program Neighborhood.lnk2
Step 2
The following screen will appear.
Double click on the Spectrum icon.
Page 17
Introduction To The Spectrum System
Step 3
The Novell Client for Windows login screen appears.
Step 4
Type in your User Name and Password and press the OK button.
Step 5
When the N Results page appears, press the Close button.
Page 18
Introduction To The Spectrum System
Step 6
At the PeopleSoft Signon screen, Type in your Operator Id and Password and press
the OK button.
Step 7
A PeopleSoft window appears. The Requisition Items window appears below,
however, depending on your workstation this window may be an Express Voucher,
Query or another window. You have successfully logged into the Spectrum System.
Page 19
Introduction To The Spectrum System
Chapter 6
Navigating through the Spectrum System
The Spectrum System is a table-driven application which stores information in a large number of
separate tables. In order to access all this information, you will need to have a basic
understanding of how to navigate through the system. This is done by a graphical user interface
(GUI) made up of menu selections, windows and panels. The navigation path looks like this:
Menu
Window Group
Window
Menu
Panel
or
Panel Group
Example of a navigation path:
Go, Administer Procurement, Enter Voucher Information
Use, Express Voucher, Invoice Information, Add
Page 20
Introduction To The Spectrum System
Example of a navigation path: (continued from previous page)
Go, Administer Procurement, Enter Voucher Information
Use, Express Voucher, Invoice Information, Add
The navigational path:
Go, Administer Procurement, Enter Voucher Information,
Use, Express Voucher, Invoice Information
means that you will find the Express Voucher-Invoice Information panel in the Use menu in the
Enter Voucher Information window. The navigational path allows you to move through levels so
that the final panel is the Data Entry, Process, View or Report panel for the specific business
process, in this case, “Express Voucher.”
Page 21
Introduction To The Spectrum System
Recent
The Spectrum System maintains a history of the panels you access. You may toggle back and
forth between recently accessed panels to view data quickly.
As you move between different panels and panel groups, The Spectrum System maintains a list
of these panels. Up to ten panel names are recorded during the course of navigation.
The following example details ten panels accessed within the Spectrum System:
The current panel being displayed is checked. The list of recent panels is only available during a
single logon period. The list is cleared when the user logs off of PeopleSoft.
To access the Recent panel, navigate as follows:
• Go, Recent
• Select one of the panels listed in the Recent panel group.
• The panel you selected will display.
Page 22
Introduction To The Spectrum System
Chapter 7
Windows
Through menu selections, you are able to access various Spectrum System windows. A
window is a section of the Spectrum System that allows you to access data entry panels. Each
window has a specific purpose for accessing information within the system. For example, if you
are using the Payables module of The Spectrum System, one window is specific to entering
vendor information, another to entering vouchers and yet another for creating payments. These
windows are used to access the panel or panel group in which data entry, process, view or
report procedures are performed.
The Spectrum System window consists of a title bar, control menu box, a menu bar, a toolbar
and a status bar.
Control
Menu Box
Title Bar
Toolbar
Menu
Bar
Status
Bar
Page 23
Introduction To The Spectrum System
Title Bar
Control
Menu Box
Displays the navigational information for the current panel, including the names of
the window, the menu and the panel group.
Provides access to commands that control the size and placement of the window.
The button on the left “minimizes” the window and turns it into a button on the task
bar, the middle button enlarges the window to fill the entire screen and the button
on the right exits the application.
Menu Bar
Provides access to panels and to common navigational and data entry commands.
The Spectrum System, like all Windows applications, is menu-driven. You will find
menu bar items displayed beneath the title bar in every window. The options in
the menu bar will vary depending on the panel and your security assignment.
There are six menu items common to every The Spectrum System window.
File, Edit, View, Go, Favorites, Help.
Menu Item
Function
File
Lists actions that save or process data. Also use this menu to exit the
Spectrum System.
Edit
Lists various data entry functions to use as you move through panels
and update the database. These options are also available through the
toolbar and function keys.
View
Lists navigation options you will use as you move through panels and
update your database. Some of these options are also available
through the toolbar and function keys.
Go
Accesses the different Spectrum System window groups you are
authorized to use.
Favorites
Lists personal preferences of commonly used panels to be accessed
quickly from any Spectrum System window.
Help
Provides access to the Spectrum System generic online help.
Page 24
Introduction To The Spectrum System
There are four additional menu items that will display depending on the specific
panel you are using and your security access rights:
Use, Process, Inquire and Report.
Menu Item
Function
Use
Provides access to the data entry panels you are authorized to access.
For example: Create Payments, Use, Express Check.
Process
Provides the ability to run certain processes. You can also use this
menu item as a step in running certain reports.
For example: Maintain Vendors, Process, 1099-MISC Balance.
Inquire
Provides online summary information. Inquire panels are for viewing
only.
For example: Manage Requests For Quotes, Inquire, Vendors By
Quotes.
Report
Provides a list of pre-defined reports available to you.
For example: Create Payments, Report, Payment History by Vendor.
Database
Panel Name
Action Type
Status Bar
The left side displays the database you are working in i.e. Production, QA, or
Training. The right side shows the panel name and which action you selected
when you accessed the current panel.
Toolbar
Contains toolbar buttons that perform certain common navigational and data entry
commands. The toolbar buttons are shortcuts for menu commands.
Page 25
Introduction To The Spectrum System
Chapter 8
Panels and Panel Groups
A panel is the graphical interface between the user and the database. They are the actual
screens containing various fields, which enable you to view, enter, and update data that are in
the Spectrum System.
When you select a menu item, a list of submenu items appears. These are the panels or panel
groups that can be selected. A panel group occurs when a single panel is not large enough to
accommodate all of the fields in a record. Once the panel is selected, the navigation path
appears in the Spectrum System title bar.
Example:
Panel
Group
In the example above, the panel group Requisitions consists of 5 individual
panels, Requisition Form, Requisition Schedule, Header Comments,
Defaults/Details, and Activities.
Panel Group
Please note above, the navigation path appears in the title bar for the Requisitions
panel. Also, the screen above displays the Requisition Form panel.
Page 26
Introduction To The Spectrum System
Chapter 9
Panel Elements
Panels provide a graphic window display of the Spectrum System. You use panels to view,
enter and update information stored in application tables. There are many different types of
elements to organize information on panels and to enable you to enter data. The options
include aesthetic elements, data entry elements and data processing elements.
Aesthetic Elements
Aesthetic elements help to organize and emphasize different fields or information on a panel.
These elements are visual aides; they never update data in the database.
Name
Function
Text
A display-only alphanumeric field with a maximum length of 30
characters, used to describe a panel, field or group of fields.
Frame
A display-only box that visually groups together a set of fields on
a panel.
Group Box
A display-only box with a text label, to group and identify related
fields, such as radio buttons.
Static Image
An unchanging graphic, such as a logo or other visual element.
Examples of Aesthetic Elements:
Control Menu Box
Title Bar
Menu
Toolbar
Static Image
¾Title Bar
¾Control Menu Box
¾Menu
¾Toolbar
¾Status Bar
Panel Tab
Frame
Group Box
¾Parameters
¾Option
Status Bar
Page 27
Introduction To The Spectrum System
Data Entry Elements
On panels, several types of data entry fields display. Each of the fields is designed to offer
different ways of entering and maintaining information. These types of fields are always
associated with the actual fields in the database.
Name
Function
Edit Box
Rectangular boxes for data entry. The size of the edit box
and the number of characters you can enter are determined by the length of the associated database field. Edit
boxes for fields with prompt tables have a prompt button, a
small button with a down arrow, to the right of the box.
Long Edit Box
Long, often wide, rectangular boxes are for long text items,
such as comments. Long edit boxes are used for variablelength alphanumeric fields; the length of the field is
determined by its contents rather than by the physical size
of the box on the panel.
Checkbox
Small square boxes that operate as a toggle switch, On
and Off, for data fields that can have one of two values.
The on and off toggle typically indicates Yes and No. Each
checkbox is independent of other checkboxes on a panel
and many may be checked at the same time.
Radio Button
Small round buttons that each represents one option for a
field with multiple defined values. Only one radio button in
a group can be turned on at one time.
Drop-Down List Box
Rectangular boxes with a prompt button within the box.
You cannot enter data in these boxes. Instead, click the
prompt button to reveal a list of valid values from which you
can select a single option. A drop-down list box provides a
static set of options from which to choose.
Page 28
Introduction To The Spectrum System
Examples of Data Entry Elements:
Edit Boxes
Check Boxes
Drop Down List Boxes
Radio Buttons
Long Edit Box
Page 29
Introduction To The Spectrum System
Data Processing Elements
The data processing elements enable you to initiate system or functional processes and
maintain levels of information on your panel:
Name
Functions
Toolbar
Button
Square buttons located on the toolbar directly beneath the menu bar.
These represent application processing actions, such as Save or
Cancel. Toolbar buttons are not actually part of the panel. They are,
however, available from every panel in the Spectrum System. Any
toolbar that is not applicable to the current procedure is grayed out.
Scroll Bars
Narrow vertical rectangles with an arrow at each end, indicating more
information is available. These rectangles have a small square
inside. Move the small square up or down inside of the rectangle to
view additional rows of data.
Example of Data Processing Elements:
Toolbar Buttons
Scroll Bars
Page 30
Introduction To The Spectrum System
Chapter 10
Toolbar Function
The toolbar buttons are shortcuts to functions associated with data entry. The same functions
can be accessed from the menu bar. If buttons are grayed out, the associated function is not
available in that panel. The menu items will also be grayed out and not available.
Examples using the shortcut button and menu bar:
Button
Action
Menu Navigation
Save
File, Save
Next Panel
View, Next Panel
Adds a new
record
Edit, Add
Page 31
Menu Bar
Introduction To The Spectrum System
The toolbar buttons are shortcuts to functions associated with data entry and navigational
commands. These commands include process actions, search list navigation, panel
navigation, row functions, the toolbar navigator, and data entry modes.
Process Actions
Button/Action
Definition
Save
Sends the information entered on the panel or panel group to the
database. If there are any required fields on the panel that are
incomplete or if there are edit errors, the system will issue a warning
or error message. The button is gray when data have been saved
or no changes have been made.
Run
Tells the system to perform a pre-defined process request. Not all
panels have pre-defined processes attached. When selected, it
opens the Process Scheduler Request panel where you can set up
your specific Run Control parameters for the current process.
Run With
Defaults
Cancel
Runs the current process without first displaying the Scheduler
Request panel. It uses the default settings for the Run Control ID.
Clears the entire panel or panel group and any data that you may
have entered or changed without saving. When you press Cancel,
the system does not warn you to save changes. Use Cancel if you
entered data incorrectly and want to start anew. After pressing
Cancel, the Spectrum System returns you to a window without any
panel information.
Page 32
Introduction To The Spectrum System
Search List Navigation
When accessing a record using a partial search, typically you will have multiple responses that
satisfy the search. In this case, the list buttons become active. The record selected appears in
the panel, but the list buttons allow you to scroll through the full list without having to perform
another search. This is an effective way to view or update a group of records that match
specific partial search criteria.
Button/Action
Definition
Next In List
Displays the data for the next data row in your Search List Box. This
push button appears gray if you did not select the data row from a list
box, if there is only one row in the list, or if the data displayed are the
last row on the list.
Previous
in List
Displays the data for the previous data row in your Search List Box.
This push button appears gray if you did not select the data row from
a list box, if there is only one row in the list, or if the data displayed
are the first row on the list.
List
Displays the list box generated by the search record for this panel
and allows you to select another row. If you accessed a row directly
without going through a list box, this push button is grayed out.
Panel Navigation
Using toolbar buttons is the most efficient way of moving through the panel groups when
performing data entry or viewing information. In a data entry session, many panels may have to
be accessed to complete the data entry process.
These steps may also be accessed from the View menu.
Page 33
Introduction To The Spectrum System
Panel Navigation (continued from previous page)
Button/Action
Definition
Next Panel in Group
Previous Panel
in Group
Next Panel
Previous Panel
Brings up the next panel in the current panel group. If you
have come to the end of the panel group, it brings up the first
panel in the group again. For example, if you are on the third
of three panels in a panel group, this button brings you to the
first panel.
Brings up the previous panel in the current panel group. If
you are at the first panel of a group, it brings up the last panel.
For example, if you are on the first of three panels in a panel
group, this button brings you to the third panel.
Brings up the next panel in the menu list. From the last panel
in a menu, the Next Panel button summons the first panel in
the next panel group on the menu. For example, imagine
there are two panel groups in a row, Group A and Group B,
each with two panels. If you press this button from the
second panel in Group A, you will move to the first panel in
Group B.
Brings up the previous panel in the menu list. From the first
panel in a menu, the Previous Panel button summons the
panel group prior to this one from the menu. For example,
imagine there are two panel groups in a row, Group A and
Group B, each with two panels. If you press this button from
the first panel in Group B, you will move to the second panel
in Group A.
Row Functions
Adding rows in a panel allows you to add additional information, rather than updating existing
data. When rows that have dates associated with them are inserted, you are actually building a
history of information.
Button/Action
Definition
Inserts a new row in a scrollable frame.
Insert Row
Deletes the current row of data.
Delete Row
Page 34
Introduction To The Spectrum System
Toolbar Navigator
The navigator buttons offer an alternative route to the panels as well as giving you an overall
view of how the business processes link together. Once in the Navigator, you can click on any
graphic to jump directly to that process without stepping through the menus.
Button Action
Navigator
Go Back
Go Forward
Definition
Toggles to the Spectrum System Navigator
tool.
Moves you to the previously accessed
panel.
Moves you forward to a panel. This feature
is turned on only after using the Go Back
button.
Data Entry Modes
When performing multiple data entries, (for example, recording information for several vendors)
the data entry mode buttons save repeated backtracking through the menus. These buttons
can be accessed from the toolbar and bring up a search dialog box to enable you to select the
next record easily.
Button/Action
Definition
Inserts a new row of information to the database with a new high-level
key.
Add
Accesses existing rows of data on the database. If data is effectivedated, displays only current and future rows.
Update/Display
Update/Display All
Accesses existing rows of data on the database and displays all
effective-dated rows. Allows you to update only current and future
rows.
Correction
Accesses existing rows of data on the database and displays all
effective-dated rows. Allows you to update all rows, including history
rows.
Page 35
Introduction To The Spectrum System
Chapter 11
Effective Dating
Effective dating is a key feature of the Spectrum System. It allows you to view, maintain,
analyze and report on past, current and future information. The Spectrum System maintains a
complete chronological history of all of your data and tables, whether you changed them two
years ago or want them to go into effect two months from now.
When you enter new information related to existing data, you don’t want to lose or overwrite the
data already stored in the database. To retain history, you add a data row identified by a date
when the information goes into effect, an effective date. Effective dates allow you to keep
history, current, and future dated information.
Effective Date Categories
The system categorizes effective-dated rows into three types: current, history, and future. You
can determine if a transaction is a current, future, or history row based on the effective date of
the transaction and today’s date.
Category
Definition
Current
The data row with the most recent effective date that is closest
to today’s date---but does not exceed today’s date (not a future
date). Only one row may be the current row.
History
Data rows that have effective dates earlier than the current data
row.
Future
Data rows that have effective dates later (greater) than today’s
date.
Example
Effective Dated Information
As Of
01/01/1999
Vendor ID
Loc
Eff Dt
Address
1201001
002
03/10/1999
248 Ex...
1201001
002
01/20/1997
126 Co...
1201001
002
09/24/1985
523 St...
Future
Current
History
Page 36
Introduction To The Spectrum System
Data Entry Modes
Every time you select a panel or panel group, a mode is associated with it. The data entry
modes are Add, Update/Display, Update/Display All, and Correction. Access to the
Correction mode is based on your security profile. If the panel does not contain effective dated
rows, the Spectrum System will default to Update/Display.
Data Entry Mode
Data Entry Required
Add
Inserts a new row of information to the database with a new high-level
key. For example, when you enter a new vendor, you will not have any
data on the vendor in the system yet, so you will add a new row of data
to the tables in which vendor data is stored.
Update/Display
Retrieves current and future existing rows of data on the database.
You can insert, but not change or delete, a current row. You can insert,
change or delete future rows.
Update/Display
All
Retrieves history, current and future existing rows of data in the
database. You can insert, but not change or delete, a current row. You
can insert, change or delete future rows.
Correction
Retrieves history, current and future rows of data. It allows you to
change or correct any row and insert new rows regardless of the
effective date or sequence number. Access to Correction is very
limited and requires extensive training.
Example
The data entry mode selected determines whether you can view and update
information.
UPDATE/
DISPLAY
ALL
UPDATE/
DISPLAY
CORRECTION
View
Update
View
Update
View
Update
FUTURE
> Today
Yes
Yes
Yes
Yes
Yes
Yes
CURRENT
< Today
Yes
No
Yes
No
Yes
Yes
HISTORY
< Current
No
No
Yes
No
Yes
Yes
Page 37
Introduction To The Spectrum System
Chapter 12
Data Retrieval
Data is retrieved by entering criteria in a search dialog box. The computer searches through the
database and either displays the panel with the row of data you requested or a list of the
matching records from your criteria entry. The list only appears if the criteria entered are not an
exact match. You may then select the data you wish to retrieve from the list to display the data
in the panel.
Searching is conducted by using key fields that are unique to specific sets of data. There may
be more than one key associated with a search; the keys listed in the first frame on the search
dialog box are referred to as the primary keys. Primary keys uniquely identify an individual, or a
unique row of data. If the primary key is entered correctly and in its entirety, the panel with the
associated data displays. Other keys are referred to as alternate search keys. If the primary
key is not known, the alternate key provides an easy way to search for data, but does not
uniquely identify rows of data. Complete or partial entry of an alternate key results in a list box
appearing from which you must select the item for viewing.
Example of a Search Dialog Box:
Primary Keys
Alternate Keys
List Box
(Search Results)
The primary keys in this example are Business Unit and Voucher ID. The alternate keys are
Invoice Number, Short Vendor Name, Vendor ID, and Name 1.
Page 38
Introduction To The Spectrum System
Search Criteria
There are two value types and a wild card option to use in the primary and alternate search
keys.
¾ Full Text Values Valid values that are entered in its entirety into a field. For example, the
voucher Id field consists of an 8-digit value. The entire 8-digit number must
be entered. In the example that follows, the Voucher Id is 00751438. Other
examples include Requester or Buyer Name, a complete name in
PeopleSoft format (Clark,Mary K); or Req ID, a 10-digit number
(0000031508). Leading zeros must be included when entering IDs.
¾ Partial Values
Partial value searches allow you to enter only a partial value in a field and
browse through a list of possible matches to select a record. Some
examples include Voucher Id (00751); Requester or Buyer Name, a partial
name (Cla); or Req ID (00000315).
¾ Wild Card (%)
The wild card is useful when searching using partial values. The wildcard
represents unknown characters in a search. An example of a wild card
search would be entering %Mary in the Requestor Name or Buyer Name
field. The system would return all people with Mary as part of their first,
middle, or last name.
If you know all of the necessary search keys to identify your data, you may enter that
information and click OK to display the panel with the information you requested.
Example of Full Text Value Search:
In the example above, the full text value was known and entered into the primary key, Voucher ID. This is known
as a full/complete search. The Business Unit by itself is not a primary key, since the Spectrum System only uses
one Business Unit, GSUFS. All transactions---vouchers, purchase orders, requisitions, and journals---are entered
using the same Business Unit.
Page 39
Introduction To The Spectrum System
Often, however, you may not have all the information you need. You can use alternate keys to
assist you in selecting the appropriate records. Once you have entered an alternate key, the
system displays the list from which you may select a value.
Example:
In this example, the primary key is unknown. The vendor name (Name 1: field) is used as an alternate search key
to help locate the data. Upon entering the data in the field Name 1:, press the Search button to display a list of
records matching the criteria you entered, OFFICE INTERIORS,INC. From this list select the appropriate data row.
Search Results
Search Results show all rows which match your search criteria. The search function can retrieve
up to 300 entries from the database at a time. Use your browser’s scroll bar to view all listings
on the current page. If your search retrieves more than the maximum 300 listings, a message at
the bottom of the panel will display---“More matching entries were found than can be displayed.”
If you are unable to retrieve the data you need on the first attempt, narrow your search by using
wildcards and/or entering additional criteria. It is better to narrow your search if the results
display too many rows to effectively review.
You can increase your system response time by limiting the number of rows the Spectrum
System retrieves during a search. This is particularly useful with tables that have many rows,
such as the Vendor ID Table. You can prompt for lists of valid values from entering partial
values just like in a Search Dialog Box.
F4 Function Key There can be many entries in the Vendor ID Table. You can select the
drop-down list box or Press F4 to view the first 300 entries of that data table. Double-click on
the data to select it for the field.
Page 40
Introduction To The Spectrum System
Example:
Place
cursor in
Vendor Id
field and
press the
F4 key for
a list of
possible
choices.
Click on the
data you wish
to retrieve and
double-click on
data to select it
for the field.
In this example, the cursor is placed in the Vendor ID field and the F4 button is pressed which
brings up a list of valid values for Vendor ID. When you click on a row of data, it becomes
highlighted. In our example, the vendor ShortName LEXISNEXIS-001 has been selected for
retrieval. To select the data for the field, double-click on it. Notice the message at the bottom of
panel, “More matching entries were found than can be displayed.” This message conveys that
the search criteria should be limited or narrowed down to better assess possible choices.
<Shift> + F4 You can also limit your search by deleting any existing values from the field and
entering the first character or characters you want the Spectrum System to match.
Example
<Shift> + F4. If you delete the data from the Business Unit field, type a G, Press
<Shift> + F4, you will retrieve a list of all Business Units beginning with G:
Page 41
Introduction To The Spectrum System
Exercise
Step 1
Partial Value Search Using a Wild Card
Navigate to the Express Voucher Search Dialog Box
Navigation: Go, Administer Procurement, Enter Voucher Information
Step 2
The Enter Voucher Information window is displayed.
Navigation: Use, Express Voucher, Invoice Information, Update/Display
Step 3
The Update/Display—Express Voucher Search Dialog Box is displayed.
Page 42
Introduction To The Spectrum System
Step 4
Input your search criteria and press the Search button.
Business Unit: defaults to GSUFS
Voucher ID: 007
Invoice Number: 2005
Name 1: %Frank
This example uses partial values for the Voucher ID and the Invoice Number fields and a Wild Card
for the Name 1 field.
Step 5
Search Results:
The Spectrum System retrieves all vouchers that have voucher ids that begin with the
numbers 007 and that have Invoice Numbers that begin with 2005 and the characters
‘Frank’ is included in the first, middle, or last name of the Name 1 field.
Step 6
Retrieve Data:
Review search results. Retrieve data by double-clicking on Voucher 00705357 or
clicking on Voucher 00705357 and pressing the OK button.
Page 43
Introduction To The Spectrum System
Step 7
The Spectrum System retrieves voucher 00705357 for viewing.
Page 44
Introduction To The Spectrum System
Chapter 13
Data Entry
All data entry takes place on the panel or panel group by using edit boxes, radio buttons, dropdown list boxes, checkboxes or long edit boxes. These all occur on panels and associate
directly with the database tables.
Moving Between and Within Panels
When moving within the panel, certain things are critical to remember:
•
•
•
The Enter key is equivalent to the Save command. Using Enter will not move you around
the panel.
Use Tab or your mouse to navigate around the panel. The Tab key moves you one field
at a time, in a pre-determined sequence. Shift + Tab moves you backwards one field at a
time. Or you can move to a specific field using your mouse. Simply position the pointer on
the field and click the left mouse button.
Using the Tab to move through the fields will ensure all required elements have been
entered.
You can move between the panels in a Panel Group by choosing any of the following methods:
•
•
•
•
Click on the panel tab with the mouse;
Press F2 to move to the next panel and (Shift + F2) to move to the previous panel;
Click the toolbar icons ¾ the Next Panel in Group icon and
¾ the Previous Panel in Group icon;
Select the panel through the menu bar.
The Name field is defined with a Name format that requires you to enter data as:
LastName,FirstName Initial
Page 45
Introduction To The Spectrum System
View Date Boxes
Enter a date by either of the following methods:
• Place the cursor in the date field and double-click with the left mouse button
• Place the cursor in the date field and Press F4
• Enter the date (mm/dd/yy): PeopleSoft requires that 6 digits be entered, but the user
does not have to type the slashes. The slashes will populate
once the user presses the Tab key or moves out of the field.
Place cursor in date field and
double-click or press F4
Select the desired date by clicking
on the forward
and back
arrows to adjust the month, and
click the double forward
and
arrows to adjust
double back
the year. For the day of the
month, click on the day.
•
Due to the change of the century, when entering two digits for the year, the user should
note the following breakdown that will populate: 00 - 49 (2000), 50 - 99 (1900s)
If you enter a field value incorrectly, the system flashes a warning message. Clicking the
Explain button shows the correct format to use.
Page 46
Introduction To The Spectrum System
Chapter 14
Processes
Once data is entered into the Spectrum System, those records are available for various
processing activities. Some examples of processes include running reports, budget checking
requisitions, and posting vouchers.
The steps for running a process are as follows:
Before running a process, specify criteria to let the system know what data
to process and when and where to process it.
Specify when and where to run the process in the Process Scheduler.
If processes are run regularly, use run controls to bypass all of these steps.
Run controls load all the specifications for you. Choose Add to establish
new run parameters, and Update/Display to run a process for which you've
already established a run control.
Exercise
Running a Report
Step 1
Select a Report from menu – Requisition Print
Step 2
Navigation: Go, Administer Procurement, Requisition Items
Step 3
Navigation: Report, Requisition Print, Add
Page 47
Introduction To The Spectrum System
Exercise - Running a Report (Continued from previous page)
Step 4
Establish a Run Control
At the Add—Requisition prompt box, type in the name of the Run Control ID and
press the OK button.
Note: Spaces cannot be used in the run control id name, use underscores instead. Once you
have established a Run Control, use the Update/Display mode the next time you run the process.
Step 5
Specify the criteria for the report.
Business Unit: GSUFS
Requisition ID: the 10-digit requisition number you would like to print
Requisition Statuses to Include: Check all boxes
Select ‘On Hold AND Not On Hold’
Press the
Save icon.
Note: You may also use the date range---From Date:, Through Date---if you do not know the
requisition number or if you would like multiple requisitions printed out..
Step 6
Press the
Run icon.
Page 48
Introduction To The Spectrum System
Exercise - Running a Report (Continued from previous page)
Step 7
The Process Scheduler Request box appears.
Select Client for Run Location, Printer for Output Destination.
The bottom of the Process Scheduler Request dialog box lists the processes that are
available to run. Highlight the processes to run and click OK. If only one process
appears, it will already be highlighted.
The Process Scheduler
The Process Scheduler plays an important role in accessing and manipulating data in the
Spectrum System. The Process Scheduler is used as a vehicle to begin or “kick-off” the
processes requested through the Process and Report on-line menus. When you request a
process to run or a standard report to print, you are actually asking the Process Scheduler to
schedule the process for you. The Process Scheduler is a PeopleTool that performs tasks
behind the scenes. It can run several kinds of processes-COBOL programs, database queries,
reports-on a regular schedule or at your request. Furthermore, it can run the processes at your
workstation or on a server. The Process Scheduler handles reports because you'd typically like
the system to generate the report while you continue to work on something else. The Process
Scheduler also enables you to track the status of the report.
Step 8
The Results of the Requisition Print page.
Page 49
Introduction To The Spectrum System
Process Monitor
It can be difficult to determine whether the process you requested actually ran, unless the output
is obvious, such as a hard copy report. The Process Monitor allows you to see whether the
process you scheduled to run was successful.
The Process Monitor is accessed through People Tools.
Step 1
Access the Process Monitor panel.
Navigation: Go, PeopleTools, Process Monitor
Step 2
Process Monitor page is displayed.
Page 50
Introduction To The Spectrum System
Updating a Process
Depending on the status of a process, you can cancel it, delete it, put it on hold, or requeue it.
The table below shows which actions you can take for each status.
Status
Error
Queued
Initiated
Canceled
Processing
Successful
Unsuccessful
Hold
Possible Actions
Delete
Cancel, Hold
Cancel
Delete
Cancel
Delete
Delete
Queue
Canceling a process keeps the process from being run and changes its status to Canceled in
the Process Monitor. Deleting a process completely removes it from the Process Monitor. The
status reads Deleted until you refresh the Process Monitor. After the monitor is refreshed, the
process no longer appears.
To cancel a process:
¾ Highlight the process in the Process Monitor.
¾ Select Cancel from the Action menu.
To delete the process:
¾ Open the Action menu again.
¾ Select Delete.
To put a process on hold:
¾ Highlight the process
¾ Select Action, Hold.
To start the process again later:
¾ Select Action, Queue.
In this Example, the Status is Success and the only Possible Action is Delete.
Page 51
Introduction To The Spectrum System
Appendix A
Keyboard Functions
Online Help Access
<F1>
Help Infobase
Search List Navigation
<F4>
<Shift> +
<F4>
<Ctrl > +
<F4>
Displays a list of all valid values.
Displays a partial list of valid codes based on
partial search criteria.
Prompts for alternate search criteria.
Panel Navigation
<F2>
<Shift> + <F2>
<F6>
<Shift> + <F6>
Displays next panel in a group.
Displays previous panel in a group.
Displays next panel in the menu.
Displays previous panel in the menu.
Scroll Functions
<F7>
<Shift> + <F7>
<Ctrl> + <F7>
<F8>
<F9>
<Shift> + <F9>
<Ctrl> + <F9>
Inserts a row.
Inserts a prior row.
Forces a row write.
Deletes a row.
Displays the next record in a search list.
Displays the previous record in a search list.
Displays all records in a search list box.
Edit Functions
<F5>
<Del>
Inserts an image.
Deletes the highlighted text.
Page 52