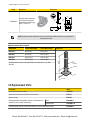
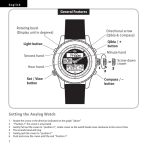
1
A-GAGE EZ-ARRAY IO-Link Instruction Manual
Rev.B 4/13/2012
157954
Phone: 800.894.0412 - Fax: 888.723.4773 - Web: www.clrwtr.com - Email: [email protected]
Contents
Contents
1 Features
2 Overview
................................................................................................................................................. 4
................................................................................................................................................ 5
2.1 System Components
.................................................................................................................................................... 6
2.2 Features
........................................................................................................................................................................6
2.3 Configuration via DIP Switch or IO-Link Interface ......................................................................................................... 7
2.3.1 Outputs
............................................................................................................................................................. 7
2.3.2 Display Invert
.................................................................................................................................................... 7
2.4 Status Indicators
........................................................................................................................................................... 7
2.4.1 Zone Indicators (Beams Blocked Segment)
..................................................................................................... 7
........................................................................................................................................... 7
2.4.2 Three-Digit Display
2.4.3 Blanking Indicator
............................................................................................................................................. 8
2.4.4 Electronic Configuration Indicator
..................................................................................................................... 8
2.4.5 Receiver Interface Status Indicators
................................................................................................................. 8
2.5 Receiver Gray (Remote Teach) Wire
........................................................................................................................... 9
2.6 Scanning Method
........................................................................................................................................................10
2.6.1 Straight Scan
.................................................................................................................................................. 11
2.6.2 Single-Edge Scan
........................................................................................................................................... 11
2.6.3 Double-Edge Scan
..........................................................................................................................................11
2.6.4 Maximum Scan Times
.................................................................................................................................... 12
2.7 Gain Configuration .......................................................................................................................................................12
2.8 Electronic Alignment Routine
......................................................................................................................................13
2.9 Blanking
......................................................................................................................................................................13
2.10 Measurement Mode Selection
.................................................................................................................................. 14
2.11 Analog Output Configuration
.................................................................................................................................... 15
2.12 Discrete Output Configuration
.................................................................................................................................. 15
3 Components and Specifications
....................................................................................................... 16
3.1 Sensor Models
............................................................................................................................................................16
3.2 Cordsets and Connections
......................................................................................................................................... 17
3.3 Alignment Aids
............................................................................................................................................................18
3.4 Accessory Mounting Brackets and Stands
................................................................................................................. 18
3.5 Replacement Parts
..................................................................................................................................................... 19
3.6 Specifications
..............................................................................................................................................................20
3.7 Emitter and Receiver Dimensions
.............................................................................................................................. 21
3.8 Standard Bracket Dimensions
.................................................................................................................................... 22
4 Installation and Alignment
................................................................................................................. 23
4.1 Mounting the Emitter and Receiver
............................................................................................................................ 23
4.2 Mechanical Alignment
.................................................................................................................................................24
4.3 Hookups
......................................................................................................................................................................25
4.4 Optical Alignment
........................................................................................................................................................26
5 Receiver User Interface
...................................................................................................................... 27
5.1 Configuration DIP Switch
............................................................................................................................................27
5.1.1 Scanning Modes (S1 and S2)
......................................................................................................................... 28
5.1.2 Measurement Modes (S3 and S4)
.................................................................................................................. 28
5.1.3 Analog Slope (S5) ............................................................................................................................................28
5.1.4 Complementary/Alarm (S6)
............................................................................................................................ 28
5.2 Alignment/Blanking Button (Electronic Alignment)
..................................................................................................... 29
5.2.1 Electronic Alignment and Blanking - Receiver Interface
................................................................................. 29
5.2.2 Flashing "000" on the 3-Digit Display
..............................................................................................................29
5.3 Gain (Sensitivity Adjust) Button
.................................................................................................................................. 29
5.4 Inverting the 3-Digit Display
........................................................................................................................................29
2
Rev.B
Phone: 800.894.0412 - Fax: 888.723.4773 - Web: www.clrwtr.com - Email: [email protected]
Contents
5.5 Troubleshooting and Error Codes
5.5.1 "Dirty" Channel Indicator
6 IO-Link Interface
...............................................................................................................................29
.................................................................................................................................30
..................................................................................................................................31
6.1 Overview
.....................................................................................................................................................................31
6.2 IO-Link Profile and Models
......................................................................................................................................... 31
6.3 Hardware Interface
..................................................................................................................................................... 32
6.3.1 Electrical Interface
.......................................................................................................................................... 32
6.3.2 IO-Link Master
................................................................................................................................................ 33
6.4 IODD (IO-Link Device Description) ..............................................................................................................................33
6.5 Configuration Data
......................................................................................................................................................33
6.5.1 Scan Configuration
......................................................................................................................................... 33
6.5.2 Blanking Configuration
....................................................................................................................................34
6.5.3 General Configuration
.....................................................................................................................................35
6.5.4 Analog Output 1 Configuration
........................................................................................................................37
6.5.5 Analog Output 2 Configuration
........................................................................................................................38
6.5.6 Discrete Output 1 Configuration
......................................................................................................................39
6.5.7 Discrete Output 2 Configuration
......................................................................................................................40
6.6 System Status and Measurement Data ....................................................................................................................... 40
6.6.1 Active Measurements
..................................................................................................................................... 40
6.6.2 ALL Measurements
.........................................................................................................................................41
6.6.3 Channel States
............................................................................................................................................... 42
6.6.4 System Info and Status
...................................................................................................................................43
6.6.5 Receiver and Emitter Version Info
.................................................................................................................. 45
6.6.6 Communications Version Info
......................................................................................................................... 45
6.6.7 Alignment/Blanking Routine
............................................................................................................................45
3
Phone: 800.894.0412 - Fax: 888.723.4773 - Web: www.clrwtr.com - Email: [email protected]
A-GAGE EZ-ARRAY IO-Link Instruction Manual
1 Features
• A cost-effective, two-piece measuring light curtain designed for quick and
simple installations with the sophistication to handle the toughest sensing
applications
• Excels at high-speed, precise process monitoring and inspection, profiling,
and web-guiding applications
• A comprehensive combination of scanning options:
•
•
•
•
• 14 measurement (“scan analysis”) modes
• 3 scanning methods
• Selectable beam blanking
• Selectable continuous or gated scan initiation
• Selectable threshold setting for semi-transparent applications
• 2 analog outputs, 2 discrete outputs
• Communication interface via IO-Link
Outstanding 4 meter range with 5 mm beam spacing
Available in 12 lengths from 150 mm to 2400 mm
Excellent 5 mm minimum object detection or 2.5 mm edge resolution, depending on scanning method
Receiver user interface for quick, intuitive setup of many common applications:
• 6-position DIP switch for setting scan mode, measurement mode, analog slope, discrete output 2 option (complementary measurement or
alarm operation)
• 2 push buttons for gain method selection and alignment/ blanking
• 7 Zone LEDs for instant alignment and beam blockage information
• 3-digit display for sensing information and diagnostics
• Advanced configuration via IO-Link communication interface
• Remote teach wire option for alignment, gain settings, inverted display, and
DIP switch disable
WARNING: Not To Be Used for Personnel Protection
Never use this product as a sensing device for personnel protection. Doing so could lead to serious injury
or death. This product does NOT include the self-checking redundant circuitry necessary to allow its use in
personnel safety applications. A sensor failure or malfunction can cause either an energized or de-energized sensor output condition.
4
wm - tel: 763-544-3164
Rev.B
Phone: 800.894.0412 - Fax: 888.723.4773 - Web: www.clrwtr.com - Email: [email protected]
2 Overview
The A-GAGE™ EZ-ARRAY™ measuring light screen is ideal for such applications as on-the-fly product sizing and profiling, edge-guiding and center-guiding, loop tensioning control, hole detection, parts counting, and similar uses (see Figure 2-1).
Emitters and receivers are available with arrays from 150 to 2400mm (5.9" to 94.5") long. The emitter has a column of infrared light
emitting diodes (LEDs) spaced 5mm apart; their light is collimated and directed toward the receiver, positioned opposite the emitter,
which has photodiodes on the same 5mm pitch. The light from each emitter LED is detected by the corresponding receiver photodiode.
This sophisticated light curtain is capable of detecting opaque cylindrical objects as small as 5mm in diameter or measuring part edges
within 2.5 mm, depending on the scanning method selected (see Scanning Method). The sensing range is 400 mm to 4 m (16" to 13').
The EZ-ARRAY’s two-piece design makes it economical and easy to use. Controller functionality is built into the receiver housing. It can
be configured for many straightforward applications simply by configuring the six-position DIP switch on the front of the receiver (the
receiver user interface).The IO-Link communication interface provides the capability for more advanced control and monitoring. See IOLink Interface.
Installation is easy, too. The emitter and receiver housings can be side-mounted or end-cap-mounted using the included end-cap brackets; longer models also include a center bracket (see Mounting the Emitter and Receiver).
Beam synchronization is achieved via the 8-conductor sensor cables. Individual LEDs and a 3-digit diagnostic display on the receiver
provide ongoing visual sensing status and diagnostic information. Comprehensive data is available to a process controller via a combination of four outputs: two analog and two discrete (discrete output 1 is an IO-Link output). The IO-Link output provides a discrete output
(SIO mode) or a communication interface (IO-Link mode).
Figure 2-1. Typical A-GAGE EZ-ARRAY application
Phone: 800.894.0412 - Fax: 888.723.4773 - Web: www.clrwtr.com - Email: [email protected]
A-GAGE EZ-ARRAY IO-Link Instruction Manual
2.1 System Components
A typical A-GAGE EZ-ARRAY has four components: an emitter and a receiver, each with an integral quick-disconnect (QD) fitting, plus an 8-pin
QD cordset for the emitter and for the receiver (see Figure 2-2).
For applications that use the IO-Link interface, an additional cable splitter
is used to convert the receiver 8-pin connector to a compatible M12 connector.
Figure 2-2. A-GAGE EZ-ARRAY system components
2.2 Features
Built-in features in the EZ-ARRAY contribute to its ease of use.
Many features are available using either the user-friendly receiver interface or the more advanced IO-Link interface.
Emitter
Connection to 5-pin
Communication Cable
Under Hinged Access Panel:
Built-in diagnostic programming and easy-to-see indicators on
the receiver simplify physical alignment and troubleshooting
(Figure 2-3); more advanced diagnostics are available via the
IO-Link interface.
The receiver has a bright LED that indicates overall sensing
status (OK, marginal alignment, and hardware error). Two other LEDs indicate serial communication status. Seven Zone indicators each communicate the blocked / aligned status of oneseventh of the total array. A 3-digit diagnostic display provides
further diagnostic information, including number of beams
blocked, whether blanking is configured, and troubleshooting
codes.
Receiver
Zone Indicators
3-Digit Diagnostic
Display
Alignment/Blanking
Push Button
Power ON
LED
Gain (Sensitivity Adjust)
Push Button
Beam #1
(Closest to
Display)
6-Position
Configuratio n
DIP Switch
Status, Communication Active, and
Communication Error LEDs
Screw-on Security Plate
limits access to DIP switch
and push buttons
Figure 2-3. A-GAGE EZ-ARRAY features
The emitter has a red LED that signals proper operation (ON when power is applied). See Status Indicators for more information about
indicators and Troubleshooting and Error Codes for display codes and troubleshooting.
The Alignment routine (Alignment Blanking Button or Alignment Blanking Routine ) automatically equalizes the excess gain of each beam
for reliable object detection throughout the array. This routine need not be performed again unless the sensing application changes, or if
the emitter and/or receiver is moved.
Configurable beam blanking accommodates machine components and fixtures that must remain in or move through the light screen.
Blanking may be set using the receiver interface, the teach wire, or the IO-Link interface.
6
wm - tel: 763-544-3164
Rev.B
Phone: 800.894.0412 - Fax: 888.723.4773 - Web: www.clrwtr.com - Email: [email protected]
A-GAGE EZ-ARRAY IO-Link Instruction Manual
The EZ-ARRAY light screen provides a wide selection of sensing and output options, including measurement (“scan analysis”) modes
and scanning methods that can determine a target object’s location, overall size, total height, or total width, or the number of objects.
Scanning may be continuous or controlled by a gate sensor.
2.3 Configuration via DIP Switch or IO-Link Interface
Commonly used configuration options can be set up easily via a six-position DIP switch located behind a hinged clear access panel on
the front of the receiver.
Access to the DIP switch can be prevented by using the screw-on security plate to hold the clear access panel closed or by disabling
them via the IO-Link interface.
2.3.1 Outputs
All models have two analog outputs and two discrete outputs (discrete output 1 is an IO-Link output).
The analog outputs are 0–10V voltage. They may be configured (via DIP switch or IO-Link interface) for either a positive or negative
slope.
Discrete output 1 is always used for measurement; discrete output 2 may be used either for alarm or measurement operation (selectable
via DIP switch or IO-Link interface). When the receiver interface is used, discrete output 1 and analog output 1 follow the same measurement mode. When the IO-Link interface is used for configuration, discrete output 2 has full configurability, including measurement mode,
NPN or PNP polarity, and normally open or normally closed operation. Discrete output 1 has the same configurability as discrete output
2, except for NPN or PNP polarity. Discrete output 1 is a dedicated push-pull output.
2.3.2 Display Invert
For applications where the sensors must be mounted with the display end at the top (so that the display is not right-reading), the receiver’s diagnostic display can be inverted for easy reading, either by use of the receiver’s remote wire (Receiver Gray (Remote Teach) Wire)
or the IO-Link interface (HW Interface Flags in Appendix: General Configuration).
2.4 Status Indicators
Both the emitter and receiver provide ongoing visual indication of operating and configuration status.
The emitter has a red LED that signals proper operation (ON when power is applied).
The receiver has a bright Status LED that indicates overall sensing status (OK, marginal alignment, and hardware error). Two other LEDs
indicate whether communication is active or if there is an error. Seven Zone indicators each communicate the blocked/aligned status of
one-seventh of the total array. A 3-digit diagnostic display provides further diagnostic information: number of beams blocked, whether
blanking is configured, and troubleshooting codes. See Troubleshooting and Error Codes for display codes and troubleshooting.
2.4.1 Zone Indicators (Beams Blocked Segment)
Seven LEDs represent emitter/receiver alignment status. They provide a visual aid for sensor alignment and monitoring objects within the
sensor’s field of view. The sensor array is partitioned into seven equal segments, each of which is represented by one of the seven LEDs.
The LED closest to DIP switch S6 (see Figure 5-1) represents the group of optical channels closest to the receiver display (the “bottom”
group). The LED closest to DIP switch 1 represents the far segment of channels.
These LEDs illuminate either green or red. When an LED is green, no unblanked beams are obstructed in that segment. When the LED
is red, one or more beams in that segment is obstructed.
2.4.2 Three-Digit Display
The 3-digit display has slightly different functions during normal operation, alignment, and gain adjust modes. In normal operation the
display indicates the current numerical value of measurement mode 1. The display also identifies the following activated sensor functions:
blanking and locked-out user interface/electronic configuration, as shown in Figure 2-4. (For directions for inverting the display, see
Receiver Gray Wire or see HW Interface Flags in General Configuration.)
Rev.B
wm - tel: 763-544-3164
7
Phone: 800.894.0412 - Fax: 888.723.4773 - Web: www.clrwtr.com - Email: [email protected]
A-GAGE EZ-ARRAY IO-Link Instruction Manual
During blanking mode, the display reads “n”, followed by the number of blocked beams in the array. During alignment mode, it reads “A”,
followed by the number of blocked, unblanked beams; a period follows the A (“A.”) if blanking is configured.
During gain adjust mode, the display reads “ L ” followed by “1” or “2” to indicate the gain level. (A “1” represents high excess gain, and a
“2” represents low contrast.)
If a sensing error occurs, the display reads “c” followed by a number that corresponds to the recommended corrective action (see Troubleshooting and Error Codes).
2.4.3 Blanking Indicator
The Blanking indicator will be visible (ON) when the blanking feature is enabled. It appears as a period following the first digit of the
display.
2.4.4 Electronic Configuration Indicator
The Electronic Configuration indicator is ON when the sensor configuration is defined by the IO-Link interface, and not the DIP switch.
When electronic configuration is enabled, the DIP switch is ignored.
‘A’ in this
position indicates
Alignment mode
Period ON
indicates
Blanking
Configured
Period ON indicates
Electronic Configuration
Enabled
Figure 2-4. Indications provided by the receiver's 3-digit display
2.4.5 Receiver Interface Status Indicators
The receiver has three status indicators: green/red STATUS, yellow COMM, and red ERROR. The following table lists the indicator
states.
Figure 2-5. Receiver Interface Status Indicators
LED Indicator
STATUS
Color
Explanation
Green
System is OK
Red
Marginal Alignment or Hardware Error; check 3-digit display*
COMM
Yellow
IO-Link Mode - Indicator is flashing
ERROR
Red
Error: Check cabling or master controller
*Display shows “c”: See Troubleshooting and Error Codes.
Display shows only numbers: Low Gain/Marginal Alignment condition. See Troubleshooting and Error Codes.
8
wm - tel: 763-544-3164
Rev.B
Phone: 800.894.0412 - Fax: 888.723.4773 - Web: www.clrwtr.com - Email: [email protected]
A-GAGE EZ-ARRAY IO-Link Instruction Manual
2.5 Receiver Gray (Remote Teach) Wire
The receiver gray (remote teach) wire is used to electronically emulate the receiver push button functions (see Troubleshooting and Error
Codes) via a process controller, to disable the DIP switches for security, or to provide a gate input to initiate sensor scanning. Connect a
normally open switch between the receiver's gray wire and dc common, or connect the gray wire to a digital input (PLC) and pulse the
wire as indicated in Figure 2-5.
NOTE: A low level is 0 to 2 volts and a high level is 10 to 30 volts or circuit open. Input impedance is 22k.
Remote TEACH/Gate in the determines the functionality of the receiver gray wire (see Remote TEACH/Gate in Scan Configuration ).
• Disabled: The remote wire has no function (regardless of whether it is low or high). When the gray wire is disabled, the receiver is in
continuous scan mode; it begins a new scan immediately after updating the outputs from the previous scan. (Continuous scan is used
in most analog output applications and whenever continuous updating of the outputs is acceptable.) The gray wire is always enabled
when in DIP switch mode.
• Remote Teach: The gray wire provides the full Remote Teach functionality shown in Figure 2-5.
• Alignment/Sensitivity: This mode is an abbreviated version of Remote Teach. It can perform the alignment and sensitivity adjustment functions, but not the display inversion or DIP switch enable/disable functions.
Gate Mode options enable the gray wire to be wed as a gate input pulse, typically from a dc device such as an NPN-output photoelectric
sensor or a PLC discrete output.
• Gate - Active High - The receiver scans whenever the gate is pulled high.
• Gate - Active Low - The receiver scans whenever the gate is pulled low.
• Gate - Rising Edge - The receiver scans once for each low-to-high gate transition. (Multiple transitions cannot be faster than the
sensor's response for them to be reliably detected.)
• Gate - Falling Edge - The receiver scans once for each high-to-low gate transition. (Multiple transitions cannot be faster than the
sensor's response for them to be reliably detected.)
Figure 2-6. Remote Wire TEACH Procedures
Process
Alignment /
Blanking
Access Alignment
Mode
Access Blanking
Mode
Remote Wire Procedure 0.05 < sec. T < Result
0.8 sec.
"A" appears on 3-digit display
1X
From Alignment Mode:
"n" appears on 3-digit display, along with number
of blocked beams
2X
Exit Blanking Mode
1X
"A." appears on 3-digit display (sensor returns to
alignment mode with blanking enabled)
Sensor returns to run mode
Exit Alignment Mode
1X
Rev.B
wm - tel: 763-544-3164
9
Phone: 800.894.0412 - Fax: 888.723.4773 - Web: www.clrwtr.com - Email: [email protected]
A-GAGE EZ-ARRAY IO-Link Instruction Manual
Process
Remote Wire Procedure 0.05 < sec. T < Result
0.8 sec.
Gain Method Access Gain Mode
"L" appears on 3-digit display, along with number
"1" or "2", to designate gain level
From Run Mode:
2X
Toggle Between
Gain Settings
Number changes from number "1" to "2", back to
"1", etc.
1X
Save Gain Level and
Exit
When correct level is displayed:
Gain level is configured:
"1" = High-excess-gain setting
"2" = Low-contrast setting
Sensor returns to run mode
2X
Invert Display Invert Display
Display inverts from previous state; sensor continues in run mode
3X
Receiver In- Receiver Interface
terface Ena- Enable/Disable
ble/Disable
The factory default is Receiver Interface enabled.
4X
Four-pulsing the remote line saves the current settings and disables the interface (the sensor continues to operate using the saved settings; changes
made to the DIP switch will have no effect).
Repeating the process enables the Receiver Interface so that settings can be changed.
2.6 Scanning Method
One of three scanning methods may be configured:
• Straight Scan
• Single-edge Scan
• Double-edge Scan (1, 2, 4, 8, 16, or 32 steps)
Sensor response time is a function of sensor length and scanning method. Maximum scan times are shown in Figure 2-8.
Figure 2-7. The effect of scan mode and step size on minimum object detection size and edge resolution
Scanning
Method
Straight Scan
LowContrast
High-Excess-Gain
Minimum Object Detection
Size*
5 mm
(0.2")
10 mm
(0.4")
Edge Resolution
5mm
(0.2")
5mm (0.2")
Single-Edge
Scan
Double-Edge Scan (per Edge)
Step Size (Number of Beams)
1
2
4
8
16
32
10mm (0.4")
10mm
(0.4")
20mm
(0.8")
30mm
(1.2")
50mm (2")
90mm
(3.6")
170mm
(6.8")
2.5mm (0.1")
2.5mm
(0.1")
2.5mm
(0.1")
2.5mm
(0.1")
2.5mm
(0.1")
2.5mm
(0.1")
2.5mm
(0.1")
*MODS determined using a rod target object
10
wm - tel: 763-544-3164
Rev.B
Phone: 800.894.0412 - Fax: 888.723.4773 - Web: www.clrwtr.com - Email: [email protected]
A-GAGE EZ-ARRAY IO-Link Instruction Manual
2.6.1 Straight Scan
Straight Scan is the default mode, in which all beams are scanned in sequence, from the display end to the far end of the array. This
scanning method provides the smallest object detection size. Straight scan is used when low-contrast sensitivity is selected or when
single-edge and double-edge scan cannot be used. The edge resolution is 5 mm (0.2"). When low-contrast sensing is selected (used
when measuring semi-transparent objects), the minimum object detection size is 5 mm (0.2") diameter. When high-excess-gain sensing
is selected, the minimum object detection size is 10 mm (0.4"). See Figure 2-6.
2.6.2 Single-Edge Scan
Single-Edge Scan is used to measure the height of a single object. This scanning method is commonly used for box height measurement. For single-edge scan, the receiver always activates the first beam channel (or "bottom" beam, nearest the display). When the first
beam is blocked, the sensor performs a binary search to hunt for the last beam blocked, as follows:
1. The receiver scans only the first beam until it is blocked (see Figure 2-7).
2. When the first beam is blocked, the sensor looks to see whether the middle beam is blocked or made (unblocked).
3. If the middle beam is made (unblocked), the sensor checks the bottom quarter beam; if the middle beam is blocked, the sensor
checks the top quarter beam.
4. The routine continues to divide the number of beams in half until the edge is found.
Single-edge scan can be used only for single, solid objects that block the first beam (closest to the display). Because the receiver checks
only the first beam until it is blocked, single-edge scan will not function when the item to be measured does not block the first beam.
Single-edge scan is also ineffective if the object does not present a continuous blocked pattern.
Single-edge scan works only when the high-excess-gain setting is enabled. When single-edge scan is selected, the sensor object detection size is 10 mm and edge resolution is 2.5 mm.
2.6.3 Double-Edge Scan
Double-Edge Scan is used to detect two edges of a single object, for example, to determine box width measurements. Double-edge scan
requires the selection of a step size: 1, 2, 4, 8, 16 or 32 beams. The sensor uses the steps to "skip" over beams, as follows:
1. The sensor activates beam 1 (closest to the sensor display end).
2. The sensor activates the next beam, determined by the step size. (For example, if the step size is 2, beam 3 is next; if the step size
is 8, beam 9 is next.)
3. As long as the activated beam is made (unblocked), the sensor continues the stepping routine until a blocked beam is found.
4. When a blocked beam is found, a binary search is conducted to find the object's "bottom" edge.
5. When the bottom edge is found, the sensor continues to step through the array until it finds the next unblocked beam.
6. Another binary search is performed to find the second edge.
Similar to single-edge scan, double-edge scan has some restrictions: the object should provide a solid obstruction; the size of the object
determines the maximum step size (Figure 2-6). Double-edge scan can be used to detect up to three objects. Like single-edge scan,
double-edge scan works only when the high-excess-gain setting is selected. When double-edge scan is selected, the sensor object detection size varies, depending on the step size, but edge resolution is 2.5 mm.
Rev.B
wm - tel: 763-544-3164
11
Phone: 800.894.0412 - Fax: 888.723.4773 - Web: www.clrwtr.com - Email: [email protected]
A-GAGE EZ-ARRAY IO-Link Instruction Manual
Step #1
Step #2
Beam #1 of 30
blocked
Step #3
Beam #15
blocked
Beam #23 clear
Emitter
Receiver
Step #4
Step #5
Beam #17
blocked
Step #6
Beam #19 clear
Beam #18
blocked
Figure 2-8. Finding an edge using a binary search (single-edge scan)
2.6.4 Maximum Scan Times
Maximum Scan Times (in milliseconds)
Array Length
Straight
Scan
Single-Edge
Scan
Double-Edge Scan
Step 1
Beam
Step 2
Beams
Step 4
Beams
Step 8
Beams
Step 16
Beams
Step 32
Beams
150 mm (5.9")
2.8
1.5
3.4
2.8
2.5
2.4
1.9
N/A
300 mm (11.8")
5.0
1.5
5.9
4.1
3.2
2.8
2.3
2.1
450 mm (17.7")
7.1
1.6
8.5
5.5
4.2
4.0
3.2
2.5
600 mm (23.6")
9.3
1.6
11.0
6.8
4.9
4.2
4.0
2.8
750 mm (29.5")
11.4
1.7
13.5
8.1
5.7
4.6
4.5
4.5
900 mm (35.4")
13.6
1.7
16.0
9.5
6.1
4.7
4.6
4.6
1050 mm (41.3")
15.7
1.8
18.6
10.8
6.8
5.2
4.8
4.8
1200 mm (47.2")
17.9
1.8
21.1
12.2
7.4
5.5
4.9
4.9
1500 mm (59.1")
22.2
1.9
26.1
14.8
9.0
6.4
5.3
4.9
1800 mm (70.9")
26.5
2.0
31.2
17.5
10.5
7.3
6.0
5.6
2100 mm (82.7")
30.8
2.8
36.3
20.2
12.0
8.2
6.7
5.6
2400 mm (94.5")
35.1
2.8
41.4
22.9
13.5
9.1
7.4
5.9
Scan times are also dependent on analog filter speed; see Analog Output 1 Configuration and Analog Output 2 Configuration.
Figure 2-9. Maximum scan times for straight, single-edge and double-edge scanning
2.7 Gain Configuration
12
w - tel: 763-544-3164
Rev.B
Phone: 800.894.0412 - Fax: 888.723.4773 - Web: www.clrwtr.com - Email: [email protected]
A-GAGE EZ-ARRAY IO-Link Instruction Manual
The EZ-ARRAY provides two gain options for straight scan applications: high excess gain and low contrast. The gain method can be
selected using the receiver push button, the receiver remote teach wire, or the IO-Link interface.
High (maximized) excess gain is suited for detecting opaque objects and for reliable sensing in dirtier environments where objects to be
detected are 10 mm or larger. The high excess gain method is always used in single- and double-edge scan. The high excess gain option
has a minimum blocked threshold level, which provides reliable sensing at higher excess gain levels.
The low-contrast setting is used for sensing semi-transparent materials and for detecting objects as small as 5 mm (straight scan only).
In low-contrast operation, only a portion of a beam must be blocked for detection to occur. In low-contrast operation, the sensor sets an
individual threshold for each optical channel during the alignment process; this process equalizes the signal strength to allow semi-transparent object detection.
When using the IO-Link interface, low-contrast sensing provides a fine-tune sensitivity setting of 15% to 50%. When using the receiver
interface, low-contrast sensitivity is always 30%.
Gain Setting
Scan Method
EZ-ARRAY MODS*
EZ-ARRAY Resolution
Low Contrast
Straight Scan
5 mm
5 mm
Single-edge Scan
-
-
Double-edge Scan
-
-
Straight Scan
10 mm
5 mm
Single-edge Scan
10 mm
2.5 mm
Double-edge Scan
Depends on step size
2.5 mm / edge 5 mm total (both edges)
High Excess Gain
* MODS: Minimum Object Detection Size
Figure 2-10. Effects of Gain selection on minimum object detection size and sensing resolution
2.8 Electronic Alignment Routine
The objective of the optical alignment process is to adjust the emitter light level to maximize sensor performance. Perform the alignment
procedure at installation and again whenever the emitter and/or receiver is moved.
During the alignment procedure, the receiver polls each beam channel to measure excess gain and performs a gain adjustment for each
beam. When the system exits the alignment procedure, each channel's signal strength is stored in non-volatile memory.
The procedure can be performed using the receiver remote wire, the receiver interface push button or the IO-Link interface (see Receiver
Gray Wire, Alignment/Blanking Button, or refer to Alignment Blanking Routine). The receiver's Alignment push button may be disabled, by
configuration thru the IO-Link interface.
2.9 Blanking
If a machine fixture or other equipment blocks one or more sensing beams, the affected beam channels may be blanked. The blanking
option causes the receiver to ignore the status of blanked beams for measurement mode calculations. For example, if a machine fixture
blocks one or more beams during sensing, the output data will be incorrect; if the beams blocked by the fixture are blanked, the output
data will be correct. Blanking may be configured using the receiver's Alignment push button, the receiver remote wire, or the IO-Link
interface.
Rev.B
wm - tel: 763-544-3164
13
Phone: 800.894.0412 - Fax: 888.723.4773 - Web: www.clrwtr.com - Email: [email protected]
A-GAGE EZ-ARRAY IO-Link Instruction Manual
2.10 Measurement Mode Selection
The outputs may be configured for any of fourteen measurement (scan analysis) modes, which refer to specific beam locations, quantities of beams, or edge transitions. Note that not all measurement mode options are available when the receiver interface is used for
configuration. Selected modes are individually assigned to each output (see Configuration DIP Switch or refer to Measurement 1 and
Measurement 2 table in General Configuration).
When using the IO-Link interface for configuration, discrete output 2 can have NPN or PNP polarity (regardless of model), be normally
open or normally closed, and be assigned to any of the measurement modes. Discrete output 1 has the same configuration options as
discrete output 2, except for NPN or PNP polarity. Discrete output 1 is the IO-Link output and is a dedicated push-pull output. When using
the receiver interface, limited output configuration combinations may be selected see (Configuration DIP Switch).
NOTE: Array beams are numbered in sequence (beam 1 located nearest the sensor display; see Figure 2-3).
The "first beam" referenced in the following descriptions is the beam nearest the sensor display.
"Beam Location" Modes
Receiver
First Beam Blocked (FBB)
The location of the first blocked beam.
First Beam Made (FBM)
The location of the first made (unblocked) beam.
Emitter
60
50
Last Beam Blocked (LBB)
The location of the last blocked beam.
40
30
20
Last Beam Made (LBM)
The location of the last made beam.
In Last Beam Made mode,
last beam is #50 of 60
In First Beam Made mode,
first beam is #40 of 60
10
Receiver
Middle Beam Blocked (MBB)
The location of the beam midway between the first and last
blocked beams.
Emitter
Last Beam Blocked (LBB)
First Beam Blocked (FBB)
60
50
"Beam Total" Modes
Total Beams Blocked (TBB)
The total number of blocked beams.
40
30
20
Receiver
Total Beams Made (TBM)
The number of beams made.
Contiguous Beams Blocked (CBB)
The largest number of consecutively blocked beams.
Contiguous Beams Made (CBM)
The largest number of consecutively made beams.
Outside Dimension (OD)
The inclusive distance (measured in beams) from the first
blocked beam to the last blocked beam.
Inside Dimension (ID)
The number of made beams, between the first and last
blocked beams.
14
Last Beam Made (LBM)
First Beam Made (FBM)
w - tel: 763-544-3164
In Last Beam Blocked mode,
last beam is #55 of 60
In First Beam Blocked mode,
first beam is #20 of 60
10
Emitter
Total Beams Made (TBM)
Total Beams Blocked (TBB)
60
50
40
30
20
10
In Total Beams Made mode,
38 of 60 possible beams are
made
In Total Beams Blocked mode,
22 of 60 possible beams are
blocked
Figure 2-11. Measurement mode examples
Rev.B
Phone: 800.894.0412 - Fax: 888.723.4773 - Web: www.clrwtr.com - Email: [email protected]
A-GAGE EZ-ARRAY IO-Link Instruction Manual
Transitions (TRN)
The number of changes from blocked to clear status and from clear to blocked status. (If beams 6-34 are blocked, then
there is a clear-to-blocked transition from beam 5 to bream 6, and a blocked-to-clear transition from beam 34 to beam 35.)
Transition mode can be used to count objects within the array.
Contiguous First Beam Blocked (CFBB)
The location of the first blocked beam in the largest group of adjacent blocked beams.
Contiguous Last Beam Blocked (CLBB)
The location of the last blocked beam in the largest group of adjacent blocked beams.
Carpet Nap and Carpet Edge
These measurement modes are used to measure the location of carpet backing and tuft, and are selectable only via the IOLink interface, and only when the Scan Type "Carpet Nap" is selected. The modes can be measured from either end of the
sensor, but at least 10 beams (2") must be blocked from one edge.
2.11 Analog Output Configuration
Analog output configuration assigns analog outputs 1 and 2 to one of the measurement modes described in Measurement Mode Selection. When the selected measurement mode involves first or last beam blocked or made (unblocked), the assigned output will vary in
proportion to the beam number identified during a scan. When the measurement mode involves total beams blocked or made, that assigned output will vary in proportion to the total beams counted during a scan.
Analog outputs may have Null and Span values set in the IO-Link interface, in addition to a filter setting (to smooth the output) and Zero
Value (to specify the output value when the measurement mode value is zero). Refer to Appendix: Analog Output 1 Configuration and
Analog Output 2 Configuration.
2.12 Discrete Output Configuration
Discrete Output 1; Receiver Interface
When the receiver interface is used for configuration, the measurement mode assigned to discrete output 1 is the same as
that assigned to analog output 1.
Discrete Output 2; Receiver Interface
Discrete output 2 (only) has two options: alarm and complementary (measurement) operation.
Alarm
Output 2 energizes when the receiver detects a sensor error (such as a disconnected cable) or whenever the excess gain of
one or more beams becomes marginal.
Complementary (Measurement)
Discrete output 2 operation is complementary to discrete output 1 (when output 1 is ON, output 2 is OFF, and vice versa).
Discrete Output 1 and 2 Configuration; IO-Link Interface
When the IO-Link interface is used for configuration, the discrete outputs have more options: either discrete output can be
assigned to any of the measurement modes, high and low set points can be added, the outputs can be inverted, and hysteresis values can be set, as well as a scan number to smooth output performance. Discrete output 2 can be assigned to
alarm mode via the IO-Link interface also. Refer to Appendix: Discrete Output 1 Configuration and Discrete Output 2 Configuration.
Rev.B
wm - tel: 763-544-3164
15
Phone: 800.894.0412 - Fax: 888.723.4773 - Web: www.clrwtr.com - Email: [email protected]
A-GAGE EZ-ARRAY IO-Link Instruction Manual
3 Components and Specifications
3.1 Sensor Models
Emitter/Receiver Model IO-Link
Discrete Output*
Analog Output
Array Length Y**
Total Beams
EA5E150Q Emitter
EA5R150XKQ Receiver
PNP
Voltage (0-10V)
150mm (5.9")
30
EA5E300Q Emitter
EA5R300XKQ Receiver
PNP
Voltage (0-10V)
300mm (11.8")
60
EA5E450Q Emitter
EA5R450XKQ Receiver
PNP
Voltage (0-10V)
450mm (17.7")
90
EA5E600Q Emitter
EA5R600XKQ Receiver
PNP
Voltage (0-10V)
600mm (23.6")
120
EA5E750Q Emitter
EA5R750XKQ Receiver
PNP
Voltage (0-10V)
750mm (29.5")
150
EA5E900Q Emitter
EA5R900XKQ Receiver
PNP
Voltage (0-10V)
900mm (35.4")
180
EA5E1050Q Emitter
EA5R1050XKQ Receiver
PNP
Voltage (0-10V)
1050mm (41.3")**
210
EA5E1200Q Emitter
EA5R1200XKQ Receiver
PNP
Voltage (0-10V)
1200mm (47.2")**
240
EA5E1500Q Emitter
EA5R1500XKQ Receiver
PNP
Voltage (0-10V)
1500mm (59.1")**
300
EA5E1800Q Emitter
EA5R1800XKQ Receiver
PNP
Voltage (0-10V)
1800mm (70.9")**
360
EA5E2100Q Emitter
EA5R2100XKQ Receiver
PNP
Voltage (0-10V)
2100mm (82.7")**
420
EA5E2400Q Emitter
EA5R2400XKQ Receiver
PNP
Voltage (0-10V)
2400mm (94.5")**
480
*Discrete Output 1 is push-pull (IO-Link)
** Models with array lengths 1050mm and longer ship with a center bracket as well as two end-cap brackets.
16
wm - tel: 763-544-3164
Rev.B
Phone: 800.894.0412 - Fax: 888.723.4773 - Web: www.clrwtr.com - Email: [email protected]
A-GAGE EZ-ARRAY IO-Link Instruction Manual
3.2 Cordsets and Connections
Quick-Disconnect Sensor Cordsets
Model
Description
MAQDC-815
MAQDC-830
MAQDC-850
Image
5 m (15') long
9 m (30') long
Straight female connector, 8-pin Euro- 15 m (50') long
style
Pinout
M12X1
Female Connector Shown
Ø15.0 mm
(0.59")
Brown
48.5 mm
(1.91")
Green
Yellow
White
Blue
Pink
Gray
Red
Male M12/Euro to Female M12/Euro QD Cordsets
Model
Length
DEE2R-81D
0.3 m (1')
DEE2R-83D
0.9 m (3')
DEE2R-88D
2.5 m (8')
DEE2R-815D
4.6 m (15')
DEE2R-825D
7.6 m (25')
DEE2R-830D
7.6 m (30')
DEE2R-850D
15.2 m (50')
DEE2R-875D
22.9 m (75')
DEE2R-8100D
30.5 m (100')
Rev.B
wm - tel: 763-544-3164
Wire
Termination
8-conductor cable, 22 AWG
M12/Euro QD fitting at each
end, one male, one female
17
Phone: 800.894.0412 - Fax: 888.723.4773 - Web: www.clrwtr.com - Email: [email protected]
A-GAGE EZ-ARRAY IO-Link Instruction Manual
IO-Link Cable Splitters
Model
Length
Description
0 m (0')
8-pin female to split 5-pin
male and 8-pin female, Eurostyle, straight, with shield
(IO-Link pin 2 is Voltage Output 1)
0 m (0')
8-pin female to split 5-pin
male and 8-pin female, Eurostyle, straight, with shield
(IO-Link pin 2 is Discrete
Output 2)
CSB-M1250M1280
CSB-M1240M1280*
* Shipped with all EZ-ARRAY IO-Link receivers
3.3 Alignment Aids
Model
Description
LAT-1-SS
Self-contained visible-beam laser tool for aligning any EZ-ARRAY emitter/receiver pair. Includes retroreflective target material and mounting clip.
EZA-LAT-SS
Replacement adaptor (clip) hardware for EZ-ARRAY models
EZA-LAT-2
Clip-on retroreflective LAT target
BRT-THG-2-100
2" retroreflective tape, 100'
BT-1
Beam Tracker
3.4 Accessory Mounting Brackets and Stands
See Replacement Parts for standard brackets. Order one EZA-MBK-20 bracket per sensor, two per pair.
18
wm - tel: 763-544-3164
Rev.B
Phone: 800.894.0412 - Fax: 888.723.4773 - Web: www.clrwtr.com - Email: [email protected]
A-GAGE EZ-ARRAY IO-Link Instruction Manual
Model
Description
Dimensions
50.0 mm
(1.97")
EZA-MBK-20
44.4 mm
(1.75")
Universal adaptor bracket pair
for mounting to engineered/
slotted aluminum framing (e.g.,
80/20™, Unistrut™).
20 mm
(0.79")
4.2 mm
(0.17")
CL
39.2 mm
(1.54")
58.2 mm
(2.29")
40 mm
(1.57")
NOTE: Standard brackets shipped with sensors connect directly to MSA series stand, using hardware included with the stands.
MSA Series Stands (Base Included)*
Stand Model
Useable Stand Height
Overall Stand Height
MSA-S24-1
483 mm (19")
610 mm (24")
MSA-S42-1
940 mm (37")
1067 mm (42")
MSA-S66-1
1549 mm (61")
1676 mm (66")
MSA-S84-1
2007 mm (79")
2134 mm (84")
*Available without a base by adding suffix NB to the model number, e.g., MSAS24-1NB.
Dimensions
Usable
Stand
Height
Pole
40 mm
(1.58") Square
(4) M10 Bolt
120.6 mm (4.75")
Base
6.4 mm (0.25")
3.5 Replacement Parts
Description
Model
Access cover with label - receiver
EA5-ADR-1
Access cover security plate (includes 2 screws, wrench)
EZA-TP-1
Wrench, security
EZA-HK-1
Standard bracket kit with hardware (includes 2 end brackets and
hardware to mount to MSA Series stands)
Black
EZA-MBK-11
Stainless Steel
EZA-MBK-11N
Center bracket kit (includes 1 bracket and hardware to mount to MSA Series stands)
Rev.B
wm - tel: 763-544-3164
EZA-MBK-12
19
Phone: 800.894.0412 - Fax: 888.723.4773 - Web: www.clrwtr.com - Email: [email protected]
A-GAGE EZ-ARRAY IO-Link Instruction Manual
3.6 Specifications
System Configuration (Receiver Interface)
6-position DIP switch: Used to set scanning type,
measurement modes, analog slope, and discrete output 2 function (see Configuration DIP Switch)
Emitter/Receiver Range
400 mm to 4 m (16" to 13')
Field of View
Nominally ±3°
Push Buttons: Two momentary push buttons for alignment and gain level selection
Beam Spacing
5 mm (0.2")
Light Source
Infrared LED
Minimum Object Detection Size
Straight Scan, Low-Contrast: 5 mm (0.2")
Status Indicators (or see Status Indicators)
Straight Scan, High-Excess-Gain: 10 mm (0.4")
IO-Link Indicators
See Figure 2-5 for other scan mode values; size is tested using a rod.
Emitter:
Sensor Positional Resolution
Straight Scan: 5 mm (0.2")
Red Status LED
ON - Status OK
Flashing at 1 hz - Error
Double-Edge Scan: 2.5 mm (0.1")
Single-Edge Scan: 2.5 mm (0.1")
Receiver:
Supply Voltage (Limit Values)
Emitter: 12 to 30V dc
7 Zone Indicators
Red - Blocked channels within zone
Receiver Models: 18 to 30V dc
Supply Power Requirements
Emitter/Receiver Pair (Exclusive of Discrete Load):
Less than 9 watts
Green - All channels clear within zone
3-digit 7-segment measurement mode/diagnostic indicator
STATUS: Bi-Color Indicator LED
Power-up delay: 2 seconds
Red - Hardware Error or Marginal
Alignment
Teach Input (Receiver Gray Wire)
Low: 0 to 2 volts
High: 6 to 30 volts or open (input impedance 22 K
ohms)
Two Discrete Outputs
Protected against false pulse on power-up and continuous overload or short circuit.
Discrete Output 1 (SIO Mode)
Type: Solid-State Push-Pull
Rating: 100 mA maximum (sourcing or sinking)
ON-State Saturation Voltage: less than 3V @ 100 mA
(sourcing or sinking)
Discrete Output 2
Type: Solid-State NPN or PNP (current sinking or
sourcing)
Rating: 100 mA maximum
20
System Configuration (IO-Link Interface)
Supplied IODD files provide all configuration options of
receiver interface, plus additional functionality; see
Overview and IO Link Device Description
Green - OK
COMM: Yellow flashing indicates IO-Link
mode
ERROR: ON Red indicates Error
Connections
IO-Link Interface: The receiver uses a cable splitter
that converts the 8-pin connector to a compatible M12
IO-Link connector; see Cordsets and Connections.
Other Sensor connections: 8-conductor quick-disconnect cables (one each for emitter and receiver), ordered separately; see Cordsets and Connections for
available lengths (may not exceed 75 meters long),
PVC-jacketed cables measure 5.8 mm diameter, have
shield wire; 22-gauge conductors
Construction
wm - tel: 763-544-3164
Rev.B
Phone: 800.894.0412 - Fax: 888.723.4773 - Web: www.clrwtr.com - Email: [email protected]
A-GAGE EZ-ARRAY IO-Link Instruction Manual
OFF-State Leakage Current: NPN: less than 200 uA
@ 30V dc; PNP: less than 10 uA @ 30V dc
ON-State Saturation Voltage: NPN: less than 1.6V @
100 mA; PNP: less than 2.0V @ 100 mA
Two Analog Outputs
Voltage Sourcing: 0 to 10V (maximum current load of
5 mA)
Aluminum housing with clear-anodized finish
Acrylic lens cover
Environmental Rating
IEC IP65
Operating Conditions
Temperature: -40° to +70° C (-40° to +158° F)
Maximum relative humidity: 95% at 50° C (non-condensing)
IO-Link Interface
Baud Rate: 38,400 bps (COM2)
Certifications
Process Data Width: 16 bits
Scan Time
Scan times depend on scan mode and sensor length.
Straight scan times range from 2.8 to 26.5 ms. See
Figure 2-8 for all combinations.
3.7 Emitter and Receiver Dimensions
45.2 mm
(1.78")
12 mm
(0.47")
36.0 mm
(1.42")
Y
L1
L2
L3
56.0 mm
(2.20")
65 mm
(2.6")
4.2 mm
(0.17")
59 mm
(2.3")
R13 mm (0.5")
minimum bend
IO-Link
Splitter
With Cable Splitter Connection
With Cable Connection
Rev.B
wm - tel: 763-544-3164
21
Phone: 800.894.0412 - Fax: 888.723.4773 - Web: www.clrwtr.com - Email: [email protected]
A-GAGE EZ-ARRAY IO-Link Instruction Manual
Emitter or Receiver
Model
Housing Length L1
Distance Between Bracket Holes L2 L3
Defined Area Y
EA5..150..
227 mm (8.9")
260 mm (10.2")
199 mm (7.8")
150 mm (5.9")
EA5..300..
379 mm (14.9")
412 mm (16.2")
351 mm (13.8")
300 mm (11.8")
EA5..450..
529 mm (20.8")
562 mm (22.1")
501 mm (19.7")
450 mm (17.7")
EA5..600..
678 mm (26.7")
704 mm (27.7")
650 mm (25.6")
600 mm (23.6")
EA5..750..
828 mm (32.6")
861 mm (33.9")
800 mm (31.5")
750 mm (29.5")
EA5..900..
978 mm (38.5")
1011 mm (39.8")
950 mm (37.4")
900 mm (35.4")
EA5..1050..
1128 mm (44.4")
1161 mm (45.7")
1100 mm (43.3")
1050 mm (41.3")
EA5..1200..
1278 mm (50.3")
1311 mm (51.6")
1250 mm (49.2")
1200 mm (47.2")
EA5..1500..
1578 mm (62.1")
1611 mm (63.4")
1550 mm (61.0")
1500 mm (59.1")
EA5..1800..
1878 mm (73.9")
1911 mm (75.2")
1850 mm (72.8")
1800 mm (70.9")
EA5..2100..
2178 mm (85.7")
2211 mm (87.0")
2150 mm (84.6")
2100 mm (82.7")
EA5..2400..
2478 mm (97.6")
2511 mm (98.9")
2450 mm (96.4")
2400 mm (94.5")
3.8 Standard Bracket Dimensions
Center Bracket (model EZA-MBK-12**)
End Cap Brackets (model EZA-MBK-11*)
4 x 5.8 mm (0.23")
wide slots
Ø 21.5 mm
(0.85")
Ø 33 mm
(1.30")
4 x R 19.4 mm
(0.76")
4 x 45
38.2 mm
(1.50")
20 mm
(0.79")
55 mm
(2.17")
4.2 mm
(0.17")
63.2 mm
(2.49")
Ø 60 mm
20 mm
(0.79")
20 mm
(0.79")
55.6 mm
(2.19")
25 mm
(0.98")
50 mm
(1.96")
4.2 mm
(0.17")
10 mm
(0.39")
9.5 mm
(0.37")
2 x 5 mm
(0.20")
2 x 15 mm
(0.59")
2 x 7 mm
(0.28")
2 x R 5 mm
(0.20")
17.5 mm
(0.69")
50 mm
(1.97")
Ø 8.3 mm
(0.33")
36 mm
(1.42")
Ø 7 mm
(0.28")
15 mm
(0.59")
20.0 mm
(0.79")
20 mm
(0.79")
*Dimensions are identical for model EZA-MBK-11N stainless steel
brackets.
** Supplied with emitters and receivers over 1050 mm.
22
wm - tel: 763-544-3164
Rev.B
Phone: 800.894.0412 - Fax: 888.723.4773 - Web: www.clrwtr.com - Email: [email protected]
4 Installation and Alignment
4.1 Mounting the Emitter and Receiver
Compact EZ-ARRAY emitters and receivers are easy to handle during mounting. When mounted to the sensor end caps, the supplied
mounting brackets allow ±30° rotation. An emitter may be separated from 400 mm to 4 m (16" to 13') from its receiver.
From a common point of reference, make measurements to locate the emitter and receiver in the same plane, with their midpoints and
display ends directly opposite each other. (If sensors are mounted with their display ends at the top, see Receiver Gray Wire or refer to
HW Interface table in General Configuration for directions on inverting the 3-digit display.) Mount the brackets to the emitter and receiver
housings using the supplied M6 bolts and Keps nuts, or user-supplied hardware; see Figure 4-1.
Center mounting brackets must be used with longer sensors, if they are subject to shock or vibration. In such situations, the sensors
are designed to be mounted with up to 900 mm unsupported distance (between brackets). Sensors 1050 mm and longer are supplied
with a center bracket to be used as needed with the standard end-cap brackets.
1. Attach the center bracket to the mounting surface when mounting the end-cap brackets.
2. Attach the clamp to both slots of the housing, using the included M5 screws and T-nuts.
3. After the sensor is mounted to the end-cap brackets, attach the clamp to the center bracket using the supplied M5 screw.
EZ-ARRAY End-Cap Brackets (supplied with each emitter and receiver)
End-Mounted
Side-Mounted
(two sensor brackets may be substituted)
Swivel Center Bracket (supplied with emitters
and receivers 1050 mm and longer)
Sensors are designed to be mounted with up to
900 mm unsupported distance between brackets.
Figure 4-1. A-GAGE EZ-ARRAY emitter and receiver mounting hardware
Rev.B
wm - tel: 763-544-3164
23
Phone: 800.894.0412 - Fax: 888.723.4773 - Web: www.clrwtr.com - Email: [email protected]
A-GAGE EZ-ARRAY IO-Link Instruction Manual
4.2 Mechanical Alignment
Mount the emitter and receiver in their brackets and position the windows of the two
units directly facing each other. Measure from one or more reference planes (e.g., the
building floor) to the same point(s) on the emitter and receiver to verify their mechanical
alignment. Use a carpenter's level, a plumb bob, or the optional LAT-1-SS Laser Alignment Tool, or check the diagonal distances between the sensors, to achieve mechanical alignment.
When alignment is difficult, a LAT-1-SS tool is useful to assist or confirm alignment by
providing a visible red dot along the sensor's optical axis (see Figure 4-2). Snap the
LAT-1 clip onto the sensor housing, turn on its laser emitter, and use a strip of retroreflective tape at the opposite sensor to see the dot.
Also check "by eye" for line-of-sight alignment. Make any necessary final mechanical
adjustments, and hand-tighten the bracket hardware. See Optical Alignment and Alignment Blanking Button for further alignment information.
Figure 4-2.
Optical alignment using the LAT-1-SS
Figure 4-3. Sensor mounting, mechanical alignment
Verify that:
• The emitter and receiver are directly opposite each other, and
nothing is interrupting the beams.
• The sensing area is the same distance from a common reference plane for each sensor.
• The emitter and receiver are in the same plane and are level/
plumb and square to each other (vertical, horizontal, or inclined at the same angle, and not tilted front-to-back or side-toside).
Emitter
Receiver
A
level
level
level
X
B
level
X
Y
Y
Z
Z
Level Surface
X
Angled or Horizontal Installations - verify that:
X
Level Surface
• Distance X at the emitter and receiver are equal.
Vertical Installations - verify that:
• Distance Y at the emitter and receiver are equal.
• Distance X at emitter and receiver are equal.
• Distance Z at the emitter and reciever are equal from parallel
• Both sensors are level/plumb (check both the side and face).
surfaces.
• Sensing area is square. Verify diagonal measurements if pos• Vertical face (i.e., the lens) is level/plumb.
sible (Diagonal A = Diagonal B).
• Sensing area is square. Check diagonal measurements if possible; see Vertical Installations at right.
24
wm - tel: 763-544-3164
Rev.B
Phone: 800.894.0412 - Fax: 888.723.4773 - Web: www.clrwtr.com - Email: [email protected]
4.3 Hookups
Refer to Figures 4-4 and 4-5 for the appropriate hookup information.
18-30V dc
Power
–
Inputs
+
Receiver
bn
bn
Power Supply V+
Power Supply V-
bu
bu
Power Supply V-
Sync
pk
pk
Sync
V Out 1
wh
V Out 2
ye
Out 1
gn
Out 2
rd
–
wh
+
+
Outputs
–
Receiver gray wire: The receiver has an input that can be used as a gate input
or for remote teach. To initiate remote teach, alignment, and gating functions, tie
the wire through a switch to sensor common. See Receiver Gray (Remote
Teach) Wire for more information.
Emitter
Power Supply V+
ye
gn
Refer to Figures 4-4 and 4-5 for standard hookup information and Specifications
for further electrical requirements.
Analog white and yellow wires: The receiver has two analog outputs. Both
outputs are voltage analog outputs. The white wire is referenced as analog output 1; the yellow wire is referenced as analog output 2. The voltage analog outputs will source current through an external load to sensor common.
Teach
gy
Shield
bare
rd
Load
gy
Load
0-2V dc
bare
Shield
Figure 4-4. Hookup for outputs configured as
PNP (without IO-Link Master)
Discrete Outputs: The receiver has two discrete outputs; the green wire is referenced as discrete output 1, and the red wire is referenced as discrete output 2.
Discrete output 1 is a push-pull output. Discrete output 2 is PNP, unless the polarity is altered via the communication interface. Refer to Specifications for further electrical requirements.
Sync (Pink) Wire
The emitter and receiver are electrically synchronized via the pink wire. The
emitter and receiver pink wires must only be electrically connected together.
Receiver
bn
Power Supply V+
bn
Power Supply V-
bu
Sync
pk
IO-Link
Cable
Splitter
2
7
6
3
8
Power Supply VSync
2
7
6
1
3
4
2
gn
rd*
* Out 2 can be either
Discrete Output 2 or
Voltage Output 1,
depending on splitter
model
t2
*
C/
Q
VV+
Out 2*
pk
Ou
C/Q
bu
Emitter
Power Supply V+
IO-Link
Master
Figure 4-5. Hookup with IO-Link Master
Phone: 800.894.0412 - Fax: 888.723.4773 - Web: www.clrwtr.com - Email: [email protected]
A-GAGE EZ-ARRAY IO-Link Instruction Manual
4.4 Optical Alignment
After the electrical connections are made, power up the emitter and receiver.
Verify that input power is present to both emitter and receiver; the emitter Status indicator and the receiver Status LED should be ON green. If the receiver
Status LED is on red (and a "c" appears on the 3-digit display), refer to Troubleshooting and Error Codes.
a)
Straightedge
Straightedge
0 beams blocked; all Zone indicators ON Green
NOTE: At power-up, all Zone indicators are tested
(flash red), then the number of blocked beams is
displayed.
b)
60 beams blocked; all Zone indicators ON Red
Observe the receiver indicators (see table below).
Optimize Alignment and Maximize Excess Gain
Verify that the emitter and receiver are pointed squarely at each other. A
straightedge (e.g., a level) can help determine the direction the sensor is facing
(see Figure 4-7).
c)
Slightly loosen the sensor mounting screws and rotate one sensor to the left
and right, noting the positions where the receiver Zone indicators turn from
green to red; repeat with the other sensor. Center each sensor between the noted positions and tighten the end cap mounting screws, making sure to maintain the positioning. The sensor windows should directly face each other.
30 beams blocked; 4 Zone indicators ON Green, 3 ON Red
d)
Once optimum optical alignment is verified, proceed to configuration, via the re- 0 beams blocked; all Zone indicators ON Green
mote teach wire, the receiver interface, or the IO-Link interface (Receiver Gray
Figure 4-7. Optimizing optical alignment; 300 mm
Wire, Alignment Blanking Button, or refer to the Appendix: IO Link Alignment
Blanking Routine) and complete the electronic alignment. This further alignment model shown
step adjusts the emitted light level of each beam for the application, to maximize sensing performance.
Figure 4-8. Receiver Interface Indicators during Alignment
All Beams Either Clear or
Blanked
Zone Indicators
Out of Alignment
Some ON Red (zones with blocked
beams) Some ON Green (zones with
all clear beams)
All ON Red (Some beams blocked
in each zone)
Receiver Status In- ON Green
dicator
ON Green
ON Green
3-Digit Display
Number of blocked beams
Total number of beams in the array
26
All ON Green
Some Beams Blocked or MisAligned
0 (Number of blocked beams)
wm - tel: 763-544-3164
Rev.B
Phone: 800.894.0412 - Fax: 888.723.4773 - Web: www.clrwtr.com - Email: [email protected]
5 Receiver User Interface
The receiver user interface comprises the six-position DIP switch, two push buttons, 3-digit display, and other indicators present on the
receiver (see Status Indicators for more complete status indicator information). The receiver interface enables configuration of standardized combinations of the EZ-ARRAY sensing options (output configuration, scanning methods and modes); for more advanced setup,
refer to to IO-Link Interface.
5.1 Configuration DIP Switch
The DIP switch can be used to configure the sensor. Access the switch by
removing the screw-on security plate and lifting the clear hinged access cover. The access cover may be removed entirely (pull straight out to remove,
press back in to replace) for easier access during configuration.
Some of the switches are assigned their own functions, others work together
in combination (see table). Switches S1 and S2 in combination select one of
four scanning modes. Switches S3 and S4 in combination select one of four
measurement mode pairs (one for each analog output). Switch S5 defines the
analog slope setting for both analog outputs and S6 defines whether discrete
output 2 is complementary to discrete 1, or functions as an alarm (when configuration is accomplished via DIP switch, discrete output 1 and analog output
1 follow the same measurement mode).
To open access
cover, insert a
small flat-blade
screwdriver, press
up, and pull.
Figure 5-1. Receiver user interface. NOTE: All DIP
switch positions are shown in the ON condition
Figure 5-2. EZ-ARRAY Receiver User Interface DIP Switch Settings
Switch Settings*
Result
S1
S2
Scan Mode
ON
ON
Straight Scan
ON
OFF
Double-Edge, Step 1
OFF
ON
Double-Edge, Step 4
OFF
OFF
Single-Edge
S3
S4
Analog 1 (Value reads on 3-digit display)
Analog 2
ON
ON
TBB
FBB
ON
OFF
LBB
MBB
OFF
ON
OD
ID
OFF
OFF
CBB
CFBB
S5 ON
Positive Analog Slope
S5 OFF
Negative Analog Slope
S6 ON
Discrete 2 Complementary
S6 OFF
Discrete 2 Alarm
*Underlined setting are factory defaults
Phone: 800.894.0412 - Fax: 888.723.4773 - Web: www.clrwtr.com - Email: [email protected]
A-GAGE EZ-ARRAY IO-Link Instruction Manual
5.1.1 Scanning Modes (S1 and S2)
Straight Scan (S1 ON, S2 ON)
Straight Scan is the most versatile scanning mode and can be used without the exceptions noted in the other scanning
modes. Use this scanning mode when using the low-contrast sensitivity setting to measure semi-transparent materials.
Double-Edge Step 1 (S1 ON, S2 OFF)
Double-Edge Step 1 can be used when three or fewer opaque objects are presented to the light curtain at one time. The
advantage of this mode is improved sensor edge resolution (2.5 mm). The minimum object detection size is 10 mm.
Double-Edge Step 4 (S1 OFF, S2 ON)
Double-Edge Step 4 can be used when three or fewer opaque objects are presented to the light curtain and the minimum
size object to be detected is 30 mm. This scanning mode ignores objects smaller than 30 mm. Like Double-Edge Step 1, the
sensor edge resolution is 2.5 mm. See Figure 2-8 for sensor scan times.
Single-Edge Scan (S1 OFF, S2 OFF)
Single-Edge Scan can be used when a single opaque object is presented to the light curtain at one time. The object must
block the "bottom" channel (the channel closest to the receiver display). Like the double-edge scans, the sensor edge resolution is 2.5 mm. The minimum object detection size is 10 mm. See Figure 2-8 for sensor scan times. Because single-edge
scan is capable only of measuring the height of an opaque object that blocks the bottom channel and all channels up to the
height of the object, the pertinent measurement modes are LBB (last beam blocked) or TBB (total beams blocked). When
single-edge scan is selected, the selected measurement mode will be applied to both analog outputs. Selection of OD/ID
with single-edge scan will result in an error code.
5.1.2 Measurement Modes (S3 and S4)
The measurement modes, determined by switches S3 and S4 in combination, define what information is calculated by the sensor and
sent via the analog outputs. See Measurement Mode Selection for measurement mode definitions. Discrete output 1 and analog output 1
will follow the same measurement mode. (If single-edge scan is selected, select measurement mode LBB or TBB.)
During normal operation, the 3-digit diagnostic display reads out the numerical value of the specified measuring mode for analog output
1.
5.1.3 Analog Slope (S5)
Switch S5 defines the analog output slope. As the measurement mode values increase, the analog output voltage can either increase
(positive slope, S5 ON) or decrease (negative slope, S5 OFF). Switch S5 applies the same slope to both analog outputs.
5.1.4 Complementary/Alarm (S6)
Switch S6 defines the operation of discrete output 2. When the receiver user interface is used, discrete output 1 is active when an object
is detected by the sensor (normally open operation). In complementary mode (S6 ON), output 2 will always be in the opposite state of
output 1. In alarm mode (S6 OFF), discrete output 2 will be active when the sensor detects a system fault. System faults include a failed
emitter, mis-wiring of the emitter/receiver communication wire (the pink wire), and low excess gain (if the sensor is configured for highcontrast sensitivity).
28
wm - tel: 763-544-3164
Rev.B
Phone: 800.894.0412 - Fax: 888.723.4773 - Web: www.clrwtr.com - Email: [email protected]
A-GAGE EZ-ARRAY IO-Link Instruction Manual
5.2 Alignment/Blanking Button (Electronic Alignment)
The Alignment/Blanking push button is used both to maximize the alignment and to access the blanking feature. The electronic alignment
routine adjusts the emitted light level to maximize sensor performance. Perform the procedure at installation and again when the emitter
and/or receiver is moved. For IO-Link interface alignment instructions, see Alignment Blanking Routine.
Blanking is used to maintain sensing accuracy in applications where a fixed object (for instance a permanently mounted bracket) will
block one or more beams. The sensor will ignore the blanked channels when calculating outputs from the selected measurement modes.
5.2.1 Electronic Alignment and Blanking - Receiver Interface
To initiate the electronic alignment procedure, use a small screwdriver to press the Alignment/Blanking button for two or more seconds.
The left-hand digit of the 3-digit display will read "A" (representing alignment); the right two digits will show the number of beams blocked.
The receiver is learning the clear condition. Rotate the sensors as required (but do not change the distance between them). When the
receiver's 3-digit display shows 0 beams blocked, the sensors are adequately aligned.
Tighten the sensor mounts, then press the Alignment/Blanking button again for two seconds to exit alignment mode. If all sensor light
channels are clear, the EZ-ARRAY stores each channel's signal strength in non-volatile memory and reads "- - -" on the 3-digit display.
Re-alignment is not required again, unless the emitter or receiver is moved.
If any beams are blocked by objects other than the sensing target to be measured during run mode, those beams can be blanked in
alignment mode for more accurate measurement. The blocked beams must be either blanked or cleared during alignment mode for alignment to proceed (see below). While the "A" is visible on the receiver display, momentarily (about 0.5 seconds max.) press the Alignment/
Blanking button again. The "A" will change to "n" to indicate the sensor is ready to "learn" the blanking pattern; momentarily press the
button again to exit the blanking routine. The sensor blanks the blocked beams and the display changes to "A."; the period following the
lefthand digit signifies blanking is active. Press the Alignment/Blanking button for two seconds to exit alignment mode. The EZ-ARRAY
stores each channel's signal strength in non-volatile memory and reads "-. - -" on the 3-digit display to denote blanking is in use.
5.2.2 Flashing "000" on the 3-Digit Display
When returning to run mode, the receiver determines whether any unblanked beam channels are obstructed. If any channels are obstructed, the new alignment settings are not saved; the receiver flashes zeroes on the display three times and sensing will continue, using the
previously set alignment settings. If this occurs, either clear the blocked beams and repeat the alignment routine or repeat the alignment
routine and blank the blocked beams.
5.3 Gain (Sensitivity Adjust) Button
To change the sensitivity (Gain setting), press and hold the button for two seconds. The left-hand digit of the 3-digit display will read " L ";
the right-hand digit will read "1" (high excess-gain) or "2" (low-contrast). The sensitivity level can then be toggled between the values 1
and 2. When the desired sensitivity level is displayed, hold the Gain push button for 2 seconds and the sensor will return to run mode.
5.4 Inverting the 3-Digit Display
For instances where the sensors must be mounted in an inverted position, the 3-digit display can be can be inverted for readability. See
Receiver Gray Wire. The 3-digit display can then be switched back to "normal" by repeating the procedure.
NOTE: The periods on the three seven-segment indicators do not move when the display is inverted.
5.5 Troubleshooting and Error Codes
If the receiver Status LED is red and the 3-digit display reads "c" followed by a number from 1 to 10, a corrective action is needed (see
table below).
Rev.B
wm - tel: 763-544-3164
29
Phone: 800.894.0412 - Fax: 888.723.4773 - Web: www.clrwtr.com - Email: [email protected]
A-GAGE EZ-ARRAY IO-Link Instruction Manual
5.5.1 "Dirty" Channel Indicator
If the Status LED is red, but no "c" is visible on the 3-digit display (the scan measurement mode result is displayed), the sensor alignment
is marginal. Clean the sensor windows and perform the alignment procedure as necessary.
For all corrective actions, first verify proper supply voltages and wiring connectivity. Disconnect and re-connect the sensor cable connectors to verify proper connector installation.
Figure 5-3. Error Codes
Error
Code
Problem
Corrective Action
1
Receiver EEPROM Hard Failure
This problem is caused by a receiver failure that cannot be corrected by the user.
Replace the receiver.
2
Receiver Alignment/Blanking Configuration Error
Remove and re-apply sensor supply voltage. If the error code 2 is removed, electrically re-align the sensor (Alignment/Blanking Button). If the error code persists, contact Banner for further problem-solving techniques.
3
Reserved for Factory
Replace the receiver.
4
Emitter or Wiring Problem
5
Emitter Channel Error
The emitter has identified a nonfunctional optical channel. Temporary fix: Blank the
channel (Section Alignment/Blanking Button) to ignore the problem. Permanent fix:
Replace the emitter.
6
Reserved for Factory
Replace the receiver.
7
Reserved for Factory
Replace the emitter.
8
Reserved for Factory
Replace the receiver.
9
Reserved for Factory
Replace the receiver.
10
Incompatible Scan and Measurement
Mode
Some measurement modes are incompatible with some scanning modes. SingleEdge Scan; do not use the following measurement modes: OD, ID, FBM, LBM,
TBM, CBM, Nap Detection Double-Edge Scan; do not use the following measurement modes: FBM, LBM, TBM, CBM, Nap Detection
30
1. Verify that emitter and receiver wiring is correct (see Figures 4-4 and 4-5).
2. Check the status of the emitter Status LED. Emitter LED OFF: Check the voltage across the emitter brown and blue wires. If the voltage across the emitter
brown and blue wire is OK, then replace the emitter. Emitter Status LED
flashing (approx. every 2 seconds): Verify that the emitter/receiver synch
(pink) wires are correctly installed.
3. Verify that the Synch wires are correctly installed. Check the synch wire dc voltage. If the voltage is below 1 volt or above 3 volts, then again check the synch
wire for possible mis-wiring. Unplug first the receiver and then the emitter to
determine the problem source.
wm - tel: 763-544-3164
Rev.B
Phone: 800.894.0412 - Fax: 888.723.4773 - Web: www.clrwtr.com - Email: [email protected]
6 IO-Link Interface
6.1 Overview
For the latest IO-Link protocol and specifications, please visit the web site at http://www.io-link.com
IO-Link is a point-to-point communication link between master and slave. It can be used to automatically parameterize sensors and transmit process data.
6.2 IO-Link Profile and Models
Figure 6-1. IO-Link Profile
IO-Link Version
1.0
COM-Mode
COM2 (38,400 bps)
Process Data Width
16-Bit
Process Data Structure
Input Data: Bit 0-12: Measurement 1 Value, Bit 13-15: Reserved
SIO-Mode Support
Yes
Memory Request for Data Management
180 Bytes
Sub-Index Access
Not Supported
Figure 6-2. Device IDs and Minimum Cycle Times
Model
Device ID
Min. Cycle Time (ms)
EA5R150XKQ
65536
11.6
EA5R300XKQ
65537
19.2
EA5R450XKQ
65538
26.4
EA5R600XKQ
65539
35.2
EA5R750XKQ
65540
43.2
EA5R900XKQ
65541
49.6
EA5R1050XKQ
65542
57.6
EA5R1200XKQ
65543
64.0
EA5R1500XKQ
65545
80.0
EA5R1800XKQ
65546
94.4
EA5R2100XKQ
65547
108.8
EA5R2400XKQ
65548
123.2
Phone: 800.894.0412 - Fax: 888.723.4773 - Web: www.clrwtr.com - Email: [email protected]
A-GAGE EZ-ARRAY IO-Link Instruction Manual
6.3 Hardware Interface
IO-Link is designed around IEC 61131-9 Single-drop digital communication interface for sensors and actuators (SDCI). Figure 6-3 shows
the SDCI connection for 3-wire connection devices. Power, ground, communication, and/or switching signal are required, pin 2 is an
optional I/O. The EZ-ARRAY provides the SDCI connection with an IO-Link cable splitter accessory. The EZ-Array is a Port Class A
device.
Figure 6-3. SDCI Connection
6.3.1 Electrical Interface
Figures 6-4 and 6-6 show the pinout of the EZ-ARRAY IO-Link cable splitters.
Figure 6-4. EZ-ARRAY IO-Link Cable Splitter Pinouts
IO-Link Split- CSB-M1240M1280 (Dual Discrete)
ter Connector
EZ-ARRAY
8-Wire Ca- Signal
#1
8-Pin Conble
nector
Definition
EZ-ARRAY
8-Pin Connector
8-Wire
Cable
Signal
Definition
1
2
Brown
L+
18-30 VDC
2
Brown
L+
18-30 VDC
2
8
Red
Q
Switching Signal
D02
1
White
AO
V Out 1 (0-10V)
3
7
Blue
L-
0 VDC
7
Blue
L-
0 VDC
4
3
Green
Q
Switching Signal
DO1 (SIO)
3
Green
Q
Switching Signal
DO1 (SIO)
C
IO-Link (SDCI)
C
IO-Link (SDCI)
NC
No Connection
NC
No Connection
5
32
NC
NC
CSB-M1250M1280 (Analog)
wm - tel: 763-544-3164
NC
NC
Rev.B
Phone: 800.894.0412 - Fax: 888.723.4773 - Web: www.clrwtr.com - Email: [email protected]
A-GAGE EZ-ARRAY IO-Link Instruction Manual
Figure 6-5. IO-Link Splitter
Figure 6-6.
2
7
6
2
7
6
3
8*
1
3
4
2
*CSB-M1240M1280 is shown, for CSB-M1250M1280 pin 1 is connected
NOTE: If an additional cable between the receiver and splitter is required, its length
must be less than a meter.
6.3.2 IO-Link Master
A list of IO-Link Master manufacturers can be found under the "About Us" at io-link website.
6.4 IODD (IO-Link Device Description)
An IODD file is a file that formally describes a device using XML notation. The IODD provides all the necessary properties
to establish
communication and configuration. The EZ-ARRAY IO-Link IODD package consists of an IODD file, and three image files:
• Banner_Engineering-<Device Name>-<Date>-IODD1.0.1.xml
• Banner_Engineering-logo.png
• Banner_Engineering-EA5RXK-icon.png
• Banner_Engineering-EA5RXK-pic.png
This IO-Link IODD package is contained on the supplied IO-Link Device Description Resource CD (P/N 18491). For the
latest IODD
packages, please refer to the Banner website.
6.5 Configuration Data
IO-Link models of the EZ-ARRAY use the Service Parameter Data Unit (SPDU) channel for providing read-write access to
configuration
data.
6.5.1 Scan Configuration
The Scan Configuration contains the settings for the scan type and receiver's remote teach wire (gray wire) function.
Table A-1. Scan Configuration
SPDU
Byte Position
Member Name
Index
Sub-Index
80
1
0
Scan Type
80
2
1
Remote Teach/Gate
Rev.B
wm - tel: 763-544-3164
33
Phone: 800.894.0412 - Fax: 888.723.4773 - Web: www.clrwtr.com - Email: [email protected]
A-GAGE EZ-ARRAY IO-Link Instruction Manual
Table A-2. Scan Type
Value
Type
Description
1
Straight
Straight Scanning
2
Single Edge
Scanning for Single Edge
3
Double Edge - Step 1
Scanning for Edges of up to 3 objects (fires every channel)
4
Double Edge - Step 2
Scanning for Edges of up to 3 objects (fires channels 1, 3, 5, ...)
5
Double Edge - Step 4
Scanning for Edges of up to 3 objects (fires channels 1, 5, 9, ...)
6
Double Edge - Step 8
Scanning for Edges of up to 3 objects (fires channels 1, 9, 17, ...)
7
Double Edge - Step 16
Scanning for Edges of up to 3 objects (fires channels 1, 17, 33, ...)
8
Double Edge - Step 32
Scanning for Edges of up to 3 objects (fires channels 1, 33, 65, ...)
10
Carpet Nap
Scanning for Carpet Nap Detection Applications
Table A-3. Remote Teach/Gate
Value
Function
Description
0
Disabled
Disabled
1
Remote Teach
Enabled with All Functionality
2
Alignment/Sensitivity
Only Alignment, Blanking, and Sensitivity Adjustments can be performed
3
Gate - Active High
Setting the gray wire in the high state enables scanning
4
Gate - Active Low
Setting the gray wire in the low state enables scanning
5
Gate - Rising Edge
A single scan will occur after the gray wire goes from a low-to-high state
6
Gate - Falling Edge
A single scan will occur after the gray wire goes from a high-to-low state
6.5.2 Blanking Configuration
The Blanking Configuration contains the blanking bit-mask for the EZ-ARRAY's channels. Each sub-index represents 16 channels.
Table A-4. Blanking Configuration
SPDU
Byte Position
Member Name
Index
Sub-Index
81
1
0
Blanking 1-8
81
1
1
Blanking 9-16
81
...
...
...
81
30
58
Blanking 465-472
81
30
59
Blanking 473-480
34
wm - tel: 763-544-3164
Rev.B
Phone: 800.894.0412 - Fax: 888.723.4773 - Web: www.clrwtr.com - Email: [email protected]
A-GAGE EZ-ARRAY IO-Link Instruction Manual
Table A-5. Blanking Bit-Mask
Value
Status
Description
0
Non-Blanked
The channel will be used during scanning
1
Blanked
The channel will be skipped during scanning
6.5.3 General Configuration
The General Configuration contains the general settings for the EZ-ARRAY.
Table A-7. General Configuration
SPDU
Byte Position
Member Name
Index
Sub-Index
86
1
0
Emitter Power
86
2
1
Gain Method
86
3
2
Low Contrast Sensitivity
86
See table A-11
3
HW Interface Flags
86
9
4
Measurement 1 (Input Process Data)
86
10
5
Measurement 2
86
12
8-9
Number of Dirty Channels
86
13
10-13
Time of Service
Table A-8. Emitter Power
Value
Function
Description
1
Level 1
Power Setting 1 (Lowest)
2
Level 2
Power Setting 2
3
Level 3
Power Setting 3
4
Level 4
Power Setting 4
5
Level 5
Power Setting 5
6
Level 6
Power Setting 6
7
Level 7
Power Setting 7
8
Level 8
Power Setting 8
9
Level 9
Power Setting 9
10
Level 10
Power Setting 10
11
Level 11
Power Setting 11 (Highest)
Rev.B
wm - tel: 763-544-3164
35
Phone: 800.894.0412 - Fax: 888.723.4773 - Web: www.clrwtr.com - Email: [email protected]
A-GAGE EZ-ARRAY IO-Link Instruction Manual
Table A-9. Gain Method
Value
Status
Description
1
High-Excess Gain
Fixed thresholds for maximum excess gain
2
Low Contrast
Adjustable percentage based thresholds (only in Straight Scan)
Table A-10. Low Contrast Sensitivity
Value
Function
Description
0
10%
Blocked threshold is set 10% below aligned signal
1
15%
Blocked threshold is set 15% below aligned signal
2
20%
Blocked threshold is set 20% below aligned signal
3
25%
Blocked threshold is set 25% below aligned signal
4
30%
Blocked threshold is set 30% below aligned signal
5
35%
Blocked threshold is set 35% below aligned signal
6
40%
Blocked threshold is set 40% below aligned signal
7
45%
Blocked threshold is set 45% below aligned signal
8
50%
Blocked threshold is set 50% below aligned signal
Table A-11. HW Interface Flags
SPDU SubIndex
Bit Position
Flag
Description
4
0
Display Orientation
0 = Normal, 1 = Inverted
5
1
Configuration Type
0 = DIP Switch, 1 = Advanced Control
6
2
Sensitivity Button
0 = Enabled, 1 = Disabled
7
3
Align/Blank Button
0 = Enabled, 1 = Disabled
Table A-12. Measurement 1 and Measurement 2
Measurement 1 & Measurement 2
Value
Function
Description
0
Disabled
Disabled
1
FBB
First Beam Blocked
2
LBB
Last Beam Blocked
3
TBB
Total Beams Blocked
4
TRN
Transitions
5
CBB
Contiguous Beams Blocked
6
FBM
First Beam Made
7
LBM
Last Beam Made
8
TBM
Total Beams Made
36
wm - tel: 763-544-3164
Rev.B
Phone: 800.894.0412 - Fax: 888.723.4773 - Web: www.clrwtr.com - Email: [email protected]
A-GAGE EZ-ARRAY IO-Link Instruction Manual
Measurement 1 & Measurement 2
Value
Function
Description
9
CBM
Contiguous Beams Made
10
MBB
Middle Beam Blocked
11
OD
Outer Diameter
12
ID
Inner Diameter
13
CFBB
Contiguous First Beam Blocked
14
CLBB
Contiguous Last Beam Blocked
15
O1 FBB
Object 1 First Beam Blocked
16
O1 LBB
Object 1 Last Beam Blocked
17
O2 FBB
Object 2 First Beam Blocked
18
O2 LBB
Object 2 Last Beam Blocked
19
O3 FBB
Object 3 First Beam Blocked
20
O3 LBB
Object 3 Last Beam Blocked
21
CARPET NAP
Carpet Nap
24
CARPET EDGE
Carpet Edge
Table A-13. Number of Dirty Channels
Range
Description
1-360
Number of channels that need to be dirty before indicator is lit (150 to 1800 mm Length Models)
1-480
Number of channels that need to be dirty before indicator is lit (2100 to 2400 mm Length Models)
Table A-14. Time of Service
Range
Description
2^32-1
Number of hours EZ-ARRAY has been in operation
6.5.4 Analog Output 1 Configuration
The Analog Output 1 Configuration contains the settings for the first analog output.
Table A-21. Analog Output 1 Configuration
SPDU
Byte Position
Member Name
Index
Sub-Index
82
See table A-22
0
Config Flags
82
9
2
Filter Speed
82
11
4-5
NULL Output
82
12
6-7
SPAN Output
Rev.B
wm - tel: 763-544-3164
37
Phone: 800.894.0412 - Fax: 888.723.4773 - Web: www.clrwtr.com - Email: [email protected]
A-GAGE EZ-ARRAY IO-Link Instruction Manual
Table A-22. Config Flags (Analog Output 1 & 2)
SPDU Sub-Index
Bit Position
Flag
Description
1
0
Slope
0 = Negative, 1 = Positive
2
1
Measurement
0 = Measurement 2, 1 = Measurement 1
3
2-3
ZERO Value
0 = Hold, 1 = Minimum, 2 = Maximum
4
4
Peak Detect
0 = Disabled, 1 = Enabled
5
5
Peak Detect Direction
0 = Maximum, 1 = Minimum
6
6
Status
0 = Disabled, 1 = Enabled
7
7
Peak Detect Reset
0 = Auto, 1 = External Communications
Table A-23. Filter Speed (Analog Output 1 & 2)
Value
Filter Speed
Description
0
Fast
No filtering
1
Medium
Filter step response is 6 scans for 98% of signal
3
Slow
Filter step response is 24 scans for 98% of signal
Table A-24. NULL Output (Analog Output 1 & 2)
Range
Description
0-4095
Minimum DAC value of Analog Output (MUST be < SPAN Output)
Table A-25. SPAN Output (Analog Output 1 & 2)
Range
Description
0-4095
Maximum DAC value of Analog Output (MUST be > NULL Output)
6.5.5 Analog Output 2 Configuration
The Analog Output 2 Configuration contains the settings for the second analog output.
Table A-26. Analog Output 2 Configuration
SPDU
Byte Position
Member Name
Index
Sub-Index
83
See Table A-22
0
Config Flags
83
9
2
Filter Speed
83
11
4-5
NULL Output
83
12
6-7
SPAN Output
38
wwm - tel: 763-544-3164
Rev.B
Phone: 800.894.0412 - Fax: 888.723.4773 - Web: www.clrwtr.com - Email: [email protected]
A-GAGE EZ-ARRAY IO-Link Instruction Manual
6.5.6 Discrete Output 1 Configuration
The Discrete Output 1 Configuration contains the settings for the first discrete output.
Table A-27. Discrete Output 1 Configuration
SPDU
Byte Position
Member Name
Index
Sub-Index
84
See Table A-28
0
Config Flags
84
7
2-3
Scan Response
84
8
4-5
Hysteresis LOW
84
9
6-7
Hysteresis HIGH
84
10
8-9
Threshold LOW
84
11
10-11
Threshold HIGH
Table A-28. Config Flags (Discrete Output 1 & 2)
SPDU SubIndex
Bit Position
Flag
Description
1
0
Status
0 = Disabled, 1 = Enabled
2
1
Type
0 = Measurement, 1 = Alarm/Health (Discrete Output 1 can ONLY be of
type Measurement)
3
2
Polarity1
0 = PNP, 1 = NPN
4
3
Mode2
0 = Normally Closed (Health), 1 = Normally Open (Alarm)
5
4
Measurement
0 = Measurement 2, 1 = Measurement 1
1IO-Link
2For
Model: Discrete Output 2 ONLY, Discrete Output 1 is PUSH-PULL
Type = Alarm/Health, Mode setting corresponds to 0=Health, 1=Alarm
Table A-29. Scan Response (Discrete Output 1 & 2)
Range
Description
1-250
Number of consecutive measurements before changing state
Table A-30. Hysteresis LOW (Discrete Output 1 & 2)
Range
Description
0-359
Lower hysteresis threshold for discrete output (MUST be < Threshold LOW) (150 to 1800 mm Length Models)
0-479
Lower hysteresis threshold for discrete output (MUST be < Threshold LOW) (2100 to 2400 mm Length Models)
Table A-31. Hysteresis HIGH (Discrete Output 1 & 2)
Range
Description
2-361
Upper hysteresis threshold for discrete output (MUST be > Threshold HIGH) (150 to 1800 mm Length Models)
2-481
Upper hysteresis threshold for discrete output (MUST be > Threshold HIGH) (2100 to 2400 mm Length Models)
Rev.B
wm - tel: 763-544-3164
39
Phone: 800.894.0412 - Fax: 888.723.4773 - Web: www.clrwtr.com - Email: [email protected]
A-GAGE EZ-ARRAY IO-Link Instruction Manual
Table A-32. Threshold LOW (Discrete Output 1 & 2)
Range
Description
1-360
Lower threshold for discrete output (MUST be <= Threshold HIGH) (150 to 1800 mm Length Models)
1-480
Lower threshold for discrete output (MUST be <= Threshold HIGH) (2100 to 2400 mm Length Models)
Table A-33. Threshold HIGH (Discrete Output 1 & 2)
Range
Description
1-360
Upper threshold for discrete output (MUST be >= Threshold LOW) (150 to 1800 mm Length Models)
1-480
Upper threshold for discrete output (MUST be >= Threshold LOW) (2100 to 2400 mm Length Models)
6.5.7 Discrete Output 2 Configuration
The Discrete Output 2 Configuration contains the settings for the second discrete output.
Table A-34. Discrete Output 2 Configuration
SPDU
Byte Position
Member Name
Index
Sub-Index
85
See Table A-28
0
Configuration
85
7
2-3
Demodulation Count
85
8
4-5
Hysteresis LOW
85
9
6-7
Hysteresis HIGH
85
10
8-9
Threshold LOW
85
11
10-11
Threshold HIGH
6.6 System Status and Measurement Data
IO-Link models of the EZ-ARRAY use the SPDU channel to provide access to system status measurement data and the Alignment/
Blanking routine.
6.6.1 Active Measurements
The Active Measurements section contains the current values of the two measurements that were configured in the General Configuration.
Table B-1. Active Measurements
SPDU
Index
Byte Position
Member Name
Sub-Index
64
1
0-1
Measurement 1
64
2
2-3
Measurement 2
40
wm - tel: 763-544-3164
Rev.B
Phone: 800.894.0412 - Fax: 888.723.4773 - Web: www.clrwtr.com - Email: [email protected]
A-GAGE EZ-ARRAY IO-Link Instruction Manual
Table B-2. Measurement 1 and Measurement 2
Range
Description
0-1920
Measurements are represented in 4x channel resolution
6.6.2 ALL Measurements
The ALL Measurements section contains the current values of all the available measurements.
Table B-3. ALL Measurements
SPDU
Byte Position
Member Name
Index
Sub-Index
67
1
0-1
FBB
67
2
2-3
LBB
67
3
4-5
TBB
67
4
6-7
TRN
67
5
8-9
CBB
67
6
10-11
FBM
67
7
12-13
LBM
67
8
14-15
TBM
67
9
16-17
CBM
67
10
18-19
MBB
67
11
20-21
OD
67
12
22-23
ID
67
13
24-25
CFBB
67
14
26-27
CLBB
67
15
28-29
O1 FBB
67
16
30-31
O1 LBB
67
17
32-33
O2 FBB
67
18
34-35
O2 LBB
67
19
36-37
O3 FBB
67
20
38-39
O3 LBB
67
21
40-41
CARPET NAP
67
22
42-43
AO1 PEAK
67
23
44-45
AO2 PEAK
67
24
46-47
CARPET EDGE
Rev.B
wom - tel: 763-544-3164
Phone: 800.894.0412 - Fax: 888.723.4773 - Web: www.clrwtr.com - Email: [email protected]
41
A-GAGE EZ-ARRAY IO-Link Instruction Manual
Table B-4. Measurements (ALL)
Range
Description
0-1920
Measurements are represented in 4x channel resolution
AO1 PEAK and AO2 PEAK Measurements
The AO1 PEAK and AO2 PEAK measurements store the minimum/maximum values of Analog Output 1 and Analog Output 2 respectively. When the EZ-ARRAY's Analog Outputs are configured to have Peak Detect = Enabled and Peak Detect Reset = External Communications, then reading these measurements will reset the Analog Output Peak Detect value. To enable this mode of operation, the Analog
Output's Configuration Flags must be configured as shown in Example 1 (see Table A-22).
Example 1. Analog Output Configuration Flags for Peak Detection with External Comm Reset
SPDU Sub-Index
Bit Position
Flag
Description
Value
1
0
Slope
0 = Negative, 1 = Positive
X*
2
1
Measurement
0 = Measurement 2, 1 = Measurement 1
X
3
2-3
ZERO Value
00 = Hold, 01 = Minimum, 10 = Maximum
XX
4
4
Peak Detect
0 = Disabled, 1 = Enabled
1
5
5
Peak Detect Direction
0 = Maximum, 1 = Minimum
X
6
6
Status
0 = Disabled, 1 = Enabled
1
7
7
Peak Detect Reset
0 = Auto, 1 = External Communications
1
* X denotes a don't care value
6.6.3 Channel States
The Channel States section contains the state of all the channels in the EZ-ARRAY. Each sub-index represents 16 channels.
Table B-5. Channel States
SPDU
Byte Position
Member Name
Index
Sub-Index
65
1
0
Channels 1-8
65
1
1
Channels 9-16
65
...
...
...
65
30
58
Channels 465-472
65
30
59
Channels 473-480
Table B-6. Channel States Bit-Mask
Value
State
Description
0
Made
The channel is made (clear)
1
Blocked
The channel is blocked
For example, if the first and third beams of the EZ-ARRAY are blocked, Sub-Index 1 would contain the value 0x0005.
42
wm - tel: 763-544-3164
Phone: 800.894.0412 - Fax: 888.723.4773 - Web: www.clrwtr.com - Email: [email protected]
Rev.B
A-GAGE EZ-ARRAY IO-Link Instruction Manual
6.6.4 System Info and Status
The System Info and Status section contains the current status of the EZ-ARRAY.
Table B-7. System Info and Status
SPDU
Byte Position
Member Name
Index
Sub-Index
66
1
0-1
Number of Emitter Channels
66
2
2-3
Emitter First Bad Channel
66
3
4-5
Number of Receiver Channels
66
See Table B-12
8
DIP Switch
66
12
9
ERROR Code
66
13
10
Alignment Status
66
See Table B-14
11
Discrete Outputs
66
17
12-13
Analog Output 1 DAC
66
18
14-15
Analog Output 2 DAC
Table B-9. Number of Emitter Channels
Range
Description
30-480
Number of channels the emitter has (multiples of 30)
Table B-10. Emitter First Bad Channel
Range
Description
0-480
First channel that emitter is unable to fire (0 = no bad channels)
Table B-11. Number of Receiver Channels
Range
Description
30-480
Number of channels the Receiver has (multiples of 30)
Table B-12. DIP Switch
SPDU Sub-In- Bit Position
dex
Function
Description
5
0
DIP Switch 6
0 = ON, 1 = OFF
6
1
DIP Switch 5
0 = ON, 1 = OFF
7
2
DIP Switch 4
0 = ON, 1 = OFF
8
3
DIP Switch 3
0 = ON, 1 = OFF
9
4
DIP Switch 2
0 = ON, 1 = OFF
10
5
DIP Switch 1
0 = ON, 1 = OFF
Rev.B
wm - tel: 763-544-3164
43
Phone: 800.894.0412 - Fax: 888.723.4773 - Web: www.clrwtr.com - Email: [email protected]
A-GAGE EZ-ARRAY IO-Link Instruction Manual
Table B-13. ERROR Code
Value
Status
0
System OK
1
Receiver EEPROM Hard Failure
2
Receiver Alignment/Blanking Configuration Error
3
Reserved for Factory 3
4
Emitter or Wiring Problem
5
Emitter Channel Error
6
Reserved for Factory 6
7
Reserved for Factory 7
8
Reserved for Factory 8
9
Reserved for Factory 9
10
Incompatible Scan and Measurement Mode
Table B-14. Alignment Status
Value
Status
0
Failed
1
Success
Table B-15. Discrete Outputs
SPDU SubIndex
Bit Position
Function
Description
14
0
Discrete Output 1
0 = OFF, 1 = ON
15
1
Discrete Output 2
0 = OFF, 1 = ON
Table B-16. Analog Output 1 DAC & Analog Output 2 DAC
Range
Description
0-4095
Current DAC value of analog output
44
wm - tel: 763-544-3164
Rev.B
Phone: 800.894.0412 - Fax: 888.723.4773 - Web: www.clrwtr.com - Email: [email protected]
A-GAGE EZ-ARRAY IO-Link Instruction Manual
6.6.5 Receiver and Emitter Version Info
The Receiver and Emitter Version Info section contains the part numbers and versions of the receiver and emitter firmware.
Table B-17. Receiver and Emitter Version Info
SPDU
Byte Position
Member Name
Index
Sub-Index
68
1
0-3
Receiver Part Number
68
2
4
Receiver Version
68
4
6-9
Emitter Part Number
68
5
10
Emitter Version
6.6.6 Communications Version Info
The Communications Version Info section contains the part number and version of the communications firmware.
Table B-18. Communications Version Info
SPDU
Byte Position
Member Name
Index
Sub-Index
69
1
0-3
Part Number
69
2
4
Version
6.6.7 Alignment/Blanking Routine
The Alignment/Blanking Routine section provides a state-machine for executing the Alignment and/or Blanking routines.
Table B-19. Alignment/Blanking Routine
SPDU
Index
Sub-Index
92
1
Byte Position
Member Name
0
Alignment / Blanking Mode
Table B-20. Alignment/Blanking Mode
Value
Rev.B
State
0
IDLE State
1
Access Alignment Mode
2
Alignment State
3
Exit Alignment Mode
4
Access Blanking Mode
5
Blanking State
6
Exit Blanking Mode
wm - tel: 763-544-3164
45
Phone: 800.894.0412 - Fax: 888.723.4773 - Web: www.clrwtr.com - Email: [email protected]
A-GAGE EZ-ARRAY IO-Link Instruction Manual
Figure B-1. Alignment/Blanking Mode State Machine
1: Access
Alignment Mode
4: Access
Blanking Mode
2: Status:
Alignment
Mode
0: Idle
3: Exit
Alignment Mode
5: Status:
Blanking
Mode
6: Exit
Blanking Mode
See Overview: Electronic Alignment Routine and Overview: Blanking for details on Alignment and Blanking routines. The Alignment Status can be read in the System Info and Status section to check if the Alignment routine was successful.
46
wm - tel: 763-544-3164
Rev.B
Phone: 800.894.0412 - Fax: 888.723.4773 - Web: www.clrwtr.com - Email: [email protected]