1
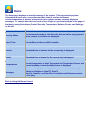
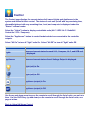
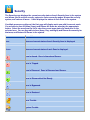
for Windows Media Center User's Guide Table of Contents • • • • • • Introduction System Requirements Installation Running HAI Home Control Using HAI Home Control Product Support Introduction Thank you for purchasing HAI Home Control for Windows Media Center. HAI Home Control is software that runs on a Windows Media Center computer for controlling lighting, temperatures, and security on a television using a single Media Center remote control. A Windows Media Center coordinates music, television, and home photography for an enjoyable home entertainment experience. HAI’s Home Control coordinates security, temperature, and lighting for comfort, convenience and safety. A Windows Media Center is an easy-to-use integrated digital entertainment center. It can play, pause and rewind live TV, play DVDs and CDs, store your digital music, videos and photos, browse the Internet, e-mail and run Windows XP applications. With HAI Home Control, the Windows Media Center presents your HAI system’s features, too. You get menus for lighting control, security, temperature control, macros, the event log, and more. So you can settle in for a great movie with the lights, temperature, and security adjusted exactly as you please. HAI Home Control runs on a single Windows Media Center computer that is connected to an HAI controller through an RS-232 / RS-485 serial interface or to an HAI Omni IIe or OmniPro II over it's built-in Ethernet port. The HAI Home Control pages can be viewed and accessed over the connected display device including television sets. Additionally, it can be viewed and accessed from various other display devices (i.e. television sets) in a home using Windows Media Center Extenders. Media Center Extenders allow you to enjoy digital entertainment and home control from any room in your home. Please review this file which contains necessary and helpful information on the installation, configuration, and operation of this software. Back to Table of Contents System Requirements 1. 2. 3. 4. HAI Controller Requirements Computer Requirements Requirements for Recording Cameras Back to Table of Contents HAI Controller Requirements: 1. HAI OmniLT, Omni, Omni II, Omni IIe, OmniPro, or OmniPro II controller with 1.8 firmware or later. 2. The Windows Media Center computer running HAI Home Control connects to the HAI controller in one of the following manners: a. Through the HAI Model 10A17-1 Serial Interface connected to an OmniLT, Omni, Omni II, Omni IIe, OmniPro, or OmniPro II controller. This interface provides both an RS-232 interface and an RS-485 interface. The RS-232 interface is provided through a standard DB-9M connector. The serial interface may be connected to a personal computer using a readily available "null modem" or data transfer cable. The RS-485 interface is provided through a two-position terminal block. b. Through a serial interface built onto the OmniLT, Omni II, Omni IIe, or OmniPro II controller. This serial interface supports both RS-232 and RS-485 connections. The RS-232 interface is provided through a modular connector located in the upper left corner of the controller. To access the RS-232 interface, use the HAI Model 21A05-2 Serial Cable Kit. Plug one end of the cable into the modular connector on the controller. Plug the other end into the Model 21A05-1 Communication Cable Adaptor (modular to DB-9 RS-232), which connects the controller serial port to the computer's DB-9 RS-232 port. The RS-485 interface is provided through the same modular connector. To select RS-485, move the interface jumper (below the modular connector) from the "232" to the "485" position. Using a standard 4 position phone cable (with the tab on the modular cable facing up, make sure that the Yellow wire is at the top), use the Yellow and Green wires for communications. c. Through the built-in Ethernet interface (J6) on an Omni IIe or OmniPro II controller. Use a standard network cable to connect the controller to a hub, switch, or router. Use a network crossover cable when connecting the controller directly to the NIC card on a computer. The RS-232 interface is configured as DTE (data terminal equipment). This is the same configuration as provided on a typical personal computer. In this configuration, Pin 2 (RX) and Pin 3 (RX) between the serial interface and the PC must be crossed. If your Windows Media Center computer in not equipped with an RS-232 serial port, you can purchase a USB Serial Adapter, such as the Keyspan USA19HS. See your HAI distributor for more information. The RS-485 interface may be connected to the external device up to 1000 feet away when using standard twisted pair cabling. If the PC isn't equipped with an RS-485 port (most computers aren't), a port powered RS-232 to RS-485 converter is required. Back to System Requirements Computer Requirements: Minimum Computer Requirements • • 2 GHz processor or higher, Pentium IV, or equivalent Microsoft Windows XP Media Center Edition 2004 or Microsoft Windows XP Media Center Edition 2005 • 512 megabytes (MB) of RAM • 80 gigabytes (GB) hard-disk space • CD-ROM or DVD drive Recommended Computer Configuration • • • 3 GHz processor or higher, Pentium IV, or equivalent Microsoft Windows XP Media Center Edition 2005 1 gigabyte (GB) of RAM Back to System Requirements Requirements for Recording Cameras HAI Home Control can record television channels based upon rules created within the application. These channels can consist of cameras that are modulated onto the incoming video signal to your television. These are the required components: • Windows XP Media Center Edition 2005 • CCD cameras • Video modulator(s) with power adaptor(s) and cables (optional audio input for sound) CCD cameras require a power source. Connect the power adaptor (required for your selected camera) to the camera according to the manufacturer's instructions. Connect the camera's video output to the video input (usually RCA connector) on the modulator. If applicable, connect the audio output to the audio input (usually 3.5mm stereo jack) on the modulator. Configure the modulator according to the manufacturer's instructions. The channel in which the video image is modulated onto must be programmed into the modulator. The output from the modulator (usually "F" connector) is then combined with your incoming video signal. Back to System Requirements Back to Table of Contents Installation To set up HAI Home Control, follow each of the steps below: 1. Install HAI Home Control 2. Register Online 3. Back to Table of Contents Install HAI Home Control 1. Insert the HAI HAI Home Control compact disk into your CD-ROM drive. 2. Select the "Install Home Control" option. 3. Carefully read the "License Agreement". If you accept all of the terms of the "License Agreement", select "I accept the terms in the license agreement". 4. Follow the instructions provided on the screen. Register Online Next, you are prompted to "Register Online". Select "Yes" to fill out the registration form. Tip: It is strongly recommended that you take advantage of this automated process. You must register this software to have access to the HAI Home Control Update page which allows you to download patches and feature enhancing updates and allows us to alert you of product updates and enhancements to this software are available. Fill out the form completely. When complete, scroll down and choose the "Submit" button at the bottom of the page. A confirmation page will be displayed. Note: Do not register this software twice. If the software must be reinstalled, bypass the "Register Online" by selecting "No" when prompted. If the registration is unsuccessful, call HAI for support. Back to Installation Back to Table of Contents Running HAI Home Control The following steps will guide you through running and configuring HAI Home Control. 1. 2. 3. 4. Starting HAI Home Control Configuring a Serial Connection Configuring a Network Connection Back to Table of Contents Starting HAI Home Control To start HAI Home Control, press the START button (the green button with the Windows logo) on the Media Center remote to display the Media Center Start menu. Press the down-arrow on the remote until "More Programs" is highlighted, and then press the "OK" button. Press the arrow button until "HAI Home" is highlighted, and then press the "OK" button. TIP: After HAI has been selected from the "More Programs" page, it will show up as an item in the Start menu. When accessing HAI Home Control for the first time, you will first need to make a connection with the HAI controller. You will likely receive the following error: HAI HOME CONTROL ERROR HAI Home Control is unable to communicate with the HAI controller. You must enter valid connection information to establish communications with the controller. Press OK to verify and change settings. Press the "OK" button. Press the right-arrow on the remote so that the "Change Settings" button is highlighted, and then press the OK button on the remote to enter the Controller Connection Properties. Select the method in which the Media Center computer is connected to the HAI controller under "Connection Type". • If you are connected to the controller's serial interface, select "Serial" as the Connection Type. • If you are connecting to an Omni IIe or OmniPro II controller over your local network, select "Network" as the Connection Type. Press the [+] button to change the setting to "Network" and the [-] button to change the setting to "Serial". Once selected, press the down-arrow button on the remote so that "Next" is selected, then press the OK button. Serial: Serial Port, Baud Rate, and Access Code HAI Home Control needs to know the Serial Port, Baud Rate, and Access Code (Code 1 in HAI controller) to establish a serial connection to the controller. Select "Serial" as the Connection Type, and then press the down-arrow button on the remote so that "Next" is highlighted, then press the OK button. Communications Port Using the [+] and [-] buttons, select the communications port that corresponds to the serial port (COM1 - COM9) on the Media Center computer connected to the controller. Once selected, press the down-arrow key on the remote to select the Baud Rate. Baud Rate The Baud Rate corresponds to the baud rate specified for communications within the controller. If you are unsure of the correct settings, verify the settings at the console or use the specified settings in the HAI PC Access Software. Once selected, press the down-arrow key so that "Next" is highlighted, then press the OK button to enter the Access Code. Access Code Using the numeric keypad on the remote, enter the 4-digit access code. The Access Code must be the same as "Code 1" in the controller. Once complete, press the down-arrow key so that "Next" is highlighted, then press the OK button. Connecting to the Controller With the "Connect" button highlighted, press the OK button. A dialog will appear alerting you that connection may take several minutes. DO NOT EXIT UNTIL THE CONNECTION IS COMPLETE. Press the "OK" button to begin the connection process. When the connection is complete, the dialog will disappear and the connection status is displayed under the "Connect" button: • Success! Choose 'Finish' now - will be displayed if a successful connection has been made. Press the Finish button to begin the home control experience. Select the "Finish" button to begin! • Failure! Choose 'Back' to verify proper settings and try again - will be displayed if the connection fails. Press the Back button to correct settings. Select the "Back" button and correct the connection settings. TIP: If the connections fails, a dialog may appear with a more specific error message. Network: IP Address, Port, and Encryption Key HAI Home Control needs to know the controller’s local network IP address, the controller’s local network port number, and the controller's 128-bit encryption key (all of this information can be obtained from the controller using the console or PC Access) to establish a serial connection to the controller. Select "Network" as the Connection Type, and then press the down-arrow button on the remote so that "Next" is highlighted, then press the OK button. Controller IP Address Using the numeric keypad on the remote or a keyboard, enter the controller’s local network IP address. Once entered, press the down-arrow key on the remote to select the Controller Port. Controller Port Using the numeric keypad on the remote or a keyboard, enter the controller’s local network port number. Once entered, press the down-arrow key so that "Next" is highlighted, then press the OK button to enter the Encryption Key. Encryption Key Using a keyboard, enter Part 1 of the "Encryption Key" (this is 8 2-digit values from 0-9 and/or the letters A-F, each separated by a hyphen "-" ) that matches PT 1 (part 1) of the Encryption Key in the controller. Once entered, press the down-arrow key on the remote to select Part 2 of the Encryption Key. Using a keyboard, enter Part 2 of the "Encryption Key" (this is 8 2-digit values from 0-9 and/or the letters A-F, each separated by a hyphen "-" ) that matches PT 2 (part 2) of the Encryption Key in the controller. Once complete, press the down-arrow key so that "Next" is highlighted, then press the OK button. Connecting to the Controller With the "Connect" button highlighted, press the OK button. A dialog will appear alerting you that connection may take several minutes. DO NOT EXIT UNTIL THE CONNECTION IS COMPLETE. Press the "OK" button to begin the connection process. When the connection is complete, the dialog will disappear and the connection status is displayed under the "Connect" button: • Success! Choose 'Finish' now - will be displayed if a successful connection has been made. Press the Finish button to begin the home control experience. Select the "Finish" button to begin! • Failure! Choose 'Back' to verify proper settings and try again - will be displayed if the connection fails. Press the Back button to correct settings. Select the "Back" button and correct the connection settings. Back to Running HAI Home Control Back to Table of Contents Using HAI Home Control Now the fun begins! The following steps will guide you through using HAI Home Control. 1. General Operation 2. Event Notifications 3. Home Page 4. Control Page 5. Security Page 6. Temperature Page 7. Button Page 8. Events Page 9. Surveillance Page 10. Settings Page General Operation In general, there are three ways to navigate around HAI Home Control: 1. Use the remote control that came with your Windows Media Center computer. Use the arrow keys and OK button to move to and select various items. Use the numeric keypad when necessary to enter a numeric value. Use the "Back" button to go back to the previous page. 2. Use a mouse. Move the mouse to the desired item, and then click the left button to select the highlighted item. To go back to the previous page, click on the back-arrow in the green circle. 3. Use a keyboard. Use the arrow keys and enter key to move and select various items. Use the keyboard keys when necessary. Use the backspace key to go back to the previous page. When scrolling through a list of items (e.g. lights, zones, etc.), use the up and down arrow keys on the remote to scroll through the list, one item at a time. Use the CH/PG key (up and down) on the remote to scroll through the list, one page at a time. When an item is highlighted, it can be selected. To select an item, press the OK button on the remote. Back to Using HAI Home Control Event Notifications If "Event Notifications" are enabled, each time a system event takes place (i.e. a unit gets turned on or off, a zone opens or closes, security is armed or disarmed, etc.), an event pop-up box is displayed with the event details. See Settings for additional details. Back to Using HAI Home Control Home The Home page displays an overall summary of the system. This page security system information for each area, current time and date, time of sunrise and sunset, current temperature of devices connected to your system, and any currently displayed messages. To control other devices (such as turn a light on) you must navigate to the page of that device using the buttons (Control, Security, Temperature, Buttons, Events, and Settings) on the left. Item Description Security Status Current security mode of each Security Area as well as any bypassed zones, alarms, or troubles are displayed. Date & Time Current Date and time on HAI Controller Sunrise Calculated time of sunrise for the current day is displayed. Sunset Calculated time of sunset for the current day is displayed. Temperatures Current temperature of each Thermostat and Temperature Sensor and current humidity of each Humidity Sensor is displayed. Messages Any message that is currently displayed on a console is listed (this feature is available on OmniLT, Omni II, Omni IIe, OmniPro, and OmniPro II controllers with firmware version 1.8 or later). Back to Using HAI Home Control Control The Control page displays the current status of all named Lights and Appliances in the system and allows for their control. The status of each unit (on/off with any remaining time, dimmed/brightened with any remaining time, level, and ramp rate is displayed under the "Status" column header. Select the "Lights" button to display controllable units (HLC / UPB / ALC / RadiaRA / CentraLite / X-10 / Compose). Select the "Appliances" button to control hardwired devices connected to the controller outputs. Select "All On" to turn all "light" units On. Select "All Off" to turn all "light" units Off. Item Description Lights Name and current status for each X-10, Compose, ALC, and UPB unit is displayed. Appliances Name and current status of each Voltage Output is displayed. Light (unit) is On. Light (unit) is Off. Appliance (output) is On. Appliance (output) is Off. Use the up and down arrow keys on the remote to scroll through the list of units, one unit at a time. Use the CH/PG key (up and down) on the remote to scroll through the list of units, one page at a time. Back to Using HAI Home Control Security The Security page displays the current security status of each Security Area in the system and allows you to arm the security system to various security modes, disarm the security system, and restore all areas . It also displays the status of each Zone in the system. If multiple areas are configured, the first page will display each area with its current mode. You are able to Arm All Areas (Away) and Disarm All Areas be selecting the appropriate button. Select the area from the list to view the current zone status for each zone in the selected area. You are then able to Arm (Away, Day, and Night) and Disarm the security for that area, and Restore All Zones in the system. Item Description Area Name and current status of each Security Area is displayed Zones Name and current status of each Zone is displayed. Area is Armed. Zone is Armed and Secure. Zone is Tripped. Area is Disarmed. Zone is Disarmed and Secure. Zone is Disarmed but Not Ready. Zone is Bypassed. Zone is Restored. Zone Trouble. System Trouble. Alarm is Tripped. System Reset. Use the up and down arrow keys on the remote to scroll through the list of areas or zones, one at a time. Use the CH/PG key (up and down) on the remote to scroll through the list of areas or zones, one page at a time. Back to Using HAI Home Control Temperature The Temperature page displays the current temperature and humidity of all Thermostats, Temperature Sensor , and Humidity Sensors in your system. Select a device from the list to change its settings. Item Description Thermostats Name and current temperature, heat and cool settings, system mode, fan mode, and hold status of each HAI Thermostat is displayed. Temp Sensors and PESMs Name and current temperature, high and low settings, and status of each Temperature Sensor is displayed. Humidity Sensors Name and current humidity, high and low settings, and status of each Humidity Sensor is displayed. Thermostat Temperature Sensor PESM (Energy Saver) Humidity Sensor When changing the Heat Setting, Cool Setting, or System Mode, you must select the "Set" button before the change will take effect. You can only make one change at a time, so you must select the "Set" button before making a change to a different item. Back to Using HAI Home Control Buttons The Button page displays a list of all available Buttons (macros) to perform a series of actions with a single press. Selecting a Button from the list allows that button to be executed. Item Description Button Name of each button is displayed. Button Use the up and down arrow keys on the remote to scroll through the list of buttons, one at a time. Use the CH/PG key (up and down) on the remote to scroll through the list of buttons, one page at a time. Back to Using HAI Home Control Events The Events page displays a list of the 100 most recent System Events. Item Description Event Name Name of each Event along with its description, date, and time is displayed. <Varies> Event Back to Using HAI Home Control Surveillance If you are running Windows Media Center edition 2005, you are able to create rules that allows you to record cameras that are modulated onto the incoming video signal to your television. Click the "Surveillance" icon to view, add, edit, and delete rules, and to view recorded videos. Record Rules A rule is a conditional statement that tells HAI Home Control what to do when the specified event occurs. Currently, HAI Home Control will record video from the desired camera (channel) for a specified duration when the event occurs. The "Rules" list contains: • • • • • • Rule Condition and Properties: The event condition that will trigger the video recording. Channel to Record: Which channel that is recorded when the condition is triggered. Duration: How many minutes to record the channel. Guaranteed Recording: If selected, this option will override other recordings in progress. Rule Name: The name given to the rule. Enable Rule: If selected, the rule is enabled and will record when the condition is triggered. Rule is Enabled Rule is Disabled Select a rule from the list to display a detailed description, to edit, to delete, or to disable the rule. Create a Rule To create a new rule, select the "Add" button . 1. Select the condition and properties for your rule: This is where you specify the event condition. Select a condition from the drop-down list. Event conditions and properties consist of: • • • • Alarm is activate [specify area and alarm type] Light or Appliance changes state [specify unit and state] Security is armed or disarmed [specify area, mode, and user] Security zone changes state [specify zone and state] 2. Video Settings Channel to Record: Select the channel to be recorded from the drop-down list. ______________________________________________ IMPORTANT NOTE: In order for channel recording to work, the channel number you specify must be a channel that exists in the guide. If you don’t manually add the modulated channel to the Guide, then recording will fail. To manually add the channel to the Guide, do the following from the main Media Center Menu: Choose “Settings” Choose “TV” Choose “Guide” Choose “Add Missing Channels” Choose “Add Channel” and then complete the wizard _______________________________________________ Duration: Enter the duration (in minutes) for the record operation. Guaranteed Recording: Check this box to record according to the rule even if other recordings are in progress. 3. Specify a name for this rule: Rule Name: Enter a name for the rule. The rule name is displayed in the list of rules. Enable Rule: Check this box to enable the rule to record when the condition is triggered. Edit / Enable / Disable / Delete To edit a rule, select the rule from the list, then select the "Edit". You can then edit the condition and properties, channel to recode, duration, guaranteed recording, give the rule a new name, and enable/disable the rule. To enable a rule, select the rule from the list, then select "Enable". The rule is now enabled. To disable a rule, select the rule from the list, then select "Disable". The rule is now disabled. To delete a rule, select the rule from the list, then select "Delete". The rule is now deleted. When a Rule Fires When the event condition in the rule occurs (and if the rule is enabled), the rule list is updated to reflect the "Last Event" which will contain the date and time when the event took place. Back to Using HAI Home Control Settings Settings The Settings page is used to change configure user preferences, view and change connection settings, sync data with the controller, and view the system log which display the HAI Home Control Server history. After starting HAI Home Control, click on the Settings icon to modify these settings: Main - Configure user preferences 1. Startup page: When HAI Home Control, select which page is displayed. By default the "Welcome" page is displayed. 2. Enable Sounds: HAI Home Control makes sounds while navigating and selecting items. Check this box to enable sounds. 3. Enable Event Notifications: Each time a system event takes place (i.e. a unit gets turned on or off, a zone opens or closes, security is armed or disarmed, etc.) an event pop-up box is displayed with the event details. Uncheck the box do disable the event notifications. Controller - Controller Connection Properties 1. View the current connection settings. These settings include connection type: Serial (Port and Baud Rate) or Network (Controller IP Address and Controller Port) 2. To change the current settings, highlight the "Change Settings" button, then press the OK button. Select the method in which the Media Center computer is connected to the HAI controller under "Connection Type". o If you are connected to the controller's serial interface, select "Serial" as the Connection Type. o If you are are connecting to an Omni IIe or OmniPro II controller over your local network, select "Network" as the Connection Type. Press the [+] button to change the setting to "Network" and the [-] button to change the setting to "Serial". Once selected, press the down-arrow button on the remote so that "Next" is selected, then press the OK button. Data Sync - Data Synchronization Preferences 1. This page displays settings for whether or not the "Setup" and "Names" information is retrieved from the controller each time the Windows Media Center computer is started. A checked box indicates that this information will be retrieved. 2. Choosing either of the "Sync" buttons will retrieve the associated information. Retrieving this information can take several seconds/minutes depending on the amount of data to be transferred. The time and date of the last sync is displayed. 3. You can also have the controller's time updated daily with the computer's time by checking the "Sync controller time with computer" check box. This is particularly advantageous when your computer's time in updated by a National Time Server. System Log - Recent System Notices 1. The "System Log" button is used to display the HAI Home Control Server history which includes errors and other useful information. If the log becomes too large, you have the option to delete the current log by selecting the "Clear Log" button. Back to Using HAI Home Control Back to Table of Contents Product Support In the event that there are any questions, please call your installer first. If you need assistance directly from HAI, please call us at (504) 736-9810, between the hours of 9:00 AM and 5:00 PM, Central Time or email [email protected]. We will be happy to assist you. When calling, please have the version and serial number of HAI Home Control. Back to Table of Contents