1
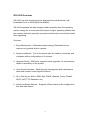
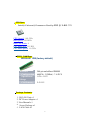
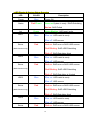
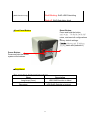
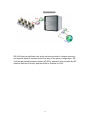
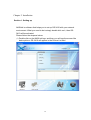
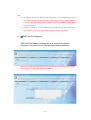
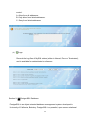
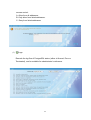
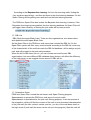
PROLinux Server Master User Manual
1
Table Of Contents
Table Of Contents............................................................................................................................... ..2
GS-3410 OVERVIEW........................................................................................4
CHAPTER 1. NETWORK STRUCTURE..............................................................12
SECTION 1. SETTING UP......................................................................................14
SECTION 2. SOFTWARE INSTALLATION...........................................................................16
CHAPTER 3. SYSTEM.............................................................................................19
SECTION 1. NETWORK MANAGEMENT...........................................................................19
SECTION 2. ACCOUNT MANAGEMENT............................................................................24
SECTION 3. BACKUP....................................................................................................30
SECTION 4. SYSTEM INFORMATION................................................................................33
SECTION 5. HARD DISK MANAGEMENT.........................................................................36
SECTION 6. POWER MANAGEMENT...............................................................................38
SECTION 7. MRTG CHAT..........................................................................................40
SECTION 8. ON LINE SERVICE......................................................................................41
SECTION 9. QUALITY OF SERVICE (QOS)......................................................................43
CHAPTER 4. SERVER.............................................................................................46
SECTION 1. WEB SERVER............................................................................................46
SECTION 2. MAIL SERVER (OPTION).............................................................................52
SECTION 3. FILE SERVER.............................................................................................66
SECTION 4. DNS SERVER............................................................................................71
SECTION 5. FTP SERVER............................................................................................75
SECTION 6. PROXY SERVER..........................................................................................79
SECTION 7. DHCP SERVER.........................................................................................85
SECTION 8. MYSQL DATABASE (*).............................................................................88
SECTION 9. POSTGRESQL DATABASE...........................................................................90
SECTION 10. E-MAIL ANTI-VIRUS (OPTION)..................................................................93
SECTION 11. SPAM FILTER (OPTION).............................................................................96
SECTION12. UPS......................................................................................................107
SECTION13. DDNS SETTING......................................................................................109
2
SECTION14. DYNAMIC DNS SERVER..........................................................................111
SECTION 15. INTRANET VPN SERVER........................................................................113
SECTION 16. ITUNES SERVER....................................................................................117
SECTION17. UPNP MEDIA SERVER............................................................................121
SECTION18. BITTORRENT DOWNLOAD .......................................................................123
CHAPTER 5. GUI....................................................................................................127
SECTION1. GUI MANAGEMENT.................................................................................127
3
GS-3410 Overview
GS-3410 is a multi-functional server designed for small business, with
Embedded Linux on DOM (Disk On Module).
GS-3410 separates the data storage media completely from the operating
system, design for environments that require a higher operating stability than
the ordinary disk drive operation, prevents unauthorized use and back tracks
from happening.
Features:
1. Easy Maintenance - Embedded system design (Embedded Linux),
requires only general skills to operate.
2. Simple Installment - Turn on the power after the cable is connected, and
completes all the configurations in 3 minutes.
3. Upgrade Facility - PROLinux supports online upgrades, for automatically
repairs vulnerability on the system.
4. User-friendly Interface - Simplifying the management and maintenance
tasks and comes in multi-lingual interfaces.
5. All in One Server (built-in DNS, Mail, WWW, Webmail, Proxy, Firewall,
DHCP, NAT, FTP, Database, etc.).
6. Quick and Simple Restore - Supports off-site backup of the configuration
files and data restore.
4
■
Hardware Introduction
■
Mainboard Spec
Processor System
CPU
Chipset
BIOS
With Socekt LGA775 Support Core 2 Duo/ Pentium D/Celeron D
Intel 945GC + ICH7R
Award 4Mb Flash ROM
Memory
Memory Slots
Memory Type
Max. Capacity
2 x DIMM (240pin) socket
DDR2 667/533 SDRAM
4GB
Graphics
On-Board Graphics
Max. Share Memory
Intel Graphics Media Accelerator (GMA) 950
Shared system memory up to 224MB
Expansion Slot
PCI-E Slot
1 x PCI-E x16 Slot Graphic Port
5
IDE / SATA
Main Storage Controller
Storage Supports
Intel ICH7R
1 x Dual Channel Ultra ATA-100 EIDE
4 x SATA2 Support RAID 0, 1, 0+1 ; data
transfer rates up to 3.0Gbit/s
Audio
Controller / CODEC
Surround Support
Realtek ALC662 HD Audio CODEC
5.1CH
LAN
Controller
Realtek RTL8111C Gigabit LAN Ethernet
Interface
Controller for PCI Express x 2
10/100/1000Base-T x 2
I/O Controller
Controller
USB Header
GPIO(DIO)
SIR Header
CPU Fan Header
System Fan Header
Super I/O Controller ITE IT8718
1 x 2*5 Pin (Support 2 devices)
1 x 2*5 Pin (8-bit Digital I/O)
1 x 1*5 Pin (2.0 Pitch)
1 x 1*4 Pin
1 x 1*3 Pin
Rear I/O
PS/2 Port
Serial Port
VGA Port
LAN Port
USB Port
Audio Jacks
1 x Keyboard / 1 x Mouse
1 x DB-9
1 x DB-15
2 x RJ-45
4 X USB 2.0
1 x Mic-in / 1 x Line-in / 1 x Line-out
Internal I/O
ATX Power Connector
12V Power Connector
SATA Connector
IDE Connector
Front Panel Header
Front Audio Header
1 x 2*10 Pin
1 x 2*2 Pin
4 x SATA2 Ports
1 x 40 Pin
1 x 2*5 Pin
1 x 2*5 Pin (2.0 Pitch)
Watchdog Timer
Output
Interval
System Reset
1~255 sec, can be set with software on Super I/O
Environment
Operating Temp.
0~450C
Form Factor
Mini-ITX
Dimensions: 170mm x 170mm (6.69” x 6.69”)
6
CPU Spec
■
Intel® Celeron® Processor Family 420 @ 1.6G CPU
CPU Speed: 1.60 GHz
Bus Speed: 800 MHz
Bus/Core Ratio: 8
L2 Cache Size: 512 KB
L2 Cache Speed: 1.6 GHz
DDR2 _RAM Spec
■
DDR2-667 1GB (factory default)
Interface
Configuration
Operational
Voltage
CAS Latency
■
240-pin unbuffered DIMM
64M*8 ( 512Mbit ) * 16 PCS
1.8V+- 0.1V
5-5-5-15
Package Contents:
1. GS-3410 Unit x 1
2. DC Power Adapter x 1
3. User Manual x1
4. Screw Package x1
5. LAN Cable x1
7
■
Assembly Viewing:
■
Front / Rear Panel
8
HDD2
Status
Power
Status
Act
HDD1
Status
HDD3
Status
HDD4
Status
Key- lock solt
RS-232 Port
Giga LAN x 2
LAN 1 LAN 2
(WAN) (LAN)
Mouse
5cm Cooling Fan
Keyboard
VGA
Power Switch
USB 2.0 x 4
8cm Cooling Fan
Power DC Jack
9
■
LED Display & System Status Overview
LED
COLOR
Power
Blue
Status
Red/Green
Description
Power ON.
Green on:System is ready / RAID Rebuilding
Red on: RAID Failed
Act
Green
HDD1
Blue
Green Blinking : HDD read / write.
Blue on: HDD install is ready
Blue off: HDD remove
Status
Red
Red on: RIAD error or RAID HDD remove
Red Blinking: RAID HDD Rebuilding
(RAID Function only)
Red off: RAID Rebuilding finish
HDD2
Blue
Blue on: HDD install is ready
Blue off: HDD remove
Status
Red
Red on: RIAD error or RAID HDD remove
Red Blinking: RAID HDD Rebuilding
(RAID Function only)
Red off: RAID Rebuilding is finished
HDD3
Blue
Blue on: HDD install is ready
Blue off: HDD remove
Status
Red
Red on: RIAD error or RAID HDD remove
Red Blinking: RAID HDD Rebuilding
(RAID Function only)
Red off: RAID Rebuilding finish
HDD4
Blue
Blue on: HDD install is ready
Blue off: HDD remove
Status
Red
Red on: RIAD error or RAID HDD remove
10
(RAID Function only)
Red Blinking: RAID HDD Rebuilding
Red off: RAID Rebuilding finish
Front Panel Button
Reset Button:
Press and hold the button,
send out the “Do Re Me Do Re Me“
noise, and reset all configurations
to
factory default settings .
(Include : Network card IP Address,
Account name and password.)
■
Power Button:
Press and hold the button,
system will shutdown.
Beep Alarm
■
Note: if you turn on the buzzer and warn function.
Beep
Description
Long beep (3 sec)
HDD RAID function is failed
Ding-dong
HDD RAID Rebuild is finished.
11
Chapter 1. Network Structure
12
GS-3410 plays a significant role as the services provider in network structure,
and network setup is required as the first step of the server configuration. GS3410 will be placed between modem (ATUR for example) that provided by ISP
(Internet Services Provide), and the HUBs or Switchs on LAN.
13
Chapter 2. Installation
Section 1. Setting up
NASLink is software that helps you to set up GS-3410 with your network
environment. What you need to do is simply double click on it, then GS3410 will be activated.
Please follow the steps as below:
(1) Double click on the NASLink logo, and then you will see the screen like
below picture. GS-3410 will appear in the Device List field.
14
(2) Click on GS3410, where in the Device List, then HDD is not initialized
message will pop up. It also will show the WAN IP address and WAN MAC
address in the Basic Information field.
(3) Click on “OK”, then Click on Access via web. Then you will redirect to
administrator login page.
15
Section 2. Software Installation
When the network configuration is completed in PROLinux and the
connection with LAN operates correctly, you may perform software
installation by the following steps:
(1) Login to the GUI with Internet browser (such as IE, Firefox) from PC on
LAN. If you connect to WAN port(The port beside PS/2 port), the IP is
http://192.168.1.251:6666. If you connect to LAN port, the IP is
http://192.168.79.254:6666.
Note: Default User Name: sysadmin Password: sysadmin1234
16
(2) When you first time login for software installation, you will be asking if
you would like to do RAID configuration. The screen will display all the
hard disk information and availability. Please select one of the hard
disk to install and press Format Hard Disk button.
Note:
1. Data will be removed completely from the hard disk selected,
please check if there is any critical data in the hard disk.
2. Click other options only after the partition process is completed.
(3) PROLinux Home page will display on the screen after the product is
activated, and you may able to perform system and server services
setup
17
Note: Default value of all services status is set to “Service Terminated”!
18
Chapter 3. System
System manages settings of Network, User, Back Up, system Information,
and Online service in PROLinux.
Section 1.
(1)
Network Management
Network Setting
Changes PROLinux settings on network environment.
19
20
Note:
1. Host Name and Domain Name is the address for you to contact with the world,
or in email address, the name after the symbol “@”. You may need to apply for
a domain name and assign your IP address to from the (DNSP) Domain Name
Service Provider.
2. When you change to a new IP address, it may cause a GUI disconnection to
occur. Please re-connect with the new IP again restore connection.
(2)
DMZ and Port Mapping
DMZ and Port Mapping settings allow all Internet connection
requests to forward to one of the specified internal machines.
Note: If the computer install with only one LAN card or the driver of the secondary
LAN card does not exist, this feature is disabled.
21
Port Mapping: Forwards all packets intended for one forwarding port
on the gateway from the Internet to be routed on a specified port on
one of the internal machines. To specify a range of segment to the
ports, place a symbol "-" between the port numbers (ex: 20-21)The
following setting indicate that If you set the Global IP address in
Network Setting to 123.11.22.33, Internet connection made to port
8888 in 123.11.22.33 will be forwarded to 192.168.1.10, port 80.
DMZ: Allows a single computer on your LAN to expose all of its ports
to the Internet. If you assign an IP address that is different from WAN
IP address, system will add a virtual IP to your WAN Ethernet card
automatic.
Assume that the WAN IP is set to 123.11.22.33. With DMZ setting as
shown below, system will add an WAN IP 123.11.22.44, and all
service connects to 123.11.22.44 will forward to and respond by the
computer with LAN IP of 192.168.1.10.
(3)
Intranet Access Control
To deny certain PCs on LAN to access network functions, set
PROLinux as the gateway server in the network, connect LAN to
Internet through PROLinux, and deny services request from certain
PC by apply settings in Intranet Access Control. The figure below is
an example that indicates PCs with LAN IP of
192.168.0.10~192.168.0.20 is restricted to web pages browsing on
Internet.
22
Note:
1. For special request, Click
to add new items to the DENY list
2. If the computer install with only one LAN card or the driver of the secondary
LAN card does not exist, this feature is disabled.
(4)
Server Security Setting
Server Security Setting protects PROLinux from common attacks
from Internet (port scan, ping to death).
(5)
Static Routing
Set “PROLinux Server Master” a gateway server, this function will set
static routing.
23
PPPoE Dial-up Setting
(6)
If you are using ADSL dial-up network connection with dynamic IP,
PROLinux also supports ADSL dial-up connection. Enter the user
name and password provided by ISP to acquire an ADSL Dynamic
IP.
Section 2.
Account Management
PROLinux is a multi-user and multi-task operating system and requires
management on user accounts. To achieve a more efficient and flexible
system management, different file permissions are set to different accounts
and groups.
24
(1)
New Account
Adds new user accounts to PROLinux. Each account added is able
to request services on Mail (Optional), File, FTP servers.
You may set the Data Quota and Mail Message Size limitation on the
accounts, and restrict specific accounts to access user’s homepage,
Mail server, File server (Network Neighborhood) and FTP server.
Note:
1.
Use only English alphabet (accounts may differ in Upper case or
Lower case) and digits only when creating a new account.
2.
The initial character of the account must not be a digit.
3.
Windows system recognizes the account name as the same whether it
is in upper case or lower case, but ”PROLinux” and ”prolinux” is
recognized as different accounts in Linux system. That means File
server (Network Neighborhood) will recognize them as the same
account causing an abnormal login to happen, while Mail server and
FTP server recognize them as the same account. To avoid this
25
complex to happen, please add new account with extreme careful on
the case sensitive matters.
4.
To place a user’s homepage, login to the FTP server or File server with
a user account. Place that homepage in public_html under the home
directory, and go to http://YourDomainName/Useraccount/ for
browsing.
(2)
New Group
New Group enables a set of accounts to set at the same time, and
with same permission to access particular files or directories. To
ensure a good account management, create new accounts with
Group function to give a group of users the same permission.
(3)
Account Listing
Account Listing contains names and information of existing accounts
in PROLinux, you may edit single account or delete multiple
accounts here.
26
(4)
Group Listing
Displays the existing Group Listing in PROLinux, edit one group or
delete multiple groups.
Note:
Delete a group only when all existing accounts in that group are deleted.
(5)
Batch Increasing Accounts
Batch Increasing Accounts is a function offers administrator to add a
large number of accounts without repeatedly performs the same
steps over and over again. Firstly create a .txt file include information
about the new users. Each one of the new user information uses a
single line, and contains 3 key values: account, username and
password (the value of username and password can be void). Place
a comma (,) between each value to separate them from each other.
Save the file and upload the file to add massive users to the system.
27
(6)
Add accounts by sequence
Add accounts by sequence allow PROLinux to create user accounts
in Academic institutes and add the accounts with serial number. User
accounts will be added base on your requirements and settings to
serial number.
28
Note: When a new serial number account is newly added, its password is identical
to its user name.
(7)
Account Application settings
Set up Apply account settings properly to provide existing users
ability to modify information to their accounts or application for new
user account for Mail, FTP services access on PROLinux.
Open the account and management page:
https://YourDomainName:6666/unauth/
29
Account and management page features:
A. Apply for new accounts.
B. Progress inquires.
C. Password amends.
D. Check status.
Note: If the links to the account application does not display on the screen, check
the ”Applies linkage display” option on the account and management page.
Note: To set up administrator e-mail account, please go to GUI -> GUI
Management -> Basic information settings in PROLinux GUI page.
Verify Account Application
(8)
Allow administrator to view, verify whether or not to create or delete
account applications and reply messages to users.
Section 3.
Backup
Back up files and save them to shared folder on remote windows and shared
directory in PROLinux File Server (Network Neighborhood).
30
(1)
Backup Server Setting
Backup Server Setting allows PROLinux to set up IP address,
shared folder name, account and password for quick access to the
backup server. Safety Issue enables PROLinux to avoid lack of
backup server capacity from happening.
Note:
1. When the IP address, Shared folder, account and password are entered and
saved. Click on “Check available space“to test the connection between
PROLinux and backup server, also you will be able to know if the destination
has enough space for you to backup.
2. Some of OS requires log in username and password; however, please confirm
if you have permission to write on destination backup server.
3. The backup server can either be a remote windows system or any other local
NAS.
(2)
Backup / Restore
The Back/Restore functions are enabled when the backup server is
set. It can be used to back or restore files such as accounts, mails,
31
user home directories and system settings on PROLinux.
Back up files will display in date (YYYY-MM-DD) format. To restore
back up files, select a specified backup date first, and select the
items to start the restore process.
Note: When back up process fails, please check if the shared folder on backup
server is permit to “Write”, or the firewall on backup server is enabled causing the
connection failed
(3)
Schedule Backup
Schedule Backup manages the schedule of backup process, in
everyday, every week, or on particular date within a specified timing.
If the option “Send Report To Administrator's Mail“ is checked, system
will automatically deliver a mail message to notify administrator when
backup process completes.
Note:
1. If the “Send Report To Administrator's Mail” option is checked, the message will
deliver to administrator base on the information in GUI -> Basic information
32
settings -> Administrator E-Mail. The message can only be sent normally if the
PROLinux Mail server is started.
2. When the number of Schedule Backup exceeds your setup in “Numbers of
back up copies kept”, system will automatically remove the oldest backup files.
Section 4.
System Information
Information provides viewing on current System hardware info, System Date,
and Logs in PROLinux.
(1)
Hardware Info
System Info displays information of CPU Model, Work Frequencies,
Cache Device, PCI Device, IDE Device, SCSI Device and memory
in PROLinux.
33
(2)
System Date
System Date allows you to adjust settings of current Time Zone,
Date and Time in PROLinux.
(3)
Alarm System
Alarm system is to prevent system crashed by over heating such as
CPU and HDD over heating. You may modify the temperature and
fan working duration which you feel comfortable with.
34
Logs
(4)
Logs provide administrator records of system messages, registry
information and hardware detection in PROLinux. There are 2
different types of logs available for administrator’s reference:
1.
messages records information about system error messages
(or important information).
2.
klog records information about hardware detected on
PROLinux when the system started.
Note: To avoid the size of log files from getting too big, PROLinux will automatically change the
name of log files (EX: “message” will change to “message.1”) on every Sunday. System will keep
the 4 of the most recent files for administrator’s reference.
35
Section 5.
Hard Disk Management
Information provides viewing on current Hard Disk Management, Hard Disk
Info, RAID Configuration, RAID Settings in PROLinux.
(1)
Hard Disk Configuration
Hard Disk Configuration displays status of the hard disk partitions in
PROLinux system. The default setting for PROLinux is to creates 4
partitions on the hard disk, i.e. /sys, /data, /mail, swap.
/sys: System kernel and source code of all packages. By default, it is
irreplaceable to other partitions.
swap: A virtual memory partition. This special disk space is used to
temporarily store partitions of main memory containing programs or
program data. By default, it is irreplaceable to other partitions
/data: Directory for user’s files storage, such as web pages, data
uploaded from FTP server and File server.
/mail: Directory used exclusively for user’s mailbox storage.
36
When a new hard disk is mounted, this disk may delete/format and
change the partition position of /data, /mail directories in Hard Disk
Info.
You may also perform disk partition here first and mount the
partitions by applying settings in the following servers.
1. File server: Mount the unused partition and assign it for
”Shared Folder” usability.
2. FTP server: Mount the unused partition and assign it for ”FTP
Anonymous Directory” usability.
3. Proxy server: Mount the unused partition and assign it to
”Disk Cache” usability.
(2)
RAID Configuration
PROLinux has the most convenient GUI for user to enable RAID
functions of RAID 0, 1, 5, 6, 10 and JBOD.
Support flexible HDD configurations.
37
User is able to configure HDD modes at their preference, for example,
Sample 1: HDD1, HDD2, RAID 1(HDD3+HDD4)
Sample 2: RAID 1(HDD1+HDD2), RAID 0(HDD3+HDD4)
Sample 3: RAID 0(HDD1+Hdd2), RAID 0(HDD3+HDD4)
(3)
RAID Settings
If RAID auto rebuilding is enable, it will re-join automatically again
when any hard disk of RAID failed. The change of buzzer warming
setting will be effective immediately. Other changes will be effective
next time.
Section 6.
Power Management
Power Management can shutdown and reboot PROLinux .
38
(1)
System Reboot
System Reboot shuts down the system and restart the system.
(2)
System Shutdown
The function shuts down the system and turns the power off.
39
Section 7.
MRTG Chat
MRTG Chat graphically presents Network MRTG, Memory MRTG and CPU
MRTG of the PROLinux Server and its content can be analyzed in daily,
weekly, monthly and yearly manner.
(1)
Network MRTG
40
(2)
RAM MRTG
(3)
CPU MRTG
Section 8.
(1)
On line Service
On-line Upgrade
On-line Upgrade allows administrator to optimize current module
status on PROLinux. Offering abilities to upgrade modules or add a
new module to the system whenever a new function is implemented
or a new vulnerability has been discovered.
41
Note:
1. All of the Live Upgrade files is only for downloading on the Internet, its
downloading time depends on the bandwidth which network uses.
42
Section 9.
Quality of Service (QoS)
Quality of Service allows PROLinux to apply bandwidth regulations to different
IP addresses and Ports.
With Bandwidth regulations, you may define rules for each Ethernet card to
have different bandwidth regulation from each other, or have a single Ethernet
card to apply multiple bandwidth regulations. Settings in Bandwidth
regulations are to define the ”flow out” of one particular Ethernet card.
Regulations control is where to apply Bandwidth regulations to the IP
addresses and Ports you wish to control.
(1)
Bandwidth regulations
Click ”NEW” to add one bandwidth regulation to a single Ethernet
card.
1. Bandwidth guarantee: This determines the “fixed” bandwidth that
PROLinux allows for Ethernet card that applies the regulation.
2. Maximum bandwidth: When there is bandwidth remain unused,
this will determine the maximum bandwidth PROLinux allows for
Ethernet card that applies this regulation. Therefore, the value of
”Maximum bandwidth” is usually greater than or equal to the
value of ”Bandwidth guarantee”.
43
3. You may not delete any regulation listed that is already applied to
an Ethernet card.
(2)
Control Regulations
Control regulations is where to apply Bandwidth regulations to the IP
addresses and Ports you wish to control. Select a regulation you
wish to apply. If the fields are left empty, it means that the regulations
you selected will be applied to all IP addresses and ports.
For example: To apply bandwidth regulation control of web browsing
to machine with IP address: 123.123.123.123, please set the
regulation as the figure shown below. This will control the Bandwidth
guarantee to 50KB, and Maximum bandwidth is 70KB if there is
bandwidth remain unused.
44
(3)
Bandwidth monitoring
Bandwidth monitoring allows administrator to observe bandwidth
traffics on the network section that Ethernet card belongs, and
display in both values and graphics.
45
Chapter 4. Server
PROLinux provides the most common network services like WWW, Mail, FTP, DNS, …
etc. Administrator can easily ensure the server works normally by performing only a few
simple steps.
Section 1.
Web Server
Web Server is the most extensive application among all network services. PROLinux
adopts Apache Server as its Web Server, and supports PHP programming. Apache is
one of the most popular web servers in the world.
46
(1)
Status
Status displays the current status of the Web Server, in either Running or
terminated. To change the current status, please click on the options: Start, Stop
or Restart.
To place a Web pages: Login as the default administrator: sysadmin, and upload the web pages
with FTP Server or File Server and place them in home/www/html. You may then browse the
web pages by using a web browser. The default password of the FTP Server and File Server in
sysadmin is adminpw.
(2)
Virtual Host
47
Virtual Host enables PROLinux to have two or more domain names. Each with
their own independent web pages.
EX: Assume that www.prolinux.com.tw and mail.prolinux.com.tw are assigned to
the same host IP, and administrator wish to place different web pages for each
one of them. Virtual Host can so so by setting web directory for
www.prolinux.com.tw to user/sysadmin/home/www, and web directory for
mail.prolinux.com.tw to user/web/home/mail.
Note:
1. The root directory of the homepage is “html”, so creating a new directory with the same
name is not allowed.
2. The homepage of mail.prolinux.com.tw is placed in user/web/home/mail. Where as the
homepage of www.prolinux.com.tw is stored in user/sysadmin/home/www. Please pay extra
attention to the directories when placing web pages for each domain.
3. Press “start” to enable the Virtual Host settings.
4. When adding a new setting to the Virtual Host, please make sure the DNS setting of the two
domains are assigned to the same IP address.
48
(3)
Virtual Host Bandwidth
Virtual Host Bandwidth offers administrator to understand the PROLinux Server
Master independent flow state of each fictitious host computer.
(4)
php.ini Settings
There are two major WWW programs on the Internet. They are Open Source
Apache and Windows IIS, the two programs each supports program language
for Dynamic HTML. PROLinux adopts Apache for it also supports PHP program
language.
PHP is mainly used for Dynamic HTML web page design, such as message
board, forum and chat room. Its free of charge, multi-platform, easy to learn and
high performance features making it one of the most popular web Programs
today.
php.ini is the main configuration file for PHP program, the settings are
adjustable for specified purposes.
49
Note: To restore the original settings to fix mistakes made on editing php.ini. PROLinux offers
“Restore default php.ini” option to restore original setting after the changes made are saved.
(5)
Web Application Installation
PROLinux provides optional or free web programs. Any of the web programs
available on the list can be installed and deleted through this interface.
A. Select installation path: By default, it will install the web Program to the
directory where the homepage is (/data/www/html). If the Virtual Host enabled,
the existing directories for Virtual Host will display in the scroll down list for
select.
B. Select file to install: Upload and install the web programs provided.
C. Input the DB server account, Input the DB server password: please refer to
the installation manual to decide if a database is needed for the web program.
To create the database, please enter the account and password. (Default
database account: root, Password: mydbpw)
D. Select to set as a front page: Check this option to automatically set the web
page as the front page for the browser.
50
(6)
IP Access Control
IP Access Control enables firewall management for single server in PROLinux.
A. Allow from all addresses.
B. Only allow from listed addresses.
C. Deny from listed addresses.
(5)
Logs
Records access log files of Web Server, available for administrator’s reference
on source IP that accessed to Web Server.
51
Note: To avoid the size of log files from getting too big, PROLinux will automatically change the
name of log files (EX: “access_log” will change to “access_log.1”) on every Sunday. System will
keep the 4 of the most recent files for administrator’s reference.
Section 2.
Mail Server (option)
E-mail and web browsing are the most popular network services today, and mail server
is usually provided by ISP or from a free E-mail service provider. PROLinux provides
Mail server functionalities, simply add a new account start sending or receive mail with
PROLinux. Note: It's under the additional ordering.
52
(1)
Status
Status displays the current status of the Mail Server, in either Running or
terminated. To change the current status, please click on the options: Start, Stop
or Restart.
Note: When the Mail server is running, POP3 and IMAP will also be activated.
53
(2)
Settings
There are 8 parameter settings in Mail Server Settings:
54
A.
Accept mail by following domains: PROLinux will receive mails from the
domain (i.e. the domain name after “@” in the mail address) listed in
"Accept messages address to the following domains". To receive e-mail
from
B.
“[email protected]”, enter “demo.prolinux.com.tw” in "Accept
messages address to the following domains". For adding multiple mail
domains, enter only one domain per each line.
C.
Mail message size limitation: Prevent the bandwidth consumed by large
mails by controling single mail size with this function.
Deliver mail via a relay host:
This setting will collect all the outgoing messages together and sent by one
outgoing mail server.
D.
E.
Dynamic Spammer blocking: This function enable the Mail Server to
automatically detect if the source IP of the receiving mail is match to the
IPs in black-list of the RBLS (Realtime Blackhole Lists Server) of RBL
community, or IPs in free black-list database http://www.ordb.org/. Once
the source IP of the mail matches one of the IPs in the database,
PROLinux will stop receiving this mail. This function will reduce the
numbers of spam mails.
F.
Enable SASL
55
To use SASL, a protocol includes a command for identifying and
authenticating a user to a server and for optionally negotiating protection of
subsequent protocol interactions. If its use is negotiated, a security layer is
inserted between the protocol and the connection.
Enable Secure connection (SSL):
Enable the Secure connection, The user (ex: outlook) can preset the com port
(smtp 25)or receiving(imap443, pop3 110) can be used as will as encrypted
com port ( smtps 465,pop3s 995,imaps 993).
G.
56
H.
Allow to relay mail from IP address/Blocking by from/Blocking by subject:
Set up to block mail sent by specified IP address, senders or keywords,
to prevent PROLinux from receiving advertising mails and virus mails
(Please DO NOT enter the symbol “@“ to the list to define the blocking
target.)
EX:
pony@ => Blocks mail from senders with mail addresses which contain
“pony@”, no matter which domain it is sent from.
[email protected] => Block mails from sender mail address of
“[email protected]”.
@hinet.net => Blocks any mail from the domain name “hinet.net”.
Blocking by subject: PROLinux also provides settings for blocking by the
mail subject. Ex:sex => Blocks any mail with subject which contains the
word “sex” (in upper or lower case).
Note: Because there is no fixed encoding for Chinese subject, “Blocking by subject” only
supports subject with English encoding.
I.
Allow / Denny Email from listed Reversed IP Addresses:
57
This will prevent or enable the IP address been reversed from the domain name.
This is usually be useful on one independent mx (ex: spam server).
At the front end of the PROLinux , the PROLinux will only receive the mails
from this server only.
(3)
Mail Group
To send a mail to 4 users at the same time for example, you must enter the mail
address 4 times.
Mail Group simplifies such kind of procedure, by defining these 4 users into one
mail group (ex: mailgroup). Simply fill in the Group address (ex:
mailgroup@YourDomainName (prolinux.com.tw)), the Mail Server will then send
the mail simultaneously to 4 users in that group.
Note: Mail Group can also set up for external mail accounts, by entering the complete mail
address (ex: [email protected]). And for local mail addresses, only account name (ex:
user1, user2) is required.
58
Blind Carbon Copy
(4)
Blind Carbon Copy (BCC) settings may apply to all in-coming or out-going mail
on Mail Server.
If any mail sender or receiver matches the mail address in the setting, the incoming or out-going mail will be forwarded (Blind Carbon Copy) to the addresses
listed in “E-mail Address” field.
EX:
a.
Any mails with sender address [email protected] will BCC to
[email protected] and [email protected].
59
b.
Any mails with recipient address [email protected] will BCC to
[email protected].
c.
The mail sent to address contains domain name of “test.com” will also
BCC to [email protected].
d.
All outgoing mail will BCC to [email protected]
60
(5)
Mail Queue
Mail Queue displays the mail that is currently sending, or mail that has been
failed to send. Please check the status fields for failures, or delete those mail
sending queues with this function.
(6)
User Mailboxes
User Mailboxes provide administrator ability to check the current size of user’s
mailboxes. Administrator may check each message in the mailbox by click
“view” on the right.
61
(7)
IP Access Control
IP Access Control enables firewall management for single server in PROLinux.
IP Access Control controls settings of SMTP, POP3, IMAP services in Mail
Server.
A. Allow from all addresses.
B. Only allow from listed addresses.
C. Deny from listed addresses.
(8)
Logs
Records access log files of Mail Server, available for administrator’s reference
on mails received and sent with the Mail Server.
62
Note: To avoid the size of log files from getting too big, PROLinux will automatically change the
name of log files (EX: change “maillog” to “maillog.1”) on every Sunday. System will keep the 4
of the most recent files for administrator’s reference.
(9) Additional features
A.
SMTP Identity Certification support: To prevent PROLinux from being a
relay of massive advertising mails. It allows only accounts that are SMTPcertified to send out any mails.
When you decide to send mail by using Outlook express or Outlook,
please check the option “My server requires authorization” in “servers”.
63
B.
POP3 and IMAP supports: PROLinux supports two of the most popular
protocols on receiving mails: POP3 and IMAP. The differences between
these two protocols is described as below:
POP3: Receiving mails with POP3, the mails are deleted after downloading
from the server.
IMAP: Receiving mails with IMAP will download only the mail titles. Client
side can then decide whether to download the mails or delete them from the
server.
64
C.
Webmail support: Other than mail application such as outlook, PROLinux
also provides ability to receive webmail through a web browser.Simply
enter http://YourDomainName/webmail and login with the accounts in
PROLinux.
65
Section 3.
File Server
File Server (Samba) is a MS Windows-compatible server system for Unix-Like system to
interact with “Network Neighborhood”. By simply start the server and add a new
account, PROLinux is able to access data and files on Windows “Network
Neighborhood”.
66
(1)
Status
Status displays the current status of the File Server, in either Running or
terminated. To change the current status, please click on the options: Start, Stop
or Restart.
(2)
Settings
To display Host name and Work Group in “Network Neighborhood”.
(3)
Share Folders
Share Folders functions like the “shared folder” in Windows. Add a new folder
and click “Edit” button
to set the access permissions to that folder.
67
Note: When the Share folder is set up, please click on the “Enable” button at the right to
activate the share folders.
A.
B.
C.
Folder Name: The name of the share folder.
Description: Description and usage information of the share folder.
Permissions Control:
a.
Able to browse – Check this option gives users permission to
view the folder content.
b.
Read Only - Check this option gives users permission to read
c.
D.
E.
F.
G.
H.
(view only) the files within the folder.
The permission changes the other people file – Check this
option gives permission for user to modify, save and delete
files from other users.
Accounts enable to read only: When the option for “Read Only” is
unchecked to the shared folder, administrator may give permission of
“Read Only” to accounts within the list.
Accounts enable to save: When the “Read Only” option is checked.
Administrator may give permission of “The permission changes the
other people file” to accounts within the list.
Invalid accounts: Deny access to share folders to accounts within the
list.
Valid accounts: Allow access to share folder only to accounts within
the list.
Mount partition: Select a partition that is not mounted and mount the
share folder to that partition.
Note: Please ensure the partition is formatted and ready for use. You may partition
and format the disk in System -> Information -> Hard Disk Info.
68
(4)
IP Access Control
IP Access Control enables firewall management for single server in PROLinux.
A. Allow from all addresses.
B. Only allow from listed addresses.
C. Deny from listed addresses.
.
(5)
Logs
Records access log files of File Server, available for administrator’s reference on
source IP that had been access to File Server in PROLinux. The log files will
named in “log.(host name)” format.
69
Note: To avoid the size of log files from getting too big, PROLinux will automatically change the
name of log files on every Sunday. System will keep the 4 of the most recent files for
administrator’s reference.
70
Section 4.
DNS Server
IP address is most common used method for domains to communicate with each other.
However, IP address is displayed in digits, which is not easy for user to memorize. DNS
provide ability to re-name IP address to a readable domain name. The main function of
DNS Server is to convert IP to domain name, and vice versa. It is important to
applications on Web Server and Mail server.
EX: Entering http://www.yahoo.com in “Address” field of the browser is the same as
entering http://68.142.197.74. This is because DNS Server will converts ”
http://www.yahoo.com” and automatically connect to http:// 68.142.197.74 for Yahoo
web site.
(1)
Status
Status displays the current status of the DNS Server, in either Running or
terminated. To change the current status, please click on the options: Start, Stop
or Restart.
71
(2)
Settings
DNS Server in PROLinux manages Forward Zone and Reverse Zone within
multiple domains, and can be used as a Slave DNS Server.
Note: Forward Zone: Assigns a domain name to certain IP address.
(EX: www.yahoo.com is assigned to 68.142.197.74)
Reverse Zone: Assign IP Address to a Domain name.
(EX: 68.142.197.74 is assigned to www.yahoo.com)
A. Add and edit domain name to Forward Zone:
Click “New”, Select “Forward Zone” in Zone Type, enter the domain name and
save.
Click the
icon next to the list in Settings to edit the domain settings if needed
(refer to the figure below). When a new Forward Zone domain is added, system
will automatically create a ”Host (A)” record and a ” Name Server (NS)” record.
The existing record, SOA setting can be edited and new records can be added to
the domain.
72
EX 1:
Add a new host and assign the domain name: www.testsite.com to the IP:
39.128.21.89.
EX 2:
The domain name that receives mails sent to www.testsite.com and with a
Priority setting to 10.
EX 3:
Change the “Time to refresh” setting of Slave DNS updating with Master DNS to
once every hour.
You will be able to find the “SOA Setting” when you are editing Zone Type.
73
B. Slave DNS (Forward Zone):
DNS Server Setting allows server to act as a Slave DNS, PROLinux will
automatically update data from the Master DNS.
EX:
The setting shown below indicates that the Master DNS server IP of the domain
(www.testsite.com) is set to 39.128.21.89.
Note: You may click
to view the DNS log file after updating with the Master DNS Server. If an
error message appears after clicking the icon
, it means that PROLinux is unable to update
data from the Master DNS Server. Please check if: (1) the DNS Server is started? (2) the Slave
DNS is set to “enable”? (3) the Master DNS Server offers permission for updating.
74
Logs
(3)
Records log files of DNS Server status (either in Normal, Error or Terminated) for
administrator’s reference.
Note: To avoid the size of log files from getting too big, PROLinux will automatically change the
name of log files on every Sunday. System will keep the 4 of the most recent files for
administrator’s reference.
Section 5.
FTP Server
FTP (File Transfer Protocol) Server is one of the most common services on network.
The main function is to transfer files through network. Add a new account to FTP Server
and activate it to start file transfer with FTP Server.
75
(1)
Status
Status displays the current status of the FTP Server, in either Running or
terminated. To change the current status, please click on the options: Start, Stop
or Restart.
(2)
Settings
Host Name: Name of the FTP Server.
Maximum number of logins
Enable Passive Mode: Some of the PCs on hub may not be able to connect to
FTP Server. However, enable this option and set the PCs’ connection mode as
76
Passive Mode might solve this problem.
Upload/Download Transfer Rate: Control the upload and download transfer
rate to users, “0” indicates that the transfer rate is set to “unlimited”.
Upload/Download transfer rate has been restrained for user: Enter the user
name to apply the transfer rate mentioned above. If there is no user on the list,
Upload/Download Transfer Rate will apply to all users. You may place “!” in front
of the user name, so the user is not apply to the Upload or Download Transfer
Rate rule.
EX 1:
Upload Transfer Rate of user Jeff is limited to 50KB/s, and Download Transfer
Rate of user Steven is limited to 100KB/s. No other limitation will apply to other
user.
Welcome Message: Welcome message display when user login to the FTP
Server.
(3)
Anonymous Settings
77
To login to FTP Server anonymously without enter user name and password,
you may set the access permissions to control anonymous access in
Anonymous Settings.
Mount partition: Select a partition that is not mounted and mount the FTP folder
(ftp_file) to that partition.
Note: Please ensure the partition is formatted and ready for use. You may partition and format
the disk in System -> Information -> Hard Disk Info.
(4)
IP Access Control
IP Access Control enables firewall management for single server in PROLinux.
A. Allow from all addresses.
B. Only allow from listed addresses.
C. Deny from listed addresses.
(5)
Logs
FTP Server contains 2 different log files, “secure” and “xferlog”.
“secure” records login information such as date, time, source IP and user
name.
78
“xferlog” records each operation a user made after login, such as upload,
download, delete and change name…etc.
Note: To avoid the size of log files from getting too big, PROLinux will automatically change the
name of log files on every Sunday. System will keep the 4 of the most recent files for
administrator’s reference.
Section 6.
Proxy Server
Proxy Server intercepts all requests for data to the real server to see if it can fulfill the
requests itself. If not, it forwards the request to the real server. The data will save in
cache memory, to reduce repeatedly connections for same data. Proxy Server increases
the speed of web browsing and saves network Bandwidth.
(1)
Status
Status displays the current status of the Proxy Server, in either running or
terminated. To change the current status, please click on the options: Start, Stop
or Restart.
79
(2)
Settings
Client Settings:
To enable Proxy Server function for client application, certain settings on client
side is required. (Please see the example below using Internet Explorer)
A. Start IE Browser, click on Tools -> Internet Options.
B. Select Connections -> LAN Settings.
80
C. Click “Use a Proxy server for your LAN” and enter the domain Name or IP of
PROLinux I field “Address”, then enter 3128 for the field “Port”. Click on “Ok”
to quit, the client application will then browse the web pages through Proxy
Server.
81
Check this box
3128
Proxy Server Settings:
Sets the detail settings of the Proxy Server.
A.
Memory Cache Size: Set up the memory size for Proxy Server cache.
B.
Disk Cache Size: Set up the disk size for Proxy Server cache.
C.
IP Access Control: IP Address or Section used for Proxy Server in
PROLinux.
D.
Transparent Proxy enable: Ignore the settings for clients when there are
too many clients.
Note: Once checked, all client application of internal machine will browse web pages
through Proxy Server.
E.
Rebuild Cache: Delete existing data in cache to quick remove old data in
Proxy Server.
F.
Mount partition: You may select a partition that is not mounted and mount
the Proxy Server to that partition.
Note: Please ensure the partition is formatted and ready for use. You may partition and
82
format the disk in System -> Information -> Hard Disk Info.
(3)
Web page filter
You may use Web Page Filter to block web page or web address with specified
word for client application in browsing web through Proxy Server.
A. Domain name/IP filter: Block the entire domain and web address that
matches the specified words in this field.
Ex: Enter the web address “news.yahoo.com.tw” in this field and block the web
site of Yahoo News.
Ex: Enter the web address “webmssenger.msn.com” in this field and block the
web site of Web messenger “http:// webmssenger.msn.com”.
Ex: Enter IP address “66.94.230.50” in this field and block anything from IP
address 66.94.230.50.
B. Web IP filter by keyword: Block the links of web address that match any of
the specified words.
Ex: Enter the word “mail” in this field and the web page contains the keyword
“mail” is blocked. http://mail.google.com/mail/?shva=1#inbox.
Ex: When the keyword is set to “shopping”, the web page is blocked if the
client application is trying to access the web page with address or link below.
83
http://www.google.com.tw/search?hl=zhTW&q=shopping&btnG=Google+%E6%90%9C%E5%B0%8B&meta=
Note: The web page blocked is displayed as above.
(4)
Logs
Proxy Server contains 3 different log files, “access.log” and “cache.log” and
“store.log”.
access.log records IPs that has been connected to Proxy Server.
cache.log records memory cache access for Proxy Server.
84
cache.log records disk cache access for Proxy Server.
Note: To avoid the size of log files from getting too big, PROLinux will automatically change the
name of log files on every Sunday. System will keep the 4 of the most recent files for
administrator’s reference.
Section 7.
DHCP Server
DHCP (Dynamic Host Configuration Protocol) is a protocol that can automatically assign
IP address and settings to client PCs. Client PCs may configure with settings provided
by DHCP and get instant access to the network services.
(1)
Status
Status displays the current status of the DHCP Server, in either Running or
terminated. To change the current status, please click on the options: Start, Stop
or Restart.
85
Note: Enable an Ethernet card with dynamic IP before starting DHCP, otherwise it may not
function normally.
(2)
Dynamically IP Assignment
Dynamically IP Assignment: Settings for Interface, Start IP, End IP and Gateway.
(3)
Statically IP Assignment
DHCP can also assign IP address to MAC address with in one of the internal
machine. To view the MAC address in Windows, please click on Start -> All
Programs -> Accessories -> Command Prompt, and enter “ipconfig /all” to
display MAC Address in Windows.
86
(4)
Logs
DHCP Server contains 2 different log files, “message” and “dhcpd.leases”.
message records information about start, terminated and error message in the
DHCP Server.
dhcpd.leases records IP addresses assigned by the DHCP Server.
Note: To avoid the size of log files from getting too big, PROLinux will automatically change the
name of log files on every Sunday. System will keep 4 of the most recent files for administrator’s
87
reference.
Section 8.
MySQL Database (*)
MySQL is a multi-user and multi-thread database server and has become a most
popular and standardized database language in the world.
A legal license is required when using MySQL, for it is not a freeware. PORLinux
product does not include MySQL when purchasing. PROLinux only offers free Module
for downloading. Please go to http://www.mysql.com/products/licensing.html for more
information on MySQL Licensing issues.
(1)
Status
Status displays the current status of the MySQL Database, in either Running or
terminated. To change the current status, please click on the options: Start, Stop
or Restart. For operations on MySQL Management UI, please connect to the link
as shown below.
88
Note:
1.
Live Upgrade need to be completed before downloading MySQL module.
2.
MySQL Management UI is managed by phpMyAdmin web program. To enable, please
start the Web Server first.
3.
MySQL requires certain knowledge on database, which is not included in this manual.
Please refer to the books or technical professional for more information on the operation.
4.
(2)
Default User Name in phpMyAdmin: root
Password: mydbpw
my.cnf settings
The MySQL-4.1 database does support the charset: UTF-8 Unicode (utf8). So this
setting is only available when the MySQL-4.1 module has been installed under the
PROLinux. However, the setting will not be available when the MySQL-4.0 module is
installed.
The My.cnf file is the primitive setting for the MySQL server, there are more references
from the "http://www.mysql.com”
(3)
IP Access Control
IP Access Control enables firewall management for MySQL database access
89
control.
A. Allow from all addresses.
B. Only allow from listed addresses.
C. Deny from listed addresses.
Logs
(4)
Records the log files of MySQL status (either in Normal, Error or Terminated),
and is available for administrator’s reference.
Section 9.
PostgreSQL Database
PostgreSQL is an object-oriented database management system developed in
University of California, Berkeley. PostgreSQL is a powerful, open source relational
90
database system. It supports stored procedures in multiple languages and most of SQL
Syntax (sub-queries, schemas, classes and functions). And supports may of the
programming languages, including PHP, C, C++, Java, perl, tcl and python.
Status
(1)
Status displays the current status of the PostgreSQL Database, in either
Running or terminated. To change the current status, please click on the
options: Start, Stop or Restart. For operations on PostgreSQL Management UI,
please connect to link as shown below.
Note:
1.
PostgreSQL Management UI is managed by phpMyAdmin web program. To enable,
please start the Web Server first.
2.
PostgreSQL requires certain knowledge on database, which is not included in this
manual. Please refer to the books or technical professional for more information on the
operation.
3.
(2)
Default User Name in phpMyAdmin: root
Password: mydbpw
IP Access Control
IP Access Control enables firewall management for PostgreSQL database
91
access control.
A. Allow from all addresses.
B. Only allow from listed addresses.
C. Deny from listed addresses.
(3)
Logs
Records the log files of PostgreSQL status (either in Normal, Error or
Terminated), and is available for administrator’s reference.
92
Section 10.
E-mail Anti-Virus (option)
E-mail Anti-virus in PROLinux uses free and powerful ClamAV engine for scanning virus
mail. Note: It's under the additional ordering.
Settings
(1)
A.
Enable E-mail Virus scan: Check the option to enable Scanning on Mail
Server.
B.
Virus scan engine: Select a virus scan Engine.
C.
Virus scan timing (Sec.): Set the maximum timing for virus scan.
D.
What to do with infected mail: Select the reaction when a virus is found.
There are 2 options, “Delete Mail” and “Store in the quarantine area”.
E.
Notify sender: Check the option to send a warning mail to the sender
when the mail sent contains virus.
Note: Many of the viruses are able to create a fake sender field in the mail.
F.
Notify administrator: Check this option to send mail to administrator
mailbox set in GUI -> Basic information settings -> Administrator EMail.Once a virus is found, System will automatically send a warning mail
to administrator.
G.
Terminated extend file names: Set the virus scan engine to identify
specified file extensions within the mail attachment and classify them as
infected mails.
93
H.
Filter has IFrame mark mail: Filter mails that contain “IFrame” tag in HTML
Language.
I.
Filter has Object mark mail: Filter mails that contain “Object” tag in HTML
Language.
J.
Filter has Script mark mail: Filter mails that contain “Script” tag in HTML
Language.
K.
Filter has Form mark mail: Filter mails that contain “Form” tag in HTML
Language.
L.
Filter extract or attachment incomplete: Filter mails with incomplete
extraction or attachments.
Note: Please Check the options above (H-L) if you don’t fully understand the settings
mean. There are too many viruses that can infect your mail with those methods.
(2)
Virus definition update
The default setting of Virus definition update in PROLinux is set to update
hourly. You may also update the virus engine manually by clicking on “Update
Immediately”.
94
(3)
Infected mail check
This function allows viewing on the mail that is classified as infected mail by
mistake. Select and view the mail by date, click on the “Download” button on
the right to save that mail to your PC. Click on the “delete all” button can delete
all infected mail. You may move your cursor to column of Rules, and you will be
able to see what virus this mail contains.
Note: Mails in the quarantine area may contain virus, please ensure that your PC is installed
anti-virus program before you download it.
95
Section 11.
Spam Filter (option)
The Spam Filter module, It provide the protections from the large quantity of junk mails
When the Spam Filter been installed in PROLinux, you will need no other protections or
any other Spam Filter server.
Note: It's under the additional ordering.
(1).
Settings
There are different settings for the Spam Filter, can be customized as required.
A. Enable Spam checks
Enable the Spam Filter for the Mail Server.
B. Max Spam check Size
The junk mails are distributed by the mail sending programs. So the size of the junk
mail itself may not to be too large, so to avoid the wasting process works for the
server by the larger file size of ordinary mails, the max spam check size function can
be turn on. The bigger check size you set, the stricter checking is done; however, the
system loading will be heavier.
C. Enable the Bayesian Auto-learning
96
According to the Bayesian Auto- learning:
learning It's from the receiving mails, finding the
<key word>or<special tag>, and then put them to the Auto-learning database. So the
Spam Filtering will be getting more precise from the Auto-learning process.
The PROLinux Spam Filter also include the Bayesian Auto-learning. However, if the
Bayesian Auto-learning has enabled, the Auto-learning database for Spam Filter will
get bigger, then efficiency of filtering the junk mails will be more precise.
D. RBL List
RBL (Real time spam Black Lists), There are lots organizations, who does collect
and update the world spam Black Lists.
So the Spam Filter in the PROLinux mail server has included the RBL list. So the
Spam Filter system will filter every received mails according to the RBL list, when any
of the characteristic of the mail has mach the RBL list database, will be assign as junk
mail, and will proceed to the junk mail procedure.
When the link to RBL been turn on, you can choose more well known RBL
organizations, but more different RBL database been choose, will affect the efficiency
of the mail server, so we suggest choose around 5 RBL will do.
E. Quarantine Score
PROLinux Spam Filter is used the well known mail Spam Filtering program
Spamassassin to protect the PROLinux mail server from junk mails.
Spamassassin is specialized for the junk mail filtering program. It use the process of
the integration, which will filter the content of the mail by over thousand characteristics
of the junk mail (the title, content, sender, and etc.), so any of the mail been reach to
the high score of junk mail (the score can be set up in the program), then the mail will
97
be assigned to junk mail and will proceed to the junk mail procedure.
The default score to assign a junk mail is 5; the score suggestion is 1 ~10, the smaller
number is more critic.
F. The Spam processing
When the mail is assigned as a junk mail, the mail will proceed to the junk mail
procedure.
a. Add text to the start of the subject line
When you enable the signature of the spam mail, so the junk mail will be add
text to the start of the subject line. There are three kind of signature:
〔G-SPAM〕when the junk mail mach the list of the database by the server and
the RBL list.
〔S-SPAM〕when the mail been assigned by the Spamassassin.
〔U-SPAM〕when the customized setting been enabled, and the mail is mach the
customized black list or been scored as junk mail.
b. Deliver the message as normal
Even the mail been assigned as junk mail, will still be received by the
recipient, so the recipient will receive all the junks mails.
c. Delete the message
Delete the mail when been assigned as junk mail, it will cost some miss
assignment that mail could be deleted as well; and can't rescue the deleted
mail.
d. Store the message in the quarantine
It will put the junk mail into the separate container, it's also recommend to use
this function because it will solve the problem of receiving junk mail and you can
also get the mail back from the separate container for the junk mails.
※ The function will need to use the database, and please conform the
database has been set up under PROLIinux and running properly.
The supported database ( postgresql8, mysql40, mysql41), need to input the
name of the database server, the account name and the password. Through the
■
98
database server testing to conform the server is running properly, when the
database is working properly, please through the setting of the database to set
up the structure of the database it self, when all has been setup, the junk mail
will put in to the separate container.
■ Set
Days to keep Quarantined Mail:
The junk mail in the separate container will stay for a few days. The system
will prevent junk mail get over filled the container storage. When the junk mail
reaches the days of keeping, it will remove to the deleted mail, and then be
deleted permanently.
■ Send
the summary notice of Quarantine:
When it's enabled, the system will send the report of the assigned junk mails
automatically to notice the user what all the assigned junk mails in the
quarantine. The “Please schedule time up the…”selection is on the right hand
side, which can be set up the time of Sending the summary notice of quarantine.
e. User Interface
This function is for user to manage their quarantine mail, which blocked by
spam filter. When the user interface been enabled, user can change the
setting from the user administration interface, which provide the information
of junk mails and the mail been deleted. The user administration level can be
set as following:
Login to the GUI with Internet browser (EX: IE or Firefox) from one of the
PC on LAN. https://192.168.1.252:8066
By login with the username and the password, you will enter to the spam filter
interface.
99
Note: Default User Name: sysadmin Password: adminpw
100
Blocked Messages:
Here is the place where the junk mails been blocked, user can reply the mail, delete
and download the mail.
Deleted Message:
This is the place where the mail is due from the blocked message (Please check the
setting of “Set days to keep mail in Quarantine”). Mail in the delete message area will be
removed after the days you set in the “Set days to keep mail in Quarantine”. User can
download, recovering or replace the delete mail to the quarantine, for the convenience of
reply the mail.
User can set the personalized black and white list when it's been enabled.
Through the user admin interface → set up the desire list for sender black and white list
When it's been enabled, the user can add the black and white list through the user
admin interface → in the quarantine mail and deleted mail holding areas, can add
the black and white list to the chosen mail, sending out and also add to the white
101
list.
※ User can set the score of the junk mail when this is enable. User can enter
through the user admin interface to set up the desired score (Default score is
5).
※ User can set the Bayesian Auto-learning function. Through the user admin
interface, user is able to enable the personal Bayesian Auto-learning.
f. User Permission Settings
The user administration account need to be preset by the user manager under
the main administration. The user manager can be set individually, like the
numbers of the junk mail category, The Bayesian Auto-learning function,
personal mail Blacklist / Whitelist and the assign the notice text for the mails in
the quarantine.
Allow personalized settings
102
Allow user to define the score of SPAM
Allow user to Bayesian learning
Allow user to define blacklist and whitelist
Allow user to add to blacklist and whitelist automatically
g. Send Report to Administrator and Set days to keep reports:
By enable the Send report to Administrator, the mail will be filter by
PROLinux spam filter system and provide daily report to system
administrator. To avoid the report mail will result of getting larger file by
adding report everyday; the user can set the holding days for the report.
(2).
Admin Blacklist /Whitelist
The spam filter does provide the admin Blacklist / Whitelist, when you set it up, you
need the enable bottom on the right hand side. Approved Senders will set in Whitelist,
Blocked Senders will set in Blacklist.
103
(3).
User Blacklist / Whitelist
This function is for administrator to help users to manage their blacklist/whitelist settings.
Administrator may modify settings account by account.
(4).
Bayesian Database
Bayesian analysis Database is the learning the characteristics of the spam filter, the
administrator can back up the database, recover, upload the new database or
change the assign of the junk mail and reset a new Bayesian Database.
(5).
Summary reports
The system analyses graphic report will show daily and hours mail flow, like the top 100
junk mail listing.
104
(6).Inspection of Blocked Mail
The Inspection of Blocked Mail is for the administrator to review the junk mail in the
quarantine for the individual user.
105
(6) Inspection of Blocked Mail
This place is for administrator to check blocked mail of different users. Administrator
is able to Add User’s Blocked Senders, Add User’s Approved Senders, Add Blocked
Senders, Add Approved Senders and Deliver Message. Please note if administrator does
not allow user to define their own blacklist/whitelist, there will be no Add User’s Blocked
Senders and Add User’s Approved Senders.
Add User’s Blocked Senders: Help single user to put senders to their blacklist.
Add User’s Approved Senders: Help single user to put senders to their whitelist
Add Blocked Senders: Put senders to blocked list for whole service.
Add Approved Senders: Put senders to whitelist for whole service.
Deliver Message: Send out mail from Inspection area to user.
106
Section12.
UPS
To avoid the data loss and damage to the device caused by unstable power voltage or
power failure, PROLinux support UPS Device to protect your System. It will
automatically shut down when the Power failure occurs, and restart the system when
power restores.
(1)
Status
Status displays the current status of the UPS device, in either running or
terminated. To change the current status, please click on the options: Start, Stop
or Restart.
107
108
(2)
Settings
Set up COM Port to support UPS with setting of Time for server to shutdown
when no electricity and Time for server to shutdown when running out of
battery.
Note:
1.
The current version of PROLinux system supports NEWSEED
(http://www.newseed.com.tw) and OPTI UPS ( http://www.opti-ups.com.tw) device.
2.
PROLinux will define the system as in battery low status if you start the UPS without
one installed.
Section13.
DDNS setting
DDNS service allows user to setup a domain name in server when using dial-up
connection such as Dynamic IP. DDNS provides ability to communicate with DNS server
automatically when your dynamic IP is changed, mostly for ADSL dial-up service.
(1)
Status
Status displays the current status of the DDNS, in either Running or terminated.
109
To change the current status, please click on the options: Start, Stop or Restart.
(2)
Settings
If you would like to have a domain name, but you are using Dynamic IP, you
may set up a domain name and password of DDNS Server. Prolinux will
automatically communicate with DDNS Server when your IP address changes.
Before using DDNS service, please register a host name from the DDNS
provider*. The server supports the 4 DDNS providers: www.3322.org,
www.twnic.net.tw, www.noip.cn, www.no-ip.com.
.
This feature is
available after enabled
110
Section14.
Dynamic DNS Server
Dynamic DNS is a method, protocol, or network service that provides the capability for a
networked device using the Internet Protocol Suite, such as an IP router or computer
system, to notify a domain name server to change its new IP. In real time (ad-hoc), the
active DNS configuration of its configured hostnames, addresses or other information
stored in DNS.
To set up a server on the Internet and enable users to access it easily, a fixed and easy
to-remember host name is often required. However, if ISP provides only dynamic IP
address, the IP address of the server will change from time to time and is difficult to
recall. You can enable DDNS service to solve the problem.
After enabling DDNS service, whenever the NAS restarts or the IP address is changed,
the NAS will notify DDNS provider immediately to record the new IP address. When the
user tries to connect the NAS via domain name, DDNS will transfer the recorded IP
address to the user.
(1)
Status
Click Start to enable the Dynamic DNS Server.
111
(2)
Settings
Enter the user name, password.
(3)
Dynamic DNS Management
Dynamic DNS Server must match the DNS server forward zone setting. Please
checks the DNS Server settings correctly and can assign the host name with
dynamic IP renew.
Field ‘(*)’ is for serial number replacement.
112
The serial number field permits alphabets (a-zA-Z) and digits (0-9) only.
Such as: Host Name: test (*), serial number from 001 to 010 will create
testoo1~test010 host name. Host Name: (*) 001 serial number: letters from ’a’ to ‘f’
will create a001~f001 host name.
DNS Lookup
(4)
Input the domain name, will get its dynamic IP.
Section 15.
Intranet VPN Server
VPN (Virtual Private Networks) is a private network that uses a public network (usually
the Internet) to connect remote sites or users together and provides intranet
functionalities with security.
VPN Service in PROLinux is using client - server structures. It is simple to built up a
VPN network environment if both client side and server side are using PROLinux.
113
(1)
Status
Status displays the current status of the VPN Server, in either Running or
terminated. It also shows the connection status with another network
environment. The figure shown below indicates that VPN is running and
successfully connects to another VPN Server.
(2)
Settings
Set the settings to connect local VPN Server with remote VPN Server.
Connecting mode: Set the mode to either a client or a server when VPN started.
If connecting mode is set to client, the VPN server on the other side must be set
as server.
Subject LAN card for IP section: If there are multiple LAN cards on LAN, Select
the one of the LAN cards and its IP section to connect to another VPN server.
Note: The IP section on local site must differ from the IP section on the remote site.
114
Remote WAN IP: Set the WAN IP of VPN server on remote site.
Remote LAN IP: Set the LAN IP of VPN server on remote side.
Remote LAN IP section: Set the LAN IP section of VPN server on remote side.
EX:
A VPN service is required for both area A and area B.; and you want VPN server
in area A to function as server mode, while area B as client mode.
Network environment of area A
WAN IP: 59.120.206.195
LAN IP: 192.168.99.254
LAN IP section: 192.168.99.0/255.255.255.0
Network environment of area B
WAN IP: 218.166.119.84
LAN IP: 192.168.1.250
LAN IP section: 192.168.1.0/255.255.255.0
For the network structure, please refer to the figure below:
115
VPN Server settings for area A as below:
VPN Server settings for area B as below:
(3)
IP Access Control
IP Access Control enables firewall management for VPN access control.
A. Allow from all addresses.
B. Only allow from listed addresses.
C. Deny from listed addresses.
116
Section 16.
iTunes Server
This page provides activating the iTunes Server on the device. You will be able to play
music files on this device with your iTunes client software directly.
(1).
Status
Click “ Start ” in the Enable iTunes Server column.
117
(2).
Settings
iTunes Server is to Share Music Folders on File Server. Please go to File Server and
create share folders first.
Host name: Select iTunes Server’s name.
Rescan Interval: According to your setting, will rescan and add new file into the iTunes
Folder.
Filename codepage: Set up the file name to support Languages of encoding type.
Password: Set up your password.
File Extension: Set up your media support type.
Share folders: Place your media files in the folder.
Note: If the share folder not exists in file system, iTunes server will not be able to activate.
(3).
Playlist Settings
This is the playlist file for specifying iTunes-style.
118
(4).
IP Access Control
IP Access Control enables firewall management for iTunes server in PROLinux.
A. Allow from all addresses.
B. Only allow from listed addresses.
C. Deny from listed addresses.
119
(5).
Logs
Records connection log files of iTunes server for administrator’s reference. It contains
file, “mt-daapg.log”.
120
Section17.
UPnP Media Server
This device supports UPnP Media server, which allows users to play media files with
UPnP client (ex. DMA devices).
(1).
Status
Click “ Start ” in the Enable UPnPAV Media Server column.
(2).
Settings
Host name: Choose your own UPnP Media Server’s name.
Rescan Interval: According to your setting, it will rescan and add new file into the UPnP
Folder.
File name codepage: Set up the file name to support Languages of encoding type.
File Extension: Set up your media support type.
Share folders: Place your media files in the folder.
121
Note: Before use UPnP Media Server application, please go to File Server and create a share first.
(3).
IP Access Control
IP Access Control enables firewall management for uPnP server in PROLinux.
A. Allow from all addresses.
B. Only allow from listed addresses.
C. Deny from listed addresses.
(4).
Logs
Records connection log files of UPnP Media server for administrator’s
reference. It contains file, “gmediaserver.log”.
122
Section18.
BitTorrent Download
This device supports BitTorrent downloading client that provides automatic file
downloading.
(1).
Status
Click “ Start ” in the BitTorrent Enable column.
(2).
Settings
You can specify the Limitation of amount of peers, Limit incoming BitTorrent traffic,
Limit outgoing BitTorrent traffic speed in the Max upload/download column. If you set
to 0 means it is no limitation.
123
Note: Before use BT, please activate file server to create a folder for BT.
(3).
Task List
BitTorrent is the global standard for accessing rich media over the internet.
Find and select the torrent file you wish to upload / download.
a. Get a *.torrent file for downloading your demanding file.
b. Place this *.torrent file in the “torrents” folder in the device.
(4).
IP Access Control
IP Access Control enables firewall management for single server in PROLinux.
A. Allow from all addresses.
B. Only allow from listed addresses.
C. Deny from listed addresses.
124
(5).
Logs
Records connection log files of BitTorrent Download for administrator’s
reference. It contains file, “btpd.log”.
Warning:
All users of this device are warned against illegal downloading of copyrighted materials. The P2P
embedded functionality is provided for downloading authorized files only. Downloading or distribution of
unauthorized materials may result in severe civil and criminal penalty. Users of this device are subject to
125
the restrictions of the copyright laws and should accept all the consequences.
126
Chapter 5. GUI
GUI setups and manages the Graphic User Interface in PROLinux.
Section1.
(1)
GUI Management
Password Settings
Password Settings allow administrator (sysadmin) to change his/her
user name and password in PROLinux.
127
(2)
Access Management
Access Management is for security settings of GUI.
Enable SSL Connection: Provides administrator to connect and
transfer data to GUI with data encryption.
Authorize Mode: Provides administrator to login by one of two
certificate methods. Access Control: Allow or deny access to GUI in
PROLinux from a specified IP.
Access Control:
A. Allow from all addresses.
B. Only allow from listed addresses.
C. Deny from listed addresses.
(3)
System Info. Setup
Please fill in each field correctly, all system messages will be sent to
the administrator's mail account according to administrator
information here.
128
(4)
Notices To Host
If mail server is not started, please set up an administrator’s mail for
communication. If you start the mail server, you don’t need to set up
here.
(5)
Logs
Records connection log files of GUI Management for administrator’s
reference. It contains 2 different files, “miniserv.log” and
“miniserv.error”.
129
M0-90-485G
130