1
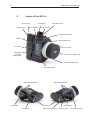
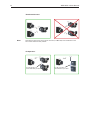
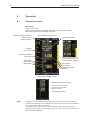
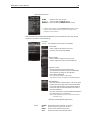
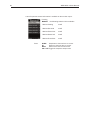
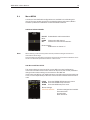
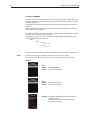
WCU-4
Wireless Compact Unit
U S E R
th
M A N U A L
2013
4 April15,
Date: January
2014
All rights reserved.
This document is provided under a license agreement containing restrictions on use
and disclosure and is also protected by copyright law.
Due to continued product development this information may change without notice.
The information and intellectual property contained herein is confidential between
ARRI and the client and remains the exclusive property of ARRI. If you find any
problems in the documentation, please report them to us in writing. ARRI does not
warrant that this document is error-free.
Arnold & Richter Cine Technik
Tuerkenstr. 89
D-80799 Munich
Germany
mailto: [email protected]
http://www.arri.com
Scope
This instruction manual applies to the following hardware:
ARRI WCU-4
Document revision history
No.ID
1
2
3
drawing
K5.74422.0 0063-50-00-00-05
K5.74422.0 0063-50-00-00-05
K5.74422.0 0063-50-00-00-05
release/revisiondate
FG1156
W01003
W01004
June 17, 2013
Nov 27, 2013
Jan 15, 2014
ARRI WCU-4 User Manual
3
Contents
1Disclaimer
4
2Introduction
5
2.1
About this Manual
6
3
Safety Guidelines
7
3.1
3.1
3.1
General Safety Instructions
Specific Safety Instructions
General Precautions
7
8
8
4
Power Supply
9
5
Layout of the WCU-4
10
6
Control Scope
12
7
Setup
13
7.1
7.2
Wireless Operation
Wired Operation
13
14
8Operation
8.1 Display Description
16
8.2
8.3
8.4
8.5
8.6
8.7
Main Screen Menus Description
Menu CAM
Menu MENU
Menu IRIS
Menu ZOOM
Menu FOCUS
AAppendix
A.1 Order Numbers and Accessories
A.2
A.3
A.4
A.5
A.6
A.7
Connector Pin-Out
Dimensions and Weight
Electrical Specifications
Symbols Descriptions and Screen Messages
Menu Tree
Service Mode
16
18
18
21
29
30
31
32
32
33
33
34
35
37
38
4
ARRI WCU-4 User Manual
1Disclaimer
Before using the Wireless Compact Unit (WCU-4), make sure you read and
understand all the respective instructions in the enclosed manual. The ARRI
Wireless Lens Control System is only available for commercial customers.
The customer agrees by its use that the ARRI Wireless Compact Unit (WCU-4)
or other components of the system are only deployed for commercial use.
Otherwise the customer must contact ARRI preceding the utilization.
ARRI endeavors to enhance the quality, reliability and safety of their products,
but customers agree and acknowledge that the possibility of defects therein
cannot be eliminated entirely. To minimize risks of damage to property or injury
(including death) to persons arising from defects in the products, customers
must integrate adequate safety measures in working with the system and must
comply with all issued safety instructions for designated use.
No part of this document may be copied or reproduced in any form or by any
means without the prior written consent of ARRI. ARRI assumes no liability
for any errors that may appear in this document. The information is subject to
change without notice.
With regard to the actual design, refer to the latest publications of ARRI data
sheets or data books, etc., for the most up-to-date specifications. Not all
products and/or types are available in every country. Please check with an ARRI
sales representative for availability and additional information.
ARRI or its subsidiaries do not assume any liability for infringement of patents,
copyrights or other intellectual property rights of third parties by or arising
from the use of ARRI products or any other liability arising from the use of
such products. No license, express, implied or otherwise, is granted under any
patents, copyrights or other intellectual property rights of ARRI or others.
ARRI or its subsidiaries expressly exclude any liability, warranty, demand or
other obligation for any claim, representation, cause, or action whatsoever,
express or implied, whether in contract or tort, including negligence, or
incorporated in terms and conditions, whether by statute, law or otherwise. In
no event shall ARRI or its subsidiaries be liable for any special, direct, indirect,
incidental, or consequential damages, including but not limited to lost profits,
lost savings, lost revenues or economic loss of any kind or for any third party
claim, downtime, good-will, damage to or replacement of equipment or
property, any costs of recovering any material or goods associated with the
assembly or use of our products, or any other damages or personal injury and
the like regardless if such liability is based on tort, warranty, contract or any
other unwritten law.
In the event that one or all of the forgoing clauses are not permitted by
applicable law, clauses that are permitted to the fullest extent under applicable
law shall apply.
ARRI is a registered trademark of
Arnold & Richter Cine Technik GmbH & Co Betriebs KG
This product meets CE and FCC regulations.
ARRI WCU-4 User Manual
2
5
Introduction
WCU-4 Functions
•
•
•
•
•
•
Radio control of IRIS/FOCUS/ZOOM lens motors
Numerical and grafical lens data display *
Remote switch camera REC/STANDBY (RUN/STOP)
Camera information and control for ALEXA Plus and ALEXA Studio type cameras *
Ultrasonic distanc readouts information
Connects to ARRI WHITE radio remotes:
ALEXA Plus and ALEXA Studio type cameras, UMC-3A, ARRI cameras with white coded radio modem installed
* full funcionality requires ALEXA SUP9.0 software packet and the optional WCU-4 ALEXA remote license
The WCU-4 is an all-inclusive hand unit offering up to 3-axes lens control. It includes
a newly designed, super-smooth focus knob with adjustable friction and backlit, focus
rings that are well readable in the dark. The whole unit is completely splash proof
for ARRI typical reliability. The slider has its scale on the 3” display, providing clearly
readable T-stop numbers.
The left side handle includes an ergonomically designed, pressure-sensitive zoom
knob. A user programmable button underneath the handle provides quick access to
functions like quick zoom (ZAP) or focus setting marks. A hand strap provides extra
stability and leaves the holding hand’s thumb free, thus allowing even the most
challenging parallel shifts of iris and focus at the same time.
The large 3” transflective TFT display reflects ambient light and thus remains clearly
visible even in direct sunlight while saving battery power. It provides enough room
for status information of camera and hand unit, measured distances from ultrasonic
devices or lens data in a graphical form. Motor limits can be easily set by pressing one
of the sealed, backlit buttons next to the display.
ARRI Lens Data Display functionality is integrated and when used with the ALEXA
camera, the unit displays camera settings and status information. Pre-marked focus
rings can be used with WCU-4’s integrated lens mapping, providing comfort and ease
of use when working with different lenses.
The optional ALEXA Remote License activates remote camera setup capabilities via
WCU-4 for ALEXA Plus, ALEXA Plus 4:3, ALEXA XT Plus, ALEXA Studio, and
ALEXA XT Studio cameras. This includes setting frame rate, shutter angle, exposure
index, white balance, and monitor outputs.
Users can save their preferred WCU-4 settings on an SD card, enabling them to
immediately personalize any WCU-4, anywhere in the world.
One of the most ground-breaking new features of the WCU-4 is the option to use
Vibration-Markers, which provide haptic feedback for electronic markers.
Essentially, focus pullers can set marks, and the unit will vibrate to warn them when
they are at their pre-set marks. This allows them to keep their eyes on the performers
at all times, leading to greater accuracy of focus.
The WCU-4 is designed to be upgradable. New firmware versions and future feature
options can be easily installed to the unit via SD card. Various mounting points allow
mounting of accessories. The unit is powered by an affordable camcorder battery and
is compatible to existing ARRI motor controllers equipped with the white coded radio
modem. It is also easily serviceable, with many exchangeable components, including
the display.
6
ARRI WCU-4 User Manual
2.1
About this Manual
ARRI recommends that all users of the WCU-4 read the manual in its
entirety prior to use. For experienced users, the manual‘s structure also
provides quick access for reference.
In this manual:
•
Safety Guidelines
•
General Precautions
•
Power Supply
•
Layout of the WCU-4
•
Operation of the WCU-4
•
Camera Control
•
Lens Motors Usage
•Connections
•
Technical Data
ALEXA* specific functions are not explained in detail within this manual, please
refer to the respective ALEXA handbook.
* Within this manual, the term ALEXA stands for ALEXA Plus, ALEXA Plus 4:3,
ALEXA Studio, ALEXA XT Plus or ALEXA XT Studio cameras.
How to use this manual:
All directions are given from the operator‘s point of view.
Connectors are written in all capital letters, for example, LCS. Menus
and screens on the WCU-4 controls are written in all capital letters, for
example, CAM menu and HOME screen. Buttons are written in bold
typeface capital letters, for example, SET button.
The appendix at the back of the manual contains useful reference material
including WCU-4 specifications, connector pin-out diagrams, error and warning
message explanations, WCU-4 dimensional drawings and a menu structure tree.
ARRI WCU-4 User Manual
3
7
Safety Guidelines
Any violation of these safety instructions or non-observance of personal care could
cause serious injuries to users and affiliates, and damage to the equipment or
other objects.
Explanation of Warning Signs and Indications
Indicates a possible risk of injury or damage to the equipment.
Indicates the risk of electric shock or fire danger that could result in
injury or damage to the equipment.
Note: Indicates further information or information from other instruction manuals
3.1
General Safety Instructions
•
Always follow these instructions to ensure against injury to yourself or others and damage to the system or other objects.
•
This safety information is in addition to the product-specific operating instructions in general and must be strictly observed for safety reasons.
•
Read and understand all safety and operating instructions before you
operate or install the system!
•
Retain all safety and operating instructions for future reference.
•
Heed all warnings on the system and in the safety and operating
instructions before you operate or install the system. Follow all installation and operating instructions.
•
Do not use accessories or attachments that are not recommended by ARRI, as they may cause hazards and invalidate the warranty!
•
Do not attempt to repair any part of the system! Repairs must only be carried out by authorized ARRI Service Centers.
8
ARRI WCU-4 User Manual
3.2
3.3
Specific Safety Instructions
•
Do not remove any safety measures from the system!
•
Do not operate the system in areas with humidity above operating levels or expose it to water or moisture!
•
Do not subject the system to severe shocks!
•
Do not place the system on an unstable trolley/hand truck, stand, tripod, bracket, table or any other unstable support device! The system may fall, causing serious personal injury and damage to the system or other objects.
•
Operate the system using only the type of power source indicated in the manual! Unplug the power cable by gripping the power plug, not the cable!
•
Never insert objects of any kind into any part of the system if not clearly qualified for the task in the manual, as objects may touch dangerous
voltage points or short out parts! This could cause fire or electrical shock.
•
Unplug the system from the power outlet before opening any part of the system or before making any changes to the system, especially the
attaching or removing of cables!
•
Do not use solvents to clean!
•
Do not remove any stickers or paint-marked screws!
General Precautions
Storage and Transport
•
All cables have to be unplugged from the WCU-4 when it is transported or stored inside a case.
•
Do not store the WCU-4 in places where it is subject to extreme
temperatures, direct sunlight, high humidity or severe vibration, or near strong magnetic fields.
ARRI WCU-4 User Manual
4
9
Power Supply
Battery Operation
Recommended battery:
SONY NP-FM 500H Li-Ion battery (ARRI order no. K2.47851.0)
Recommended Chargers:
SONY BC-VM10 (ARRI order no. K2.47852.0)
For safety purposes, only use the recommended charger and battery types.
Please also take note of the following directives for battery handling:
Do not incinerate.
Do not expose to temperatures beyond
-20 to +50°C ( -4 to +122°F).
Do not disassemble.
Replace or re-charge the battery, if the “Low Battery“ message on the WCU-4
Status Screen appears.
The charger must only be used indoors. Do not expose it to humidity or high temperatures.
Note: To achieve full battery capacity, leave the battery in the charger for about
one hour after the charge LED has gone out.
Defective batteries must not be thrown into domestic waste, but disposed of onshore in a safe manner consistent with all applicable regulations.
Note: For handling details please read the charger and battery operation manual.
Hardwired Operation
The WCU-4 connects to the LCS bus connector on ALEXA cameras, ARRI film
cameras and the UMC-3A for power supply and control, using standard LCS cables
with a cable length up to 80 m (260 ft).
In hardwired operation mode, using power supplied through an LCS cable,
no battery is necessary.
Battery charging is not possible through the WCU-4.
10
ARRI WCU-4 User Manual
5
Layout of the WCU-4
Strap Eyelet
Status LED
Internal Antenna
Zoom Control
Record Button
Power Button
Ambient Light Sensor
Display
Upper Softbuttons
Focus Knob
Iris Control
Re-writable
Iris Scale
Display Area
Knob Friction Adjustment
Detachable Scale Ring
Lower Softbuttons
M4 Threaded Bushes
LCS Socket
User Button
M4 Threaded Bushes
Strap Eyelet Battery Compartment
SD Card Slot
Battery Latch
Lanyard Connection
ARRI WCU-4 User Manual
11
Battery Compartment
Push in the battery completely when loading.
Shift the release slider to release the battery.
Power Button
Powers on/off the unit.
Press button briefly to power-on the unit.
Press and hold for approx. 2 seconds to turn off.
Display
3” transflective TFT color panel.
Displays camera and lens status and control information.
Automatic or manual luminance control.
Ambient Light Sensor
Controls display luminance and scale ring and
button illumination in automatic mode.
Focus Knob
Controls focus lens motor.
Re-configurable to iris lens motor control.
Scale Ring
Detachable re-writable blank ring or
pre-marked focus rings for standard lenses.
Knob Friction
Adjust the friction for the focus knob.
Press and hold the center button.
Turn the focus knob clockwise to increase the friction.
Turn the focus knob counterclockwise to decrease the friction.
Iris Control
Slider controls iris lens motor.
Re-configurable to focus lens motor control.
Zoom Control Pressure sensitive handle knob controls zoom lens motor.
Record Button Press button briefly for alternate camera record/standby
or Run/Stop, depending on camera type and connection.
Displays the same status as currently shown on the camera.
Status LED
Upper Softbuttons
Press button briefly to select the menu item shown below.
Lower Softbuttons
Press button briefly to select the menu item shown above.
User Button
Configurable push button, default function: Zoom ZAP.
LCS Socket
Power and control connection to ARRI cameras and UMC-3A only.
No support of accessory units.
SD Card Slot
Protected by an undetachable rubber cap.
Save/load user setups on an SD card (SD or SDHC up to 32GB).
Install new firmware and license keys to the WCU-4.
Install the hand strap here.
Strap Eyelet
Lanyard Connection
Install the lanyard bolt here.
Protected radio antenna.
Internal Antenna
12
ARRI WCU-4 User Manual
6
Control Scope
Radio communication is only possible to “white“ coded radio units.
Basic Support Advanced Support
SUPSUP
New Features
ALEXA Plus/Studio
7.0
9.0
ALEXA remote control,
lens mapping,
UDM/CTM support, torque adjust
UMC-3A
UDM/CTM
04B04C
ARRICAM + LDB-ST/LT 06A
ARRIFLEX 435 Xtreme 05A
ARRIFLEX 416 Plus (HS) 04A
Note: To tap the full potential of the WCU-4‘s possibilities, be sure to have updated all connected units to a software version equal or higher to those listed.
ARRI WCU-4 User Manual
13
7
Setup
7.1
Wireless Setup
One WCU-4 controls up to three lens motors
ALEXA Plus/Studio camera
ARRI camera with white radio
CLM-2, CLM-3 or CLM-4
lens motors
WCU-4
Focus
Iris
Zoom
UMC-3A
white radio
Camera or UMC-3A connected
Up to three WCU-4s control selected lens motors and ALEXA functions
Example Configuration:
All WCU-4s are set to the same radio channel.
On one WCU-4 iris as well as focus control is enabled, zoom control is disabled.
On one WCU-4 iris and focus controls are disabled, zoom control is enabled.
The third WCU-4 has all lens motor controls disabled and controls ALEXA properties only*.
Pre-set for zoom
control only
Pre-set for both
focus and iris control
Set ALEXA properties *
ALEXA Plus/Studio camera
CLM-2, CLM-3 or CLM-4
lens motors
Focus
Iris
Zoom
* with optionally available ALEXA Remote software license
14
ARRI WCU-4 User Manual
Distributed Control
Note:
Simultaneous lens motor control of two cameras (or UMC-3A‘s) with one WCU-4 on the
same radio channel is NOT possible.
3D Operation
For 3D operation
use ALEXA 3D sync cable
For 3D operation
use UMC-3A sync cable
ARRI WCU-4 User Manual
7.2
15
Wired Setup
Example Configuration:
Use the LCS socket and ARRI LCS cables to connect the WCU-4 to an ARRI camera with lens
motor drive capability or to an UMC-3A.
The LCS wiring provides power and control lines.
Cable length may be up to 80 m (260 ft).
ALEXA Plus/Studio camera
ARRI camera with lens motor drive
CLM-2, CLM-3 or CLM-4
lens motors
LCS
Focus
Iris
Zoom
UMC-3A
white radio
K4.41395.0
K4.41397.0
K2.41389.0
Note:
Camera or UMC-3A connected
LC-Z1-S LCS Cable 3.5 m (11 ft)
LC-M1-Sp-S LCS Spiral Cable
LC-E1 LCS Cable Drum Extension 75 m (250 ft), use with LC-Z1-S
If connected via LCS bus, the WCU-4‘s radio transmission will be disabled automatically.
16
ARRI WCU-4 User Manual
8Operation
8.1
Display Description
Main Screen
Typical main screen:
WCU-4 connected to an ALEXA Plus or Studio camera on radio channel 1.
LDS zoom lens with all lens motors connected.
Radio Transmission Quality
Radio Channel
Battery Capacity
Upper Softbutton Menu Items
Camera Information
Iris Scale
or Iris Value
Selected Premarked
Focus Ring
Distance value and position
shown with UDM/CTM connected to ALEXA or UMC-3A
Zoom Scale
Zoom Value
LIMIT Range
Focus Value
Focus Scale
Depth Of Field Bar
Markers
Lower Softbutton Menu Items
Sample Analog Camera Screen
Iris and focus values shown
instead of lens scales with
LDS or LDA lenses
Green RUN signalization
Note: The WCU-4 can only display data that is provided by the connected camera or UMC-3A.
Therefore the appearance of the display will vary, depending on the type of camera/UMC-3A, lens, and accessory, linked to the system.
The reason for a time-delay between actuator position change and scale display is the
difference between given value from knob, slider or stick and the actual motor position, sent from the camera or UMC-3A.
ARRI WCU-4 User Manual
17
Upper Softbuttons
CAL
Calibrate all connected lens motors. Press and hold for activation.
CAM Enter the CAMERA INFO and the SETUP* and MONOUT* sub-menus.
* Extended ALEXA camera control is possible with optional software license (K2.72145.0), available from the ARRI license shop.
MENU Enter the WCU-4 and lens motor configuration sub-menus.
Lower Softbuttons
IRIS Direct access to Iris function:
- Set/reset LIMITs, LOCK iris value.
ZOOM Direct access to zoom functions:
- Set/reset LIMITs, set zoom speed, LOCK zoom value.
FOCUSDirect access to FOCUS functions:
- Set/reset LIMITs, limit the focus knob (K-LIM), LOCK the focus value,
set/reset MARKERs.
Transmission Quality The higher the number of bars, the better the radio connection quality.
Radio Channel
Radio channels 0-7 are available (see Appendix A.4 for details).
Battery Capacity
Battery symbol indicates the current capacity (completely white = full).
Camera Information
- Camera status REC - STDBY - ERROR
- Remaining record capacity in min:sec
- Camera battery voltage
- Current frame rate in fps**
- Shutter angle**
** replaced by UDM/CTM distance value if an Ultrasonic Distance Meter (UDM/CTM)
is connected to the ALEXA or UMC-3A.
Iris Scale ***
- Graphical iris scale, iris position indicator
- Re-writable blank area for individual scale notes
(activate in MENU CONTROL SETUP SLIDER
Iris Value
With some ARRI analog cameras, the iris value will be shown instead of the iris scale.
Focus Scale***
Moving focus lens scale image, MARKER positions.
Focus Value
Numerical focal value in metric or imperial values.
Depth Of Field
Yellow depth of field range bar, if lens data is available from the ALEXA.
Focus Markers
Up to eight pre-set markers will be shown as lines in the depth-of-field bar area.
Zoom Scale***
Zoom lens scale extents values, zoom position indication, limits indication.
Zoom Value
Numerical zoom value.
*** if the display scale or pointer moves in opposite direction to the slider/stick/knob, change the respective motor direction on the camera or UMC-3A
BLANK SCREEN)
18
ARRI WCU-4 User Manual
8.2
Main Screen Menus
Press one of the following softbuttons on the main screen to enter a menu:
CAM, MENU, IRIS, ZOOM, FOCUS
To navigate through the menu items use the softbuttons:
HOME
Return to the main screen.
BACK
Return to the previous menu screen.
DOWN*
Step down to the next item on screen.
UP*
Step up to the next item on screen.
ENTER
Confirm the menu item selection.
8.3
* Keep softbutton pressed to scroll through the list.
Menu CAM
The sub-menu CAM displays detailed camera information, if available from the
connected camera.
Typical analog camera screen
ARRI WCU-4 User Manual
19
Typical ALEXA screen:
HOME
Return to the main screen.
SETUP ** enter the ALEXA SETUP screen
MONOUT **enter the ALEXA MONITOR OUT screen
** Available with optionally available ALEXA Remote software license.
Firmware version SUP9 for ALEXA and 01.01 for the WCU-4 are required for full functionality
With the optionally available ALEXA Remote license installed, the user has remote
access to a number of camera settings.
Pressing
SETUP the following sub-menus are available:
- Frame Rate
select a frame rate from the pre-set fps list of the connected ALEXA - Shutter Angle
select a shutter angle from the pre-set shutter angle list of the connected ALEXA - Exposure Index
sets the exposure index rated in ASA.
The ALEXA has a base sensitivity of 800 ASA. The camera’s EI rating can be adjusted from 160 to 3200 ASA.
Note: ASA rating is identical to ISO rating.
Note: Exposure Index is not applied to ARRIRAW signals.
- White Balance
Sets the camera’s white balance. This is the color temperature of the light source that the ALEXA
is currently adjusted for. Select a white balance value from the pre-set white balance list of the connected ALEXA.
The user can execute an automatic white balance by pressing the Auto WB button.
Note: A pop-up window will inform, if the action has been successful or not.
- ND Filter on/off (ALEXA Studio only)
PressDOWN
Step down to the next item on screen.
UP
Step up to the next item on screen.
BACK
Return to the Camera Info screen.
SET
Set the camera to the selected value.
20
ARRI WCU-4 User Manual
A set of important camera information is available on the monitor output.
Pressing
MONOUT the following selection list is available:
- Monitor Peaking
- Monitor Surround
on/off
- Monitor False Color
on/off
- Monitor Status Info
on/off
- Monitor Framelines
on/off
on/off
Press
DOWN
Step down to the next item on screen.
UP
Step up to the next item on screen.
BACK
Return to the Camera Info screen.
ON or OFF Toggle the respective output state.
ARRI WCU-4 User Manual
8.4
21
Menu MENU
A number of user definable configurations are available in the following submenus. The user has also access to more detailed system information, WCU-4
firmware updates and installation of licensed software features.
Sub-Menu RADIO CHANNEL
ON OFF Enable/disable radio transmission.
UP or
DOWN Change the radio channel.
SET Confirm the radio channel selection.
Shown setting:
Radio active on channel “1”.
Note: When selecting a radio channel, please consider potential local legal restrictions of transmission bands usage.
A list of the WCU-4 transmission frequencies as well as the general FCC certification can be found in the Electrical Specifications section of this manual.
Sub-Menu CONTROL SETUP
This screen shows an overview of the current WCU-4 control configuration.
In this menu the WCU-4 lens motor control can be pre-set, but it is not possible to
change the lens motor settings on the camera or the UMC-3A.
If more than one WCU-4 or an additional zoom unit shall control the lens motors at
a time, it is the responsibility of the user to avoid control conflicts within the handunits. STICK Enter the (ZOOM)-STICK setup sub-menu.
SLIDER Enter the SLIDER setup sub-menu.
KNOB Enter the KNOB setup sub-menu.
Shown settings:
CONTROL MATRIX: All motors assigned and enabled.
Focus with knob.
Iris with slider.
Zoom with stick.
22
ARRI WCU-4 User Manual
Sub-Menu CONTROL SETUP > SLIDER SETUP
Select lens motor control, enable/disable blank screen in the Iris scale area.
UP or
DOWN Select the sub-menu item.
CHANGEChange the function.
BACK Return to the SYSTEM SETUP screen
and keep changes.
CONTROL: Slider control.
Options: iris, focus, off.
BLANK SCREEN:
White marker area for slider.
Options: on, off.
Note: For individual Iris marks on the Iris Scale display area use a water-based felt marker.
Sub-Menu CONTROL SETUP > STICK SETUP
Select zoom lens motor control.
UP or
DOWN Select the sub-menu item.
CHANGEChange the function.
BACK Return to the SYSTEM SETUP screen
and keep changes.
CONTROL: Stick controls zoom.
Options: zoom, off.
Sub-Menu CONTROL SETUP > KNOB SETUP
Select lens motor control, enable/disable vibration.
UP or
DOWN Select the sub-menu item.
CHANGEChange the function.
BACK Return to the SYSTEM SETUP screen
and keep changes.
CONTROL: Knob control.
Options: focus, iris, off.
VIBRATION: Vibration on knob marker position.
Options: on, off.
ARRI WCU-4 User Manual
23
Sub-Menu MOTOR TORQUE
Using CLM-3 and CLM-4 motors, the motor torque can be adapted to the kind of lens
and application, especially to prevent sensitive lenses from mechanical overload.
For small, less ruggedly designed lenses, the torque should be set to lower values.
For high speed applications and large lenses, the torque may be set to higher values.
For connected CLM-2 motors no torque adjustment is available.
The display will show no support in this case.
If no motor is connected, the display will show n/a.
UP or
DOWN Select the focus, iris or zoom motor.
CHANGE Change the torque limit.
Shown settings:
Focus: Torque level 4 (1-4 available).
Iris:
No torque setting possible (CLM-2 motor).
Zoom: Not connected to the WCU-4.
CLM-3 lens motors provide very high torque for high speed lens drive. Be sure that
lens, lens motors and rods are correctly adjusted and fastened.
Take care to re-calibrate the CLM-3 motor after re-attachment of the motor and
after each lens change!
Ignoring this procedure can lead to severe lens damage.
Note: If the torque level is not adequate to lens properties or operation temperature, the electronic torque limitation may cause a high-frequency noise.
Use a higher torque level to reduce this effect.
24
ARRI WCU-4 User Manual
Sub-Menu PREMARKED FOCUS RING
For mapping the focus scale of ARRI LDS lenses or other lenses, represented in the
ARRI Lens Data Archive, a set of replaceable pre-marked focus rings is available.
For lenses not yet represented in the Lens Data Archive (LDA) a blank focus ring
may be used.
Select a focus ring with a lower value, but next to the nearest distance shown on
the lens scale.
Example: Lowest focus distance on the lens: 0.8 m
Available focus rings: 0.25 m, 0.35 m, 0.5 m, 1 m (12”,14”, 20”,36”)
Best fit: Focus ring with 0.5 m
- Select the lens from the ALEXA LDA menu.
- Select the focus ring from the WCU-4 menu.
- The focus lens scale on the WCU-4 will now map to the lens on the camera.
UP or
DOWN Select the attached focus ring.
SET Confirm the selection.
Note: The displayed focus unit (metric - imperial) depends on the camera setting or LDS lens type.
Sub-Menu LENS DATA
The circle of confusion for correct calculation of depth of field can be set in this
menu.
UP or
DOWN Select the preferred circle of confusion.
SET Confirm the selection.
ARRI WCU-4 User Manual
25
Sub-Menu USER BUTTON
The WCU-4’s user button may be assigned to different functions.
UP or
DOWN
SET
Select the User Button function.
Confirm the selection.
ZOOM zap
Function (Zoom full speed).
KNOB marker Set new marker on knob scale.
Sub-Menu BACKLIGHT
The WCU-4 display and knob scale illumination may be dimmed to operational needs.
The backlight intensity may be set to a fixed value or automatically up to a pre-set
maximum value, ambient light dependent.
MODE
UP or
DOWN
SET
Toggles between FIX and AUTO mode.
Change the illumination intensity from 0 to 10.
Confirm the selection.
Sensor
Sub-Menu USER SETTINGS
Up to six user settings may be stored and recalled on/from an SD card.
The WCU-4 can also be re-set to the factory settings.
UP or
DOWN
ENTER
UP or
DOWN
SAVE
LOAD
Select LOAD, SAVE or factory reset.
The LOAD or SAVE sub-menu or
reset to factory settings.
Select the setting number.
The highlighted setup to SD card.
The highlighted setup from SD card.
x marked settings have been saved previously and can be
overwritten without request.
26
ARRI WCU-4 User Manual
Sub-Menu FIRMWARE
The WCU-4’s versatile layout allows many functions to be implemented. For a userfriendly integration of future functions, an easy-to-use firmware update procedure
has been integrated.
In addition, fee-based licensed features, especially for ALEXA camera control, are
available.
WCU-4 software licenses are bound to the WCU-4’s serial number and cannot be
transferred to another WCU-4.
For a WCU-4 update you need to prepare a standard FAT-32 formatted SD or SDHC
memory card up to 32 Gb (not enclosed).
The update or license file must be copied into the Firmware or Licenses folder,
using the following folder structure:
ARRI
- WCU4
- Firmware
- xxxx.upd
- Licenses
- xxxx.lic
Load the card into the SD card slot, located at the WCU-4’s bottom (card “face-up”).
Note: Be sure that the battery is completely charged prior to starting any update!
Do not remove the battery until the WCU-4 has re-started automatically after update.
UPDATE
UP or
DOWN Select Update file.
ENTER Confirm the selection.
UP or
DOWN Select the update file.
ENTER Confirm the selection
UPDATE Press both UPDATE keys simultaneously for
firmware update.
The WCU-4 re-starts automatically when the update is finished.
ARRI WCU-4 User Manual
27
LICENSES
INSTALL a license
A licensed feature is bound to the WCU-4’s hardware serial number.
Before purchasing a license key, you must save the WCU-4’s hardware info file for upload during the purchasing process.
Select LICENSED FEATURES from the FIRMWARE menu.
Install an SD card and press the HWINFO softbutton.
A file named “K2.72103.0-####-wcu4.ipkg” will be generated, with #### being the WCU-4 serial number.
Visit the ARRI LICENSE SHOP at http://alshop.arri.de and follow the instructions for purchasing and downloading license keys.
Available licenses for WCU-4 currently include:
ALEXA Remote License Key (K2.72145.0)
To install the new license(s) after purchase, copy the license file to the SD card, using the above described folder structure.
Install the SD card and again select LICENSED FEATURES from the FIRMWARE menu.
Press the INSTALL softbutton and select a license file from
the INSTALL LICENSE screen using the UP/DOWN softbuttons, if necessary.
Press the INSTALL softbutton again, then confirm your selection by pressing both INSTALL softbuttons.
DELETE a license
Press the DELETE softbutton and select a license file from the DELETE LICENSE screen, using the UP/DOWN softbuttons.
Press the DELETE softbutton and select a license file from
the DELETE LICENSE screen using the UP/DOWN softbuttons, if necessary.
Press the DELETE softbutton again, then confirm your selection by pressing both DELETE softbuttons.
Once purchased, a license key can be re-installed again to the linked WCU-4 at any time.
28
ARRI WCU-4 User Manual
Sub-Menu SYSTEM INFO
This screen shows the installed WCU-4 firmware version,
network (MAC) address and firmware version of the installed radio module,
and the MAC address(es) of the connected device(s).
Shown settings:
WCU-4:
Software version and date
Internal radio module:
Radio network address and firmware version
Connected camera/UMC-3A:
Radio network address
WCU-4:
Serial number
8.5
Menu IRIS
The IRIS sub-menu allows the setting of LIMITs and LOCKing the Iris to a set value.
If LIMIT is set, the complete slider travel is available for the limited Iris range, thus
stretching the Iris scale.
Symbols next to the LIMIT softbutton item indicate that LIMIT or LOCK is active.
How to use the LIMIT function:
Shift the slider to the first LIMIT position.
LIMIT Press to store the current Iris position.
- LIMIT starts blinking and a LIM symbol appears
Adjust slider to the second LIMIT position.
LIMIT Press to store the current Iris position.
- LIMIT and the LIM symbol stop blinking*
LIMIT Press again to clear the LIMIT positions.
LOCK LOCK
Press to lock the current Iris position.
- A padlock symbol will indicate the LOCK status
Press again to clear the LOCK function.
* An alternate method to set LIMITs is to press and hold the LIMIT button on the first position, move to the second position and release the LIMIT button then.
Note: LOCK can be set within the LIMIT borders, even when LIMIT is active, and will override the LIMIT function in this case.
ARRI WCU-4 User Manual
8.6
29
Menu ZOOM
The ZOOM sub-menu allows the setting of LIMITs, LOCKing the zoom to a set value
and limiting the maximum zoom speed.
Symbols next to the LIMIT softbutton item indicate that LIMIT or LOCK is active.
LOCK Press to lock the current Zoom position.
- A padlock symbol will indicate the LOCK status
LOCK
Press again to clear the LOCK function.
How to use the LIMIT function:
LIMIT Press to store the current Zoom position.
- LIMIT starts blinking and a LIM symbol appears
- Drive motor to the second LIMIT position
LIMIT Press to store the current Zoom position.
- LIMIT and the LIM symbol stop blinking*
LIMIT Press again to clear the LIMIT positions.
How to use the maximum Zoom speed function:
UP or
DOWN
Press to enter the zoom speed sub-menu.
Press to select the maximum zoom speed.
Press and hold to change the speed in
steps of tens.
SET Confirm the selection.
* An alternate method to set LIMITs is to press and hold the LIMIT button on the first
position, move to the second position and release the LIMIT button then.
Note: LOCK can be set within the LIMIT borders, even when LIMIT is active, and will override the LIMIT function in this case.
30
ARRI WCU-4 User Manual
8.7
Menu FOCUS
The FOCUS sub-menu allows the setting of LIMITs, LOCKing the focus to a set value,
squeezing the focus scale to a limited knob angle (K-LIM) and setting up to eight colorcoded focus markers.
With the use of LDS or LDA lenses, a scale OFFSET may be added. Symbols next to
the FOCUS softbutton item indicate that LIMIT, K-LIM or LOCK is active.
LOCK Press to lock the current Focus position.
- A padlock symbol will indicate the LOCK status
LOCK
Press again to clear the LOCK function.
MARKER Press to enter the MARKER menu.
MARK** Press to set a marker at the current knob position.
- A colored line occurs next to the Focus scale
- Passing the Focus mark activates the WCU-4’s vibration indicator
REMOVE Press to clear the actual marker position.
RESET Press to clear all markers.
** If the function “KNOB marker” in the USER BUTTON menu is activated, pressing the user
button also MARKs the actual knob position.
MOTOR
Press to switch back to the lens drive menu.
How to use the LIMIT function:
LIMIT LIMIT Turn the knob to the first LIMIT position.
Press to store the current focus position.
- LIMIT starts blinking and a LIM symbol appears
Adjust the knob to the second LIMIT position.
Press to store the current focus position.
- LIMIT and the LIM symbol stop blinking*
LIMIT Press again to clear the LIMIT positions.
How to use the K-LIM function:
K-LIM K-LIM
Turn the knob to the first LIMIT position.
Press to store the current knob position.
- K-LIM starts blinking and a
symbol appears.
Adjust the knob to the second K-LIM position.
Press to store the current knob position.
- K-LIM and the
symbol stops blinking.
K-LIM
Press again to clear the K-LIM positions.
* An alternate method to set LIMITs is to press and hold the LIMIT softbutton on the first position, move to the second position and release the LIMIT softbutton then.
Note: LOCK can be set within the LIMIT borders, even when LIMIT is active, and will override the LIMIT function in this case.
K-LIM and LIMIT can be combined. A
symbol will be displayed next to the
FOCUS softbutton.
ARRI WCU-4 User Manual
31
How to use the OFFSET function:
In some cases the lens scale and the WCU-4 scale may diverge slightly or lenses
have to be synchronised, eg. for 3D shooting.
Using the WCU-4 OFFSET, one can align scales easily.
OFFSET Press and hold, turn the knob to the desired position, then release the OFFSET softbutton.
OFFSET Repeat the procedure to change the offset value.
K-LIM Press to clear the offset setting.
Note: The OFFSET value is stored in the ALEXA or UMC-3A (for 3D setup only) until the
connected camera or UMC-3A is powered down.
32
ARRI WCU-4 User Manual
AAppendix
A.1
Order Numbers and Accessories
K2.72103.0
WCU-4 Wireless Compact Unit
Included accessories:
K2.72117.0
K4.72467.0
K4.72487.0
K5.74420.0
K5.74422.0
WCU-4 Blank Focus Ring
WCU-4 Hand Strap
WCU-4 Neck Lanyard
WCU-4 Quick Guide
WCU-4 User Manual (english)
Recommended battery and charger:
K2.47851.0
K2.47852.0
Charger power cords:
05.20369.0
05.20370.0
05.20368.0
SONY NP-FM 500H Li-Ion Battery 7.2 V 11.8 Wh
SONY BC-VM10 Li-Ion Battery Charger with Power Cord EU
Power Cord UK
Power Cord US
Power Cord EU
Power Supply (via LCS connector)
K2.0000425
Power supply HPS-1
LCS Cables:
K4.41395.0
K4.41397.0
K2.41389.0
K-LC-Z1-S LCS Cable 3.5 m (11 ft)
K-LC-M1-Sp-S LCS Spiral Cable
LC-E1 LCS Cable Drum Extension 75 m (250 ft)
Licensed software keys:
K2.72145.0
ALEXA Remote License Key for WCU-4
Available from ARRI License Shop http://alshop.arri.de
Pre-marked focus rings:
K2.72129.0
K2.72130.0
K2.72131.0
K2.72132.0
K2.72133.0
K2.72134.0
K2.72135.0
K2.72136.0
K2.0000848
WCU-4 Pre-marked Focus Ring 0.25 m
WCU-4 Pre-marked Focus Ring 0.35 m
WCU-4 Pre-marked Focus Ring 0.5 m
WCU-4 Pre-marked Focus Ring 1 m
WCU-4 Pre-marked Focus Ring 12”
WCU-4 Pre-marked Focus Ring 14”
WCU-4 Pre-marked Focus Ring 20”
WCU-4 Pre-marked Focus Ring 3’6”
WCU-4 Knob Calibration Ring
ARRI WCU-4 User Manual
A.2
Connector Pinout
LCS Connector:
Socket View
A.3
33
1 GND
2 NC
3 CAN-L
4 CAN-H
5 Battery +10.4 to 34 V DC
Dimensions and Weight
W Width
Height
Depth
H
Accessory Threads Dimensions:
Weight: Without straps and battery
730 g/25.8 oz.
161 mm
151 mm
165 mm (new antenna)
90 mm
34
ARRI WCU-4 User Manual
A.4
Electrical Specifications
Power Supply:
Battery Via LCSsocket
7.2 V Li-Ion battery
10.4 to 34 V DC (camera supply)
Power Consumption
220 [email protected] V
70 mA@24 V
Operating Temperature: -20 to +50 °C (-4 to +122°F )
RF Transmission: ISM 2.4 GHz / one of eight channels selectable
ARRI Channel No.
Frequency
02.410 GHz
12.415 GHz
22.430 GHz
32.435 GHz
42.450 GHz
52.455 GHz
62.470 GHz
72.475 GHz
ARRI WCU-4 User Manual
35
Declaration of Conformity
We, Manufacturer
ARRI CINE + VIDEO GERÄTE GmbH
Pottendorferstrasse 25-27
A-1120 Wien
declare that the product
Wireless Compact Unit
WCU-4
is in conformity with
DIN EN 55103-1: 2009
DIN EN 55022: 2010
DIN EN 55103-2: 2009
DIN EN61000-4-2: 1995 +A1: 1998 +A2: 2001
DIN EN61000-4-3: 2006 +A1: 2008
Built-in Transceiver Module
is listed under
FCC ID: W7Z-FSTARPRO
IC: 8254A-FSTARPRO
Alternative built-in Transceiver Module
is listed under
FCC ID: Y7N-EMIP100
IC: 9482A-EMIP100
Date:Signature
February 26, 2013
Ing. Walter Trauninger
Class A Statement:
Note: This equipment has been tested and found to comply with the limits for a Class A digital device, pursuant to Part 15 of the FCC Rules. These limits are designed to provide
reasonable protection against harmful interference when the equipment is operated in a commercial environment. This equipment generates, uses, and can radiate radio fre
quency energy and, if not installed and used in accordance with the instruction manual, may cause harmful interference to radio communications. Operation of this equipment in a residential area is likely to cause harmful interference in which case the user will be required to correct the interference at his own expense.
This equipment complies with the Canadian ICES-003 Class A specifications.
Cet appaeil numérique de la Class A est conforme à la norme NMB-003 du Canada.
36
ARRI WCU-4 User Manual
A.5
Symbols and Screen Messages
Main Screen Symbols
IRIS motor not connected, equivalent for ZOOM and FOCUS motor.
IRIS motor connected, but not available for the WCU-4, e.g. control
through another remote unit, equivalent for ZOOM and FOCUS
motor.
IRIS motor status unknown, e.g. during system startup,
equivalent for ZOOM and FOCUS motor.
Zoom motor LOCKed, equivalent for IRIS and FOCUS motor.
Focus motor LIMITs set, equivalent for IRIS and ZOOM motor.
Focus motor K-LIM set.
Focus motor LIMITs combined with K-LIM.
Zoom motor actual speed value (0-100).
CAM information, respond to message or CANCEL.
Critical CAM information, respond to message or CANCEL.
Radio connection active.
Radio connection disabled.
Low battery.
Pre-marked focus ring active, but no lens data available from
camera or UMC-3A.
ATTENTION: Focus control is disabled in this case.
Screen Messages
Message
Description HW Info file could not be stored. Insert a SD-card.
Please insert SD card.
License file not valid!
The license file on the SD card does not correspond to the WCU-4 serial number.
Used path not found!
Create a valid folder structure on the SD card like shown on page 24 (sub-menu Firmware).
Function not available during camera record.
Disabled during record
Calibrate lens motors now?
Motors calibrating ...
Calibrate lens motors - recommended.
In case you are sure that nothing has been changed since the last calibration, press CANCEL.
Wait until calibration is finished.
* Functions available with optional ALEXA Remote Software License
A.6
WCU-4 SW Version
01.01
ARRI WCU-4 User Manual
37
Menu Tree
38
ARRI WCU-4 User Manual
A.7
Service Mode
The service mode offers re-calibration of focus knob, iris slider and zoom stick.
This particularly fixes a potential non-linearity of the focus knob that can cause
a misalignment with pre-marked focus rings and hand-marked rings that are
exchanged between various WCU-4 units. All WCU-4 units above serial number
6262 are delivered with the extended knob calibration from the factory.
ONLY use the service mode if you experience issues and need to re-calibrate the
WCU-4 control devices! Make sure that you understand the calibration procedure
before using it.
Please note that hand-marked focus rings might have an offset after re-calibrating
the focus knob!
To avoid unexpected interaction with an occasionally connected camera or UMC, be sure
the radio is disabled and no cable is connected to the LCS socket.
The new calibration becomes effective after rebooting the WCU-4.
Switch-on the unit, instantly press and hold both upper and lower middle
softbuttons until the service mode screen appears.
Available procedures:
ZOOM Adjust zero position and direction.
KNOB Adjust end-stops and linearity*.
SLIDER Adjust end-stops and linearity.
* An optionally available focus ring will be needed for linearity alignment.
ZOOM Calibration mode
Press the ZOOM softbutton and the STICK SETUP screen appears.
ADJ-DIR In the case the zoom actuator acts in the
wrongdirection, move the stick upwards and press ADJ-DIR
ADJ-0 In the case the zero stick position is not correct (issue: the zoom motor moves without pressing the stick), leave the stick in its center position and press ADJ-0.
BACK Return to the SERVICE MODE main screen.
ARRI WCU-4 User Manual
39
Knob Calibration mode
Press the KNOB softbutton and the KNOB SETUP screen appears.
K-CW Turn the knob clockwise to its end-position, then press K-CW .
K-CCW Turn the knob counter-clockwise to its end-
position, then press K-CCW .
Knob Linearizing Procedure
Attach the WCU-4 Knob Calibration Ring K2.0000848.
Do not start the linearizing procedure without the ARRI calibration ring applied. Once you pressed SETUP or SET1, you must go through the whole alignment procedure.
By this action, the previously stored alignment points will be cleared beyond recall!
K-LIN Enter the KNOB SETUP screen
Press
TEST
to check the aligned ring positions. If the scale
does not correspond with the ring positions,
press SETUP to start the knob linearizing procedure.
Turn the knob exactly to ring position to number 1 and
press
SET1 to confirm and store the alignment position.
Repeat the procedure, until you finished with position SET16.
Press UNDO if you missed the the correct alignment position and repeat the last step.
Press READY at the end of the procedure to the SERVICE MODE screen.
BACK Return to the KNOB SETUP.
40
ARRI WCU-4 User Manual
Slider Calibration mode
Press the SLIDER softbutton and the SLIDER SETUP screen appears.
S-UP
Move the slider to its top end-position, then
press S-UP.
S-DOWN Move the slider to its bottom end-position, then press S-DOWN.
Note: Slider Linearizing Procedure
Beware of a possible parallax error between slider pointer and the displayed alignment bar.
Turn the WCU-4 as shown.
Move the slider exactly to the ”0” position bar on the display and
press
SET 0 to confirm and store the alignment position.
Repeat the procedure, until you finished with position SET 12.
Press READY at the end of the procedure to return to the
SERVICE MODE screen.
BACK Return to the SERVICE MODE screen.
ARRI WCU-4 User Manual
41