1
Reseller Web Site
Instructions Manual
CONTENTS
1. WHY USE OUR RESELLER WEB SITE TO SELL SMS? – GENERAL INFORMATION ON OUR RESELLER WEB SITE. ............ 4
2. HOW CAN I HAVE MY OWN RESELLER WEB SITE? – DETAILS WE NEED YOU TO PROVIDE US FOR IMPLEMENTING
THE RESELLER WEB SITE FOR YOU................................................................................................................................. 4
3. INTRODUCTION OF THE RESELLER WEB SITE. – GENERAL DESCRIPTION OF THE RESELLER WEB SITE DASHBOARD
AND ITS OPTIONS. ........................................................................................................................................................ 4
4. WHERE CAN I EDIT MY RESELLER ACCOUNT DETAILS? – INSTRUCTIONS ON HOW TO ACCESS THE RESELLER
ACCOUNT DETAILS AND EDIT THEM. ............................................................................................................................ 7
5. WHERE CAN I VIEW MY RESELLER ACCOUNT BILLING HISTORY? – VIEWING YOUR RECENT PAYMENTS (FOR THE
LAST SIX MONTHS). ...................................................................................................................................................... 9
6. HOW CAN I IMPORT MY CONTACTS TO MY ACCOUNT? – INSTRUCTIONS ON HOW TO IMPORT YOUR CONTACTS TO
YOUR RESELLER ACCOUNT. ......................................................................................................................................... 10
7. HOW CAN I VIEW MY TAGS? – INSTRUCTIONS ON HOW TO VIEW YOUR TAGS AND DELETE THOSE THAT YOU ARE
NOT USING ANYMORE. ............................................................................................................................................... 16
8. HOW CAN I VIEW, DELETE AND EDIT MY CONTACTS? – INSTRUCTIONS ON HOW TO VIEW, DELETE OR EDIT THE
CONTACTS OF A TAG. ................................................................................................................................................. 17
9. IS IT POSSIBLE TO DOWNLOAD THE CONTACTS OF A TAG? – INSTRUCTIONS ON HOW TO DOWNLOAD THE
CONTACTS OF A TAG IN .CSV OR .XLS FILE. ................................................................................................................. 20
10. IS IT POSSIBLE TO SEND AN SMS TO ONE OR MORE SELECTED CONTACTS? – INSTRUCTIONS ON HOW TO SEND AN
SMS TO ONE OR MORE SELECTED CONTACTS DIRECTLY FROM THE TAG PAGE. .......................................................... 20
11. HOW CAN I SEND A SINGLE SMS? – SENDING AN SMS TO ONE RECIPIENT. ........................................................... 21
12. HOW CAN I SEND A BULK SMS CAMPAIGN? – SENDING SMS TO MULTIPLE RECIPIENTS. ...................................... 24
13. WHERE CAN I VIEW THE STATISTICS FOR MY SMS TRAFFIC? – VIEWING THE STATISTICS OF YOUR ACCOUNT'S SMS
TRAFFIC. ..................................................................................................................................................................... 46
14. WHERE CAN I VIEW THE SMS HISTORY OF MY ACCOUNT? – VIEWING THE SMS HISTORY OF YOUR ACCOUNT. .... 47
15. WHERE CAN I VIEW THE COVERAGE OF MY BULK SMS SERVICE? – VIEWING ALL THE MOBILE NETWORKS THAT
ARE COVERED FROM THE BULK SMS SERVICE OF YOUR ACCOUNT. ............................................................................ 48
16. CAN I RECEIVE THE DLRS (DELIVERY REPORTS) OF MY SMS MESSAGES TO MY SERVER AND HOW? –
INSTRUCTIONS ON HOW TO RECEIVE THE DLRS OF YOUR SMS MESSAGES AUTOMATICALLY TO YOUR SERVER......... 49
17. HOW CAN I PREVENT SOME MOBILE NUMBERS FROM RECEIVING MY SMS MESSAGES IN THE FUTURE? –
REGISTERING ONE OR MORE MOBILE NUMBERS IN THE SMS BLOCKLIST.* ................................................................ 50
18. HOW CAN I PREVENT SOME MOBILE NUMBERS FROM RECEIVING SMS FROM ANY OF MY CUSTOMERS
ACCOUNTS IN THE FUTURE? – REGISTERING ONE OR MORE MOBILE NUMBERS IN THE GLOBAL SMS BLOCKLIST.* ... 52
19. HOW CAN I SET UP GENERIC PROFITS FOR MY RESELLER WEB SITE? – SETTING UP GENERIC PROFITS FOR SPECIFIC
MOBILE OPERATORS................................................................................................................................................... 54
20. HOW CAN I SET UP PER-USER PROFITS FOR THE USER ACCOUNTS OF MY RESELLER WEB SITE? – SETTING UP PERUSER PROFITS FOR SPECIFIC MOBILE OPERATORS. ..................................................................................................... 60
21. WHAT ARE THE AVAILABLE PROFIT TYPES THAT I CAN CHOOSE TO CHARGE MY CUSTOMERS' ACCOUNTS? –
DESCRIBING THE PROFIT TYPES AND THEIR DIFFERENCES. ......................................................................................... 65
22. HOW CAN I RESTRICT THE DESTINATIONS WHERE A USER ACCOUNT CAN SEND SMS AND THE ORIGINATORS HE IS
ALLOWED TO USE? – INSTRUCTIONS ON HOW YOU CAN LIMIT THE COVERAGE OF A USER ACCOUNT FROM
WORLDWIDE TO SPECIFIC MOBILE OPERATORS AND RESTRICT THE ORIGINATOR FEATURE. ..................................... 65
23. WHERE IS MY RESELLER CONTROL PANEL? – ACCESSING THE RESELLER CONTROL PANEL. ................................... 68
24. HOW CAN I CREATE A USER ACCOUNT? – INSTRUCTIONS ON HOW TO CREATE A USER ACCOUNT. ...................... 69
25. HOW CAN I EDIT THE DETAILS OF A USER ACCOUNT OR EVEN DELETE IT? – MODIFYING OR DELETING A USER
ACCOUNT. .................................................................................................................................................................. 72
26. HOW CAN I ADD OR REMOVE AN AMOUNT FROM THE BALANCE OF A USER ACCOUNT? – ADDING OR REMOVING
AMOUNTS FROM AN ACCOUNT BALANCE. ................................................................................................................. 73
27. HOW CAN I CREATE A RESELLER ACCOUNT? – INSTRUCTIONS ON HOW TO CREATE A RESELLER ACCOUNT. ......... 74
28. HOW CAN I EDIT THE DETAILS OF A RESELLER ACCOUNT OR EVEN DELETE IT? – MODIFYING OR DELETING A
RESELLER ACCOUNT. ................................................................................................................................................... 80
29. HOW CAN I ADD OR REMOVE AN AMOUNT FROM THE BALANCE OF A RESELLER ACCOUNT? – ADDING OR
REMOVING AMOUNTS FROM A RESELLER ACCOUNT BALANCE. ................................................................................. 81
30. HOW CAN I CHANGE THE CURRENCY TO WHICH I SELL SMS TO MY CUSTOMERS? – CHANGING THE CURRENCY OF
YOUR RESELLER WEB SITE. .......................................................................................................................................... 82
31. HOW CAN I CUSTOMIZE MY RESELLER WEB SITE? – CUSTOMIZING THE TEMPLATE OF YOUR RESELLER WEB SITE,
UPLOADING YOUR OWN LOGO AND OTHER CHANGES. .............................................................................................. 83
1. Why use our Reseller web site to sell SMS? – General information on our
Reseller web site.
Any customer who wishes to sell SMS to his clients, needs a website to create accounts for them, add SMS
credits to their balance, view full statistics for their SMS traffic etc. Our Reseller platform has all the above
features and even more. Our customer who wants to be a Reseller, gets a fully functional white-label
website for selling SMS without any need to invest on development and website hosting (the Reseller web
site is hosted to our secure web servers). The control panel is very easy to use even for inexperienced users
and enables the Reseller to quickly complete any task, from creating customer accounts and adding them
credits to completely changing the web site’s template and adding his company logo. From the moment
someone becomes our Reseller, he can sell SMS to his clients at any price he wants, choosing his own profit
margin, and his clients pay him directly to buy SMS. Moreover, our Reseller platform allows the customer to
create other sub-Reseller accounts enabling him to provide his clients with their own Reseller web site
expanding this way his business and increasing his customers’ loyalty.
2. How can I have my own Reseller web site? – Details we need you to
provide us for implementing the Reseller web site for you.
To create a Reseller web site for you, the following procedure must be followed:
•
You must provide us with a domain name under which you want to have the Reseller web site (e.g.
your-domain.com) or a sub-domain of an existing domain name (e.g. sms.your-domain.com).
•
You must make the DNS of your domain or sub-domain name, point to the IP address 78.46.210.185
or ask your web hosting company to do it for you. More specifically:
a) If you want to use a domain name, for example your-domain.com, you should log in the
control panel and add the following information to the DNS setting:
your-domain.com IN A 78.46.210.185
www.your-domain.com IN A 78.46.210.185
b) If you want to use a sub-domain name, for example sms.your-domain.com, you should log in
the control panel and add the following information to the DNS setting:
sms.your-domain.com IN A 78.46.210.185
www.sms.your-domain.com IN A 78.46.210.185
IMPORTANT: PLEASE NOTE THAT THE RESELLER WEB SITE WILL BE HOSTED IN OUR SERVERS AND
YOU SHOULD NOT REDIRECT OR AUTOREFRESH (OR ANYTHING ELSE) YOUR DOMAIN OR SUBDOMAIN TO OUR IP ADDRESS. YOU HAVE TO MAKE THE DNS POINT TO 78.46.210.185 EXACTLY AS
DESCRIBED ABOVE.
•
After you make this change to DNS we will immediately start creating your Reseller web site (usually
it takes 2-3 working days to be ready). Upon finishing it, we will send you an email with all the
details you need to access your Reseller account.
Please note that if you already have an existing account to our system (Web account, HTTP API or SMPP),
you have the option to keep it as a second account or, if you wish to stop using it, we can delete it and
transfer the remaining balance to your new Reseller account.
3. Introduction of the Reseller Web Site. – General description of the
Reseller web site Dashboard and its options.
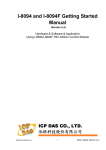
When you log in your Reseller account the first page you see is the Dashboard. Here you can see all the
available options organized in the following tabs: USER, SERVICES and ADMINISTRATOR (see Figure 1a).
Fig. 1a – Dashboard
The Dashboard is also accessible by clicking on the Dashboard option of the drop-down menu on the top of
the page (see Figure 1b).
Fig. 1b – Dashboard
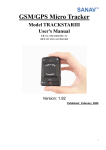
In the USER tab there are all the options available for editing your account and your contacts (under “My
Account” and “Contacts” respectively). The same options are available in the left menu also (see Figure 2).
Fig. 2 – Options under USER tab
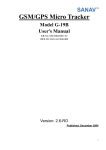
In the SERVICES tab there are all the options available for using the bulk SMS Service (more services will be
available soon). The same options are available in the left menu also (see Figure 3).
Fig. 3 – Options under SERVICES tab
In the ADMINISTRATOR tab there are all the options available for setting Generic Profits and per User
profits. The same options are available in the left menu also (see Figure 4a).
Fig. 4a – Options under ADMINISTRATOR tab
You can change the language of your account by clicking on the language menu on the top of the page (see
Figure 4b).
Fig. 4b – Changing the language of your account
4. Where can I edit my Reseller Account details? – Instructions on how to
access the Reseller Account details and edit them.
To edit your Reseller Account details such as name, email, password etc., you have to click on the “My
Account” option in the left menu of the page (see Figure 5).
Fig. 5 – Reseller Account
The options that are available under “My Account” are “Personal Details”, “Change Password” and "My
Billing History". By clicking on the “Personal Details” option, you are able to change your personal details
(Full Name, Country, E-mail, Mobile and Password) (see Figure 6a).
Fig. 6a – Reseller Account Details
NOTE: If you change your e-mail address or your mobile phone, you will be requested to confirm the change
for security reasons (the system will send an e-mail to your inbox or an SMS to your mobile phone), so make
sure that your new details are correct.
The personal details page is also accessible by clicking on the Personal Details option of the drop-down
menu on the top of the page (see Figure 6b). From the same drop-down menu you can click on the Logout
option if you wish to log off your account.
Fig. 6b – Reseller Account Details
By clicking on the "Change Password" option you can change your old password with a new one (see Figure
7) although the password can also be changed by clicking on the “Change Password” option (see Figure 6a).
Fig. 7 – Changing Password
5. Where can I view my Reseller Account billing history? – Viewing your
recent payments (for the last six months).
By clicking on the "My Billing History" under “My Account” option in the left menu, you can view all the
payments you made the last six months (see Figure 8).
Fig. 8 – Billing History
6. How can I import my Contacts to my account? – Instructions on how to
import your Contacts to your Reseller Account.
To import your Contacts to your Account, you have to click on the “Contacts” option in the left menu of the
page (see Figure 9).
Fig. 9 – Contacts
The options that are available under “Contacts” are “Add”, “Import” and “Tags Directory”.
ADD CONTACTS
By clicking on the “Add” option, you are able to add one or more Contacts by typing or copy-pasting them
inside the text area (see Figure 10). The Contacts have to be inserted with the following format:
+XXXXXXXXXX,John Doe,01-01-1970. You can't use any comma in full names (ex. John, Doe) because it will
be recognized as separator. If, however, it is necessary to use a comma in a full name you must include the
full name inside quotation marks " " (ex. "John, Doe").
Below the text area there is a field where you can type one or more Tags to associate with the Contacts you
want to add (see Figure 10). If one or more Tags do not exist yet, they will be created automatically by the
system. Tags will be explained in detail later in this document but for now, it must be noted that they are
used to create groups of Contacts (so they are acting like Contact folders). This is essential when you don’t
want to send an SMS to all of your Contacts but to some of them because all you have to do is to select the
proper Tag(s) and the SMS will be sent only to the Contacts associated with the specific Tag(s).
On the right side of the text area there are some options (under "Adding Options" box) which you can use to
remove duplicates, remove wrong mobile numbers or even add a prefix in case your mobile numbers are
not in the international format (see Figure 10). Please note that all mobile numbers of the Contacts you add
must always be in their international format (e.g. +44XXXXXXXXXX for UK, +49XXXXXXXXXX for Germany,
+20XXXXXXXXX for Egypt etc.) otherwise you will not be able to send SMS to them.
After you finish typing your Contacts and the associated Tag(s), you have to click on the “Add Contacts”
button and the Contacts will be added to the Directory.
Fig. 10 – Adding Contacts
IMPORT CONTACTS
By clicking on the “Import” option, you are able to import your Contacts by uploading them in a .csv or an
.xls file (see Figure 11). Please note that .xlsx files are not supported yet therefore you will not be able to
import your Contacts by uploading such a file.
Fig. 11 – Import Contacts
When you click on the csv or on the xls icon, you have two options for uploading your file. Either you can
‘drag-and-drop’ the file into the area on the left of the page or you can find the file located in your Hard Disk
Drive (HDD) by clicking in the field inside the area on the right (see Figure 12).
Fig. 12 – Uploading a file with Contacts
If you upload a csv file, you have to choose which separator (semi-colon (;) or comma (,)) is used in the file
(see Figure 13). You have also to define which data the columns of the csv contain (e.g. 1st column contains
the Phone, 2nd column contains the Name etc.). The csv file can have up to 4 columns (Phone, Name,
Birthday and Tag(s)) while it is possible to have one column with the numbers only (Phone). In case of
multiple Tags in the csv file, they have to be separated with spaces.
Tags can also be added separately in the text area (“Tag Box”) at the end of the page (see Figure 13). In case
there are already Tags in the file, they will be merged with the Tags of the Tag Box.
Finally, you can remove any duplicate contacts or add a prefix in case your mobile numbers are not in the
international format, by checking the relevant boxes under the "Adding Options" at the bottom of the page
(see Figure 13).
Fig. 13 – Defining the structure of a .csv file
After you finish defining the structure of the csv file, you have to click on the “Import Contacts” button and
the Contacts will be imported to the specified Tag(s).
If you upload a xls file, you have to define from which Sheets and Columns the data will be uploaded (e.g.
from the 1st Sheet, Column A contains the Phone, Column B contains the Name etc.) (see Figure 14). Each
time you define an association (e.g. Sheet 1, Column A for the Phone) you have to click on the "Add
Association" button.
Fig. 14a – Defining the structure of a .xls file
When you define the next association, you will notice that the data selected in the previous association are
not available for selection anymore. For example, in Figure 14b you can see that since the associations of the
Phone and Name are already added, there are available only Birthday, Comments and Tag(s) to be
associated with Sheets and Columns of the xls file.
Please note also, that you can associate data from multiple Sheets and Columns of the xls file (e.g. Sheet 1,
Column A for the Phone, Sheet 2, Column A for the Name etc.) for greater flexibility. However, in this case
you have to make sure that the Row Number of all associated data for each record is identical (for example,
if the phone +441234567890 is in Sheet 1, Column A, Row 1 and the mobile owner's name is John Doe and
it is in Sheet2, Column A, it must be also in Row 1 otherwise the mobile number will be associated with the
wrong name or with no name at all).
You can add up to 5 associations (Phone, Name, Birthday, Comments and Tag(s)) while it is possible to have
only one association with the numbers only (Phone). In case of multiple Tags in the xls file, they have to be
separated with spaces.
Fig. 14b – Defining the structure of a .xls file
Tags can also be added separately in the text area (“Tag Box”) at the end of the page (see Figure 14c). In
case there are already Tags in the xls file, they will be merged with the Tags of the Tag Box.
Finally, you can remove any duplicate contacts or add a prefix in case your mobile numbers are not in the
international format, by checking the relevant boxes under the "Adding Options" at the bottom of the page
(see Figure 14c).
After you finish defining the structure of the xls file, you have to click on the “Import Contacts” button and
the Contacts will be imported to the specified Tag(s) (see Figure 14c).
Fig. 14c – Defining the structure of a .xls file
7. How can I view my Tags? – Instructions on how to view your Tags and
delete those that you are not using anymore.
To view your Tags you have to click on the “Tags Directory” under the “Contacts” option in the left menu of
the page (see Figure 15). In the new page that will be displayed you can view all of your Tags along with the
information of how many contacts each Tag is associated with. If you click on the name of a Tag, you can
rename it by typing in a new name.
If you wish to delete a Tag you have to click on the “X” sign of the Tag (see Figure 15, indicated in blue
frame). This action deletes also the associated Contacts unless these Contacts are associated with more
Tags.
If your Tags Directory contains a large number of Tags, you can quickly find a specific Tag by typing its name
or a part of it, in the field Tag on the top of the page (see Figure 15).
Fig. 15 – Viewing and Deleting Tags in the Tags Directory
Please note that in the Tags Directory page there is no option for adding Tags because all Tags are
automatically created during the process of importing Contacts.
8. How can I view, delete and edit my Contacts? – Instructions on how to
view, delete or edit the Contacts of a Tag.
To view the Contacts of a Tag you have to click on the small human icon inside the Tag box (see Figure 15,
indicated in blue frame). In the next page that will be displayed you can view all of the Contacts associated
with this Tag, displayed in groups of 20, 50 or 100 Contacts per page but you have also the option to use one
or more filters in order to view a specific group of Contacts (see Figure 16a).
The filters that you can use are Name, Phone and Birthday. You can choose any of them or all of them, then
you have to type a name, a mobile phone or a birthday in the field below and then click on the “Add Filter”
button (see Figure 16a). If you click on the Strict check box then the Contacts will be filtered strictly with the
characters you typed in the field.
You can use multiple times the same filter for your search, which you can combine by using the AND and OR
operators (see Figure 16a). For example, if you select two times the Name filter (e.g. 1st Name filter John,
2nd Name filter Smith) and you want to view all the Contacts that contain both of the names at the same
time, then you have to use the AND operator and you will probably get results like John Smith, John D.
Smith, Johnson Smith etc. But if you want to view all the Contacts that contain the name of the 1st Name
filter or all the Contacts that contain the name of the 2nd Name filter, then you have to use the OR
operator.
Fig. 16a – Viewing and Deleting Contacts of a Tag
After you select all the filters you want and the relevant Contacts are displayed, you can click on some of
them and then delete them by clicking on the “Selected Contacts” button. In the small window that will
appear (see Figure 16b) you can delete all the Contacts you just selected by clicking the Delete ALL (X)
button or unselect some of them first before you delete the rest. If you want to delete all the Contacts, you
have to select all of them by clicking on the “Select All” button (see Figure 16b), then click on the “Selected
Contacts” button right next to it on the left side and in the small window that will appear you just click the
Delete ALL (X) button.
Fig. 16b – Viewing and Deleting Contacts of a Tag
Fig. 16c – Viewing and Editing Contacts of a Tag
To edit a single Contact you have to move the mouse pointer on to the Contact (there is no need to click on
it) until it expands (see Figure 16c) and then you have to click on the Edit Contact option inside. In the small
window that will appear (see Figure 16d) you can change the Name, the Phone, the Birthday of the Contact
or even put some comments. After you finish, just click on the Save button to save the changes.
Fig. 16d – Viewing and Editing Contacts of a Tag
9. Is it possible to download the Contacts of a Tag? – Instructions on how to
download the Contacts of a Tag in .csv or .xls file.
To download the Contacts of a Tag in a .csv or a .xls file, you have just to click on the .CSV or .XLS links
respectively (see Figure 17). Before downloading the file you can also delete possible duplicate Contacts that
exist in the Tag by clicking the "Delete duplicate contacts of tag:" (see Figure 17).
Fig. 17 – Downloading Contacts of a Tag in a .csv or .xls file
10. Is it possible to send an SMS to one or more selected Contacts? –
Instructions on how to send an SMS to one or more selected Contacts
directly from the Tag page.
To send an SMS to a single Contact or to some of them that you selected, you have to click first the
"Actions" button (see Figure 18a).
Fig. 18a – Sending SMS from the TAG Page
In the small window that will appear (see Figure 18a), click on the Send Bulk SMS button and in the next
page (see Figure 18b), click on the icon that is indicated with red frame and follow the procedure (this
procedure will be explained in detail in Question 12).
Fig. 18b – Sending SMS from the TAG Page
11. How can I send a single SMS? – Sending an SMS to one recipient.
To send a single SMS to one recipient you have to click on the “Send Single SMS” option in the left menu of
the page (see Figure 19a). In the new page that will be displayed, you have to type the recipient’s mobile
number into the Recipient field and then you have to type the SMS text inside the Text Box.
You can also change the originator (sender ID) of the SMS message in the Originator field, however please
note that the originator must be up to 14 digits or up to 11 alphanumeric characters (no special characters
are allowed). It is very important to mention here that even if the originator you typed follows these
limitations, it may not be possible for the SMS to be delivered with this originator as this feature may not be
available from the destination network.
By clicking on the "Load Text from Template..." link (see Figure 19a) you are able to choose one from the
available SMS templates in the small window that will pop up (see Figure 19b). In order to make your choice
you just have to click on the SMS template that you want and it will be loaded in the SMS Text Box of the
previous page. You can add unlimited new SMS templates and store them for future use by typing your text
into the Text Box and then click on the "Add" button (see Figure 19b). By clicking on the "X" button you can
delete an SMS template. When you finish adding SMS templates, click on the "Close" button.
It is possible to set an expiration time for your SMS in the "Expiration Date/Time" Box (see Figure 19a). If
your SMS message is not sent at the expiration time you set, due to queue or other reasons, then it will not
be sent at all. This is a very useful feature in cases where you don't want your SMS to be delivered late thus
avoiding possible annoyance of the recipient.
You are able to send your message in the future by clicking on the relevant option inside the “Send
Date/Time” box. If you want your SMS to be sent immediately then leave the "Now" option checked.
After you finish typing your SMS, you can click on the "Send SMS" button (see Figure 19a) and the SMS will
be sent according with the parameters you set.
Fig. 19a – Sending a single SMS
Fig. 19b – Sending a single SMS using an SMS Template
The window that will be displayed after the SMS is sent (see Figure 19c), informs you that the SMS sending
was successful and provides you with some options to continue from this point (Send New SMS, View
History, View Statistics and Add Balance - for setting up the Add Balance page see Question 31). The
displayed Submission ID can be used to find this SMS message in the SMS History (for more information, see
Question 14).
Fig. 19c – Sending a single SMS
12. How can I send a bulk SMS campaign? – Sending SMS to multiple
recipients.
To send SMS to multiple recipients you have to click on the “Send Bulk SMS” option in the left menu of the
page (see Figure 20a). In the new page that will be displayed you have 4 different options to send bulk SMS,
each one of them represented with an icon.
Fig. 20a – Sending bulk SMS
A. Send Bulk SMS to Contacts from your Contacts Directory.
Click on the first icon (see Figure 20b).
Fig. 20b – Sending bulk SMS to Contacts from your Contacts directory
In the next page that will be displayed choose one or more tags just by clicking on them (see Figure 20c). If
you clicked by mistake on a tag to which you don't want to send SMS, then by clicking again on it you can
uncheck it. The Total Contacts Selected number is changing according to the total number of Contacts that
the selected Tags contain (in this example, 2+2=4).
After you finish choosing the tags you want, click on the Continue button.
Fig. 20c – Sending bulk SMS to Contacts from your Contacts directory
In the next page that will be displayed (see Figure 20d) you can type the SMS text inside the Text Box or you
can choose an SMS template from the available ones by clicking on the "Load Text from Template..." link.
It is possible to create a personalized SMS text that will include the name of each Contact (if there is one) by
typing #fullname# in the text (see Figure 20d). For example, by typing "Hello #fullname#! We have an
interesting offer for you.", the #fullname# will be replaced inside the text with the name of each Contact
and this action will produce SMS messages like "Hello John Doe! We have an interesting offer for you.". In
case that there is no name in a specific Contact, the #fullname# will be replaced by the fallback value
"Sir/Madam" which you can change to something else if you wish (see Figure 20d). Note also that by
clicking on the #fullname# (see Figure 20d) it is automatically inserted in the Text Box so you don't have to
type it when you create your SMS text.
When you finish typing your SMS message you can click on the Continue to Final Sending Options button
(see Figure 20d).
Fig. 20d – Sending bulk SMS to Contacts from your Contacts directory
In the next page you can see the total number of SMS messages that were created, the number of valid SMS
and the invalid ones as well as the estimated cost (see Figure 20e). It is important here to note that the
actual cost that will be charged to your account balance after the bulk SMS sending, may vary from the one
that you see in this page. This is due to the fact that the estimated cost is calculated based on the prefixes of
the mobile numbers in order to determine the destination network of each SMS and in countries with MNP
(Mobile Number Portability) this is not always correct. In any case, the actual cost of the bulk SMS sending
will be available after the SMS submission in the SMS history.
In this page you can also change the Originator of the SMS (see Figure 20e), set a time and date in the future
for the SMS to be sent if you don't want to send them right now, as well as set the expiration time for your
bulk SMS sending. This feature is very useful when you want to send time-sensitive SMS campaigns where
the SMS must be delivered on time or else not to be delivered at all.
Finally, you can check some random SMS messages in the Random SMS Preview box (see Figure 20e) by
clicking in the box area and if everything is fine, you can click on the Start SMS Submission button to
proceed to the final stage of the bulk SMS sending.
Fig. 20e – Sending bulk SMS to Contacts from your Contacts directory
The next page (see Figure 20f) informs you that the bulk SMS sending was successful and provides you with
some options to continue from this point (Start New Bulk SMS Sending, View History, View Statistics and
Add Balance - for setting up the Add Balance page see Question 31). The displayed Submission ID can be
used to find these SMS messages in the SMS History (for more information, see Question 14).
Fig. 20f – Sending bulk SMS to Contacts from your Contacts directory
B. Send Bulk SMS by Uploading a .csv or .xls File that Contains only Numbers or Numbers and Names
Click on the second icon (see Figure 21a).
Fig. 21a – Sending bulk SMS by uploading a .csv or .xls file with Contacts
In the next page that will be displayed you are able to choose the type of the file (.csv or.xls) that you would
like to upload (see Figure 21b). Please note that .xlsx files are not supported yet therefore you will not be
able to send bulk SMS by uploading such a file.
Fig. 21b – Sending bulk SMS by uploading a .csv or .xls file with Contacts
When you click on the .csv or on the .xls icon, you have two options for uploading your file. Either you can
‘drag-and-drop’ the file into the area on the left of the page or you can find the file located in your Hard Disk
Drive (HDD) by clicking in the field inside the area on the right (see Figure 21c).
Fig. 21c – Sending bulk SMS by uploading a .csv or .xls file with Contacts
If you upload a .csv file, you have to choose which separator (semi-colon (;) or comma (,)) is used in the file
(see Figure 21d). You have also to define which data the columns of the csv contain (e.g. 1st column contains
the Phone, 2nd column contains the Name). The csv file can have up to 2 columns (Phone and Name) while it
is possible to have one column with the numbers only (Phone).
It is important here to note that the .csv file can contain up to 300.000 Contacts. Files with a number of
Contacts more than that may fail to be uploaded. Furthermore, the .csv file has to be UTF-8 encoded
otherwise any characters in the message texts that do not belong to basic Latin alphabet, will not be
recognized.
Fig. 21d – Sending bulk SMS by uploading a .csv file with Contacts - Defining .csv file structure
After you finish defining the structure of the csv file, you have to click on the Continue button.
If you upload a .xls file, you have to define from which Sheets and Columns the data will be uploaded (e.g.
from the 1st Sheet, Column A contains the Phone, Column B contains the Name etc.) (see Figure 21e). Each
time you define an association (e.g. Sheet 1, Column A for the Phone) you have to click on the "Add
Association" button.
Fig. 21e – Sending bulk SMS by uploading a .xls file with Contacts - Defining .xls file structure
When you define the next association, you will notice that the data selected in the previous association are
not available for selection anymore. For example, in Figure 21f you can see that since the association of the
Phone is already added, there is available only the Name to be associated with Sheets and Columns of the
xls file.
Please note also, that you can associate data from multiple Sheets and Columns of the xls file (e.g. Sheet 1,
Column A for the Phone and Sheet 2, Column A for the Name) for greater flexibility. However, in this case
you have to make sure that the Row Number of all associated data for each record is identical (for example,
if the phone +441234567890 is in Sheet 1, Column A, Row 1 and the mobile owner's name is John Doe and
it is in Sheet2, Column A, it must be also in Row 1 otherwise the mobile number will be associated with the
wrong name or with no name at all).
You can add up to 2 associations (Phone and Name) while it is possible to have only one association with the
numbers only (Phone).
It is important here to note that a .xls file cannot contain more than 65536 rows by its nature (maximum
65536 Contacts) therefore it is impossible to upload more Contacts than that in a single shot using an xls file.
Fig. 21f – Sending bulk SMS by uploading a .xls file with Contacts - Defining .xls file structure
After you finish defining the structure of the xls file, you have to click on the Continue button.
In the next page that will be displayed (see Figure 21g) you can type the SMS text inside the Text Box or you
can choose an SMS template from the available ones by clicking on the "Load Text from Template..." link.
It is possible to create a personalized SMS text that will include the name of each Contact (if there is one) by
typing #fullname# in the text (see Figure 21g). For example, by typing "Hello #fullname#! We have an
interesting offer for you.", the #fullname# will be replaced inside the text with the name of each Contact
and this action will produce SMS messages like "Hello John Doe! We have an interesting offer for you.". In
case that there is no name in a specific Contact, the #fullname# will be replaced by the fallback value
"Sir/Madam" which you can change to something else if you wish (see Figure 21g). Note also that by clicking
on the #fullname# (see Figure 21g) it is automatically inserted in the Text Box so you don't have to type it
when you create your SMS text.
An important thing to note here regarding the SMS details box on the right side of the screen (see Figure
21g), is that the information displayed there is based on the number of characters of the SMS text that you
type in the Text Box including the characters of the replacement tag #fullname# (e.g. "Hello #fullname#! We
have an interesting offer for you."). However, since the replacement tag #fullname# is going to be replaced
by the Contact names in the final SMS messages, each SMS message will have different number of
characters from the number that is indicated in the SMS details box and some of the messages may exceed
the 160 characters limit if the text is too long (in this case they will be delivered as 2 SMS or even more).
When you finish typing your SMS message you can click on the Continue to Final Sending Options button
(see Figure 21g).
Fig. 21g – Sending bulk SMS by uploading a .csv or .xls file with Contacts
In the next page you can see the total number of SMS messages that were created, the number of valid SMS
and the invalid ones as well as the estimated cost (see Figure 21h). It is important here to note that the
actual cost that will be charged to your account balance after the bulk SMS sending, may vary from the one
that you see in this page. This is due to the fact that the estimated cost is calculated based on the prefixes of
the mobile numbers in order to determine the destination network of each SMS and in countries with MNP
(Mobile Number Portability) this is not always correct. In any case, the actual cost of the bulk SMS sending
will be available after the SMS submission in the SMS history.
In this page you can also change the Originator of the SMS (see Figure 21h), set a time and date in the future
for the SMS to be sent if you don't want to send them right now, as well as set the expiration time for your
bulk SMS sending. This feature is very useful when you want to send time-sensitive SMS campaigns where
the SMS must be delivered on time or else not to be delivered at all.
Finally, you can check some random SMS messages in the Random SMS Preview box (see Figure 21h) by
clicking in the box area and if everything is fine, you can click on the Start SMS Submission button to
proceed to the final stage of the bulk SMS sending.
Fig. 21h – Sending bulk SMS by uploading a .csv or .xls file with Contacts
The next page (see Figure 21i) informs you that the bulk SMS sending was successful and provides you with
some options to continue from this point (Start New Bulk SMS Sending, View History, View Statistics and
Add Balance - for setting up the Add Balance page see Question 31). The displayed Submission ID can be
used to find these SMS messages in the SMS History (for more information, see Question 14).
Fig. 21i – Sending bulk SMS by uploading a .csv or .xls file with Contacts
C. Send Bulk SMS by Typing Contacts Line by Line
Click on the third icon (see Figure 22a).
Fig. 22a – Sending bulk SMS by typing Contacts line by line
In the next page that will be displayed (see Figure 22b) you are able to type or copy-paste your Contacts,
one for each line, inside the text area. The Contacts have to be inserted with the format +XXXXXXXXXX,John
Doe and you can't use any comma in full names (ex. John, Doe) because it will be recognized as separator. If,
however, it is necessary to use a comma in a full name, you must include the full name inside quotation
marks " " (ex. "John, Doe").
Fig. 22b – Sending bulk SMS by typing Contacts line by line
If you wish, you are able to add more data except numbers and names (e.g. +999999999999,John Doe,20%)
(see Figure 22b) which you can use in the next stage to create SMS texts personalized to each Contact. The
number of additional columns that you can add is unlimited but keep in mind that too many columns with
data will have an impact on the length of the final SMS text. If the text exceeds the 160 characters limit then
the message will be delivered in 2 or even more SMS messages thus increasing the total cost of the SMS
campaign.
When adding more columns with data you will notice that the number of extra columns is indicated in the
Contact Details box on the right side of the screen (see Figure 22b). In the same box you can also see the
total number of lines, the total number of Contacts and the total number of them with a Full Name. In this
example, the 1 extra column is considered the column that contains the percentages 20% and 35% (see
Figure 22b).
Of course, you can always use just one column with mobile numbers only (one number for each line) and
send the same SMS message to all of them.
It is important here to note that you cannot upload more than 300.000 Contacts with this method. After you
finish typing your Contacts, you have to click on the Continue button (see Figure 22b).
In the next page that will be displayed (see Figure 22c) you can type the SMS text inside the Text Box or you
can choose an SMS template from the available ones by clicking on the "Load Text from Template..." link.
Fig. 22c – Sending bulk SMS by typing Contacts line by line
The SMS text that you will type, can be personalized to each Contact and include the Contact's name (if
there is one) by typing #fullname# in the text (see Figure 22c). If you added an extra column with data in the
previous stage, you can include these data in the final SMS message by typing #extratag0# in the text (see
Figure 22c). For example, by typing "Dear #fullname#, you are entitled a #extratag0# discount on all of our
products", the #fullname# and the #extratag0# will be replaced inside the text with the name of each
Contact and the relevant data from the extra column, and this action will produce SMS messages like "Dear
John Doe, you are entitled a 20% discount on all of our products.".
In case that there is no name in a specific Contact, the #fullname# will be replaced by the fallback value
"Sir/Madam" which you can change to something else if you wish (see Figure 22c). Likewise, if there is no
data in the extra column for a specific Contact, the #extratag0# in our example will be replaced by the
fallback value "10%". Note also that by clicking on the #fullname# and on the #extratag0# (see Figure 22c)
they are automatically inserted in the Text Box so you don't have to type them when you create your SMS
text.
If you added more than one extra columns with data in the previous step, you will see more replacements
tags available in this step (#extratag0#, #extratag1#, #extratag2# etc.) which you can type in your SMS text.
An important thing to note here regarding the SMS details box on the right side of the screen (see Figure
22c), is that the information displayed there is based on the number of characters of the SMS text that you
type in the Text Box including the characters of the replacement tags (e.g. Dear #fullname#, you are entitled
a #extratag0# discount on all of our products...). However, since the replacement tags are going to be
replaced by Contact names and other data in the final SMS messages, each SMS message will have different
number of characters from the number that is indicated in the SMS details box and some of the messages
may exceed the 160 characters limit if the text is too long (in this case they will be delivered as 2 SMS or
even more).
When you finish typing your SMS message you can click on the Continue to Final Sending Options button
(see Figure 22c).
In the next page you can see the total number of SMS messages that were created, the number of valid SMS
and the invalid ones as well as the estimated cost (see Figure 22d). It is important here to note that the
actual cost that will be charged to your account balance after the bulk SMS sending, may vary from the one
that you see in this page. This is due to the fact that the estimated cost is calculated based on the prefixes of
the mobile numbers in order to determine the destination network of each SMS and in countries with MNP
(Mobile Number Portability) this is not always correct. In any case, the actual cost of the bulk SMS sending
will be available after the SMS submission in the SMS history.
In this page you can also change the Originator of the SMS (see Figure 22d), set a time and date in the future
for the SMS to be sent if you don't want to send them right now, as well as set the expiration time for your
bulk SMS sending. This feature is very useful when you want to send time-sensitive SMS campaigns where
the SMS must be delivered on time or else not to be delivered at all.
Finally, you can check some random SMS messages in the Random SMS Preview box (see Figure 22d) by
clicking in the box area and if everything is fine, you can click on the Start SMS Submission button to
proceed to the final stage of the bulk SMS sending.
Fig. 22d – Sending bulk SMS by typing Contacts line by line
The next page (see Figure 22e) informs you that the bulk SMS sending was successful and provides you with
some options to continue from this point (Start New Bulk SMS Sending, View History, View Statistics and
Add Balance - for setting up the Add Balance page see Question 31). The displayed Submission ID can be
used to find these SMS messages in the SMS History (for more information, see Question 14).
Fig. 22e – Sending bulk SMS by typing Contacts line by line
D. Send Bulk SMS by Uploading a .csv or .xls File that Contains Numbers and pre-generated SMS messages
Click on the forth icon (see Figure 23a).
Fig. 23a – Sending bulk SMS by uploading a .csv or .xls file with pre-generated SMS
In the next page that will be displayed you are able to choose the type of the file (.csv or.xls) that you would
like to upload (see Figure 23b). Please note that .xlsx files are not supported yet therefore you will not be
able to send bulk SMS by uploading such a file.
Fig. 23b – Sending bulk SMS by uploading a .csv or .xls file with pre-generated SMS
When you click on the .csv or on the .xls icon, you have two options for uploading your file. Either you can
‘drag-and-drop’ the file into the area on the left of the page or you can find the file located in your Hard Disk
Drive (HDD) by clicking in the field inside the area on the right (see Figure 23c).
Fig. 23c – Sending bulk SMS by uploading a .csv or .xls file with pre-generated SMS
If you upload a .csv file, you have to choose which separator (semi-colon (;) or comma (,)) is used in the file
(see Figure 23d). You have also to define which data the columns of the csv contain (e.g. 1st column contains
the Recipient's Phone, 2nd column contains the SMS Text). The csv file must contain both columns
(Recipient's Phone and SMS Text) otherwise it will not be possible to continue to the next step.
If the pre-generated SMS messages that are contained in your file, are in Unicode format you can check the
"Transform Unicode SMS to Normal SMS if possible" option (see Figure 23d) in order to convert the
Unicode characters of the text to standard Latin alphabet characters so as to be sent as normal SMS (with
160 characters). Please note that this conversion is possible only in certain cases, for example Arabic and
Chinese characters cannot be converted to standard Latin characters.
It is also important to note that the .csv file can contain up to 70.000 SMS pre-generated SMS messages.
Files with a number of SMS messages more than that may fail to be uploaded. Furthermore, the .csv file has
to be UTF-8 encoded otherwise any characters in the message texts that do not belong to basic Latin
alphabet, will not be recognized.
Fig. 23d – Sending bulk SMS by uploading a .csv file with pre-generated SMS - Defining .csv file structure
After you finish defining the structure of the csv file, you have to click on the Continue button.
If you upload a .xls file, you have to define from which Sheets and Columns the data will be uploaded (e.g.
from the 1st Sheet, Column A contains the Recipient's Phone, Column B contains the SMS Text etc.) (see
Figure 23e). Each time you define an association (e.g. Sheet 1, Column A for the Recipient's Phone) you have
to click on the "Add Association" button.
Fig. 23e – Sending bulk SMS by uploading a .xls file with pre-generated SMS - Defining .xls file structure
When you define the next association, you will notice that the data selected in the previous association are
not available for selection anymore. For example, in Figure 23f you can see that since the association of the
Recipient's Phone is already added, there is available only the SMS Text to be associated with Sheets and
Columns of the xls file.
Please note also, that you can associate data from multiple Sheets and Columns of the xls file (e.g. Sheet 1,
Column A for the Recipient's Phone and Sheet 2, Column A for the SMS Text) for greater flexibility.
However, in this case you have to make sure that the Row Number of all associated data for each record is
identical (for example, if the Recipient's phone +441234567890 is in Sheet 1, Column A, Row 1 and the pregenerated SMS text for that specific phone is in Sheet2, Column A, it must be also in Row 1 otherwise the
mobile number will be associated with the wrong SMS text or with no SMS text at all).
You have to add both associations (Recipient's Phone and SMS Text) otherwise it will not be possible to
continue to the next step.
If the pre-generated SMS messages that are contained in your file, are in Unicode format you can check the
"Transform Unicode SMS to Normal SMS if possible" option (see Figure 23f) in order to convert the
Unicode characters of the text to standard Latin alphabet characters so as to be sent as normal SMS (with
160 characters). Please note that this conversion is possible only in certain cases, for example Arabic and
Chinese characters cannot be converted to standard Latin characters.
It is also important to note that a .xls file cannot contain more than 65536 rows by its nature (maximum
65536 pre-generated SMS messages) therefore it is impossible to upload more pre-generated SMS than that
in a single shot using an xls file.
Fig. 23f – Sending bulk SMS by uploading a .xls file with pre-generated SMS - Defining .xls file structure
After you finish defining the structure of the xls file, you have to click on the Continue button.
In the next page you can see the total number of SMS messages that were created, the number of valid SMS
and the invalid ones as well as the estimated cost (see Figure 23g). It is important here to note that the
actual cost that will be charged to your account balance after the bulk SMS sending, may vary from the one
that you see in this page. This is due to the fact that the estimated cost is calculated based on the prefixes of
the mobile numbers in order to determine the destination network of each SMS and in countries with MNP
(Mobile Number Portability) this is not always correct. In any case, the actual cost of the bulk SMS sending
will be available after the SMS submission in the SMS history.
In this page you can also change the Originator of the SMS (see Figure 23g), set a time and date in the future
for the SMS to be sent if you don't want to send them right now, as well as set the expiration time for your
bulk SMS sending. This feature is very useful when you want to send time-sensitive SMS campaigns where
the SMS must be delivered on time or else not to be delivered at all.
Finally, you can check some random SMS messages in the Random SMS Preview box (see Figure 23g) by
clicking in the box area and if everything is fine, you can click on the Start SMS Submission button to
proceed to the final stage of the bulk SMS sending.
Fig. 23g – Sending bulk SMS by uploading a .csv or .xls file with pre-generated SMS
The next page (see Figure 23h) informs you that the bulk SMS sending was successful and provides you with
some options to continue from this point (Start New Bulk SMS Sending, View History, View Statistics and
Add Balance - for setting up the Add Balance page see Question 31). The displayed Submission ID can be
used to find these SMS messages in the SMS History (for more information, see Question 14).
Fig. 23h – Sending bulk SMS by uploading a .csv or .xls file with pre-generated SMS
13. Where can I view the Statistics for my SMS traffic? – Viewing the
Statistics of your account's SMS traffic.
To view the Statistics for your SMS traffic you have to click on the “Statistics” option under the “SMS
service” in the left menu of the page (see Figure 24). In the new page that will be displayed you can view the
Statistics of the SMS traffic that was sent within the specified date period. You can choose to view Statistics
based on the date that the traffic was registered to be sent ("Date Registered" option) -which is very useful
when you schedule future SMS campaigns- or the date that the traffic was actually sent ("Date Sent"
option).
The Statistics that are displayed in this page are of 3 types (see Figure 24):
1. A table with the volumes of the Pending, Sent, Undelivered and Delivered SMS along with the Total Cost
per single day for the given period.
2. A pie chart with % percentages of the Pending, Sent, Undelivered and Delivered SMS.
3. A list with % percentages of the of the Top Destinations that your SMS traffic was sent to.
Fig. 24 – Viewing the Statistics for your SMS traffic
14. Where can I view the SMS History of my account? – Viewing the SMS
History of your account.
To view the SMS History of your account you have to click on the “History” option under the “SMS service”
in the left menu of the page (see Figure 25). In the new page that will be displayed you can view all the SMS
messages that were sent the last one month (Date filter preselected), displayed in groups of 5, 10, 25, 50 or
100 SMS messages per page but you have also the option to use one or more filters in order to view a
specific group of SMS messages.
The filters that you can use are Date, Recipient, Originator, Country, Operator, Delivery Status and
Submission ID. You can choose any of them or all of them, then you have to type in the relevant values in
the fields below and then click on the “Add Filter” button (see Figure 25). For example, for the Date filter
you have to choose between Date Sent or Date Registered and the Range of dates, for the Country filter
you have to choose the Country etc. One of the filters that worth notice is the Submission ID since you can
use this filter to find all the SMS from a specific campaign. The Submission ID is provided to you after you
successfully submit an SMS campaign (or even a single SMS) as described in Question 12.
You can use multiple times the same filter for your search which are combined always with the OR operator.
For example, if you select two times the Country filter (e.g. 1st Country filter Value UK, 2nd Country filter
Value Germany) you will view all the SMS messages that were sent to mobile operators of UK or to mobile
operators of Germany (obviously a message cannot be sent at the same time to a mobile operator of UK and
to a mobile operator of Germany). However, you can use multiple times the Recipient and the Originator
filter and you can combine them by using the AND and OR operators (see Figure 25). For example, if you
select two times the Recipient filter (e.g. 1st Recipient filter Value 4499, 2nd Recipient filter Value 765) and
you want to view all the SMS messages that were sent to recipients mobile phones that contain at the same
time the digits '4499' and the digits '765', then you have to use the AND operator. But if you want to view all
the SMS messages that their recipients contain the digits '4499' or all the SMS messages that their recipients
contain the digits '765', then you have to use the OR operator.
Fig. 25 – Viewing the SMS History of your account
After you select all the filters you want for your search, the SMS messages that match will be displayed with
full information such as Status (Delivered, Undelivered etc.), Mobile Number of Recipient, Originator, Date
Sent etc. (see Figure 25). If you wish, you can download the search results in a .csv or .xls file by clicking on
the relevant link (see Figure 25).
15. Where can I view the Coverage of my bulk SMS service? – Viewing all the
mobile networks that are covered from the bulk SMS service of your
account.
To view the mobile networks that are covered from your bulk SMS service along with the cost per SMS that
you are charged to send to each one of them, you have to click on the “Coverage” option under the “SMS
service” in the left menu of the page (see Figure 26). In the new page that will be displayed you can view the
list with the mobile networks that are currently covered, sorted by country and its international calling code.
In the right column of the page you can view also the cost per SMS that you are currently charged to send to
each one of these networks.
Fig. 26 – Viewing the Coverage of your account
16. Can I receive the DLRs (Delivery Reports) of my SMS messages to my
server and how? – Instructions on how to receive the DLRs of your SMS
messages automatically to your server.
If you send your bulk SMS campaigns through HTTP API then receiving the DLRs directly to your server
immediately as they become available, is certainly something that provides you with certain benefits. In
order to set up automatic DLR forwarding you have first to setup from your side a script in a programming
language that will handle the Delivery Reports that will be sent from our system.
After setting up your script you have to click on the “DLR Forwarding” option under the “SMS service” in the
left menu of the page (see Figure 27). In the new page that will be displayed you have to type a valid URL in
the DLR Forwarding URL field where you will be receiving the DLRs. You need also to type in the Expected
Response field (see Figure 27) the exact response (without using quotes or spaces) that your script will
return to our system each time you receive a DLR. This is a requirement in order to avoid unnecessary
resubmission of DLRs. When you finish, click on the Set DLR Forwarding URL button.
Please note that the DLRs will be sent through HTTP GET Requests to your script and the parameters are the
following: id (the message id), phone (recipient's mobile number), status (DLR status code), date (status
date in UTC time zone), cost (the cost of the SMS) and operatorid (the network operator id). For a complete
list of all the network operators with their respective operatorid values you have to click on the relevant link
at the bottom of the page (see Figure 27).
You can always enable or disable the automatic DLR forwarding by clicking on the desired option in the
Status field on the top of the page (see Figure 27).
Fig. 27 – Setting Up Automatic Receiving of DLRs
17. How can I prevent some mobile numbers from receiving my SMS
messages in the future? – Registering one or more mobile numbers in the
SMS Blocklist.*
*This function may not be available in your account. For more information ask your account manager.
If you want to prevent specific mobile numbers from receiving SMS messages from your account even if they
are in your mobile lists, then you have to register them in the SMS Blocklist. To do that you have to click on
the “SMS Blocklist” option under the “SMS service” in the left menu of the page (see Figure 28a).
Fig. 28a – Adding mobile numbers in the SMS Blocklist
In the new page that will be displayed you can click on the Add recipients to blocklist... button and in the
small window that will pop up you can add one or more mobile numbers (see Figure 28b). After you finish
typing in the mobile numbers you want to exclude from future SMS sending, you can click on the Add
recipients to blocklist... button.
Fig. 28b – Adding mobile numbers in the SMS Blocklist
The numbers are now added in the SMS Blocklist (see Figure 28c). You can delete any mobile number from
the Blocklist by clicking on the "X" at the right side of the page in case you want the number to start
receiving SMS again. If the numbers in the SMS Blocklist are too many and you want to check if a mobile
number is in the list, you can type in the number or a part of it in the Search for blocked recipients field and
then click on Search.
Fig. 28c – Adding mobile numbers in the SMS Blocklist
18. How can I prevent some mobile numbers from receiving SMS from any
of my customers accounts in the future? – Registering one or more mobile
numbers in the Global SMS Blocklist.*
*This function may not be available in your Reseller account. For more information ask your account manager.
If you want to prevent specific mobile numbers from receiving SMS messages from your Reseller account
and all of your customers' accounts, then you have to register them in the Global SMS Blocklist. To do that
you have to click on the “Global SMS Blocklist” option under the “SMS service” in the left menu of the page
(see Figure 29a).
Fig. 29a – Adding mobile numbers in the Global SMS Blocklist
In the new page that will be displayed you can click on the Add recipients to blocklist... button and in the
small window that will pop up you can add one or more mobile numbers (see Figure 29b). After you finish
typing in the mobile numbers you want to exclude from future SMS sending, you can click on the Add
recipients to blocklist... button.
Fig. 29b – Adding mobile numbers in the Global SMS Blocklist
The numbers are now added in the Global SMS Blocklist (see Figure 29c). You can delete any mobile number
from the Blocklist by clicking on the "X" at the right side of the page in case you want the number to start
receiving SMS again. If the numbers in the Global SMS Blocklist are too many and you want to check if a
mobile number is in the list, you can type in the number or a part of it in the Search for blocked recipients
field and then click on Search.
Fig. 29c – Adding mobile numbers in the Global SMS Blocklist
Please note that the Global SMS Blocklist prevents mobile numbers to receive SMS from your Reseller
account and all of the sub-accounts (single user accounts) that you will create. However, if you create a subReseller account (see Question 27 for more information) the Global SMS Blocklist of your Reseller account
does not apply to the SMS that will be sent from this sub-Reseller or the sub-accounts that are created
under it. Each sub-Reseller account you create, is considered an independent Reseller web site with its own
SMS Global Blocklist.
19. How can I set up Generic Profits for my Reseller web site? – Setting up
Generic Profits for specific mobile operators.
Generic Profits and Per-User Profits are rules of charging your customers in order for you to be able to
make the desired profit on the SMS traffic they are sending. It is possible to set up Generic Profits for
specific mobile operators that will apply to ALL user accounts of your Reseller web site that send SMS traffic
to these operators (except those who have a Per-User Profit set for these operators -more information on
Question 20).
To set up Generic Profits for specific mobile networks you have to click on the “Generic Profits” option
under the “SMS service” in the left menu of the page (see Figure 30a).
Fig. 30a – Setting Up Generic Profits for specific mobile operators
In the new page that will be displayed you have to click on the "Add New Profit" button (see Figure 30b).
Note also that the menu on the left side is now accessible only if you click on the small Menu button (see
Figure 30b).
Fig. 30b – Setting Up Generic Profits for specific mobile operators
In the new window that will pop up you can select a specific operator to add a generic profit by clicking on
the Add Selected Operator button or you can select all operators of a specific country by clicking on the Add
ALL Country's Operators button (see Figure 30c). You can clear all the selections and start over by clicking
on the Clear button.
Fig. 30c – Setting Up Generic Profits for specific mobile operators
For example, if you click on the Add Selected Operator button and MTN Afghanistan is the selected
operator, then you will be able to choose one of the three different Profit Types and type in the value you
want in the Value field (see Figure 30d & Figure 30e). For more information on the Profit Types see
Question 21.
Fig. 30d – Setting Up Generic Profits for specific mobile operators - Add Selected Operator
Fig. 30e – Setting Up Generic Profits for specific mobile operators - Add Selected Operator
As you can see in Figure 30e, by typing in the value 30 (with Profit Type Price = Cost + Value% this means
30% profit), the price that this Reseller will charge his customers for sending SMS to MTN Afghanistan, is
0.0058 EUR/SMS since the cost that we charge him is 0.0045 EUR/SMS.
Note also that if you move the mouse pointer over the Price, it will automatically change to the Cost (see
Figure 30f) that we charge for sending SMS to the specific operator (in this case 0.0045 EUR/SMS).
Fig. 30f – Setting Up Generic Profits for specific mobile operators - Displaying the Cost
If you click on the Add ALL Country's Operators button and Afghanistan is the selected country, then you
will be able to choose one of the three different Profit Types and type in the value you want in the Value
field (see Figure 30g & Figure 30h). For more information on the Profit Types see Question 21.
Fig. 30g – Setting Up Generic Profits for specific mobile operators - Add ALL Country's Operators
Fig. 30h – Setting Up Generic Profits for specific mobile operators - Add ALL Country's Operators
As you can see in Figure 30h, by typing in the value 30 (with Profit Type Price = Cost + Value% this means
30% profit), the prices that this Reseller will charge his customers for sending SMS to all mobile operators in
Afghanistan are automatically calculated based on the cost that we charge him (e.g. for Roshan operator he
will charge 0.0143 EUR/SMS since the cost that we charge him is 0.0110 EUR/SMS).
Note also that if you move the mouse pointer over the Prices, they will automatically change to the Costs
(see Figure 30i) that we charge for sending SMS to these specific operators (in this case 0.0110 EUR/SMS).
Fig. 30i – Setting Up Generic Profits for specific mobile operators - Displaying the Cost
When you finish setting Generic Profits, click on the "Add Profit Details" button (see Figure 30h) to add
them into your account.
In the next page that will be displayed you will see all the Generic Profits that you added (see Figure 30j).
You can clear a Generic Profit by clicking on the "X" button on its right side or you can clear all Generic
Profits by clicking on the "Clear All Profits" button (see Figure 30j). If you move the mouse pointer over a
Profit, it will change automatically to the Profit Type selected for this Profit (see Figure 30j) (in this case,
Price = Cost + Value%).
Fig. 30j – Setting Up Generic Profits for specific mobile operators - Displaying the Generic Profits
You can edit a Generic Profit by clicking on it and in the new window that will pop up (see Figure 30k) you
can choose a new Profit Type and a new Value. After you finish, you can click on the Save Profit Details
button and the changes will be saved.
Fig. 30k – Setting Up Generic Profits for specific mobile operators - Editing a Profit
As you add more Generic Profits the list will grow more and more and at some point it might become
difficult to view it, edit it etc. In this case you can use one or more filters to display only the Generic Profits
you want (see Figure 30j). The available filters are Country, Operator and Profit and they work with the
same way that was described for the filters in other pages of the Reseller web site (Contacts - Questions 8,
SMS History - Question 14 etc). For example, if you enable the Country filter and you select Afghanistan as
country, then all Generic Profits that were set for operators of this country will be displayed. Please note
also that only the Country and Profit filters can be combined as the Operator filter by its nature displays
always unique results.
20. How can I set up Per-User Profits for the user accounts of my Reseller
web site? – Setting up Per-User Profits for specific mobile operators.
You can set up Per-User Profits to a user or to a Reseller account to charge the customer when sending SMS
to specific mobile operators. Per-User Profits precede Generic Profits when set to a user account, giving you
greater flexibility on charging the customer with different prices than the Generic ones.
To set up Per-User Profits for specific mobile networks you have to click on the “Per-User Profits” option
under the “SMS service” in the left menu of the page (see Figure 31a).
Fig. 31a – Setting Up Per-User Profits for specific mobile operators
In the new page that will be displayed you have to click on the "Add New Profit" button (see Figure 31b).
Note also that the menu on the left side is now accessible only if you click on the small Menu button (see
Figure 31b).
Fig. 31b – Setting Up Per-User Profits for specific mobile operators
In the new window that will pop up you can click on the User field to select the user account to which you
will set the Per-User Profits (see Figure 31c).
Fig. 31c – Setting Up Per-User Profits for specific mobile operators
A new smaller window will appear (see Figure 31d & Figure 31e) where you type in the email of the user
account or the Full Name (or just a part of these data). If you didn't create any user accounts yet in your
Reseller website then you will not be able to set any Per-User Profits. For more information on how you can
create user accounts see Question 24.
Fig. 31d – Setting Up Per-User Profits for specific mobile operators
After typing the user's email or full name you have to click on the Search Users button and all the user
accounts that match with your entry will be displayed (see Figure 31e). You can select the user account you
want by clicking on the Select button right next to it.
Fig. 31e – Setting Up Per-User Profits for specific mobile operators
Having selected the account, you are back to the previous window where you can select a specific operator
to add a Per-User Profit by clicking on the Add Selected Operator button or you can select all operators of a
specific country by clicking on the Add ALL Country's Operators button (see Figure 31f). You can clear all the
selections and start over by clicking on the Clear button.
Fig. 31f – Setting Up Per-User Profits for specific mobile operators
From that point the process of adding Per-User Profits to the selected account is exactly the same with the
process of adding Generic Profits (see Question 19). When you finish setting the Per-User Profits, click on
the "Add Profit Details" button (see Figure 31f) to add them into your account.
In the next page that will be displayed you will see all the Per-User Profits that you added (see Figure 31g).
You can clear a Per-User Profit by clicking on the "X" button on its right side or you can clear all Per-User
Profits by clicking on the "Clear All Profits" button (see Figure 31g). If you move the mouse pointer over a
Profit, it will change automatically to the Profit Type selected for this Profit (see Figure 31g) (in this case,
Price = Cost + Value).
Note also that all 3 Profit Types have been used to set the Per-User Profits for this account (the first and the
last are Price = Cost + Value%, the second is Price = Cost + Value and the third is Price = Value)
Fig. 31g – Setting Up Per-User Profits for specific mobile operators - Displaying the Per-User Profits
You can edit a Per-User Profit of a user account by clicking on it and in the new window that will pop up (see
Figure 31h) you can choose a new Profit Type and a new Value. After you finish, you can click on the Save
Profit Details button and the changes will be saved.
Fig. 31h – Setting Up Per-User Profits for specific mobile operators - Editing a Profit
As you add more Per-User Profits the list will grow more and more and at some point it might become
difficult to view it, edit it etc. In this case you can use one or more filters to display only the Per-User Profits
you want (see Figure 31g). The available filters are User, Country, Operator and Profit and they work with
the same way that was described for the filters in other pages of the Reseller web site (Contacts - Questions
8, SMS History - Question 14, Generic Profits - Question 19 etc). For example, if you enable the Country
filter and you select Afghanistan as country, then all Per-User Profits that were set for operators of this
country will be displayed. Please note also that the User, Country and Profit filters can be combined
together while the Operator filter can be combined only with the User filter.
21. What are the available Profit Types that I can choose to charge my
customers' accounts? – Describing the Profit Types and their differences.
The 3 Profit Types that are available, are:
A. Price = Cost + Value%
In this profit type you type in the Value you want (e.g. 30) which will be your net profit as a percentage
(30%) of the price we charge you (Cost) to a specific operator. So, if for example the price we charge you to
send SMS to a specific operator is 0.01 EUR/SMS and you type in the value 30, then your net profit is 0.003
EUR/SMS and the final price you charge your customers will be 0.013 EUR/SMS. However, if the price (Cost)
that we charge you, increases to 0.02 EUR/SMS in the future then your net profit will still be 30% but as an
absolute amount in this case will be 0.006 EUR/SMS (and the final price you charge your customers will be
0.026 EUR/SMS).
B. Price = Cost + Value
In this profit type you type in the Value you want (e.g. 0.005) which will be your net profit as a fixed amount
added on the price we charge you (Cost) to a specific operator. So, if for example the price we charge you to
send SMS to a specific operator is 0.01 EUR/SMS and you type in the value 0.005, then your net profit is
0.005 EUR/SMS and the final price you charge your customers will be 0.015 EUR/SMS. Even if the price
(Cost) that we charge you changes in the future, your net profit will always be the fixed amount of 0.005
EUR/SMS.
C. Price = Value
In this profit type you type in the Value you want (e.g. 0.012) which will be the final Price you charge your
customers to send SMS to a specific operator (therefore it must include the price we charge you and any net
profit you want to have). So, if for example the price we charge you to send SMS to a specific operator is
0.01 EUR/SMS and you type in the value 0.012, then this is the final price (0.012 EUR/SMS) that you will
charge your customers (and your net profit in this case will be 0.002 EUR/SMS). It is very important here to
note, that this profit type does not ensure your profit in cases where the price we charge you increases, so
you have to be very careful when you choose this profit type.
22. How can I restrict the destinations where a user account can send SMS
and the originators he is allowed to use? – Instructions on how you can
limit the coverage of a user account from Worldwide to specific mobile
operators and restrict the originator feature.
When you create a user or a sub-Reseller account, they have by default Worldwide coverage and the ability
to choose any originator they want when sending their SMS traffic. However, you can restrict the
destinations where an account can send SMS to only the ones that you have set in the Per-User Profits page
for this specific account (for more information on the topic see Question 20) and the same you can do for
the originators that the account can use.
To restrict the Coverage and the Originators that an account can use, you have to click on the "Per-User
Rules" option under the “SMS service” in the left menu of the page (see Figure 32a). In the new page that
will be displayed you can view a list with all the user and sub-Reseller accounts that you have created so far
along with their Coverage and Originator Types.
To change the coverage of an account you have to click on the Coverage Type of the account (in this
example, the Coverage Type is WORLWIDE - see Figure 32a).
Fig. 32a – Restricting Coverage and Originators of user and sub-Reseller accounts
In the new window that will pop up you can click on the RESTRICTED button and the coverage of the
account will automatically change from worldwide to only the destinations you have set for this account in
the Per-User Profits page (see Figure 32b).
Fig. 32b – Restricting Coverage and Originators of user and sub-Reseller accounts - Editing Coverage
To limit the originators that the account can use you have to click on the Originator Type of the account (in
this example, the Originator Type is FREE - see Figure 32a).
In the new window that will pop up (see Figure 32c) you can click on the MOBILE button to restrict the
originator only to the mobile number that was used when you created the account (see Question 24 for
more information) or you can click on the LIST button to add a list of specific originators that the user will be
allowed to use.
Fig. 32c – Restricting Coverage and Originators of user and sub-Reseller accounts - Editing Coverage
If you click on the LIST button the window will change to the one in Figure 32d, giving you the options to add
as many originators as you wish, deleting some of them (Delete Selected button) or all of them (Clear
button). When you finish, click on the Save Changes button and the user account will be able to use only the
Originators you set when he sends SMS.
Fig. 32d – Restricting Coverage and Originators of user and sub-Reseller accounts - Editing Originator
23. Where is my Reseller control panel? – Accessing the Reseller control
panel.
When you log in your Reseller account, you can access the Reseller control panel by clicking on the
“Administrator Panel” link which is on the left menu of the page (see Figure 33).
Fig. 33 – Reseller Menu
The options that are available under “Administrator Panel” are “User Accounts”, “Reseller Accounts” and
"Options & Policies".
24. How can I create a User Account? – Instructions on how to create a User
Account.
To create a User Account you have to click on the "User Accounts" option in the left menu of the page
under the "Administrator Panel" (see Figure 34a).
Fig. 34a – Creating a User Account
In the new page that will be displayed you have to click on the "Add New User" button (see Figure 34b).
Note also that the menu on the left side is now accessible only if you click on the small Menu button (see
Figure 34b).
Fig. 34b – Creating a User Account
In the new window that will pop up you have to type in the required details in the relevant fields (E-mail, Full
Name, Country and Mobile). Note that the password is predefined by the system but you can change it to
something else if you want to. After filling all fields, in the GENERAL tab you can check the Required User
Confirmations E-mail option if you want the user to confirm his email when he will try to login for the first
time. In the same tab you can also change the default language of the website that the user will view (see
Figure 34c).
Fig. 34c – Creating a User Account
In the SERVICES tab you can select the services that will be available to this user account (see Figure 34d).
Note that in the Figure 34d only the SMS service is available for this Reseller host but there are other
services that may be available for a Reseller host which can be activated to a specific user account.
Fig. 34d – Creating a User Account
In the ALERTS tab you can enable the Low Balance Alert and the Zero Balance Alert for this user account
(see Figure 34e). In the Low Balance Alert you can set the amount of money (Alert Limit) that when reached
the user will be notified by email so he can recharge his balance. The Interval Between Alerts is the time in
seconds that the system will be sending the alert emails to the user. If you enable the Zero Balance Alert
then the user will be also notified as soon as his balance becomes zero.
Fig. 34e – Creating a User Account
In the INITIAL BALANCE tab you can set the initial amount of money that will be credited to the user
account's balance (see Figure 34f). You can set the amount in the currency you are selling to your customers
(in this case it is USD) by typing it into the blue box or you can set it in the currency you are buying (this is
always in EUR) by typing it into the red box. You will notice that while you are typing the amount into one of
the boxes (Selling or Buying currency), the system automatically sets the equivalent amount into the other
box according with the currency exchange rate. After you finish, you can click on the Create User Account
button and the account will be created. For more information on how to change the currency (and the
currency exchange rate) to which you are selling to your customers see Question 30.
Fig. 34f – Creating a User Account
25. How can I edit the details of a User Account or even delete it? –
Modifying or deleting a User Account.
To edit a user account you have to click on the small human icon next to the account, on the right side of the
page. To delete the account you just have to click on the "X" icon (see Figure 35a).
Fig. 35a – Editing/Deleting a User Account
If you click on the human icon to edit the account, in the new window that will pop up you will be able to
edit any detail you wish. When you finish you can click on the "Save Account Changes" button (see Figure
35b).
Fig. 35b – Editing/Deleting a User Account
26. How can I add or remove an amount from the balance of a User
Account? – Adding or Removing amounts from an account balance.
To add or remove an amount from the balance of a user account you have to click on the money icon next to
the account, on the right side of the page (see Figure 36a).
Fig. 36a – Adding/Removing Amounts from an Account Balance
In the new window that will pop up you can click on the Add Balance (+) or Remove Balance (-) buttons and
then you have to type into the blue box the amount of money in the currency you are selling to your
customers (in this case it is USD) or you can type it in the currency you are buying (this is always in EUR) into
the red box. You will notice that while you are typing the amount into one of the boxes (Selling or Buying
currency), the system automatically sets the equivalent amount into the other box according with the
currency exchange rate. After you finish, you can click on the Update Balance button and the amount will
be added or removed according to your choice (see Figure 36b). For more information on how to change the
currency (and the currency exchange rate) to which you are selling to your customers see Question 30.
Fig. 36b – Adding/Removing Amounts from an Account Balance
27. How can I create a Reseller Account? – Instructions on how to create a
Reseller Account.
To create a Reseller Account you have to click on the "Reseller Accounts" option in the left menu of the
page under the "Administrator Panel" (see Figure 37a).
Fig. 37a – Creating a Reseller Account
In the new page that will be displayed you have to click on the "Add New Reseller" button (see Figure 37b).
Note also that the menu on the left side is now accessible only if you click on the small Menu button (see
Figure 37b).
Fig. 37b – Creating a Reseller Account
In the new window that will pop up you have to type in the domain or the sub-domain name of the new
Reseller website in the formats mydomain.tld or myhost.mydomain.tld (e.g. sms.example.com). Note that
you have to make sure that you have already pointed your domain or sub-domain name to the IP address
78.46.210.185, otherwise you will not be able to continue (for more information on how to do that, see
Question 2). After typing the domain or sub-domain of the new Reseller website you can click on the
CONTINUE button (see Figure 37c).
Fig. 37c – Creating a Reseller Account
In the next window under the WEB SITE tab, you can configure the new Reseller website by changing the
settings in the GENERAL, FINANCIAL, SERVICES and POLICIES tabs (see Figure 37d). You can also change the
name of the Reseller website in the Site Name field which appears in the "Welcome" message in the home
page of the website (e.g. if you change the Site Name to SUPER DEMO SMS the "Welcome to
demo3000.sms-providers.com" will become "Welcome to SUPER DEMO SMS"). Please note that you cannot
change the Site Host field in this step (the value of the Site Host field is the domain or the sub-domain that
you entered in the previous step). Under the GENERAL tab you can choose how many languages will be
available in the Reseller website and which of them will be the default one (see Figure 37d).
Fig. 37d – Creating a Reseller Account - Choosing Languages
Under the FINANCIAL tab you can set the Currency and the Default Profit Type with which the Reseller
website will operate (see Figure 37e). For setting the Currency you have to type in the Currency Name (e.g.
US Dollar), the Symbol/Code (e.g. USD) and the Exchange Rate between the currency of your Reseller
website and the currency of the new Reseller website that you have just created (e.g. if you enter the value
of 1.37 it will mean that 1 currency unit of your Reseller website equals to 1.37 USD which in this example is
the currency of the new Reseller website).
If you want the new Reseller website to have the same currency with your Reseller website then you have to
click on the Inherit Buying Currency link (see Figure 37e). This will set the same currency to the new website
and the exchange rate to 1 (for more information on setting the currency and the currency exchange rate
see Question 30).
For setting the Default Profit Type you have to choose one of the three different Profit Types from the
drop-down Profit Type field and type in the value you wish in the Value field (see Figure 37e). For more
information on the Profit Types see Question 21.
Fig. 37e – Creating a Reseller Account - Setting the Currency and the Default Profit Type
Under the SERVICES tab you can choose which from the available Services will be activated in the Reseller
website (see Figure 37f). Please note that some of the services you see in Figure 37f may not be available in
your account. For more information ask your account manager.
Fig. 37f – Creating a Reseller Account - Activating the Services
Under the POLICIES tab you can choose whether a user will be able to register himself when visiting the new
Reseller website. If the User Registration option remains unchecked then the only one who will be able to
create user accounts will be the Reseller (see Figure 37g). In the same window you can choose also whether
a new user will be asked to confirm his email and/or his mobile number when he logins for the first time to
his account and what initial balance he will have available for testing purposes. Please note that if you check
the "Confirm by SMS if available" option then you have to set a Registration/Startup Balance otherwise the
SMS with the confirmation code will not be sent by the system. Finally, you can choose the restrictions the
user may have on the Originator of the SMS messages he sends (see Figure 37g).
Fig. 37g – Creating a Reseller Account - Setting the Policies
By clicking on the ADMINISTRATOR tab, you can change all the settings that are related to the administrator
account (Reseller account) of the new Reseller website. The tabs that are contained here are the GENERAL,
ALERTS and INITIAL BALANCE (see Figure 37h). In the same window you have also to type in the required
details in the relevant fields (E-mail, Full Name, Country and Mobile Number of the administrator account).
Note that the password is predefined by the system but you can change it to something else if you want to.
After filling all fields, in the GENERAL tab you can check the Required User Confirmations E-mail option if
you want the administrator to confirm his email when he will try to login for the first time. In the same tab
you can also change the default language of the Reseller website that the administrator will view (see Figure
37h).
Fig. 37h – Creating a Reseller Account - Creating the Administrator
In the ALERTS tab you can enable the Low Balance Alert and the Zero Balance Alert for the administrator
account (see Figure 37i). In the Low Balance Alert you can set the amount of money (Alert Limit) that when
reached the administrator will be notified by email so he can recharge his balance. The Interval Between
Alerts is the time in seconds that the system will be sending the alert emails to the administrator. If you
enable the Zero Balance Alert then the administrator will be also notified as soon as his balance becomes
zero.
Fig. 37i – Creating a Reseller Account - Creating the Administrator
In the INITIAL BALANCE tab you can set the initial amount of money that will be credited to the
administrator account's balance (see Figure 37j). You can set the amount in the currency you are selling to
your customers (in this case it is USD) by typing it into the blue box or you can set it in the currency you are
buying (this is always in EUR) by typing it into the red box. You will notice that while you are typing the
amount into one of the boxes (Selling or Buying currency), the system automatically sets the equivalent
amount into the other box according with the currency exchange rate. After you finish, you can click on the
Create Reseller Account button and the new Reseller account will be created. For more information on how
to change the currency (and the currency exchange rate) to which you are selling to your customers see
Question 30.
Fig. 37j – Creating a Reseller Account - Creating the Administrator
28. How can I edit the details of a Reseller Account or even delete it? –
Modifying or deleting a Reseller Account.
To edit a Reseller account you have to click on the small human icon next to the account, on the right side of
the page. To delete the Reseller account you just have to click on the "X" icon (see Figure 38).
Fig. 38 – Editing/Deleting a Reseller Account
If you click on the human icon to edit the account, in the new window that will pop up you will be able to
edit any detail you wish. When you finish you can click on the "Save Reseller Account" button.
29. How can I add or remove an amount from the balance of a Reseller
Account? – Adding or Removing amounts from a Reseller account balance.
To add or remove an amount from the balance of a Reseller account you have to click on the money icon
next to the account, on the right side of the page (see Figure 39a).
Fig. 39a – Adding/Removing Amounts from a Reseller Account Balance
In the new window that will pop up you can click on the Add Balance (+) or Remove Balance (-) buttons and
then you have to type into the blue box the amount of money in the currency you are selling to your
customers (in this case it is USD) or you can type it in the currency you are buying (this is always in EUR) into
the red box. You will notice that while you are typing the amount into one of the boxes (Selling or Buying
currency), the system automatically sets the equivalent amount into the other box according with the
currency exchange rate. After you finish, you can click on the Update Balance button and the amount will
be added or removed according to your choice (see Figure 39b). For more information on how to change the
currency (and the currency exchange rate) to which you are selling to your customers see Question 30.
Fig. 39b – Adding/Removing Amounts from a Reseller Account Balance
30. How can I change the currency to which I sell SMS to my customers? –
Changing the currency of your Reseller web site.
To change the currency of your Reseller web site (i.e. the currency that your customers see in their balance)
you have to click on the "Options & Policies" option in the left menu of the page under the "Administrator
Panel" (see Figure 40a). In the new page that will be displayed you have to click on the Financial and then
on the Currency options (see Figure 40a).
Fig. 40a – Changing Currency
In this page (see Figure 40b) you have to type in the Currency Name (e.g. US Dollar), the Symbol/Code (e.g.
USD) and the Exchange Rate (e.g. 1.37, meaning that 1 EUR equals to 1.37 USD). After you type in all these
details you will see at the bottom of the page the equivalence between EUR (the currency to which you are
buying) and the new currency which will be applied to your Reseller website (currency to which you sell to
your customers).
Fig. 40b – Changing Currency
Note that the exchange rate that you will type in, must be something close to the current exchange rate that
is used in the global currency market as it will affect all the Generic and Per-User Profits that you may set
into your Reseller website (for more information on setting up Generic and Per-User Profits see Questions
19, 20 and 21).
To find out what is the current exchange rate in the global currency market between EUR and the currency
you sell to your customers, a good suggestion would be to check the website www.xe.com. There you will
find the current exchange rate between EUR and the currency you sell but it might be better to use the
average exchange rate of the last 6 months (or any other time frame you wish). To see the average
exchange rate of the last week, last month, 1 year etc. you have to click on the View Chart icon or you can
move the pointer at the bottom of the chart and pick the time frame you wish. You can find the average
exchange rate by adding the low and the high exchange rates and divide the outcome by 2 (IMPORTANT:
The rates that you will find in www.xe.com, are neither "buy" nor "sell" rates. Instead, they are mid-market
rates derived from the mid-point between the "buy" and "sell" rates from global currency markets.). Of
course you can use any other currency website you wish.
DISCLAIMER: We neither endorse or support the use of www.xe.com and we do not have any legal
relationship or co-operation with the company to which this website belongs to. We merely provide you
here with an example for your convenience as to where you can find more information on the exchange
rates between the currencies. You are solely responsible for the Currency Name, the Symbol/Code and the
Exchange Rate that you will set in your Reseller web site.
If you want to use EUR as currency you sell (for example, if you are selling to customers in European union
countries with EUR as currency), then you have to click on the Inherit Buying Currency link (see Figure 37b).
This will set the EUR as currency of your website and the exchange rate to 1 (1 EUR = 1 EUR). After you
finish, you can click on the Save Changes button (see Figure 40b).
31. How can I customize my Reseller Web Site? – Customizing the template
of your Reseller web site, uploading your own logo and other changes.
Our Reseller platform is very flexible and provides many tools which you can use to change the website
templates, upload your own logo, add pages etc. To make these changes you have to click on the
"Customize Web Site" option in the left menu of the page (see Figure 41a). The options that are available
under "Customize Web Site" are Appearance Editor, Site Logo Editor and Custom Pages. Please note that
you need technical knowledge (HTML/CSS) to make any changes to website templates, especially when
using Appearance Editor.
APPEARANCE EDITOR
By clicking on the Appearance Editor you are able to change the code in the TEMPLATES, VIEWS and
STYLESHEETS tabs (see Figure 41a).
IMPORTANT: Before you make any changes to the code in the tabs, it is highly recommended to save the
code in a separate file in order to be able to restore it if your changes produce any unnecessary results.
Fig. 41a – Customizing Reseller Web Site - Appearance Editor
TEMPLATES tab
Any change you make to the code in the TEMPLATES tab, will affect the website's template which is the area
that surrounds the central window of the Reseller website. For example, if we add the attribute
'bgcolor=#1384ff' inside the <body> tag and we type also the message 'This is a TEST!' exactly after it (see
Figure 41b), we will get the result that you can see in Figure 41c.
Note that every time you change the code, in order for the changes to take place you have to click on the
Save button as indicated also by the message 'Modified Click Save to keep changes.' that is displayed on the
top right corner (see Figure 41b).
Fig. 41b – Customizing Reseller Web Site - Appearance Editor
Fig. 41c – Customizing Reseller Web Site - Appearance Editor
As you can see in Figure 38c, the attribute 'bgcolor=#1384ff' changed the background color from white to
light blue only in the area that surrounds the central window (this is exactly the area that is affected when
you make changes to the TEMPLATES tab). Also, the message 'This is a TEST!' is displayed on the top left
corner of the screen.
VIEWS tab
The VIEWS tab contains 3 different page codes, the home.html, the main_authenticated.html and the
main_unauthenticated.html. Any change you make to any of these codes, will affect the central window of
the Reseller website that is displayed on the corresponded page (e.g. if you change the home.html, the
change will affect only the central window of the home page).
For example, if we add the attribute ' style="background-color:#35ff42" ' inside the first <div> tag of the
home.html and we type also the message 'This is a TEST!' exactly after it (see Figure 41d), we will get the
result that you can see in Figure 41e.
Fig. 41d – Customizing Reseller Web Site - Appearance Editor
Fig. 41e – Customizing Reseller Web Site - Appearance Editor
As you can see in the Figure 41e, the attribute ' style="background-color:#35ff42" ' changed the
background color from light grey to green inside the central window. Also, the message 'This is a TEST!' is
displayed inside the central window on its top left corner.
STYLESHEETS tab
The STYLESHEETS tab contains CSS code which you can modify in order to change the look and the
formatting of the pages written in HTML code. By modifying the CSS contained in the STYLESHEETS tab you
can achieve great results, creating beautiful layouts that are limited only by your imagination.
For example, if we change the hex number #F0F0F0 to #DA70D6 at the background attribute in .content as
shown in Figure 41f, we will get the result that you can see in Figure 41g.
Fig. 41f – Customizing Reseller Web Site - Appearance Editor
Fig. 41g – Customizing Reseller Web Site - Appearance Editor
As you can see in Figure 41g, the hexadecimal number #DA70D6 in the background attribute changed the
background color from light grey to light purple inside the central window.
SITE LOGO EDITOR
In the Site Logo Editor page you are able to upload your logo by clicking inside the field or by clicking on the
Browse button next to it (see Figure 41h). In the small window that will pop up you can find the file located
in your Hard Disk Drive (HDD) and select it.
Fig. 41h – Customizing Reseller Web Site - Site Logo Editor
By clicking on the Upload Logo button the logo file will be uploaded as you can see in Figure 41i. If for some
reason you want to change the logo with another one, you can click on the "[Delete logo]" link to delete it
and then upload the new one. In order to place the logo on the home page of the web site, you have to type
the command ' {{ site.logo }} ' in the Appearance Editor following the instructions given on the top of the
page (see Figure 41i).
Fig. 41i – Customizing Reseller Web Site - Site Logo Editor
For example, if we type the ' {{ site.logo }} ' command followed by a ' <br> ' in the TEMPLATES tab in the
Appearance Editor, exactly as it is shown in Figure 41j, and we click on the Save button then we will get the
result that you can see in the Figure 41k.
Fig. 41j – Customizing Reseller Web Site - Placing the Logo in the Home Page
Fig. 41k – Customizing Reseller Web Site - Placing the Logo in the Home Page
CUSTOM PAGES
In the Custom Pages section you are able to create custom pages with your own content written in one or
more languages (see Figure 41h). However, it is very important here to note that custom pages are
accessible only from links that you will place in the HTML code of the pages in the Appearance Editor
(meaning, you cannot access custom pages from the web site menus because no link can be placed there).
The only exceptions to this rule are the pages "Add Balance" and "Terms" which can be accessed from the
menus as well as other locations of the web site and for which there are Aliases already created (Smart
Aliases add_balance and terms respectively) (see Figure 41h).
Fig. 41l – Customizing Reseller Web Site - Creating Custom Pages
The first thing that you have to do in order to create a custom page, is to type in the Alias field the alias to
which the custom page will be associated with (see Figure 41l). The characters that you can use for the alias
are only Latin characters and _ (underscore character). Spaces, punctuation marks or other special
characters are not allowed. Some examples of valid aliases are: about_us, ProductsAndServices, contact_us
etc.
When you type the alias in the Alias field, you will notice that the URL path of the custom page is formulated
just below the Alias field (see Figure 41l). This URL is the one that you will use to place links inside the code
of the pages in the Appearance Editor which will lead to your custom page.
After you type in the alias, you can type in the title of the custom page in the Title field (this title will be
displayed on the top of the custom page and will serve also as HTML title of the page) (see Figure 41l). In the
Text Box Editor you can type the content of the custom page and you can also add images, links or even
embed your own HTML code by using the control buttons in the menu bar at the top of the Text Box Editor.
After you finish, you have to click on the Save Custom Page button in order to save the custom page (see
Figure 41l).
It is important to note that if you want the custom page to be available in other languages except English,
after you create it you have to click on the icon of the language you want and start typing the content again
in that language (see Figure 41l). With this way you can have the same custom page translated in the other 6
languages of the web site (French, Greek, Portuguese, Romanian, Spanish and Turkish) under the same alias
(the system will automatically display the custom page with the right content for a specific language after
the user chooses that language).
Below are 2 examples of creating custom pages, one with the predefined smart alias add_balance and one
with a totally new alias (contact_us).
ADD BALANCE Custom Page
1. First we have to type the alias add_balance in the Alias field (see Figure 41m). The URL
http://demo100.sms-providers.com/page/add_balance is automatically formulated just below the Alias
field.
2. Then we type Add Balance in the Title field (see Figure 41m) or any other title we find suitable for our
custom page.
3. We type the content of the custom page in the text box and we edit the text with the text control buttons
(see Figure 38m).
4. If we want to add links in the content we have to mark with our mouse the exact text that we want to
make it a link and then we have to click on the relevant control button in the menu bar. After we type in the
URL and title of the link, we have to choose if we want the link to open in the current window or in a new
one and then we have to click on the Submit Query button (see Figure 41m). For example, the email
[email protected] can be converted to link if we type as URL the
mailto:[email protected] (so when someone clicks on it, it will immediately open a
window of his favorite email client, e.g. Microsoft Outlook, Mozilla Thunderbird etc.). To make the phrase
'Send Single SMS' a link, all we have to type as URL is /sms/sendsingle.php and so on.
5. If we want to remove a link, either we have to delete the text or we can put the mouse cursor on the text
and then click on the relevant control button in the menu bar (see Figure 41m).
6. If we want to edit the HTML code of the custom page or if we want to add ready HTML code in it, we have
to click on the HTML control button (see Figure 41m). After we finish, we have to click on the Submit Query
button.
7. When we finish typing and editing the content of the custom page, we have to click on the Save Custom
Page button in order to save the custom page.
Fig. 41m – Customizing Reseller Web Site - Creating 'Add Balance' Custom Page
We can view the custom page we just created by calling the URL in our browser. The result will be
something like the page in Figure 41n.
Fig. 41n – Customizing Reseller Web Site - Accessing 'Add Balance' Custom Page
The add_balance custom page that we just created, is also accessible from the Add Balance option which is
available after you successfully send one single SMS or a bulk SMS sending as you can see in Figure 41o
below (see also Questions 11 & 12, Figures 19c, 20f, 21i, 22e and 23h)
Fig. 41o – Customizing Reseller Web Site - Accessing 'Add Balance' Custom Page
CONTACT US Custom Page
1. Assuming that we have already created the Add Balance custom page of the previous example, the
Custom Pages page has now the add_balance alias preloaded and the content of the Add Balance page is
displayed in the Text Box Editor. So, in order to create the new custom page we have first to choose the
[New Custom Page] option from the Custom Page field or alternatively we can click on the "Add New"
button (see Figure 41p). Then we have to type the alias contact_us in the Alias field (see Figure 41p). The
URL http://demo100.sms-providers.com/page/contact_us is automatically formulated just below the Alias
field.
2. We type Contact Us in the Title field (see Figure 41p) or any other title we find suitable for our custom
page.
3. We type the content of the custom page in the text box and we edit the text with the text control buttons
(see Figure 41p). We can add/remove links or edit the HTML code of the custom page content exactly as
described in the previous example.
4. When we finish typing and editing the content of the custom page, we have to click on the Save Custom
Page button in order to save the custom page.
Fig. 41p – Customizing Reseller Web Site - Creating 'Contact Us' Custom Page
5. If we want to create the same page in another language (e.g. French) all we have to do is to click on the
relevant button and start typing again the content of the custom page in French (see Figure 41q).
6. When we finish typing and editing the content, we have to click again on the Save Custom Page button
and the custom page will be available in French language also.
Fig. 41q – Customizing Reseller Web Site - Creating 'Contact Us' Custom Page in French
Now that we created our custom pages, we can put links to them in the HTML code of the pages in
Appearance Editor. For example, we can click on Appearance Editor, then on the Views tab and in the
main_authenticated.html page we can insert the HTML code that is shown in Figure 41r. After we click on
the Save button and refresh the page, we should see the links displayed on the top of the page (see Figure
41s). Note that, since the changes were done in the HTML code of the main_authenticated.html page, the
links will be visible in all pages of the Reseller web site after the user is logged in.
IMPORTANT: After saving any changes in the HTML code, you have to always click on the Refresh button of
your web browser in order to see the results.
Fig. 41r – Customizing Reseller Web Site - Inserting HTML code to show links to the Custom Pages
Fig. 41s – Customizing Reseller Web Site - The links to the Custom Pages are now displayed