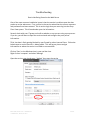
1
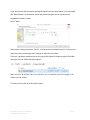
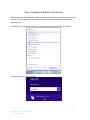
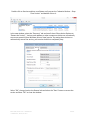
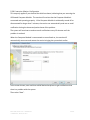
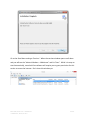
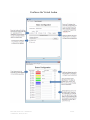
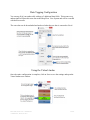
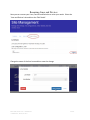
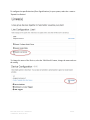
User Manual v.1-2 2015 9-1-15 Full manual can be found online at: www.industrialandons.com/webmanual.pdf Phone: (866) 290-7551 Fax: 1-866-880-4155 172 Mallard CV, Austin, TX 78737 1 of 64 Contents Declaration of Conformity ........................................................................................................ 4 Information to the User for a Class A Digital Device .............................................................. 5 System Overview ...................................................................................................................... 6 Standard Components ............................................................................................................... 7 Set Up- Physical System ......................................................................................................... 11 System Use and Error Signal (YELLOW light flashing) ....................................................... 12 DIP Address Settings .............................................................................................................. 13 Database Set Up and Use ........................................................................................................ 14 Logging in for the first time: (site or corporate admin) .......................................................... 14 Setting up the service .............................................................................................................. 15 Open, Configure and Restart the Service ............................................................................... 21 USB Cable Based Computer Module ..................................................................................... 26 Changing System Configuration Settings ................................................................................ 27 Industrial Andons WiFi Board Configuration ........................................................................ 28 Setting up the Virtual Andon .................................................................................................. 34 Configure the Virtual Andon .................................................................................................. 36 Data Tagging Configuration ................................................................................................... 37 Using the Virtual Andon ......................................................................................................... 37 Renaming Your Site Name ..................................................................................................... 38 Shifts ....................................................................................................................................... 39 Adding New Users .................................................................................................................. 40 Renaming Lines and Devices.................................................................................................. 41 Phone: (866) 290-7551 Fax: 1-866-880-4155 172 Mallard CV, Austin, TX 78737 2 of 64 Report Required and Notifications (email and text) ............................................................... 45 Web Monitor ........................................................................................................................... 48 Viewing Web Monitor Full Screen in Kiosk Mode ................................................................ 51 Estimated vs. Actual Feature .................................................................................................. 52 OEE Triggers .......................................................................................................................... 55 Problem Matrix ....................................................................................................................... 56 Entering Incident Reports ....................................................................................................... 59 Line Summary..................................................................................................................... 61 Station Summary................................................................................................................. 61 Incident Reports .................................................................................................................. 61 All Occurrences .................................................................................................................. 62 Export Raw Data ..................................................................................................................... 62 Troubleshooting ...................................................................................................................... 63 Data is Not Being Passed to the Web Server ...................................................................... 63 Phone: (866) 290-7551 Fax: 1-866-880-4155 172 Mallard CV, Austin, TX 78737 3 of 64 Declaration of Conformity Trade Name: Model Number: Compliance Test Report Number: Compliance Test Report Date: Responsible Party (in USA) Address: Andon Communication System IA201 B31001A1, B31001A2 April 2006 Industrial Andons LLC 172 Mallard Cove, Austin, TX 78737-4556 This equipment has been tested and found to comply with the limits for a Class B digital device, pursuant to Part 15 of the FCC rules. These limits are designed to provide reasonable protection against harmful interference in a residential installation. This equipment generates, uses, and can radiate radio frequency energy and, if not installed and used in accordance with the instructions, may cause harmful interference to radio communications. However, there is no guarantee that interference will not occur in a particular installation. If the unit does cause harmful interference to radio or television reception, please refer to your user’s manual for instruction on correcting the problem. I the undersigned, hereby declare that the equipment specified above conforms to the above requirements. Place: Hays County Date: October 2011 Signature: Robert Wilson Owner Industrial Andons Phone: (866) 290-7551 Fax: 1-866-880-4155 172 Mallard CV, Austin, TX 78737 4 of 64 Information to the User for a Class A Digital Device WARNING: This equipment has been tested and found to comply with the limits for Class A digital device pursuant to Part 15 of the FCC Rules. These limits are designed to provide reasonable protection against harmful interference when the equipment is operated in a commercial environment. This equipment generates, uses, and can radiate radio frequency energy and, if not installed and used in accordance with the instruction’s manual, may cause interference to radio communications. Operation of this equipment in a residential area is likely to cause interference in which case the user will be required to correct the interference at his own expense. The user is cautioned that changes and modifications made to the equipment without approval of the manufacturer could void the user’s authority to operate this equipment. Warranty Industrial Andons, LLC offers a 90-day full parts and labor warranty on all workmanship issues. The warranty does not cover abuse, neglect or improper use or installation. Defective components must be shipped back to Industrial Andons, LLC for evaluation. Industrial Andons, LLC maintains the right to decide whether defective components will be replaced, repaired in part or repaired in whole. Should you have a question with you system after the 90 days, please contact us for support. We will support and service our product after purchase. Phone: (866) 290-7551 Fax: 1-866-880-4155 172 Mallard CV, Austin, TX 78737 5 of 64 System Overview The below two diagrams show an overview of all the standard components in a system and how they communicate to one another. You do not have to have all the components and may have a custom system that is different than shown below. Phone: (866) 290-7551 Fax: 1-866-880-4155 172 Mallard CV, Austin, TX 78737 6 of 64 Standard Components Wireless Stack Light with Keyfob Control (Upgradable to Wifi Floor Signal Station) The WLRX is a standalone remote controlled stack light that is placed at or near the workstation. 4 light LED stack light (Red, Amber, Green, Blue) Lights are remotely controlled by wireless keyfob Keyfob remote control has 4 sets of On/Off buttons for turning on and off each light and has a range of ~75 feet allowing increased flexibility between light mounting location and team member location Keyfobs have a belt clip on back or can easily be secured to a pole or other location Unit can identify and track 2 unique keyfobs Multiple keyfobs can be set identically for multiple users to turn lights on and off Standard power cord for connection to a 110 vac outlet Includes L-Bracket for mounting Units are approximately 24” in overall length Optional Alarm can be added to any single light Units are upgradeable to WIFI for future data collection needs or to communicate with wifi based Plant Signal Unit -Requires the purchase of wifi board for each light, this enables the individual light to be viewed via the companies intranet -Expanded data collection and notification capabilities requires the Shop Floor View Resource Control System Units are customizable, call to discuss Phone: (866) 290-7551 Fax: 1-866-880-4155 172 Mallard CV, Austin, TX 78737 7 of 64 Floor Signal Station- FSS: (Proprietary Wireless) A four light LED stack light (Red, Amber, Green, Blue) Switch box(FSS-SB) or Keyfob(FSS-KF) input Switch box on a 6 meter cordset has four colored pushbutton switches for turning on the lights and actuating the andon system plus one momentary switch for cancelling the tone on the Plant Signal Unit (PSU) Keyfob remote control has 4 sets of On/Off buttons for turning on and off each light and has a range of ~75 feet Keyfobs have a belt clip on back or can easily be secured to a pole or other location 2 sets of inputs for each light. Default input turns lights on solid, second input turns on flashing. If two inputs are used and both on (switch box and/or keyfob), lights will flash twice as fast for added visual control Additional switch boxes(SB1) or keyfobs(KFob) can be added Additional tapped and plugged holes for easily adding receptacles and switch boxes or other switches, sensors, timers etc… 7 additional inputs (contact closure activated) that can be used to send data to the Shop Floor Viewer for collection and analysis Floor Signal Station can be mounted to any ½” pipe nipple or optional tripod stand for quick set up Standard grounded power cord for connection to a 110 vac outlet Units can be used with Plant Signal Units Units are customizable, call to discuss Phone: (866) 290-7551 Fax: 1-866-880-4155 172 Mallard CV, Austin, TX 78737 8 of 64 Plant Signal Unit-PSU: (Proprietary PSU-P and Wifi PSU-W versions) PSU aggregates signals from up to 15 Floor Signal Stations-FSS’s that are assigned to the same line. Anytime a new light is turned on, the tone module will begin to play the single line melody until all lights are turned off or a ‘tone cancel’ signal is received from a FSS Four flashing LED lights color matched to the four colors on the FSS’s One 105 db horn style tone modules with 32 selectable melodies Standard grounded power cord for connection to a 110v a/c outlet One Plant Signal Unit can control up to 15 Worker Signal Stations Up to 15 Plant Signal Units can exist in one rf environment Optional Multi-tone PSU (PSU-Multi) has a louder 119db horn and has a Compact Flash Card that allows customers to select and change the melodies played. Unit can also be configured to play different melodies depending on which FSS sent the signal or other logic, call to discuss options Phone: (866) 290-7551 Fax: 1-866-880-4155 172 Mallard CV, Austin, TX 78737 9 of 64 Shop Floor View, Resource Control System Computer Module and Software All wireless systems can add this option in the future with no changes to the existing equipment! The Shop Floor View software is a web based subscription service. The service can be easily accessed from any computer with an internet connection. The computer module is the physical component which monitors a wireless environment and collects all signals from the various andon systems in the environment and sends a record of all signals to the software in the attached computer (computer to be supplied by customer) The software allows you to send out different email messages tied to each andon light per Floor Signal Station. You can also tie automation into the andon lights or utilize up to 7 more discrete inputs not tied to lights. You can count operations, time operations automatically. Tag specific switches so that a problem report is required when the switch is turned on. Run reports and use pivot tables to analyze the data You can also view the current status of all andon lights via the internet and display this information on large screen displays Phone: (866) 290-7551 Fax: 1-866-880-4155 172 Mallard CV, Austin, TX 78737 10 of 64 Set Up- Physical System 1. Carefully remove the tripod stands (if purchased) and set them up. You do not have to use the stands. The Worker Signal Stations can be mounted directly to equipment using a standard ½” pipe nipple attached to a pipe flange. 2. Remove the Floor Signal Station. 3. Attach Floor Signal Station to the tripod stand using the ½” pipe nipple and the ½” female pipe thread. 4. Place the Floor Signal Station and cut the zip ties holding the wires bundled together. You are now ready to place the Floor Signal Station and start using the system. 5. All components with your andon system are already coded to work as one complete system. However, you can mix components with other Industrial Andons, LLC, andon systems. The following page shows the structure for the dip switches. 6. You are now ready to prepare the Plant Signal Unit. Before hanging the unit you will want to set the volume. With the horn style tone generator you change the volume by removing the screws and opening the cover on the top of the horn. The cover has been labeled “Volume”. Gently turn the dial inside for the desired volume 7. You can also change the melody. To change the melody, please refer to the Patlite Tone Module owner’s manual, which is included with your Industrial Andons Owner’s Manual. 8. You are now ready to hang your Plant Signal Unit and position your Floor Signal Stations and start using your system. Phone: (866) 290-7551 Fax: 1-866-880-4155 172 Mallard CV, Austin, TX 78737 11 of 64 System Use and Error Signal (YELLOW light flashing) To use your system make sure all components have their antenna securely installed and that all components are turned on. At the Floor Signal Stations, turn on the desired toggle switch and the corresponding light on the Floor Signal stack light will turn on. Almost immediately, the matching strobe light and tone module on the Plant Signal Unit will turn on. If you want the lights to stay on but the melody to stop, press the momentary button on the switch box. This will activate the “Tone Cancellation” feature. The tone will remain off until a new signal comes in. The “Tone Cancellation” can be initiated from any Floor Signal Station coded to the same line. Your andon system uses transceivers to communicate between the Floor Signal Stations and the Plant Signal Unit. This means that when a switch is turned on at the Floor Signal Station, it starts sending out its message once every second until it receives a confirmation signal back from the Plant Signal Unit that it received its message. If the Floor Signal Station doesn‟t get a confirmation signal in about 10 seconds, it will shut down and the Yellow light will begin flashing. If this occurs, you will have to turn the Floor Signal Station off and then back on to reset the unit. If this occurs, make sure that the Plant Signal Unit is turned on and set to the same line code as the Floor Signal Station. If this is correct, then you may need to move the Floor Signal Station or Plant Signal Unit to a better location to improve communications. Phone: (866) 290-7551 Fax: 1-866-880-4155 172 Mallard CV, Austin, TX 78737 12 of 64 DIP Address Settings All of your physical devices are set using DIP switches. These are factory set based on the information provided to Industrial Andons, LLC when the system was ordered so it should not be necessary to change these settings in the beginning. However, things change. So if there is a need to change units around, use the below chart to change the settings. Phone: (866) 290-7551 Fax: 1-866-880-4155 172 Mallard CV, Austin, TX 78737 13 of 64 Database Set Up and Use Logging in for the first time: (site or corporate admin) Goto: https://www.ShopFloorView.com and login with the Username and Password provided by Industrial Andons, llc. You will now see the Home Page. Phone: (866) 290-7551 Fax: 1-866-880-4155 172 Mallard CV, Austin, TX 78737 14 of 64 First, select the “Site Management” button and select the “Configuration” tab below the header. Setting up the service A “service” is a small program that runs in the background and once configured does not require any input from the user. In order to use the Shop Floor View system you have to install “Industrial Andons” service on a computer. This service manages the secure passing of data from the local physical or virtual andon system up to the web servers. Scroll down till you see the section labeled “Data Collector”. Phone: (866) 290-7551 Fax: 1-866-880-4155 172 Mallard CV, Austin, TX 78737 15 of 64 Load FTDI Drivers FTDI Drivers: If you are using the USB based computer module. When you plug the device into your computer, the computer should automatically install the device and give you a message that your device has been installed and is ready to use. If the computer says that it cannot find the device drivers, you can download them here by following the link provided. Next select Download next to the “Data Collection Service” row, to install the service which will pass the data from the physical devices to the website. Save and extract the files just downloaded Phone: (866) 290-7551 Fax: 1-866-880-4155 172 Mallard CV, Austin, TX 78737 16 of 64 Right click the “setup.exe” file and select it to run as admin. Even if you are an admin on the computer this will help keep the computer from locking the program folder as ‘read only’. Run the “setup.exe” file. Select “Next” Confirm the location and select “Next”. So that the service can run whether you are logged in or not, you may want to select “Everyone” at the bottom left. Phone: (866) 290-7551 Fax: 1-866-880-4155 172 Mallard CV, Austin, TX 78737 17 of 64 On some operating systems the ‘Configuration Wizard’ will open automatically. If it does not you will either need to goto your Start Menu and find the “Industrial Andons” folder and run the Configuration Wizard or in Windows 8 find the application on your splash screen. Right click program and ‘Run as Administrator’; this is different from running a program while logged in as an Administrator. Determine which boxes you need to check. 1. If you are using the web based system to capture data select the first box. 2. If you are using the wifi based Floor Signal Stations and wifi based Plant Signal Units (all devices have to be configured on your wifi network), select the second box. You can use all together in which case you will select both boxes. 3. The third option is if you are using the USB based computer module. In other words, the computer module plugs directly into your computer via USB cable. If you are you will need to select this box. Phone: (866) 290-7551 Fax: 1-866-880-4155 172 Mallard CV, Austin, TX 78737 18 of 64 Go back to the Webpage and enter the Username shown and then display the password (under Options) and enter it next to the Username. If you are using a proxy server, check the box and fill in the data. Otherwise, just hit “Next” You now need to enter the IP addresses for your wifi based Plant Signal Units or other wifi devices that you want to relay the signal to for each line and or unit. Be sure to ask your IT group for the IP address of each device when it is configured on your network. For physical andon devices leave the default port setting to 123. If you are using the Andon App on an Android device, change the port setting to 8001 and select “Mobile” from the Type drop down. Phone: (866) 290-7551 Fax: 1-866-880-4155 172 Mallard CV, Austin, TX 78737 19 of 64 If you have issues with the device getting the signal from the relay feature, you can enable the “Relay Repeat” at the bottom and it will resend the signal out to the device the designated number of times. Select “Next”. Review your settings and select “Finish”. You have now installed the service. Now you can open the service and change some settings to make it more robust. If there is a problem restarting the service, go to the Industrial Andons program file folder and right click the folder and select options. Make sure the “Read Only” box is not checked. If it is, uncheck it and select apply to all folders and sub folders. Go back and rerun the Wizard in admin mode. Phone: (866) 290-7551 Fax: 1-866-880-4155 172 Mallard CV, Austin, TX 78737 20 of 64 Open, Configure and Restart the Service Different versions of windows have different ways to find the list of services running on the computer. It can typically be accessed by going to the Device Manager and then under Administration. In Windows 7 you can type “services” in the start search tab and it will pop up there. In Windows 8, search for “services” Phone: (866) 290-7551 Fax: 1-866-880-4155 172 Mallard CV, Austin, TX 78737 21 of 64 Double click on Services and then scroll down until you see the “Industrial Andons – Shop Floor Service” and double click on it. In the new window, select the “Recovery” tab and set all three Failure Action Options to “Restart the Service”. Various push updates or other computer activities can occasionally stop a non essential (from Windows point of view) service. By setting these choices to automatically restart the service, your service should not completely stop. Select “OK”, then go back to the General tab and select the “Start” button to restart the service and then “OK” to close the window. Phone: (866) 290-7551 Fax: 1-866-880-4155 172 Mallard CV, Austin, TX 78737 22 of 64 USB Connection Monitor Configuration This step only applies if you checked the third box above; indicating that you are using the USB based Computer Module. The service will monitor that the Computer Module is connected and operating properly. If the Computer Module is accidentally turned off or disconnected for longer than 2 minutes, the service can automatically send out an email notification letting the interested parties know of the problem. The system will continue to send out email notifications every 10 minutes until the problem is resolved. When the Computer Module is reconnected or turned back on, the service will automatically reconnect and restart the service bringing the system back online. In the screen shown, enter and then add all desired recipients to get notifications that there is a problem with the system. Then select “Next”. Phone: (866) 290-7551 Fax: 1-866-880-4155 172 Mallard CV, Austin, TX 78737 23 of 64 You will then see the final page with shows a summary of the selected settings. Depending on your antivirus and firewall settings, you may get a pop up to enable the service to function properly. Phone: (866) 290-7551 Fax: 1-866-880-4155 172 Mallard CV, Austin, TX 78737 24 of 64 Go to the Start Menu and type ‘Services’. When the services window opens scroll down and you will see the “Industrial Andons – WebAccess” and hit “Start”. While it is setup to start Automatically, some AntiVirus software will require you to grant permission for this service to access the internet. Don’t close this window yet. Phone: (866) 290-7551 Fax: 1-866-880-4155 172 Mallard CV, Austin, TX 78737 25 of 64 USB Cable Based Computer Module Turn on your Computer Module and plug the USB cable into your computer. Your computer should automatically install the device drivers. Go back and hit ‘Restart’ on the service one more time. Now test that data is being passed up to the Shop Floor View system. Turn on a switch (light) on the system. Then click on your site name in the upper left corner and then select “View details” under Live Data. You should see some entries on the page like this Phone: (866) 290-7551 Fax: 1-866-880-4155 172 Mallard CV, Austin, TX 78737 26 of 64 Changing System Configuration Settings If you need to make changes to the configuration settings; like adding a new wifi device or changing an email on the list of recipients. Go to the Start or Windows icon, select ‘All Programs’ and find the Industrial Andons folder. Then Right Click on the “Configuration Wizard”, select properties and then the “Run this program as an administrator” under the “Compatibility” tab. You will then step through all of the setup screens and you can make any necessary changes. Phone: (866) 290-7551 Fax: 1-866-880-4155 172 Mallard CV, Austin, TX 78737 27 of 64 Industrial Andons WiFi Board Configuration Overview: You can watch a video on configuring the wifi boards by going here: www.industrialandons.com/wifi/wifi.mp4 The WiFi board connects to the andon controller board via a serial link. The WiFi board receives data from the controller board and relays it over a WiFi link. The signal is sent to the IP address of the computer/server that is running the “Industrial Andons Service”. The Industrial Andons Service should be installed first before configuring the WiFi board because you will need the IP address of the computer/server running the Industrial Andons Service. The WiFi board also generates web pages that can be viewed with any standard web browser. The web pages show the status of the four andon lamps, and are also used to configure the WiFi board. The wifi board is a 2.4GHz 802.11g low power module that connects at 56mb/sec and uses 40mhz channel width. Board Specifications The wifi board is a 2.4GHz 802.11g low power module that connects at up to 56mb/sec and uses 40mhz channel width. Resetting the Board Press small gold reset button here During the set up process, if you ever have to start over you can reset the wifi board to its original configuration. 1. Press the small gold reset button attached to SW1 Phone: (866) 290-7551 Fax: 1-866-880-4155 172 Mallard CV, Austin, TX 78737 28 of 64 2. With the button pressed connect the power and the Red LED should come on solid for 5-10 seconds and then flicker and a blue LED will also light up. 3. Release the button, turn unit off and back on. Unit is now reset Initial Configuration: The WiFi board is delivered from the factory with certain default settings. • On power up the board will attempt to connect to an “ad-hoc” WiFi network with the SSID set to “IAxxxxxxxxxxxx” where “xxxxxxxxxxxx” is replaced by the MAC address of the wireless chip, without the colons. So if the MAC address is 00:1E:C2:00:22:98, the initial SSID will be “IA001EC2002298”. This guarantees that if several boards are powered up in WiFi range of each other, they won’t conflict because each one has a unique SSID. • To connect to the board to configure it, open the wireless network on your pc, click on “search for available wireless networks”, and click on the SSID of the board you want to configure. • By default the boards use an IP address of 192.168.123.123. To finish connecting to the board, set your PC’s network address to 192.168.123.100, and your netmask to 255.255.255.0. Then open a browser window, and enter http://192.168.123.123 in the address field. • You should see a web page like Figure 1 Phone: (866) 290-7551 Fax: 1-866-880-4155 172 Mallard CV, Austin, TX 78737 29 of 64 Figure 1 – Overview Page • Once the board is operating with the andon controller the status of the lamp stack will be shown here. If any of the lamps are lighted the corresponding colored boxes will be filled in on this page. The boxes will be clear if the corresponding lamp is not lighted. When there is a change in state, you will need to hit refresh on your web browser to see the change. • The box to the right of the lamp stack image shows the last command the board received from the andon controller board. It is used for debugging. • Click on the “Network Configuration” Tab. Figure 2 will appear Phone: (866) 290-7551 Fax: 1-866-880-4155 172 Mallard CV, Austin, TX 78737 30 of 64 Figure 2 Configuration Page • The first thing you must do is enter the ip address of the computer/server running the Industrial Andons Service and leave the Target Port set to 8000 and press the “Save Config” button Phone: (866) 290-7551 Fax: 1-866-880-4155 172 Mallard CV, Austin, TX 78737 31 of 64 Once the page refreshes, scroll to the next box down and fill in the appropriate data for your network. • Select a suitable hostname. • If you have a central DHCP server check that box. If not, select an IP address that is within the network you intend to use. You must also set the gateway address, the subnet mask, and the DNS server addresses. • Set the SSID to the ID of the network you intend to use. If you have a central wireless access point select the “Infrastructure” mode. If not, select “ad-hoc”. Note: this board and the relay or database server device must use the same SSID. If you only have a few WiFi boards in the current installation it doesn’t matter which mode you use. If you have more than a few, it is better to set up a wireless access point, or “WAP”. Otherwise all the boards in the installation have to process every message, even ones that are not addressed to them. • There are eleven possible WiFi channels available, numbered 1-11. In most cases the defaults shown will work fine. If you have many many Phone: (866) 290-7551 Fax: 1-866-880-4155 172 Mallard CV, Austin, TX 78737 32 of 64 WiFi boards in range of each other, it might be better to have some boards use different channels. • Select no security, WEP security, or WPA. If you select WEP or WPA you have to enter keys or a passphrase. Every device on this SSID has to use the same values in order to connect to the network. • CLICK ON “Save Config”. At this point the device will no longer be connected to the computer via the ad hoc connection as it is trying to connect to the network and should be viewable on your list of connected network devices. See “Red LED status for connection status” Red LED Light Flashing The Red LED on the WiFi board indicates the connectivity of the board as follows: Solid LED: ad-hoc mode or ad-hoc transitioning to infrastructure Fast blink: infrastructure connected (on for about 1/2 second, off for about 1/2 second) No LED: infrastructure was connected, but now lost Slow blink: infrastructure connection failed, retrying Phone: (866) 290-7551 Fax: 1-866-880-4155 172 Mallard CV, Austin, TX 78737 33 of 64 Setting up the Virtual Andon The virtual andon system is a computer based andon system. You can install the program on a computer, then you can turn on lights (virtual and physical) and pass data to the Shop Floor View system just like the physical andon units. 1. Download the zip file from the IAWebaccess site or provided by Industrial Andons. 2. Unzip the folder and then run the “setup.exe” file. Be sure to first right click and “Run as Administrator” 3. Select “Install” Phone: (866) 290-7551 Fax: 1-866-880-4155 172 Mallard CV, Austin, TX 78737 34 of 64 4. Select “Config” If you get an error opening or saving your configuration settings, you will need to find the “Industrial Andons” folder under your program files (C:\Program Files (x86)). Then right click on the “Industrial Andons” folder, select “properties” and make sure the folder is not “Read Only”. Uncheck and hit “Apply” Phone: (866) 290-7551 Fax: 1-866-880-4155 172 Mallard CV, Austin, TX 78737 35 of 64 Configure the Virtual Andon Phone: (866) 290-7551 Fax: 1-866-880-4155 172 Mallard CV, Austin, TX 78737 36 of 64 Data Tagging Configuration You can tag all of your andon calls with up to 5 additional data fields. This means every andon signal will pass this extra data to the Shop Floor View System and will be recorded with that occurrence. The extra data can be downloaded and analyzed when the raw data is exported to Excel. Using the Virtual Andon Once the entire configuration is complete, click on Save to save the settings and open the Virtual Andon user window. Phone: (866) 290-7551 Fax: 1-866-880-4155 172 Mallard CV, Austin, TX 78737 37 of 64 Renaming Your Site Name It’s now time to configure the Shop Floor View system so that it is Labeled to fit your site. Goto ‘Site Management’ / ‘Configuration’ and click on ‘Edit Details’ to the right, under ‘Basic Details’. Phone: (866) 290-7551 Fax: 1-866-880-4155 172 Mallard CV, Austin, TX 78737 38 of 64 Shifts The system has a default “All Day, Every Day” shift. This should be left intact so that no matter what hours end up being worked, they system will capture the data. However, you can add additional shifts to the system as necessary. The system can handle swing or crew shifts as well where people work different hours on different days. It is important to have all shifts in the system as you can assign users to a shift. When a user is assigned to a specific shift, they will not receive notifications from the system when it is not during their shift. Phone: (866) 290-7551 Fax: 1-866-880-4155 172 Mallard CV, Austin, TX 78737 39 of 64 Adding New Users Click on the “Users” tab from the “Site Administration” screen Select ‘Add User’ and fill in the required data. The email entered here is what the system will use to send out notifications. If you want a text message to be sent, enter the proper email to text format for your cell carrier here. You must assign users to a shift in order to receive notifications. The system will only send them notifications during their assigned shift times. This is so they do not get notifications when they are not at work. If they need to get notifications all the time, assign them to the “All Day, Every Day Shift”. Phone: (866) 290-7551 Fax: 1-866-880-4155 172 Mallard CV, Austin, TX 78737 40 of 64 Renaming Lines and Devices Now you can rename your Lines, Devices and Switches to suite your needs. Select the ‘Lines and Devices’ tab and then the ‘Edit Details’ Change the name of the Line here and then save the change. Phone: (866) 290-7551 Fax: 1-866-880-4155 172 Mallard CV, Austin, TX 78737 41 of 64 To configure the specific devices (Floor Signal Stations) in your system, select the + next to ‘Expand Line Devices’ To change the name of the Device, select the ‘Edit Details’ button, change the name and save the setting Phone: (866) 290-7551 Fax: 1-866-880-4155 172 Mallard CV, Austin, TX 78737 42 of 64 Next, expand out the ‘Device Switches’ by clicking on the + next to ‘Device Switches’. There are two switch inputs for each color light. On a standard system with one switch box, the device will use the first of each of the inputs. The system is also configured with a default label with tokens that will auto populate and display on the web monitor. For example, if this was Line 5, Unit 6 and the Yellow light (switch #3) was turned on, the Label would read: “Yellow 5-6-3”. Using tokens and a coding system is an easy way to convey a lot of information quickly and to ensure the system records all occurrences uniquely. Phone: (866) 290-7551 Fax: 1-866-880-4155 172 Mallard CV, Austin, TX 78737 43 of 64 To change the name of a switch select ‘User Actions’ and ‘Edit’. Then change the name accordingly. You can also turn a switch off if you do not want the system to anything with data coming in from that switch. If you want the Web Monitor to play a sound when a new signal comes in from this switch, you can select the desired ‘Audio Alert’ from the choices shown. NOTICE: Depending on your browser, you might get an error the first time a signal comes in and it tries to play the sound. Once you allow it, your browser will play all melodies without issue for as long as the window stays open and active. Phone: (866) 290-7551 Fax: 1-866-880-4155 172 Mallard CV, Austin, TX 78737 44 of 64 Report Required and Notifications (email and text) You can now go all the way down to the Switch resolution to set up various notifications. Under ‘User Actions’, select ‘Notifications’ If you are planning on filing reports against andon calls you will need to turn the ‘Trigger’, ‘On’ under ‘Incident Reporting’. This will place every occurrence in a special queue where users can go in and enter reasons and a description as to what the problem was. Phone: (866) 290-7551 Fax: 1-866-880-4155 172 Mallard CV, Austin, TX 78737 45 of 64 On Timer Change This sends out email messages based off how long the switch has been on. You can add multiple alerts sent out at different time intervals. You can use the token [TIME] in the subject line that will automatically fill in how long the light has been on. On State Change This sends out a notification as soon as the switch hits the desired state (turn on, off, or both). Phone: (866) 290-7551 Fax: 1-866-880-4155 172 Mallard CV, Austin, TX 78737 46 of 64 On Counter Change This notification is sent based off the number of times a switch is turned on. This can be used as an electronic kanban signal. This is often used on switches not tied to turning a light on and can be used with an added limit switch. Phone: (866) 290-7551 Fax: 1-866-880-4155 172 Mallard CV, Austin, TX 78737 47 of 64 Web Monitor Now it’s time to set up the Web Monitor. Go to ‘Monitor Views’ tab and you can either edit an existing view or create a new view. Select ‘Edit Details’ to change the name of the view and to turn ‘On or Off’ the Zone Column (Label for the rows in the monitor). The ‘Large Scale’ feature should be used for views with more than 50 devices. This view will put the standard label in the boxes but will then only show the color of what light is on and not the time or switch labels. This improves responsiveness of views when there are many devices in the view. Phone: (866) 290-7551 Fax: 1-866-880-4155 172 Mallard CV, Austin, TX 78737 48 of 64 Click on ‘Expand / Collapse Assigned Devices’ to add or edit devices assigned to a view. To add a new device, select ‘Assign New Device’. The Alias blank is what shows up in the block as the label when no light is on. You can use tokens to pull the label in or type it it. Once complete, click on the name of the view to open the link to the view. Phone: (866) 290-7551 Fax: 1-866-880-4155 172 Mallard CV, Austin, TX 78737 49 of 64 This will open the view you just created and will show any lights that are on in the system. The fonts and grid will resize to the shape of the window. Phone: (866) 290-7551 Fax: 1-866-880-4155 172 Mallard CV, Austin, TX 78737 50 of 64 Viewing Web Monitor Full Screen in Kiosk Mode Kiosk mode is when Internet Explorer runs and none of the taskbars, title bars, or menus are displayed. This gives you a clean TV type view of the content and not a web page feel of the content. Kiosk mode is similar to Full Screen Mode except that Kiosk Mode locks the window making it more difficult for users to close or change the view. How to configure a shortcut for kiosk mode: 1. Open the Industrial Andons Web Monitor view that you want to create the shortcut to open 2. Copy the address in the tool bar 3. Right click on the desktop and select New > Shortcut 4. Type in the following into the window, but don’t hit ‘Next’ yet: "C:\Program Files\Internet Explorer\iexplore.exe" -k –nohome 5. Now put in one space after nohome above and paste in the monitor web address 6. Select ‘Next’ and the shortcut will be created on the desktop 7. The shortcut should open on the active screen, so if you want it to open on a secondary monitor, place the shortcut on that screen and make sure it is the active monitor when opening the link 8. To exit Kiosk Mode hit CTRL + W You can also always run the Web Monitor in Full Screen Mode. To enable this view, open the Web Monitor and place the window in the monitor where you want it displayed. Hit function F11. Phone: (866) 290-7551 Fax: 1-866-880-4155 172 Mallard CV, Austin, TX 78737 51 of 64 Estimated vs. Actual Feature With this feature you can add an estimated vs. actual field to a specific Floor Signal Station (FSS) cell in the web monitor. To add a trigger goto the ‘Lines and Devices’ tab on the Site Management page. Expand the Devices for the line you want to add as the trigger, expand the ‘Estimated vs. Actual Triggers’ and select ‘Add Trigger’. Name the Estimated vs Actual trigger and then select which switch will provide the count to the system, this is what will index the ‘Actual’ count. Enter the Estimated number to be completed during a shift and the actual amount currently or leave blank. Next select whether you need tracking by time or shift. By time is for projects with lead times longer than 1 shift. Typically it will be tracked by shift and you will need to select the shift this applies to. Phone: (866) 290-7551 Fax: 1-866-880-4155 172 Mallard CV, Austin, TX 78737 52 of 64 Finally, select whether you want the value shown in the cell on the web monitor or not. The Shop Floor View system will then calculate the takt rate based off the shift selected and the available time (subtracting out the non value added times from the shift). It will then determine what the current number completed should be. If the OEE feature is also being used on this device. The two values will toggle back and forth at the bottom of the cell. Phone: (866) 290-7551 Fax: 1-866-880-4155 172 Mallard CV, Austin, TX 78737 53 of 64 Phone: (866) 290-7551 Fax: 1-866-880-4155 172 Mallard CV, Austin, TX 78737 54 of 64 OEE Triggers This feature can calculate the current OEE of a workstation based off the assumption that when certain switches are on, the station is not performing at all or at full capacity. If this is integrated with a piece of equipment, the calculation will potentially be more accurate. Select ‘OEE Triggers’ under the desired device and then ‘Add Trigger’ Give the trigger a name and select the shift to use. The system needs a shift so that it can calculate the total available time in which to base 100% OEE. Then select which switches will impact OEE and by how much. In this example, when the Red light is on, the station is stopped 100%. However, when the Amber light is on, they are still working at 50%. Then decide whether you want the value displayed in the cell on the web monitor. Phone: (866) 290-7551 Fax: 1-866-880-4155 172 Mallard CV, Austin, TX 78737 55 of 64 Problem Matrix You can create a 3 tiered, hierarchical matrix by which you can categorize and record problems. This is used in the ‘Incident Reporting’ if it was enabled under the ‘Notifications’ portion of each switch. Then turn the selection under “Incident Reporting” to On for the desired switch. All future andon calls on this switch will now create an incident report under the “Incident Reports” section of the website. Different areas have different problems depending on the process, equipment, materials or other conditions. Therefore, each line can have a different Incident Matrix. To set up the matrix, go to the Lines and Devices tab on the Site Management page and go to the Line level and expand the ‘Expand Incident Matrix’ Phone: (866) 290-7551 Fax: 1-866-880-4155 172 Mallard CV, Austin, TX 78737 56 of 64 Phone: (866) 290-7551 Fax: 1-866-880-4155 172 Mallard CV, Austin, TX 78737 57 of 64 First create your top level Root Items. Select the item and rename it. Then you can use the ‘Create’ button to add up to two sub levels. In the example below you see that the top level has been designated by groups like Maintenance, Material Handling, Production and Quality. Under those groups you get greater level of detail for categorizing the issues. Once the full matrix has been created, it can be saved as a template and applied to other lines. You can also use the template as a starting point for the other lines and then customize as necessary. Phone: (866) 290-7551 Fax: 1-866-880-4155 172 Mallard CV, Austin, TX 78737 58 of 64 Entering Incident Reports NOTICE: When you enter a problem report, or start and save a report, you MUST enter something in all three Tiers and the Brief Description box in order to save or save and close a report. Select ‘Incident Reports’ from the top of the page. This will open the page that shows all open reports that are waiting for a report to be filed against the occurrence. Select ‘User Actions’ and ‘Edit’ for the desired occurrence. Now based off the line the occurrence happened on, the appropriate Incident Matrix will be loaded onto the screen. Select the appropriate categories and then a ‘Brief’ and ‘Full’ description can be added. The ‘Brief Description’ and problem categories will be shown on the Shift Report. If the report is complete, select ‘Save & Close’. If more information needs added later or by someone else, select ‘Save Only’ and the report can be reopened later. Phone: (866) 290-7551 Fax: 1-866-880-4155 172 Mallard CV, Austin, TX 78737 59 of 64 Running Reports-Shift Summary The Shift Summary Report is the standard report designed to give an overview of the performance of a Line for a shift or period of time. Select the “Reporting” tab from the top of the Shop Floor View screen. Select the Shift, Date Range and Line that you want to see data for. If you select the “All Day, Every Day” shift, this will show data for the entire day for the chosen line and not just a specific shift. Next you can choose to see data for all switches or filter out information you don’t want to see that might skew the charts (if the green light is on when all others are off, you may want to turn off the green switches). To turn off a switch, uncheck the box next to the switch. Phone: (866) 290-7551 Fax: 1-866-880-4155 172 Mallard CV, Austin, TX 78737 60 of 64 Line Summary The “Line Summaries” option will give an overall aggregation of the data from all devices on the line so that you can see in total the Occurrences and Duration of all calls from all devices. The Extended Switches selection is should only be turned on if you have times that lights will be on for periods longer than a shift (ie you have a change over that lasts for 3 days). Station Summary The “Station Summary” will give a similar overview as the “Line Summary” but only shows the andon calls related to the specific device. Incident Reports If you use the “Incident Matrix” and file problem reports against your andon calls this will show the occurrences with the basic information filed against the call. Phone: (866) 290-7551 Fax: 1-866-880-4155 172 Mallard CV, Austin, TX 78737 61 of 64 All Occurrences “All Occurrences” will show every andon call for the selected switches for the shift selected. Export Raw Data Exporting the Raw Data is a way for you to access the full raw data in the system so that you can do your own analysis and drop the data into your own templates. You can either download the excel file or email it by selecting some recipients before hitting the “Create Report” button. Phone: (866) 290-7551 Fax: 1-866-880-4155 172 Mallard CV, Austin, TX 78737 62 of 64 Troubleshooting Data is Not Being Passed to the Web Server One of the most common installation issues is that the service is unable to pass the data packet up to the web server. First, confirm in the service wizard that the correct username and password have been entered. This is not the login that you use to log into the Shop Floor View system. This is found under your site information. Second, check with your IT group and confirm whether or not you are using a proxy server. If you are, you will want to open the service wizard and configure the proxy server information. Third, the data is likely getting blocked by your firewall or other internet filters. Follow the below steps to run the service in –debug mode. This will log any issues and get information on where the service is not able to communicate. Click on ‘Start’ or the Windows icon in your tool bar then Right click on ‘computer’ and select ‘Manage’ Open the service, stop it and enter “–debug” then start the service Phone: (866) 290-7551 Fax: 1-866-880-4155 172 Mallard CV, Austin, TX 78737 63 of 64 Go to Event Viewer, Windows Logs and Application Clear the current log and then flip a switch and refresh the view Click on each log to see the status of the actions If data is being passed, you should see information like above. Before exiting, go back and restart the service which will take it out of debug mode making the system run better. Phone: (866) 290-7551 Fax: 1-866-880-4155 172 Mallard CV, Austin, TX 78737 64 of 64