1
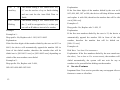
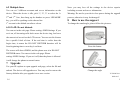
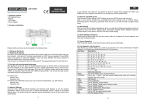
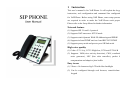
1
Instruction
This user’s manual is for VoIP Phone. It will explain the keypad
instruction, web configuration and command line configuration
for VoIP Phone. Before using VoIP Phone, some setup processes
are required in order to make the VoIP Phone work properly.
Please refer to the Setup Menu for further information.
Network feature
(1) Supports SIP 2.0 and 1.0 protocol
(2) Supports NAT transverse: STUN mode
(3) Supports static/dynamic WAN-IP-Addressing and PPPOE
(4) Supports in-band DTMF and out- band RFC2833 DTMF
(5) Supports proxy mode and peer-to-peer SIP link mode
High voice quality
(1) Codec: G.711 A/µ, G.723.1High/low, G.726 and G.729A/B
(2) Supports: VAD(voice activity detection), CNG( comfortable
noise generator), LEC (line echo canceller), packet loss
compensation and adaptive jitter buffer.
Easy to use
(1) 2 lines x 16 characters big LCD with blue backlight
(2) Can be configured through web browser, console/telnet or
keypad
1
(3) Can upgrade firmware through HTTP, FTP or TFTP
3
(4) Call function: call hold, call waiting, call forward, caller ID
3.1 Installation View
Installation
and 3-way conference.
(5) Phone function: volume adjustment, speed dial, phone book,
flash and speaker phone
(6) 2 RJ45 LAN port: one for internet and one for PC
Note: Only the module SIP-T9CMP supports the POE feature.
Package contains
(1) One SIP-T9CM
(2) One universal power adaptor
(3) One Ethernet cable
2
IP Type
(1) Fixed IP client: Set network IP address manually.
(2) DHCP client: Set network IP address DHCP.
(3) PPPoE client: Set network IP address PPPoE.
Please install your terminal as the connection chart above.
4
Ready to use
4.1 Get the IP
First of all, you should obtain the IP address of the terminal. After
you connect the phone with your local network, it will get IP
address automatically by DHCP (server assigned). Press MENU
button and up/down to select the ‘Network’ menu and press
ENTER, then press up/down to select the Status menu, then press
ENTER.
You will see L for LAN port IP and W for WAN port IP. The
default LAN port IP is 192.168.123.1.
2
3
4.2 Use the web based programming page
network uses static IP, you should set local IP, subnet mask,
After getting correct IP, open an Internet Explorer browser on the
gateway IP, DNS1 and DNS2 first. If your network uses PPPoE,
PC which is connected with the same network as the terminal
you should set PPP password first
(Please ask your network administrator how to set your PC), then
4.4 Set time and SNTP server
input the IP address in the Web page. At the end of IP address,
Click the menu Phone Setting->SNTP Settings to set your SNTP
please add the port number “:9999”, for example:
server and time zone.
http://192.168.123.1:9999 and press Enter. You will see the login
Note: If your service provider has pre-programmed some settings
screen. The default account and password are
such as Primary Server, Secondary Server, Time Zone, Synchronic
For admin user:
Time, and so on, you will not need to program these items.
Account: admin
4.5 SIP Settings
Password: admin
After you have the IP setting completed as above, you should set
For normal user: (With this account you can not set some
following parameters which are required to log in SIP
parameters, e.g. SIP domain)
Server: Display Name, User Name, Register Name, Register
Account: user
Password, Domain Server, Proxy Server, SIP Port, RTP Port,
Password:user
DTMF setting.
4.3 Network Settings
4.6 Save Settings and Reboot
Click the menu Network->WAN Settings and Network->LAN
Simply chick the Save button and quit the browser after Configure
Settings to set the network parameters. Please consult your ISP or
OK screen appears, and then click Reboot button.
network administrator about it.
4.7 Normal Operation
DHCP is default network type. Your terminal will get the required
After the terminal reboots, it will show the time and the account
network parameters such as IP, subnet mask automatically. If your
information.
4
5
4.8 Use Keypad to set this device
FWD
Call forward
!Note: Before you set SIP Setting, you need to get authority in the
CONF
3-way conference
menu Administrator->System Authority. You should input admin’s
ENTER
password here.
DEL
HOLD
This is “ENTER”, accept setting
This is “Delete”, Delete word or phone
number
This is “HOLD” function
CONTACTS
This is “CONTACTS”,Phone Book
FLASH
This is “FLASH” function
RD
This is “RD” the same number again
SPK
This the Speaker Phone
The input keys:
Key Name
Description
1
“1”, “-“, “٫”, “!”, “?”
2
“2”, “a”, “b”, “c”, “A”, “B”, “C”
3
“3”, “d”, “e”, ”f”, “D”, “E”, “F”
4
“4”, “g”, “h”, “I”, “G”, “H”, “I”
5
“5”, “j”, “k”, “l”, “J”, “K”, “L”
6
“6”, “m”, “n”, “o”, “M”, “N”, “O”
7
“7”, “p”, “q”, “r”, “s”, “P”, “Q”, “R”, ‘S”
8
“8”, “t”, “u”, “v”, “T”, “U”, “V”
9
“9”, “w”, “x”, “y”, “z”, “W”, “X”, “Y”, “Z”
patterns required and areas you are allowed to dial may vary.
0
“0”, “space”
Please consult your service provider.
*
“*”, “•”, “:”, “@”
5.2 Receiving Calls over the Internet
#
Start dialing process
When there is a call, answer it as you would as on any phone.
MENU
This is the “Menu” key to set the IP Phone
This is Up↑/Down↓ key and volume setting
when hook off. Incoming calls/dial calls
when ready .
UP/DOWN
6
5
Phone Functions
5.1 Making Calls over the Internet
User can call another VoIP terminal or any PSTN telephone
through Internet by simply dialing the destination number as you
would with on any other phone. Please note that there are dialing
7
5.3 Speaker
Using the phone: press MENU then use up/down to select the
Press SPEAKER on the phone to have a hands free call, press
‘Phone Book’ , press ENTER and use up/down to select the ‘Add
SPEAKER again to hang up or pick up the handset to have normal
entry’, then press ENTER to add a contact to the list.
call.
After you set them, press CONTACTS on the phone, then you can
5.4 Date and Time display
check the list by name or press ENTER again to check them one
After you set the SNTP (synchronized to the Internet) or phone’s
by one.
date and time, date and time will show on the screen.
5.9 Call list
5.5 Call Duration display
Press CALLLIST, then you can check the DIALED, MISSED and
The numbers will show on the screen.
RECEIVED calls. Press UP/DOWN to check the
5.6 Work as router/bridge
RECEIVED/DIALED calls when the phone is idle.
This terminal can work as a family router/ bridge, you can set it on
5.10 Speed dial
the web: Network->WAN Settings. Please select the type of the
In WEB page: Phone Book->Speed Dial Settings, you can set the
network as you want.
speed dial numbers.
! Note: We recommend you use it as a secondary router.
You can press number+# to dial out the dial number too
5.7 Volume Adjust
5.11 Melody Selection
In WEB page: Phone Setting-> Volume Settings.
In WEB page, you can select the melody of ringer or make it
You can also use keypad to output volume of speaker or handset
on/off.
by Up/Down when hook off.
You can press MENU and then use up/down to select the ‘Phone
5.8 Phone book
Setting’, press ENTER and use up/down to select the ‘Ringer’,
By WEB page: Phone Book->Phone Book, you can set the phone
and press ENTER again. Then you can set the volume of ringer in
list.
‘Ringer Volume’ and select the melody in ‘Ringer type’.
8
9
5.12 Dial Plan
Replace rule
Set dialing rule.
Left box is for the prefix to be added.
Right box is for the rule to be matched so
that action will be taken by adding the
prefix on the left.
Dial Now
When the number matches with the rule of
“Dial Now”, numbers will be sent out
automatically. The first number shall not be
set as 0, because 0 means not to use the rule
“Dial Now”. Therefore, when the “Dial
Now” is set as 0xxxx, the number will not
Drop Prefix
-No: when dialed number matches with the
be dialed out as the rule, because the first
rule, the number will be dialed without any
number is 0.
change except adding the prefix. You can
10
input 7 numbers.
Auto Dial
The default setting is 5 (seconds). While
-Yes: when dialed number matches with the
Time
dialing a number, once the user stops
rule, the specified prefix that matched the
pressing the keypad for 5 seconds, the
rule will be removed before adding the
device will commence the dialing process.
prefix in the left box. You can input 31
You can set this option within the range of
numbers.
3-9 seconds.
11
The default setting is Yes. When set to Yes,
Explanation:
“#” can be used as a key to finish dialing
If the first three digits of the number dialed by the user ae 002,
and not wait for the Auto Dial Time to
003, 004, 005, 007 or 009, the device will drop all these numbers
finish.
and replace it with 006, therefore the number that will be dialed
Use * for IP
The default setting is Yes. When set to Yes,
out is [006+xxx]
Dialing
the (*) will be recognized as (.) so that you
Example n.3:
can call an IP address instead of a number.
Drop prefix: No, Replace rule 3: 009, 12
Use
#
as
send key
Example:
Explanation:
Example n.1:
If the first two numbers dialed by the user is 12, the device will
Drop prefix: No, Replace rule 1: 002, 8613+8662
automatically append the number 009 in front of the dialed
Explanation:
number, therefore the number that will be dialed out is
If the first four digits of the number dialed by the user are 8613 or
[009+12+xxx]
8662, the device will automatically append the number 002 in
Example n.4:
front of the dialed number, therefore the number that will be
Dial Now: *xx+#xx+11x+xxxxxxxx
dialed out is [002+8613+xxx] or [002+8662+xxx] depending on
Explanation: If the first numbers dialed by the user match one of
which of the two numbers were dialed
the rules ( *xx or #xx or 11x or xxxxxxxx), the numbers will be
Example n.2:
dialed automatically, the system will not wait for any new
Drop prefix: Yes, Replace rule 2: 006,
numbers to be pressed before dialing out the number.
002+003+004+005+007+009
6
Service Features
Important Note: Your service provider may not support all service
features to some or all callers.
12
13
6.1 Caller ID display
6.4 Call Transfer
When there is a incoming call, the screen will show you the caller
Attendant Transfer
ID.
Operation: While B call A, press ‘FLASH’ button. Input the
6.2 Call Forwarding
6.2.1 Unconditional Call Forward
destination number and ‘#’, after someone pickup the call you can
The incoming call will always forward to the destination number.
be transfer to C.
Please set this function in web page: Phone Setting->Call
6.5 3-way calling
Forward.
Operation: While A and B is on the call, press ‘HOLD’ button,
6.2.2 No Answer Call Forward
input the 3rd party’s number and ‘#’. After the one pickup the call,
The incoming call will forward to the destination number if there
you can press ‘CONF’ to begin a 3-way calling.
is no answer within the time you have set. Please set this function
6.6 Call waiting/Answer the waiting call
in web page: Phone Setting->Call Forward.
When on a call and a new call comes in, you will hear the waiting
6.2.3 Busy Call Forwarding
tones. Press the ‘HOLD’ key on the phone to pick up the new call.
Another incoming call will be forwarded to the destination
6.7 Display Missed Call
number set during a phone call. Please set this function in the web
When there is a missed call on the server, the device will get a
page: Phone Setting->Call Forward.
signal from server and you will see the information ‘1 Miss Call’
6.3 Call Hold/Retrieve
on the screen.
Operation: While on a call, press ‘HOLD’ button on the phone
6.8 Voice mail
then the call will be on hold. You can dial the new number. To
When there is a voice mail on the server. The device will get a
retrieve the previous call just presses it again.
signal from server and you will see the indicator of SPEAKER
tell her/him there is a call for him and hung up, then the call will
twinkle.
14
15
6.9 Multiple lines
Note: you may lose all the settings in the device especially
You can set 3 different accounts and server information on the
device. When the device is idle, pick 1*, 2*, 3* to select the 1
nd
2 and 3
nd
st
line, then hang up the handset or press ‘SPEAKER’
key, you will be speaking on the chosen line.
st
1 account is the default one after a reboot.
including account and server information.
Warning: Do not let your device lose power during the upgrading
process, otherwise it may be damaged!
8
How to use the support
To change the stand angle, please follow the pictures:
6.10 VoIP: Do not disturb
You can set in the web page: Phone setting->DND Settings. If you
set it on, all incoming calls don't cause the device ring, but leave
the unreceived record on the LCD screen. You can set this feature
for a specific block of time. If the end time is earlier than the
begin time, it means the DO NOT DISTURB duration will be
from beginning time to next day’s end time.
Press the button
The screen will show #DND#, and the phone now is in DO NOT
DISTURB status. You can set in the web page: Phone
setting->DND Settings. If you set it off, then the phone is idle and
it will change the phone to normal status.
7
Upgrade
Use your IE explorer to open upgrade web page, select the file and
submit. The device will upgrade now. You may need to restore the
factory defaults after you upgrade it to a new version.
Change the angle
Y-T9CM-Ver.1.5
2008-6-17
16
17