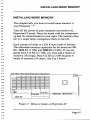
1
HYPERAM AT User's Manual Multi function memory boards for the IBM AT and compatibles V3.00 HYPERTEC PTY LIMITED 408 Victoria Road, Gladesville NSW 2111 AUSTRALIA Phone: (02) 816 1211 Fax: (02) 8163960 HYPERTEC (EUROPE) LIMITED Bank House, 40 High Street, Pewsey, Wiltshire SN9 SAQ UNITED KINGDOM Phone: (0672) 63936 Fax: (0672) 63709 ----- ----- -- --- ------ TABLE OF CONTENTS -. TABLE OF CONTENTS INTRODUCTION Introduction to Hyperam AT Checklist Installation procedure 1 2 3 INSTALLATION Step by step instructions Installing EMS 4.0 Installing Hyperam AT manually 6 26 29 PROBLEMS Before you call Hypertec Machine doesn't boot Setup errors Machine no longer boots Parity check 2 Error messages 37 38 39 40 41 43 INSTALLING MORE MEMORY Step by step instructions 47 INSTALLING MULTIPLE BOARDS Multiple boards for expanded memory Multiple boards for extended memory 51 53 --- --. --. HYPERAM AT HARDWARE REFERENCE -. How the memory works Disabling the board Expanded memory window Board address Amount of memory Serial ports Parallel ports 55 55 56 56 57 58 59 SOFTWARE REFERENCE Overview The Hyperam AT pool driver POOL.SYS POOL400.SYS EMM400.SYS RAM disks RAMDISK.SYS RAMFMT.EXE Disk caching CACHE.SYS CACHE.EXE Print spooling and interrupt driving SPOOL.SYS SPOOL.EXE INTRUPT.SYS INTRUPT.EXE The popup menu POPUP.SYS SETRAMAT.EXE WTCRAM.EXE ii 61 61 63 65 66 67 68 69 71 72 72 75 76 77 79 80 82 82 85 88 -. -. --- - - ----. TABLE OF CONTENTS ..... """ APPENDICES Appendix A Appendix B - iii Switch setting summary Warranty Product Repair Procedure Trademarks 89 92 93 94 HYPERAMAT This page intentionally blank ---- ----- ----------,.. -- iv ---- INTRODUCTION "" INTRODUCTION "" Introduction to Hyperam AT "" "" Hyperam AT is a memory board designed for the IBM AT and other 16 bit "classic" style compatible machines. There are two versions of the Hyperam AT board: Hyperam AT and Hyperam AT/MF. Both versions supply up to 2 Megabytes of memory which can be used to • bring your system memory to the 640 Kb DOS limit • provide extended memory - this is memory appearing above the normal address limit of 1024Kb and is used by multi user operating systems such as Xenix and OS/2, by the IBM "VDISK" program, by special applications such as Oracle and Lotus 123 Release 3.0. You may have up to 16Mb of extended memory in your system. • provide expanded memory for use by Hypertec software and third party software compatible with the Lotus/lntel/Microsoft Expanded Memory Specification (EMS) versions 4.0 and 3.2. In addition, Hyperam AT/MF supplies: • one serial port standard, with a second serial port optional • one parallel port standard Page 1 HYPERAMAT Both versions of the board are supplied with an extensive suite of software including: • menu driven install program which guides you through the installation process and sets up your software configuration. • RAM disk, print spooling and disk caching Checklist Your Hyperam AT package should contain: • Hyperam AT full-size expanded memory board • Hyperam AT User's Manual • Hyperam AT installation disk • Hyperam AT EMS drivers disk • Clip on 25 pin serial cable - only supplied with Hyperam AT/MF two serial port option If you do not have each of these items, contact your dealer before proceeding further. Page 2 - - -- ------ ------- ---- - INTRODUCTION ..... -- - You may also find the following additional items useful. • Guide to Operations for your ffiM PC-AT or compatible • Disk Operating System (DOS) Manual for your ffiM PC-AT or compatible. Installation procedure The Hyperam AT installation disk contains an installation program which guides you through the complete hardware and software installation procedures for the Hyperam AT board. The Hyperam AT User's Manual is designed to supplement the Install program with reference chapters and a Problems section. To install Hyperam AT correctly you must: (1 )Make a backup of the H yperam AT installation disk (2) Run the Hardware Configuration section of the Install program to obtain correct switch settings for the Hyperam AT board. (3) Install Hyperam AT in your IBM AT or compatible (4) Run the Memory and Software Configuration section of the install program to initialise the Hyperam AT as system, expanded and/or extended memory and, optionally, to install the Hypertec utilties. Tum now to the next section headed Installation. Page 3 ... HYPERAMAT This page intentionally blank Page 4 - ------ --... -... ------ ...- ------- INSTALLATION INSTALLATION The Hyperam AT installation disk contains all the instructions necessary for installing Hyperam AT correctl y in your machine. However, should you wish to install your Hyperam AT board manually (Le. without the assistance of the Hyperam AT installation program) you may do so by setting the switches on the Hyperam AT board correctly for your choosen configuration and by running the Hyperam AT Memory Configuration utility from the DOS command line prompt. There are two circumstances under which it may be preferable to install your Hyperam AT board manually in this way: (1) You wish to configure all memory on your Hyperam AT board as extended memory and therefore do not require the Hyperam AT expanded memory manager or other Hyperam AT expanded memory software utilities. (2) You are reconfiguring the allocation of expanded and extended memory on a Hyperam AT board which has already been installed, and therefore any Hyperam AT software utilities required are already present on your boot disk. PageS --- HYPERAMAT Instructions for installing Hyperam AT manually are contained in the section headed Installing Hyperam AT Manually on page 29 of this manual. If you wish to install your board manually turn to this section now. N.B. If you wish to install Hyperam AT manually for any reason other than those stated above, you should be aware that installation ofthe Hyperam AT expanded memory manager is not included in the manual install instructions. This means that if you wish to use expanded memory and choose to install your board manually, you must also install the Hyperam AT memory manager by editing your CONFIG.SYS file appropriately. This can be a cumbersome procedure and is not recommended. If you intend to use an expanded memory software application which requires EMS version 4.0, (the latest version of the Lotus Intel Microsoft (LIM) Expanded Memory Specification), you must follow the instructions under the heading "Installing EMS 4.0" on page 26 of this manual after completing the installation of your Hyperam AT board. Step 1 Ensure that you have a blank, formatted disk. See the DOS FORMAT command in your DOS User Manual if you do not know how to format disks. Make a copy of your Hyperam AT Installation disk using the DISKCOPY program. If you are unsure of how to use DISKCOPY consult your DOS manual. Store the original installation disk in a safe place. You will use the copy for the installation procedure. Page 6 ---- -- --- - - -- - - --- - -- - -- INSTALLATION Step 2 Remove the Hyperam AT board from its antistatic bag and place it in front of you with the gold edge connector towards you and the metal bracket to the right. Take a moment to study the board and compare it with Figures1 and 2 on the following page. Note the location of each of the switch banks. The Hyperam AT board may contain either 512 Kb (two banks), 1 Mb (four banks) or 2 Mb (eight banks) of memory chips. Make sure you know how much memory is on your Hyperam AT board. Step 3 You are now ready to run the Hardware Configuration section of the Hyperam AT installation program Place your copy of the Hyperam AT Installation disk in drive A of your computer and log over to drive A. At the DOS prompt enter the following command install hyperamat <enter> Keys to use The following keys are use in the install program <Enter> is use to record your choice and move down to the next field - <End> is used to record all choices made on a screen and exit from that part of the program Page 7 -- -- HYPERAMAT memory chips - - - - - - switch bank I -- D ' - - ' ' ¥ = ' - - - - - - - - - - - - , I I I I 1111 I switch 2 i metal bracket Figure 1 Hyperam AT memory chips com2 clip on socket com I clip on switch bank I socket ~~==~~~r fomi chip I fom2chip I [Qj9Pin -. I serial port parallel port switch 2 -. Page 8 - - - - - - I -- -- i metal bracket Figure 2 Hyperam AT MF - - - - -- -- - - -- - - - -- INSTALLATION <Esc> is used to exit from that part of the program without recording your choices <Fl> displays a help screen with additional information relating to the current screen The up and down arrows allow you to move up and down between fields .... Step 4 Hardware configuration Once the install program has been activated a Product Selection Menu will appear on the screen . This menu contains three questions: Number ofproduct being Installed If your Hyperam AT is the straight memory board (as illustrated in Figure 1) you should select product number 1. If your Hyperam AT is the MF (multi function) version (as illustrated in Figure 2) you should select product number 2. Key in your choice and press <enter'>. Amount of memory on card Your Hyperam AT will have either 512 Kb (2 banks of memory chips), 1024 Kb (4 banks of memory chips) or 2048 Kb (8 banks of memory chips). Key in your choice and press <enter'>. Page 9 HYPERAMAT Hyperam Board Address You must select an I/O address by which the Hyperam AT memory configuration software can access your Hyperam AT board. This address must not conflict with other devices already installed in your computer. The default setting for the Hyperam AT board address is 258. This address will not normally conflict with other devices in your computer. Other possible address for your Hyperam AT board are 268, 2a8, 2b8, 2e8, 208 and 218. Key in your selection and press <enter>. The Master Menu You will now see the Master Menu, consisting of five menu choices: (1) Manual Update This section contains update information which was not available at the time of printing this manual. (2) Configure Hardware This option contains information to help you set the switches on your Hyperam AT board correctly. Menu options (3), (4) and (5) are discussed later in this chapter. Select option (2) Configure Hardware. Page 10 ----------------- --- --- INSTALLATION You will now see on your screen a diagram representing two switch banks. If you have the MF version ofHyperam AT and selected Product Number 2 from the first screen ofthe install program you will now see two further menu options in addition to the two switch banks. Hyperam AT straight memory board If your Hyperam AT is the straight memory version of the board and you selected Product Number 1 from the first screen of the install program you are now ready to set the switches on your Hyperam AT board. Tum to Step 5 Setting the Switches. Hyperam AT MF users If your board is the multi function version and you selected Product Number 2 from the first screen of the install program you must now make selections from the further menu options displayed on the screen. (1) Adjust Parallel Port Select this option to choose the address for the parallel port on your Hyperam AT board. The valid choices are 378 and 278. -. The Hyperam AT install program will indicate any conflicts that may exist between the address you have selected and any devices already installed in your computer. Page 11 HYPERAMAT (2) Adjust Serial Ports Select this option to enable the serial port(s) on your Hyperam AT board. The Hyperam AT install program will indicate any conflicts that may exist between the serial port(s) on the Hyperam AT board and any serial ports already installed in your computer. You will notice that as you make and change your port selections the settings indicated on the switch bank diagram at the top of the screen change. You are now ready to use the settings indicated on the screen diagram as a guide to setting the switches on your Hyperam AT board. Proceed now to Step S Setting The Switches. StepS Setting the switches. Take your Hyperam AT board and place it in front of you with the metal bracket to the right and the gold edge connector towards you. Using Figure 1 or Figure 2 on pag 8 as a guide, locate switch banks 1 and 2 on the board. Using a pen or a screwdriver (not a pencil) set the switches on your Hyperam AT board to reflect the switch settings indicated on the screen diagram in front of you. You are now ready to install the board in your machine. Page 12 - - -- -- - - -- --------- INSTALLATION Step 6 Exiting from the install program and powering off your machine Exit from the install package by using the <end> key to work back to the Master menu. From the Master Menu select option (5) Exit Back to DOS. Power your machine off and unplug all power cords, cables etc. Remove the cover from the system unit. If you do not know how to do this, consult the Guide to Operations manual supplied with your computer. Step 7 Locate a vacant 16 bit (two connector) expansion slot in your machine (i.e. not an 8 bit slot). Remove the metal plate masking the hole in the back of the chassis at that expansion slot. StepS Hyperam AT/MF two serial port option users only If you have a Hyperam AT MF with two serial ports you must use both the 9 pin serial connector at the back of the Hyperam AT MF board for COM1 and the 25 pin connector on the clip on cable for COM2. To use the clip on cable you must insert the black plug into the bank of pins labelled COM2 on the Hyperam AT board. Make sure the red or black stripe on the cable is towards the left. Page 13 HYPERAMAT Step 9 Inserting the Hyperam AT board Line up the Hyperam AT board with the vacant expansion slot and lower the board gently until its edge connector is resting on the expansion slot. Place one hand at each end of the top of the board and push down evenly. You may meet some resistance so pressure is required. Align the slot in the metal bracket with the screw hole in the top edge of the rear panel. Secure with the screw you removed from the metal plate. Hyperam ATIMF two serial port option users only If you have attached the clip on cable, clip the bracket onto the back panel of the machine and fold the cable carefully down between the other boards. Step 10 Replace the cover of your system unit, reconnect all plugs and cables and tum the machine back on. Your machine should now reboot normally but will not, as yet, recognise the extra memory on the Hyperam AT board. If you encounter problems at this point, consult the Problems section in this manual. Step 11 Configuring the Memory on the Hyperam AT board To complete the installation of Hyperam AT you must now configure the memory on the board by re-running the Hyperam AT install program. Until this is done the memory on the board will not be recognised by your computer. Page 14 --- - - --- - ,.. - - INSTALLATION Replace the Hyperam AT install disk in drive A and key in .... install hyperamat <enter> You will now see the Product Selection Menu. Key in the appropriate Product Number, Amount of Memory and Board Address for your Hyperam AT board. (You should key in the same values you used in the fIrst part of the install program. When you have keyed in the correct values, press <enter>. .... You will now see the Master Menu again . This time you must select option (3) Configure Memory and Software. Select option (3) and press <enter>. You will now see the Configure Memory Menu. This screen displays details of your current system memory and asks you a series of questions about the memory on the Hyperam AT board. Step 12 Current Amount of Standard Memory This fIeld displays the total amount of system or standard memory (memory between 0 Kb and 640 Kb) currently in your computer. Page 15 HYPERAMAT In most cases this amount will be 640 Kb which is the maximum amount of system memory allowable. Enable Hyperam System Ram - (YIN) This question is asking you whether you wish to use memory on the Hyperam AT board to supplement the system memory already installed in your computer. If you already have 640 Kb of system (standard) memory in your computer you must answer N to this question as your computer will not recognise more than 640 Kb of system memory. If you have less than 640 Kb of system (standard) memory in your computer you should answer Y to this question. Answering Y means that memory from the Hyperam AT board will be used to supplement your computer's system memory. Make you selection and press <enter>. If your selection was N, proceed now to Step 13. If your selection was Y, you will now see a further two questions relating to system (standard) memory on your screen. Base of Standard Memory Provided By Hyperam This question is asking you to nominate the system memory address at which you want the Hyperam AT system memory to start. This address must be consistent with the current amount of system (standard) memory you already have in your computer. Page 16 -- ----- - - -- - - - - ,... --- INSTALLATION If, for example, your current amount of system memory is 512 Kb, the base of standard memory provided by Hyperam must also be 512 Kb. Key in the appropriate base address now and press <enter>. End of Standard Memory Provided by Hyperam You must indicate what your new total amount of system memory will now be. This is the end address for standard memory provided by the Hyperam AT board. Normally the end address will be 640 Kb. The end address cannot be greater than 640 Kb. Key in your end address now and press <enter>. -. Step 13 Enable Hyperam Extended Memory (YIN). This question is asking you if you wish to allocate some of the memory on the Hyperam AT board to extended memory. Extended memory is memory above the DOS limit of 1024 Kb. It is memory that is used for multi user operating systems such as Xenix and OS/2, and for special applications like Oracle. If you intend to use an operating system or application which requires extended memory you will probably want to answer Y to this question. Page 17 HYPERAMAT If you wish to use all the memory on your Hyperam AT board to supply expanded memory for software which complies with the Lotus-Intel-Microsoft (LIM) Expanded Memory Specification (EMS) you do not require extended memory and should answer N to this question. Make your selection now and press <enter>. If you selected N, press <end> and proceed to Step 14. If you answered Y, you will now see a further two questions appear on your screen. Base of Extended Memory Provided by Hyperam You must indicate what extended memory address you want the Hyperam AT extended memory to start at. This address must be consistent with the current total amount of extended memory you currently have in your computer. The current amount of extended memory in your computer is the total amount ofmemory counted and initialised each time you power on your computer less the total amount ofsystem (standard) memory you have. For example, if you computer normally counts up 1024 Kb of memory when you power on and you have a full 640 Kb of system memory, the total extended memory currently in your computer is: 1024 - 640 Page 18 =384 Kb. -- - - ..... -- - - --..... ..... ..... ..... INSTALLATION Extended memory always starts at the address 1024 Kb. Therefore using the above example, the base address for extended memory to be supplied by the Hyperam AT board must be: 1024 + 384 = 1408 Kb Make your selection and press <enter>. Amount of Extended Memory Provided by Hyperam You must now indicated how much of the memory on the Hyperam AT board you wish to allocate to extended memory. This amount must not exceed the total available memory on the Hyperam AT board, and should be a multiple of 128 Kb (i.e. the total amount you indicate must be evenly divisible by 128). Key in your selection now and press <enter> and then <end>. Step 14 Configuring the Hyperam AT software. You will now see the Software Menu on your screen. - - - - Page 19 ..... HYPERAMAT -- This menu consists of three selections: (1) Quick Software Installation Select this option if you (a) want to configure all the memory on your Hyperam AT board as expanded memory for use with EMS software or (b) want to configure you Hyperam AT memory as a Hypertec RAM disk. ""' ""' ""' ""' (2) Advanced Software Installation Select this option if you wish to use the Hypertec disk caching or print spooling utilities in addition to or instead of RAM disk or EMS memory (3) Return to Main Menu Select this option if you wish to make a change to a choice you made in the previous section of the install program Make your menu selection now and press <enter>. If you selected option (1) Quick Software Installation, proceed now to Step 15 below. If you selected option (2) Advanced Software Installation, proceed to Step 16. "'" ..... "'" "'" ..... "'" - "'" Step 15 Quick Software Installation You will now see the Quick Software Installation Menu on the screen. Page 20 - -- INSTALLATION Note that if you wish to configure all the memory on your Hyperam AT board as extended memory you should use the Advanced Software Installation, not the Quick Software installation. You will now be asked: Do you wish to use a ram disk (YIN) . If you do wish to install the H ypertec RAM disk utility, answer Y to this question and press <enter>. (For details of the Hypertec RAM disk utility consult the Software Reference chapter of this manual.) You will now be asked what size you wish the RAM disk to be. Your RAM disk can only be as large as the amount of available memory on your Hyperam AT board. If you allocate less than the total amount of available memory on your Hyperam AT board the balance will be configured as expanded memory for use by LIM specification software applications. Enter you choice in kilobytes now and then press <enter> and then <end>. Now proceed to Step 17 below . . Page 21 HYPERAMAT If you do not wish to use the Hypertec RAM disk utility answer N to this question, then press <enter> and then <end>. All the memory on your Hyperam AT board will be allocated to expanded memory for use by software applications which comply with the LIM Expanded Memory Specification. Now proceed to Step 17 below. Step 16 Advanced Software Installation The Advanced Software Installation allows you to install both the Hypertec RAM disk, print spooling and disk caching utilities and to configure some of the memory on your Hyperam AT board for use by LIM spec applications. The Advanced Software Installation menu consists of a diagram depicting the available memory on your Hyperam AT (the Pool Usage Map) and a further eight menu option choices. As you make your selections from these eight menu options you will see the Pool Usage Map fill with letters representing the choices you have made. For example, if you configure some of your Hyperam AT memory as a disk cache you will see a portion of the Pool U sage Map fill with the letter 'C', if you opt to install a print spooler, a portion of the map will fill with the letter 'S', 'R' if you install a RAM disk, 'E' for EMS memory. Option (1) Adjust Memory Pool allows you to (a) install the memory manager (the pool driver) Page 22 - - - - - - '" - - -- - INSTALLATION -., (b) allocate memory for use by LIM spec applications (c) configure the location of the EMS window through which your expanded memory will be accessed. The memory usage map shows the current allocation of memory in your computer and indicates the preferred location for your EMS window. (The default location is DOOO). For an explanation of the EMS window refer to the Software Reference section of this manual. Note that if you wish to configure all the memory on your Hyperam AT board as extended memory (for use by Xenix, OS/2 etc) you must answer N to the Driver Installed question in option (1). To install anyone of the Hypertec utilities, simply select the menu option which represents it (options 2, 3, 4, 5 and 6). For more details on any of the utilities, consult the Software Reference section of this manual. If you are not sure of the meaning of any of the questions asked when configuring the utilities, press the <PI> key to display an appropriate help message. When you have made your choices regarding the memory manager (pool driver) and the other Hypertec utilities, select option (7) Save Changes to Disk from the Advanced Software Installation Menu and press <enter>. Now proceed to Step 17 below. ..... Page 23 HYPERAMAT Step 17 Save Changes to Disk You will now see the Save Changes to Disk screen, which consists of four questions: Display Current Install State (YIN) This option allows you to check the choices you have made regarding the pool driver and Hypertec utilities. Press <enter> to cycle through the various utility options. Note that if you used the Quick Software Installation, the only drivers you should be installing are the pool driver and the RAM disk utility. When you have checked each of the drivers by cycling through the choices, press <.Esc> to return to the Save Changes to Disk screen. Note that if you wish to alter any o/your installation choices you must return to the appropriate utitlity menu choice. Drive from which you normally boot ( A or C) You must now indicate which drive you normally boot from so that the Hyperam AT configuration details can be copied to it. Normally your boot drive will be C. Key in your choice and press <enter>. -- --- -- -- - - - - - -Page 24 -- - INSTALLATION Directory for Hypertec Drivers You must also indicate which directory on your boot driver you wish the Hyperam AT software drivers to be copied to. If you select a directory that does not already exists, the Hyperam AT installation program will create it. The default directory is hypo Directory for Control Programs Similarly, you must select a directory for the Hyperam AT control programs to be copied to. Again, if you select a directory which does not exist, the installation program will create it. Again, the default directory is hypo When you have made your directory selections, press <enter> and then <end> to record your choices. The following message will now be displayed: The Hypertec software will now be copied to your target disk. Are you happy with your choices (YIN). -. -. If you wish to make any changes to the configuration choices you have made, answer N to this question and return to the appropriate section of the installation program. If you are happy with your selections, answer Y to continue. A batch file will now be executed which configures the memory on the Hyperam AT board and copies the Hypertec software to your boot drive. Page 25 - -. HYPERAMAT Once this is complete you will be prompted to remove the installation disk from drive A and to press any key to reboot your computer. (Ifyou wish to abort the installation at this point, use the <Ctrl> C key combination to return you to the DOS prompt.) With drive A open, press any key. Your computer will now reboot. Any memory from the Hyperam AT board configured as extended memory will be counted in the top left-hand corner of the screen as the computer reboots. Any memory configured as expanded memory will be recognised by the pool usage summary which appears in a box on the screen towards the end of the boot sequence. Details of any Hypertec utilities installed will also be displayed here. The installation is now complete. If you encounter any problems in rebooting consult the Problems section in this manual. - " ... -. " ... -. ",.. - - Installing EMS 4.0 The expanded memory manager installed by the H yperam AT installation program is called the pool driver and is driven by the device pool.sys which resides in the CONFIG.SYS file on your boot disk. -. -. - -. Page 26 - -. -. INSTALLATION This device supports version 3.2 of the Lotus Intel Microsoft (LIM) Expanded Memory Specification (EMS). Version 3.2 is not the most recent version of the LIM spec but is, however, suitable for use with most LIM spec software applications. If your LIM spec software application requires the latest version of the LIM spec - version 4.0 - you will need to install the Hyperam AT EMS 4.0 pool.sys driver or emm.sys driver. These drivers are contained on the disk labelled "EMS 4.0 drivers" supplied with your Hyperam AT board. To use either of the drivers on this disk you must manually copy files from this disk to the appropriate directory on your boot disk. If you wish to use LIM 4.0, you must first install your Hyperam AT board/ollowing steps 1 - 17 outlined above, then return to this page and follow the instructions set out below. -.. The EMS drivers disk contains two files, POOIAOO.SYS and EMM400.SYS. If you wish to use the H ypertec expanded memory manager to control Hypertec utilities (such as RAM disk, disk caching and print spooling), as well as EMS applications, you must copy the file POOL400.SYS over the top of the POOL.SYS file on your boot disk. Page 27 HYPERAMAT To do this, key in the following command with the EMS 4.0 drivers disk in drive A. copy a:'pooI400.sys c:'hyp'pool.sys where "hyp" is the name of the directory where the Hypertec software resides. Then reboot you computer to use LIM 4.0. If you only wish to use the Hypertec expanded memory manager to control EMS applications (that is, you don't want to use the Hypertec RAM disk etc), you may use the driver called EMM400.SYS in place of the larger POOL400.SYS driver. To do this, place the EMS 4.0 drivers disk in drive A and key in the following: copy a:'emm400.sys c:'hyp'emm.sys where "hyp" is the name of the directory where the Hypertec software resides. Page 28 - - ---- - - - - - ----- --- - INSTALLATION You must then edit your CONFIG.syS file in the following way: Replace the line device = c:'hyp'pool.sys hNNN wNNN eNNN with device =c:'hyp\emm.sys hNNN wNNN making sure to copy the values exactly for the "h" and "w" parameters as they were in the original command. The "e" parameter is not required as the use of emm.sys assumes that all expanded memory is allocated to EMS applications. Now reboot your machine to complete the installation. Installing Hyperam AT manually The Hyperam AT installation program contains all the steps necessary to install your Hyperam AT board correctly. In most cases you should use the installation program to install your board. Two circumstances where it may be more convenient to install your board manually are: (1) All memory on the Hyperam AT is to be configured as extended memory (for use by Xenix, OS/2 etc) Page 29 HYPERAMAT (2) You wish to alter the amount of memory allocated to expanded and extended memory but do not wish to reconfigure either the expanded memory driver (pool.sys) or any of the Hypertec utilities (RAM disk, print spool, disk cache etc). To install Hyperam AT manually you must: (1) Set the switches on the board correctly (2) Install the Hyperam AT board in your computer (3) Run the Hyperam AT memory configuration program (SETRAMAT) and computer configuration program (WTCRAM). Step 1 Setting the switches (Ifyou are reconfiguring the memory allocation on a Hyperam AT board which has already been installed, you do not need to alter the switches on your Hyperam AT board. In this case proceed to Step 3 below.) With the help of Figures 1 and 2 (on page 8), locate the switch banks on your Hyperam AT board and the amount of memory on the board. (2 banks of memory = 512 Kb, 4 banks;:;:; 1024 Kb and 8 banks = 2048 Kb). Now turn to Appendix A - Switch Setting Summary on page 89 of this manual. You must set switches for your EMS register address and for the memory size of your board. Use the switch setting tables to help you set the switches correctly. Page 30 -- - - - - --- -- ,... ,... ,... --,... -,... INSTALLATION If you have a Hyperam AT MF, you must also set the addresses for the serial and parallel ports on your Hyperam AT board. Again, use the appropriate switch setting tables in Appendix A to help you. Step 2 Installing the Hyperam AT board You must power off your computer, remove its cover and insert the HyperamAT board in a vacant 16 bit slot. For details of this procedure, refer to page 13 of this manual, insert the board as directed, then return again to this page. Step 3 Configuring the memory on the Hyperam AT board Before your computer will recognise the memory on your Hyperam AT board, you must run the SETRAMAT and WTCRAM programs located on the H yperam AT installation disk. Running Setramat Setramat configures the memory on your Hyperam AT board. To run setramat you must log over to the A drive and key in the setramat command followed by a series of parameters which specify the manner in which memory on your Hyperam AT board will be configured. Page 31 HYPERAMAT The SETRAMAT parameters are as follows: sb/NNN sets the base address from which any system memory provided by the Hyperam AT board will start sslNNN specifies the amount of system memory to be provided by the Hyperam AT board eb/NNN sets the base address from which any extended memory provided by the H yperam AT board will start es/NNN specifies the amount of extended memory to be provided by the Hyperam AT board p configures all memory on the Hyperam AT board as expanded memory for use by LIM spec applications rNNN nominates the EMS register address via which SETRAMAT accesses the Hyperam AT board wNNN sets the EMS window address via which the Hypertec pool driver or emm driver accesses the memory on the Hyperam AT board You must now run SETRAMAT by keying in the command setramat followed by your chosen parameters. Page 32 --- -- -- ---------------- INSTALLATION For example, if you wish to configure all the memory on your Hyperam AT board as extended memory, you must: (1) calculate the start address for the extended memory on the Hyperam AT board, (this will be the same as the end address of any extended memory you currently have installed), and enter this address as your eb parameter (2) calculate the total amount of memory you wish to allocate as extended memory and enter this value as your es parameter (3) identify the EMS register address of your Hyperam AT board and enter this value as your r parameter. If you are using the default register address of258 you do not need to use the r parameter. If, for instance, your computer currently has 384 Kb of extended memory (i.e. the start address for your Hyperam AT extended memory is 1408 Kb*) and your Hyperam AT board has 2048 Kb of memory, all of which you wish to configure as extended memory, your setramat command would read as follows: setramat ebl1408 esl2048 <enter> *Extended memory always starts at 1024 Kb. Therefore, to calculate the start address for extended memory allocated from the Hyperam AT board, take the base address of 1024 Kb and add the current amount of extended memory to it. Page 33 HYPERAMAT i.e. from the example above 1024 + 384 =1408 Any memory on the HyperamAT board not configured as system memory or extended memory is automatically configured as expanded memory. Step 4 Configuring your computer to recognise the Hyperam AT memory You must run the wtcram program from the Hyperam AT installation disk to correctly configure your computer to recognise the memory supplied by your Hyperam AT board. WTCRAM supports the following parameters: b =NNN indicates the total amount of system memory in your computer (including any system memory allocated by the Hyperam AT board e =NNN indicates the total amount of extended memory in your computer (including extended memory allocated by the Hyperam AT board). The total amount of extended memory is calculated by taking the extended memory base address of 1024 Kb (all extended memory starts at this address) and adding to it the amount of extended memory present in the computer before Hyperam AT was installed plus the amount of extended memory allocated from the Hyperam AT board. Page 34 ------ ----- -- ----- -- - ---- INSTALLATION For example, if your computer had 640 Kb of system memory, 384 Kb of extended memory and you installed a Hyperam AT board with 2048 Kb of memory, all of which you configured as extended memory, your total amount of extended memory would now be: 1024 + 384 + 2048 =3456 Kb From the example above, your wtcram command would be as follows: wtcram b=640 e=3456 <enter> The wtcram command is fully documented in the Software Reference section of this manual. Step 5 Rebooting your computer Once you have run the setramat and wtcram commands with the appropriate parameters, you are ready to reboot your machine. With drive A open, turn your computer off, then on again. The memory supplied by your Hyperam AT board should now be recognised as your computer goes through its boot sequence. If you experience any problems during the reboot, consult the Problems section of this manual. Page 35 HYPERAM AT This page intentionally blank ---- - ---- - --"" "" "" -"" -. -. -. -. -. "" "" -. -. ."" Page 36 -. -. "" "" PROBLEMS PROBLEMS This section is concerned with fixing problems you may encounter from time to time. - The first and most important principle of problem solving is: DON'T PANIC Most problems are caused by simple mix ups which can be solved with a little thought. Often the best approach is to just do whatever you were doing again, paying careful attention to the details. The second most important principle is: - Simplify the problem If everything was working, before you made a change, take the change out and check that everything still works. Before you call Hypertec At Hypertec we pride ourselves on our customer support. If you call us, we will make every effort to respond quickly, and to fix your problem. However, there are some things you can do before calling us that may help you to solve your problem yourself or make it easier for us to solve it for you. (1) Read this section carefully to see if your problem is described. Try the suggested fixes. Page 37 HYPERAMAT (2) Call your dealer. Your dealer is more likely to know the details of your particular installation, and therefore, what may have gone wrong. (3) Call us, but before you do, please write down the following: • How much memory is on your Hyperam AT board • The switch settings on the board. • If possible, write down the contents of the file CONFIG.SYS. This file is on your boot disk. You may find out what is in it by entering the following command at the DOS command line: type config.sys • Similarly, record the contents of the file AUTOEXEC.BAT. This file is also on your boot disk. • Details of any other third party products you have in your machine • The exact wording of any error meassages associated with your problem Machine Doesn't Boot By this we mean there is no dsiplay on the screen at all when you turn the power on. Page 38 - - -- - - -------- PROBLEMS (1) Check that the power cords are all plugged into the right boxes and that they are turned on at the power point. There should be a little light on your system unit, indicating that it has power. There should also be a light on your monitor. (2) Remove the cover from the system unit and check that all boards are finnly seated in their sockets. Replace the cover and try the power again. (3) Move switch 8 on the large switch bank on the Hyperam AT board into the up position. If the computer now boots, turn to the section headed Machine No Longer Boots in this Problems chapter. (4) If the machine still does not boot, remove the Hyperam AT board and try the power again. (5) If the machine now boots, your Hyperam AT board is probably faulty. Contact your dealer. If the machine still does not boot, your machine is probably faulty. Contact your dealer. Setup Errors If the Hyperam AT board was working, but you are now getting errors like "Memory size error - run setup" during boot try the following suggestions: (1) Press <1"1> to continue the boot. If the machine does not boot, go to the section headed Machine No Longer Boots. Page 39 HYPERAMAT (2) Place the copy of the installation disk you used to install the board in drive A:. Do a 'DIR' on it and see if there is a file called' INITHRAM.BAT'. (3) If there is, enter the command inithram <enter> This should reinitialise your HyperamAT board. Reboot the machine. (4) If the error does not go away, or there is no file INITHRAM.BAT, run the install program again and select option 3, 'Configure Memory' from the Master menu. (5) If the error still has not gone away, read the next section. Machine No longer boots Read this section if the machine was working but now no longer boots. (1) Take the cover off the machine. If necessary, read the section on removing the cover in The Guide to Operations manual for your computer. (2) Find switch S 1.8 (top right corner of the board) and move it to the ON position. Page 40 -- - -- - - ----- PROBLEMS (3) Put the cover back on the machine and tum it on. It should now boot normally. If it does not, there is something wrong in the machine other than the HyperamAT board. Call your dealer. (4) Place the HyperamAT installation disk in drive A: and enter the command: a:setramat d (5) Tum the machine off, remove the cover and move switch S 1.8 to the OFF position. (6) Replace the cover, tum the machine on and wait for it to boot. (7) With the installation disk in drive A:, enter the command: inithram - If you get a message that says 'Bad command or file name' , run the install program and select option 3 , Configure memory' from the Master menu. (8) You should now be able to reboot normally. If not, call your dealer. Parity check 2 Parity check 2 indicates a memory error on a memory expansion board. Page 41 HYPERAMAT (1) Pull the cover off the machine and check that all boards are firmly seated. If necessary pull out the memory board and plug it back in to see if the problem goes away. (2) If there is more than one memory board in the computer, check the configuration of each very carefully, to ensure that they are not configured to supply memory to the same address. (3) Pull the memory board out of the computer and see if the problem goes away. Then contact your dealer. Memory error A memory error is a message "NNNNN MMMM 201 Memory error" during the self-test. The NNNNN and MMMM are numbers telling you the address at which the error occurred, and the data bits in error. Essentially this error means that the self-test has found less memory than expected during the test sequence. It is possible that the board is faulty; it is much more likely that there is an error in the configuration of the machine or the board. For example, have you taken out a memory board and not run the mM Setup program to tell the machine that it now has less system memory? (1) Find out how much system memory your machine has without the HyperamAT board installed. Page 42 --- - - - --- -- -- -;a.. PROBLEMS '"" (2) Turn the machine on and boot. When the error occurs, press <FI> to continue the boot sequence. Place the Hyperarn AT installation disk in drive A and run the install program. (3) Select option 3 'Configure memory and software' from the Master menu and configure the memory correctly for your machine. Go through the entire configuration process. (4) Turn the machine off and back on. If the problem persists, call your dealer. '"" Error Messages Following is a list of error messages that may occur, either in the install package or when booting the machine. '"" Errors during install When you select option 3, the install program performs extensive checks on the memory of the Hyperam AT board. Following are the errors that may be reported during this phase. '"" '"" '"" N.B.Ifthe install program detects certain kinds of errors, it will attempt to fix the error and then request you to re-boot the machine. If this happens, your machine is in an error condition; you should not do normal work with it until the problem is rectified. Run the install program again. lithe error occurs a second time call your dealer. Page 43 HYPERAMAT Cannot initialise Hyperam AT The install program cannot initialise the Hyperam AT hardware. Check the setting on switch bank 1, either by taking the board out and running the install program again, or by looking in the Appendix headed "Switch setting summary". Corrupted Hyperam AT configuration The install program has detected an error and has attempted to recover. Turn the machine off and on, then run the install program again. Cannot find Hyperam AT The install program cannot find the Hyperam AT hardware. Check the setting on switch bank 1, either by taking the board out and running the install program again, or by looking at the Appendix headed "Switch setting summary". Cannot setup Hyperam AT The install program has detected an error and has attempted to recover. Check the setting on switch bank 1 by looking at the tables in the Appendix. Turn the machine off and on, then run the install program again. megal I/O address This should never happen. Call Hypertec. Unknown error The install program could not identify the cause of the problem. Call your dealer. Page 44 -- ---------- - - - --- --- PROBLEMS No valid EMS window available If you wish to use Hyperam AT to supply expanded memory for LIM spec applications, you must install a 64 Kb EMS window via which the EMS memory will be accessed. This window should be located between COOO andDFFF. However, you may have other devices in your computer which are currently occupying these addresses. (An EGA video board will occupy a portion of the CooO window. Network cards typically use the DooO region). It may, therefore, be necessary to juggle devices around to "make room" for the EMS window. Wang 260 PC Users If your computer is a Wang 260 PC you should set your EMS window at EOOO. In most other computers EOOO . should not be used. Errors during boot The pool device driver also performs some tests on the Hyperam AT board during the boot sequence, and may report some errors. Generally if you encounter errors at this stage you should run the install program again. Invalid address An invalid address has been specified to the pool driver using the 'h' parameter. Check your CONFIG.SYS file and compare it with the information on the pool driver in the Software Reference section of this manual. Page 45 HYPERAM AT Cannot find Hyperam AT The pool driver cannot find the Hyperam AT board. The most likely explanation is that the board address supplied as the 'h' parameter does not match the address set using the switches S 1.5 to S 1.7 on the board. Check both. If this is not the problem, run the install program again. Hyperam AT memory switched off The Hyperam AT memory has been disabled by moving switch S1.8 into the ON position. Turn switch S1.8 to the 'OFF' position, then try rebooting. You may also want to read the section above titled 'Setup errors'. Signature invalid The Hyperam AT board memory has been corrupted. Run the install program again. Hyperam memory disabled At some stage the SETRAMAT program has been run with the 'd' parameter. Run the install program again. Configuration corrupted The Hyperam AT board memory has been corrupted. Run the install program again. Page 46 ------ -- -- --- - ------- - - --- - INSTALLING MORE MEMORY INSTALLING MORE MEMORY This chapter tells you how to install more memory on your Hyperam AT. Turn off the power to your computer and remove the HyperarnAT board. Place the board with the components up and the metal bracket to your right. The memory chips are in a single large, contiguous block on the left.. """ Each column of chips is a 256 K-byte bank of memory. The allowable memory capacities for the board are 512 Kb, 1024 Kb (1 Mb) and 2048 Kb (2 Mb). If you are going from 512 Kb to 1 Mb, you must add 2 banks of memory (18 chips); from 512 Kb to 2 Mb requires 6 banks of memory (54 chips). See Fig 3 below. Bank 8 Bank 7 Bank 6Bank 5B.nk 4B.nk 3 Bonk 2Bank 1 [OJ 1024 Kb 2048 Kb Figure 3 Memory banks on Hyperam AT Page 47 HYPERAMAT -- -- - - -. We recommend that you purchase the memory chips through your dealer. If you decide to purchase them directly from a supplier, be sure to specify that they operate at 120 nanoseconds or faster. Caution: Memory chips are sensitve to static. Before handling the chips, ensure that you are not charged. The easiest way to do this is to touch some metal immediately before touching a chip. If conditions are such that you are receiving perceptible shocks, do not attempt to handle the chips. Step 1 Installing the memory Insert the memory chips carefully, one column at a time, starting from the first vacant column. Be careful to orient each chip in the correct direction - that is with the notched or dotted end to the right (when the Hyperam AT bracket is also to the right.) To insert a chip, check the orientation, then insert one row of legs into the corresponding row of holes in a socket. Only insert the legs half way. At this stage, you should be able to insert the row of legs on the other side of the chip; again, only insert them halfway. -. -- -. --Page 48 --- -. INSTALLING MORE MEMORY Check that each leg is sitting correctly in a hole. A common rroblem is for one of the legs to be bent up underneath the chip; you will need to check this carefully. When you have checked each leg, use steady, firm pressure on the top of the chip to push it fully home. The top of the chip should be level and in line with other chips in sockets. If it is not level, and you cannot push it home, extract it and check the legs. To extract a chip, gently insert a small screwdriver under it from the end, and carefully lever it up. When levering, try to ensure that both ends come up approximately together. Step 2 Setting the switches Once all the chips have been inserted you must alter switch bank 2 on the HyperamAT board to indicate your new amount of memory. Use the following table to set the switches. SW2.1 SW2.2 SW2.3 SW2.4 512 Kb (2 banks) OFF ON OFF OFF 1Mb (4 banks) ON OFF ON OFF 2Mb (8 banks) ON OFF ON ON Page 49 -" HYPERAMAT Step 3 Insert the Hyperam AT board in your machine. Step 4 Move SW1.B into the ON position. Step 5 Reconnect all cables and plugs and tum your machine on. Step 6 Place the Hyperam AT installation disk in drive A and enter: setramat d r NNN <enter> Where NNN is the hardware address of the Hyperam AT board (usually 258). Step 7 Turn the power off, move SW1.8 back into the OFF position and power on again. Step 8 Place the Hyperam AT installation disk in drive A, log over to drive A and enter the install program. Run the Configure Memory and Software section of the install package to reconfigure the board. Page 50 -- - --- -- -- - - -- ---------- INSTALLING MULTIPLE HYPERAM AT BOARDS INSTALLING MULTIPLE HYPERAM AT BOARDS Multiple boards for expanded memory Step 1 Install the first board using the procedures outlined in the Installation chapter. Then return to this page. Step 2 Place the second board in front of you. Look at switches 1.5,1.6 and 1.7 on switch bank 1 (located at top right). You need to select an EMS register address which is difJerentfrom the one chosen for the first board. Check the address used on the first board, then use the table below to select an address for the second board. - Sl.5 OFF ON OFF ON OFF ON OFF ON S1.6 OFF OFF OFF ON ON ON ON OFF Sl.7 OFF ON ON ON ON OFF OFF OFF EMS register EMS disabled 208 218 258 268 2A8 2B8 2E8 EMS Register address settings Normally the first board will have address 258. If this is the case we suggest that you set the second board for 268. Use a pen (not a pencil) or a screwdriver to set the second board switches. '"'" -...... Page 51 HYPERAMAT Step 3 Turn switch Sl.8 on switch bank one on the second board ON. Step 4 Tum the machine off, remove the cover and install the second board. Replace the cover and tum the machine on. Step 5 Place the Hyperam AT installation disk in drive A, log over to drive A and enter: setramat r NNN d <enter> where NNN is the EMS register address of the second board. IT, for example you used 268 you would enter: setramat r 268 d <enter> Step 6 Tum the machine off, remove the cover and move switch Sl.8 to the OFF position. Replace the cover and tum the machine on. Step 7 Place the Hyperam AT installation disk in drive A, log over to drive A and enter: setramat r NNN p <enter> where NNN is the EMS register address of the second board. Page 52 - --- ---- -- -------- ---- --- - "'" INSTALLING MULTIPLE HYPERAM AT BOARDS StepS Using EDUN or your favourite text editor, modify your CONFIG.SYS to include the new EMS register address. When you look at your CONFIG.SYS file you will see a line that looks something like: device = 'pool.sys h258 r el28 (HRlnstall) .... where 258 is the EMS register address of the first board. A full explanation of POOL.SYS can be found in the Software Reference chapter of this manual. You must insert an additional 'h' parameter for your second board's EMS register address. If for instance, the address of your second board was 268, your newly edited line, from the above example, would look like: device ='pool.sys h258 h268 r el28 Step 9 After you have finished editing, reboot the machine and observe the message displayed by the pool driver during the boot sequence. It should tell you that it finds 2 boards, and that the total amount of memory is the total of the 2 boards. Multiple boards for extended memory Refer to the previous section "Multiple boards for expanded memory". Follow steps 1 to 6, then return to this page. Page 53 HYPERAMAT Step 7 Place the Hyperam AT installation disk in drive A, log over to drive A and enter: setramat r NNN eb/NNNN es/NNNN <enter> where NNN is the EMS register of the second board, eb/NNNN prompts for the top address of the first board and es/NNNN for the amount of memory on the second board. For example, suppose the first board has 2 Megabytes (2048 Kbytes) of memory on it and the second board has 1 Megabyte (1024 Kbytes) and both boards are being used for extended memory, the command line to configure the second board would be: setramat r 268 eb/3072 es/1024 i.e. The top address of extended memory supplied by the first board is 3072 Kb (= 1024 + 2048) and the EMS register is 268. StepS You must now tell your machine about the extended memory you have just added. This can be done by running your machine's setup routine and specifying your new amount of extended memory. N.B. Some setup routines refer to extended memory as expansion memory. They are the same thing. Page 54 -- -- - - - ---- -- ---- - HARDWARE REFERENCE HARDWARE REFERENCE This section is not essential reading. The install program should tell you all you need to know about the Hyperam AT board. If, however, you would like to know more about the board in detail, read on. How the memory works The Hyperam AT board is like the AT in that most of the configuration information is stored in battery backed memory on the board. This allows most of the configuration to be performed by software, which in turn means that you do not need to take the cover off the machine when you want to change the memory setup. This configuration process is performed by a program called SETRAMAT.EXE, which is described in the software reference section of the manual. The install program runs SETRAMAT automatically after you have used the 'Configure Memory and Software' menu. Disabling the board If errors occur on boot, it is possible to disable all memory on the Hyperam AT board. This allows you to check if the errors are caused by the board without having to take it out of the machine. To enable or disable the memory on the board, set switch Sl.8 as per the following table: SI.8 OFF ON board memory ENABLED board memory DISABLED Page 55 -. -. HVPERAM AT -. -. Expanded memory window The main feature of the board is the supply of up to 2 Mb of memory compatible with the Lotus-Intel-Microsoft Expanded Memory Specification. What this means is that software applications that understand the EMS specification can use memory above the 640 Kb limit imposed by DOS.The expanded memory is accessed by a 64 Kb window that must appear in the AT address space; the valid addresses are in the range COOO to EFFF. This window must not conflict with other boards installed in the machine. The address of the window is set by the pool device driver software; the default address is DODO. This address may be changed by passing a parameter to the pool driver; see the Software Reference section for more details. Note: COOO may only be used if you do not have an enhanced graphics adapter board. EOOO should only be used ifyou have a Wang 260 PC. Board Address An EMS specification memory board uses a set of registers to control the hardware. If there are multiple EMS boards in the machine, these registers must be set to different addresses. The following table indicates how to set the register address on the Hyperam AT board. Note: The correct default for Hyperam AT is 258. If this default is not used, the address used must be passed as a parameter to the pool device driver. -. -. -. -. -. -. -. -. -. -. -. -. -. - -. -. -. -. -. -. -- -. -. --. Page 56 -. HARDWARE REFERENCE -. SI.5 SI.6 SI.7 OFF ON OFF ON OFF ON OFF ON OFF OFF OFF ON ON ON ON OFF OFF ON ON ON ON OFF OFF OFF EMS register EMS disabled 208 218 258 268 2A8 2B8 2Eg Setting EMS Register Address Amount of memory Switch bank 2 is set to indicate the amount of memory installed on the board. You may determine the amount of memory installed by counting the number of columns of chips installed. Each column is 256 Kb; thus 2 columns is 512 Kb, four columns is 1 Mb, and eight columns is 2 Mb. "" If you want to install more memory on the board, please tum to the chapter Installing More Memory. The following table indicates how the switches on switch bank 2 should be set for the amount of memory installed. 512 Kb 1Mb 2Mb SW21. SW2.2 SW2.3 SW2.4 OFF ON ON ON OFF OFF OFF ON ON OFF OFF ON Memory Size Switch Settings Page 57 HYPERAMAT Serial Ports The Hyperam AT board may be equipped with up to two serial communications ports. These devices are functionally identical to the corresponding standard IBM ports, COM! and COM2. On the Hyperam AT board, COM! uses the 9 pin D type connector at the back of the board. COM2 uses the 26 pin header labelled COM2. To use this header, you must attach the supplied Clipon cable. With the board flat on the bench in front of you, the metal bracket to the right and the gold edge connector closest to you, the headers are the two blocks of pins along the far edge of the board. The Clipon cable has a black stripe on it; the cable must be plugged into the header with the black stripe to the left. The ports may be enabled or disabled using switches S1.1 and S1.2. When disabled, the communications ports effectively do not exist, and standard ffiM communications boards may be used. For example, if you already have an ffiM serial board, you could disable COM2 on the Hyperam AT board, and configure the ffiM board as COM2. When the AT is booting, it searches for the serial ports in the order 3F8 then 2F8. The first found is installed as COMl. This means that if you only have one port installed, it will always be installed as COM!, regardless of its address in the machine. Page 58 -------- -- ------ -- ----- -- HARDWARE REFERENCE The install program searches for other serial ports and suggests a switch setting for the Hyperam AT port that does not conflict. If it cannot find an unused address, it suggests that the serial port be disabled. If you have another serial port installed, ensure that it does not conflict with your selection. The following table indicates how to set the serial ports. Note that the chip in the socket labelled "COMI" is always at address 3F8 and the chip in the socket labelled "COM2" is always at address 2F8. If you only have one serial chip on your Hyperam AT board and wish to use it at address 2F8 you must move the chip into the "COM2" socket. The COMl chip is connected to both the header directly above it (labelled COMl), and the 9 pin D-type connector on the edge of the board. Sl.l OFF ON Sl.2 OFF ON -- disable port at 3F8 enable port at 3F8 disable port at 2F8 enable port at 2F8 Serial Port Switches Parallel Port The parallel port is the large 25 pin connector on the back of the board. It is normally used for printing. You may have up to three parallel ports installed in your AT; each port must be at a different location, or they will conflict with each other. Page 59 HYPERAM AT The Hyperam AT board gives you the option of either disabling the port, in which case it will become invisible to the computer; or setting the address to one of two locations, (378 or 278 hexadecimal). The install program will look for other parallel ports in the machine and suggest a switch setting that does not conflict. If it cannot find a location that does not conflict it will recommend that the parallel port be disabled. When the AT is booting, it searches for parallel ports in the order: 3BC, 378, 278. The first port it finds is installed as LPTl, the second is installed as LPTI, and the third as LPT3. This means that if you only have one port installed, regardless of its address, it will always be installed as LPTI. The following table indicates how to set the parallel port. SI.3 OFF ON SI.4 OFF ON disable parallel port enable parallel port set address to 278 set address to 378 Parallel Port Switches -- -- ,... -. - - - ,... -- ,... -,... Page 60 SOFTWARE REFERENCE -- - SOFTWARE REFERENCE This section is not essential reading. The install program should tell you all you need to know about the Hyperam AT software. If, however, you would like more details, read on. Overview In general, the Hyperam AT software uses a device driver and a control program to perform any function. The device driver must be invoked in CONFIG.SYS; the control program may be invoked at any time after boot. The install package either creates new CONFIG.SYS and AUTOEXEC.BAT files or modifies the ones it finds on your boot disk. The Hyperam AT POOL driver (Memory manager) This device driver allows programs and Hypertec devices to access the expanded memory. When other Hypertec drivers need access to the expanded memory they make a request to this driver. Similarly, when an application program requires access to the expanded memory, the request is passed to this driver. Hyperam AT is shipped with two pool drivers, called pool.sys and poo1400.sys and an emm driver called emm.sys. -. - - Pool.sys supports LIM version 3.2 and is installed when you run the Hyperam AT installation program. Page 61 HYPERAM AT - Pool400.sys supports LIM version 4.0 and must be installed manually after running the Hyperam AT installation program. Emm.sys also supports LIM 4.0 and must also be installed manually. This driver only controls expanded memory for use by LIM spec applications. It cannot be used to control memory for the Hypertec RAM disk, print spooling and disk caching utilities. ---. - - --Page 62 --- SOFTWARE REFERENCE POOL.SYS Synopsis -. device q r = = = wNNN = eNNN = hNNN = pool.sys [q] [r] [eNNN] [hNNN] only display error messages retain the expanded memory contents if possible 'NNN' is a number specifying the window address (default DOOO) 'NNN' is the amount of memory (in Kb) to retain for expanded memory 'NNN' is the i/o port address for the HyperamAT board (default 258) The 'r' parameter is optional.If present, it will prevent a clearing of the expanded memory if internal integrity checks are correct. This allows a RAM disk to survive a reboot caused by CONTROL-ALT-DEL. The 'w' parameter is optional. It specifies the address of the 64 Kb block of memory that will be used as the window into the expanded memory. This is a block of memory that must be reserved for use by the Hyperam AT board. It should not conflict with any other memory in the machine. -.. The valid window addresses are coon, C400, C800, CCOO and DOOO and EOOO. You cannot use COOO if you have an EGA video board installed. You can only use EOOO if you have a Wang 260 PC. Page 63 HYPERAMAT The 'e' parameter is optional. If present, the number following it is used as the amount of memory to retain for use by application programs which use the Lotus/lntel Expanded Memory Specification. If this parameter is not present, the Hyperam AT software uses all available expanded memory for itself, leaving none available for use by application software. The 'h' parameter is required to specify the i/o address to be used for the registers that control the expanded memory hardware. The only criterion is that it not conflict with any other hardware addresses in the machine. See the Hardware Reference section for details. The default setting is 258. Following are the valid addresses for the board; none of these should conflict with anything but another EMS memory board. 218 258 268 2A8 2B8 2E8 208 Example device = pool.sys r wdOOO h268 e256 The above command will install the pool driver and request it to retain RAM drives if possible. 256 Kb of the expanded memory will be reserved for application programs to use. The Hyperam AT i/o address is 268, the window address is DOOO. - - - - - ,... ,... - . -,... -- Page 64 -. ,... SOFTWARE REFERENCE POOL400.SYS Supports exact! y the same parameters as those documented for POOL.SYS. You will find POOIAOO.SYS on the disk labelled EMS 4.0 drivers. - Page 65 HYPERAM AT - EMM400.SYS - Synopsis device hNNN = = emm.sys hNNN NNN is the i/o port register for the Hyperam AT board (default is 258) When loaded, emm.sys will reserve all expanded memory from the Hyperam AT board for use by EMS applications. The 'h' parameter is required to specify the i/o address to be used for the registers that control the expanded memory hardware. The only criterion is that it not conflict with any other hardware addresses in the machine. This parameter must not be altered without also altering the appropriate switches on the Hyperam AT board (see the Hardware Reference section of this manual for details of these switches). The default setting for this parameter is 258. The other valid values are 268, 208, 218, 2A8 and 2B8. EMM400.SYS must be installed manually after running the Hyperam AT installation program. Instructions for installing emm400.sys are contained in the Installation chapter of this manual. You will find EMM400.SYS on the disk labelled "EMS 4.0 drivers." - - - - - . - - - - - - Page 66 - - SOFTWARE REFERENCE RAM disks A ram disk is a block of memory that looks like an ordinary disk to the operating system. However, because a ram disk has no moving parts it works much faster than a conventional disk drive. Programs that read from and write to disk frequently can be sped up significantly if they are run from a ram disk. -. N.B. A ram disk is lost as soon as you turn the power off to your machine. You should not use RAM disks for storing sensitive information as it may be lost. A RAM disk is a block storage device like a floppy disk or hard disk and as such is allocated a letter by DOS. -. -. Because DOS learns about floppy disks and most hard disks from a hidden file called IO.SYS, these devices are allocated letters first. RAM disks, which are loadable devices declared in CONFIG.SYS are allocated drive letters after floppy and hard disks.On a machine with only floppy drives the RAM disks will start with letter C; on a machine with a hard disk they will start at D. -. -. Page 67 -- -- HYPERAMAT --- RAMDISK.SYS Synopsis device N = = ramdisk.sys [N] number of RAM disks to be declared (up to 4) The N parameter is optional. If it is omitted the default number of RAM disks is one. ------- --- -- -, - Page 68 --- SOFTWARE REFERENCE RAMFMT.EXE Synopsis ramfmt q rN NNN f [q] rN/NNN[/f] = quiet - only print error messages RAM disk number to format = size in kilobytes to make the = RAM disk force a format of the RAM disk = without questions This commands initialises one or more RAM disks. It may also be used to reinitialise an already defined RAM disk, or change its size. If this command is used on an already existing RAM disk, you will be asked if you want to proceed; if you say yes, the previous contents will be completely lost. The 'f' parameter will force the format to be performed without asking you the question; it is for use in batch files. The maximum number of RAM disks you are allowed to create was defined by you as a parameter to RAMDISK.SYS in your CONFIG.SYS file. If you did not specify a number, you may only have one RAM disk. The maximum size of a RAM disk is limited by the amount of pool memory you have, and how much memory you have allocated to other functions. Page 69 HYPERAMAT Example ramfmt rlll28 r2/54. Format RAM drive 1 at 128 Kb, RAM drive 2 at 54 Kb. Page 70 ------ --------------- ---- SOFnNAREREFERENCE '"'" Disk caching A disk cache is a block of memory set aside to store information that has been read from or written to a disk. The central assumption is that if a sector has been accessed once, there is a probability that it will be accessed again in the near future. If a copy of the information is retained in memory, then when it is accessed again there is no requirement for the disk to be accessed; instead the in-memory copy is read or written, at memory speeds. The overall effect should be to improve the perceived speed of access to the disk, as far as the user is concerned. However, it is a statistical operation. If, for example, every sector is only read or written once, then the caching can actually slow down the access to the disk, as it adds overhead to the disk operation. Because the cache cannot usually be as large as the disk it is caching (particularly if it is a hard disk), data must be moved into and out of the cache continuously. In the Hypertec software, the sector that was used the longest time ago is discarded. Thus the size of the cache has an effect on performance. A very small cache will mean that each sector is only in the cache for a very short time, losing much of the benefit. Conversely, a very large cache will slow down the system because the software spends more time searching the cache for a sector than it would have taken to read it off disk. Page 71 HYPERAMAT CACHE.SYS Synopsis device NNN = = cache.sys [NNN] maximum memory in kilobytes This driver is responsible for providing caching on disks when requested. N.B. IF YOU PLAN TO USE DISK CACHING ON A NON-IBM MACHINE WE SUGGEST YOU PROCEED WITH EXTREME CAUTION. HYPERTEC HAS DESIGNED DISK CACHING SPECIFICALLY FOR IBM MACHINES. CACHE.EXE Synopsis cache [q] fNlhN/bleld[/NNNl/t] q = quiet - only print error messages f = floppy drive number 'N' hN = hard disk drive number 'N' b = begin caching on this device e = end caching on this device d = discard the cache on this device = flash disk light to indicate valid data t NNN = time in second to retain cache contents (floppy) Page 72 -------- -. -- ---------- ---- SOFTWARE REFERENCE This program actually turns caching on by telling the cache device drive which disk drives are to be cache. For floppy disks it also specifies the length of time to retain the cache before marking it as invalid. The parameters 'fN' and 'hN' specify the drive to be affected by the command. The letter 'f' or 'h' specifies floppy or hard disk respectively. The number specifies which drive is to be affected. For technical reasons, it is not possible to use the driver letter. The numbers go from I to N for the floppies, and I to N again for the hard disks. For example, 'f!' is the fIrst floppy, normally drive A; 'hI' is the first hard disk, normally drive C. The commands are Begin caching, End caching, and Discard the cache contents. Each command affects only the drive specified in the fIrst part of the command. The Discard command is used on floppy drives when you want to change the disk. Recall that the cache is a copy of some of the sectors on the disk. If the disk is change, the cache driver cannot tell, but the contents of the cache do not match the contents of the disk. This situation may result in data corruption. It is therefore VERY IMPORTANT that you discard the cache when you change the floppy. You may discard by using this program, the popup menu, or waiting for a timeout on the cache. The optional third parameter is used to alleviate this problem. The cache driver has a timeout on the contents of a floppy cache. The default value for this period is two seconds. This is long enough to obtain much of the benefit of a cache, but short enough to ensure that data Page 73 HYPERAMAT corruption cannot occur. You may increase this timeout period if you wish; this would be done if you had a data disk that was going to be read and written frequently over a long period, for example. However, you MUST remember to discard the cache if you change the disk. There are two alternatives to the above timeout mechanism. The first is to specify the 't' parameter, instead of the 'NNN' timeout. This will cause the disk light on the floppy to flash every two seconds whenever there is valid data in the cache for that drive.This provides a visual warning not to change the floppy, but provides no protection if you ignore it. The final option is to specify a timeout of 0 (numeric zero). This will cause no timeout to occur, i.e. the cache will not be discarded until you explicitly force it. This is dangerous because you have to remember to discard every time the disk is changed. Examples cache fllb/4 f21b/200 This begins caching on floppies A and B, with timeouts of four and two hundred seconds respectively. cache fl/d f21b h lib This command discards the cache on drive A, begins caching on drive B with a default timeout of two seconds, and begins caching on the first hard disk (normally drive C). Page 74 ------------------ ---- -- SOFTWARE REFERENCE -. Print spooling and interrupt driving A print spooler is a block of memory set aside to pretend that it is a fast printer. Under normal circumstances, when the computer is sending characters to a printer it must wait for the printer to accept each character before sending the next. This means that while printing, the computer is fully occupied, and cannot be used for any other purpose. When the spooler is in place, the characters are placed in memory before being sent to the printer. As soon as the character is in the spooler, the operating system thinks it has been printed. Control is returned to the application program so that you may proceed with your work. At the same time, a background task takes the characters out of the spooler and sends them to the printer. N.B. Some application programs already have their own built-in spoolers. Examples include Framework, Multimate and Displaywrite. It is unnecessary to use Hypertec's print spooling with these programs and may even lead to problems. Page 75 HYPERAMAT SPOOL.SYS This device driver reserves a portion of pool memory for the spool buffer, and declares which devices will be spooled. Synopsis device NNN parN = = = comN = spool.sys [NNN] parNlcomN maximum memory in kilobytes provide for spooling on parallel port N (N between 1 and 4) provide for spooling on serial port N (N between 1 and 2) The NNN parameter is optional; it is a decimal number that specifies in kilobytes the maximum amount of pool memory the spooler can use. The default maximum is 8 Kb. In addition to specifying the amount of memory to reserve for spooling you must specify which ports you wish to spool on by using the parN and comN parameters (where N is the number of the port specified). Page 76 -- - SOFTWARE REFERENCE SPOOL.EXE -. -. This program activates spooling on the ports specified by SPOOL.SYS. Synopis -. -. -. -. -. -. -. -. -. spool [q] parNlcomN/bleldlplr = quiet - only print error messages q parN = parallel port N (where N is between 1 .. 4) comN = serial port N (where N is between 1 .. 2) b = Begin spooling on specified port = End spooling on specified port e d = Discard spool buffer on specified port p = Pause printing on the specified port r = Resume printing on the specified port When the Begin command is issued, any characters sent to the port will be placed in the spool buffer, and then printed by the background task. When the End command is issued, no further characters will be accepted into the spool buffer; however, the current contents will still be printed. To prevent the contents being printed, you must discard before ending. The Pause command is used to temporarily halt printing on that port; for example, to fix the paper. The spooler will continue to accept characters sent to it by the application program; they will be stored, and printed when you restart the spooler. When the Resume command is issued, printing will commence from where it was paused. The Discard command is used to flush the current contents of any of the buffers. Page 77 HVPERAMAT The Pause and Resume commands may be issued with this program or via the popup menu. If issued via the popup menu, they act on all ports, not just one. N.B. If you want printing (and spooling) to go to a serial port, you must still use the mode commands in addition to specifying your COM port in SPOOL.SYS and SPOOL.EXE. Example mode com2:96,n,7,2 mode 1ptl :=com2 spool com2/b will initialise the second serial port, redirect standard printing to it and commence spooling on it. -- ------ ----- --- - - ------ Page 78 -- SOFTWARE REFERENCE INTRUPT.SYS Synopsis device == intrupt. sys The interrupt driver allows more efficient operations of the print spooler by allowing the background printing task to avoid consuming unnecessary time on your machine. - - - -- - - -- There are two mechanisms the background task may use to print characters while the computer is performing other operations. The first is called time slicing; there is a timer in the computer which ticks 18 times a second. Once every four ticks, the background tasks takes control of the machine and sends characters to the printer, thus consuming a fixed percentage of computer time. Interrupt driving is a more efficient technique. The hardware port is given a character and told to send it; when it has finished sending, it interrupts the computer and requests another character. While the character is being sent, the computer can proceed with other activities. Interrupt driving is made optional because there is a possibility of it interfering with communications programs you may be using. Page 79 HYPERAMAT INTRUPT.EXE Synopsis intrupt [q] [1] comllcom2 rxonltxonl.. .. q quiet - only report errors = I list device status = coml serial port one = com2 = serial port two dcd = data carrier detect dsr data set ready = clear to send cts = rts = request to send data terminal ready dts = rxon xon/xoff for receive = xon/xoff for transmit txon = none disable all flow control = This program is used to control the method of flow control used by INTRUPT.SYS on serial ports. Flow control is the process of regulating the flow of characters from the computer to the printer, or from some other device to the computer. The computer can send characters to the printer more quickly than they can be printed. This means that the printer must tell the computer to stop sending for a period, so that it can catch up. Similarly, if another device is sending to the computer, the computer must be able to tell the other device when to stop. --------- -- -- -- --- -- ------ -- Page 80 -- SOFTWARE REFERENCE -. -. -. You will have to read your printer manual to determine the type of flow control required, and how to wire up the cable between the computer and the printer. The flow control is usually one of two types: XON-XOFF, or hardware lines ' -. -. -. -. -. -. -. -. -. -. Under XON-XOFF flow control, a device sends an XON character (DCl, or 11 hexadecimal in the ASCII table) to indicate that it can receive data, and an XOFF (DC3, or 13 hexadecimal) to indicate that it cannot receive data. If you specify the flag TXON, INTRUPT.SYS will stop sending if it receives an XOFF, and will start sending when it receives an XON character. If you specify RXON, INTRUPT.SYS will send an XOFF character when it cannot receive any more characters, and will send an XON when it is able to receive again. Note: Some printers send xon or xoff characters continuously when the computer is not sending to them. This can cause a 10 to 20 % loss o/performance by the at, as it has to keep handling the spurious characters. It is suggested that you turn offsuch printers when not in use. The other five flags are concerned with hardware flow control; i.e. they relate to the physical wires on your cable. If you specify DeD, DSR or crs then the corresponding signal must be TRUE (also referred to as HIGH, ASSERTED, and ON) before the computer will send data. Conversely, if you specify RTS, the computer will set R TS HIGH whenever it wants to send data. If you specify DTR, then it will set DTR TRUE whenever it is ready to receive data, and set it FALSE whenever it cannot receive. -. Page 81 -. HYPERAMAT The Popup Menu Popup is a utility supplied by Hypertec to allow control of print spooling and disk caching from within application programs. If installed, you can invoke popup by holding down the ALT key and typing a sequence of numbers (usually 224) on the numeric keypad. When you do this a small menu appears in the top left of your screen. It allows you to pause and resume printing from the print spooler, and to discard the cache on drives A and B. POPUP.SYS Synopsis device NNN = = popup.sys [0 NNN] number specifying alternate command sequence This device must be loaded last. Once invoked, selections are made from the displayed options by pressing the appropriate function key. The function is performed and the menu disappears. Page 82 - - - - -- -- - - - - -- - - - - -- ------- ---- SOFTWARE REFERENCE - The 'NNN' parameter is optional. When you press ALT 224, this is converted into a single character which the popup driver intercepts and interprets as a command to show the menu. It is possible that you have an application that requires this character. If this is the case, you can change the command by specifying a decimal number in the range 135 to 254 as a parameter to the driver. If you specify 225, for example, then to invoke the popup menu, you must type ALT 225. The options on the menu are determined by which drivers you have loaded; if, for example, you have both the spooler and the disk cache loaded, you might see the following: FI F2 F3 F4 F5 F6 - Pause Spooler Re-start Spooler Discard Spool Change Disk A: Change Disk B: Exit menu If you have the print spooler installed,the options to control it will appear. Unlike the commands you can give to the SPOOL.EXE program, they affect all the ports; if you are printing from PARI and COMI at the same time, then the 'Pause' option will pause printing on both ports. If you have the cache driver installed, the options to change floppy disks will appear. These cause the cache on the corresponding floppy disk to be discarded; see the cache program documentation for further explanation. Page 83 HYPERAMAT Note: When using your display in graphics mode, the popup menu will display a highly attenuated summary of the options. Essentially, the summary pairs each active function key with a single letter to identify the command. This is because ofspace restrictions imposed to keep the driver to a reasonable size. The letters are as self explanatory as possible, but ofnecessity some are a little cryptic; here are the letters in use: P R D A B Pause spooler Restart spooler Discard spooler buffer Change cached floppy disk A Change cached floppy disk B --- ---- - -- --- ---- Page 84 - SOFTWARE REFERENCE SETRAMAT.EXE Synopsis -. setramat [q] [sb/NNN ss/NNN] [ebINNN eslNNN] [p] [d] [r NNN] [w NNN] -. q sb/NNN = = ss/NNN eb/NNN = = es/NNN = P -. -. -. -. = d = rNNN = wNNN = quiet - only print error messages set system ram base address to NNNKb set system ram size to NNN Kb set extended ram base address to NNNKb set extended ram size to NNN Kb allocate all pages to expanded memory disable all pages set board address to NNN (default 258) set window address to NNN (default DOOO) This program is used to set the memory configuration information stored in the battery backed ram on the Hyperam AT board. Under normal circumstances the install program will run SETRAMAT for you. If however, you are installing more memory or multiple Hyperam AT boards, you may need to run this program separately. SETRAMAT sets the amount of Hyperam AT memory allocated to system and extended memory, the address of the EMS control register and the EMS window. -. -. Page 85 -. HYPERAMAT The memory on the Hyperam AT board is divided into pages. These pages may be allocated to system, extended or expanded memory. The function of SETRAMAT is to allocate these pages. The 'sb' parameter sets the address at which Hyperam AT memory allocated to system memory will appear. The valid values are 256 Kb, 384 Kb and 512 Kb. If you use the 'sb' parameter, you must also specify the 'ss' parameter; this indicates how much HyperamAT memory to give to system memory. The valid values are 128 Kb, 256 Kb and 384 Kb. The 'eb' parameter sets the address at which Hyperam AT memory allocated to extended memory will appear. The valid values are any 128 Kb boundary, starting at 1024 Kb. Thus the first few values are 1024 Kb, 1152 Kb, 1270 Kb, 1398 Kb etc. If you use the 'eb' parameter, you must also specify the ' es' parameter; this indicates how much Hyperam AT memory to give to extended memory. The valid values are simply the amount of memory you have available, in 128 Kb blocks. The 'p' parameter allocates all the memory on the board to expanded memory. This means none of the Hyperam AT memory would be available for system or extended memory. The 'd' parameter is used to disable all the memory on the Hyperam AT board. You may wish to do this if you think there is an error on the board hardware, and you want to disable the hardware to see if the error goes away. Page 86 --- - - - - -- --- SOFTWARE REFERENCE -. -. -. -. The 'r' parameter is used to specify the address of the EMS control register (also referred to as the board address elsewhere in this manual). The valid values are 258, 268, 2a8, 2b8, 2e8, 208, 218. The 'w' parameter is used to set the address of the EMS window. Valid values are COOO, C400, C800, CCOO, DOOO and EOOO. COOO may only be used if you do not have an EGA video board installed. Eooo may only be used if your computer is a Wang 260 PC. Examples setramat sb/512 ss/128 r 258 w Dooo -. -. This command will set the board to supply 128 Kb of memory to system memory, starting at address 512 Kb. The rest of the memory on the board will be used for expanded memory; the control register address will be 258, and the window address will be Dooo. setramat sb/256 ss/384 eb/1024 es/512 r 268 w COOO This command will allocate 384 Kb of memory to system memory, starting at 256 Kb. 512 Kb of memory will be allocated to extended, starting at 1024 Kb. The EMS control register will be at 268 and the window will be at Cooo. -. -. Page 87 HVPERAMAT WTCRAM.EXE This program is used to set the memory configuration information stored in the battery backed RAM on the AT motherboard. Under normal circumstances the install package will run WTCRAM for you. If you are installing your Hyperam AT board manually, however, you will need to use this program. Synopsis wtcram [b=NNN] [e=NNN] b = NNN e = NNN The 'b' parameter specifies the amount, in kilobytes, of system memory in the computer The 'e' parameter specifies tha amount, in kilobytes, of extended memory in the computer. Examples wtcram b = 640 e= 1024 Configures the computer for 640 Kb of system memory and 1024 Kb of extended memory N.B. WTCRAM works in much the same way as the AT setup program. You should run either wtcram or your setup program, not both. Page 88 ----. - - - - - -. - --- APPENDICES APPENDICES Appendix A • Switch Setting Summary Memory enable/disable This may be useful if you have a problem and want to determine whether the HyperamAT could be causing it. S1.8 OFF ON board memory ENABLED board memory DISABLED EMS register address - The table below indicates how to set the board address or EMS control register. Sl.5 Sl.6 Sl.7 - OFF ON OFF ON OFF ON OFF ON OFF OFF OFF ON ON ON ON OFF OFF ON ON ON ON OFF OFF OFF EMS Register EMS disabled 208 218 258 268 2A8 2B8 2E8 The default is 258, i.e. SW1.5, 1.6 and 1.7 all ON. Page 89 - HYPERAMAT Memory size The table below indicates how to set the address for the amount of memory installed on the board. 512Kb 1Mb 2Mb SW2.1 OFF SW2.2 ON SW2.3 OFF ON ON OFF OFF ON ON SW2.4 OFF OFF ON - - - - - - - - ,.. ,.. - - ,.. Serial ports The table below indicates how to set the serial ports. The board is labelled COM land COM2. As noted in the Hardware Reference section, the serial port at 2F8 (labelled COM2 on the HyperamAT board) may appear as COMl to DOS in some circumstances. The serial port labelled COMl on the board is used with the 9 pin connector at the back of the board. The port labelled COM2 may only be used with the 26 pin header labelled COM2. Sl.1 OFF S1.2 OFF ON ON disable port at 3F8 enable port at 3F8 disable port at 2F8 enable port at 2F8 - - - ,.. ,.. - - ,.. ,.. -- - -- - ,.. ,.. Page 90 --,.. APPENDICES Parallel port The parallel port uses the large 25 pin connector at the back of the board. When its address is set to 278, it uses interrupt level 5, and when set to 378 it uses interrupt level 7. This is as per IBM standards. The table below indicates how to set up the port. S1.3 OFF ON S1.4 OFF ON disable parallel port enable parallel port set address to 278 set address to 378 Page 91 HYPERAMAT Appendix B Warranty Hypertec Pty Ltd warrants the hardware components of this product to be in good working order for a period of two years from the date of purchase from Hypertec or an authorised Hypertec dealer. Should this product fail to be in good working order at any time in this two year warranty period, Hypertec will, at its option, repair or replace this product. Repair parts and replacement products will be furnished on an exchange basis and will be either reconditioned or new. All replaced parts will become the property of Hypertec. This limited warranty does not include service to repair damage resulting from accident, disaster, misuse, abuse or non-Hypertec modification of the product. Components, such as memory, installed by the dealer or the user are not covered by this warranty. Hypertec Pty Ltd provides no warranty of any kind for the software component of this product. The entire risk as to the results and performance of the software is assumed by you. Apart from the above, no warranty is expressed or implied, including warranty of merchantability or warranty of fitness for use or for a particular purpose. In any event, liability is limited to replacement of the product. In no event shall Hypertec be liable for any incidental, general, special, exemplary or consequential damages, even if Hypertec has been advised of the possibility of such damages. Page 92 -------- -- -- ----- --- ------- APPENDICES Product Repair Procedure - If the hardware component of your Hypertec product ever requires repair, contact your dealer first. If the product must be returned to the factory for repair, follow these guidelines for rapid turnaround: [1] You must be issued with a Return Maintenance Authority (RMA) number from Hypertec before shipping the faulty product. The RMA may be obtained by contacting Hypertec's Service Department. [2] The product must be shipped in the original packaging or equivalent. You agree to insure the product or assume the risk of loss or damage in transit, and to prepay shipping charges to and from the factory. You must enclose a copy of your original purchase receipt as proof of date of purchase for all warranty repairs. You should also enclose a type-written description of the problem, and full details on how to contact you during business hours. -. -. .... [3] If the product is being repaired under warranty, there is not charge for parts and labour, except for dealer or user-installed components. Dealer installed components are warranted by the dealer. If we find that your dealer or user-installed parts are defective, we will identify which parts are defective, but we will not replace parts unless you specifically authorise us to do so in writing when you return the board. The parts charges and any applicable labour charges will be billed. Page 93 HYPERAMAT [4] If the product is not being repaired under warranty, there is a minimum charge of $50 plus parts for each board returned. If the total cost of repair will exceed $75, we will contact you for authorisation. If you do not authorise the repair, the $50 minimum labour charge still applies and will be billed. [5] Be sure to clearly indicate the return address. If the product is being repaired under warranty, you are only liable for the shipping charges. If the product is not being repaired under warranty, shipping costs and repair expenses will be billed COD. Trademarks IBM is a trademark of International Business Machines Corporation. The Hyperam AT circuit board, circuit design and manual are protected by copyright 1986. The Hyperam AT User's Manual is protected by copyright 1990. Copyright belongs to Hypertec Research Pty Ltd. The software tools for the menu driven install package were supplied by Jack Carmon and Leon Cunio. Page 94 --- -- - - - - ... -- --- -----