1
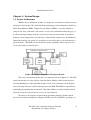
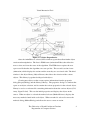
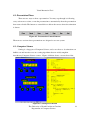
Visual Instruction Tool
By
Jeffrey Alexander
Drew Linderman
Senior Thesis
Advisors:
Dr. K. R. Subramanian
Dr. Thomas Cassen
Dr. Asis Nasipuri
December 2005
Visual Instruction Tool
Acknowledgments
Drew and Jeffrey would like to thank Dr. Subramanian and Dr. Cassen for all of
their input over the last year that has made this project what it is today. Thank you for
the ideas, debugging, and time you put into it (especially the Friday afternoon meetings).
We would also like to thank Dr. Asis Nasipuri for his help in taking our project to
the domain of Electrical Engineering. Without his help, we would not have been able to
cross this large boundary.
The University of North Carolina at Charlotte
Department of Computer Science
1
Visual Instruction Tool
Table of Contents
Chapter 1: Introduction ......................................................................................................3
Chapter 2: Background.......................................................................................................4
2.1: Problem Description .........................................................................................4
2.2: Related Work ...................................................................................................4
Chapter 3: System Design ...................................................................................................6
3.1: System Architecture..........................................................................................6
3.2: General Program Flow......................................................................................7
3.3: Visual Connection to Algorithm.......................................................................7
3.4: Object Hierarchy ..............................................................................................8
3.5: Object Library.................................................................................................10
Chapter 4: Results .............................................................................................................12
4.1: Design Phase ..................................................................................................12
4.2: Presentation Phase .........................................................................................14
4.3: Computer Science ...........................................................................................14
4.4: Electrical Engineering ....................................................................................15
Chapter 5: Conclusion.......................................................................................................18
5.1: Summary.........................................................................................................18
5.2: Future Work....................................................................................................18
References.........................................................................................................................19
Appendix: Source Code ....................................................................................................20
The University of North Carolina at Charlotte
Department of Computer Science
2
Visual Instruction Tool
Chapter 1: Introduction
Instructors are faced with the task of explaining core concepts of their discipline
in a manner that will allow students to quickly grasp the concepts being taught. Many of
these basic concepts can be expressed as a list of processes to be followed (an algorithm).
Instructors teach these algorithms with a chalk board and walk through the steps, drawing
out figures and graphs to depict graphically what occurs at each point in the algorithm.
This becomes very tedious and time consuming which limits the number of examples that
can be covered in a class.
There have been many attempts to create a system that would allow an instructor
to animate an algorithm. Many of these have draw backs, so we have designed a system
that would give an instructor, of any discipline, the ability to explain an algorithm in a
graphical way, while also showing the underlying algorithm, through a process that is not
too technical or time consuming. ANIMAL[4] is one of the systems that has many traits
which we feel are necessary to solve this problem but it lacks the ability to cross domains
as easily as our system allows.
We designed our system to be interactive, such that the instructor uses a GUI to
build the animation, with little to no programming required. We also designed the system
to show the link between an algorithm and its animation. We feel this link is one of the
important attributes of our system that leads to the understanding of a concept.
With our system, we have created animations of two sorting algorithms in
Computer Science and signal manipulation in Electrical Engineering. With further
development of an object library, we could animate any number of examples in other
disciplines of study.
The University of North Carolina at Charlotte
Department of Computer Science
3
Visual Instruction Tool
Chapter 2: Background
2.1: Problem Description
A specific example of where our system could be used is within Computer
Science. When taking an introductory Computer Science course, students spend their first
few semesters learning the basics of how assignment statements, conditional statements,
and loop constructs behave, and then move to sorting algorithms to form a basis of
knowledge that they will use forever. These fundamental concepts form the foundation
that must be understood for a student to become a viable Software Developer.
A number of systems have been developed to help students visualize the behavior
of algorithms. These systems typically involve animation to show how data are
manipulated as the algorithm is executed.
2.2: Related Work
There are a variety of systems that attempt to aid in visually explaining the
behavior of an algorithm. Systems such as JAWAA[6] and JAnime[2] are web based
systems which use a scripting language with animation capabilities. The main drawback
to JAWAA is that it’s not interactive, while JAnime has limited distribution. TANGO[5],
one of the earliest systems augments animation to an executing program and precludes
the use of pseudo code, and thus, the relationship between the visual output and the
underlying algorithmic concepts. PAVANE[3] is purely visual and thus suffers the same
drawback as TANGO.
Finally, JELIOT[1] is a purely Java based system for program visualization; this
can be challenging for use by non-programmers. ANIMAL[4], a more recent system for
animating algorithms, is closer to what we propose in our system; their system is easy to
use and flexible in presenting the algorithm as pseudo code or executable code, but there
is no support for user-centered data, expression evaluation, branching or loop constructs.
While the systems described above have some desirable characteristics related to
our goals, they are either too narrowly focused within a single domain, or they are too
complex for use by non-programmers; our system is focused on rectifying these
The University of North Carolina at Charlotte
Department of Computer Science
4
Visual Instruction Tool
drawbacks. The major disadvantages found among existing systems fall into a few
categories, summarized below.
• A proprietary programming language must be learned to implement the animation.
• The algorithm to be animated must be written in a specific programming language.
• It is time consuming to create or modify the animation.
• The system employs a fixed number of algorithms that cannot be modified.
• The manner in which the animation is presented is fixed.
• The system is not interactive or uses fixed data sets.
• Limited to the discipline of Computer Science.
The University of North Carolina at Charlotte
Department of Computer Science
5
Visual Instruction Tool
Chapter 3: System Design
3.1: System Architecture
With the above limitations in mind, we designed a system that would better aid an
instructor in their lecture. We decided that the underlying system architecture should be a
Finite State Machine (FSM). Wikipedia.com defines a FSM as “a model of behavior
composed of states, transitions, and actions. A state stores information about the past, i.e.
it reflects the input changes from the system start to the present moment. A transition
indicates a state change and is described by a condition that would need to be fulfilled to
enable the transition. An action is a description of an activity that is to be performed at a
given moment.” The FSM was chosen because many algorithms can be expressed in a
set of states with associated actions.
Figure 3.1: Major Components of Proposed System
The system was broken up into the six components shown in Figure 3.1. The GUI
allows the instructor to select objects (from the Object Library) and describe the states
(Concept Definitions) of the algorithm and the actions to be performed (on the Display
Canvas) during each state, which is then passed to the FSM. The FSM is responsible for
maintaining and running the presentation. The Object Editor is a future addition which
allow the creation of custom objects for uses in a presentation.
We chose to develop the system in the programming language Jython, which
gives us the syntactical simplicity of Python and the extensive capabilities (packages) of
The University of North Carolina at Charlotte
Department of Computer Science
6
Visual Instruction Tool
Java. Our system also needs the ability to compile and run code at runtime which Python
allows with the compile/exec commands.
3.2: General Program Flow
The first step of creating a presentation of an algorithm is to break it down into
states. Specifically within Computer Science, we use each line of text as a state. Then the
instructor associates actions to each state. Actions can be anything from update the value
of an object on screen, change its background color, or move to another state. When the
design phase is complete, the system keeps all this information in a data structure like
Figure 3.2 below.
state list
state 0,
s0
action 0
s0a0
action list
action 1
s0a1
state 1
s1
action 0
s1a0
state 2
s2
action 0
s2a0
action 1
s2a1
action 2
s0a2
Figure 3.2: Internal Data Structure of a Presentation
After this is done, an instructor can then view the presentations by stepping
through it or running it. This is done internally by starting at state 0 action 0 and then
executing each action in the current state list.
3.3: Visual Connection to Algorithm
The system has to have a visual connection to the algorithm, as in, when the
algorithm presentation is viewed, there needs to be a direct connection of how the text
based description is related to what is happening graphically. We decided that the
presentation mode would include two windows, one to show each state of the algorithm
which would note the current state, and a graphical window to show what happens in
each state.
The University of North Carolina at Charlotte
Department of Computer Science
7
Visual Instruction Tool
Figure 3.3 shows a presentation snapshot. You can see from the presentation the
numbers 9 and 6 are swapping positions. In the right window, the red line indicates the
present state is a swap, directly linking the animation and the algorithmic concept.
Figure 3.3: Presentation Mode
In having this link between algorithm and animation, we did not want the
connection to become dependent as in other systems. The view of the states of the
algorithm should be independent of what is shown, so that the instructor has the freedom
to describe the algorithm in any form or notation they choose, such as in Computer
Science, an instructor may choose from a wide range of programming languages, or even
use pseudo code to describe an algorithm.
3.4: Object Hierarchy
Each component is made up of several objects. The FSM is implemented by the
kernel object which is responsible for maintaining the states and their respective actions.
The kernel is also responsible for execution of the FSM by stepping through each state.
The GUI is responsible for collecting state and action input from the user and giving it to
the kernel in the format it understands. MainAninApp creates the initial GUI window,
which is made up of the main menu (MainMenu), canvas, and button panel (BtnPanel).
MainMenu controls the spawning of the animation editor (AnimEditor) and algorithm
editor (AlgoEditor), a simple text editor. The canvas is a display window for the objects
created and acted upon. The BtnPanel is a series of buttons used to control the kernel.
Below, Figure 3.5 graphically explains all these dependencies.
The University of North Carolina at Charlotte
Department of Computer Science
8
Visual Instruction Tool
Figure 3.5: Object Dependencies
Once the AnimEditor is selected, three windows spawn that allow further object
creation and manipulation. The first is FSMviewer (Animation Editor) that allow the
user to select and view the states of the algorithm. The FSMviewer requires the user
open a text file that has the algorithm, one state per line. The second is action viewer
(Animation) which displays the actions and the state they are associated with. The third
window is the object library (ObjectSelector) that allows the selection of the various
objects. This library is populated with pre-built objects.
Creating new objects on the screen requires information from the properties
dialog (PropertyDialog) and the library (Library). The properties dialog is a window that
opens on an object selection, and it contains the various properties for the selected object.
Library is used as a reference file containing information about the various objects (Cell,
Array, Signal, Label). This sets the initial properties and displays the object on the
canvas. When an object is selected the method selector (MethodSelector) displays the
necessary methods found inside each object. When a method is selected it creates the
methods dialog (MethodDialog) and allows the user to create an action.
The University of North Carolina at Charlotte
Department of Computer Science
9
Visual Instruction Tool
Figure 3.6: Object Creation Path
Figure 3.6 illustrates the connection between the various objects. The solid lines
show which files create others and dotted lines show information passed from the source
to the destination. This figure shows the central importance of the kernel and how
information contained there is passed throughout the system.
3.5: Object Library
One of the largest limitations of other systems is that they are limited to the
discipline of Computer Science. Algorithms, while heavily used within Computer
Science, are followed on a daily basis, from how we get ready in the morning, to how we
drive to work, or cook a meal. An algorithm is simply a set of steps that are followed in a
sequence on some input to achieve an output.
Computer Science instructors are lucky enough to have the algorithm already
stated. Other disciplines may not have an algorithm predefined or as explicit as in
Computer Science, but there is an underling set of steps followed to solve the problem.
The University of North Carolina at Charlotte
Department of Computer Science
10
Visual Instruction Tool
To allow for expansion to other disciplines, our system supports the addition of
objects to an existing library. Currently, the library of objects contains a Cell, Array, and
Signal. As Figure 3.7 shows, the
objects can even be built upon
another, such as the Array object is
a collection of Cell objects. Each
Figure 3.7: Library Object Hierarchy
object has actions that can be acted
on during a state, such as changing visual aspects like background or border, or updating
its value, such as evaluating an expression. Figure 3.8 shows the available properties of
the cell, array, and signal objects.
Figure 3.8: Object Properties
The following section describes how the user creates a presentation by calling
these actions for each state. Sections 4.3 and 4.4 show these objects being used in
animations of bubble sort, insertion sort, and basic signal manipulation.
The University of North Carolina at Charlotte
Department of Computer Science
11
Visual Instruction Tool
Chapter 4: Results
4.1: Design Phase
The process of creating a presentation of an algorithm should be simple and
should not require programming. Some other systems require you to use a specific
programming language or even use a proprietary scripting language.
It should also allow creativity in the design of the presentation, such that an
instructor has the freedom to graphically explain an algorithm in the manner they choose
that fits their teaching style.
Here are the steps to follow when designing a presentation.
1. Type text representing steps of an algorithm. Each line of text represents a state.
2. A state object is created for each line of text and inserted into a state list.
Figure 4.1: Algorithm States
3. User selects from a library the objects that will be used during the execution of the
algorithm. These are added to an object list.
Figure 4.2: Object Library
The University of North Carolina at Charlotte
Department of Computer Science
12
Visual Instruction Tool
4. User selects a line of text and an object that is to be manipulated when the chosen line
is “executed” (by stepping into it like a debugger).
5. When an object is selected, its methods are shown. User selects a method and
specifies values for method'
s arguments.
Figure 4.3: Object Methods Dialog Box
6. The method and its arguments are concatenated into a string and inserted into the
state'
s action list. Items in the action list are executed by the FSM.
Figure 4.4: Method Argument Dialog Box
7. For a given line of the algorithm, objects and methods may be selected more than
once, and are selected in the order in which animation actions are to occur.
The University of North Carolina at Charlotte
Department of Computer Science
13
Visual Instruction Tool
4.2: Presentation Phase
There are two ways to show a presentation. You may step through it, following
every action one at a time, or run the presentation to automatically show the presentation
from start to finish. The buttons to control this are below the canvas where the animation
is shown.
Figure 4.5: Presentation Control Buttons
The next two sections show presentations we designed to test our system.
4.3: Computer Science
Sorting is a large part of Computer Science, and so we chose to do animations on
bubble sort and insertion sort, two sorting algorithms that are widely taught in
introductory Computer Science courses. Figure 4.6 below shows a screen shot of the
Figure 4.6: Sorting Presentation
The University of North Carolina at Charlotte
Department of Computer Science
14
Visual Instruction Tool
animation while it is running. This specific presentation runs an example of bubble sort
and then shows an example of insertion sort, all in one presentation.
When a student views this animation, you can see how bubble sort gets its name
from the fact that larger values bubble to the right of the array. This is also powerful
because multiple algorithms can be put into one presentation to allow you to see them run,
one after another.
4.4: Electrical Engineering
An application of Electrical Engineering an instructor teaches is in the area of
signal manipulation. A signal is a series of points, drawn on a grid, that are connected to
make up a continuous line. This program provides the user with a modifiable signal
object. The user sets the points to be drawn on the blank grid, which populates it with a
signal. This signal populated grid is then acted upon with shift actions that will change
the location of the displayed signal. Each visual shift action on the canvas is connected
with that action written in the FSM viewer. This allows viewers to learn that a visual
action can be tied to written one.
The basic structure of the signal object operates on the idea that there must be a
virtual grid that the user will associate with the signal line and the real values that
contains the points within the object’s panel. The virtual grid is the visual representation
of the signal with its values
displayed on the screen. The
user will write the code using
this system and the viewer will
see the values displayed in this
Figure 4.7: Signal Grid
system. The real values are kept
hidden from the user and the
viewer but hold the x and y locations of the points within the object, and are calculated
when actions are taken on the signal.
The University of North Carolina at Charlotte
Department of Computer Science
15
Visual Instruction Tool
The following are a series of steps to create a presentation that manipulates a signal.
1) Write a text file describing the problem in a series of states, one state per line
2) Load Program
3) Click file, then animation
4) Click open in the “Animation Editor” window
5) Click “signal” in the “object library” window
6) Modify the options to your preference, then click ok
A) Hold shift and click and drag the “signal” object to resize it
B) Hold crtl and click and drag to move the object
C) Hold alt and click to delete object
7) Create additional objects using the same interface
8) Click to the line in the “animation editor” window with a action you want the
signal to take
9) Click on the object you want the action on
10) Click on the appropriate option in the list, respond to the popup, click ok, click
ok
11) Repeat as many times as necessary to complete your problem
12) To run hit reset, then run on the main menu bar
Below, Figure 4.8 shows an example presentation of signal manipulation.
Figure 4.8: Signal Presentation
The University of North Carolina at Charlotte
Department of Computer Science
16
Visual Instruction Tool
The student gains the ability to see the signals gradually change according to
specific values and different step changes. When each step in the action viewer is lit up,
an action will take place, and then when that step is finished, the next step is lit up. This
is the key relationship that must be made in order to successfully educate watchers on
how to manipulate signals.
The University of North Carolina at Charlotte
Department of Computer Science
17
Visual Instruction Tool
Chapter 5: Conclusions
5.1: Summary
Currently there is not a system that any person may use, regardless of their
technical background, which allows the freedom to animate a concept that is easy to use
and extensible to other domains of study outside of Computer Science.
The interactive nature of our system allows the user to have no knowledge of
programming and the expandable object library allows for limitless growth to other areas
of study. The presentation mode also helps connect the presentation back to the
fundamental concept being explained.
Our system is the first phase of a powerful system that will enable instructors to
explain algorithms to their students graphically, which will aid in the comprehension of
necessary core concepts in their discipline of study.
5.2: Future Work
This system has many areas of expansion as it has just begun development. In the
short term, we would like to add a graph/tree object to the library which would complete
the basics of objects used within Computer Science. We would also like to add recursion
functionality, which is not a feature of any other system available.
With the object library, we hope that it would continually grow. To facilitate this
so that anyone could create an object, not just technically minded software developers,
we have thought about the addition of an object editor. The object editor (a system in and
of itself a large undertaking) would provide a GUI for the user to create the objects,
rather than writing the code on their own.
The University of North Carolina at Charlotte
Department of Computer Science
18
Visual Instruction Tool
References
[1] J. Haajanen et al. Animation of user algorithms on the web. In Proceedings of the
IEEE Symposium on Visual Languages, Italy, pages 360–367, 1997.
[2] R.Noonan. JAnime User Manual. Dept. of Computer Science, College of William and
Mary. www.cs.wm.edu/ noonan/animations/userman/.
[3] G.C. Roman, K.C.Cox, C.D. Wilcox, and J.Y. Plun. Pavane: A system for declarative
visualization of concurrent computations. Journal of Visual Languages and Computing,
3:161–193, 1992.
[4] G. Rossling, M. Schuler, and B. Freisleben. Animal: Algorithm animation tool. In
Proceedings of the ITiCSE 2000 Conference, Helsinki, Finland, pages 37–40, 2000.
[5] J.T. Stasko. Tango: A framework and system for algorithm animation. IEEE
Computer, 23(9):27–39, 1990.
[6] W.Pierson and S.H.Rodger. Web-based animation of data structures using jawaa. In
Twentyninth SIGCSE Technical Symposium on Computer Science Education, pages 267–
271, 1998.
[7] Finite state machine. Wikipedia.com.
http://en.wikipedia.org/wiki/Finite_state_machine
The University of North Carolina at Charlotte
Department of Computer Science
19
Visual Instruction Tool
Appendix
Source Code
The University of North Carolina at Charlotte
Department of Computer Science
20