1
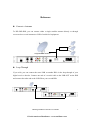
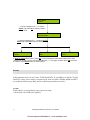
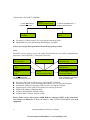
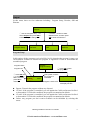
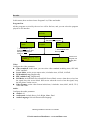
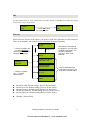
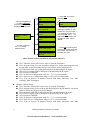
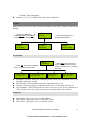
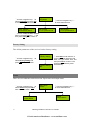
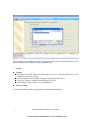
Professional HD Integrated Receiver Decoder User Manual ¾ 1RUWK$PHULFDQ'LVWULEXWRUZZZVDWHOOLWHDYFRP TABLE OF CONTENT SAFETY................................................................................................................................ 1 REFERENCE....................................................................................................................... 2 FEATURES .......................................................................................................................... 3 INTRODUCTION................................................................................................................ 4 FRONT PANEL ...................................................................................................................... 4 REAR PANEL........................................................................................................................ 5 TUNER IN AND ASI OUT ....................................................................................................... 6 TUNER IN AND IP OUT.......................................................................................................... 6 TUNER IN AND CVBS OUT ................................................................................................... 6 IP IN AND ASI OUT .............................................................................................................. 7 TUNER/IP/ASI IN AND SDI OUT .......................................................................................... 7 TUNER/IP/ASI IN AND HDMI OUT ...................................................................................... 7 SYSTEM CONNECTION DIAGRAM ......................................................................................... 8 FRONT PANEL CONTROL & OPERATION ................................................................ 9 INPUT ................................................................................................................................ 12 Sources.......................................................................................................................... 12 Params .......................................................................................................................... 13 OUTPUT ............................................................................................................................. 16 Program Setup .............................................................................................................. 16 Decoder......................................................................................................................... 17 SDI ................................................................................................................................ 18 Ethernet......................................................................................................................... 18 SYSTEM ............................................................................................................................. 20 Local Setup.................................................................................................................... 20 Properties...................................................................................................................... 20 Factory Setting.............................................................................................................. 21 STATUS .............................................................................................................................. 21 Input status.................................................................................................................... 22 Outputs status................................................................................................................ 22 NMS CONTROL & OPERATION.................................................................................. 23 LAN PARAMETERS SETTING & CONNECTION ESTABLISHMENT .......................................... 23 Local network setting.................................................................................................... 23 Connection .................................................................................................................... 23 NMS MAIN INTERFACE CONFIGURATION.......................................................................... 24 TROUBLESHOOTING .................................................................................................... 33 SPECIFICATIONS............................................................................................................ 36 ¾ 1RUWK$PHULFDQ'LVWULEXWRUZZZVDWHOOLWHDYFRP Safety z To avoid electric-shock hazards, do not open the receiver; refer service to qualified personnel only. z Keep the receiver away from flower vases, tubs, sinks, etc., in order to avoid damaging the equipment. z Do not expose the receiver in the sunlight. And keep it away from the heat source. z Do not block ventilation holes of the Receiver so that air can circulate freely. z When the abnormal phenomenon occurs, cut off the power immediately. z Do not touch the receiver during thunder. That might create electric shock hazards. z Switch the receiver off whenever it remains out of service for an extended period. z Be sure to turn the receiver off and disconnect the AC power cord before cleaning the receiver surface. If the surface is dirty, wipe clean with a cloth that has been dipped in a diluted soap water solution and wrung out thoroughly, and then wipe again with a dry cloth. z Specifications and functions may be changed for improvement without notice in advance. 1 HD Integrated Receiver Decoder User Manual ¾ 1RUWK$PHULFDQ'LVWULEXWRUZZZVDWHOOLWHDYFRP Reference z Connect a Antenna To HD IRD IRD, you can connect either a single satellite antenna directly or through converter box several antennas or LNB of multi-feed equipment. Converter Single Satellite Antenna z Loop Through If you wish, you can connect the same LNB to another IRD via the loop through of your digital receiver decoder. Connect one end of a coaxial cable to the LNB OUT on the IRD and connect the other end to the LNB IN on your second IRD. HD Integrated Receiver Decoder User Manual ¾ 1RUWK$PHULFDQ'LVWULEXWRUZZZVDWHOOLWHDYFRP 2 Features z MPEG-4 AVC (H.264) Digital compliant z DVB-S2/C/T signal input support (optional) z For DVB-S2 model, input Frequency 950-2150 MHz, Symbol Rate 1 ~ 45 Ms/s (137Ms/s for 8PSK); for DVB-T model, input Frequency 45-858 MHz, Symbol Rate 0.45 ~ 7 Ms/s; for DVB-C model, input Frequency 50-862 MHz, Symbol Rate 3 ~ 7Ms/s z 1 Tuner Input (F-Type) and Loop-through z 2 DVB Common Interfaces (CI ) for descrambling most common CA systems z 1 ASI transport stream input & 2 identical ASI outputs capable of working as TS decoder z IP stream input and output (optional) z VBI Teletext handling z 2 identical SDI outputs for convenient conversion of program format z AES/EBU digital audio output z BNC-interfaced CVBS output z HDMI output with high quality video and audio gives an audiovisual feast z Full control via front panel or Ethernet port z Automatic recovery from latest system configuration for unexpected power off z Software upgrade via NMS 3 HD Integrated Receiver Decoder User Manual ¾ 1RUWK$PHULFDQ'LVWULEXWRUZZZVDWHOOLWHDYFRP Introduction The HD IRD is an advanced MPEG-4 AVC (H.264) HD integrated receiver decoder with optional TS-IP mutual conversion function. It can receive signal from different program sources such as Tuner, ASI or IP (optional). Its prolific output interfaces such as IP, SDI, AES/EBU, HDMI and ASI can meet different system requirements. The HD IRD also has 2 common interface slots which can decode multiple scrambled channels. It is an ideal component for either a standard SD/HD digital video or an IPTV head-end system. Front Panel LED Indicator: Power: The LED lights on when the STB is power on. Lock: The LED lights on when a channel is locked. Otherwise there is no channel locked. Alarm: The LED flickers when there is something abnormal. For example, the strength of the input signal is too weak. Display screen: Show the channel name of TV or Radio program and the configuration information. CI SLOTS: There are two CI slots for various CAS CAM (PCMCIA) modules. KEY PADS: Select Keys: To change channels, adjust volume and configure the IRD. MENU: To enter the menu and the quit function of the sub menus. OK: To confirm the operation in the setup. 4 ¾ 1RUWK$PHULFDQ'LVWULEXWRUZZZVDWHOOLWHDYFRP Rear Panel 1 2 3 5 6 4 7 8 9 10 11 12 13 1. TS/IP: TS stream input and output as IP format. 2. AES/EBU: Professional digital Audio output with XLR connector. 3. HDMI: Output high quality picture and sound with one cable. 4. Cr/Cb/Y: Component output. 5. VIDEO /AUDIO: Video signal output jack and Left/right audio output jack. 6. ASI IN: BNC connector for TS input. 7. CVBS OUT: Output video with BNC interface. 8. SDI OUT: Output the SDI Video stream. 9. ASI OUT: Output MPEG-2 or Mpeg-4 TS. 10: ETHERNET: The port is used in network remote control. 11. TUNER OUT (LOOP OUT): Use it when connecting to another IRD. 12. TUNER IN: Connect to a RF or IF signal. 13. POWER SUPPLY and POWER SWITCH: 90~250V AC, 50Hz. There are several ways of connecting the IRD to your existing Audio/TV system. We recommend using one of the following set-ups for best results: Note: if you need connect the ‘Ethernet’ and ‘TS/IP’ ports at the same time, please set the separate network switch for the two connections. 5 HD Integrated Receiver Decoder User Manual ¾ 1RUWK$PHULFDQ'LVWULEXWRUZZZVDWHOOLWHDYFRP Tuner in and ASI out Tuner in and IP out Tuner in and CVBS out HD Integrated Receiver Decoder User Manual ¾ 1RUWK$PHULFDQ'LVWULEXWRUZZZVDWHOOLWHDYFRP 6 IP in and ASI out Tuner/IP/ASI in and SDI out Notice: You should select one signal source from the 1, 2 and 3 option. Tuner/IP/ASI in and HDMI out Notice: You should select one signal source from the 1, 2 and 3 option. 7 HD Integrated Receiver Decoder User Manual ¾ 1RUWK$PHULFDQ'LVWULEXWRUZZZVDWHOOLWHDYFRP System Connection Diagram YPbPr/CVBS HDMI HD IRD SDI DVB-S/S2 Program Edit / Ad Insertion HD IRD ASI ASI ASI Digital Cable receiver DVB-C/T Multiplexer QAM Modulator ASI HD IRD HD IRD IP IP IP TS IP INTERNET Network Switch Windows Video Server HD Integrated Receiver Decoder User Manual ¾ 1RUWK$PHULFDQ'LVWULEXWRUZZZVDWHOOLWHDYFRP 8 Front Panel Control & Operation SOURCES TUNER ASI IPTV Tuner:-C QAM Inputs Tuner:-T COFDM PARAMS Tuner:-S/S2 QPSK Annex A FEC Mode Annex B 16 32 64 128 256 Constellation Frequency 474 MHz Symbol Rate 6.875 Ms/s Frequency 794 MHz Bandwidth 6/7/8 MHz LNB Frequency 5150 MHz Satellite Frequency 4000 MHz Symbol Rate 26850 KBaud LNB Voltage Off 18 V 13 V LNB 22KHz Off On Receiver Off On Input Multi IP Addr Input Multi UDP Port IPTV RTP UDP Input Protocol IP Board IP Address IP Board SubNetMask Bypass CI Slot 1 CI Slot 2 Delete IP Board MAC Address Program Setup Program List Operation Program Program Play List Video Decoder Main Menu Outputs Video Standard AUTO SECAM NTSC PAL Screen Mode Auto 4:3 Full 16:9 Full DVB Subtitle Lang EBU Subtitle Lang Fail Mode Black Screen Still Picture Video Format Auto 576 I 720 P 1080 I Stereo Left Right Mono Dual Audio: 0~99 Audio Audio Mode Audio Language SDI SDI Setup Stream IP Addr Off On Stream Gateway CH 1 Program Setup Stream MAC Address Delete Add CH 1 Multicast Addr Stream Network Stream UDP Port Ethernet Auto CH 1 Transmit Channel Channel Channel Channel Channel Channel Channel Channel 1 2 3 4 5 6 7 8 Param Param Param Param Param Param Param Param CH 1 Port CH 1 TS Packets 1~7 CH 1 Time to Live 1~255 CH 1 Type of Service Monetary Cost Max Reliabiability Max Throughput Min Delay IP Address Local Setup RTP UDP CH 1 Protocol Network Mask Gateway Trap IP Address MAC Address System Properties HW Version SW Version Factory Setting YES / NO Inputs status TUNER/ASI/IPTV LOCK / UNLOCK PMT PID Program Number Status Decoder Video PID Audio[0] PID Output status Audio[1] PID CI Slot 1 Slot 2 9 HD Integrated Receiver Decoder User Manual ¾ 1RUWK$PHULFDQ'LVWULEXWRUZZZVDWHOOLWHDYFRP The default parameters: Class 1 Class 2 Class 3 SOURCE Tuner: -C QAM Tuner: -T COFDM Inputs SOURCE PARAMS Setup Tuner: -S2 QPSK/8PSK IPTV Outputs Program Setup Program List Program Video Decoder Audio SDI Ethernet SDI Output Format Stream IP Addr Stream Network Stream Gateway Stream UDP Port Channel 1~8 Param Class 4 Default value Tuner FEC mode Annex A Constellation 64 QAM Frequency 474MHz Symbol Rate 6.875Ms/s Frequency 474MHz Bandwidth 8MHz LNB Frequency 5150MHz Satellite Frequency 4000MHz Symbol Rate 26850KBaud LNB Voltage OFF LNB 22KHz OFF Receiver ON Input Multi IP Addr 227.10.20.30 Input Multi UDP Port 1234 Input Protocol UDP IP Board IP Address 192.168.1.30 IP Board SubNetMask 255.255.0.0 IP Board MAC Address 01:02:03:04:05:06 Operation Program Playlist Video standard Screen Mode DVB Subtitle lang EBU Subtitle lang Fail Mode Video Format Audio:0-99 Audio Mode Audio Language CH# Transmit CH# Program Setup CH# Multicast Addr CH# Port Bypass The 1st program Auto Auto English English Still picture 1080i 50 Stereo English Auto 192.168.1.112 255.255.255.0 0.0.0.0 3000 Off Delete 227.40.50.60 1234 HD Integrated Receiver Decoder User Manual ¾ 1RUWK$PHULFDQ'LVWULEXWRUZZZVDWHOOLWHDYFRP 10 CH# Protocol CH# TS Packets CH# Time to Live CH# Type of Service Local Setup System properties Factory setting Input status Status Output Status IP Address Network Mask Gateway Trap IP Address MAC Address HW Version SW Version UDP 7 8 Normal 192.168.1.16 255.255.255.0 192.168.1.1 0.0.0.0 A0:07:ED:0F:60:1F The current version The current version NO Tuner Decoder CI UNLOCK PMT PID Program Number Video PID Audio[0] PID Audio[1] PID Slot 1 Slot 2 The first program’s PMT PID/Program Number/Video PID/ Audio PID EMPTY EMPTY Notice: 1. If the HD IRD doesn’t contain the IP board, there’s no ‘IPTV’ option in the submenu ‘SOURCE’; 2. There’s just one kind of Tuner parameter to set in the submenu ‘PARAM’ according to the module you order. 3. To enter the whole menu, you should press ‘MENU’ button. Then you can enter each submenu or confirm the setting by pressing ‘OK’ button, and exit the submenu or cancel the setting which you just made by pressing ‘MENU’ button, and change the parameters by pressing ↑→↓← buttons. 11 HD Integrated Receiver Decoder User Manual ¾ 1RUWK$PHULFDQ'LVWULEXWRUZZZVDWHOOLWHDYFRP Input In this menu, there are two submenus used to select the input source and configure the input parameters. They are ‘SOURCES’ and ‘PARAMS’. How to get into the Input menu: z Power on the HD IRD. z After initialization, the LCD displays as: Here shows the IP of the HD IRD. For how to change the IP setting please refer to page-20 in the user manual. z HD IRD IP: 192.168.1.16 -X Depending on the HD IRD model you choose, here it shows C/T/S2 to indicate different model -C: supports DVB-C signal -T: support DVB-T signal -S2: support DVB-S/S2 signal Press the Menu button on the front panel to enter into the main menu: HD IRD IP: 192.168.1.16 -X Press Menu button to enter into the Main menu Main Menu Inputs Sources In this submenu, there are three options: TUNER, ASI and IPTV. TUNER: If you select this item, the IRD will search the signal from the tuner after configuration and exit at ‘Params’. ASI: If you select this item, the IRD will search the signal from the ASI input port. IPTV: If your equipment has the IP function and the signal is from the IP port, you can select this item. The IRD will search channels after configuration and exit at ‘Params’. HD Integrated Receiver Decoder User Manual ¾ 1RUWK$PHULFDQ'LVWULEXWRUZZZVDWHOOLWHDYFRP 12 Main Menu Inputs ① Use the navigation key↑↓to select Inputs and press OK to enter the Inputs setting menu. Inputs Source Select ② Use the navigation key↑↓to select Source Select and press OK to enter the setting menu. Source Select Tuner Source Select ASI Source Select IPTV In Source Select setting menu, press OK, a cursor will display below the first letter of the input method you choose. You can use the navigation key↑↓to change, and then press OK to confirm the source. Press Menu button to exit this menu. Params In this submenu, there are two items: TUNER and IPTV. If your IRD is for DVB-C/T/S/S2 and IPTV, please select relative reception mode such as QAM, COFDM, QPSK and IPTV. According to different type IRD, please set different parameters as below. TUNER In this option, several parameters are required to setup. 1) If the unit is for DVB-S/S2 (QPSK): 13 HD Integrated Receiver Decoder User Manual ¾ 1RUWK$PHULFDQ'LVWULEXWRUZZZVDWHOOLWHDYFRP LNB Frequency 5150MHz ① Press OK button to enter this submenu Satellite Frequency 4000MHz Inputs Source Params Setup Symbol Rate 26850KBaud LNB Voltage Off ② Use the navigation key↑↓ to select different items. ③ To modify the value, press OK, a cursor will appear below the default value, then you can modify the first number by press ↑ ↓button; press ←→button to modify other numbers. Press OK to confirm the value. LNB 22KHz Off z LNB frequency: this is the LNB’s local oscillation (LO) frequency, every LNB have one or two local oscillation frequencies which can be obtained from the LNB provider. z Satellite frequency: This is the satellite down-conversion frequency, every transponder has one frequency, and you can get this parameter from the satellite programs provider. Note: be sure the absolute value which LNB Frequency minus Satellite Frequency equals is within the range 950MHz-2150MHz. z z z Symbol rate: Every transponder have one symbol rate, you can get this parameter from the satellite programs provider. LNB Voltage: LNB voltage is the power that supply to the LNB in order to receive satellite signal with different polarization. Generally 18V is for horizontal while 13V is for vertical. LNB 22KHz: Generally this is used to control 22KHz Switch, typically used for LNB with double L.O in Ku band. ‘On’ is for the high L.O and ‘Off’ is for the low L.O 2) If the unit is for DVB-C (QAM): ① Press OK button to enter this submenu FEC Mode Annex A z z z z Inputs Source Params Setup Constellation 64 ② Use the navigation key↑↓ to select different items. Frequency 247MHz Symbol Rate 6875KBaud FEC Mode: select the adaptable FEC mode (Annex A/B) according to the fact. Constellation: set this value according to the setting of QAM modulator in the headend system. Frequency: set the frequency for receiving the cable signal. Symbol rate: set the symbol rate for receiving the cable signal. HD Integrated Receiver Decoder User Manual ¾ 1RUWK$PHULFDQ'LVWULEXWRUZZZVDWHOOLWHDYFRP 14 3) If the unit is for DVB-T (COFDM): ① Press OK button to enter this submenu Inputs Source Params Setup Frequency 247MHz z z ② Use the navigation key↑↓ to select different items. Bandwidth 6MHz Frequency: set the frequency for receiving the terrestrial signal. Bandwidth: select the transmitting bandwidth (6/7/8 MHz). Notice: you can get these parameters from the program provider. IPTV: When the receiver wants to receive the signal from the internet, you need to configure these parameters. For DVB-S/S2/C/T, this part is the same. Input Multi IP Addr 227.40.50.60 Receiver On Input Multi UDP Port 1234 Protocol UDP IP Board SubNetMask 255.255.0.0 Inputs Source Params Setup IP Board MAC Address 01:02:03:04:05:06 If you know little about the three parameters, just keep them in default value. Press OK and ↑↓ to input the three parameters according to the IP source. z z z z z z z IP Board IP Address 192.168.1.30 Receiver: Select On or Off to open or close the IPTV function. Input Multi IP Addr: Set up the multicast IP address for receiving the IP signal. Input Multi UDP port: Set up the UDP port for receiving the IP signal. Input Protocol: select UDP or RTP protocol according to the fact. IP Board IP Address: Default setting. IP Board SubNetMask: Default setting. IP Board MAC Address: Default setting. Notice: When two or above pieces of HD IRD are working in IPTV at the same time, you’d better set different ‘IP Board IP Address’ and ‘IP Board SubNetMask’ for each equipment. 15 HD Integrated Receiver Decoder User Manual ¾ 1RUWK$PHULFDQ'LVWULEXWRUZZZVDWHOOLWHDYFRP Output In this menu, there are four submenus including: Program Setup, Decoder, SDI and Ethernet. Main Menu Outputs ① Use the navigation key↑↓to select Outputs and press OK to enter the Outputs setting menu. Outputs Program Setup Outputs Decoder ② Press↑↓button to select different items, and then press OK to enter the submenu. Outputs SDI Outputs Ethernet Program Setup In this option, all the programs received will be list. By changing the program’s status, you can determine whether to transmit the program or appoint a CI Slot to descramble the scrambled program. Outputs Program Setup Program Name Program NO. ② Press OK and ↑↓ to change the status, and then press OK to confirm it. z z z z 01 Health_1 CI Slot1 $ 0204 ① Press OK to enter the program list. This symbol it means the program is scrambled Program’s service ID Program list empty! If there’s no program, it’ll display like this. Bypass: Transmit the program without any disposal. CI slot1: If the program is scrambled, you can appoint the CAM card inserted in Slot 1 to descramble it. Under this condition, the program is transmitted in default. CI solt2: If the program is scrambled, you can appoint the CAM card inserted in Slot 2 to descramble it. Under this condition, the program is transmitted in default. Delete: Any program you don’t want to transmit can be forbidden by selecting this status. HD Integrated Receiver Decoder User Manual ¾ 1RUWK$PHULFDQ'LVWULEXWRUZZZVDWHOOLWHDYFRP 16 Decoder In this menu, there are three items: Program List, Video and Audio. Program List: All the programs received by the receiver will be list here, and you can select the program played via AV interface. Outputs Decoder ① Press OK to enter the submenu ‘Program’. Decoder Video Decoder Program Decoder Audio ③ Press OK and ↑↓ to change the program, and then press OK again to confirm it. Program NO:[01] 0204 Health_1 ② Press OK to enter the Play list. Play list empty! If there’s no program, it’ll display like this. Video: Configure the video parameter z Video standard: in this item, you can select video standard including Auto, SECAM, NTSC and PAL. z Screen Mode: set the screen aspect ratio, it includes Auto, 4:3Full, 16:9Full. z DVB subtitle Lang: English only z EBU subtitle Lang: English only z Fail Mode: include Black Screen and Still Screen. Black screen: when the receiver lost the signal, keep the screen black. Still screen: when the receiver lost the signal, keep the last picture on the screen. z Video Format: set the video format in this item, it includes: Auto, 480 I, 480 P, 576 I, 720 P and 1080 I. Audio: Configure the audio parameter z Audio:0-99 z Audio mode: include Stereo, Left, Right, Mono, Dual z Audio Language: Select different audio language. 17 HD Integrated Receiver Decoder User Manual ¾ 1RUWK$PHULFDQ'LVWULEXWRUZZZVDWHOOLWHDYFRP SDI The SDI output format is ‘Auto’ which means one audio channel is embedded in the SDI video output stream and you can’t change it here. Outputs SDI ① Press OK to enter the submenu ‘SDI’. SDI Output Format Auto Ethernet When select the IP port as the output, you need to setup some parameters in this submenu. There are 8 channels, and each can be used to output IP stream separately. Channel 1 Param Setup ① Use the navigation key ↑↓to select Ethernet and press OK to enter the Ethernet setting menu. Channel 1-8 Channel 8 Param Setup The channel 1 transmits all the programs; you can’t add or delete any program. You can add or delete the program in other seven channels. Stream IP Address 192.168.1.112 Outputs Ethernet Stream Network 255.255.255.0 Stream Gateway 0.0.0.0 ② Use the navigation key↑↓to select different items. The four parameters are reserved for the future; just keep them in default value. Stream UDP Port 3000 z z z z z Stream IP Addr: Default setting ( Reserve for the future) Stream Network: Default setting ( Reserve for the future) Stream Gateway: Default setting (Reserve for the future) Stream Mac Address: Default setting (Reserve for the future) Stream UDP port: Default setting (Reserve for the future) z Channel 1 Param Setup: HD Integrated Receiver Decoder User Manual ¾ 1RUWK$PHULFDQ'LVWULEXWRUZZZVDWHOOLWHDYFRP 18 CH1 Transmit Off ① Use the navigation key ↑↓to select Channel 1 and press OK to enter the parameter setting menu. Channel 1 Param Setup ② Use the navigation key↑↓to select different items. ④ Press OK to enter the submenu. CH1 Program Setup CH1 Multicast Addr 227.40.50.60 CH1 Port 1234 CH1 Protocol UDP 01 Health_1 Add ⑤ In channel 1, you can’t make this operation. In the channel 2-8, you can press ↑ ↓ to select a program, and then press OK and ↑↓ to determine if transmitting the program by select ‘Add’ or ‘Delete’. CH1 TS Packets 7 CH1 Time to Live 5 CH1 Type of Service Normal ③ Press OK to enter the item, a cursor will appear below the first number, and then use ↑↓ to modify the value. Other channel’s menu structure is just like the channel 1. z 19 CH 1 Transmit: Select Off or On to close or open the IP channel. CH 1 Program Setup: For your operation convenience, all the input programs will be outputted via this IP channel and you can’t add or delete programs here. CH 1 Multicast Addr: Set up the multicast IP for broadcasting the IP signal CH 1 Port: Set up the UDP or RTP port for broadcasting the IP signal CH 1 Protocol: UDP/RTP CH 1 TS Packets: Configuration range is 1—7 (7 is recommended) CH 1 Time to Live: Configuration range is 1-255 (8 is recommended) Ch 1 Type of Service: It includes Normal, Min delay, Monetary Cost, Max reliability, Max Throughput Channel 2 Param Setup: CH 2 Transmit: Select Off or On to close or open the IP channel. CH 2 Program Setup: Select Add to add the program to the IP channel, and select Delete to delete the program in the IP channel. CH 2 Multicast Addr: Set up the multicast IP for broadcasting the IP signal CH 2 Port: Set up the UDP or RTP port for broadcasting the IP signal CH 2 Protocol: UDP/RTP CH 2 TS Packets: Configuration range is 1—7 (7 is recommended) CH 2 Time to Live: Configuration range is 1-5 (5 is recommended) Ch 2 Type of Service: It includes Normal, Min delay, Monetary Cost, Max HD Integrated Receiver Decoder User Manual ¾ 1RUWK$PHULFDQ'LVWULEXWRUZZZVDWHOOLWHDYFRP z reliability, Max Throughput, Channel 3/ 4/ 5/ 6/ 7/ 8 Param Setup: The same as Channel 2 System Under this menu, there are three submenus including Local Setup, Properties and Factory Setting. ① Use the navigation key↑↓to select System and press OK to enter the System setting menu. System Local Setup Main Menu System ② Use the navigation key↑↓ to select different items. System Properties System Factory Setting Local Setup System Local Setup ① Press OK and use the navigation key↑↓to select different items. Local IP Address 192.168.1.16 z z z z Local Network Mask 255.255.255.0 ② Press OK to enter the item, a cursor will appear below the first number, and then use ↑↓ to modify the value. Local Gateway 192.168.1.1 Trap IP Address 192.168.1.26 IP address: Local IP setting for connecting to the server. This IP and the server’s IP should be in the same section. Network Mask: Network Mask setting for connecting to the server. Gateway: Gateway setting for connecting to the server, it’s the same to the server. Trap IP address: This IP should be the same as the server’s IP, before connection, it will verify the server’s IP, if they are the same, the connection will be allowed. Properties z z z Mac Address: Query the receiver’s Mac Address. HW Version: Query the receiver’s hardware version. SW Version: Query the receiver’s software version. HD Integrated Receiver Decoder User Manual ¾ 1RUWK$PHULFDQ'LVWULEXWRUZZZVDWHOOLWHDYFRP 20 ① Use the navigation key↑↓to select Properties and press OK to enter the Properties menu. MAC Address A0:07:ED:0F:60:1F System Properties ② Use the navigation key↑↓ to check different items. SW Version [V:1.3.7] 2010-01-22 HW Version [v:1.2.0] 2009-09-15 ③ You can modify the MAC address here by pressing OK and ↑↓, and then press OK again to confirm it. Factory Setting Take all the parameters of the receiver back to factory setting. System Factory Setting ① Use the navigation key↑↓to select Factory Setting and press OK to enter this menu. Factory Setting NO ② Press OK to enter the item, a cursor will appear below the first letter, use ↑↓ to choose ‘YES’, and then press OK to confirm it. The equipment will restart by itself automatically. Status There are two submenus under this menu: Input status and output status. ① Use the navigation key↑↓to select Status and press OK to enter the Status menu. Status Inputs Status 21 Main Menu Status ② Use the navigation key↑↓ to check different items. Status Output Status HD Integrated Receiver Decoder User Manual ¾ 1RUWK$PHULFDQ'LVWULEXWRUZZZVDWHOOLWHDYFRP Input status Query the input status, you can check whether the equipment locks the signal or not. Press OK to enter the item to check whether the signal is locked. The signal source Status Inputs Status Tuner LOCK The status: LOCK or UNLOCK Outputs status Decoder: In this item you can check the programs’ PMT PID, Program Number, Video PID and Audio PID. CI: Check the status of the two CI slots. If a CAM card is inserted in the CI slot, it’ll display the name of this CAM card, otherwise it’ll display ‘EMPTY’. ① Use the navigation key↑↓to select Outputs Status and press OK to enter this menu. Status Outputs Status Outputs Status Decoder PMT PID 20 Program NO. 01 Video PID 10 Audio PID 12 To modify the PID, press OK and use navigation key ↑↓ to input the value, and then press OK again to confirm it. ② Use the navigation key↑↓ to check different items. Outputs Status CI CI Slot1 Irdeto If an Irdeto CAM card is inserted in the CI slot1, it’ll display ‘Irdeto’. CI Slot2 EMPTY If no CAM card is inserted in the CI slot2, it’ll display ‘EMPTY’. HD Integrated Receiver Decoder User Manual ¾ 1RUWK$PHULFDQ'LVWULEXWRUZZZVDWHOOLWHDYFRP 22 NMS Control & Operation Except using the front panel to configure and operate the equipment, this HD IRD also supplies the network management function. When you get the equipment, there should be a CD containing the network management software. If you want to control and operate the equipment via the network management software, please copy the software from the CD to your server (Computer). LAN parameters setting & connection establishment Before logging on the equipment, you should use the front panel to configure the local network setting. Local network setting Let’s take an example to explain how to configure the local network for connection. We assume the server’s IP is 192.168.1.2, network mask is 255.255.255.0 and gateway is 198.168.1.1. All these parameters in the equipment should be: z IP address: Local IP setting for connecting to the server. This IP and the server’s IP should be in the same section. For example it can be 192.168.1.x, x can be 3 to 254. z Network Mask: Network Mask setting for connecting to the server. It should be the same as server’s. 255.255.255.0. z Gateway: Gateway setting for connecting to the server. It should be the same as server: 198.168.1.1 z Trap IP address: This IP should be the same as the server’s IP. Before connection, it will verify the server’s IP, if they are the same, the connection will be allowed. It should be 192.168.1.2. Connection Connect the server and equipment via Ethernet port with an Ethernet cable before running the network management software on the server. Then log on the NMS and enter the user name and password, the default user name and password both are “admin”, just as the following picture. Notice: this NMS can manage several pieces of HD IRD at the same time, as long as these equipments are connected to the server via the Network Switch. Now we take one piece of HD IRD for example to illustrate the operation. 23 HD Integrated Receiver Decoder User Manual ¾ 1RUWK$PHULFDQ'LVWULEXWRUZZZVDWHOOLWHDYFRP NMS Main Interface Configuration After logging in successfully, it’ll search the HD IRD which is connected to the server and display it in the left side as below automatically. After logging on the HD IRD, you can see seven pages within every IRD, they are: Main Board, Audio/Video, Status, IP Board, Upgrade, System and Advance. Except that, there’re two parts used to display some correlative information, just as the following picture. HD Integrated Receiver Decoder User Manual ¾ 1RUWK$PHULFDQ'LVWULEXWRUZZZVDWHOOLWHDYFRP 24 ¾ Main Board z SOURCES In this submenu, there are three options, TUNER, ASI and IPTV. TUNER: when select this item, the receiver will search the signal from the tuner, different IRD model may have different NMS interface and operation. ASI: when select this item, the receiver will search the signal from the ASI input port. IPTV: when the signal from the IP port, you can select this item, and then set the parameters on page ‘IP Board’. z Source parameters setting In this item, you can set the parameters according to different tuner model, DVB-S (QPSK), DVB-S2 (8PSK), DVB-C (QAM) and DVB-T (COFDM). According to your IRD model setup parameters of Frequency, Symbol Rate, LNB Voltage, LNB 22KHz, QAM model, Bandwidth and so on. Regarding the meanings of these parameters, please refer to page 13-15. You can get these parameters from your program provider. z CI MultiDecrypt Mode MultiPMT: it’s the default option, you needn’t change it generally. CombinePMT: if your CAM can’t decrypt programs normally, you can try to select it. z Timer This function is used to control the broadcasting of all the programs listed in the ‘Program 25 HD Integrated Receiver Decoder User Manual ¾ 1RUWK$PHULFDQ'LVWULEXWRUZZZVDWHOOLWHDYFRP List’. For example, you can make the equipment operate any program at some time automatically. Timer: select ‘Disable’ or ‘Enable’ to close or open the timer function. Time Reference: you can select the time embedded in the TS stream or the time in the server as the time reference. IRD Current Time: the time in this HD IRD equipment. Time and Operation: set the operation you want the equipment to do and the time you want the operation is carried out at. After setting all the parameters in ‘Timer’, press ‘OK’ button to save it and press ‘ SendData’ to apply it. Then you can see the settings in the ‘Program List’. z Program List Refresh: update the programs from the input signal. Default: get all the programs’ Operation back to ‘Bypass’. In the programs list box, all the received programs will be list. There are seven items providing the programs information: Number, Name, Current Operation, Timer Operation, Timer Start time and Timer Stop time. Let’s take CCVT 4 (NO.1) for example to explain how to edit the programs. Click the program which you want to edit (in the picture, it is CCTV 4, NO.1), and then this program will be highlighted in blue, program number will show in “Program Number” item. Then click the down list menu in the “program operation” item to select the status you need. Explanation of the ‘Operation’ option: 9 Bypass: Transmit the program without any disposal. 9 CI slot1: If the program is scrambled, you can appoint the CAM card inserted in Slot 1 to descramble it. Under this condition, the program is transmitted in default. 9 CI solt2: If the program is scrambled, you can appoint the CAM card inserted in Slot 2 to descramble it. Under this condition, the program is transmitted in default. 9 Delete: Any program you don’t want to transmit can be forbidden by selecting this status. z Play List In this box, select the programs you want to play via AV interface, and then click “SendData” button to save the parameters, the programs you select will be played. z Playing program The information of the program played currently will appear here, such as PMT PID, Video PID, Audio PID and so on. Notice: After setting all the parameters for each page (including the following 6 pages), you should press ‘SendData’ to enable the new parameters. HD Integrated Receiver Decoder User Manual ¾ 1RUWK$PHULFDQ'LVWULEXWRUZZZVDWHOOLWHDYFRP 26 ¾ Audio/Video z Video Video standard: in this item, you can select video standard including Auto, SECAM, NTSC and PAL. Screen Mode: set the screen aspect ratio in this item, it includes Auto, 4:3 Full, 16:9 Full. DVB subtitle Language: English only EBU subtitle Language: English only Video Fail Mode: include Black Screen and Still Screen. Black screen: when the receiver lost the signal, keep the screen black. Still screen: when the receiver lost the signal, keep the last picture on the screen. Video Format: includes Auto, 576 I, 720 P and 1080 I. z Audio Audio Level:0-99 Audio mode: include Stereo, Left, Right, Mono, Dual Audio Language: Select different audio language. z SDI Setup They are not available temporarily, and one audio channel is embedded in the SDI video output stream automatically. 27 HD Integrated Receiver Decoder User Manual ¾ 1RUWK$PHULFDQ'LVWULEXWRUZZZVDWHOOLWHDYFRP ¾ Status This page is used to display the status of CI Slot, total input rate, valid input rate, BER (it’ll won’t affect the normal function in fact now) and tell you whether the input signal is locked or not. ¾ IP Board This page is used to configure the parameters for the IP function including ‘IP Receiver’, ‘Transmitter’ and ‘Program List’. HD Integrated Receiver Decoder User Manual ¾ 1RUWK$PHULFDQ'LVWULEXWRUZZZVDWHOOLWHDYFRP 28 Notice: when you enable the ‘IP Receiver’, you must set the right ‘MultiCastAddress’ and ‘MultiCastPort’. For example HD IRD_A HD IRD_B Role IP Transmitter IP Receiver Address IPDestAddress:227.40.50.60 MultiCastAddress :227.40.50.60 Port UDPDestPort: 1234 MultiCastPort : 1234 Protocol UDP UDP z IP Receiver Enable: When the programs are from IP source, select on. Protocol: Optional UDP and RTP according to your IP source. Enablechannel: When the programs are from IP source, select on. MulticastAddress: Set up the multicast IP address for receiving the IP signal. MulticastPort: Set up the UDP port for receiving the IP signal. ColPortMathing/RowPortMatching: If the quality of the IP output stream isn’t high, you can select ‘Enable’ in both the two options, and then set the following ‘FEC Parameters’. IGMP Parameters: these parameters are used to communicate within the equipment, it’s better to keep them in default. FEC Parameters: the larger these values are, the stronger it corrects the mistakes. But notice please: FECL multiplied FECD should less than 100. 29 HD Integrated Receiver Decoder User Manual ¾ 1RUWK$PHULFDQ'LVWULEXWRUZZZVDWHOOLWHDYFRP z Transmitter ChannelSelect: Set up the IP channel number where you want to transmit programs. EnableChannel: Enable or disable the IP channel. Protocol: Optional UDP or RTP according your requirement. EncapNum TSPackts: Configuration range is 1—7. (Number 7 is recommended). TypeOfService: It includes Normal, Min delay, Monetary cost, Max reliability, Max Throughput,. TimeToLive: Configuration range is 1-255. (Number 8 is recommended). IPDestAddress: Set up the IP channel’s multicast IP address for broadcasting the IP signal. UDPDestPort: Set up the UDP port for the IP signal. FEC Parameters: to enhance the capability of correcting errors, you can ‘Enable’ this option, select ‘InterleaveMod’ according to your request. If you know little about it; just keep these parameters default values. Other parameters: Default setting. Note: 1. IP Channel 1 transmits all the input programs, which means you can’t add or delete programs on IP channel 1. For other IP channels, you can edit the output program as you wish by selecting it and pressing ‘Change’ button. 2. after setting all the parameters for one IP channel, you should press ‘SaveThisChannelParameter’ to save the setting of this channel. z Program list In this part, you can see the information of the programs which is in the selected channel. You can determine which program will be transmitted by changing the status of ‘Operation’ in the list. ¾ Upgrade: It’s convenient to upgrade the latest software via this NMS. Click ‘Select File’ button, select a desired document and click ‘Start’ the NMS will upgrade for HD IRD automatically. You should restart the NMS after the upgrade. HD Integrated Receiver Decoder User Manual ¾ 1RUWK$PHULFDQ'LVWULEXWRUZZZVDWHOOLWHDYFRP 30 If the upgrade is successful, a message ‘Upgrade succeeds! Please restart the software!’will pop up, and then the HD IRD will restart automatically. ¾ System z z System IP address: Local IP setting for connecting to the server. This IP and the server’s IP should be in the same section. Network Mask: Network Mask setting for connecting to the server. Gateway: Gateway setting for connecting to the server. Mac Address: Query the receiver’s Mac Address. Factory setting Get all the parameters in the equipment back to the default parameters. 31 HD Integrated Receiver Decoder User Manual ¾ 1RUWK$PHULFDQ'LVWULEXWRUZZZVDWHOOLWHDYFRP ¾ Advance This option is designed for recording the information about the equipment, however, the option is not available temporarily and reserved for the future. HD Integrated Receiver Decoder User Manual ¾ 1RUWK$PHULFDQ'LVWULEXWRUZZZVDWHOOLWHDYFRP 32 Troubleshooting Problem The LCD display on the front panel does not light up. Possible causes No power. The front panel red light is No output connection. on. AV has no output. TV is not in AV mode. No or bad signal. Bad picture / Blocking error. 33 What to do Check that the main cable is plugged into the power socket. Check the output connection Set TV in AV mode. Check the cable connections, No cable connection or the LNB and other equipment program does not exist in connected between the LNB the current satellite. and the STB, and /or adjust the dish. The satellite dish is not facing the satellite. Adjust the dish. Check the signal level in the antenna setup menu. The satellite dish is not facing the satellite. Adjust the dish. Signal is too strong. Connect a signal attenuator to the LNB input. Signal is too weak. Change to a larger dish. LNB noise figure is too high. Change to a LNB with a lower noise figure. The LNB is defect. Change the LNB. HD Integrated Receiver Decoder User Manual ¾ 1RUWK$PHULFDQ'LVWULEXWRUZZZVDWHOOLWHDYFRP Problem Possible causes What to do The picture and audio are Change to a FTA channel. scrambled. Signal is good. But No picture and no audio on AV output The first program is without audio and video in Change to other programs. source signal. The system is connected with RF leads and the Change the receiver output output channel of the channel to a more suitable receiver interferes with an channel. existing terrestrial channel or video signal. There is interference on your digital satellite channel. IP stetting Check the PC IP and equipment IP. They should be in the same segment. Cable is not good Make sure the cable is good one and connect well. Network remote can not connect Make sure that ASI output No output on ASI or output BNC Connection loosing. cable connect with the output unstable. port tightly. Don’t select decrypted Select decrypted programs to programs or select be correctly. incorrectly. CAM Modular Error. Change for another CAM. Smart Card no right. Contact the content provider. Cannot Decrypt Programs. Incorrect insertion of CAM Correctly insert CAM and or Smart card. Smart card. The network cable is broken. Can’t receive IP stream Can’t output IP stream Change it to a good one. Check the address, port and protocol of the source. Be sure The multicast address, port the three parameters are set the or protocol is wrong. same value in both source and this equipment. The network cable is broken. Change it to a good one. HD Integrated Receiver Decoder User Manual ¾ 1RUWK$PHULFDQ'LVWULEXWRUZZZVDWHOOLWHDYFRP 34 Check the address, port and protocol of the equipment. Be The multicast address, port sure the three parameters are or protocol is wrong. set the same value in both this equipment and IP stream receiver. Check whether your network switch supports 100Mbps or The total IP output bitrates 1000Mbps bitrates. If the total overflow IP output bitrates more than 80Mbps, pleases use the 1000Mbps network switch. 35 HD Integrated Receiver Decoder User Manual ¾ 1RUWK$PHULFDQ'LVWULEXWRUZZZVDWHOOLWHDYFRP Specifications QPSK(8PSK) Tuner QAM COFDM Audio Frequency Range Symbol Rate Signal Strength FEC Mode Rate Demodulation Frequency Range Symbol Rate Signal Strength QAM model Frequency Range Symbol Rate Signal Strength Bandwidth Audio Decoding Audio Mode Connectors Video Decode Video Input Bit Rate Output System Video format Connectors IP/TS output IP/TS input ASI input/output Connectors Error Correction # of channels Broadcasting type Supporting Protocol Connector Error Correction Encapsulation type Broadcasting type Connector Packet Length 950~2150MHz 1~45Ms/s (1-37Ms/s for 8PSK) -65~-25dBm 1/2,2/3,3/4,5/6,7/8, QPSK, 8PSK 50~862MHz 3~7Ms/s 32~-105dBuV 16/32/64/128/256 45~858MHz 0.45~7Ms/s -90~-20dBuV 6/7/8M MPEG-1/MPEG-2 layer I & II Mono/Dual Channel/Stereo RCA (L , R),AES/EBU MPEG-II ISO/IEC 13818-2, Mpeg-4 AVC/H.264 <=15Mbps PAL/NTSC/SECAM 480i, 480p, 576i, 720p. 1080i RCA (CVBS, YPbPr), HDMI, HD-SDI 100/1000Base-T, RJ45 Pro-MPEG FEC 8 Unicast or Multicast DHCP, TCP/IP, IGMP, ARP 100/1000Base-T, RJ45 Pro-MPEG FEC MPEG2/MPEG4 TS over UDP or RTP Unicast or Multicast BNC, 75ohm 188/204 byte/packet for input 188 byte/packet for output HD Integrated Receiver Decoder User Manual ¾ 1RUWK$PHULFDQ'LVWULEXWRUZZZVDWHOOLWHDYFRP 36 Condition Access Working condition& Physical Specification 37 TS Max Bitrates Interface CA Methods CAS Power supply voltage Power consumption Temperature Humidity Size (W×D×H) Net Weight 72Mbps 2 identical CI slots Multicrypt, Simulcrypt Conax/Irdeto/Viacess/ Nagravision/CTI/DV-Crypt, etc. AC: 90~250V, 50Hz/60Hz 30W(Max) 0℃~40℃ 10%~90% 44mmH×484mmW×274mmD 3.7 Kg HD Integrated Receiver Decoder User Manual ¾ 1RUWK$PHULFDQ'LVWULEXWRUZZZVDWHOOLWHDYFRP