1
IBM Tealeaf cxImpact
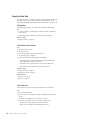
Version 9 Release 0.1
December 4, 2014
cxImpact User Manual
Note
Before using this information and the product it supports, read the information in “Notices” on page 411.
This edition applies to version 9, release 0, modification 1 of IBM Tealeaf cxImpact and to all subsequent releases
and modifications until otherwise indicated in new editions.
© Copyright IBM Corporation 1999, 2014.
US Government Users Restricted Rights – Use, duplication or disclosure restricted by GSA ADP Schedule Contract
with IBM Corp.
Contents
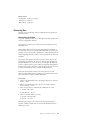
cxImpact User Manual . . . . . . . . vii
Chapter 1. cxImpact Overview . . . . . 1
What is Tealeaf cxImpact? . .
How cxImpact Works . . .
Tealeaf Terms and Concepts .
Passive Capture . . . .
Processing . . . . . .
Search, Replay, and Reporting
cxImpact Features . . . .
Tealeaf Data Flow . . . .
Stream Data . . . . . .
Request . . . . . . .
Request Record . . . .
Response . . . . . .
Hit . . . . . . . .
(Hit) Event . . . . . .
Session . . . . . . .
(Session) Event . . . .
Canister Data . . . . . .
Dimensions . . . . .
Facts. . . . . . . .
Viewing Canister Data. .
Canister Data Retention .
Index . . . . . . . .
Database . . . . . . .
Reporting Data . . . .
Top Movers . . . . .
cxResults Data . . . .
Alerts . . . . . . . .
cxConnect for Data Analysis .
Glossary . . . . . . .
Reference . . . . . . .
.
.
.
.
.
.
.
.
.
.
.
.
.
.
.
.
.
.
.
.
.
.
.
.
.
.
.
.
.
.
.
.
.
.
.
.
.
.
.
.
.
.
.
.
.
.
.
.
.
.
.
.
.
.
.
.
.
.
.
.
.
.
.
.
.
.
.
.
.
.
.
.
.
.
.
.
.
.
.
.
.
.
.
.
.
.
.
.
.
.
.
.
.
.
.
.
.
.
.
.
.
.
.
.
.
.
.
.
.
.
.
.
.
.
.
.
.
.
.
.
.
.
.
.
.
.
.
.
.
.
.
.
.
.
.
.
.
.
.
.
.
.
.
.
.
.
.
.
.
.
.
.
.
.
.
.
.
.
.
.
.
.
.
.
.
.
.
.
.
.
.
.
.
.
.
.
.
.
.
.
.
.
.
.
.
.
.
.
.
.
.
.
.
.
.
.
.
.
.
.
.
.
.
.
.
.
.
.
.
.
.
.
.
.
.
.
.
.
.
.
.
.
.
.
.
.
.
.
.
.
.
.
.
.
.
.
.
.
.
.
1
1
2
3
4
5
5
5
6
7
7
8
9
9
11
12
13
13
14
15
15
15
16
16
17
17
18
18
18
19
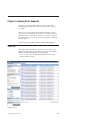
Chapter 2. Using the Tealeaf Portal . . 21
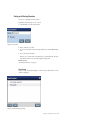
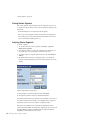
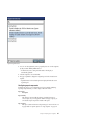
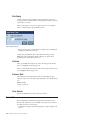
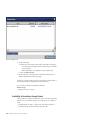
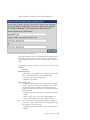
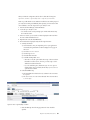
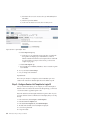
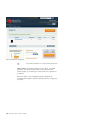
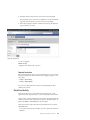
Logging in to the Tealeaf Portal
Login requirements . . . . .
Browsers . . . . . . .
Usernames and Passwords .
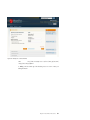
Logging In . . . . . . .
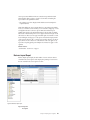
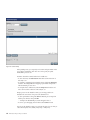
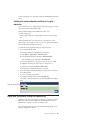
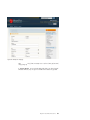
Portal Navigation . . . . .
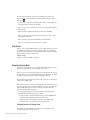
Notes on Licensing . . . . .
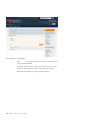
Portal State Messages . . . .
Location . . . . . . . .
State Messages . . . . . .
.
.
.
.
.
.
.
.
.
.
.
.
.
.
.
.
.
.
.
.
.
.
.
.
.
.
.
.
.
.
.
.
.
.
.
.
.
.
.
.
.
.
.
.
.
.
.
.
.
.
.
.
.
.
.
.
.
.
.
.
.
.
.
.
.
.
.
.
.
.
21
21
21
22
22
22
22
23
23
24
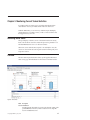
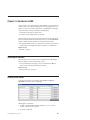
Chapter 3. Monitoring Current Tealeaf
Activities . . . . . . . . . . . . . . 27
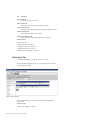
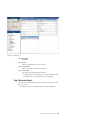
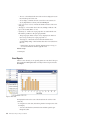
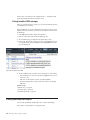
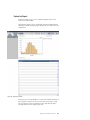
Monitoring Active Status . . . . . . .
Overview . . . . . . . . . . . .
Toolbar . . . . . . . . . . . .
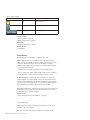
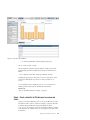
Active Status Computations . . . . . .
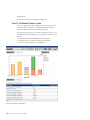
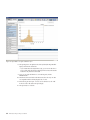
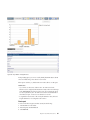
Session Distribution Chart computations.
Single Page Sessions Chart computations
Hit Distribution Chart computations . .
© Copyright IBM Corp. 1999, 2014
.
.
.
.
.
.
.
.
.
.
.
.
.
.
.
.
.
.
.
.
.
27
27
28
28
29
29
29
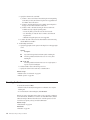
Session Activity Table . .
Monitoring Active Sessions
Commands . . . . .
Report Columns . . . .
Report Filters . . . .
Report Grouping . .
Session List Templates . .
Monitoring Active Events.
Reading the Report . . .
Report Filters . . . . .
Watching Events. . .
Filtering Active Events .
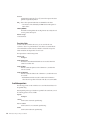
Alert Monitor. . . . .
Alert Status . . . .
Alert Detail . . . . .
Alert State . . . . .
Download . . . . .
Search Links . . . .
Graph . . . . . .
Details . . . . . .
Configuration . . . .
.
.
.
.
.
.
.
.
.
.
.
.
.
.
.
.
.
.
.
.
.
.
.
.
.
.
.
.
.
.
.
.
.
.
.
.
.
.
.
.
.
.
.
.
.
.
.
.
.
.
.
.
.
.
.
.
.
.
.
.
.
.
.
.
.
.
.
.
.
.
.
.
.
.
.
.
.
.
.
.
.
.
.
.
.
.
.
.
.
.
.
.
.
.
.
.
.
.
.
.
.
.
.
.
.
.
.
.
.
.
.
.
.
.
.
.
.
.
.
.
.
.
.
.
.
.
.
.
.
.
.
.
.
.
.
.
.
.
.
.
.
.
.
.
.
.
.
.
.
.
.
.
.
.
.
.
.
.
.
.
.
.
.
.
.
.
.
.
.
.
.
.
.
.
.
.
.
.
.
.
.
.
.
.
.
.
.
.
.
29
29
30
31
31
32
32
32
33
33
34
34
34
34
35
35
35
35
35
36
36
Chapter 4. Searching in the Portal . . . 37
Searching Session Data . . . . . .
A Basic Search . . . . . . . . .
Timestamps in Search and Reporting .
Search Page . . . . . . . . . .
Selecting Search Date Range . . . .
Search Fields Panel . . . . . . .
Search Configuration Window . . .
Executing Your Search . . . . . .
Search Toolbar . . . . . . . .
Selecting Your Search Template . . .
Search Options . . . . . . . .
Specifying Your Search Fields . . . .
Basic Search Fields . . . . . . .
Text . . . . . . . . . . . .
Numeric Fields . . . . . . . .
Events . . . . . . . . . . .
Event Values . . . . . . . . .
Session Attributes . . . . . . .
Session Information . . . . . .
Page Information . . . . . . .
Search Results - Session List . . . . .
Session list commands . . . . . .
Default Session List Template . . .
Grouping Sessions . . . . . . .
Event Info . . . . . . . . . .
Page List . . . . . . . . . .
Session Summary . . . . . . .
QuickView . . . . . . . . .
Session Properties . . . . . . .
Additional Search Functions . . . . .
Send to Event Tester . . . . . .
Link to Search . . . . . . . .
.
.
.
.
.
.
.
.
.
.
.
.
.
.
.
.
.
.
.
.
.
.
.
.
.
.
.
.
.
.
.
.
.
.
.
.
.
.
.
.
.
.
.
.
.
.
.
.
.
.
.
.
.
.
.
.
.
.
.
.
.
.
.
.
.
.
.
.
.
.
.
.
.
.
.
.
.
.
.
.
.
.
.
.
.
.
.
.
.
.
.
.
.
.
.
.
.
.
.
.
.
.
.
.
.
.
.
.
.
.
.
.
.
.
.
.
.
.
.
.
.
.
.
.
.
.
.
.
37
38
39
40
40
41
42
44
46
47
49
51
51
52
56
56
61
61
62
67
68
69
70
71
71
72
73
76
79
80
80
80
iii
Saving and Sharing Searches .
Sub-Search . . . . . . .
Exporting Session Data . . .
Search and Indexing . . . . .
Searching for Visitors . . . . .
Overview of Visitor Search . .
Visitor Search Tabs . . . . .
Define Search Tab . . . . .
Recent Searches Tab . . . .
Completed Searches Tab . . .
Scheduled Searches Tab . . .
Scheduled Search History Tab .
Enabling Visitor Search . . .
Search Keywords . . . . . .
Scoring Search Results . . . .
.
.
.
.
.
.
.
.
.
.
.
.
.
.
.
.
.
.
.
.
.
.
.
.
.
.
.
.
.
.
.
.
.
.
.
.
.
.
.
.
.
.
.
.
.
.
.
.
.
.
.
.
.
.
.
.
.
.
.
.
.
.
.
.
.
.
.
.
.
.
.
.
.
.
.
. 81
. 82
. 82
. 83
. 84
. 84
. 85
. 86
. 99
. 100
. 101
. 104
. 105
. 105
. 110
Chapter 5. Overview of Segments. . . 111
Chapter 6. Managing Session
Segments . . . . . . . . . . . . . 113
Overview. . . . . . . . . . . .
Commands . . . . . . . . . .
Fields . . . . . . . . . . . .
Legend . . . . . . . . . . .
Context Menu . . . . . . . . .
Segment Properties . . . . . . .
Sharing . . . . . . . . . . .
Expiring Segments. . . . . . . .
Logging . . . . . . . . . . .
Submitting Segments for Analysis . . .
Import Segment . . . . . . . . .
Export a Segment . . . . . . . .
Build Combined Segment . . . . . .
Enabling Building Combined Segments.
.
.
.
.
.
.
.
.
.
.
.
.
.
.
.
.
.
.
.
.
.
.
.
.
.
.
.
.
.
.
.
.
.
.
.
.
.
.
.
.
.
.
113
114
114
115
116
118
118
118
118
119
119
121
121
122
Chapter 7. Analyzing Session
Segments . . . . . . . . . . . . . 123
Preparing Segment Analysis .
Creating Session Segments .
Viewing Session Segments .
Analyzing Session Segments
Viewing Analysis . . . .
Disabling Session Segments
Segment Analysis Reports . .
Configuring Your Report .
Report Gallery . . . . . .
Exploring Reports . . . .
Detail View . . . . . .
Business Impact Report . .
Events Report . . . . .
Sessions Report. . . . .
Search Matches Report . .
Pages Report . . . . .
Form Fields Report . . .
Page Performance Report .
Reference Report . . . .
User Defined Fields Report .
Page Sequence . . . . . .
My Reports . . . . . . .
Report Filters . . . . .
iv
.
.
.
.
.
.
.
.
.
.
.
.
.
.
.
.
.
.
.
.
.
.
.
.
.
.
.
.
.
.
.
.
.
.
.
.
.
.
.
.
.
.
.
.
.
.
.
.
.
.
.
.
.
.
.
.
.
.
.
.
.
.
.
.
.
.
.
.
.
.
.
.
.
.
.
.
.
.
.
.
.
.
.
.
.
.
.
.
.
.
.
.
.
.
.
.
.
.
.
.
.
.
.
.
.
.
.
.
.
.
.
.
.
.
.
IBM Tealeaf cxImpact: cxImpact User Manual
.
.
.
.
.
.
.
.
.
.
.
.
.
.
.
.
.
.
.
.
.
.
.
.
.
.
.
.
.
.
.
.
.
.
.
.
.
.
.
.
.
.
.
.
.
.
123
123
124
124
125
125
125
126
128
128
128
129
130
131
132
133
134
135
137
137
138
140
140
Chapter 8. Managing Visitor Segments 143
Fields . . . .
Context Menu .
Sharing . .
.
.
.
.
.
.
.
.
.
.
.
.
.
.
.
.
.
.
.
.
.
.
.
.
.
.
.
.
.
.
.
.
.
. 143
. 144
. 145
Chapter 9. Analyzing Visitor Segments 147
Visitor List . . . . . .
To Analyze . . . . . .
Visitor Segment Control .
Segment Info . . . .
Search Parameters . . .
Create Session Segment .
Visitor Reports . . . . .
Report Scope and Counts
Visitor List . . . . .
Session List . . . . .
Report Builder . . . .
Scorecards . . . . .
Report Gallery . . . . .
Default Report Gallery .
Export. . . . . . . .
Export Current Report .
Exporting Visitor Data .
.
.
.
.
.
.
.
.
.
.
.
.
.
.
.
.
.
.
.
.
.
.
.
.
.
.
.
.
.
.
.
.
.
.
.
.
.
.
.
.
.
.
.
.
.
.
.
.
.
.
.
.
.
.
.
.
.
.
.
.
.
.
.
.
.
.
.
.
.
.
.
.
.
.
.
.
.
.
.
.
.
.
.
.
.
.
.
.
.
.
.
.
.
.
.
.
.
.
.
.
.
.
.
.
.
.
.
.
.
.
.
.
.
.
.
.
.
.
.
.
.
.
.
.
.
.
.
.
.
.
.
.
.
.
.
.
.
.
.
. 161
. 161
. 162
Chapter 10. Configuring Your Tealeaf
My Settings .
Preferences .
Password. .
.
.
.
.
.
.
.
.
.
.
.
.
.
.
.
.
.
.
.
.
.
.
.
.
.
.
.
.
.
.
.
.
.
147
148
148
149
150
150
151
152
152
152
154
154
154
154
159
159
160
161
Chapter 11. cxImpact Browser Based
Replay . . . . . . . . . . . . . . 165
Overview. . . . . . . . . . . .
Opening BBR . . . . . . . . . .
For Active Sessions . . . . . . .
For Completed Sessions . . . . . .
Replaying Sessions . . . . . . . .
Replay View. . . . . . . . . .
Replay Session . . . . . . . . .
Mobile device applications and BBR . .
DOM Capture and Replay . . . . .
How DOM Capture and Replay works .
Session Timeout . . . . . . . .
Finding Pages . . . . . . . . . .
Managing BBR Panes. . . . . . . .
Searching Archived Sessions for Text . .
Sharing Replays . . . . . . . . .
Sharing with Email . . . . . . .
Copy the session link. . . . . . .
Creating Event Data from BBR . . . .
Configuration . . . . . . . . . .
Configuring the Replay Server . . .
Configuring Proxy. . . . . . . .
ESI Tag Support . . . . . . . .
.
.
.
.
.
.
.
.
.
.
.
.
.
.
.
.
.
.
.
.
.
.
.
.
.
.
.
.
.
.
.
.
.
.
.
.
.
.
.
.
.
.
.
.
.
.
.
.
.
.
.
.
.
.
.
.
.
.
.
.
.
.
.
.
.
.
166
167
167
167
167
167
168
168
174
176
177
177
177
178
178
178
178
179
179
180
180
180
Chapter 12. Browser Based Replay
Interface . . . . . . . . . . . . . 181
UI Components
Session menu .
View menu . .
.
.
.
.
.
.
.
.
.
.
.
.
.
.
.
.
.
.
.
.
.
.
.
.
.
.
.
.
.
.
.
.
.
. 181
. 182
. 183
Options Menu . . . . . . . . .
Merging Session Fragment Overrides
Overlays menu . . . . . . . . .
Toolbar . . . . . . . . . . .
Page List . . . . . . . . . .
Refresh List (Active sessions only) .
Hide . . . . . . . . . . .
Annotations . . . . . . . . .
Start Replay . . . . . . . . .
First/Last . . . . . . . . .
Previous / Next . . . . . . .
Close Session . . . . . . . .
Content Pane . . . . . . . . .
User Agent Information Bar . . .
Display . . . . . . . . . . .
Replay View. . . . . . . . .
Request View . . . . . . . .
Response View . . . . . . . .
Page Load Details . . . . . . .
Page Statistics . . . . . . . . .
Navigation Pane . . . . . . . .
Navigation pane hierarchy . . . .
Navigation pane columns . . . .
Navigation pane tools . . . . .
Other panes . . . . . . . . .
Navigation context menu . . . .
Events Pane . . . . . . . . . .
Event Reports . . . . . . . .
Form Fields Pane . . . . . . . .
Form Fields menu . . . . . . .
Session Statistics . . . . . . . .
.
.
.
.
.
.
.
.
.
.
.
.
.
.
.
.
.
.
.
.
.
.
.
.
.
.
.
.
.
.
.
.
.
.
.
.
.
.
.
.
.
.
.
.
.
.
.
.
.
.
.
.
.
.
.
.
.
.
.
.
.
.
.
.
.
.
.
.
.
.
.
.
.
.
.
.
.
.
.
.
.
.
.
.
.
.
.
.
.
.
.
.
.
.
.
.
.
.
.
.
.
.
.
.
.
.
.
.
.
.
.
.
.
.
.
.
.
.
.
.
.
.
.
.
184
186
187
188
188
189
189
189
190
190
190
190
190
191
192
192
193
194
195
198
198
200
203
204
204
205
206
208
209
209
210
Chapter 13. Tracking Interactions
through BBR. . . . . . . . . . . . 211
Shadow Browsing Live Sessions . . . . .
Replay Highlighting . . . . . . . . .
Adding Annotations . . . . . . . . .
Availability of Annotations through Search
Locating Annotations . . . . . . . .
Finding Search Results in BBR. . . . . .
BBR Replay of Client User Interface Events .
.
.
.
.
.
.
.
.
.
.
.
.
.
.
211
212
213
214
215
215
215
Chapter 14. Sub-Search in BBR . . . 217
Searching for Sessions . . . . .
Defining a Sub-Search . . . . .
Executing the Search . . . . . .
Available locations for Sub-Search
Available operators . . . . .
Searching active sessions . . .
Filtered Results . . . . . . . .
Navigation List toolbar . . . .
Navigation List toolbar . . . .
Hit Details . . . . . . . .
Sub-Search in RTV . . . . . .
.
.
.
.
.
.
.
.
.
.
.
.
.
.
.
.
.
.
.
.
.
.
.
.
.
.
.
.
.
.
.
.
.
.
.
.
.
.
.
.
.
.
.
.
.
.
.
.
.
.
.
.
.
.
.
217
217
218
219
220
221
222
222
223
223
226
Chapter 15. BBR Replay Rules . . . . 227
Overview. . . .
Required Access
RTV . . . .
Replay Rule Types.
.
.
.
.
.
.
.
.
.
.
.
.
.
.
.
.
.
.
.
.
.
.
.
.
.
.
.
.
.
.
.
.
.
.
.
.
.
.
.
.
.
.
.
.
227
228
228
228
Replay Rule Configuration in BBR . . . . .
In Options menu . . . . . . . . . .
In Navigation List . . . . . . . . . .
In Main Panel . . . . . . . . . . .
In Load Details . . . . . . . . . . .
Validating the syntax and pattern matching of
regular expression . . . . . . . . . .
Replay Rule Configuration through the Replay
Server . . . . . . . . . . . . . . .
Selecting Replay Rules to Modify. . . . .
Editing replay rules . . . . . . . . .
Protocol . . . . . . . . . . . . .
Ignored URLs . . . . . . . . . . .
Highlight Only URLs. . . . . . . . .
Highlight Only URLs. . . . . . . . .
Host/Port Remapping . . . . . . . .
Response Modification . . . . . . . .
White List Rules . . . . . . . . . .
Replay Rule Configuration in RTV . . . . .
Replay Rule Configuration File . . . . . .
Special Rules . . . . . . . . . . .
.
.
.
.
.
234
234
235
236
239
a
. 241
.
.
.
.
.
.
.
.
.
.
.
.
.
241
242
242
242
243
243
243
244
244
244
245
245
247
Chapter 16. Step-based eventing . . . 249
Overview. . . . . . . . . .
Pre-requisites . . . . . . .
Limitations . . . . . . . .
Technical definition . . . . .
Message types . . . . . . .
Example messages. . . . . .
Step-based objects . . . . . . .
Default step objects . . . . .
Step trigger types . . . . . .
Privacy . . . . . . . . .
Replay . . . . . . . . . .
Navigable Pages List . . . . .
Viewing formatted JSON messages
Creating Step-Based Event Objects .
Required access . . . . . .
BBR step attribute context menu .
Creating a step attribute . . . .
Creating a step event . . . . .
Creating a dimension. . . . .
In RTV . . . . . . . . .
In Event Tester . . . . . . .
Indexing . . . . . . . . . .
Reference. . . . . . . . . .
.
.
.
.
.
.
.
.
.
.
.
.
.
.
.
.
.
.
.
.
.
.
.
.
.
.
.
.
.
.
.
.
.
.
.
.
.
.
.
.
.
.
.
.
.
.
.
.
.
.
.
.
.
.
.
.
.
.
.
.
.
.
.
.
.
.
.
.
.
.
.
.
.
.
.
.
.
.
.
.
.
.
.
.
.
.
.
.
.
.
.
.
.
.
.
.
.
.
.
.
.
.
.
.
.
.
.
.
.
.
.
.
.
.
.
250
250
250
250
251
251
254
254
254
256
256
256
258
258
259
259
260
264
266
267
267
267
267
Chapter 17. Tealeaf End-to-End
Scenarios . . . . . . . . . . . . . 269
E2E Scenario - Auditing Page Counts . . .
Changes in Licensed Page Count Model
between Release 7.x and Release 8.x . . .
Creating Report Builder Report . . . .
Adding the Report to a Dashboard . . .
E2E Scenario - Build Top IPs and Top IPs by
Referrer dashboard reports . . . . . . .
Overview. . . . . . . . . . . .
An Important Note about Dimension Data
Limits . . . . . . . . . . . . .
Step 1 - Create Event: Every Session . . .
.
. 269
.
.
.
. 270
. 270
. 276
.
.
. 278
. 278
.
.
. 279
. 280
Contents
v
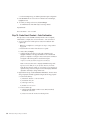
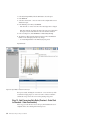
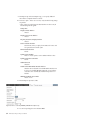
Step 2 - Search for Event in Active Sessions . .
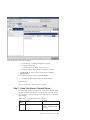
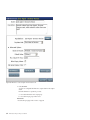
Step 3 - Create Dimension: IP Address . . . .
Step 4 - Create Dimension: Referrer by Session
Step 5 - Create Report Group: IP Addresses . .
Step 6 - Test Active Sessions for Dimensions . .
Step 7 - Create Report by using Every Session
event . . . . . . . . . . . . . . .
Step 8 - Create a blacklist of IP Addresses from
observed values . . . . . . . . . . .
Step 9 - Add Report to Dashboard . . . . .
Step 10 - Add Referrer Dimension to Report . .
Step 11 - Check Dashboard for new component
and refreshed data . . . . . . . . . .
E2E Scenario - Configure Login ID to be Searchable
Pre-Requisites . . . . . . . . . . . .
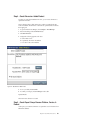
Step 1 - Configure Hit Attribute Login ID . . .
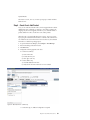
Step 2 - Review and Configure Login ID Sample
Event . . . . . . . . . . . . . . .
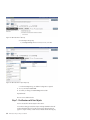
Step 3 - Configure Session List Template for
Login ID . . . . . . . . . . . . . .
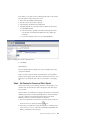
Step 4 - Test Login ID Hit Attribute and Event
Step 5 - Configure Search Template for Login ID
Step 6 - Search for Login ID . . . . . . .
Next Steps . . . . . . . . . . . . .
E2E Scenario - Create Conversion Rate Dashboard
Overview. . . . . . . . . . . . . .
Step 1 - Create Dimension: Browser Platform
Step 2 - Create Dimension: Browser Version . .
Step 3 - Create Report Group: Browser Platform
& Version . . . . . . . . . . . . .
Step 4 - Locate Session with Shopping Cart
Value . . . . . . . . . . . . . . .
Step 5 - Saving Searches . . . . . . . . .
Step 6 - Create Hit Attribute: Shopping Cart
Value . . . . . . . . . . . . . . .
Step 7 - Create Event: Shopping Cart Value . .
Step 8 - Create Dimension: Shopping Cart Value
Step 9 - Create Event: Checkout - Start . . . .
Step 10 - Create Event: Checkout - Order
Confirmation . . . . . . . . . . . .
Step 11 - Create Other Events in Checkout
Process . . . . . . . . . . . . . .
Step 12 - Create Report . . . . . . . . .
Step 13 - Add Conversion Rate Ratio (Checkout
- Order Start to Checkout - Order Confirmation)
Step 14 - Segment by Browser Platform. . . .
Step 15 - Set Y-Axis as Browser Version. . . .
Step 16 - Save/Clear/Reopen Report . . . .
Step 17 - Add Report to Dashboard . . . . .
Step 18 - Email Dashboard Daily . . . . . .
vi
IBM Tealeaf cxImpact: cxImpact User Manual
282
283
286
287
289
291
293
294
296
296
296
297
298
300
302
303
304
306
306
306
307
317
319
320
322
322
323
326
327
328
330
331
333
334
336
337
337
337
338
Step 19 - Drill Down to the Report . . . . .
Step 20 - Drill Down to the Sessions. . . . .
E2E Scenario - Create Top Products Dashboard . .
Overview. . . . . . . . . . . . . .
Prerequisites. . . . . . . . . . . . .
Step 1 - Create Dimension: Browser Platform
Step 1 - Create Dimension: Browser Platform
Step 3 - Create Hit Attribute: Add Product . .
Step 4 - Create Dimension: Added Product . .
Step 5 - Create Report Group: Browser Platform,
Version, & Product . . . . . . . . . .
Step 6 - Create Event: Add Product . . . . .
Step 7 - Find Sessions with New Objects . . .
Step 8 - Test Session for Presence of Other
Objects . . . . . . . . . . . . . .
Step 9 - Create Report: Added Product . . . .
Step 10 - Put Added Product on x-axis . . . .
Step 11 - Set Added Product dimension to show
Top 5 . . . . . . . . . . . . . . .
Step 12 - Segment to only show browser
platform WinXP . . . . . . . . . . .
Step 13 - Put Browser Version on Y-axis . . .
Step 14 - Add the Report to a Dashboard . . .
E2E Scenario - Getting Value out of Tealeaf in One
Hour . . . . . . . . . . . . . . . .
The Eventing Basics Series . . . . . . . .
Pre-Requisites . . . . . . . . . . . .
Goals of the Scenario . . . . . . . . . .
Logging in to the Portal . . . . . . . . .
Check Event Activity . . . . . . . . . .
Explore the Report . . . . . . . . . .
Drilldown Search . . . . . . . . . . .
QuickView . . . . . . . . . . . . .
Replay . . . . . . . . . . . . . .
What You Have Discovered . . . . . . .
Discovering More . . . . . . . . . . .
Next Discoveries . . . . . . . . . . .
E2E Scenario - Configure Login ID to be Searchable
Pre-requisites . . . . . . . . . . . .
Creating the Data Objects to Monitor User
Agent Information. . . . . . . . . . .
Using User Agent Data in Tealeaf . . . . .
339
339
340
340
340
341
344
346
349
349
351
352
353
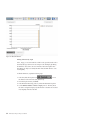
356
357
358
359
360
361
362
362
363
363
364
365
369
374
376
377
380
381
382
383
384
385
398
Chapter 18. IBM Tealeaf
documentation and help. . . . . . . 409
Notices . . . . . . . . . . . . . . 411
Trademarks . . . . . . .
Privacy Policy Considerations .
.
.
.
.
.
.
.
.
.
.
.
.
. 413
. 413
cxImpact User Manual
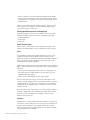
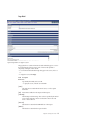
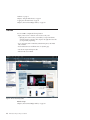
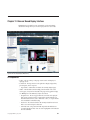
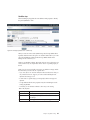
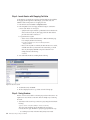
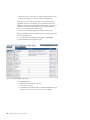
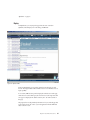
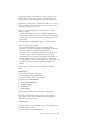
The IBM Tealeaf cxImpact User Manual describes how to use the Tealeaf® system,
including the Web Portal application for interacting with Tealeaf data, segments,
and more. Use the links below to access specific topics in the manual.
For more information on reporting functions in Tealeaf, see IBM Tealeaf Reporting
Guide.
© Copyright IBM Corp. 1999, 2014
vii
viii
IBM Tealeaf cxImpact: cxImpact User Manual
Chapter 1. cxImpact Overview
This section is an overview to the Tealeaf system and its components.
What is Tealeaf cxImpact?
IBM Tealeaf cxImpact is customer experience management (CEM) software that
performs the following functions:
v Captures each interaction between your visitors and your website.
v Processes the low-level interaction detail to provide alerts, reports, and analysis,
plus playback of those interactions.
v Shows you what happened during each visitor's experience with your site.
IBM Tealeaf cxImpact enables website owners to:
v Ensure a good experience for your visitors
v Protect revenue streams
v Reduce application support costs
Businesses are relying on Web applications to deliver business-critical services. IBM
Tealeaf cxImpact addresses the challenge of managing high-volume dynamic
websites by providing visibility into the production state of Web applications and
allowing IT operations to ascertain whether they are functioning correctly.
IBM Tealeaf cxImpact provides a single data source that captures an audit trail of
what each visitor did and saw. Tealeaf users can then analyze, isolate, replicate,
and communicate problems.
How cxImpact Works
Tealeaf software running on computers in your data center is configured to see
every byte of data exchanged between your web servers and the browsers on your
visitors' computers. Tealeaf passively captures the bi-directional data stream and
forwards a copy of each relevant packet of that data to a server running the Tealeaf
system.
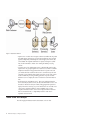
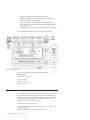
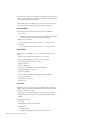
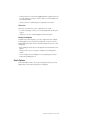
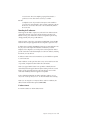
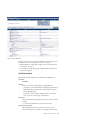
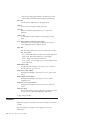
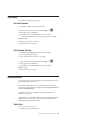
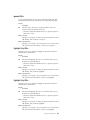
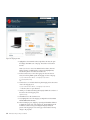
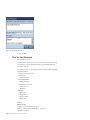
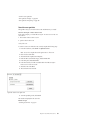
The figure below shows a typical IBM Tealeaf cxImpact setup with three types of
Tealeaf servers.
© Copyright IBM Corp. 1999, 2014
1
Figure 1. Tealeaf Server Network
v Capture Server - Tealeaf's Passive Capture software reassembles TCP/IP packets
into HTTP requests and responses for each exchange between visitor and web
application. Optionally, uninteresting data can be dropped, and sensitive data
can be deleted. The captured combinations of requests and responses (called
hits) are then forwarded to another server running the Tealeaf processing
software.
v Processing Server (also called Canister Server) - Individual hits sent from the
Capture Server are grouped together into a Tealeaf session, which is assembled
hit-by-hit to include all web page interactions between a specific visitor and
your website. The data contained in this session is scanned for keywords and
codes that you have defined. When matches are found, a record of this event is
stored for additional processing, including generation of reports and alerts.
When the session is complete, the session is indexed for search and written to
disk.
v Tealeaf Portal (also called Report Server) - This server's Web-based interface
allows data analysts, business owners, IT staff, and administrative users to view
the status of interactions with your website, with aggregate data reports that
display what visitors are doing on your site. Tealeaf users can search the saved
visitor sessions and analyze them for common attributes, such as order
completion. Individual visitors' sessions can be replayed with the actual data
that was sent and received, so a high-fidelity recreation of the visitor's
experience can be reviewed.
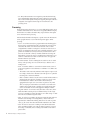
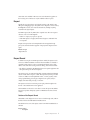
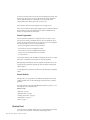
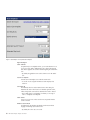
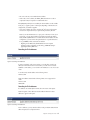
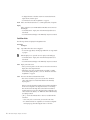
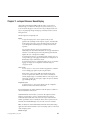
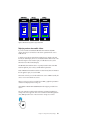
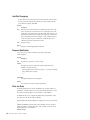
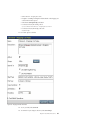
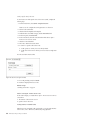
Tealeaf Terms and Concepts
The following figure illustrates Tealeaf's data structure at a lower level.
2
IBM Tealeaf cxImpact: cxImpact User Manual
Figure 2. Tealeaf Data Structure
Passive Capture
Tealeaf's Passive Capture software runs on one or more dedicated capture servers.
The following terms apply to the capture process:
v Switch - The switch is a hardware device that routes all incoming and outgoing
data packets between your visitors' computers and your web servers. Typically,
switches are configured using a hardware option called a http://
www.cisco.com/warp/public/473/41.html, which delivers a copy of every
HTTP packet to the capture server.
v Packet - The TCP/IP protocol organizes interaction between computers into
packets. An individual Web page can be broken down into many packets, each
transmitted individually between computers. The capture server typically
monitors millions of packets traveling nearly simultaneously between your Web
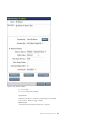
servers and visitors' computers. These packets can arrive in any order and
sometimes must be retransmitted. The capture server can be configured to
ignore packets that are not of interest, such as email messages or packets sent to
IP addresses of servers not hosting the website.
v Request - The HTTP protocol defines a request as a message requesting a
response from one computer to another. The capture server collects all HTTP
data to re-create the request and response traffic.
v Response - A response is the return message to a computer, which has made a
request. After capturing a request, the capture server then processes and
assembles packets in search of the response to it.
v Hit - A hit is defined as a request and the corresponding response to it. After the
hit has been collected, the Passive Capture software can scan the data to see if
the hit is of interest. For example, images that is displayed on every web page
are not very interesting and can be discarded. Also, sensitive information such
as usernames, passwords, and credit card numbers can be deleted. After
removing unwanted data, the Capture software securely transmits the hit data to
the Processing Server.
Chapter 1. cxImpact Overview
3
v SSL - Many website interactions are encrypted to protect the data from being
read or manipulated by third parties. The Capture software has to decrypt the
data in order to match requests and responses. Typically, the Capture software is
configured to re-encrypt the software using SSL for transmission to the
processing servers.
Processing
The Tealeaf processing software runs on one or more dedicated processing servers,
sometimes called canister servers. These servers are typically behind the company
firewall and are not visible to the Internet. They accept connections from capture
servers and receive hits for processing.
Each hit includes information that maps it to a specific visitor. This information is
used to group the hits into a session. The following terms apply to Tealeaf
processing:
v Session - As each hit is received, it is grouped with the other hits that apply to
the same visitor's current interaction with your website. The processing server
collects these hits until no more hits are received for the visitor or until a
configured limit is reached. For example, if no more hits are received over an
interval of 15 minutes, then the session can be considered complete. If a visitor
performs an extended session, it may be necessary to end that session and to
start a new one due time or memory constraints. While hits are arriving and
being added to a session, the session is considered active. Tealeaf allows you to
search for an individual session while it is still active and to view pages and
interactions that have just occurred.
v Short Term Canister - Sessions containing hits are stored in an area of volatile
memory on the processing server. As each hit arrives, it is added to a new or
existing session.
v Event - As each hit is added to a session in the short-term canister, a series of
events can be applied. An event is defined as a combination of a condition and
an action.
– The condition can be noteworthy information in the request or response code.
For example, a match can be a 404 status code in the response or a particular
text string such as "Purchase Confirmed."
– When a condition evaluates to true, the action associated with the condition is
performed. This action may be to increment a counter or to record a value.
Event-related data is written to the short-term canister and may be
aggregated into the report server. Some events are specific to a hit, while
others can only be processed with the session. When a session ends and is
written to the long-term canister, events that are associated with an entire
session are evaluated. An event can be triggered off multiple conditions.
v Long Term Canister - As each session ends, either due to visitor action, lack of
further hits within a timeout period, or insufficient memory to hold a longer
session, it is encrypted for security and written to non-volatile storage on a hard
drive. This area is called the long term canister.
v Index - As each session is written to the long term canister, the data within it is
indexed for later searching. In most deployments, a selection of the most
important data is indexed. After indexing, Tealeaf users can search on specific
values, e.g. all sessions where the username field contained the value "smith."
v Alert - An alert is an action, such as sending an email, that should be taken
when a predefined condition occurs. This may be the execution of an event or
the crossing of a threshold, such as exceeding a total number of hits within a
period of time.
4
IBM Tealeaf cxImpact: cxImpact User Manual
Search, Replay, and Reporting
After the session data has been processed, it is available to Tealeaf users to monitor
the health of their business and solve problems. Tealeaf includes several tools for
these purposes.
v IBM Tealeaf CX Portal - This Web-based portal is the primary user interface to
the Tealeaf system. It provides a wide variety of options for creating and
viewing reports, including dashboards, scorecards, and other ad-hoc reports. It
also provides a user interface to search for both active and completed sessions, a
means to review and analyze data across search results, a means to replay a user
session within a browser, and for administrative users, controls to manage the
Tealeaf system. See the IBM Tealeaf cxImpact User Manual.
v Search - The indexes created by the processing server can be searched through
the Portal. It is also possible to search for text strings in currently active sessions
in the short term canister. But the search for completed sessions in the archive is
much more powerful; Tealeaf users can search for specific types of information,
such as form field values, that are not yet indexed in active sessions. See
“Searching Session Data” on page 37.
v Replay - The ability to replay a session as a Web visitor experienced it is unique
to Tealeaf. Replay is a powerful tool for understanding the customer experience.
When you search for sessions through the Portal, you see a list of sessions
matching your search criteria. You can select one of these sessions and launch a
replay of the session. During replay, you see the actual Web pages server to the
visitor, the links the visitor clicked on, and the form fields the visitor edited.
Also available is the HTTP request data that was sent from the visitor's browser
and the actual HTML returned by the Web server. See “CX Browser Based
Replay” in IBM Tealeaf cxImpact User Manual.
v IBM Tealeaf CX RealiTea Viewer - In addition to the browser user interface for
search and replay, Tealeaf also supplies a Windows desktop application called
the IBM Tealeaf CX RealiTea Viewer (RTV) that you can install on your
personal computer. This application includes additional options for configuring
playback on the system. For more information, see IBM Tealeaf RealiTea Viewer
User Manual.
Related concepts:
Chapter 11, “cxImpact Browser Based Replay,” on page 165
“Searching Session Data” on page 37
cxImpact Features
For more information about the Portal features enabled IBM Tealeaf cxImpact, see
“Portal Navigation” on page 22.
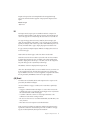
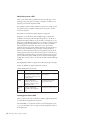
Tealeaf Data Flow
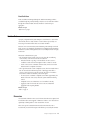
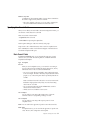
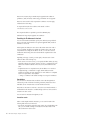
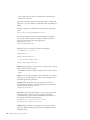
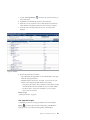
All Tealeaf data is composed of four parts:
v Stream Data: The HTTP DataStream captured by Tealeaf includes request,
response, hit, session, and event data.
v Canister Data: Derived data that is created from the HTTP DataStream. Canister
data is stored in several places and forms.
v Index: An index of important words that appear in the HTTP DataStream.
v Database:
Chapter 1. cxImpact Overview
5
– A databases containing system configuration and statistics
– A database of aggregated counts and statistics that are collected from the
Canister data, mostly based upon event data
– There is also a database of event information that is collected from the
Canister and populated with visitor-related information delivered to IBM
Tealeaf cxResults.
– A database that is containing session information for faster session searching.
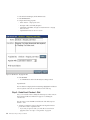
These parts and their relationships are shown in the following diagram.
Figure 3. Tealeaf Data Flows
Each of the four major parts is described in the following sections.
Related concepts:
“Canister Data” on page 13
“Index” on page 15
“Database” on page 16
“Session” on page 11
Stream Data
Tealeaf receives all packets copied by the switch and forwarded down the SPAN
port to the IBM Tealeaf CX Passive Capture Application server. Of the packets
received by the PCA server, only the HTTP and HTTPS packets are re-assembled,
processed, and forwarded for additional processing and storage. In most
configurations, other types of packets are ignored.
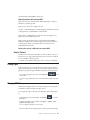
Two modes determine what is processed:
v Business Mode: Retains only specified file extensions (such as .html and .asp)
and encoding types.
v BusinessIT Mode: Retains all hits, including static objects.
6
IBM Tealeaf cxImpact: cxImpact User Manual
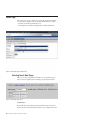
Stream data can be modified in the PCA server and in the Windows pipeline on
the Processing Server. The data can only be modified in these two places.
Request
Typically, the raw request data is not displayed anywhere in the Tealeaf system,
although for debugging purposes the system can be configured to show it. Instead,
the REQ buffer is used to store meta data about the hit, including everything
contained in the original request.
Each HTTP request (and only HTTP) that is captured causes the Passive Capture
software to look for an HTTP response.
v If there is no request, any response is ignored.
v If the HTTP request is encrypted, Tealeaf must decrypt it to understand what
was requested.
Request and response data can be manipulated in the PCA pipeline through
privacy rules and in the Windows pipeline via deployed and configured session
agents.
Related concepts:
“Request Record”
Request Record
In addition to storing the raw HTTP request data in Tealeaf, the request record is
used to store additional attributes for the hit. These hit attributes are extracted or
computed from the request or response and include information such as the IP
address of the sender and receiver, performance timing, and form field variables.
v This buffer is generated by the IBM Tealeaf CX Passive Capture Application after
the request and response have been captured.
The request record is an unstructured text blob containing multiple text delimited
sections of either name=value pairs or XML. The request record is always encoded
as UTF-8. In addition to Tealeaf predefined sections, a custom [appdata] section
can be populated during processing by configured session agents, usually to
simplify downstream data processing or evaluation.
The request record can be viewed using session replay, either through the web
browser or the standalone RTV viewer application.
The hit attributes can be used as source data for events and reports. Hit attribute
data can be exported to third-party systems via IBM Tealeaf cxConnect for Data
Analysis
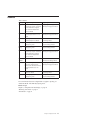
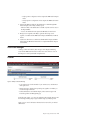
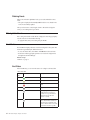
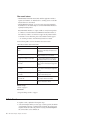
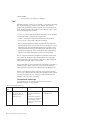
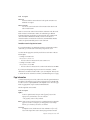
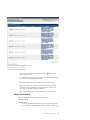
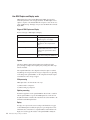
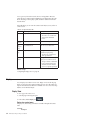
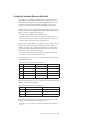
Sections of the Request Record
Hit attributes can be displayed in a list of sessions found through search, either in
the Tealeaf Portal or the IBM Tealeaf CX RealiTea Viewer.
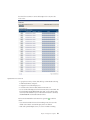
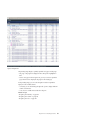
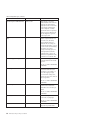
The table below lists some of the request sections from which hit attribute data is
extracted.
Request Section
Description
Chapter 1. cxImpact Overview
7
[appdata]
Custom attributes populated by session agents. These attributes are
automatically indexed for search.
[env]
HTTP request environment variables such as the HTTP Referer and HTTP
Status Code.
[timestamp]
Time stamp of the request and performance timing for the hit, calculated
by Tealeaf
[urlfield]
Parsed GET and POST data fields from the request.
[TLFID_*]
Fact information derived from the hit.
Hit Attribute Export
Displays showing selected hit attributes for sessions that are found through search
can be exported from the Portal and the Viewer into Excel.
The contents of the request record can be extracted from the Tealeaf system for
import into other external systems by using ETL tools with the IBM Tealeaf
cxConnect for Data Analysis product.
Related concepts:
“Request” on page 7
“(Hit) Event” on page 9
“Hit” on page 9
“Reporting Data” on page 16
“cxConnect for Data Analysis” on page 18
“Searching Session Data” on page 37
“Facts” on page 14
Chapter 11, “cxImpact Browser Based Replay,” on page 165
“Index” on page 15
Response
For each HTTP request, the corresponding HTTP response is also captured and, if
necessary, decrypted.
Typically only responses of content-type text/html are retained, except for the
following items, which are also retained:
v Error code responses
v RIA requests (XML)
v Binary Files explicitly kept
HTML data is stored in the same encoding scheme as it was captured.
The response data can be viewed using session replay, either in the browser or the
viewer. For HTML responses, a rendered view and a source view are provided.
Response data can be used for evaluating events.
8
IBM Tealeaf cxImpact: cxImpact User Manual
Request and response data can be manipulated in the PCA pipeline through
privacy rules and in the Windows pipeline via deployed and configured session
agents.
Related concepts:
“(Hit) Event”
Hit
Each request record/response pair is reassembled in Tealeaf to comprise a hit.
Most hits are then discarded as static objects not unique to this particular browser
session. This approach is how Tealeaf keeps the data volume to a reasonable size.
For a typical web page, there can be many (20-50) hits, but most images, style
sheets, JavaScript includes are discarded, so only a few hits per page are retained
typically. For example, if the web server provides a HTTP Redirect response to the
browser, which then fetches a page to display, the page that recorded two hits.
If a page contains JavaScript that requests XML data for display, there are at least
two hits for the page.
Note: Tealeaf uses the term page to refer to hits that are not discarded.
Tealeaf hit counts often do not include every hit of the web server but sometimes
do include more hits than page views recorded by other systems. While Tealeaf
defaults to keeping hits of content-type = text/html, it can also be configured to
keep other data types such as dynamically created images.
The attributes of the hit are displayed in the request record.
After a hit is discarded, the hit does not exist in Tealeaf. However, its existence can
be uncovered through replay, where the hit is regenerated, or by looking at the
response HTML in some cases. A record of dropped hits is reported in the statistics
that are generated by the IBM Tealeaf CX Passive Capture Application.
(Hit) Event
For hits that are not discarded, the data in the request record or response can be
processed by the Tealeaf Event Engine.
An event is defined as a trigger, a condition, and an action that is specified by a
Tealeaf user.
v A trigger is a defined moment in the lifespan of a session when events can be
evaluated. Each event is associated with a specific trigger and can only reference
the event-related data available in that trigger.
v A condition is either the occurrence of a text string in the hit data or the
combination of other Events occurring in the hit.
v The action for a hit event is to record the Event Identifier, actual Hit Time, event
value, and more.
v These items are stored in separate records with the hit data.
Events are useful for modeling user interactions with the web application and to
represent those interactions in structured reports. Events are similar to web page
tags yet are added dynamically based upon the DataStream.
Chapter 1. cxImpact Overview
9
Events also help to manage session recording. Data triggered events can be used to
monitor session, request record, and response text, which provides the basis for the
event conditions and the basis for recording.
Hit event data can be seen in multiple places. Counts for active events are shown
in the Portal in the Active Events page and can be used to trigger alerts.
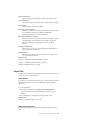
Event Conditions
The following are sample conditions that can be used for event definitions:
v Hit is received.
– Hit attribute is found in the request or response. Hit attribute can be defined
as a specific string or as the content between two specified tags.
v Other events are processed.
– session attribute value: Exact Match, Contains, >, <, or a range of values.
v Session End
– session attribute value: Exact Match, Contains, >, <, or a range of values.
Event Actions
Based upon the event conditions, one or more of the following actions can be
taken:
v
v
v
v
v
Make the event searchable: First occurrence or every occurrence
Make the event reportable: First occurrence or every occurrence
Store the detected value as text or as a number
Trigger another event
Scrape text between tags
v Store session state when the event occurred as dimensions
v Identify membership in a list/group
v
v
v
v
v
Update session attributes
Send event data to an external system through the Tealeaf Event Bus
Close session in Tealeaf
Extend Tealeaf session timeout
Discard session
Event Data
Definitions of the events are stored in a common database location to which all
Canisters in the environment refer. Individual instance event data are stored with
the session to which it is associated.
v Aggregated counts and average numeric values for events are recorded into a
database. Individual instance data can be copied into IBM Tealeaf cxResults
database.
Event data fields include:
v Session Key
v Hit Attributes: Key, Index, or other metadata
v Detected values:
– String that matched
– String that is bounded by the match pattern, such as Name = Value
10
IBM Tealeaf cxImpact: cxImpact User Manual
– String that is converted to a number (for example, 27.50 as shopping cart
total)
– String identifier of value that is defined in an enumerated list (for example,
List of OS types)
– String identifier of group to which text found belongs (for example, CA
belongs to West)
v Any reference dimensions that are associated with the event.
Event Data Export
Event records can be exported every hour to the IBM Tealeaf cxResults product
where custom queries can generate reports.
Selected event data can also be streamed across a TCP/IP socket to external
systems in real time by using the Event Bus API for third-party analysis.
Related concepts:
“Session”
“(Session) Event” on page 12
“Alerts” on page 18
“Database” on page 16
“Dimensions” on page 13
“Monitoring Active Events” on page 32
“Reporting Data” on page 16
“cxResults Data” on page 17
Related tasks:
“Session Attributes” on page 61
Session
A browser session is a series of hits between a specific browser and the web server.
A typical session involves an individual user interacting with the web server to
request (by sending an HTTP request) and retrieve (through the returned HTTP
response) a series of web pages before leaving the site. These request/response
pairings are stitched together into hits, and the sequence of hits in the session are
stitched together to comprise the session data.
v Sessions to which the visitor is continuing to add hits are considered active
sessions.
v If the visitor is no longer adding hits for a predefined time period or triggers an
action (such as logging out of the site), the active session may be closed.
Sessions that have been closed are known as completed sessions.
Every hit belongs to a session. Sessions can fragment due to various factors.
Session Cookies
Since HTTP is a stateless protocol, Tealeaf requires a method of associating the hits
of an individual session. In almost all deployments, this association is managed
through a session cookie.
Chapter 1. cxImpact Overview
11
As each hit is received in the Processing Server (which manages the Canister) from
the PCA server, the cookie is used to store the hit with previously captured hits.
After no additional hits that are containing the cookie are received for the
configured Idle Session Timeout period, the session is closed.
Session durations that exceed a preconfigured value can trigger closure.
Like a web server, Tealeaf cannot typically identify if hits are coming from different
browser windows on the same requesting browser. Hits from different browser
windows are integrated into the same session.
Session Fragmentation
Sessions can become fragmented. For example, the visitor can resume a session
after a period of inactivity exceeding the timeout value. Even though the session
cookie is the same, Tealeaf stores this visitor's experience as two session fragments.
The following situations can cause session fragmentation:
v Tealeaf or web application timeout setting is exceeded
v Sessions that are stored across multiple data centers
v Sessions that are stored across multiple Tealeaf Canisters
v Large sessions can exceed maximum session size limits
v Poor sessionization
At search time, Tealeaf provides the ability to defragment such sessions. For replay
and analysis of individual sessions, Tealeaf can connect the fragments.
Note: Reporting data indicates that session fragments are individual sessions. For
example, the time gap between fragments may be longer than the reporting data
collection interval.
See "Managing Data Sessionization in Tealeaf CX" in the IBM Tealeaf CX Installation
Manual.
Session Attributes
Through events, you can populate session attributes with specified values. These
variables and their values can be found through search in the Portal or the RTV
application.
The results segment can be analyzed by IBM Tealeaf cxResults to produce a set of
canned reports on the contained sessions.
Related concepts:
“(Hit) Event” on page 9
“Tealeaf Data Flow” on page 5
“Searching Session Data” on page 37
“cxResults Data” on page 17
“Index” on page 15
(Session) Event
For sessions that are completed, Tealeaf can process event conditions for the entire
session, such as the occurrence of certain hit events during the session.
12
IBM Tealeaf cxImpact: cxImpact User Manual
Event Definitions
Events are defined and managed through the Tealeaf Event Manager, which is
accessible through the portal. By defining events, the user can model the workflow
through the monitored website and create markers for search and report
aggregation.
Related concepts:
“(Hit) Event” on page 9
Canister Data
A properly configured Tealeaf system attempts to store all hits for a session in the
same Canister, which is a daily collection of sessions that are processed by one
Processing Server and the indexes that are associated with them.
Most users never see Canister data, instead interacting with it through search and
replay. Sessions can sometimes be fragmented across multiple Canisters. Beginning
in Release 7.2, Tealeaf can defragment sessions across multiple Canisters for replay
in the Portal.
The Canister is divided into two parts:
v The Short Term Canister contains active sessions, where hits are still being
received as they occur. Hit event records are created now.
– Unless the Canister is spooling, a new hit added to an active session is
available for search and review through the Portal in a matter of seconds.
– Search of active sessions is limited to full text search, which is slower than
indexed search for completed session data.
v The Long Term Canister contains completed sessions, which are created when no
hits are received for the Idle Timeout period or other trigger met. When a
session is closed, all session events are processed. The session is recorded to
disk, and the contents are indexed by a text search engine.
– An active session is rendered a completed session within approximately five
minutes of the end of the session, unless the system is behind in indexing
sessions.
– Completed sessions are collected into a set of LSSN files for the day.
– Aggregate counts for hit events and session events are collected and
aggregated for the reporting database.
Related concepts:
“Index” on page 15
Dimensions
Associated with a defined event are sets of reference data that can be captured and
recorded when the event is triggered. A dimension contains a set of values that are
captured by a defined pattern or value recorded from an event.
These values provide contextual information at the time when the event is
recorded. They are stored in the request when the hit is processed by the Canister.
Chapter 1. cxImpact Overview
13
For example, Tealeaf provides the following reference dimensions (in versions
prior, these were the only dimensions and they were provided for every event.
Now users can define their own event dimensions.
v #*
–
–
–
Server
URL
Host Name
Application Name
If an event is associated with these dimensions, the values of these dimensions are
recorded with the event when it is triggered. So, if an event is created to detect the
presence of Status Code 500 errors in the response, the values of the above can be
recorded with this event instance to facilitate debugging the issue.
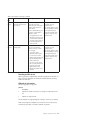
Report Groups
Dimensions are organized into groups. A report group is a collection of
dimensions. A dimension may belong to multiple report groups. When recording,
the Tealeaf system collects aggregate counts for every combination of dimension
values.
An event may be associated with multiple report groups.
Related concepts:
“(Hit) Event” on page 9
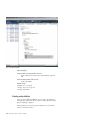
Facts
When an event is triggered in a hit, the Report Group data is recorded with the
event in a structure that is called a fact in the REQ record. A fact contains the
recorded event value and any dimension values for associated report groups and
other data.
This internal data structure is used to facilitate searching on dimensional data that
are related to the recorded event. Each dimension instance value is hashed to
provide a more easily indexed value for searching. When a string is input through
the search interface (for example, "/DEFAULTPAGE"), the same algorithm is used
to create a hashed value that can be found in the search index.
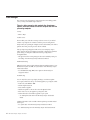
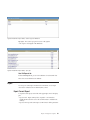
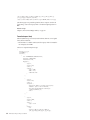
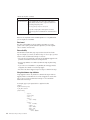
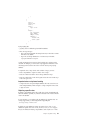
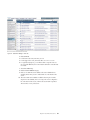
Below is an example fact that is recorded in the [TLFID_80] section of the request
buffer:
[TLFID_80]
Searchable=True
TLFID=80
TLFactValue=1
TLDimHash1=38A7EF5D4FA961F712055D92FC56088A
TLDimHash2=BC3F1812E3C8837962A83226D4A30082
TLDimHash3=8606AC74FD2DECC1899004C49B226FAE
TLDimHash4=5E6D512952FFBB9673B1D0CB08EF33B0
TLDim1=/DEFAULTPAGE
TLDim2=WWW.TEALEAF.COM
TLDim3=OTHERS
TLDim4=63.194.158.200
14
IBM Tealeaf cxImpact: cxImpact User Manual
In the above, the fact identifier (TLFID=80) and recorded event value
(TLFactValue=1) are listed above the hashed values and plain text values for each
dimension. Only the first 256 characters of the dimension value are recorded in
plain text.
Viewing Canister Data
Active Canister data can be viewed through the Active menu in the Portal or by
searching for active sessions through the Portal or the Viewer.
Active sessions are not indexed, but the data structures allow fast searching of
some hit attributes. Tealeaf can perform full scans of the response data, but this
method can slow system performance.
Completed Canister data can be viewed through search of completed sessions
through the Portal or the Viewer.
Related concepts:
“Monitoring Active Events” on page 32
“Monitoring Active Sessions” on page 29
Canister Data Retention
Canister data is typically retained for 10 days, after which it is erased to make
room for newer data.
The IBM Tealeaf cxVerify product allows for search-based subsets of each Canister
to be stored for longer periods in a different Canister.
Index
When a session is completed, it is written from the in-memory database (STC) to
disk and marked for indexing.
In most Tealeaf deployments, only a subset of the captured hit data is indexed, as
retention of this data is expensive in terms of disk space. Instead, the actual body
of the response, without HTML tags, is indexed, as well as selected sections stored
in the request record and selected event data such as the event identifier and event
value. Indexed data includes:
v Select data from the request record
– [appdata], [urlfield], session attributes
– Event Data (ID, value)
v Response
– HTML/Headers are excluded
This index data is retained for the same length of time as the Canister data. The
index data can be regenerated from the Canister data at any time.
v Depending on system load and configuration, canister data is typically indexed
within 5 minutes of session completion.
A generated index cannot be viewed, although search results indicate the use of
indexes. Using the same indexing algorithms as the Canister, the Viewer can create
and display an index for the sessions that are currently loaded, although an exact
match is not guaranteed.
Chapter 1. cxImpact Overview
15
Related concepts:
“Session” on page 11
“Canister Data” on page 13
Database
An overview of how database information is collected and reported for IBM®
Tealeaf cxImpact and IBM Tealeaf cxView.
Related concepts:
“(Hit) Event” on page 9
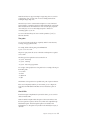
Reporting Data
The Report capabilities of IBM Tealeaf cxImpact and IBM Tealeaf cxView are based
upon aggregate counts of hit attributes, session attributes, and events. During
normal operations, the Processing Server maintains counters in 1-minute buckets as
sessions are completed.
At five-minute intervals, these counts are collected and aggregated into hourly
buckets in the Reporting database from which reports are generated based upon
the Tealeaf time zone for display in the Tealeaf Portal. At the end of the system
day, daily aggregations are created based upon the defined system time zone.
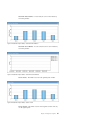
Because reporting data is aggregated, you can obtain:
v Counts: Count of individual event occurrences by time period, which might be
filtered by pre-defined dimensions.
v Numeric Values: For events that store a number that is parsed from the data
stream (for example, a shopping cart value) or calculated by the event (the
number of hits between two events), the minimum, maximum, and average
values can be displayed for the time period, which is filtered by the reference
dimensions.
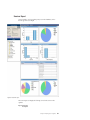
All report data is available through the Portal, through pre-defined and
user-defined reports, including scorecards and dashboards.
Direct extraction of reporting data from the Tealeaf database is not currently
supported. Data from the reports can be exported into Excel.
General Event Data Information
The following general event data information is available:
v Hourly and Daily data are updated every 5 minutes for sessions that are ended
within the current hour
v Hourly (30 days) and Daily (365 days) report data are available for longer than
the supporting Canister data.
v Depending on the system load, Data Collection can run behind.
v Fragmented sessions break session events.
v Hourly data and daily data are reported based on the value of midnight for the
Tealeaf system time.
16
IBM Tealeaf cxImpact: cxImpact User Manual
Event data can be aggregated across each reference dimension, for each
combination. To search for sessions that contain the event data, drill-down links
are provided in reports.
Event data reports are available in the following places in the Tealeaf Portal:
v IBM Tealeaf cxImpact: Tealeaf Reports
v IBM Tealeaf cxView: Dashboards and Scorecards
Event Data Reporting
Event data is reported through the Tealeaf Portal as aggregated data, not instance
data. Counts of events can be reported, and minimum, maximum, and rolling
averages, or data can be reported as numeric values.
Related concepts:
“(Hit) Event” on page 9
Top Movers
Optionally, you can track and store deviations of event values and dimension
values for reporting purposes. Since the storage of these deviations can require
more space, you must choose to record them.
Deviations can be reported over a four-week rolling period against any other
configured deviations to identify the top movers on your site.
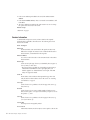
cxResults Data
The IBM Tealeaf cxResults product enables saving into a separate database only the
visitor information, session information, and event records as individual instance
data. This database maps data to individual visitors based upon a persistent cookie
that is defined by the web application.
From the database, it is possible to retrieve session and event data for uniquely
identified visitors. You can also find sessions where events occurred in a specific
sequence, even across multiple sessions.
v In IBM Tealeaf cxResults, segments are defined based on ran searches. Searches,
segment generation, and reports can be scheduled in IBM Tealeaf cxResults.
v Generated reports can populate dashboards.
IBM Tealeaf cxResults data is collected from the Canisters hourly and is typically
retained for 40-60 days, barring performance issues. Even without the HTML data,
the database can grow quickly.
Note: The use of dimensional data in IBM Tealeaf cxResults reports is not
supported in this release. Dimensional data can be used in specifying searches.
Results data is accessed through the Portal through a special search interface.
For regular reports, pre-defined searches can be scheduled and the report data
included in dashboards.
Related concepts:
“(Hit) Event” on page 9
“Session” on page 11
Chapter 1. cxImpact Overview
17
“Searching for Visitors” on page 84
Alerts
Email alerts can be generated based on event or non-event data in the Tealeaf
system. This independent service uses its own database, and alert data is not used
outside the alert system.
Alerts can be generated by hit and session events, as well as canister events, which
are a set of predefined monitors for data in the Tealeaf Canister. Alerts can be
delivered through Portal, SMS, Email, or SNMP. Only the preceding six hours of
data is available to the alert service. The interval for checking for alerts can be set
to as low as one (1) minute.
You can configure the following components for an alert:
v Thresholds
v Measurement Intervals
v Ratios
v Blackouts
Related concepts:
“(Hit) Event” on page 9
cxConnect for Data Analysis
When scheduled, a IBM Tealeaf cxConnect for Data Analysis job can extract session
and request buffer data from one or more Canisters that are based on a predefined
search term.
Extracted sessions can be delivered to multiple output formats and destinations,
including:
v Data files
v W3C Log format
IBM Tealeaf cxConnect for Data Analysis is configured through the Tealeaf Portal.
Exported data is displayed in the local file directory, depending on the output
option.
Glossary
For more information about these terms, see "Tealeaf Glossary" in the IBM Tealeaf
Glossary.
18
IBM Tealeaf cxImpact: cxImpact User Manual
Reference
Table 1. Reference
Data Type
Using or Viewing
Configuring
Request
BBR: "CX Browser Based Replay" in
the IBM Tealeaf cxImpact User Manual
RTV: "RealiTea Viewer - Request
View" in the IBM Tealeaf RealiTea
Viewer User Manual
"Configuring CX Indexing" in the
IBM Tealeaf CX Configuration Manual
Response
"RealiTea Viewer - Response View" in "Configuring CX Indexing" in the
the IBM Tealeaf RealiTea Viewer User
IBM Tealeaf CX Configuration Manual
Manual
Event
"Monitoring Active Events" in the
IBM Tealeaf cxImpact User Manual
"TEM Events Tab" in the IBM Tealeaf
Event Manager Manual
Dimension
"Tealeaf Report Builder" in the IBM
Tealeaf Reporting Guide.
"TEM Dimensions Tab" in the IBM
Tealeaf Event Manager Manual
Report
Group
"Tealeaf Report Builder" in the IBM
Tealeaf Reporting Guide.
"TEM Dimensions Tab" in the IBM
Tealeaf Event Manager Manual
Fact
BBR: "CX Browser Based Replay" in
the IBM Tealeaf cxImpact User Manual
RTV: "RealiTea Viewer - Request
View" in the IBM Tealeaf RealiTea
Viewer User Manual
"Configuring CX Indexing" in the
IBM Tealeaf CX Configuration Manual
Session
Attribute
N/A
"TEM Session Attributes Tab" in the
IBM Tealeaf Event Manager Manual
Index
Portal: “Searching Session Data” on
page 37 RTV: "RealiTea Viewer Session Search and Subsearch" in the
IBM Tealeaf RealiTea Viewer User
Manual
"Configuring CX Indexing" in the
IBM Tealeaf CX Configuration Manual
Alert
"Alert Monitor" in the IBM Tealeaf
cxImpact User Manual
"TEM Alerts Tab" in the IBM Tealeaf
Event Manager Manual
Top Mover
"Analyzing Top Movers" in the IBM
Tealeaf Reporting Guide
"TEM Top Movers Tab" in the IBM
Tealeaf Event Manager Manual
For more information about user-configured data as it applies to reporting, see
"Tealeaf Data Model" in the IBM Tealeaf Reporting Guide.
Related concepts:
Chapter 11, “cxImpact Browser Based Replay,” on page 165
“Monitoring Active Events” on page 32
“Alert Monitor” on page 34
Chapter 1. cxImpact Overview
19
20
IBM Tealeaf cxImpact: cxImpact User Manual
Chapter 2. Using the Tealeaf Portal
The Tealeaf Portal is a web-based portal to the Tealeaf system. You can use a
menu-driven navigation system to search for, analyze, and report on data captured
from your website by Tealeaf.
Additionally, through the Portal, you can replay captured sessions as visitors to
your web site experienced them. Accessing the Tealeaf Portal requires a username
and password.
Related concepts:
Chapter 11, “cxImpact Browser Based Replay,” on page 165
“Logging in to the Tealeaf Portal”
“Portal Navigation” on page 22
Logging in to the Tealeaf Portal
Note: If you have not done so already, it's recommended that you change the
default administrator account passwords as soon as possible. To change passwords,
select Tealeaf > Portal Management.
Related concepts:
Chapter 2, “Using the Tealeaf Portal”
Login requirements
The following browsers are supported for use with the Tealeaf Portal.
Note: A different set of browsers and versions is supported for connecting to the
web console of the IBM Tealeaf CX Passive Capture Application.
Browsers
Note: The Tealeaf Portal does not support access from mobile browsers.
v Microsoft Internet Explorer Web browser version 9 or later
Note: If you enable Windows Enhanced Security features, you can experience
issues when using Internet Explorer to access the Tealeaf Portal. See
"Troubleshooting - Portal" in the IBM Tealeaf Troubleshooting Guide.
v Mozilla Firefox 14 or later
v Chrome 17 or later
Note: If you have licensed IBM Tealeaf cxOverstat, the list of supported browser
versions is smaller, as HTML5 support is required. See "cxOverstat Installation and
Configuration" in the IBM Tealeaf cxOverstat User Manual.
© Copyright IBM Corp. 1999, 2014
21
Note: Several Portal features support the export of Tealeaf data into Microsoft
Excel. If you are unable to properly display these files in Microsoft Excel, see
"Troubleshooting - Portal" in the IBM Tealeaf Troubleshooting Guide.
Usernames and Passwords
v Tealeaf usernames are not case-sensitive. admin and ADMIN both work.
v Passwords are case-sensitive. myPassword and MYPASSWORD are different.
– Passwords can be up to 32 characters in length.
Logging In
1. Start a supported browser.
2. Enter http://<servername>/portal in your browser, where <servername> is the
host name of the machine on which the IBM Tealeaf CX Portal is installed by
your Tealeaf administrator.
a. On the machine where the IBM Tealeaf CX Portal is installed, to the login
page, select from the Windows Start menu:
Programs > Tealeaf Technology > Tealeaf CX Portal > Portal Login Page
3. Enter your login name and password. If Tealeaf is configured to use the
Windows Active Directory system, your login is the same as the name and
password that you use for Windows.
Portal Navigation
When you login, the default screen is displayed. You can use the top menu bar to
navigate through the Portal. Clicking any menu item opens a drop-down menu.
v The default screen for your user account is configured by your Tealeaf
administrator.
Figure 4. Portal menu
v From the menu bar, you can search the product documentation on Tealeaf
Online Help product. Enter your search term in the textbox and click Search
Online Help. See Getting Help.
Related concepts:
Chapter 2, “Using the Tealeaf Portal,” on page 21
Notes on Licensing
1. Event Manager: The Event Manager is available with the IBM Tealeaf CX
license. However, some Event Manager features are available only if additional
licenses are enabled.
v Alerts tab: Alert configuration and use requires the IBM Tealeaf cxImpact
license.
v Top Movers tab:
22
IBM Tealeaf cxImpact: cxImpact User Manual
– Daily Top Mover configuration and use requires the IBM Tealeaf cxImpact
license.
– Hourly Top Mover configuration and use requires the IBM Tealeaf cxView
license.
2. Technical Site Metrics Dashboard: This dashboard is available through IBM
Tealeaf cxImpact as the Activity Summary report.
v Drill-down links on the dashboard are available only if the user has access to
the Report Builder.
v Access to the Dashboard menu requires the IBM Tealeaf cxView license.
3. Manage Session Segments: The ability to generate and manage session
segments is available with the IBM Tealeaf cxImpact and IBM Tealeaf cxReveal
licenses.
4. Search menu: This menu is available for both IBM Tealeaf cxImpact and IBM
Tealeaf cxReveal. IBM Tealeaf cxReveal does not require IBM Tealeaf cxImpact
to be installed.
Portal State Messages
At the top of the Portal window, status messages can be displayed indicating
issues with the IBM Tealeaf CX solution. These issues can be minor to severe in
their impact on overall system health and performance.
Location
Figure 5. Example Portal State Message
v To close the message for the remainder of your current session, click the X icon
in the right corner.
v Warning messages is displayed in exported reports, regardless of whether you
close the message in the Portal.
v Tealeaf administrators can disable the display of these state messages in the
Portal through the Portal Management page.
In the following sections , you can review information about specific messages and
their meaning, including steps to begin troubleshooting any underlying issues.
Note: Access to some of the features referenced can be reserved for your Tealeaf
administrator.
Chapter 2. Using the Tealeaf Portal
23
State Messages
This section provides a description of status messages that are including possible
sources, severity, and troubleshooting instructions.
There is a delay processing data acquired after <timestamp>.
Reports, alerts and indexes can not have complete data until the
processing completes.
Severity:
v Minor to Major
Possible Sources:
The most likely cause of the above message is that one or more of your Tealeaf
Canisters is spooling data. If a Canister is unable to process incoming hits in a
timely manner, the system begins writing those hits to the hard disk, from which it
pulls hits when more processing resources become available.
If the spooling message disappears within an hour, it can temporary surge in
traffic volume. If the message redisplayed consistently or displayed for significant
periods during a workday, the conditions that lead to spooling must be
investigated further.
v The appearance of this warning message in the Portal is enabled by setting. See
"CX Settings" in the IBM Tealeaf cxImpact Administration Manual.
Health-Based Routing:
HBR can be used to manage loading balancing between multiple Canisters. If your
IBM Tealeaf CX system uses HBR, see "System Status" in the IBM Tealeaf cxImpact
Administration Manual.
v See "Health-Based Routing (HBR) Session Agent" in the IBM Tealeaf CX
Configuration Manual.
Troubleshooting:
You can verify if the system is spooling by checking to see if the DecoupleEx
session agent, which sits at the top of each Tealeaf pipeline, is spooling hits to disk.
v In the Portal, select Tealeaf > TMS.
v Click the Pipeline Status tab.
v
v
v
v
Select a Windows pipeline.
Find the DecoupleEx row. Review the value in the Queued column.
If this value is not zero, the pipeline is spooling hits to disk.
Perform the check for each Windows pipeline in your system.
– See "TMS Pipeline Status Tab" in the IBM Tealeaf cxImpact Administration
Manual.
Additional information can be available in the DecoupleEx report and the Tealeaf
Status report.
v See "System Status" in the IBM Tealeaf cxImpact Administration Manual.
v See "Tealeaf Status Report" in the IBM Tealeaf cxImpact Administration Manual.
24
IBM Tealeaf cxImpact: cxImpact User Manual
The root issue is that the Canister is unable to process hits as fast as they are
coming in, due to any of the following factors:
v Spikes in volume - Depending on your web application, there can be periodic
spikes in volume due to expected or unexpected changes in site traffic. For
example, if a marketing campaign is released, which directs traffic to the site,
there can be a spike in traffic soon after. If the only effect on the Canister is a
temporary spooling of hits due to these spikes, then the issue can not be
significant.
v Other processes taking up Processing Server resources - If other processes are
consuming system resources on the server hosting the Processing Server, overall
throughput of hits can be impacted.
– Wherever possible, you must minimize the other applications or services in
use on the Processing Server.
– Periodic maintenance tasks must be scheduled during off-peak hours for all
Tealeaf servers.
v Poorly designed events - Events that perform inefficient searches, use regular
expressions too liberally, or fire too frequently can affect Canister throughput.
v Poorly designed pipelines - The Windows pipeline is intended to be a sequence
of efficient, high-performance processing agents that drop unnecessary data and
change the captured data to meet the search, reporting, and replay requirements
of your enterprise. It is a good idea to periodically review the configuration of a
spooling pipeline to verify the following conditions:
– All included session agents are required.
– Data that is not necessary is removed early in the pipeline, so that it is not
processed needlessly by other session agents. See "Data Drop Session Agent"
in the IBM Tealeaf CX Configuration Manual.
– If the Privacy session agent is deployed, verify that all privacy rules are
needed and are efficiently designed. Poor design of regular expressions in
privacy rules can have a large impact on Canister throughput. See "Privacy
Session Agent" in the IBM Tealeaf CX Configuration Manual.
v Insufficient hardware - If your traffic volumes are changed significantly, the
hosting system can be inadequate to handle the change.
– For more information about the recommended sizing, please contact Tealeaf
Professional Services.
Report groups on one or more events have been disabled
because they exceeded the safety limit of 500,000 new
occurrences within a single hour.
Full Text:
Report groups on one or more events are disabled because they exceeded the
safety limit of 500,000 new occurrences within a single hour. Make the necessary
changes to the report group and/or event to ensure that the safety limit is not
exceeded before manually reactivating the report group.
Severity:
v Minor to Major
Possible Sources:
Chapter 2. Using the Tealeaf Portal
25
This error message indicates that the number of instances that are recorded of one
or more report groups exceeded 500,000 within a single hour. Tealeaf automatically
disables the report group so that the database does not become burdened with
data.
v The appearance of this warning message in the Portal is enabled by setting. See
"CX Settings" in the IBM Tealeaf cxImpact Administration Manual.
Troubleshooting:
Typically, this situation is caused by a poorly constructed event. In many cases, the
event is configured to be recorded on every hit, which means that the event value
and all related dimensional values are being recorded on each detected hit.
Note: In some cases, the source of the problem can be constrained to a single
dimension within the report group. To reduce the number of recorded instances for
the dimension, you might be able to constrain the dimension to use a whitelist of
recorded values. See "TEM Dimensions Tab" in the IBM Tealeaf Event Manager
Manual.
To locate the sources of these messages, complete the following steps:
1. In the Portal menu, select Configure > Event Manager.
2. Click the Events tab.
3. From the filter drop-down at the top of the page, select Events with Disabled
Report Groups.
4. The list of events that have one or more disabled report groups is displayed.
5. If possible, you must change the evaluation of the item to a different trigger. If
the event data is available on the first hit or last hit and is not required for
other evaluations during the active period of the session, then you must change
the event trigger.
You can record the event data to a session attribute, which is accessible
throughout the life of the session.
6. Additionally, you must consider whether the report group is necessary for
recording with each instance of the event. If possible, remove the report group
from the event.
7. If you believe that the data is generated by an unusual situation in the traffic in
the web application, you can re-enable the recording of the report group data.
26
IBM Tealeaf cxImpact: cxImpact User Manual
Chapter 3. Monitoring Current Tealeaf Activities
In real-time, Tealeaf can capture, process, and analyze the bi-directional data
stream between visitors to your website and the web servers that host it.
Under the Active menu, you can review any of the three reports that display
current activities for your website's visitors, as well as a means to define events
that trigger alerts for your review.
Monitoring Active Status
This report displays a real-time overview of short-term hit and session activity,
based on the last known state of the canister. The report can be generated for one
individual IBM Tealeaf CX server or for all known canisters.
When active sessions reach the time-out period or are ended by the visitor, the
sessions are closed and moved to the long-term canister for indexing. They are no
longer active sessions.
Overview
The Active Status report includes three charts to provide graphical information
about session, page, and hit distribution for all Canisters or individual canisters.
Figure 6. Active Status
Chart
Description
Session Distribution
Each bar represents the number of sessions in the short-term canister of the
specified IBM Tealeaf CX Server, which is broken down into Single-Hit
Sessions and Multi-Hit Sessions.
© Copyright IBM Corp. 1999, 2014
27
Single Page Sessions
Displays two bars for each canister:
v The stand-alone Hits bar indicates the number of one-hit sessions that
are divided by the total hits.
v The Single Hit Sessions bar indicates the number of one-hit sessions that
are divided by the total number of sessions.
Hit Distribution
Each bar represents the number total hits for all sessions in the short-term
canister of the specified IBM Tealeaf CX Server.
Toolbar
Figure 7. Active Status toolbar
Table 2. Toolbar.
Icon
Command
Description
Refresh
Refresh the report data.
Server Selector
Select the Tealeaf
Canister from which to
gather active status.
v To display the report
for another Canister,
make a selection from
the IBM Tealeaf CX
Server drop-down. To
display the report for
all Canisters in the
environment, select
<All Servers>. The
displayed charts and
detail tables are
similar.
Manually Refresh
Active Status Computations
The following computations apply to the previous charts.
28
IBM Tealeaf cxImpact: cxImpact User Manual
By default the report
refreshes every minute.
To disable automatic
refresh, click the
Manually Refresh check
box. When it is selected,
the report is refreshed
only if you click the
Refresh button.
Session Distribution Chart computations
Computation
Description
Single Hit Sessions
The number of active sessions with only a single hit
Multi-Hit Sessions
The number of active sessions with multiple hits
The two counts are vertically stacked to create a single bar per canister. This
combined bar represents the total number of active sessions on that canister.
Single Page Sessions Chart computations
Computation
Description
Stand-Alone Hits
The number of single-hit sessions divided by total hits per canister. This
computation represents the percentage of hits that are single-hit sessions.
Single Hit Sessions
The number of single-hit sessions divided by total sessions per canister.
This computation represents the percentage of sessions that are single-hit
sessions.
Hit Distribution Chart computations
Computation
Description
Hits
The total count of hits currently in the selected Canister or Canisters.
Session Activity Table
This table contains the following information about the short-term canister.
Field
Description
Sessions
The total number of sessions in the short-term canister.
Single-Page Sessions
The number of session that are containing only one page.
Hits
Shows all hits that are entering the canister.
Pages (*.aspx, *.jsp, *.do)
The number of hits on text-based pages.
Non-Pages (*.gif, *.jpg)
The number of hits that are on images and other binary resources.
Monitoring Active Sessions
This report queries the Short-Term Canister or Canisters and returns all currently
active sessions.
Chapter 3. Monitoring Current Tealeaf Activities
29
Note: This list is initially populated with all STC sessions that have multiple hits. Click Limit Hits To to select
additional filters.
Figure 8. Active Sessions
v To refresh the display, click Refresh.
Related concepts:
“Viewing Canister Data” on page 15
Commands
For each displayed session, the following command buttons are available.
Command
Description
Indicates an active session. All sessions in this report contain a blue dot.
Click to replay the selected session in RTV or BBR.
v IBM Tealeaf CX RealiTea Viewer (RTV) is a standalone application that
enables high-fidelity replay of Tealeaf sessions
30
IBM Tealeaf cxImpact: cxImpact User Manual
Display the web pages in the session.
Display storage and user information for the session.
Show Server Results Distribution
Click this link at the bottom of the page to display distribution information
on the servers from which the sessions were retrieved.
Report Columns
The following report columns are displayed in the default configuration.
Columns
Description
Session Time
Timestamp for last hit recorded by the Canister
Duration
The current length of the session. This value changes whenever the display
is refreshed.
Login ID
The Login ID value for the displayed session
Events The icons representing the Tealeaf events that appear in the session.
Note: Events marked for evaluation on the last hit of the session or at the
end of the session never appear for active sessions.
Hits
The current number of hits in the session. This value can change when the
display is refreshed.
Report Filters
You may apply the following filters to the report:
Filter
Description
Sort By
Sort the display of the report by Time or number of Hits.
Note: This function applies to the sessions that have been returned to the
browser. If the number of returned sessions is more than the number of
sessions permitted for display, the set of sessions may differ depending on
the selection.
Limit Hits To
To limit the report to display only sessions whose current hit count is over
a selected size, make a selection from this drop-down list.
Server By default, this report displays active sessions from all Short-Term
Canisters (<All Servers>). To display active sessions from only one server,
make a selection from the drop-down list.
Chapter 3. Monitoring Current Tealeaf Activities
31
Report Grouping
You can group the sessions that are based on column values. For example, if you
drag the Hits column header to the bar above it, all displayed sessions are
organized based on the number of hits in the session.
v To group displayed sessions according to a column, click a column header and
drag it to the bar above the listed column headers.
v To sort the grouping, click the Up or Down arrow next to the grouping column
header.
v You can group by multiple levels by dragging more headers to the group bar.
v To remove a grouping, click and drag the group header out of the group bar.
Session List Templates
The columns that are listed in the report are determined by the selected session list
template.
v Use the drop-down to select session list template.
v A session list template is used to display lists of sessions that are returned from
session searches.
v Tealeaf administrators can configure session list templates. See "Configuring
Search Templates" in the IBM Tealeaf cxImpact Administration Manual.
Monitoring Active Events
This report displays all events that have been detected in the short-term canister or
canisters (STC) and the number of times that each event has occurred among all
active sessions. his report does not include event counts for completed sessions
stored in the Long-Term Canister (LTC).
Figure 9. Active Events
v To display all active sessions containing a specific event, click the Live Count
column value.
– This value totals the number of sessions that contain the event.
– This value does not include the number of times an event occurred within
individual sessions or compound session or session attribute information. A
session containing two instances of a single event is counted once.
32
IBM Tealeaf cxImpact: cxImpact User Manual
v You can drill down on active events only if they have been configured to be
searchable in the Portal.
Related concepts:
“(Hit) Event” on page 9
“Viewing Canister Data” on page 15
“Reference” on page 19
Reading the Report
By default, the report is configured to display event counts across all Tealeaf
servers.
v Events are organized by default according to event labels. Clear the View by
Labels check box to see the events in alphabetical order.
v Click any column header to sort event types in ascending or descending order.
Field
Description
Watch
When the list is displayed in alphabetical order, you can select events to
watch. When you sort by this column, these events are grouped and
displayed at the top of the list.
Label/Event
The label and name of the event. You can filter the display of events.
Live Count
The number of instances of the event in the Short-Term Canister
v Click any non-zero value in this column to show all matching sessions
of the current type.
Note: Some events might displayed multiple times in a single session.
To review details on an event, move the mouse over its icon.
v The event ID is an internal identifier that is displayed in the tooltip for the event
in the Events tab.
Report Filters
Option Description
Refresh
Click the Refresh icon to immediately update event counts.
Tealeaf CX Server
Selects an individual server or all servers.
View by Labels
Select this check box to sort events according to event label.
v If not selected, active events are listed in alphabetical order.
Include Zeros
Select this check box to include in the display events that are not registered
any counts.
Chapter 3. Monitoring Current Tealeaf Activities
33
Watching Events
When events are listed in alphabetical order, you can select individual events to
watch.
v This option is displayed when View by Labels check box is not selected. Event
counts are automatically updated.
After you select events to watch, drag the column to the header to display the
events you are watching at the top of the list.
Filtering Active Events
Enter a string in the textbox to filter the list of displayed events. The page displays
only the events whose name includes the string.
v To apply the filter, enter your text string and press RETURN.
Alert Monitor
The Alert Monitor displays the status of each alert configured for the system. This
information is generated by the Tealeaf Alert Service.
v To access the alert monitor, select Active > Alert Monitor in the Portal menu.
v Tealeaf users with the appropriate permissions can create and configure alerts
through the Tealeaf Event Manager.
Related concepts:
“Reference” on page 19
Alert Status
In the Alert Monitor, you can review the status color coding for each listed alert.
Table 3. Alert Status
Alert status
code
34
Icon
Description
0
OK
1
Warning
2
Alert
3
Suppressed
4
Pending (Negative Alert) Insufficient data to evaluate. An
evaluation is not possible until the
entire time period of the Alert
Interval is occurred.
5
Pending (Ratio Alert) - Denominator
fails to meet minimum condition for
alert calculation. A minimum count
value for the denominator event must
occur before evaluation is possible.
IBM Tealeaf cxImpact: cxImpact User Manual
Alert Detail
The Detail pane contains the details for a selected alert. The pane contains details
for the alert, a graph showing the activity, (regardless of current alert state) and a
minute-by-minute list of details of past history in a table.
Alert State
The following data is available in the Alert State pane for the alert currently
selected in the Alert List.
Field
Description
Value
Current value
Status Graphical representation of status
Interval Start
Time of current alert interval start
Interval End
Time of current alert interval end
Alert Threshold
Value to trigger an alert
Warn Threshold
Value to trigger a warning
Alert History
Link to download minute-level data
Download
To export the contents of the alert detail data to an Excel (.XLS) file, click
Download.
Search Links
By using the event the alert originated from as the search criterion, the Search in
links run a search as described in the link text.
The following limitations apply to search links:
v Alerts that are based on canister events do not have Search links available. Since
canister event data is not stored with session data, search cannot be used to find
these sessions.
v Alerts based on categories of session-end events cannot be searched against live
sessions. These types of events are not fired until the end of the session, which
has not yet occurred in a live session.
v Search drill-downs are disabled for ratio alerts.
v Drill-down is disabled for events for which searching is impossible. For example,
you cannot drill down to active sessions for events based on triggers that are not
fired until the end of the session or that are configured to be discarded or to
have their final occurrence tracked.
Graph
Alert values over the described interval are displayed in a simple line graph. Red
bands indicate alert periods.
Chapter 3. Monitoring Current Tealeaf Activities
35
Details
Displays a table of alert details by minute. To sort the display, click any column
header. To reverse the sorting, click the header again.
v For count threshold alerts, this table includes interval value and interval
aggregate value.
v For ratio threshold alerts, this table includes the numerator and denominator
aggregate value and computed ratio value.
Configuration
For more information about configure alerts from session events or canister events,
see "TEM Alerts Tab" in the IBM Tealeaf Event Manager Manual.
v For more information about enabling and configuring the Alert Service, see
"Configuring the Alert Service" in the IBM Tealeaf CX Configuration Manual.
36
IBM Tealeaf cxImpact: cxImpact User Manual
Chapter 4. Searching in the Portal
Through the Portal, IBM Tealeaf cxImpact provides a powerful search mechanism
for finding relevant visitor sessions.
You can use search to look for text that appears in the request or response data, as
well as metadata included in each session. Based on the criteria that you specify,
the IBM Tealeaf cxImpact search utility returns a list of matching sessions.
v If you have licensed IBM Tealeaf cxResults, you can also search for session data
on specific visitors. This mechanism is particularly useful for addressing
customer support issues.
Note: IBM Tealeaf cxResults is a separately licensable component of the IBM
Tealeaf CX platform. IBM Tealeaf cxResults is no longer available as a newly
licensed product as of Release 8.7. Customers that licensed IBM Tealeaf cxResults
in Release 8.6 and earlier may continue to use and receive support for the
product in Release 8.7 and later. For more information, please contact Tealeaf
Customer Support .
You can also search for sessions through the IBM Tealeaf CX RealiTea Viewer, a
desktop application for session replay.
Searching Session Data
Through the Portal, you can analyze Tealeaf data through a simple yet powerful
search interface. For example, if visitors are reporting a particular scenario, you can
search for the characteristics of the scenario. Or, if visitors are abandoning
transactions, you can search these sessions and explore commonalities.
By querying data captured by Tealeaf, you can locate sessions for further analysis
or replay. By capturing the entire stream of request and response data, Tealeaf
provides users a rich reservoir of data that describes web application activities and
issues.
Through the Portal, you can initiate searches for active sessions, completed
sessions, or both types of sessions.
v Active sessions are sessions that have not been closed by the visitor or timed
out by the web application. Hits are currently being added to active sessions
based on visitor activity. To search for active sessions, select Search > Active
Sessions in the Tealeaf Portal. The default active search template is selected and
displayed in the Search page.
v Completed sessions are sessions that have been closed, written to disk, and
indexed for searching. Hits are no longer being added to these sessions. To
search for active sessions, select Search > Completed Sessions in the Tealeaf
Portal. The default completed search template is selected and displayed in the
Search page.
v To search both active and completed sessions, select Search > All Sessions in
the Tealeaf Portal. The default All Sessions search template is selected and
displayed in the Search page.
© Copyright IBM Corp. 1999, 2014
37
Other search features
v The IBM Tealeaf CX RealiTea Viewer (RTV) standalone application includes a
separate search interface. See "RealiTea Viewer - Searching Sessions" in the IBM
Tealeaf RealiTea Viewer User Manual.
v Through IBM Tealeaf cxResults, you can also search session data captured by
Tealeaf based on a rich dataset unique to each visitor. IBM Tealeaf cxResults is a
separately licensable product.
Note: IBM Tealeaf cxResults is no longer available as a newly licensed product
as of Release 8.7. Customers that licensed IBM Tealeaf cxResults in Release 8.6
and earlier may continue to use and receive support for the product in Release
8.7 and later. For more information, please contact Tealeaf Customer Support .
– See "Searching for Visitors" in the IBM Tealeaf cxResults User Manual.
Use the following table to see more information about session search:
Table 4. More information about the Active status
For more information about...
See...
Session Search and subsearch in RealiTea
Viewer
"RealiTea Viewer - Session Search and
Subsearch" in IBM Tealeaf CX RealiTea Viewer
User Manual
Exporting session data from RTV
"Exporting Session Data from RTV" in IBM
Tealeaf CX RealiTea Viewer User Manual
Locating static content in session data
"Locating Static Content in Session Data" in
IBM Tealeaf CX RealiTea Viewer User Manual
Configuring the number of days to retain
session data
"Configuring the Number of Days to Retain
Session Data" in IBM Tealeaf CX Configuration
Manual
Creating events to enable searching for
session data
"Creating Events to Enable Searching for
Session Data" in IBM Tealeaf CX Configuration
Manual
Resolving issues about moving the Canister
session data
"Moving the Canister Session data" in IBM
Tealeaf CX Troubleshooting Guide
Session information that is written to the
session data file
"Session Data File" in IBM Tealeaf cxConnect
Data Analysis Administration Manual
How session data is stored
"Session Data Retention" in IBM Tealeaf
cxImpact Administration Manual
Related concepts:
“Session” on page 11
Related tasks:
“Saving and Sharing Searches” on page 81
A Basic Search
To complete a search, complete the following basic steps.
1. Select search template: When you select a type of search to perform, the default
search template for the type of selected search is displayed. The current search
template is listed above the search panels. If necessary, click Select Template in
the Search toolbar to select a different one.
38
IBM Tealeaf cxImpact: cxImpact User Manual
v A search template is the set of fields that you can include in your search.
v Depending on the type of search, you might want to select a different session
list template, which is used to specify how the search results are displayed.
2. Specify data range: For completed searches, you can specify a range of dates
over which to search.
3. Select search fields: From the left panel, select the search fields to include in the
search.
4. Configure selected search fields: In the main panel, you can specify the values
and other conditions for the selected search fields.
5. Running your configured search: When you are satisfied with the search that
you specified, click Search to run it.
6. Search results: When results are returned, they are displayed in the selected
session list template.
Timestamps in Search and Reporting
Generally, the timestamps listed in the Portal are reported in the Tealeaf time zone,
which is displayed in the upper-right corner of every Portal page. For example,
when you drill down from a report displayed in the Tealeaf Report Builder, the
displayed time zones in the list of sessions are consistent with the times reported
in the source report.
However, for active search and for reports on active sessions, time information is
reported in the time zone selected for the current user. For example, if you are
located in the Pacific time zone, creating and executing a search of today's sessions
results in a list of sessions whose timestamps match to the current date in the
Pacific time zone. In this manner, you can identify activity that is going on right
now by comparing times in active data in the Portal to the time of your local
desktop.
v For more information on configuring your personal time zone, see "My Settings"
in the IBM Tealeaf cxImpact User Manual.
Time zone information is displayed in the Portal according to the following table.
Portal Activity
Time zone Used
Active Sessions
User time zone
Active Search
User time zone
Completed Search
Time zone is specified in the search criteria. By default, the selected time
zone is set to the User time zone. You can configure to search according to
a different time zone.
All Sessions Search
Same as Completed Search.
Report Drill-down
Tealeaf time zone
Excepted as noted above, timestamps in the Portal are in the Tealeaf system time
zone.
Chapter 4. Searching in the Portal
39
Search Page
In the Search page, you can configure a search using the selected search template
to look for active, completed, or all sessions that match the criteria you specify.
v Each user can select the search template to use.
v Search templates are created and configured by your Tealeaf administrator.
Figure 10. Searching through the Tealeaf Portal
Selecting Search Date Range
When you are using a Completed search template, you can specify the range of
dates to search for completed sessions matching your specified search criteria.
Figure 11. Search date range selector
Available Dates:
The Available Dates range reflects the widest possible date range of all sessions
stored in all active Canister and Selective Archive servers, as defined in the Portal.
40
IBM Tealeaf cxImpact: cxImpact User Manual
v The timestamp values in the Available Dates range correspond to the timestamps
of the last hit of the earliest and latest sessions in the Canisters. Within a session,
this value is recorded as the TltStsLastUse session attribute.
v Tealeaf administrators can define the set of active Canister and Selective Archive
servers in the Portal Management page.
Note: If you change the selected servers in the Search Options, the Available
Dates from which you can search does not change. The date range for available
sessions may no longer match the Available Dates range.
From the drop-down, you can specify a predefined period back from the current
date. Most of the options are intuitive, with the following exceptions:
Search Range Option
Description
Latest 5 Minutes
Searches the most recent 5 minutes of sessions that have been indexed
among the available date-time range (Completed sessions only).
Latest Hour
Searches the most recent hour of sessions that have been indexed among
the available date-time range (Completed sessions only).
To specify your own range:
1. To specify your own date and time range, select <Specify>.
2. Enter the From and To dates and times.
v When specifying a time, you may use the arrow keys and TAB and ENTER to
make your selection. To cancel the time configuration, press ESC.
3. The specified range is applied when you execute your search.
Search Fields Panel
In the left panel of the Search Page, you can select the search fields to include in
your search. You can include up to six search fields.
v To add a field to the Search Configuration window, click it.
v To remove a field, click the X icon in the upper-right corner of the box in the
Search Configuration window (
required and must be populated.
). If this icon is missing, then the field is
Depending on the selected search template, one or more of the following groups of
fields is available in the Search Fields panel.
Group Description
Basic Search Fields
Free text search of each request or response in a session or search for
specific events or both.
Session Info
As hit data is captured, Tealeaf begins assembling and updating data
pertaining to the individual session.
Page Info
When a hit is captured, Tealeaf evaluates its contents and assembles
information pertaining to the page or the entire hit.
Chapter 4. Searching in the Portal
41
Search Configuration Window
In the Search Configuration window, you can specify the scope of the search and
enter or select specific data for each of your selected search fields.
Figure 12. Search Configuration Window
Search scope
From the Search Scope drop-down, you can select how the populated search fields
are logically bound in the search.
Option Description
AND - Same Session
All given fields must match against a session.
AND - Same Page
All given fields must match against a single page in a session.
Note: The above option is only available for Completed search templates.
Note: And on Same Page searches cannot include negative operators on
search criteria.
OR - Any Session
Any given field must match against the session.
Notes on AND Searches
When an event fires, it is recorded in the report database with the reference values
at the time the event fired. When you drill into a hit-based report, a search is run
to return relevant results, which may return session counts that do not match
expectations based on the report data for the following reasons.
v If you specify an AND search with only a single search term, the Portal
automatically converts it to a single-term search so that sessions are returned.
Note: The following explanation applies to hit-based reports using dimension
value filters and how to match up report results with search results.
Session-based report data should match search results.
Text searching is session-based. When a search is run, any session containing the
dimension value and the event is returned, even if the dimension value on the hit
where the event fired is different from the dimension value in the search. For this
reason, a higher number of sessions may be displayed when drilling into the initial
session list.
For example, suppose you have two 4-page sessions:
42
IBM Tealeaf cxImpact: cxImpact User Manual
v Session 1 has page 1 with dimension value App1. On page 4, the value is App2
when Event 1 fires.
v Session 2 has page 1 with dimension value App2. On page 4, the dimension
value is App1 when Event 1 fires.
Suppose that you are viewing a report that identifies the occurrence of App2 on the
first page of the session. When you click the drill-down link, the Portal essentially
specifies the following search:
Event=Event 1 and Application=App2
Since search is session-based, the logical and is applied to the entire session, not to
the individual hit. When this search is run, both of Session 1 and Session 2 are
returned, as Event 1 and App2 is displayed somewhere in the session.
The report data displays a count of 1 for Event 1 with dimension value App2.
However, when you drill down, two sessions are returned, because both sessions
have dimension value App2 and Event 1.
For the above example, you can generate search results through the Portal search
interface that are consistent with the report data by specifying the search terms
and the following conditions:
Note: This search must be run through the Portal search interface. It cannot be
configured as a drill-down search through the session list.
v Apply a logical AND
v Specify the data/time range appropriately
v Apply And on same page in the search specification, if filtering a dimension
value other than Path. By default, And on same page is applied to searches by
using the Path filter.
Note: And on same page searches are available only for completed sessions.
Configuring search fields
Each search template has a list of search fields that are associated with it. You can
add a search field by selecting the field in the list.
v You can add up to 10 search terms to a search.
v Fields can be selected more than once and specified independently.
v Fields left empty when the search is submitted are ignored. If no fields are
specified, all sessions that are meeting the other constraints are returned.
v Searches by using Boolean search terms can be applied to a single session
fragment only, as the underlying search engine is unaware of fragmentation. If
the session contains multiple fragments, search results can be inaccurate.
Through RTV, you can retrieve search results for one search term and then
perform a search of the returned sessions for the other term.
v To remove a field, click the X icon (
).
Note: Using a NOT operator, such as does not include, on a search for field
values can slow response time. The underlying search engine must retrieve all
possible values for the field and then apply the NOT to generate results.
Chapter 4. Searching in the Portal
43
Figure 13. Search fields
Depending on the type of search field you added, different search field
configuration options are available.
Executing Your Search
When you finished configuring your search, you can start it.
v To run your search, click Search. The Search Status dialog is displayed.
v When a search is started, the specified search criteria are passed to each selected
Search Server, which analyzes the relevant indexes to return the appropriate
results.
When the search is run, fields added to the search that are not populated are
ignored and are not submitted. If no search field is properly populated, the Portal
runs a query to retrieve all sessions for the specified date range from the queried
Canisters.
v To prevent Get All queries, you can require at least one populated search field
by setting.
v You might also want to remove the All Text field from your search templates,
which can be used to submit Get All queries.
Search Status
While search results are gathered from the selected Search Server or Search Servers,
the Search Status window indicates progress.
v If your search is taking a long time or appears to be searching too many indexes,
you can be able to reconfigure the search for faster returned results.
v To cancel the search, click Cancel Search. Any results that are found so far are
returned and displayed in the configured session list template.
44
IBM Tealeaf cxImpact: cxImpact User Manual
Figure 14. Search Status Dialog
Field
Description
Sessions Found
The number of sessions found
Occurrences Found
Within the found sessions, the number of occurrences found
Indexes Searched
Lists the number of indexes that are searched and the number of indexes
that are scheduled to be searched based on the Search Servers and date
range you specified
Time Elapsed
The number of seconds that the search taken so far
Auto Stop Limit
The maximum number of sessions that are found before the search is
stopped and any matches are returned.
v This value is applied to each server. So, if your search is spanning four
servers, the maximum limit is defined as four times this value.
v This setting is designed to prevent runaway searches that can
significantly affect system performance.
Time Out
The length in time that the search is permitted to run before you stop and
return any matched sessions.
Optimizing your search
When you specify a search, the following tips can help you to return faster and
better results.
Chapter 4. Searching in the Portal
45
v Searches of completed sessions are faster than active sessions because completed
sessions are indexed.
v Avoid doing free text searches of the request or the response. Use keywords and
provided search fields instead.
v For completed session searches, try to minimize the date range to only the
relevant dates.
Search Servers
When the Search button is clicked, the following steps occur in the listed order.
Some of these steps are reported back in the Search Status window.
v The Portal passes the search query to the Report Server.
v The Report Server examines the query. If the search spans multiple Search
Servers, the Report Server farms out pieces of the request to the Search Server
on each relevant Canister Server.
v Each Search Server examines its part of the request and determines the session
indexes that must be searched.
v Those indexes are searched for matches.
v Information about matching sessions is retrieved from the indexes and sent back
to the Report Server.
v The Report Server collates the results and delivers them back to the Portal for
display to the user.
If you are searching across multiple servers, duplicate search hits and sessions are
removed. The number of returned sessions reflects the number of unique sessions
that returned, capped by the maximum permitted number of returned sessions.
The number of sessions that are found is not adjusted to reflect any duplicate
sessions that were found yet not returned due to the maximum number of sessions
setting.
You can select individual Search Servers to query as part of your search criteria
Search Toolbar
The search toolbar is located at the top of the page.
Figure 15. Search Toolbar
The below tools are displayed from left to right in the toolbar.
Tool
Description
Reset
Reset the search to the default fields and values specified in the search
template.
Save Search
Save the current search.
Open Saved Search
Open a search that has been previously saved.
Link to Search
Display a URL to the specified search.
46
IBM Tealeaf cxImpact: cxImpact User Manual
Select Template
Click to select a different search template, which enables searching for a
different type of session: active, completed, or all sessions.
Search Options
Click to open search options.
Selecting Your Search Template
From the Search page, you can choose the search template appropriate for the
search you are specifying. Typically, search templates are provided based on the
type of session for which you are searching: Active, Completed, or All Sessions.
You can also open saved searches, which automatically select the template that was
used to create them. Search templates are defined and assigned by a Tealeaf
administrator.
The currently selected search template is displayed as a hyperlink above the search
panels. To select a different search template, click the search template hyperlink.
The Template Selector is displayed:
Figure 16. Search Template Selector
Select the template to use in the Template Selector.
v To filter the display, enter text in the Search textbox. The listed templates are
filtered as you type.
v To select a template, click it. Then, click Select. Based upon your selection, a
search template is displayed. With the help of that template you can search by
using predefined parameters.
Chapter 4. Searching in the Portal
47
v After you complete your search, the Search page remembers the last template
that you used for the current type of search. If you switch from Active search to
Completed search, for example, the Search page loads the last template used for
Completed search.
Note: If you are interested only in the number of sessions in which your search
criteria occurred, you can configure a session list template to display only the
counts, which can improve search speed.
Search page differences based on template type
Depending on whether you select an Active, Completed, or All Sessions search
template, the available options for the following search features may change:
v Available search fields
v Search options
v Search scope
Search Template Types
Tealeaf monitors a visitor's interaction with a web application during a session.
Tealeaf provide default templates for active, completed, and all session searches.
Active
From captured data packets, Tealeaf assembles requests from visitors to a web
application and responses from the application to the visitor's browser. The
requests and responses are combined into Tealeaf entities called hits. A sequence of
hits for a specific visitor can be assembled into a representation of the visitor's
session with the web application application.
While the visitor is interacting with your web application, the session is considered
active, as hits are added to the session based on the visitor's continuing experience
with the site.
v The sessions that are being experienced by visitors to your web application at
this moment are known as active sessions. To search for them, use a search
template from the Active category.
v <Default_Active> - default template for active session searches
Because sessions remain active only for a short period of time, the list of active
sessions is constantly changing with new sessions starting and older sessions being
completed and moved to the archive. If you are trying to solve a problem that is
occurring with the web application right now, search active sessions for the most
relevant session data.
Note: The number of active sessions that you can search at any time is limited to a
maximum of 150,000. Under various conditions, this maximum may be reduced,
such as heavy usage of user-defined session attributes or memory resource
limitations in the search process.
Completed
When the visitor is no longer interacting with the site either due to a logout action
or inactivity for a period of time, the session is no longer active, and Tealeaf closes
the session. Tealeaf considers the session complete and saves it to the archive,
which is also known as the Long-Field Canister (LTC), where additional indexing
and processing functions are completed.
48
IBM Tealeaf cxImpact: cxImpact User Manual
v At this point, these sessions become completed sessions. Completed sessions are
no longer changing in real time. To search for them, use a search template from
the Completed category.
v <Default_Completed> - default template for completed session searches
All Sessions
Tealeaf users can search active sessions, completed sessions, or both.
v To search for both types of sessions, use a search template from the All Sessions
category.
v <Default_All_Sessions> - default template for All Sessions searches
Session list templates
In addition to the search templates, you can also configure and select a template
for displaying the list of sessions that are resulting from a search. A session list
template defines the columns of data in which the returned sessions from a search
are displayed.
v Before running the search, the session list template can be selected from Search
Options.
v After the search is run, you can switch to a different session list template as
needed.
v You can configure session list templates for use in exporting session data for
analysis through third-party tools.
Search Options
Each search template contains a list of options. Depending on the type of search
template that you select, the following options are displayed:
Chapter 4. Searching in the Portal
49
Figure 17. Search Options for Completed search templates
Option Description
Search Time Zone
(Completed only) For Completed searches, you can select the time zone to
use for your search. When a different time zone is selected, the date and
times that are applied to the search are defined regarding the selected time
zone.
v By default, the applied time zone is the local time zone for the Tealeaf
user.
Session List Template
Select the session list template to use with the current search.
v To use the one auto-assigned with the base search template, select
<Default>.
Sort Results By
The method by which to sort the returned sessions. This setting also
determines the order in which sessions are matched against the search,
which can impact the sessions that are returned if the search is aborted.
v The available options vary depending on whether you are using an
Active or Completed search template.
Search Servers
Select one or more servers whose Search Servers are queried when the
search is executed.
Automatic Search Timeout
(Completed only) The length in time that the search must run before
stopping and returning any matched sessions.
v By default, this value is set to 90 seconds.
50
IBM Tealeaf cxImpact: cxImpact User Manual
Automatic Stop Limit
(Completed only) The maximum number of sessions that are found before
the search is stopped and any matches are returned.
v This value is applied to each server. So, if your search is spanning four
servers, the maximum limit is defined as four times this value.
Specifying Your Search Fields
When you have added your search fields to the Search Configuration window, you
can enter text or make selections for each field.
There are two kinds of data in Tealeaf:
v Captured data from session hits
v Derived data from processing the captured hits
Tealeaf organizes both types of data into commonly used groups.
Except for the * and ? wildcard characters, when a search for completed session
data is submitted, the contents of each text field is stripped of characters that are
not indexed and replaced with spaces.
Basic Search Fields
In the Basic Search Fields panel, you can select the following types of search
criteria to use in your search. The following fields are available in the Default
Completed search template:
Type
Description
All Text
When you search completed sessions, you can search for a text string in
any part of the session data, including the request, the response, and any
derived data such as events or custom user-defined fields.
v You can also use the All Text search field to insert coded search queries
to the search engine. This data is indexed by using the dtSearch software
program, so any of the search options that are provided by dtSearch are
available.
Note: Some dtSearch reserved words such as not and contains must be
bracketed in single quotation marks, if they are used as literal string
values in the All Text field.
v You can insert search keywords into the All Text field to search for
annotations and annotation authors.
v All Text search is not available for active sessions.
Text in Request
You can search for a text string in the request portion of a hit. The
examined content can vary depending on the type of search.
Text in Response
You can search for a text string in the response portion of a hit in
completed sessions.
Events You can search for the appearance of specific events in the session data.
Event Values
In completed sessions, you can search for the appearance of specific event
values. However, more configuration can be required.
Chapter 4. Searching in the Portal
51
session attribute
You can search for user-created session attributes.
Text
Depending on the type of session you are searching, you can search for text strings
that are contained in requests, responses, events, and other derived data. In
general, specify the minimum text that is required to produce meaningful search
results; lengthy search terms with extraneous words in them take longer to return
the same or marginally improved results.
You can choose to return results that include the search field or do not include the
search field by making a selection from the drop-down list.
v includes - returns results with the search field. This is the default setting.
v does not include - returns results without the search field.
Note: If merging of fragments is enabled, using the NOT option might cause
returning improper results. If you search the session for the absence of a search
field returns a true result and a related fragment of the session returns a false
result (meaning that the field is present in the fragment), both the session and
the fragment are listed in the results, even though the field is displayed in the
fragment. Avoid using the NOT operator when sessions are fragmented.
You can configure the maximum word length that is permitted in newly created
session indexes by changing the value of the Maximum Word Size setting in the
Indexing Options tab of the Session Indexer configuration in TMS. Changing this
setting can have immediate impacts on search results.
Note: To limit index size, which is indexed words are truncated to a maximum of
32 characters each, by default. Longer words are truncated at 32 characters to
match search fields in the index and are submitted without prompting the user.
Note: If a search field must search for values that are longer than 32 characters,
you can create an MD5-hashed search field in the search template. When a Tealeaf
user enters the full plain text, it is converted to a 32-character MD5 value and
submitted to the search engine for processing.
Text searches by session type
In the table below, you can review how each type of text search behaves
depending on the type of search performed.
Table 5. Text searches by session type
Search
Field
In Active Sessions
In Completed Sessions
In All Sessions
All Text
This field is not available for
active sessions, due to the
inefficiency of this type of
un-indexed sessions.
The entered string is searched
against all session indexes for
matches.
Search queries are applied only
to completed sessions.
52
IBM Tealeaf cxImpact: cxImpact User Manual
v In the default configuration,
the response is not indexed, so
this search field cannot be
used to search response data.
See below.
Table 5. Text searches by session type (continued)
Search
Field
In Active Sessions
In Completed Sessions
In All Sessions
Text in
Request
The entered string is searched
against the request text in all
active sessions.
The entered string is searched
against the values in the
name/value pairs of the request
that have been stored in the
search indexes.
Note: In standard indexing, only
a selection of request fields is
indexed for search.
Search queries are executed
against both active and
completed sessions.
Note: Since the behaviors of this
field vary depending on the type
of search performed, single
search term in this field cannot
be applied to both active and
completed sessions.
v In completed sessions, value
information is stored as words
in search indexes. Name fields
are stored as fields, which can
be searched using the Form
Field search term.
Text in
Response
Searches all response text for
matching strings.
Search queries are executed
against both active and
completed sessions.
Note: Since the behaviors of this
field vary depending on the type
v To search for specific
of search performed, single
information in the response,
search term in this field cannot
you can create an event to
identify specific patterns in the be applied to both active and
completed sessions.
response and then perform a
search for that event.
In completed sessions, the
response is not indexed by
default, so this type of search
does not apply.
v You can also create a privacy
rule to insert the data into the
[appdata] section of the
request, which is always
indexed. This method is more
advanced.
Searching for URLs in text
URLs are split up by non-alphanumeric characters, typically the forward slash (\/).
Then, each word is truncated to the maximum word limit, effectively becoming
multi-word search terms.
Wildcards in text searches
The following patterns are supported:
Wildcard
Description
*
Matches any number of characters. For example, C* matches both CC and
CAT.
?
Matches any single character
How the wildcards are supported depends on the type of search you are running.
Note: It is by design that completed session search is based on words and does
not match any text within a word unless wildcards are specified.
Chapter 4. Searching in the Portal
53
In the table below, you can see how two different search strings, one with a
wildcard and one without, result in different matches that are depending on the
type of search.
Table 6. Wildcards in text searches
Search
Type
String: town
String: town*
Explanation
Active
Sessions
Matches town, towns and
township.
None.
In Active search, matches are
strict text matches. Since the text
town exists in all 3 words, all are
returned as matches.
v In the second string, there is
no such word as town*, so no
results are returned.
Completed Matches town.
Sessions
Matches town, towns and
township.
In Completed search, matches are
made based on the word as the
fundamental unit of comparison.
v The first string is treated as a
word and thus returns the
word town.
v The second string includes a
wildcard, which is supported
in completed search. So all 3
words are returned.
All
Sessions
v Active: Matches town, towns
and township.
v Completed: Matches town.
v Active: None.
v Completed: Matches town,
towns and township.
An All Sessions search runs
separate queries against the
specified sets of active sessions
and of completed sessions. Thus,
the behavior of wildcards varies
depending on the type of session
that are queried.
Limitations on use of regular expressions
Search provides some support for regular expressions, with the following
limitations:
v A regular expression must match a single whole word. You cannot use regular
expressions to match multiple words.
v Only letters are searchable by using regular expressions.
v No information is stored about line breaks. Searches that include
beginning-of-line or end-of-line regular expression criteria (^ and \$) do not
work.
v Wildcards that are closer to the start of a search expression impacts the speed of
search more. For example, the search for appl.* is nearly as fast as searching for
apple, while you search for .*pple is much slower.
Text queries in the All Text field
You can also use the All Text field to construct text-based queries of the database.
When All Text queries are in the form that is expected by the underlying dtSearch
engine, they run as if they are constructed through the Portal form.
Note: These queries are submitted to the dtSearch engine with minimal
pre-processing. As a result, it is possible to submit invalid search queries that
would otherwise be prevented by the user interface. Where possible, use the search
criteria that are provided in the Portal Search screen.
54
IBM Tealeaf cxImpact: cxImpact User Manual
Note: dtSearch does not support searching for empty string values. To search for
an empty string value, you must create an event to identify patterns that are
matching the empty string value.
One useful way to learn to construct text-based queries is to create form-based
queries and then to examine the query that is displayed beneath the search results.
When inserted back into the All Text field of a new search, the query repeats the
same search query. You can use these displayed queries as the basis for
constructing queries of your own.
You can use the dtSearch keyword contains and the parentheses (( and )) to
demarcate dtSearches.
Time grades
You can search for time grades that are assigned by Tealeaf for network transit,
round trip, and page generation times.
For example, add the following string to the All Text field:
RT_Grade contains ExcellentRT
The previous query returns all sessions in which the round-trip time was graded
as ExcellentRT.
The three types of time grades that can be searched for are:
v NT_Grade - network trip
v RT_Grade - round trip
v WS_Grade - web server page generation
For each type of time grade, there are four grade levels. For example, following are
the RT time grades:
v ExcellentRT
v NormalRT
v HighNormalRT
v HighRT
The definitions of the grade levels are specified at the point of capture in the PCA.
If this search is frequently needed in your environment, you can configure the
Portal and/or the IBM Tealeaf CX RealiTea Viewer to include these options in
search.
Client UI URLs
If Tealeaf UI Capture is implemented in your Tealeaf solution, you can search for
client user interface URLs.
Note: The Tealeaf UI Capture enables the capture of client user interface events
that do not generate a request to the web server, which can be captured through
default Tealeaf capture. Tealeaf UI Capture requires more installation and
implementation. See "UI Capture for Ajax Guide" in the IBM Tealeaf UI Capture for
Ajax Guide.
Chapter 4. Searching in the Portal
55
The following client user interface data are inserted into the [appdata] section of
the request. You can search for this data by using the Search Keywords that are
listed in your All Text search query.
Table 7. Text queries in the All Text field
Request Field
Search Keyword
Description
TLT_CUI_URL
Client UI URL
The URL on the web server where
the event was triggered.
TLT_CUI_APPLICATION_NAME
Client UI Application
The name of the client UI application
name, which can differ from the
TLT_APPLICATION_NAME request
variable value.
Numeric Fields
For search fields such as Hit Count, the text you enter is a numeric value.
Following are the search conditions:
v equals
v does not equal
v <=
v >=
v is between (specify a non-inclusive range)
v is not between (specify a non-inclusive range)
When some of the conditions is selected, a second textbox is displayed with the
default limit for the value.
Note: When you search for numeric values, values are treated as integers. Use of
floating point values (for example, 9.99) can result in false positives.
v In most fields, integers are required by the interface.
v Some fields, such as event value fields, can contain numeric or text data,
depending on the type of field. It means that the integer restriction cannot be
imposed by the user interface. For event values that are expecting numeric
values, all entered values are converted to integers.
v Session attribute fields are stored as text data, regardless of the type of value in
them.
Events
During processing of active and completed sessions, Tealeaf events are created
based on user-defined circumstances. The data that is derived from events is stored
with the actual hit and session information and can be searched like captured data.
Searching for events whose trigger is End of Session or whose reporting is set to
Report last occurrence can require adjustments to your search timeframe, as the
event time associated with these events is in the past because of the must wait for
the session timeout.
Note: If you create hit attributes from the request buffer, note that the [HitType]
section and [TLFID_*] sections (where * is the identifier for the fact) are generated
by the event engine and cannot be detected in live sessions. As a result, any events
by using these hit attributes do not fire in the Windows pipeline and are therefore
not available for searching. They do fire, however, when they are evaluated in the
Event Tester on sessions that are already passed through the Canister.
56
IBM Tealeaf cxImpact: cxImpact User Manual
Note: You can search for inactive events, which can contain no data, as long as
they are configured for display in the Portal. You cannot search for events that are
configured to discard the session.
Figure 18. Events search fields
v includes - returns a session if the search field is displayed in it. This is the
default setting.
v does not include - returns a session if the search field does not display in it.
Through the Portal, you can select events for which to search. When the Event
field is added to the Search Configuration window, you can click the <Any Event>
link to open the Event Selector:
Figure 19. Event Selector
In the Event Selector, you can display events by event label or by name.
v When events are displayed by name, you can move the mouse over the event
name to view tooltip information.
In the Event Selector, you can filter the display of events by entering text in the
textbox. The search filter is applied as you type.
Chapter 4. Searching in the Portal
57
v The list of available events is filtered based on which ones can be displayed in
the selected template. For example, End of Session events cannot displayed in an
active or an All Sessions search template.
v To select an event, click it and then click Select. The event title is displayed in
the Search page.
Limitations in searching for events in active sessions
When you search for active sessions for events, the Event Selector does not contain
events that meet any of the following conditions:
v Events that are triggered on the End of Session or Last Hit triggers have not
been triggered yet for active sessions.
v Events that are configured to report the last occurrence, which cannot be
assessed until the session is closed.
Events that meet any of the conditions mentioned are filtered from the Event
Selector.
Dimension filters
When you select an event, the default search configuration is to look for the event
in combination with any dimension. If needed, you can look for instances of the
event that match only a selected dimension.
v Dimensions can be configured to capture contextual information from the
session at the time when an event occurs. For example, you can capture into a
dimension the value of the URL for the page where the event occurred.
v By default, the dimension filter is set to <Any Dimension>, which corresponds to
the No Report Group Dimension.
To filter by a dimension:
1. To apply a dimension filter, click the <Any Dimension> link. The Dimension
Selector is displayed:
58
IBM Tealeaf cxImpact: cxImpact User Manual
Figure 20. Dimension Selector
v In the Dimension Selector, you can filter the displayed dimensions by
entering text in the textbox. The search filter is applied as you type.
2. To select a dimension, click it and then click Select.
v To remove the dimension filter, select Any Dimension.
3. After selecting a dimension, the Dimension Value Selector is displayed. You can
select one of the displayed values as part of your search term.
Chapter 4. Searching in the Portal
59
Figure 21. Dimension Value Selector
v The values in brackets are constants that are assigned by Tealeaf.
Note: You cannot directly search for null values. To search for a null value,
perform a not includes operation on the non-null dimension values.
v Values with a flag next to them are whitelisted values, which are defined in
the dimension definition.
Note: You cannot search for a specified dimension without selecting a value.
Wildcard searches on a dimension value are not supported.
Note: You can be able to modify the conditions of the event to include a
condition that identifies if a dimension value is present. Then, you can search
for the event, knowing that whenever it fires, a dimension is present.
4. After you selected a dimension value, click Select.
5. The Event search term is updated with a reference to the name of the
dimension and the value you selected.
v Dimensions and their values are configured in the Event Manager.
Note: If multiple facts are available that meet the search criteria, the oldest
dimension is selected based on creation time, since it is likely to have the most
data.
Notes on event timestamping
Event timestamps are recorded at the time that the event occurred in the session.
Individual events are triggered at five possible trigger points:
60
IBM Tealeaf cxImpact: cxImpact User Manual
v
v
v
v
v
Beginning of session
First hit
Each hit
Last hit
End of session
Depending on when the event was triggered, there can be impacts on searching for
session data.
Note: Since events are recorded at the time they occurred, you can sense
mismatched counts in events if you are searching for a session that ends in a
different hour. For example, if the event fires at 11:55 and the session ends at 12:05,
search drilldowns look for sessions in the 11-12 bucket yet will not discover the
specific session, which ended in a different hour. Reporting data is more accurate,
but drilldowns can show discrepancies.
The alert service uses the timestamp of the event to put the counts into 1-minute
time intervals. These intervals are used to determine if an alert threshold is met.
Tealeaf session data files are stored in session files by day, which is defined by the
timestamp of the last hit of the session that is compared to the GMT definition of a
day.
The IBM Tealeaf cxResults database uses the session rules, too. The database has
the details for each event and therefore can use the actual timestamp that is
recorded in the session.
Event Values
Event values are recorded in the request buffer of the hit in which they occurred.
Through the Search page, you can search for specific event values.
Event values cannot be searched for events whose value type is configured to be
Count Only.
Event values are not available in active sessions. You can return event values in
active sessions by searching the request buffer for the fact data.
Session Attributes
Tealeaf supports the creation and indexing of up to 64 session attributes. These
variables can be populated by events.
From pre-Release 8.0 versions of Tealeaf, the LoginID and UserDef 1-4 user-defined
values are moved to Session Attribute 0 and Session Attributes 1-4.
System-managed session attributes are available for search in the Session Info
panel. You can also review session attribute values in the session list that is
containing search results.
You can configure your search parameters to look for the existence of the session
attribute or for specified values in it.
Complete the following tasks to search for a session attribute:
1. In the Basic Search Fields pane, click session attribute.
Chapter 4. Searching in the Portal
61
2. In the session attribute panel added to the search, click <Select a session
attribute.
3. In the Session Attribute Selector, select a user-created session attribute to add.
Click Select.
4. The session attribute is inserted into the search criterion. You can also change
the operator and value to test for the search.
Related concepts:
“(Hit) Event” on page 9
Session Information
As Tealeaf builds and processes sessions, it derives data from the captured
information that is applicable to the entire session. The following session-level
fields can be searched:
Fields Description
Annotations
Use this text field to enter search fields for the specific annotation note.
Wildcards are accepted. An annotation value is indexed with the author's
Tealeaf username, as described in the following field.
Annotation Authors
You can also search for the author of the annotation based on the author's
Tealeaf username.
Browser Type
Search sessions by the type of browser, as identified by the user agent: IE,
Firefox, Chrome, or other values.
v Browser type data is populated only if extended user agent parsing is
enabled in the Tealeaf Reference session agent deployed in your
Windows pipeline. See "Tealeaf Reference Session Agent" in the IBM
Tealeaf CX Configuration Manual.
Client IP
The IP address of the web browser that requested the page. This value
rarely deviates from the IP address value for the session. See “Searching
for IP addresses” on page 63.
First Page
Search all sessions for a path that is also the first page of the session, e.g.
/home/index.asp.
Hit Count
Search all sessions for any session with the number of hits that is more
than, less than, equal to or not equal to the number you input. You can use
the operators =, >, and <.
Last Page
Search all sessions for a path that is also the last page of the session, e.g.
/store/confirmation.asp.
Session Index
The unique session ID assigned by Tealeaf.
TLT Session ID
Like the Tealeaf User ID, Tealeaf can inject a session-specific cookie into the
62
IBM Tealeaf cxImpact: cxImpact User Manual
visitor's browser. This cookie simplifies grouping all hits related to a
specific session if no other common session key is available.
User ID
(Completed sessions only) A Tealeaf cookie injector can be installed on
your web servers and configured to insert a unique, permanent cookie into
the browser of each visitor. This cookie's value is automatically added to
the session data.
Searching for IP addresses
Tealeaf supports the ability to capture, store, and search for IP addresses that are
specified in IPv4 format or IPv6 format. The IPv4 format is prevalent on the
Internet for many years, while the IPv6 format was designed to replace IPv4 by
offering potentially many more possible addresses.
Note: The capture of IPv6 data is supported in PCA Build 3500 or later. The IBM
Tealeaf CX Passive Capture Application must be configured to capture IPv6 data.
IP address data is inserted by the IBM Tealeaf CX Passive Capture Application into
the [env] section of the request. The fields that are defined in your search
templates can be configured to scan for the presence of this request data. Tealeaf
provides search terms in the default templates to search for IP addresses, including
the client IP, server IP, and more.
IP addresses in either format can be inserted into any search field that is specified
to search for this data.
Note: IP addresses can be copied from other sources, such as Tealeaf session data
or report data, and pasted into the IP field in the search interface.
Note: If you upgrad Tealeaf solution from a pre-Release 8.4 build, the Portal
automatically checks the upgrade data and adjusts searching for the above search
fields to use the appropriate search keyword, using the legacy versions if the
search dates include days before the upgrade was completed.
In the available default templates, IP address specification applies to Session
Info\Client IP and Page Info\Server IP. For more information about searching:
Note: If you are using the Text in Request field to search for IP addresses, the
address must be inserted without periods (AAABBBCCCDDD).
IP address formats
IPv4 and IPv6 address are valid IP address formats.
Chapter 4. Searching in the Portal
63
Wildcards in IP addresses
You can use wildcards in any octet (IPv4) or group (IPv6).
Table 8. Searching for IP addresses
Wildcard
IPv4 support
IPv6 support
*
See IPv6 support column.
The asterisk (*) can be used to
replace one or more groups.
Note: You cannot use the asterisk as
part of a specified group or octet (for
example, 4* as an entry for a group
or octet is not allowed).
?
Wildcards for single characters are
not supported.
Not supported
Ranges in IP addresses
In an IPv4 address, a range can be specified in a single octet as:
100-199
For IPv6 address, a range can be specified in one or more groups as:
0000-1000
IPv6 Limitations:
v none
IPv4 Limitations:
v You can specify a range in only one of the octets.
– If multiple ranges are specified in a single octet, then the IP address is
ignored.
– If multiple octets each contain ranges, then the IP address is ignored.
v Wildcards can not be included in octet ranges. For example, an IP address with
an octet such as CCC-D* is ignored when the search is run.
Examples for IPv4:
Table 9. Searching for IP addresses
IP address
Works
Explanation
1.12.113.114
Y
A valid entry
1.?2.113.114
Y
Not supported
1-99.22.113.114
Y
Returns all matching IP
addresses whose first octet
a value between 1 and 99
inclusive.
Notes on searching for client IP addresses
In most web applications, the client IP address is contained in the REMOTE_ADDR
field in the request.
v Tealeaf provides the search field Session Info\Client IP in the default
completed template, which is configured to search for the client IP address,
provided it is displayed in REMOTE_ADDR.
64
IBM Tealeaf cxImpact: cxImpact User Manual
v This value is the raw, non-normalized remote address.
v If this value is an IPv6 address, the REMOTE_ADDR contains the IPv6 value in
compressed format, if compression is enabled in the PCA.
If the Client IP search field is not available, the client IP address can be available
in the [env] or [appdata] section of the request, depending on the rules that are
configured for your Windows pipeline.
v If it is an IPv6 address, the value is stored in the [env] section of the request
and can be in compressed format, as captured and processed by the PCA.
Note: If your web infrastructure uses a proxy, such as Akamai, in front of your
web servers or if your network traffic is passed through a Network Address
Table, the REMOTE_ADDR field does not contain the true client IP address. In these
configurations, you must review the request headers for a special label such as
HTTP_X_FORWARDING, which contains the true client IP.
– Beginning in PCA Build 3501, the IBM Tealeaf CX Passive Capture
Application can be configured to use the HTTP_X_FORWARDING setting for
populating the REMOTE_ADDR value.
Searching for IPv4 addresses
Figure 22. Searching for IPv4 addresses
In Active, Completed, or All Session searches, you can be able to search for IP
addresses in IPv4 format for the visitor's client or your web servers. For fields
identified as an IP address, you can search for IPv4 addresses as a set of four octet
values.
To run the search, enter the address in the following format:
AAA.BBB.CCC.DDD
Note: IPv4 addresses entered in the following formats are not supported for
search:
AAA BBB CCC DDD
AAABBBCCCDDD
Searching for IPv6 addresses
IPv6 addresses are inserted by the PCA into the <env> section of the request.
Note: The capture of IPv6 addresses must be enabled in the PCA for these
addresses to appear in the request.
Figure 23. Searching for IPv6 addresses
For IPv6 addresses, you may enter the address in the provided IP address field in
either uncompressed or compressed format.
Chapter 4. Searching in the Portal
65
Note: In IPv6 notation, the port number may be appended to the address in
parentheses: (8080). In Tealeaf, searches using port numbers are not supported.
Note: You cannot search for full, compressed IPv6 addresses. You must apply
wildcards to the search string.
In compressed format, the above address can be entered as follows:
2001:db8:85a3:0:0:8a2e:370:7334
The compressed address is expanded as part of the submitted query.
Wildcards and ranges may be applied to IPv6 addresses.
Searching for IP addresses in free text
You can use the freetext search field to specify an IP address by using wildcards.
However, since this search method is run against all applicable fields, results are
returned at a slower rate.
Tealeaf captures IP addresses in active session data in their native form. After a
session is complete, IP addresses are turned into 12-digit values so they can be
easily indexed. For example, the IP address 192.168.0.1 in an active session is
rendered into the following value that is stored with the completed session data:
192168000001.
Depending on the type of search, you must specify a free-text search of an IP
address in either of the following ways:
v Active Sessions: For active sessions, you can specify the full IP address, by using
wildcards. In the previous example, search for 192.168.*.1 matches the above IP
address and all other IP addresses whose first, second, and fourth field is the
same.
v Completed Sessions: For completed sessions, the IP address is now stored as a
12-digit text string, so wildcards do not apply. Full IP addresses must be
supplied. For example, the value 192168000001 for an IP address in a completed
session is not equivalent to 192,168,000,001.
– Storing as a numerical value enables searching across ranges of IP addresses.
Annotations
You can search for annotations that are added to session data through Tealeaf.
Annotations provide a mechanism for tracking activities by Tealeaf users about
individual sessions. Annotation data is stored with the session data.
Note: After an annotation is saved into a session, the session must be indexed or
reindexed before the annotation is available through search. You cannot search for
annotations in active sessions.
You can search for annotations through RTV, as well.
Annotation search
When a search template includes annotations, you can search for either of the
following fields in the Session Info node.
v Since Visitor search queries are broken up into queries for each individual search
term, you can combine searching for Annotation or Annotation Author with
other search terms in Visitor search.
66
IBM Tealeaf cxImpact: cxImpact User Manual
Field
Description
Annotation
Use this text field to enter search terms for the specific annotation note.
Wildcards are accepted.
Annotation Author
You can also search for the author of the annotation that is based on the
author's Tealeaf user ID.
Note: You cannot create searches for these fields in combination with other search
fields. Annotations and Annotation Authors are indexed through a different
document mechanism, which results in null search results when combined with
other search fields. In IBM Tealeaf cxResults, searches for Annotations or
Annotation Authors can include other search terms, since IBM Tealeaf cxResults
searches are split into individual queries for each search term.
Annotation search using free-text search
If your search templates do not include the Annotations and Annotation Authors
search fields, you can still search for this data by using free text search.
You must enter the appropriate search keyword for these search items in the text
field. Examples:
v Searching for annotation text:
annoobject/text contains error
– Previous searches for annotations whose text contains error.
v Searching for annotation author:
annoobject/name contains ADMIN
– Previous searches for annotations whose author has the Tealeaf user ID ADMIN.
If you find yourself frequently using free-text search for annotations, a Tealeaf
administrator can add the annotation fields to your search template. The keywords
to add are Annotations and Annotation Authors, and MD5 hashing does not apply.
Page Information
As Tealeaf creates and processes hits, it derives data from the captured information
that applies to the entire hit or page. For this grouping, the list of searchable fields
for active sessions is completely different from completed sessions. The active page
fields are aggregated into reports contained within dashboards.
The following fields can be searched:
Fields Description
AppData
Search for specified name/value pairs in the [appdata] section of the
request. For more information, see Form Field below.
v The [appdata] section is always indexed.
Domain (Active sessions) Search all sessions for a particular domain from which the
pages were served. For example, if your web application uses multiple
domains, you can restrict your search to one domain.
Form Field
(Completed sessions) A field name and value combination in [urlfield]
section of the request. This section contains query parameters extracted
Chapter 4. Searching in the Portal
67
from the URL. For example, in the URL /page.html?myName=myValue, the
values inserted into the [urlfield] section are myName=myValue. To search
for these values, you specify myName contains myValue in the Form Field
term.
v The [urlfield] section is always indexed. See "Configuring CX
Indexing" in the IBM Tealeaf CX Configuration Manual.
Page Generation Time (usecs)
(Active sessions) Search for sessions with pages that took a specified
number of seconds to be created. Page Generation Time is useful for
finding slow pages.
Page Size (bytes)
(Active sessions) The size of a page measured in bytes. You can use Page
Size to search for session containing large pages.
Page URL
(Completed sessions) The full name of a requested page, not including the
server name.
Referer
(Active sessions) Search all sessions for a particular text string in the
Browser User Agent field of the HTTP Request, e.g. *Mozilla/ #.0*.
Server IP
The IP address of the server for this page. Use this field to search for pages
generated by the same web server.
Status Code
(Completed sessions) The HTTP status code returned for a requested page.
Search Results - Session List
After the search has completed, a list of matching sessions is displayed in the
Session List page.
Note: Fields that have been encrypted using privacy rules in the IBM Tealeaf CX
Passive Capture Application or Windows pipelines cannot be decrypted in the
Portal.
v These encrypted fields can be decrypted only during replay.
v As an alternative, you can leave the configured fields in unencrypted state in the
session data and then define privacy rules specifically to be applied during
session replay, permitting the display of the unencrypted data in the Portal, as
needed.
68
IBM Tealeaf cxImpact: cxImpact User Manual
Figure 24. Session List of Search Results
v Active sessions are marked with a blue light indicator (
) and are listed
above Completed sessions.
v To sort the display list of sessions by a specific column, click the column header.
To reverse the sort order, click the header again.
Note: Columns populated by session attributes are sorted as text values.
Note: In the columns of a session list, some non-alphanumeric characters in
event values may be replaced by the space character. This is a known issue.
These values are accurately displayed in QuickView.
v The session list is displayed in a session list template, which you can select.
Session list commands
The following buttons are available in the Session List page:
Button Description
Analyze Segment
If you search completed sessions and a session segment was created, the
session segment can be submitted for analysis by Tealeaf's analysis engine.
Chapter 4. Searching in the Portal
69
Manage Segments
Show the list of session segments that are created by the current and
previous searches.
Download All
Download data from all sessions in the Session List.
In the top-left corner, you can select the following actions to apply to the entire list
of displayed sessions. These options are also available for individual sessions.
Table 10. Session list commands
Command
Icon
Description
Replay
Replays the session in the browser or
in the IBM Tealeaf CX RealiTea
Viewer (RTV), depending on your
account configuration.
Page List
View the page list for the session.
QuickView
Open session QuickView, where you
can review the event and
dimensional data for every event that
was triggered in the session.
Session Info
View session properties.
Send to
Event Tester
Send the selected session to the Event
Tester as sample data.
Default Session List Template
By default, session lists are displayed in a standard template.
v In the upper right corner of the session list, you can select a different session list
template to use.
The following columns are displayed in the default session list (Standard
Template):
Column
Description
Session Time
The timestamp when the most recent hit was recorded by the Canister.
Duration
The duration in hh:mm:ss form for the session.
Login ID
The login identifier that is used for the session.
v This value is populated by configuring Session Attribute 00 to store it.
Additional configuration may be required.
Events A list of the icons for the events that are displayed in the session. This list
cannot be complete. Additional information is available in the tooltip for
each event icon.
Note: The icons are displayed in the approximate order in which the
events first fired in the session. If multiple events fire on the same hit, they
cannot be listed in the precise order of firing.
70
IBM Tealeaf cxImpact: cxImpact User Manual
Hits
The number of hits in the session
Grouping Sessions
In the session list, you can drag column headers to group sessions according to the
values in the column. For example, if you drag the Hits column header to the bar
above the column headers, then the listed sessions are grouped by the number of
hits in them.
Note: You can only group by columns that contain numeric or text data. Data such
as event lists or timestamps cannot be grouped due to inherently high variation in
it.
Figure 25. Grouping Sessions by Hits Column
v To reverse the sort order of the grouping, click the triangle next to the grouping
indicator.
v To undo the grouping, drag the triangle back over the source column header.
v You can create multiple levels of grouping.
Event Info
On any page where event icons are displayed, including a session list, you can
review detailed information about the event. Move the mouse cursor over an event
icon, and the Event Info tooltip is displayed:
Chapter 4. Searching in the Portal
71
Figure 26. Event Info tooltip
Detail Description
Name Name of the event
ID
Internal ID for the event.
v This value is also displayed in the tooltip inside the Event Manager.
Eval On
The trigger in which the event is evaluated.
Note: Events marked for evaluation on the last hit of the session or at the
end of the session never gets displayed when you search for active
sessions.
Modified
Date of last saved modification to the event definition.
Record The instance of the event in the session to track for reporting purposes.
v This value is configured in the Event Summary of the Event Wizard.
Page List
72
IBM Tealeaf cxImpact: cxImpact User Manual
Figure 27. Page List for a Session
A session in the session list can be inspected at the page level. To see the query
strings that are used to run the search, click the Show query strings check box.
Note: Events that have the Display in Session List setting disabled are not
displayed in the Page List.
Session Summary
The page list view displays the following information about the session:
Field
Description
TLTSID Tealeaf session identifier.
Page Count
Total number of pages in the session.
Note: Hits captured from the client user interface through one of the
Tealeaf logging frameworks are not tabulated in this metric.
Total Events
Total number of events that are found in the session.
Avg Round Trip
Average time between start of the response to the end of the request.
Avg Network Trip
Average time for hit and response to travel across the network.
Session ID
The internal identifier that is indicating where the session is stored in the
Canister.
Chapter 4. Searching in the Portal
73
Session Start
Displays the time when Tealeaf began recording the session in the
short-field canister.
Duration
Specifies the length of the session in minutes.
Avg Page Gen
Average generation time in seconds.
Avg View Time
Average view time in seconds.
List of pages
Below the session information, the list of pages for the session is displayed in a
grid in the order that is encountered by the visitor. The following summary
displays the following information for each page:
Field
Description
Page
Specifies the number of the page in the sequence of the session.
v The page number for each page is a link to drill down into individual
page views.
Events Displays the icons that are representing the events that occurred on that
page.
URL
The requested URL of the page. To view the entire URL query, select the
Query String option at the top of the page.
Status The status code that is generated by the web server for the page.
RT Time
Round-trip time for the request and response. The time from the first byte
of the request coming in to the last byte of the response going out.
Net Time
Network time is the number of seconds required to receive the request and
transmit the response.
Gen Time
The time that is taken by the web server to generate the page.
View Time
The length of time the visitor viewed the page.
Size
74
The size of the response in kilobytes.
IBM Tealeaf cxImpact: cxImpact User Manual
Page Detail
Figure 28. Page Detail for one page in a session
The page detail view contains information about the individual pages in a session.
It is divided into the following sections, each of which can be expanded or
collapsed by clicking the section's header:
v To scroll forward and backward through other pages in the session, click << or
>>.
v To replay the session, click Replay.
Field
Description
Hit Details
Page number, hit number, and session ID.
v To replay the session, click the session identifier.
[iamie]
The unique IDs associated with the hit and session, as well as capture
information.
[env]
Environment variables from the request and the response.
[timestamp]
The timestamps and time ratings. These values are specified by the Tealeaf
passive capture application and do not reflect time values for the web
server or visitor's browser.
[urlfield]
The data that is contained in the URL field area of the request.
[headers]
The data that is contained in the response headers.
Chapter 4. Searching in the Portal
75
[cookie]
The cookies that were sent with the request.
[appdata]
Extra data that is associated with the hit, which can also include
configurable fields.
[ref]
Contains reference data that is inserted into the request. Typically, this
section is empty.
[response]
The raw response content of the hit.
QuickView
To see details on the triggering of each event in the session, click the QuickView (
) icon next to the session of interest in the session list.
v For sessions that do not contain at least one standard request and response,
QuickView data might not be displayable.
For the selected session, QuickView displays information about which events fired
on each page, and the dimension values recorded with the events. You might order
the display by the page number or by event name.
v Events are displayed according to the values they are configured to track.
– Events must be configured to be displayed in the Portal and to be displayed
in a session list.
– Events that are provided with IBM Tealeaf cxOverstat are not displayed in a
session list.
– See "TEM Events Tab" in the IBM Tealeaf Event Manager Manual.
Note: If you cannot see events in QuickView, select the All Events option
from the Event Label drop-down. Events that have the Display in Session
List setting disabled are not displayed in QuickView at all. See "TEM Events
Tab" in the IBM Tealeaf Event Manager Manual.
Note: If you deploy one of the Logging Frameworks from IBM Tealeaf CX
Mobile for Mobile App, QuickView contains no data. The pages captured
from any supported Logging Framework do not contain viewable data.
If you deploy UI Capture, user interface events are displayed on the last valid
page on which they fired.
76
IBM Tealeaf cxImpact: cxImpact User Manual
Figure 29. Session QuickView
At the top of the screen, you can review the information from the session list for
the selected session. See “Search Results - Session List” on page 68.
v Additional details are available in the tooltip for each event in the Events list.
See “Event Info” on page 71.
v To view details for a page, click the page number link in the left column. See
“Page Detail” on page 75.
QuickView commands
The following commands and filters are available above the QuickView list.
Command
Description
Order By
Select how you want to order the display of the QuickView list:
v Page Number - events and dimensions are listed by the sequence that is
determined by the page number. The events that fired on a page are
listed in alphabetical order.
v Event Name - events are listed in alphabetical order. For each listed
event, you can see all of the pages on which it fired.
Event Label
Click to select a different event label whose events you want to see in the
event list.
v To see all events that fired in the session, select All Events.
Show Dimension Constants
When selected, dimensions where constant values such as [Limit],
[Others], and [Empty] were recorded are also displayed in the event list.
Chapter 4. Searching in the Portal
77
v To display dimension values that contain non-constant data from the
capture stream, clear this option.
v See “Dimensions and values in QuickView” on page 79.
Email Click to email the selected session to a comma-separated list of recipients.
Replay
Click to replay the session in IBM Tealeaf CX RealiTea Viewer or Browser
Based Replay.
v See "RealiTea Viewer - Replay View" in the IBM Tealeaf RealiTea Viewer
User Manual.
v See "CX Browser Based Replay" in the IBM Tealeaf cxImpact User Manual.
QuickView fields
The following columns are displayed in the QuickView list.
Field Name
Description
Page
Page number where the event was triggered.
v To review the page details, click the page number link. See “Page Detail”
on page 75.
Click the Replay icon to open the session for replay on the listed page.
v See "RealiTea Viewer - Replay View" in the IBM Tealeaf RealiTea Viewer
User Manual.
v See "CX Browser Based Replay" in the IBM Tealeaf cxImpact User Manual.
Event
Display name of the event.
v Move your mouse pointer over the event icon next to the event name to
display the event tooltip information.
v If dimension values were recorded when the event fired, you might
review them by clicking the Plus (+) icon. See “Dimensions and values
in QuickView” on page 79.
Value
The event value that was detected when it fired.
v This value is recorded as a part of a fact (event value + dimension
values) in the request. See "Tealeaf Data Model" in the IBM Tealeaf
Reporting Guide.
Note: A non-null value might or might not be recorded in the database.
Events can be configured to record specific instances of event firings.
This screen lists all event firings that occurred and were marked for
searching in the session. For more information about configuring event
values to track in the database, see "TEM Events Tab" in the IBM Tealeaf
Event Manager Manual.
v [Null] - A null value indicates that no value was recorded when the
event fired.
– Some events, such as count events, do not record event values.
– If no dimensional data was captured for an event that is configured
with report groups, then the displayed value is a null value.
78
IBM Tealeaf cxImpact: cxImpact User Manual
Dimensions and values in QuickView
To review the dimension values that were recorded when an event was triggered
in the session, click the Plus (+) icon next to the event name. On individual lines,
each dimension and its recorded value are listed.
v Dimensions are listed in alphabetical order by name.
To normalize values or place limits on the volume of data that is stored, Tealeaf
supports a set of dimension constants. These constants can be inserted as
dimension values when actual data is not available or exceeds allotted storage
space. Constants such as [Null], [Others], [Limit], and [Empty] are displayed in
place of detected values in these situations.
v To hide the display of dimension constant values, clear the Show Dimension
Constants check box in the toolbar.
v For more information about dimension constants, see "TEM Dimensions Tab" in
the IBM Tealeaf Event Manager Manual.
Session Properties
To display the properties for any session in the session list, click the
session list.
icon in the
Figure 30. Session Properties (Completed session)
Depending on the type of session, the session properties vary:
v For active sessions, the session properties include all possible Session Info terms
regardless of whether they have yet been populated with values.
v For completed sessions, the Session Info terms include session attributes that
have been populated with values. Fields that have not been populated with data
from the session are excluded.
Property
Description
TLTSID Global Tealeaf session identifier
Canister ID
The LSSN file containing the session
Session Index
The session identifier within the LSSN file
Chapter 4. Searching in the Portal
79
IP Address
IP address of the visitor
Domain The domain from which the session was recorded
Browser
Browser information retrieved from the visitor browser
Session attributes
Any defined session attributes that have been populated with data at the
time of retrieval are listed here.
v For active sessions, session attributes are listed even if they have not
been populated with data.
v Session attributes are user-defined variables that can be created to track
session information relevant to your web application.
Additional Search Functions
Tealeaf provides more search functions, including send to event tester, link to
search, saving and sharing searches, sub-search, and exporting session data.
Send to Event Tester
Any session in the session list can be sent to the Event Tester for use as test data
against events in development.
In a session list, you can move the mouse over an event icon to display a tooltip
that identify the name of the event. So, you can locate events that you are testing
using the event tooltips and then send the event to the Event Tester as sample
data.
Complete the following steps to send a session to the Event Tester:
1. Locate the session to test in the session list.
icon next to the description of the session.
2. Click the
3. By default, the provided Description is the session ID. You can enter your own
description as needed. Click Send to Event Tester.
4. To go to the Event Tester, click OK.
v To return to the session list, where you can add more sessions for the Event
Tester, click Cancel. The event that you sent is still available in the Event
Tester.
5. Sessions sent to the Event Tester can be selected and used to test against some
or all available events.
Link to Search
Tealeaf Portal users can be provided a URL to the search that you currently
specified.
v To see the URL, click Link to URL in the Search toolbar.
v You can copy and paste this URL.
Note: This URL does not run the specified search. When this URL is selected,
Tealeaf users must still authenticate through the Portal. Tealeaf does provide an
external API for running through code specified searches.
80
IBM Tealeaf cxImpact: cxImpact User Manual
Saving and Sharing Searches
You can save a specified search at any time.
Complete the following steps to save a search:
1. Click the Save icon in the Search toolbar.
Figure 31. Save Search
2. Enter a name for your search.
3. If you want to share the search with other Tealeaf users, click the Shared check
box.
4. To save the search, click Save.
Note: To save a search under an existing name, you must delete the old search
first and then save the new search by using the existing name.
Related concepts:
“Searching Session Data” on page 37
Open Saved
To open a saved search, click the Open icon in the Search toolbar. The list of saved
searches is displayed:
Figure 32. Saved Searches popup dialog
Chapter 4. Searching in the Portal
81
The list contains searches that you have saved, including any searches other
Tealeaf users have saved and shared. The shared searches are marked with the
shared icon ( ).
v Load: To load a search, select it and click Load. Loading a search populates the
search page with the saved options and fields.
Note: To load a search, you must have permission to use the search template to
which it is tied.
v Edit: To rename or change the sharing status of the search, click Edit.
Note: You can only edit saved searches that you created or to which you have
been granted shared access.
v Delete: To delete a saved search, click Delete. Confirm the deletion.
Note: You can only delete saved searches that you created.
Sub-Search
When a session is loaded in BBR and RTV, you can configure and perform a search
for additional search strings to locate the specific hits in the session where these
search strings are located. This sub-search capability enables search for text strings,
request variables, or request variable values.
Related concepts:
Chapter 14, “Sub-Search in BBR,” on page 217
Exporting Session Data
Through the Session List page, you can download the list of displayed sessions to
RTV, Excel, or PDF format for active, completed or all searches.
Note: For active sessions, data export from the session list represents the only way
to export active session data without deploying the Tealeaf Event Bus. See "Tealeaf
Event Bus" in the cxConnect for Data Analysis Administration Manual.
The exported session list includes all columns of the session list, as well as links to
replay sessions in BBR or RTV.
Note: In the session list, a column value represents the value of the last request of
the session. To acquire each value for the column in the session, you must license
and install IBM Tealeaf cxConnect for Data Analysis, a separately licensable
product of the IBM Tealeaf CX platform.
v To download the displayed set of sessions from the Session List page, click
Download All. The following options are available:
– Download to RTV - Download a file that can be opened in the IBM Tealeaf
CX RealiTea Viewer (RTV) later to retrieve the session list.
– Download to Excel - Download the session list to Excel (XML) format.
– Download to PDF - Download the session list to PDF format.
Changing Session List Display Limits
The number of sessions displayed in the session list is configured by a set of
parameters depending on the type of session:
82
IBM Tealeaf cxImpact: cxImpact User Manual
v Active Sessions - Configure the Live Max Results Limit parameter setting to
define the number of sessions.
v Completed Sessions - Configure the Session Segment Max Sessions Limit
parameter setting to define the number of sessions that can be displayed in a
session segment.
This limit also applies to IBM Tealeaf cxReveal searches.
v All Sessions - A single All Sessions search executes one search for active sessions
and one search for completed sessions, so the maximum number of sessions
displayed in a segment is the sum of the above two parameter settings.
Note: The actual number of sessions displayed may be reduced by the applied
session list template.
Changing Columns to be Exported
You can configure a session list template to display other fields. For example, you
may wish to insert session attributes as columns in the session list template. These
values can then be exported for third-party analysis.
For data export purposes, you may wish to create a separate session list template
to export session data. Or you can modify your existing session list template, as
needed.
Search and Indexing
To enable improved search performance, Tealeaf scans completed sessions for a
predefined set of data that is typically of use in locating sessions. The Portal and
RTV then use these indexes to quickly locate sessions based on search criteria that
you enter. For many customers, this data set is sufficient to enable effective search
for sessions of interest.
Indexes are not used for search of active sessions.
In some cases, you may decide that some session data that is not available by
default for search should be accessible. For example:
v You have created pipeline rules that insert application-specific data into the
request.
v You have deployed IBM Tealeaf CX UI Capture for AJAX, which enables the
capture of user interface events from the visitor's browser.
v You have deployed a Tealeaf Logging Framework, which enables the capture of
application and event data from mobile native applications.
Note: Tealeaf Logging Frameworks are components of the IBM Tealeaf CX
Mobile module. Additional configuration and deployment is required.
In the above circumstances, the data may not be automatically indexed for search.
Using one of the provided methods, you can make this data available for search
through indexed data or event values.
Important: Adding index data is considered a Tealeaf administrator task. Adding
data to be indexed for search increases the size of the indexes stored in the
Processing Server. Depending on the volume of increased data that is marked for
Chapter 4. Searching in the Portal
83
indexing, indexes can grow considerably and may impact available disk space and
performance of the Processing Server. Before you begin adding data, you should
review your goals with IT staff.
Searching for Visitors
cxResults enhances traditional search capabilities by using a relational database to
support organizing searches around the concept of a visitor.
In cxImpact, Tealeaf users can find relevant sessions by using full-featured text and
event search, much like that provided by search portals on the Internet. cxResults
extends that search capability by wrapping session data in a relational database
that tracks information unique to each visitor to your web application.
v To search for visitors, select Search > Visitors in the Portal menu.
Note: Visitor search is a component of cxResults. cxResults is no longer available
as a newly licensed product as of Release 8.7. Customers that licensed cxResults
in Release 8.6 and earlier can continue to use and receive support for the
product in Release 8.7 and later. For more information, contact Tealeaf Customer
Support .
For more information about visitor sequence search, see "Visitor Sequence Search"
in IBM Tealeaf CX Installation Manual.
Related concepts:
“cxResults Data” on page 17
Overview of Visitor Search
This section provides an overview of how visitor data is organized and how you
can configure your searches to find the data.
Note: Visitor search only applies to completed sessions that are indexed and then
extracted for use in cxResults by the Visitor Database Extractor, a process that
applies visitor information to completed sessions.
Related tasks:
“Enabling Visitor Search” on page 105
Identifying Visitors
A visitor can be uniquely identified by a data token that persists across multiple
visits (sessions). This identifier is typically retained based upon values that are
stored in a persistent cookie. If a cookie is unavailable, the identifier can be a login
ID, query string, or other mechanism that is provided by your website for uniquely
identifying visitors.
If the website does not have a persistent cookie or identifier, it is possible to use
other persistent cookies such as those used by web analytics packages.
Tealeaf also provides a Cookie Injector program that can be installed on your web
servers to create the persistent cookie in addition to any session cookies.
84
IBM Tealeaf cxImpact: cxImpact User Manual
A visitor can have multiple persistent cookies, especially if the visitor uses multiple
computers (home/work) or multiple browsers on one computer (IE, Firefox). This
common situation generates multiple records per visitor. However, if the website
application requires a user login, cxResults uses the final cookie values (after login)
to identify the visitor for that session.
The method by which cxResults identify visitors is configured by settings in the
Portal.
Visitor Segments
Visitor search provides a powerful capability to search for events and text strings
occurring in sequence in single sessions and across multiple sessions. This search
method can query the visitor database and session text database and can merge the
results.
Visitor search queries are broken down into individual queries for each search term
and run. When the results are returned, they are aggregated together by using a
logical AND. Session searches assemble a defined search into a single query.
Note: Timestamps in visitor search are always reported in the Tealeaf system
timezone.
Like Session search, the results of a Visitor search query are called segments.
Visitor Segments can be analyzed by using reports that are provided by Tealeaf.
Like Session Segments, Visitor Segments are automatically purged after a time by
the system, unless the user takes actions to extend the life of the segment. This
auto-removal prevents the system from filling up with old and unused data.
Note: When segments are created from the current day's data, their contents
remain static. If the same search is re-executed, then a new segment is created with
data up to the last hour. Since a report is specific to a segment, viewing a report
that is created from the first segment after you create the second segment can be
confusing, as new data in the second segment does not display in the old report.
As a best practice, avoid generating segments from the current day's data, and
configure scheduled searches at the end of the day to acquire the day's data.
Related concepts:
Chapter 7, “Analyzing Session Segments,” on page 123
Chapter 8, “Managing Visitor Segments,” on page 143
Related reference:
“Scheduled Searches Tab” on page 101
Visitor Data Storage
In addition to the unique visitor data, cxResults replicates the session and event
data from the text search database in cxImpact without replicating all data required
for replay. This storage mechanism uses less space, allowing the data to be retained
over a longer period of time.
In Visitor Search, searches that include Event or Event Value fields query the
Visitor database. All other fields generate queries against the session database.
Visitor Search Tabs
The following tabs are available in the Visitor Search screen:
Chapter 4. Searching in the Portal
85
Tab
Description
Define Search Tab
Specify the criteria for your search.
Recent Searches Tab
Review and re-execute the status of recently run searches.
Completed Searches Tab
Analyze the session segments generated from recently completed searches.
Scheduled Searches Tab
Review the list of schedule visitor searches.
Scheduled Search History Tab
Review the history of scheduled searches that are recently ran.
Related reference:
“Define Search Tab”
“Recent Searches Tab” on page 99
“Completed Searches Tab” on page 100
“Scheduled Searches Tab” on page 101
“Scheduled Search History Tab” on page 104
Define Search Tab
In the Define Search tab, you specify the criteria for your search.
By using the fields displayed in the tab, you can specify the terms for which you
are searching the visitor data.
Figure 33. Define Search Tab
Tealeaf administrators can create and deploy customized search templates for
Visitor Search.
Related concepts:
“Visitor Search Templates” on page 98
86
IBM Tealeaf cxImpact: cxImpact User Manual
A Basic Visitor Search
Complete the following tasks to complete a basic visitor search:
1. Specify data range: Review the list of available dates for visitors. The, specify
the date range from the Search Range drop-down.
2. Select search fields: From the left panel, select the search fields to include in the
search.
3. Configure selected search fields: In the main panel, you can specify the values
and other conditions for the selected search fields.
4. Running your configured search: When you are satisfied with the search that
you specified, click Search to run it.
5. Search results: When results are returned, they are displayed in the selected
session list template.
6. If required, searches can be saved and scheduled for execution at predefined
times.
Related concepts:
“Search Range” on page 92
“Executing Searches” on page 95
“Search Results” on page 99
“Managing Searches” on page 96
Related tasks:
“Configuring Search Terms” on page 92
Related reference:
“Visitor Search Fields Panel” on page 92
“Scheduled Searches Tab” on page 101
Searching for specific visitors:
To search for a specific visitor, you must include the field that is used for
visitorization as a field in your search template. When this field is available for use
in your searches, you can add it to your search and specify a unique visitor ID or a
range of IDs by using wildcards as the values for which to search.
Related concepts:
“Enabling search for specific visitors” on page 99
Toolbar
At the top of the Define Search tab, the following commands are available in the
toolbar.
Table 11. Toolbar
Icon
Command
Description
New
Clear the search terms and begin specifying a
new search.
Save
Save the currently specified search.
Chapter 4. Searching in the Portal
87
Table 11. Toolbar (continued)
Icon
Command
Description
Open
Open a saved search.
Reorder Search
Re-order the search terms.
Search Options
View search options.
Related concepts:
“Managing Searches” on page 96
“Opening saved searches” on page 97
Related tasks:
“Reordering search terms” on page 97
Related reference:
“Search Options”
Search Options
The following options are available for configuring visitor search.
Within a single session: You can search for text or events that occurred in a
single session or across multiple sessions. For example, you can search for visitors
who had an "Add to Cart" event in one session followed by a "Proceed to
Checkout" event in another session later. Or, you can search for both events that
are occurring in the same session.
v When this item is cleared, the search criteria can span multiple sessions.
Note: For Session Info criteria, searching within a single session is not likely to
change the results for these events that are already occurred in a session.
In the listed sequence: Sometimes, the order of occurrence of events or text
strings is important. For example, did the visitor see an "Out of Stock" message
after the "Proceed to Checkout" event? Or, when searching across sessions (Within
a single session is cleared), did the visitor ever reach the "Proceed to Checkout"
event again in the session after the "Out of Stock" message occurred?
Note: Within a single session, sequence is irrelevant for session-level events, which
all fire at the conclusion of the session. The order of execution for session-level
events within a session cannot be configured.
Related concepts:
“Session end events and session-level attributes” on page 91
Sequence search methods:
Tealeaf supports two methods of performing visitor sequence searches: “Every
occurrence”, and “Last occurrence”.
Both methods have the same restrictions and behaviors in sequence search.
88
IBM Tealeaf cxImpact: cxImpact User Manual
Every occurrence
This method performs much faster searches for sequences that are based
on each occurrence in the session. If your Tealeaf solution is deploying this
method, the label in Search Options is In the listed sequence.
Note: Tealeaf recommends by using this method for sequence search. This
method requires more installation in your Tealeaf databases.
Last occurrence
This method searches for sequences that are based on the last occurrence of
events in the session. The last occurrence method is the default sequence
search method. If your Tealeaf solution is deploying this method, the label
in Search Options is In the listed sequence (uses last occurrence).
Restrictions: When this option is selected, the events that are specified in the
search criteria must occur in the order in which they are listed on the form,
according to the following restrictions, depending on the method in use:
v The search evaluates every or the last occurrence of each search criteria.
– If the Within a single session option is selected, the search query looks for
the specified sequence of the selected parameters that are based on their
occurrence within a single session. Comparisons across multiple sessions are
not performed.
– If the above option is not selected, the search query looks for the specified
sequence of the selected parameters across sessions, which are based on every
occurrence or the last occurrence of individual parameters.
v In both of the cases, if every or last occurrence of each event occurs in the
proper sequence, then the session is matched.
Note: If two events that are listed as occurring in sequence fire on the same
page, they are evaluated as occurred in the proper sequence, since it is not
possible to determine the order of evaluation within a page.
Field Limitations
Searches in the listed sequences cannot be applied to the following fields:
v All Text
v The NOT operator is disabled in these types of searches.
v Any session-level information, such as Session Info fields or any session
attributes included in the search template, including the following session-level
attributes:
– Annotations
– Annotation Author
– Domain
– Session Duration
– Session Index
–
–
–
–
–
–
–
Hit Count
Browser Type
First Page
Last Page
TLT Server
TLT SessionID
TLT Application
Chapter 4. Searching in the Portal
89
–
–
–
–
–
TLT Host
Session Attributes
Fact Count
Event Count
Browser OS
– Browser Version
– Bot Session
Related concepts:
“Sequence within a single session”
“Sequence across multiple sessions”
“Sequencing on a single page” on page 91
Sequence within a single session: Suppose you are trying to match a sequence A,B,C.
Following are some examples listed .
If you are evaluating the events within a single session, searching for the sequence
A,B,C has the following results.
v In the following table , the last instance of each event in the session is
emphasized.
Table 12. Sequence within a single session
Results
Session 1
Session 2
Session 3
A
A
A
B
B
A
C
C
B
A
C
B
B
C
C
fail
pass
pass
Session 1 fails because the final instance of C occurs before the final instances of A
and B, meaning the final sequence in the session fails.
Sequence across multiple sessions: When you search across multiple sessions, the
same logic applies to the evaluation; the search query evaluates the sequence that
is based on the last or every occurrence of the parameter.
If you are evaluating the events across multiple sessions, the first order of
evaluation of sequence is the session, specifically the timestamp for the end of the
session. Suppose that you are searching across Session 1, Session 2, and Session 3,
whose ending timestamps are in the same order.
Example 1:
In this sequence of events, the last or every occurrence of each of the sought events
across the three sessions is emphasized:
v Session 1: A B C D E
v Session 2: B B C D A
v Session 3: A D D B D
90
IBM Tealeaf cxImpact: cxImpact User Manual
Searching for A,B,C fails, as the last instance of C is in Session 2 and occurs before
the last instance of A and B in Session 3.
Example 2:
Suppose that you have this sequence of events.
v Session 1: A B C D A
v Session 2: B B B D E
v Session 3: C D D E D
Searching for A,B,C matches, as the occurrences of A, B and C are in sequence
across the sessions.
Sequencing on a single page: If multiple events in the sequence occur on a single
page, they are always evaluated as occurring in sequence within the page, since it
is not possible to determine order of firing on an individual page. If a page
contains two events (D and E) in the sequence, they are always evaluated as
occurred in the proper sequence, regardless of whether the sequence is listed as
D,E or E,D.
Some examples can clarify. Suppose that you are searching for three events that are
listed in sequence: D,E,F.
Table 13. Sequencing on a single page
Session #
Page 1
Page 2
Page 3
Evaluation
1
D
E
F
pass
2
D, E
F
pass
3
E, D
F
pass
4
F, E, D
5
F, D
pass
E
fail
In the previous table, sequence searches of Session 1-4 all evaluate to having
occurred in the proper order. Session 5 fails because event F occurred on a page
before event E, which is therefore out of order.
Session end events and session-level attributes: The timing of the occurrence for
session-end events (events evaluated in the End of Session trigger) and
session-level parameters (such as referrer) is at the session end. So, a query for
multiple session-end parameters within a single session always fails.
v You can configure sequences of session-end search criteria across multiple
sessions.
Ignore unknown visitors: Some websites are regularly visited by computer
programs that do not display a persistent cookie, which can result in a large
number of visitors identified as UNKNOWN. You can select this option to withhold
those visitors from the results and any subsequent reporting.
Available Dates
Above the search fields, you can review the range of dates that contain data for
visitors and general session data.
Note: For the currently specified terms, the dates that are listed in bold represent
the limits of available data.
Chapter 4. Searching in the Portal
91
1. Available Dates (Visitors) - The available range of visitor data in the Visitors
database. The Visitors data set is much smaller than session data, which allows
for storage over longer periods of time.
v You can search for event data across the entire Visitors database.
v Visitor data does not become available until it is loaded in the Visitor
database, which typically occurs 1-2 hours after a session is completed.
2. Available Dates (Sessions) - The available range of indexed session data in the
CX database. Session data is typically retained for approximately two weeks
because the data needed for replay is much larger.
v You can only search for text data, Session Info, and Page Info for the date
range of available session data.
v Session data is only available for completed sessions. It is not available for
active sessions.
Search Range
To specify the range of dates to search, make a selection from the Search Range
drop-down. All options are relative to the current date.
v To specify a custom search range, select <Specify>. The date range selector is
displayed. Specify the From and To date and time values.
Visitor Search Fields Panel
In the left panel of the Define Search tab, you can review the available search
terms and add selected ones to your specified search.
You can include up to four terms in a search. The following search term categories
are displayed:
Basic Search Fields
Search for text in the request, response, or both or events and event values.
Session Info
Add search terms that apply to the entire session, including session
identifiers, session metrics, and annotations.
Page Info
Add search terms for specific data on individual pages.
Related concepts:
“Basic Search Fields” on page 93
“Session Info” on page 94
“Page Info” on page 95
Configuring Search Terms
To
1.
2.
3.
92
add a search term to your search:
Open the node that is containing the term that you want to use:
Select the term to include.
Specify the values in the search term.
a. Text values can be specified to be included or not included in the searched
sessions.
v To search for included text values, select includes.
v Specify the number of times that the value must be displayed or must not
be displayed in the session.
IBM Tealeaf cxImpact: cxImpact User Manual
b. Numeric values can be specified to match exactly, fit within a range, or to
be greater than or less than a specified value. You can also specify NOT
operators for the equals operator and is between operator.
v Select the appropriate operator from the drop-down list.
Note: The does not include operator can be used only with event search
terms. It cannot be applied to event + dimension value combinations or
any other search terms.
v Depending on the operator, you canspecify a range or a single
comparative value.
v For range operators, you must specify a value in the first textbox as the
lower bound of the range and the upper bound in the second textbox.
4. Add more search terms as needed.
Related concepts:
“Basic Search Fields”
“Session Info” on page 94
“Page Info” on page 95
“Searching Session Data” on page 37
“Specifying comparisons and counts”
Specifying comparisons and counts: You can compare the number of times that
the criteria is displayed in the visitor search to a fixed value. This ability to specify
the counts to which the criteria counts are compared enables useful analysis. For
example:
v An error count that occurs more than three times in a session can indicate
application issues.
v Failures to sign in more than three times can suggest fraud or user access
troubles.
v If the same IP address is touching the same URL more than 10 times, it can be
an indicator of fraud attempts.
These counts and other examples must be configured to meet the requirements of
your web application.
Note: When doing a comparison by using a NOT term, you can only use a count of
1 for that term.
Basic Search Fields
The following basic search fields are available in the default template, which is
typically the same template as the default Completed Search template in cxImpact.
Text: You can perform free text searches for specific terms in the request, the
response, or both of session data. You can specify multiple instances of each
criterion.
When a visitor text search is run, the corresponding session data must be gathered
from the queried Canisters and inserted into the Visitor database before the
database is queried to retrieve the results. Some implications:
v Simple text searches of visitor data takes longer than corresponding searches of
session data. Because there is no upper bound on number of records that are
returned in these searches, they are broken down into smaller searches over
Chapter 4. Searching in the Portal
93
periods of no more than one hour, by default. To improve search speed, Tealeaf
administrators can raise this hour limit, which is defined by the parameter
Maximum Text Search interval (minutes) in the cxResults settings page.
v The available data for text-based visitor searches is limited by the number of
days of data that is retained in the queried Canisters. Options for extending the
number of days of data retained in the Canisters:
1. Change the Data Retention settings.
Field
Description
All Text
Search for specified term in the request and response.
Text in Request
Search for specified term in the request.
Text in Response
Search for specified term in the request.
Note: Searches by using these fields are submitted to Search Server, which runs
them against session data that is stored in the selected Canisters.
Related concepts:
“Searching Session Data” on page 37
Events and Event Values: You can search the number of occurrences for events
and event values in the presence of an optionally specified dimension. Searches by
using these fields are run against the Visitor database.
Field
Description
Event
Search for a specified event when an optional dimension is present.
Event Values
Search for a specified event value.
Note: When you search for numeric values, values are treated as integers. Use of
floating point values (for example, 9.99) can result in false positives.
v In most fields, integers are required by the interface.
v Some fields, such as event value fields, can contain numeric or text data,
depending on the type of field, which means that the integer restriction cannot
be imposed by the user interface. For event values that are expecting numeric
values, all entered values are converted to integers.
v Session attribute fields are stored as text data, regardless of the type of value in
them.
Related concepts:
“Searching Session Data” on page 37
Session Info
From the Session Info panel, you can select search terms that apply to the entire
session. Some of these session search terms can be used to uniquely identify the
session.
94
IBM Tealeaf cxImpact: cxImpact User Manual
Note: Searching for counts of session-level information within a single session is
not supported. You can search for counts across multiple sessions, with the count
of occurrences in a single session always returned as 0 or 1.
Related concepts:
“Searching Session Data” on page 37
Page Info
From the Page Info panel, you can select search terms that apply to individual
pages. These terms can identify characteristics of the page or specific data inserted
into the request.
Related concepts:
“Searching Session Data” on page 37
Executing Searches
To run the specified search, click Search. The search is queued for processing, and
the following popup is displayed.
v You can perform other tasks while the search is queued and run.
v Depending on the contents and search fields in your search, some modification
of the characters in your search criteria can be performed to match the format of
the indexes that are searched.
v To check the status of your search, click the Recent Searches tab.
Note: If you are unable to execute searches, the Visitor database extract job
cannot be enabled.
Figure 34. Search Status popup This popup indicates the status of processing the search. While the search is queued
and processed, you can perform other tasks.
v To cancel the search, click Cancel Search.
v To hide the dialog and resume by using the Portal, click Run In Background.
The search continues to be processed.
Note: To limit index size, which is indexed words are truncated to a maximum of
32 characters each. Longer words are truncated at 32 characters to match search
Chapter 4. Searching in the Portal
95
terms in the index and are submitted without prompting the user. Tealeaf
administrators can change this limit through the configuration options of the Index
Service configuration.
After the search is complete, the Status screen shows the number of matching
visitors. If there are matches, click View Results to open the Analyze Visitor
Segment page for that segment.
v If the search results contain multiple sessions for the same visitor, the first listed
session is the initial visit, and all subsequent sessions are repeat visits.
Note: By default, the Visitor extraction process excludes all one-hit sessions, so
the count of returned sessions for Visitor searches can differ from an equivalent
search in cxImpact. If required, you can enable extraction of one-hit sessions in
Visitor search.
Related concepts:
“Search Results” on page 99
Related tasks:
“Enabling Visitor Search” on page 105
Related reference:
“Recent Searches Tab” on page 99
Managing Searches
Through the Define Search tab, you can manage searches that you save and
perform other tasks.
v To save the currently defined search, click the Save icon in the toolbar.
v To open a saved search, click the Open icon in the toolbar.
v To schedule the current search to occur on regular intervals, click the Scheduled
Searches tab.
v To clear the Define Search terms, click the New icon in the Define Search
toolbar.
v To reorder the search terms in the Define Searches tab, click the Reorder icon in
the Define Search toolbar.
v To run the specified search, click Search.
Related concepts:
“Saving searches”
“Opening saved searches” on page 97
“Deleting searches” on page 98
“Executing Searches” on page 95
Related tasks:
“Reordering search terms” on page 97
Related reference:
“Scheduled Searches Tab” on page 101
Saving searches: To save the currently specified search, click the Saveicon (
in the Define Search toolbar. Enter a name for the search. Click Save.
96
IBM Tealeaf cxImpact: cxImpact User Manual
)
A saved search can be scheduled for periodic run, which generates a session
segment that can be analyzed at your convenience.
Related reference:
“Scheduled Searches Tab” on page 101
Opening saved searches: To reuse previously defined search terms, click the
Open icon (
Load.
) in the Define Search toolbar. Select the search to open and click
Figure 35. Open Saved Search
Reordering search terms:
Through cxResults, you can search for terms that occurred in a specific sequence
within a session. For example, you can want to identify sessions in which the
visitor began the checkout process (Page URL includes checkoutbegin.asp) yet
received an application error (All Text in Response includes Application Error). In
this situation, the search terms must be listed in a specific order:
1. Page URL includes checkoutbegin.asp
2. All Text in Response includes Application Error
To enable searching in a specific order, you must configure your search options to
be in the listed sequence.
Chapter 4. Searching in the Portal
97
Figure 36. Reorder Search
v To reorder the sequence of the search terms, select a search term and use the Up
or Down arrow to reposition it. To save the new order, click Save. The Define
Search tab is updated.
Related reference:
“Search Options” on page 88
) in the
Deleting searches: To delete a saved search, click the Open icon (
toolbar. Select the saved search and click Delete. The search is deleted.
Visitor Search Templates
Visitor Search uses the default template for searches for completed session data in
cxImpact. The applicable fields from the template are available in the Visitor Search
screen.
You can create a custom search template that is containing different search fields
for use with Visitor Search.
Note: You cannot create a customized session list template for Visitor Search.
Customizing search templates:
Tealeaf administrators can create custom search templates for use in Visitor Search.
A custom template must be created for Completed Sessions and then selected for
use in Visitor Search.
98
IBM Tealeaf cxImpact: cxImpact User Manual
Enabling search for specific visitors: Depending on your implementation of
cxResults, the unique visitor identifier can be available for search through one of
the following search template fields:
v TLTVID
v LoginID
v Custom event or session attribute
Tealeaf administrators can add the appropriate field to the visitor search template
that enables users to search for unique visitor identifiers.
Selecting a visitor search template:
Complete the following steps to select a different search template for use in Visitor
Search:
1. If you are a Tealeaf administrator, select Tealeaf > Portal Management.
2. In the Portal Management screen, select CX Settings from the left pane.
3. Select the search category.
4. In the Search settings, select Visitor Search Template.
5. At the bottom of the screen, select the completed sessions search template to
use from the Value drop-down list.
Search Results
Visitor search results are displayed as a visitor segment of sessions in the Visitor
List page.
Related concepts:
Chapter 9, “Analyzing Visitor Segments,” on page 147
Chapter 8, “Managing Visitor Segments,” on page 143
Recent Searches Tab
The Recent Searches tab shows all the recent searches and their current status. A
green square in the first column means the search completed successfully. A yellow
hourglass means the search is running. A red exclamation point means there was a
problem.
You can run multiple searches simultaneously.
Chapter 4. Searching in the Portal
99
Figure 37. Recent Searches
Right-click on any displayed search and complete one of the following actions:
v View Results and Reports- Opens the search in the Analyze Visitor Segments
page.
v View Search Parameters- Displays a popup where you can select parameters to
populate the Define Search page.
v Rename the Search - Enter a new name for the search.
v Cleanup List - Removes old completed searches.
Related concepts:
Chapter 9, “Analyzing Visitor Segments,” on page 147
Completed Searches Tab
In the Completed Search tab, you can review and manage the visitor searches that
are successfully run.
More commands are available in the context menu.
100
IBM Tealeaf cxImpact: cxImpact User Manual
Figure 38. Completed Searches
Related concepts:
Chapter 8, “Managing Visitor Segments,” on page 143
Scheduled Searches Tab
Saved searches of the Visitors database can be scheduled to run on a periodic
basis. Before you schedule a search, you must configure it and save it.
For example, you might want to schedule a search of sessions that resulted in error
conditions for the previous day at 2AM in each morning.
To create, review, and reschedule searches of the Visitors database, click the
Scheduled Searches tab.
When these searches are successfully run, a visitor session segment is generated
and is available for analysis through the Managing Visitor Segments page.
Chapter 4. Searching in the Portal
101
Figure 39. Scheduled Searches Tab
In the left pane of the Scheduled Searches tab, you can review the list of searches
that are scheduled.
v To create a search, click <Create a schedule. Provide a name and other
information for the search. Then, use the right pane to define the search.
– To save your created search, click Save. The search is scheduled to be run.
– To cancel your created search, click Cancel.
v To edit a search, select it. The right pane is populated.
) icon.
v To delete a search, select it and click the Minus (
Related concepts:
Chapter 8, “Managing Visitor Segments,” on page 143
Related reference:
“Define Search Tab” on page 86
Configure a Scheduled Search
Setting Description
Active To enable the search, click the Active check box.
Description
Enter a user-friendly name for the search.
Schedule
Search Frequency
You can specify the time and day or days of the week that the search is
run. Searches can be run daily, weekly, or monthly.
Hour of Day
Set the hour when the search is run, based on the 24-hour clock.
Language
Select the language in which the search is run.
Options
102
IBM Tealeaf cxImpact: cxImpact User Manual
Saved Search
Click the link to select a visitor search that is saved to be run at the
scheduled time.
Calendar
Specify the date and time range for your search.
1. Specify the previous settings.
2. In the calendar, configure the scope of the search.
3. To save the new search, click Save. The search is saved and now displayed in
the left pane.
When the search is run, the results of the search are listed in the history tab.
Related concepts:
“Configuring Search Range”
Related reference:
“Scheduled Search History Tab” on page 104
Configuring Search Range
Using the Search Range controls, you can specify the date and time range for your
scheduled search.
Note: These settings override any date range that you can specify in the search
definition. See “Define Search Tab” on page 86.
Figure 40. Scheduled searches calendar
In the Calendar, the current date is marked by a dark blue square. The currently
specified range of dates for the search is highlighted by using light blue.
You can use the From/To controls or the Calendar tool or both to change your
search range. The Calendar displays the currently configured date range for your
search.
v By default, a scheduled visitor search is configured to search the day that is
preceding the date of execution.
Chapter 4. Searching in the Portal
103
From/To:
Use the From/To tools to specify offset days, weeks, or months before the current
focus date.
v The From/To offset date values must be a positive value. You cannot set the
value to zero.
v You can also specify a start time that is applied to the From date and an end
time that is applied to the End date.
Note: The date units (days, weeks, or months) in the From/To tools indicate the
offset value for From and To independently and relative to the date of execution.
For example, you can specify a number of weeks From dates to a number of
days To date.
v If you select a start time that is after the currently specified end time, no
calendar dates are selected.
Calendar:
The Calendar is primarily a visualization tool for identifying the search range if the
scheduled search ran today. Optionally, you may use it to specify a date range by
making selections.
v To select from months that are not displayed in the Calendar, click the << or >>*
icons.
v To specify a range of dates, click the start date. Then, press SHIFT and click the
end date. The highlighted dates are updated in the Calendar, and the From/To
selectors are updated.
v Changes that are made through the Calendar are applied to the From/To values.
The From/To values provide the most accurate information about the range of
the scheduled search.
Scheduled Search History Tab
You can review the history of searches that you have scheduled in this tab.
Figure 41. Scheduled Search History
Field
104
Description
IBM Tealeaf cxImpact: cxImpact User Manual
Created At
Timestamp for when the scheduled search was last saved
Scheduled At
Timestamp for when the search was scheduled to be run
Log Level
Log level used for the scheduled search
Message
Message reported upon execution.
v
v
Schedule process time - Scheduled search executed successfully.
No scheduled status returned - Scheduled search failed.
Enabling Visitor Search
Visitor Search is a component of cxResults, a separately licensable component of
the Tealeaf CX platform. To enable Visitor Search, you must enable and configure
the Visitor Database Extractor process.
Visitor Search scans both the session database and the Visitor database. The Visitor
database is populated by periodic executions of the Visitor database Extractor. This
process scans the session database for sessions that are ready for inclusion in the
Visitor data set and then extracts and inserts the data into the Visitor database,
including more information specific to the visitor.
Complete the following steps:
1. cxResults is enabled through license key. If you have not acquired a key to
enable cxResults, contact Tealeaf http://support.tealeaf.com.
2. The Visitor database Extractor is managed by the Tealeaf Scheduling Service,
which can be configured to periodically run Tealeaf-specific tasks. You must
enable and configure the process through the Scheduling Service.
3. After you have enable the Extractor process, you can perform additional
configuration, including the specification of the field on which unique visitor
identification is based.
4. When cxResults is enabled, you can configure the menu profile of user groups
to enable access to the Visitor Search and Segment Analysis pages.
Note: Visitor Search and Segment Analysis pages can be enabled only for CX
user groups.
5. When the Extractor process is enabled and successfully run at least once, you
can use the Visitor Search page to search for visitors.
Related tasks:
“A Basic Visitor Search” on page 87
Search Keywords
In the following table, you can review the search keywords available in Tealeaf and
how they are implemented in each storage mechanism.
Legend
Keyword
The name of the keywords as it appears in the Portal search templates.
Chapter 4. Searching in the Portal
105
STC
The keyword as it is used in the short term canister, which contains active
sessions.
LTC
The keyword as it is used in the long term canister, which typically
contains today's sessions.
In Default?
If set to A (active) or C (completed), the keyword does appear in one of the
default search template provided by Tealeaf.
Description
A brief description.
Table 14. Search Keywords
Keyword
STC
LTC
All Text
In
Description
Default?
C
Performs text search of
indexed items in completed
sessions, including text in
request and response and
event-based data.
Annotation
Authors
annoobject/name
C
Username of person who
created an annotation is
indexed along with the
annotation. This search field
lets you search for annotations
by username.
Annotations
annoobject/text
C
In RTV, you can add
annotations to pages during
replay. These annotations are
stored in a separate table and
are indexed (caveat: sessions
moved to an archive machine
are not indexed). This search
field lets you search the text of
the annotation you entered.
request/appdata
A, C
[appdata] section of the request
AppData
request/appdata
Bot Session
isbot
Is the session generated by a
bot?
To capture data for this
keyword, extended user agent
detection must be enabled.
Browser
TLT_BROWSER in
request
The browser identifier as
reported by the browser user
agent. This value is stored in
the Browser hit attribute.
To capture data for this
keyword, extended user agent
detection must be enabled.
Browser OS
browseros
The operating system as
reported by the browser user
agent.
To capture data for this
keyword, extended user agent
detection must be enabled.
106
IBM Tealeaf cxImpact: cxImpact User Manual
Table 14. Search Keywords (continued)
Keyword
STC
LTC
In
Description
Default?
Browser Type
browser
tltstsbrowser
A
Browser Version
browserversion
Type of browser, such as IE,
Firefox, or Chrome.
Note: The source of this search
field has changed beginning in
Release 8.6. For more
information, see the (Release
8.6) https://
community.tealeaf.com/
display/tealeaf86/
8.6+Release+Notes section in
https://
community.tealeaf.com/
display/tealeaf86/
8.6+Release+Notes.
The version of the visitor's
browser
To capture data for this
keyword, extended user agent
detection must be enabled.
Client IP (IPv4
legacy)
ipaddr
tltstsipaddr
A, C
Visitor's Internet Protocol
address (aaa.bbb.ccc.ddd)
v The tltstsipaddr value is
indexed only if the
environment uses IPv4
addresses. Maintained for
legacy purposes.
v If IPv6 addresses are
present, Portal-based
searches for Client IP use the
IPV6_REMOTE_ADDR request
variable for searching for
client IP addresses.
Client IP (IPv6)
ipv6_remote_addr
C
Visitor's Internet Protocol
address in IPv6 format
(aaaa.bbbb.cccc.dddd.eeee.
ffff.gggg.hhhh)
Client UI
Application
request/appdata/
TLT_CUI
_APPLICATION_NAME
TLT_CUI
_APPLICATION_NAME
The application name as
reported by Tealeaf UI
Capture. To capture data for
this keyword, extended user
agent detection must be
enabled, and the IBM Tealeaf
CX UI Capture for AJAX must
be deployed and enabled.
Client UI URL
request/appdata/
TLT_CUI_URL
TLT_CUI_URL
The URL as reported by
Tealeaf UI Capture. To capture
data for this keyword,
extended user agent detection
must be enabled, and the IBM
Tealeaf CX UI Capture for
AJAX must be deployed and
enabled.
Chapter 4. Searching in the Portal
107
Table 14. Search Keywords (continued)
Keyword
STC
LTC
In
Description
Default?
Domain
domain
TltStsDomain
A, C
Env
request/env
request/env
Events
uniqueid
tltstsuniqueid
A, C
Search for named events in
active and completed sessions.
Events with
dimensions
factidwithdims
hit//TLFID_{0}/
TLDimHash{1}
A, C
Search for events by name
with dimensions.
Event Count
numevents
Event Values
Domain from which the visitor
is visiting
Search for data in the [env]
section of the request.
Counts of occurrences of
events.
hit//TLFID_{0}/
TLFactValue
Values of Tealeaf events
Fact Count
numfacts
Count of recorded facts in the
session
First Page
frstpage
tltstsfirstpage
A, C
The first page of the session
Form Field
request/urlfield
request/urlfield
A, C
Form field data in the request
Hit Count
numhits
tltstsnumhits
A, C
The number of hits in the
session
Last Page
lastpage
tltstslastpage
A, C
Last page of the session
Page Generation
Time (usecs)
request/timestamp/
WS_generation
A
Time required to generate the
page on the visitor's browser in
milliseconds
Page Size (bytes)
request/env/
responsedatasize
A
Size of the page in bytes
Page URL
request/env/url
url
A, C
URL of the page
Referring URL
referer
http_referer
C
URL of the page from which
the visitor accessed the current
one
Server IP
Address (IPv4
legacy)
request/env/
LOCAL_ADDR
local_addr
A, C
The Internet Protocol address
of the web server.
Server IP
Address (IPv6)
request/env/
IPV6_LOCAL_ADDR
Maintained for legacy
purposes. Use ipv6_local_addr
instead.
Session Attribute customvarX
ipv6_local_addr
tltstscustomvarX
C
The Internet Protocol address
of the web server in IPV6
format.
Search for Tealeaf user-defined
session attribute with index
number X.
Session attributes are defined
through the Tealeaf Event
Manager and are updated
based on Tealeaf events.
Session Duration
(secs)
108
tltstssesnduration
IBM Tealeaf cxImpact: cxImpact User Manual
The length of the session in
seconds
Table 14. Search Keywords (continued)
Keyword
STC
LTC
In
Description
Default?
Session Index
sesnidx
tltstssesnidx
A, C
Identifier of a session within a
canister. Typically it is a
number like 1 or 469683648.
statuscode
C
The HTTP status code for the
page
Status Code
Text In Request
request
request
A, C
Active: Searches entire request
for matching strings
Completed: Search indexed
values in name/value pairs of
the request
Text In Response
response
response
A, C
Active: Searches entire
response for matching strings
Completed: Search the
response text that is not HTML
tags. This content is indexed.
TLT Application
tlt_application_name
The value of the TLT
Application field, as defined in
Tealeaf
TLT Host
tlt_host_name
The value of the TLT Host
field, as defined in Tealeaf.
To capture data for this
keyword, the Tealeaf Reference
session agent must be
deployed in your Windows
pipeline.
TLT Path
tlt_url
The value of the TLT Path
field, as defined in Tealeaf.
To capture data for this
keyword, the Tealeaf Reference
session agent must be
deployed in your Windows
pipeline.
TLT Server
tlt_server
The value of the TLT Server
field, as defined in Tealeaf.
To capture data for this
keyword, the Tealeaf Reference
session agent must be
deployed in your Windows
pipeline.
TLT Session ID
sesnid
tltstssesnid
TLTVID
tltvid
tltststltvid
A, C
The value of the Tealeaf
session identifier
The value of the Tealeaf visitor
identifier
Chapter 4. Searching in the Portal
109
Table 14. Search Keywords (continued)
Keyword
STC
LTC
In
Description
Default?
Traffic Type
tltststraffictype
tltststraffictype
A,C
The type of traffic, such as
MOBILE, BOT, or BROWSER.
Note: The source of this search
field has changed beginning in
Release 8.6. For more
information, see the (Release
8.6) https://
community.tealeaf.com/
display/tealeaf86/
8.6+Release+Notes section in
https://
community.tealeaf.com/
display/tealeaf86/
8.6+Release+Notes.
User ID
userid
tltstsuserid
A, C
The user identifier, as defined
by the web application
Scoring Search Results
This information describes how search results are scored and ranked by Tealeaf.
When a session segment is created, it uses a default value of 1000 sessions from
the search that is completed. When the defined limit of sessions is exceeded in the
results, some rules are applied to the sessions to determine which ones are shown
to the requesting user.
Each session is assigned a score that is based on what was found in it and the
number of occurrences. The score is a count of words that were found for each
search term.
v If you search for a phrase in the response, a session that contains five instances
of that phrase is more likely to be returned than a session that contains two
instances of the phrase.
v If you search for a session-level attribute that is displayed only once in the
session, that search item yields only one hit per session. As a result, the score is
consistent across all returned sessions. In this case, the most recent sessions are
returned, as the search indexes are searched from new to old.
Note: Events are indexed as session-level attributes. No matter how many times
an event fires in a session, it can generate one only search hit.
110
IBM Tealeaf cxImpact: cxImpact User Manual
Chapter 5. Overview of Segments
Execution of a search queries the database and returns a list of sessions that match
the search conditions. This list is called a segment, which can either be a list of
sessions or a list of sessions identified by visitor, depending on the type of analysis
performed.
Searching for session data is part of the cxImpact product.
In cxResults, searching for visitors queries the Visitor database and returns a list of
matching sessions called a visitor segment. In a visitor segment, all returned
sessions have unique visitor identifiers and session identifiers, so that you can drill
into the visitor information and sessions themselves. Most websites manage visitor
identification through their own methods. Tealeaf can rely on your visitor
identifiers. Optionally, the Tealeaf Cookie Injector can be deployed on your web
server to generate guaranteed unique identifiers for each visitor.
After a visitor segment has been generated by search or a saved one has been
loaded, it can be subjected to analysis by the Tealeaf reporting engine. After a
segment has been analyzed, you can select one or more sessions in it and generate
cxResults reports on those segments. Visitor segments can be converted to session
segments, which enables page and path analysis through the cxImpact reporting
capabilities. Recent and completed searches can be managed through a common
interface, through which you generate analysis and reports, review segment
parameters, and share or delete the segment.
Related concepts:
“Searching Session Data” on page 37
“Searching for Visitors” on page 84
Chapter 7, “Analyzing Session Segments,” on page 123
Chapter 8, “Managing Visitor Segments,” on page 143
Chapter 6, “Managing Session Segments,” on page 113
Related tasks:
“Create Session Segment” on page 150
© Copyright IBM Corp. 1999, 2014
111
112
IBM Tealeaf cxImpact: cxImpact User Manual
Chapter 6. Managing Session Segments
The Managing Session Segments page shows the lists of currently stored sessions,
which may include the results of your session searches and imported segments.
Depending on your configuration settings, each search that you execute may create
a segment in this page, where you can execute analysis of it.
v To manage session segments, select Analyze > Segments > Manage Session
Segments.
v When a segment is analyzed, the segment files are read from storage. If the
analysis is successful, the segment data is inserted into the Tealeaf database. As
a result, data for analyzed segments exists in two places.
v After managed segments have been analyzed, they may be reviewed in detail.
Related concepts:
Chapter 7, “Analyzing Session Segments,” on page 123
“Submitting Segments for Analysis” on page 119
“My Settings” on page 161
Overview
In the Manage Session Segments page, you can review the available session
segments, submit them for analysis, and manage access to them.
Figure 42. Managing Session Segments
v Above the list of sessions, you can perform multiple commands.
© Copyright IBM Corp. 1999, 2014
113
v You can perform actions on individual session segments through a menu. To
display the context menu for a segment, right-click it.
Related concepts:
“Commands”
“Fields”
Related reference:
“Context Menu” on page 116
Commands
v To review the legend for the page icons, click Show Legend.
v To refresh the page, click Refresh.
Table 15. Commands
Command
Description
Required License
Import
Segment
Import an external session segment
for integration with Tealeaf CX
through the Portal.
cxConnect
Build
Combined
Segment
You can build combine segments
based on sessions that have been
searched for or replayed.
cxReveal
Context
Menu
More menu options are available
through the context menu.
Analysis options require cxResults.
Related concepts:
“Legend” on page 115
Related tasks:
“Import Segment” on page 119
“Build Combined Segment” on page 121
Related reference:
“Context Menu” on page 116
Fields
Field
Description
Segment Status
Any displayed icon indicates the status for the segment.
Shared Indicates if the segment is shared.
Name
The name of the segment.
Owner
The Tealeaf user who owns the segment.
Time Stamp
The timestamp for when the segment was created.
Expiration
The timestamp for when the segment is scheduled to expire.
114
IBM Tealeaf cxImpact: cxImpact User Manual
Session Count
The number of sessions in the segment.
Note: The maximum number of sessions that are permitted in a session
segment is defined by the Session Segment Max Sessions Limit setting in
the Portal. For session segments created from Portal searches, this limit is
applied to the returned search results, which can reduce the number of
sessions in the generated session segment.
Related concepts:
“Legend”
“Expiring Segments” on page 118
“Sharing” on page 118
Legend
The Legend shows the possible segment status states for sessions that are
analyzed.
Figure 43. Legend
Status Description
Unused session segment
This segment is not analyzed yet.
Note: All segments must be analyzed before they are displayed in the
segment analysis page.
Queued for analysis
The segment is queued for analysis by Tealeaf.
Analysis incomplete
The segment is in the process of being analyzed.
Analysis complete
Analysis of the segment is completed.
Chapter 6. Managing Session Segments
115
Analysis failed
Analysis of the segment failed.
Failed once, queued for retry
The analysis of the segment is failed. RSExtractor service makes two more
attempts to analyze before the segment is listed as failing analysis.
Insufficient space available
There is insufficient disk space available on the server for completing the
analysis. To free up space, you can:
v Delete segments that are analyzed.
v Contact your Tealeaf administrator.
Expired session segment
This session segment is expired and queued for removal from this list.
v To delay the expiration, right-click the item in the list of segments and
select Postpone Expiration.
Related concepts:
Chapter 7, “Analyzing Session Segments,” on page 123
“Expiring Segments” on page 118
Related reference:
“Context Menu”
Context Menu
Figure 44. Context menu for selected segment
116
IBM Tealeaf cxImpact: cxImpact User Manual
For any session segment, you can right-click its row to open the following context
menu options:
v More options become available after a segment is analyzed.
Note: Segment analysis is a component of cxResults. cxResults is no longer
available as a newly licensed product as of Release 8.7. Customers that licensed
cxResults in Release 8.6 and earlier may continue to use and receive support for
the product in Release 8.7 and later. For more information, contact Tealeaf
Customer Support .
See “Submitting Segments for Analysis” on page 119.
Menu Item
Description
Submit for Analysis
Submit the selected segment for analysis. See “Submitting Segments for
Analysis” on page 119.
Cancel Job
If the segment is submitted for analysis, select this option to cancel the
analysis job.
View Job Status
See the status for any task that is performed on the segment.
View Analysis
See the completed analysis for the selected segment.
Share
Share the segment with others.
Note: This option is only available if you are a Tealeaf administrator or the
owner of the segment. See “Sharing” on page 118.
Copy
Create a copy of the segment. In the dialog, enter the new name for the
segment and click Copy. The segment now displayed in the list.
Rename
Rename the segment. Enter the new name, and click Save.
Delete
Queues the segment for deletion and changes its status to be expired.
Postpone Expiration
You can delay the expiration date of the segment. Select the time period to
delay the expiration from today's date. Then click Postpone.
View Sessions List
Click this option to view the individual sessions in the segment. To return
to this screen, click Manage Segments above the session list. See
"Analyzing Session Segments" in the IBM Tealeaf cxResults User Manual.
Replay All Sessions
When selected, this option creates a Tealeaf session file (.TLX) for export,
which you can then import and replay through RTV.
Properties
Click this option to review the read-only properties of the session segment.
See “Segment Properties” on page 118.
Chapter 6. Managing Session Segments
117
Segment Properties
Most of the segment properties are self-explanatory. More properties are displayed
after the segment is analyzed.
v There are two expiration times for a segment, and they can vary slightly. Raw
segment data is stored as file-based data on the search server. Analyzed
segments and their analysis are stored in the Tealeaf database. If analysis is
performed on the segment, these timestamps must be very close together.
– Times listed in the Segment Properties dialog and the main page are in the
Tealeaf system timezone.
v The Size property indicates the actual file size of the segment on the search
server. It does not indicate database size.
Sharing
You can share your segments among all Tealeaf users. Individual users can share
segments that they create, and administrators have access to all segments in the
list.
Note: Segments that are shared can be deleted by any Tealeaf user.
v To share a segment, right-click it in the Session Segment list and select Share.
v To stop sharing a segment that you have shared, right-click it and select Stop
Sharing.
Expiring Segments
By default, analyzed segments are configured to expire 7 days after they are
created. Through the context menu, you can delay expiration as needed.
When a session is expired, it is removed from the Canister the next time that the
Data Collector scans the canister.
Note: Sessions that are not analyzed are removed after 24 hours.
Related reference:
“Context Menu” on page 116
Logging
Logging messages related to the analysis of session segments are available in two
locations in the Portal Management page.
Note: Depending on your Tealeaf permissions, the Portal Management page can be
available to Tealeaf administrators only. For more information, contact your Tealeaf
administrator.
Analysis results log
To access the log for the session segment analysis through the Portal:
1. In the Portal menu, select Tealeaf > Portal Management.
2. In the left pane, click Logs.
3. Click Session Segments.
Any log messages generated by segment analysis from the Managing Session
Segments page can be reviewed here. To review a message, select it.
118
IBM Tealeaf cxImpact: cxImpact User Manual
Analysis service log
Session analysis is performed by the RSExtractor service.
To access the log for the RSExtractor service through the Portal:
1. In the portal menu, select Tealeaf > Portal Management.
2. In the left pane, click Logs.
3. Click Reporting Service.
The log file for the current day's RSExtractor service (TeaLeaf RSE Service.log) is
stored in the Logs directory inside the Tealeaf install directory.
Submitting Segments for Analysis
Submitting segments for analysis passes the segment to cxImpact for analysis for
reporting purposes. When you run analysis of a segment, the task is queued for
execution, which you can track in the left-hand Segment Status column.
Note: All segments must be analyzed before they are displayed in the segment
analysis page, from which reports can be generated.
v To perform analysis on a segment, right-click the segment name in the Session
Segment list and select Submit for Analysis.
v To cancel analysis on a segment, right-click the segment name in the Session
Segment list and select Cancel Job.
When the segment is analyzed, its status icon is changed in the left column.
v To review segment analysis, right-click the segment name in the Session
Segment list and select View Analysis.
When analysis fails for a single segment, the problem is typically with the segment
itself. Failure across multiple segments can indicate an issue with the analysis
service itself.
v If segment analysis fails, the Portal makes two attempts to reanalyze the
segment. If analysis fails three times, it is marked as failed, and analysis is not
attempted again.
Related concepts:
“Legend” on page 115
Chapter 7, “Analyzing Session Segments,” on page 123
“Logging” on page 118
Import Segment
You can integrate externally created queries to generate session segments for use.
This mechanism can be useful for integrating Tealeaf with third-party systems that
need access to Tealeaf data.
Note: The ability to import externally created segments into Tealeaf requires the
Segment Builder Service, which is a component of cxConnect, a separately
licensable component of the Tealeaf CX system. please contact your IBM Tealeaf
representative.
Through the Portal, you can upload the session segment query for the import
segment service. The Tealeaf Segment Builder service runs the query against the
Chapter 6. Managing Session Segments
119
Tealeaf session data set to generate sets of sessions that are assembled into a single
segment.
Figure 45. Import Session Segment
Segment files that are successfully imported and run are displayed as new
segments in this list.
v The Segment Builder service can integrate files in .txt, .csv, or .zip format. See
"Segment Builder Service" in the IBM Tealeaf cxConnect for Web Analytics
Administration Manual.
To
1.
2.
3.
import a segment file
Click Import Segment.
In the dialog, click Browse... to navigate and select the file to import.
To override the integration settings that are specified in the Portal, clear the
Use Default Settings check box. The following settings are displayed:
Setting Description
Segment Name
The name of the imported segment, which is displayed in the Manage
Session Segments page after successful import.
Use Integration ID Prefix
When selected, the integration identifier prefix is added to search for
values in the import file.
120
IBM Tealeaf cxImpact: cxImpact User Manual
Integration ID Prefix
This value is pre-populated with the value stored in the CX Settings
page. You can change this value to override the system value for the
specific segment that is being imported.
Search Date Span
The number of days before the current date to search for matching
data.
Search Term
The name of the term to search for values that match those provided in
the query file. The search terms that are displayed in the drop-down
come from the request of each hit of session data.
MD5 Hashing
If enabled, an MD5 hash is applied to the imported segment file values
before running it.
Data Field Column
The column number in the imported segment in which data is stored. If
the query file contains a single column of values for which to search in
the search term, then this value can be set to the default value: 1.
Column Delimiter
If the import file contains multiple columns, this value defines the
character that is used to separate column data in the segment.
Share Segment
When set to Yes, the imported segment is automatically shared with
other Tealeaf users.
4. Then, click Upload.
5. A success message indicates that the segment file is queued for importation.
Note: Depending on the size of the segment and the load on the system, it can
be a few minutes before the segment is available in this list. See "Integration" in
the IBM Tealeaf cxImpact Administration Manual.
6. To refresh the displayed list of segments, click Refresh.
Note: When the segment to import is displayed in the list, check the session
count column. If the value is 0, then the segment builder importation process
failed.
Export a Segment
To export a session segment, right-click it and select View Sessions List. In the
session list, click Download All.
Build Combined Segment
In the Build Combined Segment dialog, you can specify segment data based on
date, users or groups, and session criteria to combine into a single segment
accessible in the Tealeaf Portal.
Note: You can combine session segments that were created by cxReveal users and
groups only.
Chapter 6. Managing Session Segments
121
Figure 46. Building Combined Segments
To build a combined segment:
1. In the Manage Session Segments page, click Build Combined Segment.
2. In the dialog, enter a name for the new session segment.
3. Select the Session Criteria:
v All Sessions from Searches - Combines all sessions that are returned from
searches for the users. The date range is not available for this selection.
v All Replayed Sessions - Combines all sessions that are replayed by the
users over the date range.
v All Sessions Replayed via BBR - Combines all sessions that are replayed
through Browser-Based Replay by the users over the date range.
v All Sessions Replayed via RTV - Combines all sessions that are replayed
through the desktop RealiTea Viewer application by the users over the date
range.
4. Select a date or range of dates in the calendar panel.
v To select a predefined range, use the Quick Select drop-down.
v The date range is not available if All Sessions from Searches is selected.
5. Select the Tealeaf user or users whose segments you want to combine into a
single one.
v To select a user group, click the cxReveal Groups option button. Then, select
the group of users from the drop-down.
v To select an individual user, click the cxReveal Users option button. Then,
select the user from the drop-down.
6. To create the specified segment, click Create.
7. If the resulting segment contains any sessions, the segment is generated and
listed in the Manage Session Segments list.
Enabling Building Combined Segments
Tealeaf administrators can enable the building of combined segments through the
Tealeaf Portal. In the user administration page, the Create Combined Session
Segment property must be set to true for selected users, groups, or both.
122
IBM Tealeaf cxImpact: cxImpact User Manual
Chapter 7. Analyzing Session Segments
To identify, understand, and quantify the impact of online customer issues, any set
of sessions can be submitted for analysis by cxImpact's analytics engine. Tealeaf's
analytic functions produce insightful reports that present the overall impact of an
issue and may identify the source of the problem. The analysis section is divided
into a series of galleries that provide views into different aspects of the set of
sessions.
A session segment is the set of sessions returned when a specific search is
executed. The session segments that have been generated and made available can
be accessed through the Session Segments page for review, analysis, and reporting.
v Session segment analysis reporting enables rapid diagnosis, isolation, and
correlation of problem attributes.
By default, whenever you perform a search on completed sessions, a session
segment is automatically saved with a default name that includes the date and the
words or terms for which you searched. For example, if you searched for the
words login error on July 6, 2006, any automatically generated session segment
may be named:
07062006 (login error)
These reports are generated by ad-hoc analysis executed by the RS Extractor.
Preparing Segment Analysis
Segments are prepared for analysis in the Manage Session Segments page. You can
review the steps required to prepare a segment for use in the analysis page.
Creating Session Segments
Session segments can be created in any of the following ways:
1. Auto-generated when a search of completed session is run.
2. Created when a query is fed to the Segment Builder Service through the Portal.
See "Import Segment" in the IBM Tealeaf cxResults User Manual.
You can save the parameters that you use to search for re-execution later. With the
help of a saved search, you can quickly run a common search that can help to
localize recurring problems or to perform system maintenance work.
v If your user account is configured to auto-create session segments, each
scheduled execution of the saved search generates a new session segment that
can be analyzed.
For cxResults users, you can turn visitor segments into session segments, against
which segment analysis can be performed.
Related concepts:
Chapter 6, “Managing Session Segments,” on page 113
“My Settings” on page 161
“Searching Session Data” on page 37
Chapter 8, “Managing Visitor Segments,” on page 143
Related tasks:
© Copyright IBM Corp. 1999, 2014
123
“Import Segment” on page 119
Viewing Session Segments
Each session segment is tied to the Tealeaf user who defined the search. You can
see only those results sets that you create or that are marked for sharing by other
Tealeaf users.
v Tealeaf administrators can see and interact with all segments.
Note: Some sessions displayed in the list cannot be able to be replayed. Over
time, available sessions can be trimmed from Tealeaf. While the record of the
session is retained, the underlying data is not.
Analyzing Session Segments
To analyze a segment:
1. To view the current list of session segments, click Analyze > Segments >
Manage Session Segments.
2. Each segment is listed on a separate line in the table. In the left column, you
can see the status of any analysis that is performed on the session.
3. To perform analysis on a segment, right-click its name and select Submit for
Analysis.
4. The Submit Analyze Job window is displayed, where you can specify the
Name, ID, Job Priority, Expiration period, and email properties for the session
segment:
Figure 47. Submit Analyze Job popup dialog
5. Change settings as needed. To begin the analysis, click Submit.
6. The segment is queued for analysis for the Result Set Extractor.
Note: The Result Set Extractor expects Tealeaf session identifiers (TLTSID) to be no
more than 32 ASCII characters in length. Session identifiers that are longer than
this limit can result in an error and a failure to complete the analysis.
Note: If the session information in a segment that is submitted for analysis
contains any malformed XML, the analysis fails. Typically, this issue can be caused
by ReqCancelled hits generating unfinished XML or by malformed XML hits
submitted from the UI Capture for Ajax solution.
124
IBM Tealeaf cxImpact: cxImpact User Manual
Related concepts:
Chapter 6, “Managing Session Segments,” on page 113
Viewing Analysis
Segments that are successfully analyzed contain a Checkmark icon in the left
column of the Session Segment list.
v To review the analysis, right-click the segment and select View Analysis. The
segment is opened in the segment analysis page.
Disabling Session Segments
You can disable automatic session segments at the user level or site level.
At the User Level
For individual users, there are two ways to disable automatic session segment
creation:
1. My Settings:
a. From the Portal menu, select Configure > My Settings.
b. Click the Preferences link.
c. For Create Session Segment for Completed Session Search, select
Disabled.
d. Click Save.
2. Tealeaf administrators: To disable the auto-session segment creation, please
complete the following:
a. From the Portal menu, select Tealeaf > Portal Management.
b. Click the CX User Administration link.
c. Click the Users link.
d. Select the user whose permissions you want to edit.
e. For Create Session Segment for Completed Session Search, select
Disabled.
f. Click Save.
At the Site Level
For all users of the Portal, you can disable auto-session segment creation by using
the following steps:
1. From the Portal menu, select Tealeaf > Portal Management.
2. Click the CX Settings link.
3.
4.
5.
6.
Click the Search link.
Select Create Session Segment for Completed Searches.
From the drop-down, select Disabled.
Click Save.
Segment Analysis Reports
Through Tealeaf, you can quickly access critical, hard-to-find session information
for easy diagnosis of visitor issues with your web application. The Analysis section
is divided into a series of galleries that provide views into different aspects of the
set of sessions that were examined.
Chapter 7. Analyzing Session Segments
125
In each gallery, you can review snapshots of analysis of that aspect of the
submitted session data. For example, is a problem related to environmental factors,
like browser type or web server? Or was it related to specific application
functionality? Answers to these questions and more are available through analysis
reports.
v To open the segment analysis page, select Analyze > Segments > Analyze
Session Segments.
Configuring Your Report
In the segment analysis page, you can configure the report to display on the page.
v To select a different segment, click Change.
v To configure the report for the current segment, make your selections in the
Reports panel.
v To postpone the expiration of the current segment, click Postpone Expiration.
Select how long you would like to postpone the expiration for the segment from
the drop-down and click Set.
v To delete the current segment, click Delete This Segment.
v To see the list of sessions in the currently selected session segment, click Session
List. The session list is displayed in the default session list template.
Related concepts:
“Configuring report components” on page 127
“Searching Session Data” on page 37
Related tasks:
“Selecting a different segment”
Selecting a different segment
1. To select a different segment to analyze, click Change.
2. The Segment Selector is displayed:
126
IBM Tealeaf cxImpact: cxImpact User Manual
Figure 48. Segment Selector
3. You can view the segments by name or grouped by date. To view the segments
by date, click the View by Labels check box.
v To filter the list, enter a string in
automatically updated.
4. Select the segment to use and click
5. The page is updated to display the
segment.
v Updated metrics for the selected
Segments pane.
the Filter textbox. The display is
Select.
configured report for the selected session
segment are displayed inside the Session
Configuring report components
In the Reports panel, you can configure the type of report and the underlying
reporting components that you want to display in the main window.
Report Type
Description
Report Gallery
This gallery of reports enables the selection of individual reports on
various aspects of your web application. Within each type of report, you
can select the report components to include in the report.
Page Sequence
This report contains information on the percentage of visitors who hit a set
of pages listed in a specific sequence. See “Page Sequence” on page 138.
Chapter 7. Analyzing Session Segments
127
My Reports
You can save selected reports to this area, which is specific to your user
account.
Report Filters
Apply filters to the displayed reports.
Related concepts:
“My Reports” on page 140
“Report Filters” on page 140
Related tasks:
“Report Gallery”
“Page Sequence” on page 138
Report Gallery
The Report Gallery contains a set of useful reports that are provided by Tealeaf.
You can use these reports to review summaries on search and segment data for the
currently selected sessions or as the basis for building your own analytical reports.
v There is a Report Gallery for session segments, as well. Since you can create
session segments from visitor segments, you can find it useful to review the
session segment report gallery for more reports.
To
1.
2.
3.
view a report in the visitor Report Gallery:
Click Report Gallery in the left navigation pane.
To select a report, click <Select a Gallery> in the main display pane.
In the Dashboard Selector, select the report gallery to load.
a. To load the default dashboard, select Report Gallery in the Dashboard
Selector.
b. Then, click Select.
4. The selected dashboard is displayed by using the visitor segment data as
inputs.
Related concepts:
Chapter 7, “Analyzing Session Segments,” on page 123
“Default Report Gallery” on page 154
Exploring Reports
Each selected component is displayed in the report as a separate chart.
v To explore the data that composes a chart, click the Drilldown icon (
report in the Gallery view. The Detail view is displayed.
) on the
Detail View
In the Detail view, you can see the underlying data that composes the chart
component.
v To download this data to excel, click Download to Excel in the detail table.
v To return to the report gallery, you can click the link in the breadcrumb trail
above the detail report.
128
IBM Tealeaf cxImpact: cxImpact User Manual
Some reports contain drill-down links in counts that are reported in the detail
table. Click these links to perform a search for sessions that are matching the
report criteria for the specified time frame.
v The resulting session list is displayed in the default session list template for
completed searches.
Note: When drilling into session segment data from a report that spans multiple
hours, if you load the sessions into RTV, you can notice that a single page or event
is displayed in the list for each hour's report. While the Portal-based report
identifies items based on the individual timestamp of the page, RTV can identify
items based on the timestamp of the session. Suppose that a session begins at 8:50
and ends at 9:10. This session has pages in both the eight o'clock and the 9 o'clock
hours. Drilling into hourly page or event reports can result in the display in RTV
of the session in the list for the 8 o'clock hour report and for the nine o'clock hour
report, which can cause confusion for some RTV users. This issue applies to any
report whose reporting period spans multiple hours and does not apply to visitor
segments.
Related reference:
“Search Results - Session List” on page 68
Business Impact Report
Business Impact reports display the total number of sessions and users that are
contained in the session segment. It also displays the percentage of total sessions
that are contained in the session segment over time.
Figure 49. Business Impact report
Report Component
Description
Chapter 7. Analyzing Session Segments
129
Impacted Sessions Ratio
A breakdown of sessions per hour (percentage)
Impacted Users
Review the count of sessions per login identifier in the session segment.
Events Report
The Events report shows the most frequently occurring events and pages, as well
as graphs for event and page data.
Note: Session segments that are generated through visitor search use the RSE
service to create them. RSE service is part of cxImpact, which means that cxResults
event filtering options are not applied to sessions generated in this manner.
Figure 50. Events report
Report Component
Description
Top Events
Most frequently triggered events in the session segment
Top Page by Avg Event Count
Top pages that are based on the average number of events that are fired on
the page across all sessions in the segment
v Page data is URL data that is filtered through dimensional values.
Top URL by Avg Event Count
Top URLs in session data based on the average number of events fired on
the page across all sessions in the segment
130
IBM Tealeaf cxImpact: cxImpact User Manual
Sessions Report
Sessions include a set of reports that portray session-level attributes, such as
browser type and session length.
Figure 51. Sessions report
The Session Report can display the following counts for the sessions in the
segment:
Report Component
Description
Chapter 7. Analyzing Session Segments
131
Sessions by Hour
Count of sessions per hour in the segment
Operating System
Pie chart breakdown of operating systems used by visitors
Session Page Count Distribution
Number of sessions, grouped by the number of pages in each
Session Length Distribution
Number of sessions, grouped by the length in minutes
Top Logins
Top unique user IDs (Login ID) that are displayed in sessions
Top IP Addresses
Top IP Addresses showing up in sessions
Bots
Automated bots crawling the site
Browser Agents
Statistics on browser agents in the session segment
Search Matches Report
Search matches indicate the pages where your search terms were found.
Note: When you review Search Match reports for session-level search terms, the
reports are empty because they display hit-level results only.
Note: If you created the session segment from the results of a search for visitors,
this report contains no data. Visitor searches do not contain match count
information, which is unavailable in the generated segment.
Figure 52. Search Matches report
132
IBM Tealeaf cxImpact: cxImpact User Manual
Report Component
Description
Top Pages with Search Match
Top pages where a search match was found
v Page data is URL data that is filtered through dimensional values.
Top Servers with Search Match
Servers where the highest number of search matches were found
Top Referrers for Search Match Page
Where search matches were found, this component lists the most frequent
referrer values.
Top URLs with Search Match
Top URLs in the session data where a search match was found
Pages Report
The Page report provides detail on the pages that were viewed within the set of
sessions.
Figure 53. Pages report
Report Component
Description
Pages by Hour
Number of pages in the session data for each hour of the segment
v Page data is URL data that is filtered through dimensional values.
Chapter 7. Analyzing Session Segments
133
Top Pages by Number of Sessions
Top pages in the segment that is based on the number of sessions in which
they appear
v Page data is URL data that is filtered through dimensional values.
Top Entry Pages
Top pages where sessions in the segment were begun
v Page data is URL data that is filtered through dimensional values.
Top Exit Pages
Top pages where sessions in the segment were ended
v Page data is URL data that is filtered through dimensional values.
Top URL Values
Top URLs in the segment that is based on total count
Top Entry URL Values
Top URLs where sessions in the segment were begun
Top Session Referrer
Top session referrer values in the segment
Status Codes
Pie chart of the status code information for responses in the session
segment
Top Exit URL Values
Top URLs where sessions in the segment were concluded
Top Pages
Top pages in the segment that is based on total count
v Page data is URL data that is filtered through dimensional values.
Top URLs by Number of Sessions
Top URLs in the segment based on the number of sessions in which they
are displayed
Form Fields Report
Form Fields enable you to drill into the names and values of form fields that
existed in this set of sessions.
134
IBM Tealeaf cxImpact: cxImpact User Manual
Figure 54. Form Fields report
Report Component
Description
Top Form Fields
The top form fields used in the session segment
Top Form Field Values
The top values used in form fields in the segment
Top Hit Field Values
The top field values extracted by the RS Extractor.
v To display data in this report component, you must configure the values
for the RS Extractor to extract from the session segment data.
Page Performance Report
Page Performance details the specific performance metrics for the pages served in
this set of sessions.
v The grades in this report are assigned by the Passive Capture Application.
Chapter 7. Analyzing Session Segments
135
Figure 55. Page Performance report
Report Component
Description
Top Page by Avg Size
Top average page size in kilobytes for hits in the segment
v Page data is URL data filtered through dimensional values.
Req Cancelled Distribution
Pie chart showing request cancelled by client percentages for the hits in the
segment
Network Grades
Pie chart of grades for network travel time for the hits in the segment
Round Trip Grades
Pie chart of grades for round trip time for the hits in the segment
Page Gen Grades
Pie chart of grades for page generation time for the hits in the segment
Top Page by Page Gen
Top page generation times in seconds for hits in the segment
v Page data is URL data filtered through dimensional values.
136
IBM Tealeaf cxImpact: cxImpact User Manual
Reference Report
The Reference gallery provides information about the applications, hosts, and
servers that are represented in this set of sessions.
v Data for this report is normalized using the URL/Host/App/Server report
group of dimension data. This report group is provided by Tealeaf.
v To populate this report with data, you must include the Tealeaf Reference
session agent in your Windows pipeline.
Figure 56. Reference report
Report Component
Description
Top Applications
The top Application values in the segment.
v The Application dimension is populated by values captured and stored
in the TLT_APPLICATION_NAME variable for the request.
Top Hosts
The top Host values in the segment.
v The Host dimension is populated by values captured and stored in the
TLT_HOST_NAME variable for the request.
Top Servers
The top Server values in the segment.
v The Server dimension is populated by values captured and stored in the
TLT_SERVERS variable for the request.
User Defined Fields Report
The User Defined Fields gallery provides information about values in the UserDef1
through UserDef4 fields in the set of sessions.
Chapter 7. Analyzing Session Segments
137
v Typically, these four fields are mapped to the Session Attributes 1 - 4. These
attributes are defined during upgrade or may be defined through the Tealeaf
Event Manager.
Figure 57. User Defined Fields report
Page Sequence
For the selected session segment, you can analyze the sequence of pages as
percentages. For a selected page, you can review the entry and exit pages to the
selected page as a percentage across the session segment.
1. In the left pane, click Page Sequence.
v All of the pages values that is displayed in the segment are loaded into the
Focus drop-down. Depending on the number of pages, this step can take a
while.
v Page data is URL data that is filtered through dimensional values.
2. In the main window, select the focus page from the Focus drop-down.
3. The Page Sequence report for the selected page is displayed:
138
IBM Tealeaf cxImpact: cxImpact User Manual
Figure 58. Page Sequence Report
v To review page sequencing for the most popular pages in the segment, click
Top Pages.
v To review page sequencing for the most popular individual page in the
segment, click Top Entry.
v To review page sequencing for the most popular final page of the segments,
click Top Exit.
v To review page sequencing for all pages that is displayed in the segments,
click All Pages.
In the Page Sequence report, you can examine the most common previous and next
pages in the sequence for the focus page in the rank order of their appearance. In
the left chart, you can see the rank order of pages that are leading into the focus
page, while the right chart displays the rank order of the pages visited subsequent
to the focus page.
v The Session % metric computes the percentage of sessions in which the focus
page is preceded or followed by the listed page. If the focus page is visited
multiple times in the same session from different pages, the Session % metrics
for previous Pages can total over 100%. The same applies to Session % metrics
for Next Pages.
v The View % metric totals the percentage of sessions that viewed the listed page.
Since this metric is tabulated only once per session, the percentage totals 100%
for each focus page.
v When you select a next or previous page in the detail table, the focus is changed
to that page.
Chapter 7. Analyzing Session Segments
139
v To drill-down to the sessions that contain the listed page, click the Camera icon.
– To return to the Page Sequence report, click the Page Sequence link in the
breadcrumb trail above the main panel.
Related reference:
“Search Results - Session List” on page 68
My Reports
My Reports allow you to save a specific report into a local folder for viewing at a
later time, and you can gather reports from different groups onto the same pane.
You can use these as shortcuts to display favorite reports.
v To add a report to your My Reports area, right-click the report in the Reports
Tree and select Copy To My Reports.
v To remove a report from your My Reports area, right-click the report and select
Remove Report. The report is removed from My Reports but is still available in
the Reports Gallery.
Report Filters
You can filter any session segment report that is based on the data that is
presented in the report. That filter can then be applied to any other report in the
report gallery.
Note: A filter is specific to the report from which it was created. For example, if
you create a filter that is based on the Top Entry Pages report, the filter is defined
to filter sessions that have the selected value as their entry page. The filter does
not get applied to all sessions that include the page. As a result, it is important to
name your filters carefully.
The include and exclude filter options describe how the sessions that match the
filter are used in report data set. For example, if you exclude a filter that applies to
all sessions, none of the reports have any data. If you include a filter, all reports
perform their actions on the subset matching the included filter.
v Multiple filters can be combined to add or remove sessions from the base data
set.
Creating a report filter
1. From the Reports panel on the left side of the screen, select a report to view.
2. For the selected report, click the drill-down button in the upper-right corner of
a pane.
3. The data is displayed. To create a filter based on the value of the data,
right-click it and select Set Value as Filter.
Figure 59. Setting a value as a filter
140
IBM Tealeaf cxImpact: cxImpact User Manual
4. If prompted, provide a name for the filter, and click Create.
Applying a report filter
The new filter appears under the Report Filters node in the Reports panel on the
left side of the screen. To use a filter, right-click and select from the context menu.
Command
Description
Include Filter
Filter reports to only apply to sessions that match the filter.
Exclude Filter
Filter reports to only apply to sessions that do not match the filter.
Disable Filter
Disable the use of the filter. This setting also excludes the filter from use.
Disable All Filters
Disable all displayed filters. This setting also excludes all filters from use.
Remove Filter
Delete the filter. The filter is removed from the Report Filters node.
Remove All Filters
Delete all filters. All filters are removed.
In the figure below, the filter Page: others is excluded, and the filter Hour: 8 is
included:
Chapter 7. Analyzing Session Segments
141
Figure 60. Applied Report Filters
142
IBM Tealeaf cxImpact: cxImpact User Manual
Chapter 8. Managing Visitor Segments
Through the Portal, you can review visitor segments and perform various
functions on them.
Note: The ability to manage visitor segments requires the cxResults product.
cxResults is no longer available as a newly licensed product as of Release 8.7.
Customers that licensed cxResults in Release 8.6 and earlier may continue to use
and receive support for the product in Release 8.7 and later. For more information,
please contact Tealeaf Customer Support .
To manage your visitor segments, select Analyze > Segments > Manage Visitor
Segments in the Portal menu. The Completed Searches tab of the Visitors Search
page is displayed.
Figure 61. Managing Visitor Segments
This page shows all completed searches that are still retained by the system.
To refresh the page, click Refresh.
Related concepts:
“Searching for Visitors” on page 84
Fields
Each search has a unique ID, a description that defaults to a list of editable search
parameters, the Request date time, and Expiration Date/Time, and the number of
visitors that matched the search.
Field
Description
ID
Unique identifier for the search.
© Copyright IBM Corp. 1999, 2014
143
Description
A user-friendly description of the search. This value defaults to a list of the
editable search parameters.
Requested On
Timestamp when the search was run.
Expires
Timestamp when the search is scheduled to expire.
Matches
Number of positive matches in the visitor search.
Context Menu
For any visitor segment, you can right-click its row to open the following context
menu options:
v Any unavailable options are not applicable for the current selection.
Menu Item
Description
View Results and Reports
For any search with a positive number of matches, this option opens the
"Analyzing Visitor Segments" in the IBM Tealeaf cxResults User Manual page
that is displaying the segment matches.
View Segment Parameters
Opens a window showing the search parameters. From this popup, you
can initiate another search.
Schedule This Search
When you save the search, you can schedule the selected search to occur at
regular intervals through the Scheduled Searches tab.
Share
Share the segment with others.
Note: This option is only available if you are a Tealeaf administrator or the
owner of the segment.
Rename Rename the segment. Enter the new name, and click Save.
Delete Queues the segment for deletion and changes its status to be expired.
Set Expiration Date
You can set the expiration date of the segment. Select this option and then
enter the number of days to delay the expiration from today's date. Click
Save.
Refresh List
Refreshes the list to include any status changes or new searches that are
completed since the page was displayed.
Related concepts:
“Searching for Visitors” on page 84
Chapter 9, “Analyzing Visitor Segments,” on page 147
“Sharing” on page 118
Related reference:
“Scheduled Searches Tab” on page 101
144
IBM Tealeaf cxImpact: cxImpact User Manual
Sharing
Tealeaf users and administrators can share segments among all Tealeaf users.
Individual users can share segments that they create, and administrators have
access to all segments in the list.
Note: Segments that are shared can be deleted by any Tealeaf user.
Chapter 8. Managing Visitor Segments
145
146
IBM Tealeaf cxImpact: cxImpact User Manual
Chapter 9. Analyzing Visitor Segments
Visitor data can be analyzed and presented in a variety of report formats,
including bar graphs and pie charts, for events and value events on visitors to
your website.
Note: Analysis of visitor segments requires cxResults. cxResults is no longer
available as a newly licensed product as of Release 8.7. Customers that licensed
cxResults in Release 8.6 and earlier may continue to use and receive support for
the product in Release 8.7 and later. For more information, please contact Tealeaf
Customer Support .
To begin analysis, select Analyze > Segments > Analyze Visitor Segments.
Visitor List
After creating a Visitor Segment with a search, you can access reports on the
segment on the Visitor List page. To view the Visitor List page, select Analyze >
Segments > Analyze Visitor Segments from the Portal menu.
v You can also access it from the Visitor Search tabs (Define Search, Recent
Searches, Completed Searches).
Figure 62. Visitor List
© Copyright IBM Corp. 1999, 2014
147
To Analyze
Steps:
Complete the following steps to select an analyzed segment.
1. In Visitor List page, click the Visitor Segment link.
2. In the Segment Selector, navigate to the find the visitor segment to use. Click
Select.
3. The Visitor List is displayed.
v It contains the list of all matching sessions.
4. In the left pane, you can review information about the segment and the search
parameters that retrieved the list:
v Visitor Segment: Click to select a different analyzed segment.
v Segment Info: This panel contains information about the visitor segment that
you selected.
v Search Parameters: This panel lists the search parameters that are used to
create the segment. You can re-execute the search, if needed.
v Reports: Select the report to display.
v Report Scope:
– Include all sessions for matching visitors - When selected, search
includes all matching visitor sessions within the segment time span.
v Session Segment: To create a session segment from the displayed list of
visitor sessions, click Create Session Segment.
Note: If the session information in a segment that is submitted for analysis
contains any malformed XML, the analysis faisl. Typically, this issue can be caused
by ReqCancelled hits generating unfinished XML or by malformed XML hits
submitted from the UI Capture for Ajax solution.
Related concepts:
“Visitor Segment Control”
“Segment Info” on page 149
“Search Parameters” on page 150
Related tasks:
“Create Session Segment” on page 150
Related reference:
“Visitor Reports” on page 151
Visitor Segment Control
From the Visitor Segment pane, you can view the name of the current Visitor
Segment. To select another segment for reporting, click <Select a segment>.
In the Segment Selector, you can browse segments listed by date, by order in the
alphabet, or by filtering the list.
148
IBM Tealeaf cxImpact: cxImpact User Manual
Figure 63. Segment Selector
v To select a segment for reporting, click the segment description and then click
Select. The Visitor List is updated with the new segment information.
Segment Info
Following is the Visitor Segment control is the Segment Information pane, which
provides the key statistics on the segment:
Figure 64. Segment Info
Statistic
Description
Segment ID
Internal identifier for the visitor segment
Chapter 9. Analyzing Visitor Segments
149
Visitors Matching Search
Number of visitors matching the search
Total Visitors in Time Period
Total number of visitors during the specified date range for the search
Sessions Matching Search
Number of sessions matching the search
Total Sessions in Time Period
Total number of sessions during the specified date range for the search
Search Parameters
The Search Parameter pane contains the search criteria that were passed through
Visitor Search to run the search.
Figure 65. Search Parameters
The Search Parameters pane shows the parameters that define the segment. From
here, you can initiate another search.
Related concepts:
“Searching for Visitors” on page 84
Create Session Segment
From the displayed visitor segment, you can create a session segment, with the
help of it you can perform session analysis through cxImpact and to create
session-based reports from the data.
v The created session segment exists independently of the visitor segment from
which it is created. The deletion or expiration of one of the segments does not
affect the other.
v Each time the visitor segment is created, you can create a session segment from
it, even if the analysis of a previous created session segment that is not
completed.
150
IBM Tealeaf cxImpact: cxImpact User Manual
Note: In the created session segment, the number of visitors matches the
number of visitors in the parent visitor segment if the login identifiers for
cxImpact and cxResults are gathered from the same source data. Typically, they
are linked by configuring cxResults visitorization.
Figure 66. Create session segment
To create a session segment:
1. In the Session Segment panel, click Create Session Segment.
2. In the Analyze as Session Segment dialog, enter a name for the segment.
v To include all sessions that were created by visitors that are displayed in the
list, click the check box.
3. To create the segment, click Create.
4. Status information about the task to create the segment is posted in the Session
Segment panel of the Visitor List page.
Note: While the task is being processed, you can perform other tasks in the
Portal and then return to this page to review the analysis.
5. When the segment is created, it is automatically submitted to the RSE service
for analysis and displayed in the Session Segments page. To view the analysis
of the segment, click View Segment Analysis.
v The created session segment is available for further use.
Related concepts:
Chapter 7, “Analyzing Session Segments,” on page 123
Chapter 6, “Managing Session Segments,” on page 113
Visitor Reports
The Report gallery shows the pre-defined Segment reports. Selecting each report
type changes the report appearing in the pane to the right.
Note: When segments are created from the current day's data, their contents
remain static. If the same search is rerun, then a new segment is created with data
up to the last hour. Since a report is specific to a segment, viewing a report created
from the first segment after creating the second segment may be confusing, as new
data in the second segment does not appear in the old report. As a best practice,
avoid generating segments from the current day's data, and configure scheduled
searches at the end of the day to acquire the day's data.
Chapter 9. Analyzing Visitor Segments
151
Figure 67. Visitor Reports
The following types of Visitor Reports exist:
v Visitor List
v Session List
v Report Builder
v Scorecards
Visitor segment reports that are saved or scheduled can be added as components
to cxView dashboards. See "Configuring Dashboards" in the IBM Tealeaf cxView
User Manual.
Related concepts:
“Report Builder” on page 154
“Scorecards” on page 154
“Searching for Visitors” on page 84
Related reference:
“Visitor List”
Report Scope and Counts
When analyzing a segment of visitors, you must often analyze all sessions for
those visitors, in addition to the sessions matching the search criteria. For example,
you might need to analyze the sessions surrounding the matching segments for the
matching visitors.
The Report Counts control allows you to switch the groupings on counts used in
the reports. For example, the Visitor Counts option produces counts of visitors,
while the Session Counts option shows counts of sessions. Event Counts shows
counts of events.
Visitor List
The Visitor List is the default report, showing the list of visitors matching the
query, the number of sessions matching the search, the date of the first and last
sessions, and the total number of sessions in the period for that visitor. See “Visitor
List.”
Session List
The Session List displays each list that occurred in the visitor segment. It also
shows an icon for every event that occurred during the session in approximately
152
IBM Tealeaf cxImpact: cxImpact User Manual
the order of first occurrence. To review the description of an event, move the
mouse over it.
Figure 68. Visitor List - Session List
v To group the sessions by a column, click and drag a column header to the Drag
Column Headers Here to Group bar.
v To replay the session, click the Replay icon.
v To send the event to the Event Tester, click the Event Tester icon.
v You can download the displayed session list into RTV, Excel, or PDF format. The
downloaded data includes BBR and RTV replay links, as well as all data in the
session list, which enables the export of visitor data from Tealeaf. To download,
click Download All and select the destination format.
Each session that matched the search criteria has a green dot ( ) in the first
column.
v If you selected to include all sessions from matching visitors, the session list
includes sessions that do not match the query and are not marked.
v If the search spanned multiple sessions, no session is marked as matching.
Chapter 9. Analyzing Visitor Segments
153
Note: Some sessions that are displayed in the list cannot be replayable. Over time,
available sessions can be trimmed from Tealeaf for space and usefulness
considerations. While the record of the session is retained, the underlying data is
not.
Related concepts:
“Exporting Visitor Data” on page 160
Related reference:
“Search Results - Session List” on page 68
Report Builder
Through the Visitor Report Builder, you can build event and ratio reports that use
the selected visitor segment as source data.
Scorecards
You can display scorecards that use the data from the selected visitor segments as
inputs. Click the Scorecard link. Select the scorecard to use and click Select. The
scorecard is displayed.
Note: Scorecards that contain events not included in cxResults cannot be loaded to
display Visitor data. Scorecards that use a dimension to filter data cannot be used
in cxResults.
Report Gallery
The Report Gallery contains a set of useful reports that are provided by Tealeaf.
You can use these reports to review summaries on search and segment data for the
currently selected sessions or as the basis for building your own analytical reports.
v There is a Report Gallery for session segments, as well. Since you can create
session segments from visitor segments, you can find it useful to review the
session segment report gallery for more reports.
To view a report in the visitor Report Gallery:
1. Click Report Gallery in the left navigation pane.
2. To select a report, click <Select a Gallery> in the main display pane.
3. In the Dashboard Selector, select the report gallery to load.
a. To load the default dashboard, select Report Gallery in the Dashboard
Selector.
b. Then, click Select.
4. The selected dashboard is displayed by using the visitor segment data as
inputs.
Related concepts:
Chapter 7, “Analyzing Session Segments,” on page 123
“Default Report Gallery”
Default Report Gallery
The following reports are available in the default Report Gallery.
154
IBM Tealeaf cxImpact: cxImpact User Manual
Visitors tab
The Visitors tab provides a pre-defined set of common reports, with the
aggregations of counts for visitors, logins, referrers, or other visitor-related metrics.
Top Visitors: Count of sessions, including first and last session timestamp, for
each visitor identified in the segment.
Figure 69. Default Visitor Report Gallery - Top Visitors
Field
Description
User ID
Hashed value for the user identifier. If the cxResults setting Use TLTUID
for Visitor ID is set to true, then the value for TLTUID is used.
v If the TLTUID value is not available, then this field is blank.
Matches
Count of search matches in the segment for the visitor
First Session
Timestamp for first session for the visitor in the segment
Last Session
Timestamp for last session for the visitor in the segment
Total Sessions
Count of sessions for the visitor in the segment
Top Logins: Count of top login identifiers in the segment.
Figure 70. Default Visitor Report Gallery - Top Logins
Chapter 9. Analyzing Visitor Segments
155
Top Session Referrer: Count of top referrers to begin the sessions in the segment.
Figure 71. Default Visitor Report Gallery - Top Session Referrer
Top Entry Pages: Count of top entry pages to the web application in sessions in
the segment.
Figure 72. Default Visitor Report Gallery - Top Entry Pages
Top Exit Pages: Count of top exit pages in sessions in the segment.
Figure 73. Default Visitor Report Gallery - Top Exit Pages
Session Reports tab
The Search Session Reports tab shows the number of sessions and the number of
visitors matching the search criteria over the period of the Search. For each of the
search terms, a count is displayed in the report.
156
IBM Tealeaf cxImpact: cxImpact User Manual
Search Term Visitor Matches: For each search, the count of visitor matches by
each search parameter.
Figure 74. Default Visitor Report Gallery - Search Term Visitor Matches
Search Term Session Matches: For each search, the count of session matches by
each search parameter.
Figure 75. Default Visitor Report Gallery - Search Term Session Matches
Sessions Counts: The number of sessions in the segment by date and time.
Figure 76. Default Visitor Report Gallery - Sessions Counts
Sessions by Hour: The number of sessions in the segment each hour of the day
over the segment period.
Chapter 9. Analyzing Visitor Segments
157
Figure 77. Default Visitor Report Gallery - Sessions by Hour
Page Counts: The number of pages in the segment by date and time.
Figure 78. Default Visitor Report Gallery - Page Counts
Pages by Hour: The number of pages in the segment each hour of the day over
the segment period.
Figure 79. Default Visitor Report Gallery - Pages by Hour
Session Page Count Distribution: The count of pages in sessions, broken out into
groups.
158
IBM Tealeaf cxImpact: cxImpact User Manual
Figure 80. Default Visitor Report Gallery - Session Page Count Distribution
Top Logins: The count of top logins for sessions in the segment.
v This report is also displayed in the Visitors tab.
Figure 81. Default Visitor Report Gallery - Top Logins
User Def Reports tab
In the User Def Reports tab, you can review tabulations for each UserDef value.
These values are user-defined session attributes.
Export
You can export a current report in either Excel or PDF format. You can export
visitor data for selected sessions in either RTV, PDF, or Excel.
Export Current Report
To export the current report, use the links in the upper-right corner of the display
pane.
v Export to Excel - Report summary data is exported in .xml format that's
readable by Microsoft Excel. Session and search information is included in the
summary.
v Export to PDF - Export the current report to PDF format for offline presentation.
Chapter 9. Analyzing Visitor Segments
159
Exporting Visitor Data
Through Visitor search, you can retrieve sessions of interest and then, by following
these steps, export session list data for offline review into RTV, PDF, or Excel
format. This exported data includes replay links and all columns of the session list.
Configuration
Before exporting Visitor data, you should review and configure the following
items:
1. You must configure a search template to include all columns of data that you
wish to export.
2. This template must be selected as the default visitor search template.
Related concepts:
“Searching for Visitors” on page 84
From Session List for Visitors
Steps:
To export from the Session List:
Execute your search.
Click the appropriate Sessions list in the Visitor list.
The Session List page is displayed.
Click Download All. The following options are displayed:
v Download to RTV - Download a file that can be opened in the RealiTea
Viewer (RTV) later to retrieve the session list.
v Download to Excel - Download the session list to Excel (XML) format.
v Download to PDF - Download the session list to PDF format.
Related concepts:
1.
2.
3.
4.
“Searching for Visitors” on page 84
“Exporting Session Data” on page 82
Related reference:
“Session List” on page 152
“Visitor List” on page 152
From Visitor List
From the Visitor List, export your data to Microsoft Excel or to PDF format.
Steps:
To export from the Visitor List:
1. Run your search. See "Searching for Visitors" in the IBM Tealeaf cxResults User
Manual.
2. The Visitor List is displayed. See “Visitor List” on page 152.
3. In the corner of the Visitor List, you can select the output format:
v Export to Excel - Export the Visitor List to Microsoft Excel.
v Export to PDF - Generate a PDF containing the Visitor List.
160
IBM Tealeaf cxImpact: cxImpact User Manual
Chapter 10. Configuring Your Tealeaf
Through the Configure menu, you can configure your personal settings and, if you
have the appropriate permissions, dashboards, scorecards, and search templates.
Note: Access to the Configure menu is determined by permissions in your user
account. For more information, please contact your Tealeaf administrator.
Through the My Settings page, you can make adjustments to your location,
language, start page, replay, password, and default search and dashboard settings.
v Through your settings, you can also clear your local cache, which is used to
store common data used by Tealeaf.
Note: If you believe that any cached data has been refreshed in the Tealeaf
system, clearing the cache forces your browser to reload the data from Tealeaf.
v From time to time, you should change your password. Users can be forced to
change their password periodically.
Related concepts:
“My Settings”
My Settings
All Portal users can modify their own preference settings and passwords. To
change your user settings, select Configure > My Settings. Then select one of the
options from the sidebar on the left.
Note: If you are forced to this page immediately after login, please verify that you
have access to your configured landing page. This page is defined by the Start
Page value in the My Settings page.
Preferences
For most of your preferences, you can apply the default values assigned by your
Tealeaf administrator to your primary user group. To apply the default value,
select Primary Group Default.
Setting Description
ID
This value is a system-generated number used internally to identify your
account.
Email
Enter a valid email address for delivery of session segment analysis,
scheduled dashboards, alerts, and other output of the Tealeaf system.
Note: You cannot create and deliver report snapshots if you do not have
an entry for this email address. It is recommended that you do not create
report snapshots from admin accounts.
Time Zone (used in Search)
Hourly report values are displayed in the user's timezone, but the daily
roll-up of reporting data is controlled by the system timezone. To avoid
confusion, set this value to the same as the system timezone.
© Copyright IBM Corp. 1999, 2014
161
v This time zone setting applies primarily to the affected users' search
activities. Other Portal activities utilize the Tealeaf system time zone.
Date Format
Select the format to display dates from the drop-down list.
Language
Select your choice of language to display in the Portal.
Start Page
The list of available start pages depends on your account's access
permissions.
Log Out If Idle
You can toggle this feature, if needed. You cannot adjust the timeout
length.
Create Session Segment for Completed Session Search
By default, every search you perform on completed sessions creates a
session segment that remains available for 24 hours.
Replay Mode
Note: This setting appears only if your user account has the Lock Replay
Mode setting disabled.
v RTV - Launch the IBM Tealeaf CX RealiTea Viewer desktop application to
replay sessions. RTV must be installed on your local desktop.
v Browser - Replay sessions inside the web browser.
v Prompt on Replay - For each replay, you can choose to display it in RTV
or your web browser.
Dashboard Detail Mode
To display drill-down information, you can choose to do it in the same
browser window or to open a new one.
Default Active Search Template
The default search template to load when you choose to search for active
sessions.
Default Completed Search Template
The default search template to load when you choose to search for
completed sessions.
Default All Sessions Search Template
The default search template to load when you choose to search for all
sessions.
Primary User Group
Allows the user to change what group they belong to. Many users will not
have any options here beyond the administrator selected group.
To apply changes, click Save.
Password
Updates the user password. Portal passwords can be a maximum of 32 characters
in length.
Note: This setting does not appear if you are logged in via NT or SSO
authentication.
162
IBM Tealeaf cxImpact: cxImpact User Manual
To change your password, click Save.
Chapter 10. Configuring Your Tealeaf
163
164
IBM Tealeaf cxImpact: cxImpact User Manual
Chapter 11. cxImpact Browser Based Replay
cxImpact Browser Based Replay (BBR) enables the replay of visitor sessions
directly through your web browser. Through an easy-to-use interface, you can
review in real time all pages in visitor sessions as they are displayed to the user.
Or, you can quickly step through selected pages to identify issues that occurred
during the session.
The following terms are frequently used:
Replay
A replay is the display of the visitor's experience with your web
application. By assembling all of the requests, responses, and related data
in the sequence of the visitor session, the Tealeaf system can replay the
session through Browser-Based Replay to accurately mimic the visitor
experience.
You can replay both active sessions and completed sessions.
Additionally, users with Admin authorization can view page load details in
real-time to assist with diagnostics and to help identify specific files that
might be the cause of discrepancies in fidelity.
For information about how to use real-time logging of Replay Server, see
"Using real-time page load logging information for session diagnostics" in
theIBM Tealeaf cxImpact Administration manual.
For information about how to configure the Replay Server to use real-time
logging, see "Replay Server Configuration" in the IBM Tealeaf CX
Configuration manual.
Active session
An active session is a visitor session with the web application to which the
visitor is adding pages right now by browsing the website.
During replay of active sessions, BBR automatically refreshes active
sessions on a periodic basis. When an active session is refreshed, the
currently displayed page is not refreshed. When UI events are part of the
current page, a refresh can cause replay to jump to the previous standard
page and disrupt the replay.
Completed session
A completed session is a visitor session that the visitor has completed or
abandoned or that has been timed out by Tealeaf.
Browser Based Replay runs entirely within the Portal and requires no additional
software installation for Tealeaf users.
Note: BBR maintains and forwards to your browser the required Set-Cookie
headers to properly replay a session. To ensure that the Portal cookies are
maintained, Tealeaf resends them at the end of each request. If the maximum
number of permitted cookies is exceeded, the oldest cookies in your browser are
discarded, which enables BBR replay and your Portal session to be sustained.
BBR is an alternative to Tealeaf's IBM Tealeaf CX RealiTea Viewer (RTV) desktop
application, which must be installed on each user's desktop system as an advanced
search and replay system.
Related concepts:
© Copyright IBM Corp. 1999, 2014
165
“Reference” on page 19
Chapter 2, “Using the Tealeaf Portal,” on page 21
“Logging in to the Tealeaf Portal” on page 21
Chapter 12, “Browser Based Replay Interface,” on page 181
Overview
You can use BBR to complete the following functions:
v Replay visitor sessions or track live visitor sessions as they occur.
– Replaying active sessions as they occur enables you to provide real-time
customer support for customers and to diagnose web application issues that
you are personally experiencing.
v Show visitor input, such as entered text, selected menu options, and clicked
links or buttons.
v Track activities that occur on different views of a dynamic page.
v View the raw request and response data.
v Drill down into session details.
Figure 82. Browser Based Replay (BBR)
Related concepts:
Chapter 12, “Browser Based Replay Interface,” on page 181
166
IBM Tealeaf cxImpact: cxImpact User Manual
Opening BBR
To open BBR, complete the following steps:
For Active Sessions
1. Select Active > Sessions in the Tealeaf Portal menu.
).
2. Next to the session you want to replay, click the Replay icon (
3. In the popup dialog, select Browser.
4. The selected session is opened in BBR in a new browser window.
v See "Monitoring Active Sessions" in the IBM Tealeaf cxImpact User Manual.
Related concepts:
“Monitoring Active Sessions” on page 29
“Searching Session Data” on page 37
For Completed Sessions
1. Select Search > Completed Sessions in the Tealeaf Portal menu.
2. Select a Completed search template.
3. Specify the search criteria for which you are looking.
4. Next to the session you want to replay, click the Replay icon (
5. In the popup dialog, select Browser.
6. The selected session is opened in BBR in a new browser window.
).
Related concepts:
“Searching Session Data” on page 37
Replaying Sessions
You can examine pages as they are displayed to the visitor and replay the visitor's
experience through your web browser.
For best replay results, replay the session in the same browser that was used to
create the session. This information is displayed along the User Agent Information
Bar under Best Replayed Using.
Note: Replay of sessions across multiple browser tabs or multiple browser
windows is not supported.
Note: BBR cannot set cookies that are intended to be captured as part of the visitor
experience. If cookies are integral to replay, you must use the IBM Tealeaf CX
RealiTea Viewer desktop application instead.
Replay View
To view a page as the visitor saw it:
1. Select the page in the Navigation pane.
Chapter 11. cxImpact Browser Based Replay
167
2. In the toolbar, click the Replay icon (
).
Replay Session
To replay the entire visitor session:
1. Select the page at which to begin the replay in the Navigation pane.
) icon in the toolbar.
2. Click the Start Replay (
3. You can choose to replay the session as it was captured or to delay each page a
preset number of seconds.
During replay, a counter at the top of the page indicates how many seconds
remain in the replay of the current page.
) icon in the
v To stop replay at any time, click the Pause (
toolbar. The currently replaying page remains in the Content Pane for further
exploration.
Related concepts:
Chapter 12, “Browser Based Replay Interface,” on page 181
Mobile device applications and BBR
You can capture interactions that mobile device users have with your web site and
then replay their sessions using Browser Based Replay.
Browser Based Replay supports the following types of mobile device applications:
v Mobile Web Apps:
Mobile web apps are web applications that can be accessed by mobile devices.
– Support for Mobile Wen Apps was introduced in IBM Tealeaf Version 8.8
– Mobile Web Apps are coded entirely in JavaScript and use Java™ classes.
– Mobile Web Apps use only UIC.
v Native Apps:
Native applications are applications that are native to the mobile devices on
which they run.
– Support for Native applications was introduced in IBM Tealeaf Version 9.0.
– Native applications use either the iOS or Android operating system platform
and are platform-specific (meaning, iOS applications do not run on an Android
device and vice versa).
v Hybrid Apps
– Support for Hybrid applications was introduced in
– With Hybrid applications, you can call native APIs from a web app.
Note: In IBM Tealeaf Version 9.0.1, Replay has the following limitations for
hybrid apps:
– Only 1 webView is supported.
– There is no support for frame/iframe within the webView.
– Only simple UI events are supported within webView.
168
IBM Tealeaf cxImpact: cxImpact User Manual
Figure 83. Mobile device applications supported by BBR
Replaying sessions from mobile visitors
If you have licensed and enabled the IBM Tealeaf CX Mobile module, BBR
supports the replay of user interface events that are captured from the visitor's
mobile browser.
To render sessions that are captured from mobile devices for display in the web
browser, the Tealeaf Replay Server uses an embedded renderer that is based on the
Chromium engine. For best results in replay of mobile-based sessions, use the
Chrome browser in Browser-Based Replay.
The IBM Tealeaf CX Mobile module is a separately licensed module of the IBM
Tealeaf CX platform. please contact your IBM Tealeaf representative.
Note: If IBM Tealeaf CX Mobile module has not been licensed, there are limitations
that are applied to replay of sessions in BBR.
The manner in which you work with mobile device sessions in BBR is basically the
same as it is for non-mobile device sessions.
When you replay sessions from a mobile device in BBR, a graphical representation
of the device is displayed in the viewing area.
Select Options > Resize View to Match Session when replaying a mobile device
session.
The visitor interactions with the mobile application are depicted graphically. For
example, if the visitor tapped two times on a UI element on the mobile application
screen, BBR depicts this action on the screen in the viewing area as follows:
Chapter 11. cxImpact Browser Based Replay
169
Mobile device gestures in BBR
When a visitor interacts with your mobile-based web site, mobile app, or native
hybrid app using a touch device (for example, a smart phone or tablet), you can
replay the gestures from that experience in BBR.
The capability to capture and replay mobile device gestures (for example, tap and
swipe gestures) gives you insight into interactions that are specific to a mobile
device user's experience.
Note: If there is no mobile licence, gesture Replay is not supported.
Being able to view mobile device gestures in BBR can help you identify and
troubleshoot customer pain points and address design flaws in your web site or
application that otherwise might have gone unnoticed. For example, lets say your
business has a mobile banking application for your customers. A customer accesses
the banking application from their mobile device to view their account balance.
After viewing their account balance, the customer wants to go back to the
application's home page to perform a different transaction. The user taps the logo
in the top of the account balance page several times, assuming that the logo
functions as a link to the home page. However, the application developer for the
mobile app did not code the logo to link to the home page. As a result, the user is
frustrated and confused about how to navigate back to the home page. By having
access to mobile device gestures in BBR, you can see where the visitor struggled
(multiple taps on the logo) and you can share this information with the mobile app
developer.
Note: Highlighting in BBR is not supported for mobile gestures (type11 messages).
Gestures are enabled in the supported frameworks as follows:
Table 16. Enabling gestures reference table
Framework
Method for enabling
For more information see
iOS
Gestures are enabled in the
TLFConfigurableItems.plist file in
each application in which you want
to capture gestures.
IBM Tealeaf CX Mobile iOS Logging
Framework Guide
Android
Gestures are enable in the
mainActivity.jar file in each
application in which you want to
capture gestures UIC.
IBM Tealeaf CX Mobile Android
Logging Framework Guide
Java-based
web
application
Gestures are enabled in the
TealeafSDK.js file configuration
object.
IBM Tealeaf CX UI Capture j2 Guide
Analyzing gesture events in BBR
When you replay sessions from a mobile device in BBR, a graphical representation
of a mobile device is displayed in the viewing area.
Like standard BBR, you can replay the customer's session from beginning to end,
or you can go through the session one page at a time by clicking the UI events in
the Navigation pane.
170
IBM Tealeaf cxImpact: cxImpact User Manual
The gestures are displayed graphically on the graphical representation of the
device.
Additionally, you can review the request and response message formats.
Related concepts:
“Replay Highlighting” on page 212
Gesture events captured:
Gestures that are used to select items in an application or to adjust views in the
application are captured by Tealeaf.
Tap gestures
This table lists and describes the tap gestures that are captured from web and
mobile apps:
Note: The arrows that illustrate the direction of a swipe or pinch gesture are not
supported by the Internet Explorer browser.
Table 17. Tap gestures
Gesture name
Description
Tap
This gesture is a one-finger gesture.
Image displayed in Replay
For a tap gesture, one-finger taps and lifts from the
screen in 1 location.
Tap and Hold
This gesture is a one-finger gesture.
For a Tap and Hold gesture, one-finger presses and
stays on the screen until information is displayed or
an action occurs.
Note: The response to a Tap and Hold gesture can
vary from one application to another. For example,
a Tap and Hold gesture might display an
information bubble, magnify content under the
finger, or present the user with a context menu.
Double tap
This gesture is a one-finger gesture.
For a double tap gesture, one-finger taps twice in
close succession in 1 location of the screen.
Swipe gestures
This table lists and describes the swipe gestures that are captured from web and
mobile apps:
Chapter 11. cxImpact Browser Based Replay
171
Table 18. Swipe gestures
Gesture name
Description
Image displayed in Replay
Swipe vertically This gesture is a one-finger gesture.
For a swipe vertically gesture, one-finger:
1. taps and holds in 1 location of screen,
2. continues to engage screen while it moves up or
down
3. lifts from the screen in different location.
Note: The initial tap becomes lighter in color, while
the destination is highlighted by a darker color
Swipe
horizontally
This gesture is a one-finger gesture.
For a swipe horizontally gesture, one-finger:
1. taps and holds in 1 location of screen,
2. continues to engage screen while it moves left or
right
3. lifts from the screen in different location.
Note: The initial tap becomes lighter in color, while
the destination is highlighted by a darker color
Resize gestures
This table lists and describes the resize gestures that are captured from web and
mobile apps:
Note: See the IBM Tealeaf Customer Experience 9.0.1 Release Notes for information
about a known limitation for handling some iOS pinch gestures.
Table 19. Resize gestures
Gesture name
Description
Pinch open
Sometimes referred to as a spread gesture, this is a
two-finger gesture.
Image displayed in Replay
For a pinch open gesture, 2 fingers:
1. tap and hold in 1 location of the screen,
2. maintain contact with the screen while the
fingers move apart from each other in any
direction,
Note: Accompanying arrows indicate the
direction (open or close) of the pinch
3. lift from the screen at a new location.
Pinch close
This gesture is a two-finger gesture.
For a pinch close resize gesture, 2 fingers:
1. tap and hold in 1 location on the screen,
2. maintain contact with the screen while the
fingers move toward each other,
3. lift from the screen at a new location.
172
IBM Tealeaf cxImpact: cxImpact User Manual
Note: Accompanying arrows indicate the
direction (open or close) of the pinch
Replaying sessions that have both web and mobile data
You can use BBR to replay sessions that contain "hybrid" data (data captured from
a mobile device and from a webView).
Hybrid Replay for Tealeaf Version 9.0.1 requires the mobile device SDK version
9.0.1. If you are running a pre 9.0.1 Version of the Replay Server, Hybrid Replay
will not work.
If you are using both native and hybrid replay together, consider setting up a
server with a different network IP address that is separate from the replay server
and implementing the following folder structures for native and hybrid replay:
v For Native Replay:
– D:\IBM\IBM Tealeaf CX\ReplayServer\Idt
The Idt folder contains the dojo library.
– D:\IBM\IBM Tealeaf CX\ReplayServer\TLT
The TLT folder contains the native replay templates.
v For Hybrid Replay:
– C:\IBM\IBM Tealeaf CX\ReplayServer\Apps\mobile app name\mobile app
verson\images
The images folder contains the static image resources.
– C:\IBM\IBM Tealeaf CX\ReplayServer\Apps\mobile app name\mobile app
verson\css
The css folder contains the static css resource.
Note: If the original path to the static resource file is file:///abc/def.jpg, then
you copy def.jpg to IBM Tealeaf install dir\ReplayServer\Apps\mobile app
name\mobile app verson\.
Replaying sessions that contain data that was captured from multiple sources, is
known as Hybrid replay.
For information about how to add capture code to the events that you want to
capture, see the IBM Tealeaf CX UI Capture j2 Guide.
If you are using BBR for Hybrid replay, you must upload to the Replay server all
the static resources captured from the mobile device. Examples of static resources
include image files and cascading style sheet (css) files.
Upload the static resources into the following directory:
ReplayServer/Apps/mobile app name/mobile app verson/
where the values for mobile app name and mobile app verson are pulled from the
JSON hit. For example:
Figure 84. JSON hit sample
{
"serialNumber": 0,
"messageVersion": "0.0.0.1",
"sessions": [
{
"startTime": 1328311295574,
"id": "945202AC4E93104E05EDADE1F6059B97",
"messages": [
Chapter 11. cxImpact Browser Based Replay
173
{
"offset": 124,
"contextOffset": 4556,
"type": 2,
"logicalPageName": "HomeActivity"
}
]
}
],
"clientEnvironment": {
"height": 800,
"osVersion": "2.2",
"pixelDensity": 1.5,
"width": 480,
"deviceHeight": 533.3300170898438,
"osType": "Android",
"mobileEnvironment": {
"appName": "sdkTest4",
"android": {
"keyboardType": "QWERTY",
"brand": "generic",
"fingerPrint": "generic/sdk/generic/:2.2/FRF91/43546:eng/test-keys"
},
"totalMemory": 459243520,
"totalStorage": 45568,
"orientationType": "PORTRAIT",
"appVersion": "1.0",
"manufacturer": "unknown",
"userId": "d192d257-b308-42cf-aacc-2dd034c232bd",
"locale": "English (United States)",
"deviceModel": "Android Simulator",
"language": "English"
},
"deviceWidth": 320
}
}
Note: The path to the images and css resources are relative in html file where they
are used.
Using Figure 84 on page 173 as an example, the path into which you upload the
static resources is:
ReplayServer/Apps/sdkTest4/1.0/
DOM Capture and Replay
Classic Capture and Replay works well for a traditional customer-to-websiteinteraction scenarios, where everything that runs the application and or website is
contained in the response to the customers request.
For scenarios not currently supported by classic Capture and Replay, use DOM
Capture and Replay. For example, use DOM Capture and Replay for scenarios
where a complicated JavaScript runs in a single page application or for a
multivariate testing scenario.
Benefits of DOM Capture and Replay
With DOM Capture and Replay, you have:
v More control over dynamic interaction
v More data in session
v Less Rich Internet Application (RIA) work
174
IBM Tealeaf cxImpact: cxImpact User Manual
Considerations for using DOM Capture and Replay
Before you use DOM Capture and Replay, consider the impact of using DOM
Capture and Replay:
v Using DOM Capture and Replay requires extra configuration tasks on the
Capture side.
You need to enable DOM capture and set the message size thresholds.
v Use DOM Capture and Replay judiciously.
Capturing DOM for every UI event or every page action can result in a large
amount of data being sent to the server which, depending on your site's
bandwidth and server capacity, might be problematic.
Classic Capture and Replay versus DOM Capture and Replay
This table compares Classic Capture and Replay and DOM Capture and Replay:
Table 20. Comparing classic Capture and Replay to DOM Capture and Replay
For Classic Capture and Replay. . .
For DOM Capture and Replay. . .
UI Capture SDK collects event
UI Capture SDK collects DOM after
eventing
Canister session processing of static response
includes user agent + UI Capture SDK
Canister session processing of static
response includes user agent + UI Capture
SDK
When recalling a session for replay, go to the
Rendering Engines inside Replay
Uses the captured DOM to display a page
in BBR; does not use the Rendering
Engines.
Uses rendering agent based on user agent
Does not use rendering agent.
The Rendering Engine runs JavaScript for
dynamic content
Uses the exact DOM that the user saw at
the moment of capture, rather than a
simulation by the renderer.
HTML consists of re-rendered response.
HTML consists of the response + DOM.
BBR renders HTML in browser
BBR renders HTML in browser
Performance and DOM Capture and Replay
Using DOM Capture and Replay instead of the classic Capture and Replay can
result in faster performance at replay time and a truer replay experience, because:
v Classic capture and replay relies on the Rendering Engine to render a page in
BBR, while DOM Capture and Replay uses the captured DOM to display a page
in BBR.
Because DOM Capture and Replay does not rely on a rendering process, there
are less resources that are involved to display the page, resulting in better
performance in BBR.
v Classic capture and replay processes dynamic content when the session is
recalled, while DOM Capture and Replay captures dynamic content in the DOM
(when it happens to the user the first time).
Because DOM Capture and Replay uses the exact DOM that the user saw at the
moment of capture, rather than a simulation produced by a Rendering Engine,
DOM Capture and Replay provides a "truer" replay experience.
Chapter 11. cxImpact Browser Based Replay
175
How DOM Capture and Replay works
DOM Capture relies on the Document Object Model (DOM), which provides a
structured representation of the web page (document). The DOM Capture Service
captures a "snapshot" of the rendered DOM. The "snapshot" is sent to the server as
a Type 12 JSON message. The Replay server processes the DOM for Browser Based
Replay (BBR).
Stages of DOM Capture and Replay
There are four stages of DOM Capture and Replay:
Stage
Processing
Capture
During this stage, UI Capture processes the
DOM message into a UI hit request.
PCA Processing
During this stage, PCA handles
decompression of the compressed POST
data.
Pipeline Processing
During this stage, the pipeline moves the
captured DOM from the UI hit to a 'virtual'
hit that uses the captured DOM as the hit
response.
Replay
This stage processes the session on the
replay server according to the defined rules.
Capture
After the raw DOM is captured, Tealeaf updates input variables and applies
privacy masking according to the UI Capture privacy masking rules. Inline script
elements are deleted.
If the captured DOM is below the configured size limit, the capture is serialized
into JSON Type 12 message format. The message is compressed or not, depending
on the settings. If the captured DOM is over the configured size limit, the capture
is discarded and an error message is logged.
PCA processing
DOM capture data is sent from the UIC in two ways:
1. JSON text with no compression
2. JSON text with gzip compression
Pipeline processing
The Windows pipeline moves the captured DOM from the UI hit into a virtual hit
with the captured DOM as a response. The DOM Capture data is removed from
the JSON and metadata is modified. The virtual hit has the same PAGE URL as the
UI hit that had the DOM captured data.
Replay
The replay server processes the session according to the defined rules. For pages
on which DOM Capture is enabled, the replay server goes through the UI events
and identifies those events that have a captured DOM associated with them. The
Replay server uses the page ID and token of the captured DOM to identify the
176
IBM Tealeaf cxImpact: cxImpact User Manual
virtual hit and the rendered DOM for the UI event.
Replaying sessions with captured DOM
Replay rules are used to determine whether DOM Capture replay is enabled or
disabled for a particular page URL.
Replay processes the session according to the rules.
For pages on which DOM Capture is enabled, the Replay identifies those UI events
on the page that have captured DOM associated with them.
Note: If there is no DOM Capture associated with a UI event, Replay does not
display the event in the BBR navigation list.
Replay uses the page id and the token associated with the captured DOM, to
identify the virtual hit in the session that is tagged with the same information in
its request headers. Replay associates the response of the virtual hit as the
rendered DOM for the UI event.
Working with sessions in BBR that have captured DOM
Session Timeout
If a BBR session has been idle for 30 minutes, it is timed out by the server. If you
fail to browse to new pages within the timeout period, you must close and reload
the session in BBR to continue navigating.
v Check the session identifier and the page you were on before you click Close.
Finding Pages
In the Navigation pane, you can review the pages from the current session that
apply to the current mode. For example, if you are currently in Replay mode, only
pages that can possibly be replayed in BBR are displayed in the Navigation pane.
) icon
v To see a list of all pages in the session, click the Page List (
in the toolbar.
v To jump to a page, click the Blue Arrow icon in the leftmost column of the Page
List.
Managing BBR Panes
The Browser Based Replay interface can be altered to display the most important
content that is needed to find pages and replay sessions.
You can toggle the display of the panes in the left sidebar and the entire sidebar,
too.
v To hide the display of the entire sidebar, click the Hide (
BBR toolbar.
) icon in the
v To display the sidebar when it is hidden, select Options > Options > Show
Sidebar from the BBR toolbar.
v To close a subpane, click the X icon in its corner.
Note: You cannot close the Navigation pane. To hide it, close the entire sidebar.
Chapter 11. cxImpact Browser Based Replay
177
v To redisplay a hidden pane, you can enable it through the Options > Options
sub-menu.
v To minimize a sub-pane, click the Minimize icon in its corner. The other panes
expand to occupy their space.
Searching Archived Sessions for Text
Through BBR, you can search completed sessions for text that you see during
replay. This mechanism is useful for matching the results of active sessions to
activities that are already processed by the Tealeaf system.
1. To search completed sessions for a text string, select Options > Search
Completed Sessions from the BBR toolbar.
2. In the dialog box, enter the text for which to search.
v To copy text to the dialog box, select it in the Content pane. Then, in the
dialog box, click Copy Selected Text.
3. To search for the entered text, click Search.
v All available Canisters are searched across the available dates.
v Submitting a search closes the current replay.
v To cancel the search in progress, click Stop Search. Any retrieved results are
displayed.
Related concepts:
“Searching Session Data” on page 37
Sharing Replays
You can share your replays with other Tealeaf users. Each replay can be accessed
through a URL on the Tealeaf server, and this URL can be shared with others to
allow them to see the same replay.
Sharing with Email
To send the URL by email:
1. Select Options > Sessions > Send Link by Email from the BBR toolbar.
2. Enter the email addresses of the individuals who must receive the email.
Separate each email address by a comma. Do not include spaces or carriage
returns.
Note: The list of email addresses is authenticated against known users of the
Tealeaf system.
3. Enter a title for the replay session. This title is displayed as the display text for
the URL link.
4. If needed, you can include a message with your replay link.
v You do not need to include the URL in the message.
5. To send the message, click OK.
Copy the session link
If needed for other purposes, you can retrieve and copy the URL to the clipboard
of your local desktop for pasting elsewhere.
1. Select Options > Session > Copy Link To Session from the BBR toolbar.
178
IBM Tealeaf cxImpact: cxImpact User Manual
2. The link is displayed in an address bar at the top of the BBR window. To copy
it, press CTRL + C.
3. Paste it as needed.
4. To close the address bar, click theX on the right side of the screen.
Related concepts:
Chapter 12, “Browser Based Replay Interface,” on page 181
Creating Event Data from BBR
Through the context menu in Replay, Request, or Response mode, you can create
events that are based on your selections in BBR. Based upon the selected text, a hit
attribute is created, and an event definition is pre-populated with values to
accurately identify the selected text in the session data.
Note: As a precaution before you begin you must verify that there are no unsaved
changes in the Tealeaf Event Manager.
1. Select the text. This text might be an HTML element in Replay mode, a
name-value pair in Request mode, a header in Response mode, or another text
selection.
2. Right-click the selection and select one of the following options:
Option Description
Create New Event from selection...
When text is selected, this context menu command is available for
creating an event from the selected text. The Tealeaf Event Manager is
pre-populated with values to match the selected text.
Create New Hit Attribute from selection...
When text is selected, this context menu command is available for
creating a hit attribute that uses the selected text as the pattern to
match. The Tealeaf Event Manager is pre-populated with values to
match the selected text.
Note: Hit attributes that are created from BBR match on a fixed text
string. Since these attributes always return the same value, they are not
permitted to be used to populate dimensions.
3. The Tealeaf Event Manager is opened, with the new definition pre-populated
with detection parameters to identify the selection.
4. Continue specifying the event or hit attribute.
5. To save changes, click Save Draft.
Note: If you click Cancel to cancel an event creation, the hit attribute to match
the event is already saved as a draft. You must delete the drafted hit attribute
through the Hit Attributes tab or revert all changes, which remove all local,
drafted changes through the Tealeaf Event Manager.
6. To commit your changes to the server, click Save Changes.
7. The event and hit attribute data are created.
Configuration
You can configure the replay server or associated proxy server.
Chapter 11. cxImpact Browser Based Replay
179
Configuring the Replay Server
Tealeaf administrators can create and configure Replay Server instances through
the Portal Management page. Multiple Replay Servers can be deployed to
distribute the BBR rendering load among multiple servers.
Configuring BBR replay rules
Tealeaf administrators can configure the replay rules that are applied to
Browser-Based Replay through the Replay Server configuration in the Portal
Management page.
Related concepts:
Chapter 15, “BBR Replay Rules,” on page 227
Configuring Proxy
If a proxy is in use to broker connections between BBR users and the Replay
Server and the origin server, review and complete the following configuration
changes.
ESI Tag Support
BBR does provide partial support of the ESI include tags, which are a form of
partial dynamic page caching, without additional configuration. See "RealiTea
Viewer - Replay Rules" in the IBM Tealeaf RealiTea Viewer User Manual.
180
IBM Tealeaf cxImpact: cxImpact User Manual
Chapter 12. Browser Based Replay Interface
The BBR window is divided four panes and includes a toolbar and multiple
statistical bars through which you can control replay and review session data.
Figure 85. Browser Based Replay (BBR) desktop
UI Components
v Toolbar - The area at the top of the page contains controls and displays for
replaying sessions.
v Content Pane - The large window on the right side. It displays replayed hits,
parsed requests, and raw responses.
– Page Statistics - Statistics that are related to the currently displayed page.
v Sidebar - The left sidebar contains multiple panes that enable review of the
session pages, events, and form field data. This page can be toggled for display.
See "BBR Options" in the IBM Tealeaf cxImpact User Manual.
– Navigation Pane - The list of pages within the session that can be replayed.
Click an entry to display it in the content window. Red text indicates a hit
that either returned an error, such as HTTP 400+ or 500+, or a request that the
user canceled before it finished loading.
– Events Pane - The events that fired for the currently selected hit. Each event
links to an event chart report for that event.
– Form Fields Pane - The posted form fields and parsed URL fields that are
associated with the hit. These values are used to highlight the form fields that
the visitor submitted.
© Copyright IBM Corp. 1999, 2014
181
v Session Statistics - At the bottom of the page, you can review statistics about the
current session.
Related concepts:
“Toolbar” on page 188
“Page Statistics” on page 198
“Session Statistics” on page 210
Related reference:
“Content Pane” on page 190
“Navigation Pane” on page 198
“Events Pane” on page 206
“Form Fields Pane” on page 209
Session menu
The Session menu provides various options for the session you are viewing. A
check mark to the left of an option means that it is enabled.
Note: The Session menu is not available if all of the underlying features are
separately disabled in BBR. T
Option Description
Open TLA
This option allows you to open an archived session file into BBR for replay.
Replay rules are applied during replay.
Note: TLA files that are loaded through BBR do not have On-Demand
Privacy rules that are applied to them and can pose a security risk if this
feature is enabled.
View in RTV
Select this option to view your current session in RTV instead of BBR.
Export as TLA
Export the current session as a TLA file.
Send to Event Tester
Send the current session to the Event Tester. The Event Tester can be used
to evaluate event definitions against sessions that are found through search
or uploaded to the server.
Email Link to Session
This option opens a window to email a direct link to the BBR session. A
message can be included with the link. BBR replay links can be configured
to last for a predefined number of days.
Copy Link To Session
The direct link to the session is displayed in place of the toolbar. Click X to
close it and redisplay the toolbar.
Related concepts:
“Searching Session Data” on page 37
Chapter 11, “cxImpact Browser Based Replay,” on page 165
182
IBM Tealeaf cxImpact: cxImpact User Manual
View menu
The View menu provides various views for your current session. A check mark to
the left of an option means that it is enabled.
Option Description
Show Sidebar: Opens the display of the sidebar that contains the Navigation,
Events, and Form Fields panes.
Events Panel: Opens the display of the Events panel. This panel can be
displayed in Replay view only.
Form Field Panel: Opens the display of the Form Fields panel. This panel
can be displayed in Replay view only.
Replay
In Replay view, the web page is displayed as seen by the visitor.
Request
In Request view, the Content pane displays the headers in the request that
are sent by the visitor's browser to the web server.
Response
In Response view, the raw HTML sent from the web server to the visitor's
browser is displayed in the Content pane.
Page Load Details
View Page Load Details screen.
User Agent Info
Display user agent information for the session. A user agent is the entity
that is used to contact your web application. In most cases, the user agent
is a web browser.
For a list of the default user agent fields that are captured and maintained
by IBM Tealeaf, see "Configuring User Agent Detection" in the IBM Tealeaf
cxImpact Administration Manual.
Full Page List
Opens the Page List.
Page Hit Logs
Displays the logs from the rendering engines that show the processing
being performed by the Replay Server.
This option is available to users with Admin authorization only.
Information in the Page Hit logs can help users diagnose and troubleshoot
problems related to the customer's session.
For information about how to use real-time logging of Replay Server,
"Using real-time page load logging information for session diagnostics" see
in the IBM Tealeaf cxImpact Administration manual.
Annotations
View existing annotations or add annotations.
Related concepts:
“Page Load Details” on page 195
Chapter 13, “Tracking Interactions through BBR,” on page 211
Related tasks:
“Replay View” on page 167
Chapter 12. Browser Based Replay Interface
183
Related reference:
“Events Pane” on page 206
“Form Fields Pane” on page 209
“Request View” on page 193
“Response View” on page 194
“Page List” on page 188
Options Menu
Option Description
View menu
Page Load Details
View Page Load Details screen. See "Browser Based Replay Interface" in
the IBM Tealeaf cxImpact User Manual.
User Agent Info
Display user agent information for the session.
v A user agent is the entity that is used to contact your web application. In
most cases, the user agent is a web browser.
Processing logs
Displays the logs from the rendering engines that show the processing
being performed by the Replay Server.
This option is available to users with Admin authorization only.
Information in the Processing logs can help users diagnose and
troubleshoot problems related to the customer's session.
For information about how to use real-time logging of Replay Server, see
"Using real-time page load logging information for session diagnostics" in
the IBM Tealeaf cxImpact Administration manual.
Full Page List
Opens the Page List.
Session menu
Note: The Session menu is not available if all of the underlying features
are separately disabled in BBR.
Note: The Session menu is not available if the current session was loaded
from a TLA file.
Send to Event Tester
Send the current session to the Event Tester.
v The Event Tester can be used to evaluate event definitions against
sessions that are found through search or uploaded to the server.
Send Link By Email
Opens a window for emailing a direct link to the BBR session. A message
can be included with the link.
v BBR replay links can be configured to last for a predefined number of
days.
184
IBM Tealeaf cxImpact: cxImpact User Manual
Copy Link To Session
The direct link to the session is displayed in place of the toolbar. The X
button closes it and re-displays the toolbar.
View in RTV
Downloads the session for desktop viewing in the IBM Tealeaf CX RealiTea
Viewer.
v View in RTV is only available if the global logging level used by the
Portal application is set to 9 through TMS. If the global logging level is
not set to 9, you will not see this option in the menu.
Note: The RTV client must be installed on your local desktop.
Refresh Page List
(active sessions) Query the server for any updates to the Page List.
Download TLA
Download a BBR session as a TLA file. Save TLA will ask for Search Server
credentials to download the TLA.
Note: This option is only available if Advanced Options are enabled for
BBR for one or more groups to which you belong or if Logging Level 9 is
enabled.
Options menu
Contains the list of BBR options. A check mark to the left of an option
means that it is enabled.
This menu includes the following options.
v Show Sidebar
v Show Events
v Show Form Fields
v UI Events
– Show All UI Events
– Only Show Last UI Events
– Hide All UI Events
– Show ScreenView LOAD/UNLOAD
v Use Hit Number in Navigation List
v Use Default Page Name in List
– Show URL
– Show TLT_URL
– Show Page Title
v Merge Session Fragments
v Report JavaScript Errors
v Resize Replay Pane to Match Session
Note: This option is only enabled if you have an IBM Tealeaf CX Mobile
license.
v Edit Rules Profile
v Suggest Rules
Search Completed Sessions
Opens free text search of completed sessions. You can copy and paste text
from the Content pane to search in completed sessions.
Chapter 12. Browser Based Replay Interface
185
Sub-Search
Search the displayed session for one or more strings.
Load TLA
Load a Tealeaf archive session file into BBR for replay. Replay rules are
applied during replay.
Note: TLA files that are loaded through BBR do not have On-Demand
Privacy rules that are applied to them and can pose a security risk if this
feature is enabled.
Note: This option is not available unless Advanced Options are enabled
for BBR for one or more groups to which you belong.
TLA files can be downloaded and saved through BBR, RTV, or the Event
Tester.
Close Session
Closes the current BBR session and the browser window.
Related concepts:
Chapter 12, “Browser Based Replay Interface,” on page 181
“Searching Session Data” on page 37
Chapter 14, “Sub-Search in BBR,” on page 217
Chapter 15, “BBR Replay Rules,” on page 227
Chapter 11, “cxImpact Browser Based Replay,” on page 165
Merging Session Fragment Overrides
Ideally, a session is stored in a single Canister file on a single server. However,
session timeouts, data storage, and other factors can contribute to the
fragmentation of sessions, in which the entire session is stored in multiple files in
multiple locations.
Note: These settings override the default Replay Server behaviors and apply only
to the current session being replayed in BBR. They are not retained from replay to
replay. As a result, replay behaviors can vary between BBR and RTV.
The Replay Server can be configured to automatically merge fragments of a
requested session into a single session for replay. When configured to do so, the
Replay Server acquires all fragments of a session from a set of selected Canisters
within a specified time range. This range is specified as a number of hours before
to a number of hours after the main session fragment.
Through BBR, you can specify new settings for the merging of session fragments
for the session that is currently loaded in BBR.
v To merge session fragments, select Options > Advanced > Merge Session
Fragments from the drop-down menu. The following dialog is displayed,
containing the current merge session fragment settings, which you can override
for the current session:
186
IBM Tealeaf cxImpact: cxImpact User Manual
Figure 86. Merge Session Fragments
Setting Description
Merge Session Fragments
Enable or disable merging of session fragments for the current session.
When enabled, the following settings are applied to the current session
only.
Note: To restore the default settings, reload the session.
Session Merge Timespan Radius (Hours)
Specify the number of hours in front of and behind the selected session
fragment in which to search for other fragments in the session.
Session Merge Search Servers
Select the servers across which search server searches to find and
assemble session fragments into a complete session.
– To search across all currently available servers, click the All Servers
check box.
Note: When the merging of session fragments is enabled, the request is submitted
to Search Server, which attempts to fulfill it by gathering the requested fragments.
In situations where Search Server is unable to gather the session information, it
returns the main session fragment, which enables partial replay of the session. No
session information is available for the fragment.
The default options for merging fragments can be configured through the Portal.
Merging session fragments is enabled and disabled for users at the group level.
Overlays menu
If IBM Tealeaf cxOverstat is licensed and Tealeaf is capturing data, the Overlays
menu is available.
Chapter 12. Browser Based Replay Interface
187
Note: IBM Tealeaf cxOverstat is a separately licensable product that is used to
monitor usability aspects of your web application. please contact your IBM Tealeaf
representative.
Note: The Overlays menu may not be available for all BBR sessions.
Toolbar
The top of the replay window contains the following controls and displays.
v Refresh List (Active sessions only)
v Page List
v Hide
v
v
v
v
v
v
v
BBR Options
Start Replay
First/Last
Previous/Next
Request View
Response View
Replay View
v Overlays menu
v Annotations
v Close Session
The toolbar can be configured for individual groups or users.
Related concepts:
“Hide” on page 189
“Start Replay” on page 190
“First/Last” on page 190
“Previous / Next” on page 190
“Overlays menu” on page 187
“Annotations” on page 189
“Close Session” on page 190
Related tasks:
“Replay View” on page 167
Related reference:
“Refresh List (Active sessions only)” on page 189
“Page List”
“Request View” on page 193
“Response View” on page 194
Page List
188
IBM Tealeaf cxImpact: cxImpact User Manual
Figure 87. Page List
Click the Page List button to open a window that lists all pages in the current
replay session. Blue arrows indicate pages that can be viewed in BBR. Click the
blue arrow to view the associated page.
If Tealeaf is configured to capture UI Events, BBR can be configured to display
them in the Page List, marked with a UI icon. Display of UI Events can be toggled.
Refresh List (Active sessions only)
This button is displayed only during replay of an active session. Click it to display
any new pages that the visitor has added to their session since the last time you
loaded or refreshed the page list.
Hide
This button collapses the three panes on the left sidebar. To open them, select View
> Show > Sidebar.
Annotations
Click to add annotations to the current page.
Related concepts:
Chapter 13, “Tracking Interactions through BBR,” on page 211
Chapter 12. Browser Based Replay Interface
189
Start Replay
Switches to the Content pane and begins an automatic playback of the session
from the page that is currently selected in the Navigation pane, timed to match the
original visitor's view times.
When you start replay, you can choose to replay the session as it was captured
(Auto) or to delay each page a preset number of seconds:
Figure 88. Page Delay Time
v When set to Auto, replay accurately reflects how long the visitor waited between
completing recorded actions on the site.
To begin replay, click Start. The label on the toolbar button changes to Stop
Replay, and a timer is displayed to the left of the button to count down the
seconds between each hit in the recorded session.
First/Last
When you click First, the Navigation List scrolls to the first page in the list. The
first row is highlighted and the first page loads.
When you click Last, the Navigation List scrolls to the last page in the list. The last
row is highlighted and the last page loads.
Previous / Next
Steps backward or forward through the navigation list, displaying the replay,
request, or response view in the Content pane, depending on the currently selected
view.
Related concepts:
“Display” on page 192
Close Session
Ends the current BBR session and closes the browser window.
Content Pane
This pane displays the replayed hit, the request headers sent from the visitor's
browser to the website server, or the raw HTML of the response that is sent from
the website server to the visitor's browser.
v To change the content pane, click the Replay, Request, or Response button in the
toolbar.
190
IBM Tealeaf cxImpact: cxImpact User Manual
Figure 89. Content Pane
v If highlighting is enabled, the modified form fields and selected links are
highlighted in green on the page in Replay view.
v When Replay Shield is enabled, your mouse-driven interactions with the
Content pane are disabled, which prevents accidental execution of any JavaScript
that might be triggered.
Related concepts:
“Display” on page 192
User Agent Information Bar
If IBM Tealeaf CX Mobile is licensed, user agent information can be inserted in a
title bar above the replay pane.
Just above the content pane, you can review any available information that Tealeaf
has detected and extracted from the user agent string that is submitted by the
visitor's device to the web server that delivered the session.
Note: This information is available only if the IBM Tealeaf CX Mobile module is
licensed and properly configured.
Chapter 12. Browser Based Replay Interface
191
A user agent is any device that is used to browse a web application. Most user
agents self-report a unique string that identifies the exact brand and model of the
device. This string is used to query a public standard for additional information
about the device.
In the table below, you can review the content of each field, its source, and how it
can be accessed.
Table 21. User Agent Information Bar
Item
Source Request Field
Description
Browser
TLT_BROWSER
Visitor browser type
v This value is also available in the
Tealeaf System Hit Attribute
Browser.
Browser
Platform
TLT_BROWSER_PLATFORM
The mobile device platform
Best
Replayed
Using
TLT_BROWSER_VERSION
The X.0 version of the browser
Traffic
Type
TLT_TRAFFIC_TYPE
The type of traffic, as identified by
extended user agent parsing
v This data is also captured in the
Traffic Type dimension.
Replay
Renderer
The type of renderer that is used by
Replay Server to render the session
v The type of renderer is determined
by the configured renderer types
and the browser from which the
session was originally experienced.
Related concepts:
“Configuring the Replay Server” on page 180
Display
You can display session data in various views. Replay view shows the web page
display as seen by the visitor. Request and Response views show the request and
response interactions between the browser and Web server. You can use Load Page
Details to review individual objects.
Replay View
To view a page as the visitor saw it:
1. Select the page in the Navigation pane.
2. In the toolbar, click the Replay icon (
).
Replay view context menu
In Replay view, the following commands are available in the right-click context
menu.
Command
Description
192
IBM Tealeaf cxImpact: cxImpact User Manual
View Document Source
View the source code for the selected document of the current response.
View Element Source
View the source code for the element that is currently selected on the page.
Add Annotation
Add an annotation for the current selection.
Create New Event from selection...
When text is selected, this context menu command is available for creating
an event from the selected text. The Tealeaf Event Manager is
pre-populated with values to match the selected text.
Create New Hit Attribute from selection...
When text is selected, this context menu command is available for creating
a hit attribute that uses the selected text as the pattern to match. The
Tealeaf Event Manager is pre-populated with values to match this
selection.
Test Response Modify Rules
In Replay view, you can review and test the response modification rules
that are applied to the current page.
Examine Cookies...
Review the cookies that are stored for the current session, which you can
copy to the clipboard as needed.
Related concepts:
Chapter 13, “Tracking Interactions through BBR,” on page 211
Chapter 11, “cxImpact Browser Based Replay,” on page 165
Chapter 15, “BBR Replay Rules,” on page 227
Request View
In Request view, the Content pane displays the headers in the request that are sent
by the visitor's browser to the Web server.
Step Attributes
If you deploy one of the Tealeaf client frameworks to submit events from the client
application to Tealeaf, you can review the submitted messages through BBR
request view.
To access step attributes:
v At the top of the request pane, click Click here to view Step Attributes.
– If you do not have access to the Event Manager, you cannot create step
attributes.
v The raw JSON messages are displayed in the [RequestBody] section.
Related concepts:
Chapter 16, “Step-based eventing,” on page 249
Replay view context menu
In Replay view, the following commands are available in the right-click context
menu.
Chapter 12. Browser Based Replay Interface
193
Command
Description
View Document Source
View the source code for the selected document of the current response.
View Element Source
View the source code for the element that is currently selected on the page.
Add Annotation
Add an annotation for the current selection.
Create New Event from selection...
When text is selected, this context menu command is available for creating
an event from the selected text. The Tealeaf Event Manager is
pre-populated with values to match the selected text.
Create New Hit Attribute from selection...
When text is selected, this context menu command is available for creating
a hit attribute that uses the selected text as the pattern to match. The
Tealeaf Event Manager is pre-populated with values to match this
selection.
Test Response Modify Rules
In Replay view, you can review and test the response modification rules
that are applied to the current page.
Examine Cookies...
Review the cookies that are stored for the current session, which you can
copy to the clipboard as needed.
Related concepts:
Chapter 13, “Tracking Interactions through BBR,” on page 211
Chapter 11, “cxImpact Browser Based Replay,” on page 165
Chapter 15, “BBR Replay Rules,” on page 227
Response View
In Response view, the raw HTML sent from the Web server to the visitor's browser
is displayed in the Content pane.
Response view context menu
In Response view, the following commands are available in the right-click context
menu.
Note: Context menu commands are only available in Response view if some text is
selected.
Command
Description
Create New Event from selection...
When text is selected, this context menu command is available for creating
an event from the selected text. The Tealeaf Event Manager is
pre-populated with values to match the selected text.
Create New Hit Attribute from selection...
When text is selected, this context menu command is available for creating
194
IBM Tealeaf cxImpact: cxImpact User Manual
a hit attribute to match the selected text. The Hit Attributes tab of the
Tealeaf Event Manager is pre-populated with values to match this
selection.
Create Response Modify Rule
You can create and review the response modification rules that are applied
to the current page. After the rule is applied, the Response Modify Rule is
applied and the session is reloaded.
Test Response Modify Rules
You can review and test the response modification rules that are applied to
the current page.
Related concepts:
Chapter 15, “BBR Replay Rules,” on page 227
Chapter 11, “cxImpact Browser Based Replay,” on page 165
Page Load Details
You can review the individual objects that are referenced and loaded for a page
after session replay completes or interactively during session replay.
Reviewing page load details after session replay
To review the page load details for a page after Session Replay has completed:
1. From the navigation area, select the page for which you want to review the
load details.
2. From the menu option drop down list, select View > Page Load Details.
The Page Load Details window is displayed.
For a description of data that is displayed in the Page Load Details window,
see Working with the Page Load details window.
Reviewing page load details during session replay
To review page load details during session replay:
1. Load the session for viewing.
2. While the session is replaying, select Page Load Details from the Processing
window.
The Page Load Details window is displayed.
For a description of data that is displayed in the Page Load Details window,
see Working with the Page Load details window.
Working with the Page Load details window
The time, in seconds, that it took to render the page is displayed at the top of the
Page Load Details window.
The Page Load Details window can be used to review all of the content that is
requested from an individual page and whether the replay client was successful in
loading it. It displays all of the requests to get the resources for a page. If a
resource fails to load, the page might not render correctly.
Having access to real-time PLD gives users insight into the workings of the HTTP
interactions (as it pertains to getting the resources for a page) that occur in the
Chapter 12. Browser Based Replay Interface
195
client / server architecture. The details presented in the window are an account of
the interaction between the renderer and Replay Server or the Remote Host.
You can size the columns and scroll vertically and horizontally to optimize content
viewing.
If you are using a TLI Server, you can identify the objects in the page that were
retrieved from a TLI file. In the Source column, any entry that includes TLI
indicates that Replay Server either retrieved it from the TLI Server or from the TLI
cache that is maintained on the Replay Server. See "Managing Static Archives" in
the IBM Tealeaf cxImpact Administration Manual.
The column definitions for the Page Load details window are as follows:
Page
A numeric identifier of the page that the customer navigated to during the
session.
The number corresponds to the page number that is displayed in the
Navigation panel in the BBR user interface.
Status Code
Indicates the load status of the page. Valid values are:
v Done
v Fail
Code
Indicates the HTTP status code of the request.
Valid values are any standard HTTP status. For example, a status of 200
indicates the request has succeeded, while a status 404 indicates the page
was not found.
Load Time
The time in seconds that it took the resource to load and the content to be
received by the customer.
Content
The Content column specifies the MIME or Content-type of the content
received.
MIME is a standard identifier that indicates the type of data that a file
contains. For example, the content might be text/html, text/plain, or
text/javascript.
Method
Indicates the HTTP method type. This will almost always be GET or POST.
Source
The source of the loaded page. Valid values include:
v Session
A value of Session indicates that the content that was found within the
session.
v RemoteHost
A value of RemoteHost indicates the content was not found within the
session, thus getting it from the original source.
v Info
A value of Info indicates the content is of an informative nature.
URL
196
The content URL or resource URL.
IBM Tealeaf cxImpact: cxImpact User Manual
Error Message
Displays the error message text for a page if an error was encountered.
Error code
Displays the code for the error message if an error was encountered.
You can right-click in the Page Load Details window to access operations from the
context menu.
Related concepts:
“Page Load Details context menu”
Page Load Details context menu
In the Load Details window, the following commands are available in the
right-click context menu.
Note: The available context menu commands may change depending on the
currently selected content in the Page Load Details window.
Table 22. Page Load Details - Context menu commands
Command
Description
Host/Port Remap
Using host/port remapping, you can redirect BBR to retrieve
content from a different host name and port from the origin
server. This feature prevents unnecessary retrieval from the origin
server during replay.
Copy URL to clipboard This option allows you to copy the URL to your clipboard so you
can paste it elsewhere.
Open URL
This option allows you to open the selected URL in a new
browser.
QueryData
If the URL contains query parameters, they are listed as
name-value pairs in this sub-menu.
For example, if the URL was www.test.com/?type=JSON
&reload=false, then the sub-menu displayed would be:
type=JSON
reload=false
Request Headers
Mouse-over to view name-value pairs in the header of the
request. Select one to open an edit window from which you can
copy values.
Response Headers
Mouse-over to view name-value pairs in the header of the
response. Select one to open an edit window from which you can
copy values.
View Response Text
When the selected object is an AMF hit, this option decodes the
binary object and displays it in text form in Notepad.exe.
Add Block URL Rule
Use this command to remove a resource. Sometimes resources are
not critical for the page to render correctly, and if the resource
impacts page load performance in a negative manner, you can use
this command to write a "Add block url rule".
Related concepts:
Chapter 15, “BBR Replay Rules,” on page 227
Chapter 12. Browser Based Replay Interface
197
Page Statistics
Just above the topic pane, you can review the statistics for the currently displayed
page.
Figure 90. Page Statistics
Statistic
Description
Gen Time
Time that is required to generate the page, in seconds.
Net Trip
The time that is required to transmit the page across the network to the
visitor's browser, in seconds.
Round Trip
The time that is required to transmit both the request and the response, in
seconds.
Response Size
The size of the page that is delivered to the visitor (the response), in bytes.
Status Code
Any HTTP status code that is generated by the hit.
Navigation Pane
The Navigation pane displays the pages and their related sub-pages in the order in
which they were experienced by the visitor.
v If the Content pane is in Replay view, only the hits that can be visibly replayed
are displayed.
v If the Content pane is in Request or Response view, all hits are displayed.
198
IBM Tealeaf cxImpact: cxImpact User Manual
Figure 91. Navigation List
The preceding image displays a partially expanded set of pages and sub-pages.
v The page or sub-page that is displayed in the content pane is highlighted in
blue.
v Next to some pages in the Navigation List, you may see carets to expand the
page. Click the caret to display the sub-pages for the selected page.
In the preceding image, you can see the Navigation List that is expanded to
display all of the available columns.
v As needed, you can click and drag the right side of pane to display additional
columns of information.
v A set of tools is available in the toolbar above the pane.
Related concepts:
“Navigation pane hierarchy” on page 200
“Navigation pane columns” on page 203
“Navigation pane tools” on page 204
Chapter 12. Browser Based Replay Interface
199
Navigation pane hierarchy
In the Page column, you can see how the pages are organized in a hierarchy. The
currently displayed page is highlighted. To display a page in the Content pane,
select it in the Navigation pane.
Right-click any entry in the Navigation pane to open a menu.
To see a full list of all pages in the session, click the Page List icon in the toolbar.
Structure of hierarchy
Note: ScreenView nodes are visible only in Replay view.
v In Request and response view, UI events are listed in physical order of
occurrence under a page.
+ Page
+ ScreenView
+ ScreenView
+ UI Event
+ UI Event
+ ScreenView
+ UI Event
200
IBM Tealeaf cxImpact: cxImpact User Manual
Definitions
Table 23. Navigation pane hierarchy
Icon
Term
Description
Page
A page is defined as any hit (request
and response pair) in which the
returned response is in a text-based
format, such as HTML, XML, or plain
text. If a page is not displayed during
replay, none of the underlying events
is displayed either. A page can be
hidden by replay rule, by
ReqCancelled failure, or by another
means. Redirect pages are not
displayed by BBR. The page number
is listed next to the icon. These
numbers can differ if the session is
fragmented.
v Pages that are numbered with two
dashes (--) can indicate UI hits,
pages that are served from a
caching server, or non-pages such
as redirects.
– UI events are positioned beneath
the page where they were
detected.
v Pages that are followed by an
asterisk and a number in
parenthesis, for example *(110),
indicate that was a cached back
page was hit. The number in
parenthesis is the previous page
hit.
v If you want, you can display the
hit number, instead of the page
number, in the first column. To
toggle display of hit numbers,
select Options drop-down >
Options > Use Hit Numbers in
Navigation List.
– When the above is selected, hit
numbers are displayed for all
objects in Request and Response
view and only for pages in
Replay view.
Chapter 12. Browser Based Replay Interface
201
Table 23. Navigation pane hierarchy (continued)
Icon
Term
Description
Page
v The title of the UI event provides
some information about the event
that occurred.
continued
v If the session is captured by using
a Logging Framework from IBM
Tealeaf CX Mobile for Mobile App,
there are no page numbers, as
sessions for mobile native
application sessions do not contain
viewable pages. Red text indicates
a hit that either returned an error,
such as HTTP 400+ or 500+, or a
request that the visitor canceled
before it completed loading.
Caret
Click to display the sub-page that is
associated with this page.
ScreenView
A Tealeaf-specific term, a ScreenView
is defined as a state or stage of a
single URL. Some web applications
can contain multiple sets of user
interaction objects that are referenced
from the same URL. For example, a
page on your web application may
contain multiple tabs, in each of
which the visitor performs separate
discrete actions. For tracking
purposes, you can group user actions
by the tab in which they occurred by
using the Tealeaf Screen Views.
v Screen Views are displayed in BBR
only. These subpages are not
available for display in RTV.
ScreenView tracking requires the
deployment of a Tealeaf client
framework. For more information:
202
IBM Tealeaf cxImpact: cxImpact User Manual
Table 23. Navigation pane hierarchy (continued)
Icon
Term
Description
UI Event
A UI event is any user interface event
that is captured from the visitor's
client by using one of the Tealeaf
client frameworks. For mobile native
and AJAX-based applications, for
example, some user interactions do
not generate a request and
corresponding response from the
server. Using Tealeaf client
frameworks, you can capture these
types of user interface events and
actions and submit them for capture
and processing to Tealeaf.
Note: Click events are fired after the
HTML for the rendered page is
stored. For the last click event on the
page, the click event can be delayed
until any configured UI custom
highlighting is applied.
Note: Orientationchange, touchstart,
touchend, and scroll UI Events do
not replay if you did not installed or
configured the CX Mobile licence.
Although they are present in the
session data, events of the following
types are not displayed in the
Navigation List:
v load, unload, attention, scroll,
and resize.
v ClientState events that are
submitted from UI Capture
UI event tracking requires the
deployment of a Tealeaf client
framework. For more information:
Related reference:
“Navigation Pane” on page 198
Navigation pane columns
By default, the navigation pane is sized to show only some of the available
columns on the left side of the screen. As needed, you can click and drag the right
side of the navigation pane to display the other columns of information.
Column
Description
Page
The page and its associated subpages.
Title
Title of the page as reported in the data
Time Stamp
The time stamp when the page was captured
Chapter 12. Browser Based Replay Interface
203
Gen Time
The time that it took to generate the response
Net Trip
The network transit time to send the response
Round Trip
The network transit time to send the request and return the response
Response Size
The size of the response in bytes
Status The HTTP status code for the response.
v A status code of 200 means that all is well
Related reference:
“Navigation Pane” on page 198
Navigation pane tools
The following tools are available in the Navigation pane toolbar.
Table 24. Navigation pane tools
Icon
Tool
Description
Page List
Click to display the full list of pages in the
session, which additional details.
v See “Page List” on page 188.
Hide
Click to hide the left navigation pane.
v To show the pane again, select Options
drop-down > Options > Show Sidebar.
Filter By
Click to select filtering options for the
Navigation pane, as they are specified in
Sub-Search.
Related concepts:
Chapter 14, “Sub-Search in BBR,” on page 217
Related reference:
“Navigation Pane” on page 198
Other panes
The following panes can also be displayed on the left side of BBR below the
Navigation pane.
v Events Pane
v Form Fields Pane
The options to toggle the display of the above panes are available through the
Options menu.
Related reference:
“Events Pane” on page 206
“Form Fields Pane” on page 209
204
IBM Tealeaf cxImpact: cxImpact User Manual
Navigation context menu
The following menu commands are available in the context menu for the
Navigation pane.
When you select a page or subpage in the Navigation pane, the following options
can be displayed:
Command
Description
Replay
Display selected page in Replay view.
Note: This option is not available in Request and Response view if the
selected page or subpage cannot be replayed.
Request
Display selected page in Request view.
Response
Display selected page in Response view.
For Tealeaf administrators, the following items are displayed in the context menu
accessible through the Navigation pane.
Note: To configure replay rules, you must be a member of one of the following
admin groups:
v Admin Group
v cxReveal Admin
v cxView Admin
Using replay rules, you can apply changes to the content before it is displayed in
the screen. Replay rules can be used to remove pages from replay, suppress display
of replayed pages, and more.
Note: Replay rules that are configured in BBR are saved to the replay server,
where they are applied to all Tealeaf users during replay. These replay rules do not
apply to a specific user or to a specific session.
Tealeaf administrators can also configure replay rules by using the Portal
Management page.
v For more information about replay rules in general, see RealiTea Viewer - Replay
Rule.
Command
Description
Remove this page from replay
Marks the selected page to not be displayed in Replay view. While the
page is still displayed in the Navigation pane, it does not display replay.
To add the page back into replay, right-click the page after the one that is
removed in Navigation pane and select Delete rule which removes this
page from replay....
Chapter 12. Browser Based Replay Interface
205
Delete rule which removes this page from replay...
If a replay rule is lied to the page to remove it from replay, you can this
option to revert the removal from replay.
Treat this page as Highlight Only
You can instruct BBR to treat this page as containing highlighting
information only. The previous page in the Navigation list is displayed,
and the content of the selected page is applied as highlighting to the page.
Treat this page as a Popup Page
You can create a replay rule that instructs BBR to treat this page as a
popup window. During replay, a popup window can interrupt the flow of
replay and can cause some page data to fail to display.
Add Custom UI Event Highlighting...
When a UI Event entry is selected in the Navigation List, you can apply
custom highlighting to the selected element by specifying a JavaScript
function.
Open URL in browser
This option allows you to open the selected URL in a new browser.
Copy URL to clipboard
This option allows you to copy the URL to your clipboard so you can paste
it elsewhere.
Related concepts:
Chapter 15, “BBR Replay Rules,” on page 227
Related tasks:
“Replay View” on page 167
Related reference:
“Request View” on page 193
“Response View” on page 194
Events Pane
This pane displays a list of all events that are logged for the currently selected
page. Events are listed in the order of execution. It is only visible when the
Content pane is in Replay view.
206
IBM Tealeaf cxImpact: cxImpact User Manual
Figure 92. Events Pane
In the preceding image, you can see how event data is presented in the Event
pane.
For each line in an event listing:
v Event (n) - This line identifies the sequence in the session when the event fired,
after which is listed the event name.
Chapter 12. Browser Based Replay Interface
207
– The Icon: value indicates the file name of the icon that is displayed in session
lists and other reports for this event.
– You can display a chart that shows the counts of the event occurrences for
any day. Right-click the event entry and select Show Report.
v Event Occurrences in Session (n) - Indicates the number of instances of the event
on the page.
Value[Type] (n) - The recorded value of the event, including an indicator of the
type of value recorded (Numeric or Text).
v ReportGroup (n) - Parent node a report group that is associated with the event.
The number in parentheses is the report group identifier.
– The report group No Dimension Report Group is displayed as No Dimension
Report Group, and always has a report group index of 1.
– Fact(n)[Type] (n) - Indicates the fact into which the indicated value is
recorded. Multiple listings of the fact indicate that values were recorded more
than once.
v
- Beneath facts in report group other than No Dimension Report Group, you
can review the dimensions and their applicable values.
Related concepts:
“Event Reports”
Event Reports
When an event is selected, you can optionally generate an event chart of the report
that is displayed in BBR. Right-click the event entry in the Events pane and select
Show Report.
Figure 93. Event Chart
The displayed chart shows the counts of the selected event for each hour of the
current day.
v To change the size of the chart, click and drag from the lower-right corner of the
chart display.
– To revert to the default size, minimize the chart and then expand it again
through the toolbar.
208
IBM Tealeaf cxImpact: cxImpact User Manual
v To change the selected focus period, click the Calendar icon in the chart's
toolbar.
v You might specify a focus period that extends across multiple dates. Click the
start date, and then click the end date.
v You might also display data from a comparison range.
v To hide the report, click the Minimize icon in the toolbar.
v To close the report, click the X icon in the toolbar.
Form Fields Pane
Figure 94. Form Fields Pane
During replay, if the page displayed in the Content pane contains form fields, you
can review the form field names and the values that are entered by the visitor in
the Form Fields pane.
v Form field names are listed in alphabetical order.
true/false values typically indicate that a check box or radio button was
selected or cleared.
v This pane is only visible when the Content pane is in Replay view.
v
Form Fields menu
The following commands are available in the menu when items are listed in the
Form Fields.
Command
Description
Search Completed Sessions
Search the available completed sessions for the form field name.
Create New Event from
Create an event that detects the form field name in the session data.
Create New Hit Attribute from
Create a hit attribute that detects the form field name in the session data.
The Hit Attributes tab of the Tealeaf Event Manager is pre-populated with
values to match this item.
Chapter 12. Browser Based Replay Interface
209
Related concepts:
Chapter 11, “cxImpact Browser Based Replay,” on page 165
“Searching Session Data” on page 37
Session Statistics
Figure 95. Session Statistics
Along the bottom of the window is information about the session:
Statistic
Description
Session First Use
The first date and time stamp of the session.
Session Last Use
The last date and time stamp of the session.
Hit Count
The number of hits in the session.
Last Update
The date and time stamp of the last time that Browser Based Replay was
updated with session information, which is useful for identifying the
currency of your session data.
v For active sessions, this information updates when the page and
navigation lists are refreshed.
210
IBM Tealeaf cxImpact: cxImpact User Manual
Chapter 13. Tracking Interactions through BBR
As sessions are currently being experienced by visitors to your web application,
you can use Browser-Based Replay to track how they evolve in real time. You can
select the pages of active sessions like the pages of a completed session. As
needed, you can refresh the list of pages to see where the visitor is browsing in the
web application.
v In the Session List in the Portal, active sessions are denoted with a blue circle
marker in the leftmost column.
During replay, items that are displayed in the Events and Form Fields panes can be
highlighted in the session.
v You can also add annotations to active sessions.
Related concepts:
“Searching Session Data” on page 37
Shadow Browsing Live Sessions
If needed, you can follow along in real time as a visitor explores the website. This
"shadow browsing" feature enables close support of your customers and the
tracking of activities that are otherwise causing problems with the web application.
Note: Shadow browsing applies to active sessions only.
© Copyright IBM Corp. 1999, 2014
211
Figure 96. Refresh List
v To update the list of session pages through Browser-Based Replay, click the
). Results of the refresh are displayed so that you can monitor
Refresh icon (
the changes in the page list.
v During replay, active sessions are automatically refreshed every 60 seconds.
Replay Highlighting
During replay, you can monitor the visitor's clicked or entered data.
When replay highlighting is enabled, the elements that the visitor interacted with
are highlighted by a green border in Browser Based Replay.
Each type 4 message corresponds to a user action such as a click on a button or
text change in a text box.
Highlighting elements makes it easier to monitor and track clicked buttons,
selected links, and any form data entered by the web site visitor.
Replay highlighting and mobile gestures
Traditional highlighting in BBR is not supported for mobile gestures (type11
messages).
212
IBM Tealeaf cxImpact: cxImpact User Manual
Unlike type 4 messages, most type 11 messages do not contain UI element
information related to user actions such as swiping or pinching, because those
actions are not performed on an element, but rather on an area of the mobile
device screen.
For several mobile gestures, Tealeaf collects data from the area of the mobile device
screen that the visitor interacts with, not on the underlying UI element. Because of
the fundamental difference in how mobile device users interact with your web site
or application, Tealeaf does not apply the traditional green highlight border to
indicate when a gesture occurred. Instead, Tealeaf represents Gestures from a
mobile device by displaying animated hand icons on the Replay view.
Note: Only Type 11 gestures are shown with the hand icons. If a Type 4 UI event
is captured, and highlighting is enabled, Tealeaf uses the regular green border for
mobile sessions.
Related concepts:
“Replaying sessions from mobile visitors” on page 169
Adding Annotations
You can annotate specific pages during replay through BBR.
For example, if you are assisting a customer with a problem, you can mark the
page where the problem occurred for resolution by your web development team.
Any BBR user can add annotations.
Note: You cannot add annotations to a TLA session that you loaded into BBR.
To annotate a session page:
Note: You cannot add annotations to UI events pages, which are inserted by the
Tealeaf IBM Tealeaf CX UI Capture for AJAX.
Note: After an annotation is added, it cannot be removed.
1. In BBR, select the page that you want to annotate.
2. In the toolbar, click the Annotations (
3. The following dialog is displayed:
) icon.
Chapter 13. Tracking Interactions through BBR
213
Figure 97. Add Annotations
4. To add an annotation:
a. Enter the text of the annotation in the textbox at the bottom of the dialog.
v You can select from preselected values by using the drop-down indicator
next to the textbox.
v Tealeaf administrators can configure the list of preselected values.
b. Then, click Add Annotation.
5. The annotation text, your Tealeaf user ID, and the Time Stamp when it was
added are displayed in the Annotations popup.
Annotations are stored with the session data as annotation text and the author of
the annotation, like they are displayed in the Annotations dialog.
You can search for annotations through the Tealeaf Portal.
Related concepts:
“Searching Session Data” on page 37
Availability of Annotations through Search
After you add, edit, or delete an annotation, the session is queued for re-indexing.
When the session is re-indexed, changes to its annotations are now available for
search.
v If multiple changes are made to a single session, each change is queued. If
possible, the indexer re-indexes all changes at the same time.
214
IBM Tealeaf cxImpact: cxImpact User Manual
Note: Depending on the length of the queue at the time annotation changes are
saved, it can take a few minutes before the changes are available through search of
completed sessions.
Note: Since annotations must be indexed for search, you cannot search for
annotations in active sessions.
Locating Annotations
After you finish adding annotations, you can locate annotations in the session
through the Navigation panel, where a small yellow icon (
) is displayed next to
the Title of any page that has been annotated.
v In the BBR toolbar, the Annotation button is also highlighted when you select
the page in theNavigation panel that contains the annotation.
Finding Search Results in BBR
If you load the session in Browser-Based Replay from a session list of search
results, you can identify the pages where search terms are found through
theNavigation panel. Next to the Title of pages that contains search hits is
displayed a small red flag icon (
).
BBR Replay of Client User Interface Events
If you install and deploy the UI Capture JavaScripts into your web application,
Browser-Based Replay supports replay of client user interface events.
v UI Capture enables the capture of user interface events that occur on your
visitor's client browsers that would otherwise not be detected by Tealeaf. These
events are submitted to Tealeaf for capture, analysis, and replay. In BBR, replay
of client user interface events is managed by Replay Server, instead of your
browser. Replay Server renders the user interface event inside the browser
control on the server and then delivers the finished rendering to your browser
for display.
For example, suppose UI Capture captures a client user interface event in which
the following actions occur:
1. User selects a drop-down menu. Menu is displayed.
2. User makes a selection from the menu.
In BBR, the captured UI event is displayed as a static page in which the user
makes the selection from the menu.
Chapter 13. Tracking Interactions through BBR
215
216
IBM Tealeaf cxImpact: cxImpact User Manual
Chapter 14. Sub-Search in BBR
After you locate a session and opened it for replay in BBR, you can search the text
contents of the session to filter the displayed list of hits. Through Sub-Search, you
specify one or more search terms to examine text or specified fields in the request
of the session that is currently loaded in Browser Based Replay.
v Search terms can be strings or numeric values.
v For numeric values, ranged searches are supported.
When the Sub-Search is run, the Navigation List is filtered to display only the hits
in the session that match the Sub-Search criteria. Then, you can use theHit Details
window to further review the matches to locate the specific hit of interest.
v The maximum number of items or occurrences that are returned in a Sub-Search
is 10,000. There can be multiple items that are returned for an individual hit.
Related concepts:
“Sub-Search” on page 82
Searching for Sessions
Sub-Search operates only on sessions that are loaded into Browser Based Replay.
Before you begin, you must locate and replay a session.
v For more information about loading a TLA session file directly into BBR, see
"Session menu" in the IBM Tealeaf cxImpact User Manual.
Related concepts:
“Searching Session Data” on page 37
Defining a Sub-Search
To specify a Sub-Search of a session that is loaded in BBR, select Options >
Sub-Search. The following window is displayed.
Defining fields of a Sub-Search
1. To enable a search field, click the leftmost check box for a row, or make a
selection in the first column of options.
2. To specify a search field:
© Copyright IBM Corp. 1999, 2014
217
a. Specify the columns in the search field:
1) Column 1: Select a search location from the drop-down list. Depending
on the field you select, the Column 3 drop-down list is populated with
all available values in the session.
2) Column 2: Select the field operator. The available operators depend on
the type of location that is selected for Sub-Search.
3) Column 3: Enter or select the text string for which to search in the
available location, by using the specified operator.
v For text-only fields, you enter the value for which to search.
v For other fields, you select the value for which to search from the
drop-down list.
v Wildcards and regular expressions are not supported.
b. To match only items in the session data that match the search term exactly,
click the Match Case checkbox.
3. To add multiple search terms:
a. Specify the appropriate search operator in the drop-down in the upper-right
corner:
Operator
Description
OR
Any match of the specified search terms yields a matching hit.
AND
All of the specified search terms must occur on a hit to yield a
matching hit.
AND on same page
All of the specified search terms must occur on a single request or
response to yield a matching hit.
b. Click the checkbox next to the following row in list.
c. Specify each column for the search term, as described above.
Related concepts:
“Available locations for Sub-Search” on page 219
“Available operators” on page 220
Executing the Search
To run the Sub-Search, click Filter.
v When the results are returned, the Navigation List is filtered to show only the
matching hits.
v To review the details of the matching hits, click Hit Details.
Note: If you receive a data retrieval error when you run your search or attempt to
review the hit details, the BBR session can time out. In the BBR window, select the
address bar and press ENTER to refresh the session. Your filter operation can now
work. If the issue persists, contact your Tealeaf administrator.
Related concepts:
“Filtered Results” on page 222
Related tasks:
“Hit Details” on page 223
218
IBM Tealeaf cxImpact: cxImpact User Manual
Available locations for Sub-Search
In Sub-Search, you can specify the following locations for which to search for the
specified string.
v This list includes more fields than the session's request fields that are indexed
for search.
Note: To filter the list, begin typing the name of the section in the request where
the field you want is located. For example, entering env in the textbox limits the
list to only the [env] fields of the request.
Location
Description
Full Response Text
Search the entire response of each hit for the specified text.
Note: You can use this search field to search for specific error conditions
that are emitted from your web server to the visitor. For example, you can
search for error messages that generated when Replay Server was unable
to properly render the page. Enter Error rendering this page! in this
textbox.
Request Text
Search the indexed fields in the request of each hit for the specified text.
All Text
Search all available name-value pairs in the request and response text of
each hit.
HitType
Selected field is listed in the [HitType] section of the request. This data is
gathered and generated by Tealeaf.
TLFID_*
Available fields for an instance of an event and its associated dimension
values that are recorded in the hit.
appdata
Selected field is listed in the [appdata] section of the request. This data is
inserted by user-defined actions that are completed in the Windows
pipeline.
ExtendedUserAgent
Selected field is listed in the [ExtendedUserAgent] section of the request.
This data is inserted by the Tealeaf Reference session agent for user agent
detection.
env
Selected field is listed in the [env] section of the request. This data is
gathered and generated by Tealeaf.
iamie
Selected field is listed in the [iamie] section of the request. This data is
gathered and generated by Tealeaf.
timestamp
Selected field is listed in the [timestamp] section of the request.
v This section contains timestamp information that is gathered and
generated by the IBM Tealeaf CX Passive Capture Application.
Chapter 14. Sub-Search in BBR
219
urlfield
Selected field is listed in the [urlfield] section of the request. This data is
gathered and generated by Tealeaf.
HTTP_* These values represent headers that are submitted from the client.
v Some headers can be submitted by the IBM Tealeaf CX UI Capture for
AJAX solution.
TRANSFER_ENCODING
The transfer encoding defines the encoding character set used by the web
server to generate the response.
Related concepts:
“Event data fields”
Event data fields
For each event that occurred in the session, you can search for the event
occurrence's value or for specific dimension values that are associated with the
event. The fields that contain event data available in Sub-Search correspond to
entries inserted into the request when an event occurs.
The request data is in the following format:
Example Field
Description
TLFID_375TLFactValue
The Tealeaf event with internal identifier 375 was recorded. This field
contains its recorded value.
TLFID_375/TLDim1
This field contains the plain-text value of dimension 1, recorded when
event 375 occurred.
TLFID_375/TLDimHash1
This field contains the hashed value of dimension 1, recorded when event
375 occurred.
v Hashed dimension fields are stored to enable search for dimension
values that are longer than 32 characters. This data is not user-readable.
Available operators
The following operators can be available to use to search the selected location for
the specified string.
Note: Depending on the type of data that is specified for the search term, some of
the following operators are not available.
Operator
Description
contains
Search location contains the specified string.
does not contain
Search location does not contain the specified string.
matches
Search location matches the specified string.
220
IBM Tealeaf cxImpact: cxImpact User Manual
does not match
Search location does not match the specified string.
less than/equal to
For numeric values, the search location contains at least one value that is
less than or equal to the specified numeric value.
greater than/equal to
For numeric values, the search location contains at least one value that is
greater than or equal to the specified numeric value.
between
For numeric values, the search location contains at least one value that is
between the two specified values.
Searching active sessions
Sub-Searches can be applied to active sessions. Limitations:
1. The search is applied only against the pages, ScreenViews, and UI events that
are currently listed in the Navigation List.
Note: Before you define a Sub-Search against an active session, you must
refresh the list of pages by using the Refresh button in the toolbar.
2. Any actions that are not applied to a session until it is completed are not
searchable in the session. Events that are triggered on the Last Hit or End of
Session trigger cannot be displayed in an active session and are therefore not
searchable.
Chapter 14. Sub-Search in BBR
221
Filtered Results
After a Sub-Search is specified and run, the Navigation List is filtered to display
only the matching hits.
Table 25. Filtered Results.
Figure 98. Nav List before Sub-Search
Figure 99. Nav List after Sub-Search
Note: To refresh this list, you must re-execute the search.
Note: The filtered list is a flat list. ScreenViews and UI events can be included in
the list of hits.
You can use the Previous and Next icons in the toolbar above the main panel to
step through the filtered list of hits.
Navigation List toolbar
Table 26. Navigation List toolbar
Icon
222
IBM Tealeaf cxImpact: cxImpact User Manual
Title
Description
Page List
Opens the page list. See "Browser Based
Replay Interface" in the IBM Tealeaf
cxImpact User Manual.
Table 26. Navigation List toolbar (continued)
Icon
Title
Description
Hide
Hide the Navigation List panel.
v To re-display the Navigation List, select
View > Show > Sidebar. See "View
menu" in the IBM Tealeaf cxImpact User
Manual.
Filter By
Filter the Navigation List by the item that
is selected in the drop-down. See Filtering
the Navigation List.
Related concepts:
Chapter 12, “Browser Based Replay Interface,” on page 181
Navigation List toolbar
Table 27. Navigation List toolbar
Icon
Title
Description
Page List
Opens the page list. See "Browser Based
Replay Interface" in the IBM Tealeaf
cxImpact User Manual.
Hide
Hide the Navigation List panel.
v To re-display the Navigation List, select
View > Show > Sidebar. See "View
menu" in the IBM Tealeaf cxImpact User
Manual.
Filter By
Filter the Navigation List by the item that
is selected in the drop-down. See Filtering
the Navigation List.
Related concepts:
Chapter 12, “Browser Based Replay Interface,” on page 181
Hit Details
In the Hit Details popup, you can review the details of the hits that match the
Sub-Search results.
v To jump to the occurrence, double-click the row in which it is listed. TheHit
Details window closes, and BBR displays the matching page, ScreenView, or UI
event where the Sub-Search match occurs, in the current view: Request,
Response, or Replay.
Chapter 14. Sub-Search in BBR
223
Figure 100. Hit Details of matching Sub-Search hits
Column
Description
Page
The page in the full session where the match was found
Note: Values of -1 in this column indicate that the page cannot be
displayed.
Location
The location in the hit where the match was found
Term
224
The search term that was found
IBM Tealeaf cxImpact: cxImpact User Manual
Context
The byte number in the request or response where the matching text was
found, followed by the contextual information that surrounds the matching
string
Note: You can use the text of the Context column to locate other sessions
with the same text pattern:
1. Highlight the text of interest. Do not highlight the byte number.
2. To copy the text, press CTRL + C. The text is copied.
3. To go to the Search page, select Search > Completed Sessions from the
Portal menu.
4. Paste the text into the appropriate field.
v See "Searching Session Data" in the IBM Tealeaf cxImpact User Manual.
Hit Details context menu
The following menu commands are available in the context menu from the Hit
Details window.
When you select a page in the Hit Details window, the following options may be
displayed:
Command
Description
Replay
Display selected page in Replay view.
Request
Display selected page in Request view.
Response
Display selected page in Response view.
For Tealeaf administrators, the following items can also be displayed in the context
menu.
Note: To configure replay rules, you must be a member of one of the following
admin groups:
v "CX User Administration" in the IBM Tealeaf cxImpact Administration Manual:
Admin Group
v "cxReveal User Administration" in the IBM Tealeaf cxReveal Administration
Manual: cxReveal Admin
v "cxView User Administration" in the IBM Tealeaf cxImpact Administration Manual:
cxView Admin
Using replay rules, you can apply changes to the content before it is displayed in
the screen. Replay rules can be used to remove pages from replay, suppress display
of replayed pages, and more.
Note: Replay rules that are configured in BBR are saved to the replay server,
where they are applied to all Tealeaf users during replay. These replay rules do not
apply to a specific user or to a specific session.
Tealeaf administrators can also configure replay rules through the Portal
Management page.
Chapter 14. Sub-Search in BBR
225
Command
Description
Remove this page from replay
Marks the selected page to not be displayed in Replay view. While the
page is still displayed in theHit Details window, it does not appear during
replay.
v To add the page back into replay, right-click the page after the one that
has been removed in the Hit Details window and select Delete rule
which removes this page from replay....
Treat this page as Highlight Only
You can create a replay rule that instructs BBR to treat this page as
containing highlighting information only. The previous page in the list is
displayed, and the content of the selected page is applied as highlighting
to the page.
Treat this page as a Popup Page
You can create a replay rule that instructs BBR to treat this page as a
popup window. During replay, a popup window can interrupt the flow of
replay and can cause some page data to fail to display.
Related concepts:
Chapter 12, “Browser Based Replay Interface,” on page 181
Chapter 15, “BBR Replay Rules,” on page 227
Sub-Search in RTV
You can also complete searches within sessions through the IBM Tealeaf CX
RealiTea Viewer, the desktop client for searching and replaying sessions.
226
IBM Tealeaf cxImpact: cxImpact User Manual
Chapter 15. BBR Replay Rules
To enable the highest fidelity replay without impacting the origin server or servers
of your web application, you can configure and deploy replay rules.
A replay rule is a modification to the session data during replay so that the replay
looks as close as possible to the original experience of your web application's
visitor. For example:
v The captured session data can contain references to a server that is not available
from where Tealeaf users are replaying the session. So, you must configure a
replay rule to modify URLs pointing to the origin server to point to a different
server.
v If the session is from an application that requires authentication, an
unauthenticated Tealeaf user can generate a significant number of Status Code
401 - Access Denied errors during replay. Using a replay rule, you can instruct
BBR to ignore or remove these pages during replay.
v The session can reference an external JavaScript file, which you may or may not
want to reference during replay. You can configure replay rules to suppress the
JavaScript file or to modify it so that it works effectively during session replay.
There are many more uses for replay rules. In the sections below, you can review
the replay rules that can be configured through the Replay Server to be applied to
all Browser Based Replay sessions.
Note: Replay rules do not change the stored session data. They are applied only
during replay by the Replay Server to the data that is passed to Browser Based
Replay for display to the Tealeaf user.
Note: The quality of session replay is dependent upon the nature of the web
application. Websites that employ sophisticated display technologies or rely on
client user interaction events can require significant customization of the common
replay profile and replay rules.
Overview
Replay rules that apply to BBR can be configured in the following locations:
1. Replay Server: Through the Portal Management page, you can select the master
Replay Server and configure replay rules through the GUI. Changes to the
replay rules from the master Replay Server are automatically forwarded to any
slave Replay Servers, so that all servers are using the same set of rules.
2. Browser-Based Replay: When you have a session that is loaded into BBR, you
can use the context menus to create replay rules that are based on specific,
highlighted data in the currently loaded session.
3. IBM Tealeaf CX RealiTea Viewer: If you must configure replay rules that are
not supported through the BBR or Replay Server interfaces, you can download
and install the IBM Tealeaf CX RealiTea Viewer desktop application, which can
be used to search and replay sessions from your local desktop. When changes
are made to replay rules through RTV, they can be synchronized with the BBR
replay rule set.
© Copyright IBM Corp. 1999, 2014
227
4. Configuration File: For Tealeaf users who are comfortable working with XML,
you can configure replay rules in the native XML format by accessing the
configuration file on the master Replay Server.
Note: Tealeaf does not recommend configuring replay rules through the XML
file, as no data validation is completed on the edited file. Where possible, use
the user interface methods for configuring replay rules.
Related concepts:
“Replay Rule Configuration through the Replay Server” on page 241
“Replay Rule Configuration in BBR” on page 234
“Replay Rule Configuration in RTV” on page 245
“Replay Rule Configuration File” on page 245
Required Access
Note: To create or modify replay rules for BBR, you must have access to the Portal
Management page (Tealeaf > Portal Management in the Portal menu). For more
information, contact your Tealeaf administrator.
Although it is not recommended, you can configure replay rules in XML format by
using the configuration file that is available on the Replay Server.
You must have command-line write permissions on the server that hosts the
Replay Server.
Related concepts:
“Replay Rule Configuration File” on page 245
RTV
In many cases, the original replay rule was developed for use with the IBM Tealeaf
CX RealiTea Viewer. RTV is a desktop application for locating and replaying
sessions.
Many of the sections in the BBR replay rules area reference corresponding content
in the Realitea Viewer manual.
Replay Rule Types
Tealeaf supports the following types of replay rules.
In the table below, you can determine whether the rule is supported for
configuration through the Replay Server, BBR, or RTV.
v Links are provided to additional documentation on each replay rule type. In
some cases, the best documentation is available in the "RealiTea Viewer (RTV)
User Manual" in the IBM Tealeaf RealiTea Viewer User Manual.
228
IBM Tealeaf cxImpact: cxImpact User Manual
Table 28. Replay Rule Types
Rule Name
XML Node
Description
Popup Page
PopupURL
PopupURL marks pages as popup, so
they are not used for highlighting.
This rule is available in the BBR Rule
Profile Editor.
You can create a regular expression to
match URLs that you do not wish to
display in the Navigable Pages List or
during replay.
Remove this page from Replay
HighlightonlyURL
HighlightOnlyUrl
For AJAX-based pages, you can
configure a page to apply highlighting
only to the content retained from the
previous page. In this manner, you
can simulate the application and the
capture of UI events.
This rule is available in the BBR Rule
Profile Editor.
Ignore ReqVar for URL Match
IgnoreReqVarForURLMatch
During replay, the replay client
attempts to match requests to
responses in the session data. In some
cases, you can improve matching by
providing a URL pattern, which is
used to remove request variables,
such as timestamp information, from
the set that is used to match the
request to the response.
This rule is available in the BBR Rule
Profile Editor.
ResponseMod
ResponseModify
ResponseModify rules are used to
complete special modifications to the
response to enhance the replay that is
displayed to the Tealeaf user. For
example, you can configure a
ResponseModify rule to disable
JavaScript used to break their pages
out of frames.
This rule is available in the BBR Rule
Profile Editor.
External File Modification
ExternFileModify
ExternFileModify rules can be
configured to complete additional
processing to external files that can
interfere with replay.
This rule is available in the BBR Rule
Profile Editor.
Chapter 15. BBR Replay Rules
229
Table 28. Replay Rule Types (continued)
Rule Name
XML Node
Description
Dynamic Response Modification Rules
DynResponseMod
When replaying a session that
includes data that is delivered from a
third party, the contents from the
third party must be associated with a
specific request. If the third-party
content is required to accurately
represent the customer's experience, a
dynamic response modification rule
must be configured to acquire the
content at replay time.
Dynamic External File Modification
Rules
DynExternalFileMod
If the main page loaded into RTV
references a separate file that is not
part of the session, the file may
require modification before it is
loaded into RTV. For example, if a
JavaScript file referenced by a page in
a session contains a domain reference,
that reference can result in a
JavaScript error during replay. You
can design dynamic external file
modification rules to apply to the
referenced JavaScript file that modify
the file before it is loaded into RTV.
Remove this page from Replay
IgnoreURL
IgnoreURL removes pages that should
not be replayable from the Viewable
Pages list.
This rule is available in the BBR Rule
Profile Editor.
Host Remap
RemapHost
RemapHost remaps the host that is
named in the HostProfile node to
some other host. For example, you
can use this mapping to replay
session data from a backup server,
instead of the origin server, which can
impact usage metrics.
This rule is available in the BBR Rule
Profile Editor.
Portal Remap
RemapPort
RemapPort remaps the port number
of the host that is named in the
HostProfile node to some other port
number.
This rule is available in the BBR Rule
Profile Editor.
Host Protocol
Protocol
Protocol forces the protocol to a
specific value: auto, http, https.
This rule is available in the BBR Rule
Profile Editor.
Frame Rule
230
FrameRule
IBM Tealeaf cxImpact: cxImpact User Manual
FrameRule is used to force a URL to
alway load into particular frame
Table 28. Replay Rule Types (continued)
Rule Name
XML Node
Description
BlockedURL
BlockRemoteURL
If needed, you can specify a URL or
set of URLs that are prevented from
reaching out to the origin server. If
the replay client is unable to locate
the response in the session data, no
effort is made to reach the origin
server for the missing content.
This rule is available in the BBR Rule
Profile Editor.
New Host
HostProfile
Add a host to monitor. The name of
the host must be the full domain
name of it (for example,
www.example.com. Each host has its
own set of profile rules, so you must
add or copy rules from any existing
host to the new one.
This rule is available in the BBR Rule
Profile Editor.
Whitelist Rule
whitelistName
By default, the Replay Server operates
in Blacklist mode, in which all URLs
are permitted to contact the origin
server. In many environments, this
ability to touch the origin server
during replay is not desirable or even
permitted. In Whitelist mode, you can
configure URL patterns that are
permitted to contact the origin server,
and all other URLs are blocked.
This rule is available in the BBR Rule
Profile Editor.
Custom UI Event Highlighting
UIElementCustomHighlight
Replay Rule for UI Events: For the
selected UI event, you can add or
modify custom highlighting rules.
These rules can be used when the
element being highlighted needs
special handling, such as calling a
javascript function for some custom
control. They can also be used for
debugging or alerting purposes when
specific user actions or values is
displayed in a session.
This rule is available in the BBR Rule
Profile Editor.
Ignoring UI Elements during Replay
Replay Rule for UI Events
Replay Rule for UI Events: You can
choose to ignore selected UI elements
during session replay. When this
option is selected, the following
dialog is pre-populated with the
regular expression pattern to identify
the UI element.
Chapter 15. BBR Replay Rules
231
Table 28. Replay Rule Types (continued)
Rule Name
XML Node
Description
Keystroke Breakouts
Replay Rule for UI Events
Replay Rule for UI Events: UI
Capture supports the capture of
Intellisense keystrokes as UI events.
Keystrokes applied with UI elements,
such as textboxes and form fields, are
bundled together into a single UI
event for capture. To support
appropriate replay of the visitor
experience, RTV can be configured to
break out these aggregated keystroke
events into individual UI events for
each keystroke. When keystrokes are
broken out in RTV, you can see the
characters that are displayed in the
order that the visitor entered them.
Remap URL
232
IBM Tealeaf cxImpact: cxImpact User Manual
You can use the remapping URL
feature to remap the URL of content
external to the captured pages of a
session to a new destination.
Remapping URLs is commonly used
in situations where the external
content is not available or accessible
from the original site, and a copy is
made on another server to which you
can remap the URL.
Table 28. Replay Rule Types (continued)
Rule Name
XML Node
Description
PatchResponseWithPostValue
PatchResponseWith PostValue
This rule allows you to set up
patterns in the request, from which
values are grabbed. These values are
patched in the response. This work is
handled by the plug-ins, since the
type of the data can vary, and each
plug-in best knows its data type.
This rule has several attributes.
requestValue - Use this attribute for
query string values, or values where
the plug-in parses and 'flattens' the
request into name-value pairs. This is
a simple string match, not a regex.
Use this attribute or requestPattern,
not both.
requestPattern - Use this attribute for
request body values. This is a regex
pattern, which is used on the raw
request body as a whole. Use this
attribute or requestValue, not both.
When responsePattern is empty, this
pattern is used as the response
replacement pattern.
responsePattern (optional) - Use this
attribute when the response
replacement pattern needs to differ
from requestPattern.
You can also use this rule when a
value in a query string needs to be
patched into a jsonp response. The
responsePattern attribute is used to
specify what to replace in the
response.
This rule is available in the BBR Rule
Profile Editor.
MobileMod Rule
MobileMod
MobileMod Rule corrects the
dimensions of mobile devices that are
based on user agent information
during Replay.
This rule is available in the BBR Rule
Profile Editor.
Related concepts:
“Treat this page as a Popup Page” on page 235
“Removing pages from replay based on a request field” on page 236
Chapter 15, “BBR Replay Rules,” on page 227
“Host-Port Remapping” on page 239
“Protocol” on page 242
“Custom UI Event Highlighting” on page 239
Chapter 15. BBR Replay Rules
233
Related tasks:
“Selecting Replay Rules to Modify” on page 242
Related reference:
“White List Rules” on page 244
Replay Rule Configuration in BBR
You can configure browser based replay rules in the navigation list, main panel,
load details, or Options Menu.
In Options menu
In the Options menu, you can access the Rules Profile Editor and view suggested
rules.
Rules Profile Editor
In Browser-Based Replay, you can use the Rules Profile Editor to view your list of
existing rules. You can add rules, delete rules, edit rules, rename rules, and view
properties. You can also edit the raw XML for the rules and view the rules history.
The Rules Profile Editor in Browser-Based Replay supports the following rules:
v Host or Domain
v IgnoreURL
v PopupURL
v Host Remap
v Portal Remap
v
v
v
v
v
v
Host Protocol
ResponseMod
HighlightonlyURL
Custom UI Highlight Rule
BlockedURL
PatchResponseWithPostValue
v Whitelist Rule
v MobileMod Rule
v IgnoreReqVar for Matching URL
Click Options > Replay Rules > Edit Rules Profile to open the Rules Profile
Editor.
Suggest Rules
If you have Admin privileges, you can view and apply suggested rules for a
Microsoft AJAX-based session from the Options menu.
You can also view and apply suggested rules to block or ignore third party calls to
clean up the replay experience so that you only see what is viewable and
necessary. Ingore URL removes the page from the navigation list and replay. Block
URL does not allow the Replay Server fetch the data from third-party Origin site.
234
IBM Tealeaf cxImpact: cxImpact User Manual
Click Options > Replay Rules > Suggest Rules to open a dialog with suggested
rules for the loaded session. Suggested rules are displayed in an expandable tree
view. You can apply all of the suggested rules or select some of the rules you want
to apply. Once you selected the rules to apply, click Apply Rules to apply the rules
to Replay Server. The session reloads with the new rules applied.
In Navigation List
Depending on the current selection in the Navigation List, you can apply the
following replay rules to the current page.
Context menu option
Description
Remove this page from replay
For more information about creating this type of rule, see related links at
the bottom.
Treat this page as Highlight Only
For more information about creating this type of rule, see related links at
the bottom.
Treat this page as a Popup Page
If needed, you can mark pages as popup pages so that BBR can adjust to
improve replay performance.
Add Custom UI Event Highlighting?
For more information about creating this type of rule, see related links at
the bottom.
Related concepts:
“Treat this page as a Popup Page”
Chapter 12, “Browser Based Replay Interface,” on page 181
“Highlight Only URLs” on page 243
“Custom UI Event Highlighting” on page 239
Treat this page as a Popup Page
A popup page is considered to be any page that the web application forces to be
rendered in a new browser window. During replay, BBR can have some difficulties
in displaying popup content, user interactions, and subsequent hits if it does not
know that specific pages are popup pages.
Figure 101. Treat URL as a Popup Page
Chapter 15. BBR Replay Rules
235
When this option is selected in the context menu, the URL of the current page is
automatically specified for you. As needed, you can use wildcards (* or ?) to
specify a set of URLs as popups.
In Main Panel
You can configure replay rules through the context menus in BBR. In Request,
Response or Replay view, you can select an item, right-click, and select one of the
following options.
Option Description
Remove page from Replay based on request field
Based on a field included in the request, you can selectively remove the
page from display during replay.
Note: This selection is available only if text is selected in Request view.
Test Response Modify Rules
Through this dialog, you can review and test any response modify rules
that are applicable to the current page.
Note: This selection is available in Response view only.
UI Event Custom Highlight
When a UI event is selected in the Navigation List, you can add or modify
custom highlighting rules to be applied to the user interface event.
Note: This selection is available through the context menu when you select
a UI event in the Navigation List.
Host/Port Remapping
From the Load Details screen, you can configure host/port remapping
rules.
Related concepts:
“Removing pages from replay based on a request field”
“Custom UI Event Highlighting” on page 239
Chapter 12, “Browser Based Replay Interface,” on page 181
Related tasks:
“Testing BBR Response Modify rules” on page 238
Removing pages from replay based on a request field
Through BBR, you can choose to remove one or more pages that are based on the
URL pattern, request variable parameters, or both. By removing pages that are
based on request variables, you can significantly remove the replay experience.
Note: Pages that are removed from replay are not removed from the session data.
You can still search for and report on these pages.
Note: If your site responds to multiple HTTP_HOST values, you must manually edit
the profile to ensure that the ignore rule is correctly recorded against all
server_name values.
For example, you can choose to remove from replay pages that are permanently
moved or are redirect pages, which are determined based on specific values for the
StatusCode request variable.
236
IBM Tealeaf cxImpact: cxImpact User Manual
Note: This selection is available only if text is selected in Request view.
Figure 102. Remove pages from replay based on a request field
StatusCode=301 indicates a page is moved permanently. In the example, when the
URL matches /store/index.php/electronics/cellphones/ and the StatusCode
request variable in the [env] section is set to 301, then the page is removed from
replay.
In the preceding dialog, you can specificy exact values, and also patterns of values.
Parameter
Description
Request variable name
In these fields, you must specify the request variable section and variable
name on which to match pages for removal from BBR replay.
v The request variable section must be specified.
v Wildcards are not permitted.
Request variable value
For additional specification, you can enter a specific value for the request
variable on which to match. In the previous example, a request variable
value must be included, or all hits that contain StatusCode entries are
dropped from replay, which would remove all valid hits that are returned
from the web server.
v Specifying this parameter is optional. If it is not specified, all values are
matched.
v When you specify values, you can use the standard wildcards: ? to
replace a single character, and * to replace multiple characters.
URL
You can use this field to specify whether the replay rule is applied to a
specific URL or a pattern of URLs. If this value is not specified, the replay
rule is applied across the entire domain.
v Specifying this parameter is optional. If it is not specified, all values are
matched.
Chapter 15. BBR Replay Rules
237
v When you specify values, you can use the standard wildcards: ? to
replace a single character, and * to replace multiple characters.
Related concepts:
“Replay Rule Configuration File” on page 245
Testing BBR Response Modify rules
Through BBR, you can review the Response Modify rules that are applied to the
current page and test them as needed by using the current hit as test data.
Note: This selection is available in Response view only.
Note: Through BBR, you can review rules only. Response Modification rules are
created through the Portal Management page.
Figure 103. Test Response Modify rules
In the Test Response Modify Rules dialog, you can review the number of rules that
are applied to current URL and then complete tests by using those rules and
review the test results.
To test applicable Response Modify rules:
If the Rules Applying to this Page count is greater than 0, you can:
1. In the Test Response Modify Rules dialog, click Test.
2. If changes are applied to the response based on the tested rules, the number of
changes is listed under Test Results.
v To view the modified response, click View.
v To view a text-based diff display of the changes, click Diff....
Related concepts:
“Response Modification” on page 244
238
IBM Tealeaf cxImpact: cxImpact User Manual
Custom UI Event Highlighting
For the selected UI event, you can add or modify custom highlighting rules. These
rules can be used when the selected element requires special handling, such as
calling a JavaScript function for a custom control. Custom highlighting rules can
also be used for debugging or alerting purposes when specific user actions or
values are displayed in a session.
Note: Custom UI event highlighting applies to UI events captured from the
visitor's browser through UI Capture.
Option Description
Element ID
The element ID is pre-populated with the unique identifier for the selected
event through element ID or XPath.
v You can modify theElement ID field to use a regular expression, if
needed, for matching multiple elements.
function
In the dialog, you can specify the function that is evaluated by BBR for
purposes of highlighting this element. During evaluation, no setting of
values, highlighting or clicking is performed.
v Tealeaf provides a set of references that you can use in your JavaScript
function.
Note: Custom UI event highlighting works exactly like the RTV version.
In Load Details
When the Load Page Details screen is displayed, you can configure the following
rules from the context menu.
Host-Port Remapping
You can configure BBR to pull static content that is referenced in the session data
from a different host, port, and protocol as needed.
Chapter 15. BBR Replay Rules
239
Figure 104. Host/Port Remap
In the preceding screen, you can specify how host names and port numbers in the
session data are translated to other values. You can also specify an explicit
HTTP/HTTPS protocol to use.
Hostname: Select the host name from the list of available ones.
v To add a host name, click Add Hostname. Enter the host name in the form of
www.example.com.
v To complete no remapping for the selected host name, click the No Remapping
check box. This setting enables the remapping of port numbers and protocols
without redirecting to a new server.
v To remap the host to a different one, click the Remap Host to check box and
enter a new host name in the form of www.example2.com.
Remaps ports to: For the selected host name, you can remap ports that are
detected in the session data to new ports on the destination host.
v To add a port number to remap, click Add Port. Enter the port to remap from
and the port to which to remap. Click OK.
– To remap to the default HTTP port, set the remapped value to 0.
v To remove a port remapping, select it in the list and click Remove Port.
Protocol: For the selected host name, you can change the protocol to use when you
contact the remap host: Auto (default), Always http, or Always https.
240
IBM Tealeaf cxImpact: cxImpact User Manual
Host/Port remapping is also supported in replay through IBM Tealeaf CX RealiTea
Viewer.
Validating the syntax and pattern matching of a regular
expression
As an administrator, you can validate the syntax and pattern matching of a regular
expression by using the Regex Matcher utility.
The Regex Matcher utility provides administrators with a way to:
v practice writing strings
v test that a regular expression is valid and able to be used for advanced replay
rules.
Note: Regex Matcher does not test the expression on the Replay sever. The
primary purpose of this utility is provide a way for you to practice writing strings
and to test for pattern matching in the response.
To validate the syntax and pattern matching of a regular expression:
1. Access the Regex Matcher utility.
To access Regex Matcher from the IBM Tealeaf CX menu bar:
a. Select Options > Replay Rules > Edit Rules Profile.
b. From the Rule Profile Editor, select New > Add ResponseMod.
Note: For Mobile sessions, select New > Add MobileMod.
To access Regex Matcher from a response message in the view area of BBR:
a. Highlight a text string in the response that you want to remove.
b. Right-click and select Create Response Modify Rule.
The Create Response Modify Rule dialog box is presented.
2. In the Create Response Modify Rule dialog box, enter the text for the rule if it
has not been pre-filled.
3. To test for a valid regex, click the Test.
4. To test pattern matching, enter text in the Test pattern field.
If the pattern matches, the background color in the Test pattern field display in
green.
Figure 105. Matching Pattern
Replay Rule Configuration through the Replay Server
The Replay Server supports the creation of a custom set of replay rules to apply to
BBR sessions. These rules are managed by the master Replay Server, which
publishes them on request to the other slave Replay Servers.
If you are deploying white lists in an environment with multiple Replay Servers,
additional configuration is required.
Chapter 15. BBR Replay Rules
241
Selecting Replay Rules to Modify
To modify replay rules for domains that are monitored by Tealeaf:
1. In the Portal menu, select Tealeaf > Portal Management.
2. The Portal Management page is displayed. In the left navigation panel, click the
Manage Servers link.
3. Select the master Replay Server.
Note: You can configure replay rules only on the master Replay Server, which
provides rules to all slave servers.
4. Click Rules in the toolbar. This option is available only for the master Replay
Server.
5. The Replay Rule Domains panel is displayed at the bottom of the screen.
v To add a domain, enter the domain in the space that is provided and click
Add. Use the following format for the domain name:
www.<domain_name>.com
v To edit the replay rules for an existing domain, select the domain, and click
the Edit link.
v To delete replay rules for a domain, select the domain, and click the Delete
link.
Related concepts:
“Editing replay rules”
Editing replay rules
When you edit replay rules, you can populate new rules by using the following
commands.
v To add a rule, complete the appropriate properties and click Add.
v To delete a rule, click the Delete link next to its name.
v To load the properties from the rule into the appropriate textboxes for editing,
click the Load link. Saving a loaded rule replaces it.
The following replay rules can be configured through the Portal.
Note: When you enter URLs for replay rules, protocol identifiers, such as http://
or https://, are not needed. You can specify the protocol to use for all replay rules
or allow the Portal to resolve.
v Port identifiers such as :8080 and :443, are not applicable and must not be
entered.
Related concepts:
“Protocol”
Protocol
Select the Protocol in use from the drop-down. Set this value to Auto so that replay
server detects the appropriate protocol to use.
242
IBM Tealeaf cxImpact: cxImpact User Manual
Ignored URLs
You can configure the Replay Server to ignore specific URLs during replay. URLs
matching the parameters that are specified here are not displayed during replay.
Property
Description
URL
The URL to ignore. This value is concatenated with the value for the
domain to produce the full path to be ignored.
v The URL can include the wildcard character (*) to represent a pattern of
URLs, such as /home/*.
Request variable
Optionally, you can specify a variable in the request with which to match a
URL. Matches of this variable are not replayed.
Request Variable Value
Optionally, you can specify a value for the Request variable in the request
with which to match a URL. Matches of this value are not replayed.
Highlight Only URLs
The Replay Server can be configured to highlight only the URLs that match the
parameters that are specified here.
Property
Description
URL
The URL to be highlighted. This value is concatenated with the value for
the domain to produce the full path.
v The URL can include the wildcard character (*) to represent a pattern of
URLs, such as /home/*.
Request variable
Optionally, you can specify a variable in the request with which to match a
URL. Matches of this variable are highlighted.
Request Variable Value
Optionally, you can specify a value for the Request variable in the request
with which to match a URL. Matches of this value are highlighted.
Chapter 15. BBR Replay Rules
243
Host/Port Remapping
v To add a host to track, enter the host name in the Host textbox. Then, click Set.
v To map a port for the selected host, enter the port to map and then enter the
port to which it is mapped. Click Add.
Property
Description
Host
This host name is used instead of the host pulled from the domain of the
session. Since the host is used for the <base> to indicate the source of the
content, this value can be used to remap the content in the session to a site
other than the original site For example, if the original site is obscured by
proxies, this setting can be used to remap to a static, available resource. It
can also be used to map to an available server within the proxy from
which images and other content can be loaded.
Port
The port to remap.
Maps To
The port to which remapped traffic is delivered.
Response Modification
If you want, you can modify content in the response by using simple
search-and-replace.
Property
Description
URL
The URL whose response you want to modify.
Pattern
The pattern for which to search in the response. The pattern can be
specified as a regular expression.
v Special regular expression characters (such as ( or )) must be escaped by
using a backslash. For example:
\(
Replacement
The replacement text for the found pattern.
Replace
The occurrences for which to make the replacement.
White List Rules
By default, the Replay Server operates in Blacklist mode, in which all URLs are
permitted to contact the origin server. In many environments, this ability to touch
the origin server during replay can not be desirable or even permitted.
In Whitelist mode, you can configure URL patterns that are permitted to contact
the origin server, and all other URLs are blocked.
Note: Whitelist mode must be enabled in each Replay Server in your environment.
Whitelist and Blacklist mode rules apply only if the Replay Server is not able to
satisfy the request for content from its local cache of objects or from a TLI Server
that is deployed in your environment.
Related concepts:
244
IBM Tealeaf cxImpact: cxImpact User Manual
“Configuring the Replay Server” on page 180
Regular expressions
When you enable Whitelist mode for the Replay Server, you can specify the set of
URLs that are permitted to contact the origin server through the Portal
Management page. Using regular expressions, you can specify a set of URL
patterns that are permitted to query the origin server during replay. For the listed
URL or URLs, the Replay Server references the data that is stored on the origin
server during replay.
v The URLs that do not match the whitelist are effectively blacklisted, which can
be used to protect the source application from triggering web analytics metrics
and Tealeaf data counts, among other things.
Note: Poorly specified regular expressions can significantly affect server
performance. See "Regular Expressions in the RealiTea Viewer" in the IBM Tealeaf
RealiTea Viewer User Manual.
Property
Description
Pattern
The pattern in URLs for the selected server. Matching URLs are permitted
to contact with the origin server. The pattern can be specified as a regular
expression.
v Special regular expression characters (such as ( or )) must be escaped by
using a backslash. For example:
\(
v If the pattern value is empty, the default pattern is used. This pattern
causes Replay Server to contact the origin server for image and static
content, which is not stored as part of the session data.
\.(jpg|jpeg|gif|css|js)$
Replay Rule Configuration in RTV
If you install the IBM Tealeaf CX RealiTea Viewer on your local desktop, you can
create replay during replay from data that is displayed in request or replay view.
Note: Replay rules that are created in RTV are applied to the local application only
by default. If you use RTV to create replay rules, you can choose to synchronize
your RTV replay rules with those rules maintained in the Replay Server for BBR.
See "Synching RTV Profile with BBR" in the IBM Tealeaf RealiTea Viewer User
Manual.
RTV can be configured to auto-suggest rules for AJAX-based replay.
Replay Rule Configuration File
Through the Replay Rules text file, you can use control host and port remapping,
custom page modification, and the fields in the session's requests that are used for
the URL, host name, and more.
v The RequestMapping node contains a standard set of entries that are found in the
session requests and rarely must be modified.
Chapter 15. BBR Replay Rules
245
v For an example replay rule profile, see "Example Profile" in the IBM Tealeaf
RealiTea Viewer User Manual.
Note: Tealeaf recommends using the Portal Management page to configure BBR
replay rules, as some data validation is completed before rules are permitted to be
defined.
The replay configuration is an XML file in the following location on the Replay
Server:
<Tealeaf_install_directory>\System\ReplayServerProfile.xml
Host and port remapping and other custom page modifications are applied to
sessions based on their host names. For example, to customize sessions from
www.sample.com, the following node must be displayed in
ReplayServerProfile.xml:
<HostProfile name="www.sample.com">
Within the HostProfile node, the follow entries control remapping:
<!-- RemapMode values: off, on, null -->
<RemapMode value=’on’ />
<RemapHost value="www.sample2.com" />
<!-- There can be multiple RemapPort nodes -->
<RemapPort valueIn="49191" valueOut="80" />
RemapMode toggles remapping, or it remaps a host to a null host, which can always
return a 404 status code on any request.
v With RemapMode enabled, the RemapHost node specifies the host name to which to
remap.
RemapPort is used to remap port numbers to other numbers. This value is needed
when images or other page elements are available on a port other than the port
number that appears in the captured data.
IgnoreURL specifies the URLs that must not be displayed in the NavList. It
supports the asterisk wildcard (*). In the following example, any URL matching
/path.axd with query parameters is ignored:
<IgnoreURL value="/path.axd?*" />
ResponseMod is used to apply regular expressions to response pages to alter them
as might be required for replay. For example, you might use it to disable a
JavaScript that forces a page to break from a FRAMESET if it finds itself in one.
The ResponseMod node has the following attributes:
<ResponseModify url=".*" pattern="top.location != location"
replacementString="0" occurrences="first" id="7"/>
PopupURL Similar to IgnoreURL rules, PopupURL rules can be used to identify
popup pages. BBR includes these pages in the NavList and displays them in the
main replay window.
246
IBM Tealeaf cxImpact: cxImpact User Manual
<PopupURL value="/path/popup.asp?*" id="3"/>
Note: PopupURL behavior is different in RTV. See "RealiTea Viewer - Profile
Options" in the IBM Tealeaf RealiTea Viewer User Manual.
ExternalFileModify These rules are used to modified external files that are
referenced in the response. In the following example, an external JavaScript file is
modified in order to change the value of this.fadeDuration from .8 to .001,
which causes the fade for the page to be much shorter.
<ExternalFileModify id="409"
url="/path/Details.js\?cache=.*"
pattern="this.fadeDuration = .8;"
replacementString="this.fadeDuration = .001;"
occurrences="all"/>
Related concepts:
“Replay Rule Configuration through the Replay Server” on page 241
Special Rules
You can review rules that can be applied to manage special or unusual situations
in replay.
On-Demand Privacy
As needed, you can configure privacy rules to be applied to sensitive data only
during replay, which enables the original session to retain the data for search and
reporting purposes. These privacy rules can be configured to block or mask
sensitive data without affecting the stored session.
On-Demand Privacy rules are applied through Search Server.
Replay Rules and UI Capture
If you deploy IBM Tealeaf CX UI Capture for AJAX by using the XML method of
submitting client-side events, you must configure special rules to make replay
work effectively.
Note: If you deploy a Tealeaf client framework solution to capture interactions for
a Javascript-based or AJAX-based web application, you must develop and apply
replay rules.
Disabling UI Capture: As needed, you can configure a replay rule to disable UI
Capture during replay.
Chapter 15. BBR Replay Rules
247
248
IBM Tealeaf cxImpact: cxImpact User Manual
Chapter 16. Step-based eventing
On the traditional, HTML-based web, user actions typically triggered a single
responding action from the web server. When you clicked a button, a form was
submitted. When you clicked a link, a new page was loaded. For applications built
on this framework, an individual event might occur only once per page.
In rich internet applications, however, this paradigm was altered. Many user
interactions on a page do not change the page itself. In fact, a user can complete
the same action of interest multiple times. For example, suppose that your web
application enables the entry of multiple addresses from a single form. When
Submit is clicked, the address data is submitted, and the form is cleared, enabling
another entry. In this case, the same event, SubmitAddress, can occur multiple times
on the same page. In Tealeaf, you want to be able to track all of these occurrences,
instead of just the first one.
Note: A primary usage for step-based eventing is to track events that may occur
multiple times on a single page.
Through step-based eventing, you can create Tealeaf events of these user interface
events that are generated by your rich internet application. In addition to creating
events from individual hits, you can also create events from steps, which are
individual user actions that are captured from the client application and submitted
to Tealeaf by using one of Tealeaf's client frameworks
v A step can be considered a "subhit" of a hit; a step reflects a discrete, trackable
user action, or a server-side action that does not result from a user action (such
as a redirect).
v Steps are captured by a client framework, which is bundled together, and
submitted as JSON messages to Tealeaf. These messages are then inserted into a
designated section of the request of the parent hit.
Step-based eventing enables the capture of multiple events from a single page of
your client application.
Note: Step-based eventing requires licensing, installation, and configuration of one
of the Tealeaf client frameworks, including IBM Tealeaf CX UI Capture for AJAX,
IBM Tealeaf CX Mobile Android Logging Framework, and IBM Tealeaf CX Mobile
iOS Logging Framework. Beginning in Release 8.5, new versions these frameworks
are required to enable step-based eventing. For more information, contact Tealeaf
Professional Services.
Note: IBM Tealeaf CX UI Capture for AJAX is only available to legacy users.
This information provides background information about client
framework-generated steps and step-based eventing.
Related concepts:
“Raw request body” on page 251
© Copyright IBM Corp. 1999, 2014
249
Overview
An overview of step-based events, including prerequisites, limitations, message
types, and example messages.
Pre-requisites
To create step-based events, the following components are required:
1. Tealeaf Release 8.5 or later
2. PCA Build 33xx. Tealeaf recommends using PCA Build 3330 at a minimum.
Note: Since PCA Build 3330, there were bug fixes and new features that can be
of interest to you, including the ability to capture IPv6 addresses and support
for new Linux platforms. See "Release Notes - PCA" in the IBM Tealeaf Release
Notes - Passive Capture Application.
You must be able to configure the capture of the application/json POST data
types through the IBM Tealeaf CX Passive Capture Application.
3. One or more of the Tealeaf capture solutions:
Table 29. Pre-Requisites
Solution
Description
Documentation
IBM Tealeaf
CX UI
Capture for
AJAX
Used to capture client-side user
interface events for AJAX-based
applications
"UI Capture for Ajax Guide" in the
IBM Tealeaf UI Capture for Ajax Guide
IBM Tealeaf
CX Mobile
Android
Logging
Framework
Used to capture client-side from
Android-based mobile native
applications
"Tealeaf Android Logging Framework
Reference Guide" in the IBM Tealeaf
Android Logging Framework Reference
Guide
IBM Tealeaf Used to capture client-side from
iOS-based mobile native applications
CX Mobile
iOS Logging
Framework
"Tealeaf iOS Logging Framework
Reference Guide" in the IBM Tealeaf
iOS Logging Framework Reference Guide
Limitations
The maximum length for selected values of text for attributes and events is 256
characters.
Sequence and distance events
Note: Distance and Sequence events operate on hits, not steps. As a result, the
distance between events on multiple steps of the same hit evaluates to zero (0).
Technical definition
A step is defined as a specially formatted JSON message that is submitted by the
Tealeaf client frameworks to represent a session state of a form field.
v Step messages can contain any type of data. The data depends on the specific
client framework that is sending the message.
v A step contains UI events from a single session only.
v In Tealeaf, these messages are submitted in JSON format and are not easy to
decipher in raw format.
Related concepts:
250
IBM Tealeaf cxImpact: cxImpact User Manual
“Example messages”
Message types
Events that are captured from client frameworks are bundled together and
submitted as a set of messages. A message from a client framework is what defines
a single step in Tealeaf, which is a single event that is identified and captured by a
client framework.
Multiple messages can represent a single action of the visitor. For example, clicking
a radio button might result in two messages of different types: one for the click
event and one for change event.
Note: If you do not want to double count actions, use both the event type AND
the ID/name when you create events for a specific action. If you look only for ID =
checkout method for example, then this event fires twice when you only wanted it
to fire once.
The volume of messages can depend on the configured logging level, which is
defined in the client frameworks.
Client Framework
Documentation
IBM Tealeaf CX UI Capture for AJAX
UI Capture does not support dynamic logging levels.
IBM Tealeaf CX Mobile Android Logging Framework
"Tealeaf Android Logging Framework Configuration File" in the IBM Tealeaf
Android Logging Framework Reference Guide
IBM Tealeaf CX Mobile iOS Logging Framework
"Tealeaf iOS Logging Framework Installation and Implementation" in the
IBM Tealeaf iOS Logging Framework Reference Guide
Example messages
You can review the raw format of a submitted set of JSON messages and the
format in which they are displayed after processing in Tealeaf.
Raw request body
The [RequestBody] following information includes a sample raw request, which
contains a set of JSON messages.
Note: In the raw request, the following entry is a single paragraph. You cannot use
this section to create step-based attributes.
v While it is possible to create hit attributes from the [RequestBody] section, it is
not recommended, as this format might change over time.
[RequestBody]
{"version":"0.0.0.4","serialNumber":1,"sessions":[{"id":"ID14H2M3S663R0.36228193
267311725","startTime":1326837723663,"timezoneOffset":480,"messages":[{"type":2,
"offset":2226,"count":1,"context":{"type":"LOAD","name":"root","renderTime":
2226}},{"type":6,"offset":2230,"count":2,"exception":{"description":"Unable to
get value of the property ’nodeValue’: object is null or undefined",
"url":"http://straussandplesser.com/store/js/coremetrics/eluminate.js",
"line":1}},{"type":4,"offset":24878,"count":3,"event":{"type":"click"},"target":
Chapter 16. Step-based eventing
251
{"id":"[[’main’],[’DIV’,1],[’DIV’,0],[’TABLE’,0],[’TR’,0],[’TD’,0],[’DIV’,0],
[’P’,0],[’A’,0]]","idType":-2,"type":"A"}},
{"type":2,"offset":24880,"count":4,"context":{"type":"UNLOAD","name":"root"}}]}]}
After the messages were passed through Tealeaf, the raw request is stored in the
[RequestBody] section of the request, which is viewable through Request View in
BBR.
Related concepts:
Chapter 12, “Browser Based Replay Interface,” on page 181
Formatted request body
When the JSON messages are received, Tealeaf reformats them into a more legible
format, which is listed here.
v This information is available at the bottom of the request, which is formatted for
view in Request View in BBR.
Click to view expanded example messages.
{
"version": "0.0.0.4",
"serialNumber": 1,
"sessions": [
{
"id": "ID14H2M3S663R0.36228193267311725",
"startTime": 1326837723663,
"timezoneOffset": 480,
"messages": [
{
"type": 2,
"offset": 2226,
"count": 1,
"context": {
"type": "LOAD",
"name": "root",
"renderTime": 2226
}
},
{
"type": 6,
"offset": 2230,
"count": 2,
"exception": {
"description": "Unable to get value of the property
’nodeValue’: object is null or undefined",
"url":"http://straussandplesser.com/store/js/
coremetrics/eluminate.js",
"line": 1
}
},
{
"type": 4,
"offset": 24878,
"count": 3,
"event": {
"type": "click"
},
"target": {
"id":
"[[’main’],[’DIV’,1],[’DIV’,0],[’TABLE’,0],
[’TR’,0],[’TD’,0],[’DIV’,0],[’P’,0],[’A’,0]]",
252
IBM Tealeaf cxImpact: cxImpact User Manual
"idType": -2,
"type": "A"
}
},
{
"type": 2,
"offset": 24880,
"count": 4,
"context": {
"type": "UNLOAD",
"name": "root"
}
}
],
}
]
}
In the preceding example, the content after the following string is a set of four
separate messages:
"messages": [
Each message is demarcated by a set of curly brackets.
v Data that is defined at the same level as messages (such as serialNumber or
timezoneOffset) is considered environmental data.
Each step message constitutes a single step.
v Step-triggered events can fire per message step.
v In the preceding example, there are four-step messages. As a result,
step-triggered events can fire up to four times on this hit.
Note: Each step-triggered event also has access to the hit attribute data of its
parent hit and the environmental data included for reference in each step.
When you create step attributes, the value that is extracted is the contents between
the colon (:) and the final comma (,) on the line.
Suppose you want to monitor exception messages that are submitted from the
client framework. In the example above, the data is in the following area.
v In the following example, message data that was present in the previous
example but is not relevant to the example is replaced with the <omitted> string.
"sessions": [
{
<omitted>
"messages": [
<omitted>
{
"type": 6,
"offset": 2230,
"count": 2,
"exception": {
"description": "Unable to get value of the property
’nodeValue’: object is null or undefined",
"url": "http://straussandplesser.com/store/js/
coremetrics/eluminate.js",
"line": 1
Chapter 16. Step-based eventing
253
In the preceding example, you can see that the exception message is stored in the
description value. To reference this value in step-based eventing, when you create
the step attribute to monitor the above, the node in the tree is referenced by using
the following structure:
sessions[0].message.exception.description
The naming structures for the sessions and messages nodes are changed, and the
type identifier is omitted.
Note: When you create step attributes through BBR, you use the menu, which
automatically pre-populates the attribute with the appropriate reference within the
Event Manager. These steps are described later.
Related tasks:
“Viewing formatted JSON messages” on page 258
Step-based objects
In Tealeaf, you can create two types of objects to monitor events that are captured
from a client framework and passed as messages to Tealeaf:
v Step attributes are hit attributes that acquire its data from a step. Step attributes
are specified in a slightly different manner but complete an identical function.
v Step-based events are standard Tealeaf events that are configured to fire on one of
the steps triggers. As conditions, they can use any standard type of Tealeaf
condition, and also step attributes.
Related concepts:
“Step trigger types”
“Creating a step event” on page 264
“Creating a step attribute” on page 260
Default step objects
Tealeaf provides a number of step-based events and attributes for use in step-based
eventing.
v For more information about provided step attributes, see "Pattern Objects
Reference" in the IBM Tealeaf Event Manager Manual.
v For more information about provided step-based eventing, see "EES Reference Tealeaf Event Reference" in the IBM Tealeaf Event Manager Manual.
Step trigger types
To support step-based eventing, the Event Manager now provides two more
trigger types:
Trigger Description
Every Step
Event is evaluated with other events in each step.
After Every Step
Event is evaluated after every step is evaluated.
Note: This trigger is rarely used.
254
IBM Tealeaf cxImpact: cxImpact User Manual
In the previous example, any event triggered to fire on Every Step is checked for
each combination of JSON message and environmental data. In the previous
example, any Every Step event is checked for the load, unload, exception, and
other data message.
Note: Step attributes are permitted to reference objects from the parent hit. As a
result, you can reference hit attributes in step events, but not vice versa.
In the event definition, the trigger can be selected from the Evaluate drop-down:
Figure 106. Available event triggers
Available triggers are displayed in the order of evaluation. For a particular hit with
underlying steps, each Every Hit event is evaluated first, followed by each Every
Step event and After Every Step event. Then, the After Every Hit events are
evaluated.
Note: The events that fire on each trigger determine the availability of data. An
event can use data from any event that fired before the current event. In a
multi-hit session, the After Every Hit trigger fire on the previous hit before the
events configured to fire on Every Hit from the next hit. The same applies to
step-based triggers.
The order of firing is more accurately displayed as a nested structure:
* First Hit of Session
* Every Hit
* Every Step
* After Every Step
* After Every Hit
* Last Hit
* End of Session
Related concepts:
“Notes on using after every step trigger” on page 256
Chapter 16. Step-based eventing
255
Notes on using after every step trigger
In almost all cases, when you create step attributes, you are interested in the
current context of the session. You create attributes to monitor the current data that
is available as of the current step. As a result, the After Every Step trigger is
rarely used.
In the example below, the After Every Step trigger is used. This scenario mirrors
the After Every Hit trigger usage, except that it applies to steps instead of hits.
The After Every Step trigger is useful when you must compare the current state
with the previous state. For example, suppose you want to know whether users
clicked the same object twice in a row.
v To test this scenario, you must know both the object currently being click, and
the previously clicked object. If the events that track both the current and
previous states fire on the same trigger, they are updated at the same time and
therefore always have the same value.
v However, if the previous state event fires just after the current state value by
using the After Every Step trigger, the previous state event is not updated
when the current state event fires. Therefore, you can compare the current state
with the previous state by using an event that fires on the Every Step trigger.
Note: Form messages contain the currState and prevState properties within a
step. The currState property refers to the final value of the form field after
editing, and prevState refers to the default value before editing. These references
do not work for testing if the same action occurred twice, since the default value
can be reset to blank each time it is accessed.
Privacy
To manage blocking or masking of sensitive data, Tealeaf provides privacy
mechanisms to manage specific data before it is transmitted to Tealeaf.
Note: Application of privacy blocking or masking in the PCA or in the Windows
pipeline requires complex regular expressions, which can cause significant
performance degradation if improperly specified. Tealeaf strongly recommends
using the privacy solution that is provided with your client framework to manage
sensitive data.
Replay
In Browser-Based Replay, steps are displayed as subpages to the main page on
which they occurred. Any triggered events are displayed beneath them.
v During replay, steps can be displayed in a more user-friendly format.
Note: Replay of step-based events in RTV is not supported.
Navigable Pages List
Through the request view of BBR, you can create hit attributes and events for
steps. When you load a session that contains JSON-based steps into BBR, the
Navigable Pages List looks like:
256
IBM Tealeaf cxImpact: cxImpact User Manual
Figure 107. BBR Navigable Pages List
In the preceding image, the step that is captured from the visitor's user interface
are indicated by the UIEvent label. In the preceding example, each instance also
Chapter 16. Step-based eventing
257
lists the range of user interface events captured. UIEvent: 1 -4 indicates that the
specific step includes 4 individual user interface events.
Viewing formatted JSON messages
When one of the UIEvent steps is selected, you can review the JSON messages that
are submitted as part of the step.
Note: Any BBR user can view the formatted client framework messages. To create
attributes and events from them, you must have access permissions to the Tealeaf
Event Manager.
1. Click Request in the toolbar to display the request data.
2. Click one of the UIEvent entries in the Navigable Pages List.
3. The raw JSON messages are displayed in the [RequestBody] section.
4. However, this information is not easy to read. To review the JSON messages in
a more legible format, click the Click here to view Step Attributes link at the
top of the request pane.
Figure 108. Step Attributes link in BBR
5. The list of JSON messages are broken out into separate lines for easier reading.
v Each selectable item is a name-value pair that is highlighted when you move
your mouse over it.
v Null values can be selected for creation of step-based attributes.
v Hit and event objects that you create search for the values for the specified
JSON item.
Related concepts:
“Required access” on page 259
“Raw request body” on page 251
“Formatted request body” on page 252
Creating Step-Based Event Objects
You can create step attributes through Request view in Browser Based Replay.
Note: Creation of step attributes is not supported in RTV.
258
IBM Tealeaf cxImpact: cxImpact User Manual
When you create objects through Browser Based Replay, the Event Manager checks
to see if the selected content is already referenced in an existing event object. If so,
the Event Manager selects that object for you to edit.
In some cases, the selected event object is provided by Tealeaf and is therefore not
editable. For example, Tealeaf provides the CUI Hit hit attribute, which references
the contents of the HTTP_X_TEALEAF request variable. When you choose to create
attributes or events from the values of this request variable, the Event Manager
selects the CUI Hit attribute for you to edit. This hit attribute cannot be edited.
Note: If you want to create more step attributes and events from session data for
which attributes or events are already created, you must create them manually
through the Event Manager.
Note: There is a known issue in which the PCA fails to properly recognize UTF-8
encoding in data that is submitted from client frameworks, and the data can be
mangled in the stored session, causing issues in eventing and search.
Note: The following information applies to IBM Tealeaf version 9.0A only.
9.0A can properly recognize UTF-8 encoding in data that is submitted from client
frameworks.
Required access
Note: To create step attributes, you must have permissions to access the Tealeaf
Event Manager, where event-related objects are created in the Portal.
To test access, select Configure > Event Manager.
BBR step attribute context menu
To create a step attribute or event in BBR, right-click a name-value pair in the
formatted JSON message. The context menu is displayed:
v These items are disabled if you do not have access to the Event Manager.
Chapter 16. Step-based eventing
259
Figure 109. BBR Context Menu
Option Description
Create New Event from Step Attribute selection
Create a step-based event and any necessary hit attribute to gather the
data.
Create New Step Attribute from selection
Create a step attribute.
Related concepts:
“Required access” on page 259
“Creating a step event” on page 264
“Creating a step attribute”
Creating a step attribute
When you select a JSON item in BBR and choose to create a step attribute, the
Event Manager is opened in the browser window currently opened to the Portal.
The following dialog is displayed:
Note: Depending on your browser type and configuration, you can manually
switch over to the Portal window.
260
IBM Tealeaf cxImpact: cxImpact User Manual
Figure 110. Creating a step attribute
Step attributes are commingled with hit attributes. They do not belong to a special
category. What defines an attribute as a step attribute are the properties that are
listed.
Table 30. Key Properties:
Attribute Properties
Description
Use Step Pattern
For step attributes, the Use Step Pattern radio button is selected for
you, which enables specification of the xpath to the node whose
value you want to track.
v When a step pattern is used to identify an attribute, the check is
completed by using a case-sensitive search by default. If you
choose to change the type of pattern tag to a step pattern, the
existing case-sensitive settings are preserved.
Chapter 16. Step-based eventing
261
Table 30. Key Properties: (continued)
Attribute Properties
Description
Step Attribute Path
The Step Attribute Path value contains the node information to
uniquely identify the JSON value to acquire in the attribute. For
the preceding example, the path is:
.sessions[0].message.exception.description
This provides a unique path to the description value for the
exception message that was submitted from a client framework to
Tealeaf.
Note: You can complete the same Post-Match Operations on a step attribute that
you can complete on a hit attribute.
Data format
The values of step attributes are always treated as text patterns. As a result,
operators such as equals perform text-based comparisons, even if the captured
value is a numeric or Boolean value.
Data availability
Like the hits that contain them, steps are processed in isolation from all other
steps. For example, if you want to use data from step 1 for use on step 2, you must
create an event to record the data from step 1 for later use.
v Since each step is associated with a parent hit, any hit attributes triggered on the
parent hit are available for reference in each step of the hit.
v However, step attributes are available only within the single step that is being
evaluated.
v If you want to use a hit attribute in a step attribute, the event trigger must be
configured to be evaluated on one of the step triggers.
v Data from events that are triggered on previous steps is available in later steps.
Using data between step attributes
A step triggered event uses only data that is contained in the step in which it is
triggered, which is a similar behavior to how hits are triggered. To use data from
step 1 in step 2, you must record the data from step 1 in an event and then
reference the event in step 2.
For example, suppose your request data for a single hit looks like:
[appdata]
TLT_URL=/tealeaftarget.php
TLT_CUI_URL= /checkout
[StepAttributes]
{
"type": 4,
"offset": 8063,
"count": 1,
"event": {
"type": "change"
},
"target": {
"id": firstname",
"idType": -1,
"type": "INPUT",
"dwell": 2196,
"currState": {
"value": "MyName"
262
IBM Tealeaf cxImpact: cxImpact User Manual
}
}
},
{
"type": 4,
"offset": 2293,
"count": 2,
"event": {
"type": "click"
},
"target": {
"id": "login:guest",
"type": "INPUT",
"subType": "radio",
"currState": {
"checked": true,
"value": "guest"
}
}
},
In the preceding data:
v [appdata] data is available through standard hit attributes.
v There are 2-step messages:
– Step 1: The first step identifies the change client event, in which the firstname
form field is set to MyName.
– Step 2: The second step identifies the click client event, in which the
login.guest element is set to guest.
A single step-triggered event cannot use data from both step 1 and step 2 at the
same time. For example, you cannot create a step-triggered event that fires on the
click message and records the value of the firstname value by using only step
attributes.
To capture the value of Step 1 based on the condition of Step 2, you must:
v Create a step attribute to capture firstname's value on Step 1.
v Create an event that records the value of the step attribute for Step 1.
v Create an event that fires on the click for guest and uses the value for the Step 1
event for the guest value.
Important notes on step-based eventing
v A single web action can require multiple attributes and events to track. You can
create multiple attributes, which are inputs to a single compound event to track
a single user action.
Capturing a specific value
By default, a step attribute captures all possible values for the selected JSON path.
When the attribute is specified, any value that is detected for the node becomes the
value for the attribute.
In some situations, you can gather in the step attribute only specified values. For
example, suppose that you are tracking the following JSON path:
.sessions[0].message.clientState.event
By default, any step attribute can capture any instance of any value. So, your
attribute can capture values such as load, attention, resize, or scroll. Suppose
that you are interested in creating a step attribute to track only the scroll values.
Chapter 16. Step-based eventing
263
After you create the step attribute through BBR, you can complete the following
modifications to the attribute definition through the Event Manager.
1. Edit the step attribute.
2. Click thePost Match Operations caret.
3. Select the User RegEx check box.
4. In the RegEx textbox, enter:
scroll
5. To save the change, click Save Draft.
6. To commit the change, click Save Changes.
Now, the step attribute records only the instances of the scroll value for the
specified JSON path.
As an alternative, you can specify a step attribute without using the RegEx portion.
When you use the step attribute in an event, specify that the value of the step
attribute equals scroll.
Creating a step event
When you select a JSON item in BBR and choose to create an event, the Event
Manager is opened in the browser window currently opened to the Portal. The
Event Wizard is displayed.
Note: Depending on your browser type and configuration, you can manually
switch over to the Portal window.
The default event checks every step to see whether the JSON item is present and
records the last occurrence in the event by default. Using this configuration, you
can track the number of sessions in which the event occurred.
Note: If you cancel creation of a step-based event, you must revert the step
attribute, if created, through the Hit Attributes tab.
Triggers for step objects
Step-based events can be evaluated on the Every Step and After Every Step
trigger.
Triggers for compound events using step-based events as
conditions
Note: If you are creating an event with multiple conditions that uses one or more
step-based events, you must set the event to be evaluated on After Every Hit.
That trigger is evaluated after Every Hit, Every Step, and After Every Step, in
that order.
Related concepts:
“Step trigger types” on page 254
Tracked Occurrences for step events
Note: For any event that is triggered off step-based data, you must configure it to
track occurrences at the individual hit level. Do not use session-level tracking, as
those options operate only on the first or last hit of the session.
264
IBM Tealeaf cxImpact: cxImpact User Manual
Condition step
The Event Manager pre-populates the event definition with properties to identify
the specific JSON item to track.
Figure 111. Creating a step-based event - Condition step
When you create an event to track a JSON message item, the step attribute that is
required to detect the name-value pair is also created in draft mode for you. In the
above, the Hit Attribute condition specifies the step attribute that the Event
Manager has also created for you.
Note: For step attribute conditions, Match Count and Last Value value tests are not
useful, as there is only one unique match and its value for a specified property on
the hit.
Note: If you do not want to double count actions, use both the event type and the
ID/name when you create events for a specific action.
v If you look only for ID = checkout method, then this event fires twice when you
only wanted it to fire once. Suppose you want to track clicked objects. Each
object has the event type click.
v To track clicks of a specific object, you must specify both the event type and
object ID.
v If a step attribute with the same properties exists, the Event Manager uses the
existing step attribute.
v As needed, you can add extra conditions to the event you are creating.
Table 31. Key Properties:
Attribute Properties
Description
Icon
You must select an identifying icon for your step-based events.
Labels
You can organize your step-based events into labels within the
Event Manager.
Evaluate
Set the trigger to be either of the step-based triggers.
Chapter 16. Step-based eventing
265
Table 31. Key Properties: (continued)
Attribute Properties
Description
Track
Set the occurrences to track to monitor the first or last occurrence
in the session or every occurrence.
v If you want to track the number of sessions in which the event
occurrence, set the value to Last Occurrence.
v If you want to track each time that the event occurred in a
session, set the value to Every Occurrence.
Value Type
Step-based events can track numeric or text values or the count of
occurrences of the event.
Related concepts:
“Step trigger types” on page 254
“Creating a step attribute” on page 260
Value step
Figure 112. Creating a step-based event - Value step
Note: The value of step-based events can be specified like any other event.
Other steps
For step-based events, you can configure the other steps as you would any other
event.
Advanced Mode
To see the native JavaScript created for your step-based event, click Advanced
Mode.
Creating a dimension
After you create the step attribute, event, or both to track a value in a submitted
message, you can create a dimension to record values from the event or attribute
in the standard manner.
Note: Dimensions that are populated by step attributes or events can capture new
values from multiple steps in a hit.
266
IBM Tealeaf cxImpact: cxImpact User Manual
In RTV
Creation of step attributes and events is not supported in RTV.
In request view, you can review the raw JSON messages in the [RequestBody]
section of the request.
You can use RTV to save test TLA sessions, which can be loaded into the Event
Tester to use as test data for step-based events.
In Event Tester
In the Event Tester, you can validate the triggering of step-based attributes and
events. Step attributes and the events that are triggered from them are displayed as
regular hit attributes and events in the test results.
Note: After you create step-based objects, it can take a few minutes before they are
available for selection in the Event Tester.
Indexing
Step-based event data is not indexed by default. You can, however, search for
events through BBR and RTV.
It is possible to move data from one location in the request into another section
which is automatically indexed for search.
Note: If you must index some JSON-based session data for search, you must use a
privacy rule to insert the data into the [appdata] section. Creation of the rule
requires configuration of a regular expression to locate the data. Regular
expressions are considered an advanced configuration option, as if they are poorly
specified, they can significantly impact system performance.
v For more information about configuring regular expressions, contact Tealeaf
http://support.tealeaf.com.
v Use of privacy rules against JSON message data is likely to be supported in a
later release.
Related concepts:
“Searching Session Data” on page 37
Reference
Section
Description
"CX Browser Based Replay" in the IBM Tealeaf cxImpact User Manual
BBR documentation
"Browser Based Replay Interface" in the IBM Tealeaf cxImpact User Manual
How to use BBR, including how to access request view
"TEM Hit Attributes Tab" in the IBM Tealeaf Event Manager Manual
How to create hit attributes or step attributes in Event Manager
"TEM Events Tab" in the IBM Tealeaf Event Manager Manual
How to create events in Event Manager
Chapter 16. Step-based eventing
267
"UI Capture for Ajax Guide" in the IBM Tealeaf UI Capture for Ajax Guide
Reference guide for the IBM Tealeaf CX UI Capture for AJAX solution
"Tealeaf Android Logging Framework Reference Guide" in the IBM Tealeaf
Android Logging Framework Reference Guide
Reference guide for the IBM Tealeaf CX Mobile Android Logging
Framework
"Tealeaf iOS Logging Framework Reference Guide" in the IBM Tealeaf iOS
Logging Framework Reference Guide
Reference guide for the Tealeaf IOS Logging Framework
"Event Tester" in the IBM Tealeaf Event Manager Manual
Portal-based Event Tester displays step-based attributes and events
transparently
"Searching Session Data" in the IBM Tealeaf cxImpact User Manual
Searching for sessions through the Portal
"RealiTea Viewer - Request View" in the IBM Tealeaf RealiTea Viewer User Manual
Request view page for RTV.
Note: You cannot create step attributes through RTV.
"RealiTea Viewer - Session Search and Subsearch" in the IBM Tealeaf RealiTea
Viewer User Manual
Searching for sessions through RTV
"Configuring CX Indexing" in the IBM Tealeaf CX Configuration Manual
How sessions are indexed and how data is added for indexing
"Privacy Session Agent" in the IBM Tealeaf CX Configuration Manual
Session agent that is used to move content in the request
Related concepts:
Chapter 12, “Browser Based Replay Interface,” on page 181
“Searching Session Data” on page 37
Chapter 11, “cxImpact Browser Based Replay,” on page 165
268
IBM Tealeaf cxImpact: cxImpact User Manual
Chapter 17. Tealeaf End-to-End Scenarios
This section contains scenarios that demonstrate end-to-end functionality in
Tealeaf. Using these scenarios, you can learn how to build the objects required to
monitor critical aspects of your web application, as contained in the data captured
by Tealeaf. After the required objects are created, these scenarios provide steps for
publishing the data in reports, displaying in replay, or searching for it to identify
potential issues with the application.
Each scenario is designed to produce a useful result of a general use case. After
you have completed a scenario, feel free to modify the steps in order to customize
results for your specific web application.
Scenarios
v "E2E Scenario - Auditing Page Counts" in the IBM Tealeaf cxImpact User Manual
v "E2E Scenario - Build Top IPs and Top IPs by Referrer dashboard reports" in the
IBM Tealeaf cxImpact User Manual
v "E2E Scenario - Configure Login ID to be Searchable" in the IBM Tealeaf cxImpact
User Manual
v "E2E Scenario - Create Conversion Rate Dashboard" in the IBM Tealeaf cxImpact
User Manual
v "E2E Scenario - Create Top Products Dashboard" in the IBM Tealeaf cxImpact User
Manual
v "E2E Scenario - Getting Value out of Tealeaf in One Hour" in the IBM Tealeaf
cxImpact User Manual
v "E2E Scenario - Tracking User Agent Information in Tealeaf" in the IBM Tealeaf
cxImpact User Manual
E2E Scenario - Auditing Page Counts
Many Tealeaf customers utilize a licensing model in which the count of pages
captured and processed by Tealeaf is the primary metric for billing purposes. For
example, a customer may license Tealeaf products based on an estimated an
average daily page count of 10 million. To monitor compliance, this customer may
wish to track the average page counts captured by Tealeaf on a daily basis. Since
licensing is renewed on an annual basis, the average count over the preceding days
is a useful metric for monitoring compliance.
v The standard Tealeaf licensing model is based on counts of CPUs where Tealeaf
software has been deployed.
v The page count licensing model is particularly useful for customers who have
installed Tealeaf in virtualized environments.
This section describes how to create a report in the Tealeaf Report Builder to
monitor daily page counts and the rolling average of page counts over the
preceding year.
v For customers that do not use the page count licensing model, this End-to-End
Scenario is a useful demonstration of how to surface data captured by Tealeaf
Standard Events into reports and to track their changes using Top Movers and
alerts.
© Copyright IBM Corp. 1999, 2014
269
Changes in Licensed Page Count Model between Release 7.x
and Release 8.x
If you have upgraded from Release 7.x to Release 8.x, you may notice a change in
the count of licensed pages. The following are factors:
1. In Release 7.x, discard events were evaluated at the end of a session, which
resulted in the pages of the discarded session being counted as licensed pages.
In Release 8.x, they can be evaluated anywhere in the session. Since Tealeaf
recommends discarding sessions as early as possible, the licensed page counts
may drop as a result of where you apply the discard event(s) in the session.
2. In Release 8.x, a licensed page is defined as having any of the following content
types:
text/html;
text/xml;
application/xml;
application/xhtml;
application/json;
application/x-json;
text/json;
text/x-json;
v For the mobile client frameworks, licensed pages are counted based on the
occurrence of the ScreenView load message in the JSON data.
Note: In Release 8.5 and earlier, the ScreenView object was called the
Application Context object.
– See "Tealeaf JSON Object Schema Reference" in the IBM Tealeaf Client
Framework Data Integration Guide.
3. In Release 8.x, page redirects are also processed as licensed pages. This ensures
that a page redirect is captured by Tealeaf and can be used to create an event
or troubleshoot issues with the hosted page that contains the redirect.
Creating Report Builder Report
Please complete the following steps to create the Report Builder report to monitor
page counts.
1. Login to the Tealeaf Portal.
2. Before you begin, you may wish to review the volume of reporting data that
is currently available in the database:
a. From the Portal menu, select Tealeaf > Portal Management.
b. Click the IBM Tealeaf CX Settings category.
c. Click the Data Retention link.
d. Review the value for Reporting Data (daily) Days Retain. This value
indicates the number of days previous to today for which you can
compute the daily page counts.
e. You may wish to use this information later in this scenario. See "CX
Settings" in the IBM Tealeaf cxImpact Administration Manual.
3. From the Portal menu, select Analyze > Report Builder.
270
IBM Tealeaf cxImpact: cxImpact User Manual
Figure 113. Report Builder in the menu
4. The Report Builder is displayed. See "Tealeaf Report Builder" in the IBM
Tealeaf Reporting Guide.
v The Report Builder may display the most recent report that you opened. To
create a new report, click the New icon in the toolbar.
Chapter 17. Tealeaf End-to-End Scenarios
271
Figure 114. Tealeaf Report Builder
5. In the Events tab on the left side, click Add Event. The Event Selector is
displayed.
6. Verify that the View by Labels checkbox is selected.
7. Click the Tealeaf Standard Events event label.
8. Click the + icon.
272
IBM Tealeaf cxImpact: cxImpact User Manual
Figure 115. Event Selector
9. Select the Page Count event.
Chapter 17. Tealeaf End-to-End Scenarios
273
Figure 116. Page Count event
10. Click Select.
11. The event is added to the report.
12. In the generated report, page counts for a particular date are broken down by
each hour of the day. For purposes of this exercise, this level of detail is not
useful. For licensing purposes, only the daily counts of page counts are
meaningful.
13. Click the Calendar tool. Select the date range over which you would like to
review the daily page count totals. In the example below, the preceding 30
days has been selected.
v To select a range of dates, click the starting date of the range. Press SHIFT
and select the ending date of the range.
274
IBM Tealeaf cxImpact: cxImpact User Manual
Figure 117. Selecting date range for the report
14. In the resulting report, data may be grouped at weekly (in this case) or
monthly levels. At the bottom of the report, you can review the totals and
daily average, which are automatically tabulated for you:
Figure 118. Page Count report with daily averages
15. These figures can be used to track your daily page counts for reporting
purposes.
Chapter 17. Tealeaf End-to-End Scenarios
275
16. To save the report, click the Save icon in the toolbar. Enter a name such as
Weekly Page Counts. Click Save.
For more information on creating reports, see "Tealeaf Report Builder" in the IBM
Tealeaf Reporting Guide.
Adding the Report to a Dashboard
Optionally, this report can be added to an existing dashboard. When the report is
available in a dashboard, users can visit the dashboard, which may contain other
useful reports, on a daily basis to keep tabs on system activities. In the steps
below, the report is added to the Technical Site Metrics dashboard.
1. If it is not already, open the Weekly Page Counts report in the Tealeaf Report
Builder.
v See "Tealeaf Report Builder" in the IBM Tealeaf Reporting Guide.
2. From the toolbar, select the Add to Dashboard icon. The Add Report to
Dashboard dialog is displayed.
3. Select the following options:
a. Change the title as needed.
b. For Updates, select Every Hour. Since this report tabulates values for the
preceding day, it should not need more frequent updates.
c. For the Display, select Chart. You can select the Table option if you prefer to
see the raw counts instead of the graphic.
d. To enable exploration of the underlying Report Builder report, select
Enabled for the Drilldown option.
e. For the Period, select Yesterday.
f. For the target dashboard tab:
1) Click the link next to Target Tab.
2) Click the Technical Site Metrics entry.
3) Select Activity Reports.
276
IBM Tealeaf cxImpact: cxImpact User Manual
Figure 119. Selecting the dashboard
4) Click Select.
g. To add the configured report to the selected dashboard, click Add.
4.
5.
6.
7.
The report is added.
To see the report, select Dashboard > Technical Site Metrics.
Click the Activity Reports tab.
The report is displayed at the bottom of the page.
v See "Using Dashboards" in the IBM Tealeaf cxView User Manual.
Figure 120. Weekly Page Counts dashboard report
8. You may wish to reposition the dashboard component on the Activity Reports
tab. See "Configuring Dashboards" in the IBM Tealeaf cxView User Manual.
Chapter 17. Tealeaf End-to-End Scenarios
277
E2E Scenario - Build Top IPs and Top IPs by Referrer dashboard
reports
This scenario provides step-by-step instructions on how to create the data objects
to identify and report on the Top IP addresses and referrers for your web
application.
IP addresses often provide unique identifiers to the machine from which the visitor
is starting the session. By tracking the IP addresses of your visitors, you may be
able to identify the most frequent visitors to your application and, if needed, filter
out unwanted traffic from your Tealeaf reporting data for visits, for example, by
bots.
v Depending on the visitor's connection to the Internet, the IP address can be
dynamically assigned, so these values cannot be guaranteed to be unique
identifiers to a machine in all cases.
A session's referrer identifies the URL from which one of your visitors started to
begin the session. Identifying the top referrers to your web application can be
useful in tracking the effectiveness of your marketing campaigns. By identifying
the top referrers as dimensional data, you can assess the value of your
relationships with partners driving content to your web application.
For example, if your campaigns include identifying information as query
parameters in the URL, you can configure Tealeaf to capture and track this
information. In the following simple example, the URL value for this referrer
contains a query parameter (CampaignID) and value (01), which would be useful to
track:
http://www.example.com?CampaignID=01
These pieces of information provide contextual information for the most frequent
visitors to your web application and the most common points of entry. These
reports are then added to a dashboard for convenient review.
Overview
Basic Steps
1. To begin, you create an event that is fired at the beginning of each session.
2. You then create the dimensions to capture the IP address and referrer for each
session.
3. You create a report using the Every Session event and the IP address as a
dimension on the report.
4. When the report is created and populated with data, you export the Top 100
values reported in the report.
5. These values are added to the whitelist for the dimension, which allows you to
report on them.
6. You may also filter out the other observed values in the dimension into a
blacklist.
7. You then add the report to a dashboard, which displays the Top 100 IP
addresses for your site.
8. The above steps can be repeated to create a dashboard component based on the
referrer value for each session.
278
IBM Tealeaf cxImpact: cxImpact User Manual
An Important Note about Dimension Data Limits
Suppose that you are interested in creating dimensions to capture referrer URLs
and IP addresses. Typically, URL and IP address data is captured and stored in
Tealeaf as dimensional data. As hits are passed through the pipeline, these values
are captured and stored in the Tealeaf database. Depending on the volume of
traffic on your site, this dataset could number in the millions of unique values.
To prevent runaway creation of dimensional data that becomes unwieldy to use in
reporting, Tealeaf imposes a configurable limit on the maximum number of unique
dimension values to be captured on an hourly basis.
v This limit can be configured for individual dimensions.
v This limit is applied to each Canister. For example, if you define a limit of 10
unique values and have two Canisters in your environment, a maximum of 10 X
2 unique values for the dimension can be recorded per hour.
Suppose for the IP address dimension, you configure a limit of 2 unique values per
hour in a single Canister environment. This limit means that in a single hour, a
maximum of 2 unique values is written to the database from your lone Canister.
Any other value that is subsequently captured in the same hour is written using
the limit value, which is set to [Limit] by default.
v This example limit is extremely small for demonstration purposes; by default,
the limit value is set to 1000 unique values per hour.
In the following table , you can see a set of example IP addresses that are detected
in the pipeline for each hour:
Table 32. An Important Note about Dimension Data Limits
Address Hr 1
Hr 2
Hr 3
Addr 1
1.1.1.1
1.1.1.4
1.1.1.4
Addr 2
1.1.1.2
1.1.1.5
1.1.1.5
Addr 3
1.1.1.3
1.1.1.1
1.1.1.1
Addr 4
1.1.1.4
1.1.1.2
10.255.255.1
Addr 5
1.1.1.5
1.1.1.3
10.255.255.2
If the limit for this dimension is set to 2 per hour, then for each hour, the following
addresses are recorded for the dimension:
Table 33. An Important Note about Dimension Data Limits
Hour
Recorded
Recorded as [Limit]
Hr 1
1.1.1.1, 1.1.1.2
1.1.1.3, 1.1.1.4, 1.1.1.5
Hr 2
1.1.1.4, 1.1.1.5
1.1.1.1, 1.1.1.2, 1.1.1.3
Hr 3
1.1.1.4, 1.1.1.5
1.1.1.1, 10.255.255.1, 10.255.255.2
Based upon the configured limit of two unique values recorded per hour for this
dimension, all other values for URL are recorded as [Limit].
v For Hour 1, you can see that two new values are recorded. Three IP addresses
are not.
Chapter 17. Tealeaf End-to-End Scenarios
279
v For Hour 2, two of the values that were assigned the [Limit] value in Hour 1
are now recorded. Values that were recorded in Hour 1 are present in Hour 2,
but because they appeared after the limit had been reached, they are recorded as
[Limit].
v For purposes of recording, Hour 3 looks identical to Hour 2. However, two new,
previously undetected values are captured, but they are not recorded because
the limit has already been reached.
The above example demonstrates the potential uncertainties around capturing
dimensional values with a high volume of unique values per hour. To manage the
data volume:
v You can raise the limit for each configured dimension sufficiently high to
account for the volume.
Note: This approach can significantly impact your data storage.
v Use an approximation for the IP address.
– Instead of using the Referrer value, you can use the Referrer Domain for
Session session attribute provided by Tealeaf as the source for the dimension.
Instead of capturing the full referral URL (e.g. www.tealeaf.com/mypage.htm),
this session attribute just captures the domain value (e.g. www.tealeaf.com).
– Instead of the Client IP Address value, you can use the User Agent of
Client session attribute provided by Tealeaf as the source for the dimension.
Note: Depending on the volume of traffic to your site and the number of unique
URLs that are configured to be captured for referrer and IP address, you can not
be able to produce a high-fidelity dataset for Top values. If you do not have the
available storage to meet your requirements, you should use one of the above
recommendations as the source of the dimension data instead. Please make the
replacements as needed in the instructions for creating the dimensions below.
Step 1 - Create Event: Every Session
Create an event that is called Every Session, which fires on the first hit of the
session. This event uses the Session GUID session attribute, which is the internal
Tealeaf identifier that is assigned by the Canister on the first hit of each valid
session; each session has a Session GUID value, which means that this event fires
for every valid session.
Note: You can find other uses for this event.
This event then creates reports that evaluate all sessions.
1. To open the Tealeaf Event Manager, select Configure > Event Manager.
2. In the Event Manager, click the Events tab.
280
IBM Tealeaf cxImpact: cxImpact User Manual
Figure 121. Tealeaf Event Manager - Events tab
3. Click New Event.
4. For the Name of the event, enter Every Session.
5. For the trigger of the event, set Evaluate On to First hit of session.
6. For organizational purposes, you can find it useful to assign the event to a
new event label. Otherwise, the event is listed in the Default event label after
it is created.
7. Select the Condition step.
8. Click the Session Attributes category.
9. Click Session GUID. This session attribute is the session identifier that is
created by Tealeaf. Every session is marked with one on the first hit of the
session.
10. The Session GUID session attribute is added to the main pane. From the
drop-down for the attribute, select Is not empty. The event is configured to
fire on the first hit of the session, whenever the Session GUID is specified.
This event fires on every valid session.
Chapter 17. Tealeaf End-to-End Scenarios
281
Figure 122. Create event Every Session
11. Save your draft.
12. Save your changes and commit them.
Expected Results:
The Every Session event is created.
Step 2 - Search for Event in Active Sessions
After you create a new event, you should verify that is being written to sessions.
Since this event is created on the first hit of any new session, it must be available
in any active session that was started after you saved the event to the server.
These steps help you to find a session where the event is displayed and can be
reused for locating sessions to test after you create new event objects contained in
them.
1. In the Portal, select Search > Active Sessions. The Active Session Search page
is displayed.
Figure 123. Search - Active Sessions
282
IBM Tealeaf cxImpact: cxImpact User Manual
2. If any search fields are displayed, click the X icon in the corner to remove
them.
3. From the left navigation panel, click the Basic Search Fields panel. Click
Events.
4. An Events search term is displayed in the search criteria.
a. Click <Select an event.
b. Open the event label containing the Every Session event.
c. Click the Every Session event.
Figure 124. Search - Event Selector
d. To select it, click Select.
5. Leave the dimension value as <Any Dimension>.
6. Click Search.
Expected Results:
When the search results are returned, all active sessions in which the Every
Session event has occurred are displayed.
You can also use the Event Tester to verify event operations.
Step 3 - Create Dimension: IP Address
Tealeaf provides a session attribute Client IP Address, which is created and
maintained by the Canister to identify the IP address from which the visitor's client
Chapter 17. Tealeaf End-to-End Scenarios
283
application is connecting. In this step, you create a dimension that is called IP
Address, which is populated by the Client IP Address session attribute.
A dimension provides contextual information that can be recorded when an event
is recorded. When you create a dimension and associate it with a specific event,
whenever the event is recorded, the value for the dimension is also recorded. In
this case, the value for the visitor's IP address can be recorded.
1. To open the Tealeaf Event Manager, select Configure > Event Manager.
2. In the Event Manager, click the Dimensions tab.
3.
4.
5.
6.
7.
8.
9.
To create a dimension, click New Dimension.
Set the name: IP Address.
Set the Populated By value: Client IP Address session attribute.
Set the Populated With value: First Value in Session.
For Values to Record, set the value to Whitelist + Observed Values.
For Default Value, select [Others].
For Max Values Per Hour, you must adjust the setting that is based on traffic
volume for your site.
Note: If the accepted maximum for Max Values Per Hour is not already
known, you must leave the default value. Depending on the volume of traffic
to your site, setting it to a much higher value can increase data storage
requirements.
Note: For this dimension, you might not be able to configure an acceptable
limit to generate a high-fidelity data set.
10. Select the Turn On Logging button.
284
IBM Tealeaf cxImpact: cxImpact User Manual
Figure 125. Create dimension IP Address
11. Save your draft.
12. Save your changes and commit them.
Expected Results:
The dimension IP Address is created and is populated by the session attribute
Client IP Address. Dimension logging is enabled.
Related concepts:
“An Important Note about Dimension Data Limits” on page 279
Chapter 17. Tealeaf End-to-End Scenarios
285
Step 4 - Create Dimension: Referrer by Session
In this step, you configure a dimension to capture the referrer for the session. The
referrer is the IP address from which the visitor left to begin the session on your
web application.
v There is a hit attribute for capturing the referrer, which tracks the previous page
visited by the visitor for each hit. For this exercise, use the session referrer.
A session attribute is a variable associated with each session. Tealeaf provides a
number of session attributes for your use and enables the configuration of up to 64
user-defined session attributes.
v See "TEM Session Attributes Tab" in the IBM Tealeaf Event Manager Manual.
In the following sequence, you create a dimension, which is populated by the
Referrer for Session session attribute. This attribute is a default session attribute
provided by Tealeaf. Call this new dimension Referrer for Session.
1. To open the Tealeaf Event Manager, select Configure > Event Manager.
2. In the Event Manager, click the Dimensions tab.
3. To create a new dimension, click New Dimension.
4. Set the name: Referrer for Session.
5.
6.
7.
8.
9.
Set the Populated By value: Referrer for Session session attribute.
Set the Populated With value: First Value in Session.
For Values to Record, set the value to Whitelist + Observed Values.
For Default Value, select [Others].
For Max Values Per Hour, you must adjust the setting based on traffic volume
for your site.
Note: If the accepted maximum for Max Values Per Hour is not already
known, you must leave the default value. Depending on the volume of traffic
to your site, setting it to a much higher value can increase data storage
requirements.
Note: For this dimension, you can not be able to configure an acceptable limit
to generate a high-fidelity dataset.
286
IBM Tealeaf cxImpact: cxImpact User Manual
Figure 126. Create dimension Referrer for Session
10. Save your draft.
11. Save your changes and commit them.
Expected Results:
The dimension Referrer for Session is created.
Related concepts:
“An Important Note about Dimension Data Limits” on page 279
Step 5 - Create Report Group: IP Addresses
In this step, you bring together the objects you already created. You create a simple
report group containing the Client IP Address and Referrer for Session
dimensions.
A report group is an organizing structure for dimensions. In the Tealeaf Report
Builder, you can include multiple dimensions in a report if they belong to the same
report group. This structure enables efficient storage of dimensional data while
maintaining flexibility in reporting.
v A report group may contain up to 4 dimensions.
v A dimension must belong to at least one report group.
This report group is then associated with the Every Session event.
1. To open the Tealeaf Event Manager, select Configure > Event Manager.
2. In the Event Manager, click the Dimensions tab.
Chapter 17. Tealeaf End-to-End Scenarios
287
3.
4.
5.
6.
7.
To create a report group, click New Report Group.
In the Add Report Group dialog, set the Name: IP Addresses.
If it is not already configured, set the Template to Standard.
Click Add Dimensions.
Select IP Address and Referrer for Session dimensions.
Figure 127. Create report group IP Addresses
8.
9.
10.
11.
12.
288
Click Save Draft. Report group IP Addresses is created.
In the Event Manager, click the Events tab.
Edit the Every Session event.
Click the Report Groups step.
Add the report group IP Addresses to the event.
IBM Tealeaf cxImpact: cxImpact User Manual
Figure 128. Create event Every Session
13. Save your draft.
14. Save your changes and commit them.
Expected Results:
The report group IP Addresses is created and associated with the event Every
Session. Since the event fires on each session once, the IP address and referrer
values are captured into the dimensions in the report group. This information can
be used as context for reporting.
Step 6 - Test Active Sessions for Dimensions
Now, you can check for the presence of these dimensions. When the Every Session
is triggered, the values for the dimensions, the IP address, and the referrer value,
are also written into the request of the first hit of the session. So, this data is
available as soon as the event is recorded, which is on the first page of every
session.
The following steps show how to search for event + dimension combinations in
active sessions. This method of search is useful for finding specific sessions that are
based on narrowly defined dimensions.
1. As you did in a previous step, search active sessions for the Every Session
event.
v As you did previously, leave the dimension as <Any Dimension>.
2. The list of returned sessions includes all active sessions where the Every
Session event fired. This event is fired on the first page of a session. Now, the
dimensions are configured to be recorded when the event fires, so you can
quickly locate a session that contains the recorded dimensions.
).
a. In the displayed list of sessions, click the Send to Event Tester icon (
In the dialog, you might want to change the Description to something easier
Chapter 17. Tealeaf End-to-End Scenarios
289
to locate, such as Test Session - Every Session. Click Send to Event
Tester. Click OK to go immediately to the Event Tester.
) icon next to the session you want to begin
3. In the Event Tester, click the (
testing. The session is evaluated.
4. In the Select Events tab, click the event label containing the Every Session
event. Click the event to add it to the list of tested events. Do not select any
other events.
Figure 129. Event Tester - Every Session selected
5. Click the View Results tab.
a. Expand the Events node to display the Every Session event.
b. Expand the entry for Page 1.
c. Expand the entry for the report group to which you assigned the two
dimensions. See IP Addresses.
290
IBM Tealeaf cxImpact: cxImpact User Manual
Figure 130. Event Tester - View Results tab
Expected Results:
If the two dimensions are displayed in the tested results, then they are being
recorded with the event. In the above, the Referrer for Session value is set to a
null value (TLT$NULL). In this case, no value was recorded for it.
Related tasks:
“Step 2 - Search for Event in Active Sessions” on page 282
Step 7 - Create Report by using Every Session event
Note: Before you continue with this step, you must wait at least one hour so that
reporting data can be gathered and aggregated into the database. Data for your
new event and dimensions is not available until it is aggregated into the database.
After the event is tested and at least one hour is passed, you can create your first
report by using the event.
In this step, you generate a report in the Tealeaf Report Builder that uses the Every
Session event with the IP Address dimension added to the x-axis.
The Tealeaf Report Builder enables Portal users to create ad hoc reports by using
events, dimensions, and ratios of their own choosing. The Report Builder uses the
flexibility of data object creation to deliver critical analytical capability to the
desktops of the users that are most informed about your web application.
1. To open the Tealeaf Report Builder, select Analyze > Report Builder from the
Portal menu.
2. In the Report Builder, click the Create New button in the toolbar.
3. A new report is created.
4. To add an event, click Add Event. Add the Every Session event to the report.
v If you did not assign an event group to the event, it is in the Default
group.
Note: If you create the Every Session event within the last hour, you might
not see any data in the report.
Chapter 17. Tealeaf End-to-End Scenarios
291
5. Click the Dimensions tab. Click and drag the dimension IP Address to the
x-axis.
6. When you add the IP address dimension, you might be prompted that the
report is too large to display. Click OK for the moment.
7. Next to the IP address dimension, click the drop-down menu caret. Select
Filter.
8. In the Dimension Filter dialog, select the Top N check box. For the Maximum
Number of Values to Display, enter the number of top IPs to display. 25 is a
good starting value.
Figure 131. Dimension Top N filter
9. Click Apply. The report is updated to show sessions for only the Top IP
addresses.
10. To save the report, click the Save button in the toolbar. Enter the name Top IP
Addresses.
11. Click Save. The report is saved.
292
IBM Tealeaf cxImpact: cxImpact User Manual
Figure 132. Create report Top IP Addresses
v See "Tealeaf Report Builder" in the IBM Tealeaf Reporting Guide.
The Top IP Address report is created.
This report generates a simple list of the IP addresses visiting your site for the
designated time period. The meaningful data in the report is the dimension IP
Address.
v If you configured a Top N filter, only the top IP addresses are listed.
By adding the report group to other events, you can now create reports on those
events that are filtered by the top values for IP Address and Referrer for
Session.
You can modify the report to display the Referrer for Session dimension to
identify top referrers. These steps are described later in this tutorial.
Related tasks:
“Step 10 - Add Referrer Dimension to Report” on page 296
Step 8 - Create a blacklist of IP Addresses from observed
values
Suppose you are able to identify that some of your "top" IP addresses are sourced
from traffic in which you have no interest. For example, you may have been able
to determine through extended user agent parsing that the IP address
76.21.18.170 is a bot crawling your site. You can add this IP address to a blacklist
for the dimension you created in order to prevent its appearance in reports using
the dimension.
Chapter 17. Tealeaf End-to-End Scenarios
293
v For more information about extended user agent parsing, see "Tealeaf Reference
Session Agent" in the IBM Tealeaf CX Configuration Manual.
1. To open the Tealeaf Event Manager, select Configure > Event Manager.
2. In the Event Manager, click the Dimensions tab.
3. Right-click the dimension IP Address and select Edit Dimension....
4. In the Edit Dimension dialog, click Edit Blacklist.
5. Click Download Log Values....
6. Open the downloaded file in Microsoft Excel.
7. Edit the list of log values into include only the items that you wish to add to
your blacklist.
8. In the Edit Blacklist window, click Import File....
9. Select the file you edited locally. Click Import.
10. The values are displayed in your blacklist. Click Done.
11. Save your draft.
12. Save your changes and commit them.
Expected Results:
After completing this step, the IP values in the blacklist do not appear in the
report, starting at ten minutes past the next hour.
Step 9 - Add Report to Dashboard
As needed, you can add the report that you created to a dashboard for display in
the Portal. In this step, you add the Top IP Addresses report to a dashboard as a
table from the Report Builder.
1. If not done already, create a dashboard where this report can be posted.
a. To configure dashboards, select Configure > Dashboard in the Portal
menu.
b. Click the Dashboards link in the left navigation pane.
c. To add a dashboard, click the + icon in the upper-right corner.
d. Enter a name for the dashboard. For this scenario, the name is
E2E_TopIPdash.
e. Click OK.
f. To save your dashboard, click Save.
g. The dashboard E2E_TopIPdash is created. It is empty now.
2. To open the Tealeaf Report Builder, select Analyze > Report Builder from the
Portal menu.
3. Click the Open button in the toolbar.
4. Open the Top IP Addresses report.
5. The Top IP Addresses report is displayed.
) in the
6. In the toolbar, click the Add Report to Dashboard button (
toolbar.
7. In the dialog, set the following values:
a. Set Display: Table.
b. Set Target Tab: Select the E2E_IPdash dashboard. Select the Default tab or
other tab if you want to put it elsewhere. Click Select.
294
IBM Tealeaf cxImpact: cxImpact User Manual
Figure 133. Add report to dashboard
c. To add the report, click Add.
8. A success message indicates that the report is added to the dashboard.
9. In the Portal menu, select Dashboard > More.
10. In the Dashboard selector, select E2E_TopIPdash.
Figure 134. E2E_IPdash dashboard
Expected Results:
The Top IP Addresses report is displayed in table format in the selected tab of the
dashboard.
Chapter 17. Tealeaf End-to-End Scenarios
295
Step 10 - Add Referrer Dimension to Report
In the following optional steps, you can reconfigure the Top IP Addresses report so
that it represents the top IP address of your visitors for each referrer. This
information is valuable in determining which sources of traffic are most valuable
to your site.
1. To open the Tealeaf Report Builder, select Analyze > Report Builder from the
Portal menu.
2. Open the existing Top IP Addresses report.
3. Save the report as a new name: Top IP Addresses by Referrer.
4. Add the Referrer for Session dimension to the X-Axis.
5.
6.
7.
8.
Click the Options button in the toolbar.
Set Report Title: Top IP Addresses by Referrer. Click Apply.
Save the report.
Add the new report to the same dashboard.
Expected Results:
The report is saved with a new name and the Referrer for Session dimension
added to it.
Related tasks:
“Step 9 - Add Report to Dashboard” on page 294
Step 11 - Check Dashboard for new component and refreshed
data
Navigate to the dashboard where the Top IP Addresses report was previously
added to verify that the new report is displayed.
1. In the Portal menu, select Dashboard > More.
2. In the Dashboard selector, select E2E_TopIPdash.
3. Verify that both reports are added to the dashboard and are populated with
data.
4. If not, click the refresh icon (
to force a data refresh.
) in the toolbar in the dashboard component
Expected Results:
The report with Referrer for Session data is displayed.
E2E Scenario - Configure Login ID to be Searchable
For web applications that use or require user authentication, capturing Login ID's
can be a useful means for tracking visitor behavior. While a Login ID is not a
guaranteed indicator of a unique visitor, it does provide insight into the activities
on your web application that are engaged through specific user accounts, which is
useful for addressing customer service issues.
v Tealeaf recommends using the Tealeaf Cookie Injector to generate unique,
persistent cookies for individual visitors.
296
IBM Tealeaf cxImpact: cxImpact User Manual
As part of the installation, Tealeaf provides a number of pre-defined data objects
that you can use for tracking basic activities, metrics, and other useful information
about your web application. Among these are two objects for capturing Login IDs.
This End-to-End Scenario describes how to configure the provided Login ID data
objects for your web application's needs and then to surface that information in
search through the Tealeaf Portal.
Note: For customers who have upgraded from Release 7.2 or earlier, the existing
Login ID values in your system have been migrated to be stored in the Login ID
session attribute in your upgraded system. However, you must still complete these
steps in order to configure the hit attribute and event for tracking Login IDs.
As part of the set of provided data objects, Tealeaf includes a hit attribute, an
event, and a session attribute for detecting the Login ID displayed in your web
application.
v A hit attribute is used to define the set of characters in request or response data
that demarcate an element of data that you want to track through an event.
v An event is triggered by a condition. In this case, the condition is the presence
of the Login ID hit attribute. When this hit attribute is detected, the event is
fired, which stores the Login ID value in the session attribute Login ID.
v A session attribute is a session-level variable that can be populated and updated
based on events. The Login ID session attribute is the first one in your system.
Tealeaf supports the creation of up to 64 session attributes.
v When the hit attribute for Login ID is detected, the event is triggered, and the
session attribute Login ID is updated with the value.
The scenario begins with how to configure the Login ID hit attribute and test if the
session attribute is being properly populated.
Pre-Requisites
Before you begin, you must review where the value of the Login ID for your web
application is published in the response delivered to the visitor. You can identify
this information by logging into your publicly available version of the web
application, navigating to a page where the Login ID is published, and then
viewing the source of the page through your web browser.
In the web page source, you must locate a uniquely identifiable snippet of HTML
code that appears just before the Login ID value and the HTML snippet that marks
the end of the Login ID.
For example, Tealeaf Online Help display Login ID's in the HTML response that is
returned to each authenticated visitor. This information is demarcated in the
HTML code.
Note: If you are currently viewing this section through Tealeaf Online Help, you
can view the source code of the HTML page through your browser.
In the HTML code delivered by Tealeaf Online Help, the Login ID's look like the
following:
<input type="hidden" id="userID" value="[email protected]" />
In the above snippet, the markers to identify the login would be the following:
v Start Tag: <input type="hidden" id="userID" value="
v End Tag: " />
Chapter 17. Tealeaf End-to-End Scenarios
297
The Start Tag and End Tags to uniquely identify the Login ID published on the
pages of your web application must be known before you can complete this
scenario.
Note: The login ID for your web application can be more easily extracted from the
request of a hit. Where it appears depends on your web application and how
Tealeaf is configured. For more information, contact your web development team.
Step 1 - Configure Hit Attribute Login ID
Most of the Tealeaf End-to-End Scenarios begin with creating or configuring the
required data objects in the Tealeaf Event Manager.
The Tealeaf Event Manager is a Portal-based interface for creating the data objects
required to detect important data values concerning user behavior, site
performance, and other key metrics and to generate searchable and reportable
events from them.
This first step requires the configuration of the Login ID hit attribute provided by
Tealeaf to identify the login identifiers published in each page of your web
application.
Note: If you have upgraded from Release 8.0, you may need to create this hit
attribute. You can complete the same steps below, creating the attribute instead of
editing the pre-existing one.
1. Login to the Tealeaf Portal as an administrator.
2. From the Portal menu, select Configure > Event Manager. The Tealeaf Event
Manager is displayed.
3. In the Tealeaf Event Manager, click the Hit Attributes tab.
Figure 135. Event Manager - Hit Attributes tab
4. Locate the Login ID hit attribute.
298
IBM Tealeaf cxImpact: cxImpact User Manual
v You can filter for the hit attribute by entering Login ID in the Filter Hit
Attributes entry box in the left column.
5. Right-click the Login ID hit attribute and select Edit Hit Attribute....
6. In the Edit Hit Attribute window, configure the following properties:
a. Name: Leave this value as Login ID.
b. Description: Enter a meaningful description here.
c. Active: Set to true.
d. Search In: Set to Response if login ID's are published in the pages delivered
to your visitors. Otherwise, if it appears in the request, set this value to
Request.
v Depending on your web application and Tealeaf configuration, the login
ID may be in the Request instead of the Response.
e. Select Use Start Tag/End Tag.
f. Start Tag: Enter the value of the start tag as specified in your web
application.
g. End Tag: Enter the value of the end tag as specified in your web
application.
Note: In a tag, you may use \r for carriage return and \n for line feed.
v All lines in the Tealeaf request are separated by \r\n, so they can be used
to indicate the start and end of lines.
v The line separator used in the response is controlled by your application's
code. It may contain \r, \n, or both.
Note: If you want to reduce the memory usage of a hit attribute, set All
Matches to false. Only the first instance of the hit attribute is tracked; all
other instances on the page are ignored.
7. Your edited hit attribute should look something like the following:
Chapter 17. Tealeaf End-to-End Scenarios
299
Figure 136. Editing Login ID hit attribute
8. Save your draft.
9. Save your changes and commit them.
Expected Results:
The Login ID hit attribute is configured with the Start and End tags to track login
identifiers for your web application.
Step 2 - Review and Configure Login ID Sample Event
In this step, you review the provided event Login ID Sample to verify that it is
properly configured. A key step in the review is to verify that it is supplying
values to record to the Login ID session attribute.
This session attribute is included by default in all new installations. However, it is
not enabled at startup. Those steps are included.
300
IBM Tealeaf cxImpact: cxImpact User Manual
When you finish the configuration, the data flow look like the following line:
Login ID hit attribute > Login ID Sample event > Login ID session attribute
Note: It is possible that the session attribute is modified to suit another purpose. If
you verify that it is being used differently than expected, you must create another
session attribute to store the output of the Login ID Sample event.
1. In the Tealeaf Event Manager, click the Events tab.
2. Locate the Login ID Sample event.
v You can filter for the event by entering Login ID in the Filter Events entry
box in the left column.
3. In the Icon column, you can see the icon that is displayed in the Portal when
the event is fired. Remember this icon.
4. Right-click the event and select Edit Event....
5. The Event Wizard is displayed. Verify the following information:
a. Summary information:
1) Set Evaluate On to Every Hit. Depending on how your application is
constructed, the login identifier can be first displayed on any page in
the session.
2) Set Track to First Per Session.
3) Set Value Type to Text.
4) Select the Active check box.
5) Searchable and Reportable: false
v When set to true, this option enables the storage of the event data in
the database. For this scenario, however, you must assign a session
attribute to track this information.
v If you do enable this option, then the Display in Portal option is
enabled. If that option is selected, then the Display in Session List
option becomes available.
b. Click the Condition step:
1) The hit attribute that is listed as the only condition for the event must
be Login ID.
2) The action is set to First Value must be tested. This value must be set
to Is not empty.
Figure 137. Event - Login ID Sample - Condition
c. Click the Value step. The following properties and values should be
specified:
Chapter 17. Tealeaf End-to-End Scenarios
301
1) If the listed value to record is not set to the Login ID hit attribute, then
click Select....
2) Select the Login ID hit attribute.
3) Set the value for the item to record to be First Match per Hit.
Figure 138. Event - Login ID Sample - Value
d. Click the Report Groups step.
1) In this step, you can configure the report group that is associated with
the Login ID event. Report groups contain dimensions, which are
defined contextual information that can be captured and associated with
an event occurrence. For purposes of this exercise, you do not must
configure report groups.
e. Click the More Options step.
f. Next to Update Session Attribute, click Select.... Select or create the Login ID
session attribute.
6. To save your draft, click Save Changes.
7. Save your changes and commit them.
Expected Results:
The event Login ID Sample is configured to use the hit attribute Login ID as a
condition. The values that are detected update the session attribute Login ID.
Step 3 - Configure Session List Template for Login ID
After you create the data objects, you can configure your session list template so
that these values are surfaced in the Portal. In the subsequent step, you will locate
a session that contains a populated Login ID value.
Note: The standard session list template includes the Login ID column. If you do
not want to add this column to a different session list template, then you can skip
this step.
1. In the Portal menu, select Configure > Search Templates.
2. Click the Session List Templates tab.
3.
4.
5.
6.
302
In the Session List Templates tab, click Standard Template.
The fields in the standard session list template are displayed.
Look for the Login ID field.
If Login ID is listed:
IBM Tealeaf cxImpact: cxImpact User Manual
a. Select it and click Edit.
b. In the Configure Session List Column dialog, verify the following
properties:
1) Title: Login ID
2) Type: If this drop-down is present, select cxImpact.
3) Field: Session Attribute Value
4) Attribute: The name of the session attribute that you created or modified
to store the value of the login identifier (e.g. Login ID).
5) Operation: <Display Field Value>.
6) Leave Contains Large Text Values cleared.
Figure 139. Configuring Session List Templates - Standard
7) If you made changes to the above properties, click Save.
7. If Login ID is not listed:
a. Click All Columns.
b. In the Configured Session List Columns dialog, click the + icon.
c. In the Configure Session List Column dialog, create the new session list
column. Be sure to specify the properties and values described in the
verification step above.
d. Click Save.
e. In the Configured Session List Columns dialog, select the new Login ID
field and click Add to Template.
f. The newly created session list column has been added to the selected session
list template.
Expected Results:
A session list column containing the recorded Login ID session attribute value is
added to a selected session list template.
Step 4 - Test Login ID Hit Attribute and Event
After you have created or configured the hit attribute, event, and session attribute
for Login ID, you may use the following steps to test that they are properly
configured and captured from your web application.
Note: Tealeaf must be currently capturing and analyzing data from your web
application.
You may also test events and hit attributes in the Event Tester.
Chapter 17. Tealeaf End-to-End Scenarios
303
1. Login to the version of the web application that you're monitoring using a
login ID that is unique and not used by others.
2. Navigate to a page where the Login ID is populated.
v When the page is captured by Tealeaf and processed in the Short Term
Canister, the Login ID hit attribute on the page is detected, and the event is
fired on the page in your captured session. The login ID value is recorded in
the session attribute and can now appear in the session list template you
configured.
v Within a minute or two, the data should be available in Tealeaf.
3. From the Tealeaf Portal menu, select Active > Sessions.
4. In the Active Sessions page, in the displayed session list template the Login ID
column for one of the sessions should be populated by the Login ID value that
you used to login. Also, you should see the icon for the Login ID event in the
Events column.
v If the Login ID column or Events column does not appear in the page, select
the session list template that you modified in the previous step from the
drop-down in the upper-right corner.
5. If the test fails, verify that the Start Tag and the End Tag for the hit attribute
match exactly the HTML output from your web application.
a. You must edit the hit attribute again.
b. You can then rerun the sequence in this step to verify that the data is being
captured properly.
Expected Results:
The session you were creating is displayed the list of active sessions. In the list of
fields in the session list template is the Login ID column, which contains the value
for the login identifier that you used to create the session.
Since this value is populated by the Login ID session attribute, you have verified
that it is being properly populated by the event, which is triggered by the hit
attribute.
Related tasks:
“Step 1 - Configure Hit Attribute Login ID” on page 298
Step 5 - Configure Search Template for Login ID
After you verify the capture and storage of the Login ID value to the Login ID
session attribute, you might want to enable searching for the session attribute in
active and completed session data.
For example, for customer service representatives in your organization, you might
want to add the Login ID session attribute to the default Active search template, so
that they can review sessions with customers on the phone who are still navigating
the web application.
v Search for active sessions and for completed sessions uses different search
templates. You can repeat this step for each type of search template.
v To begin, you must add it to an Active search template first, since you can
immediately search for data against the active session that you already created.
1. In the Portal menu, select Configure > Search Templates.
2. Click the Search Templates tab.
304
IBM Tealeaf cxImpact: cxImpact User Manual
3. In the Search template configuration page, select the type of search template in
which to add theLogin ID field. For this example, you can click the Active
node. Select <Default Active.
4. The search fields in the template are listed in the right pane. If Login ID is not
included in the search template, complete the following steps:
a. Click Search Fields.
b. In the Configured Search Fields dialog, scan the list for Login ID.
c. If the field is available, select it and click Add to Template. Skip the
remaining steps in this sequence.
d. If it is not available, complete the following steps:
1) Click the + icon. In the Configure Search Field dialog, you must specify
the following properties:
a) Name: Enter a name for the search field (for example, Login ID).
b)
c)
d)
e)
Input Type: Select Free Text.
Keyword: Select Session attribute.
MD5 Hashing: Select Disabled.
Attribute: Click <Select an attribute. In the Attribute Selector, select
Login ID and click Select.
Figure 140. Configuring Search Templates - Search Field
f) Click Save.
2) In the Configured Search Fields dialog, click Add to Template.
3) Close the window.
e. Click Save. The new field is added to the selected search template.
5. You might want to repeat the previous steps to add the Login ID session
attribute field to search templates of the other types (Completed and All
Sessions).
Expected Results:
Chapter 17. Tealeaf End-to-End Scenarios
305
The Login ID field is added to one or more search templates.
Step 6 - Search for Login ID
In this step, you can use the newly added search field Login ID to search for Login
ID values.
1. To test the search template, select Search in the Portal menu, followed by the
type of search template.
v If you have added it to a Completed session search template only, you may
have to wait until your sample session is closed by you or times out and the
session is processed by Tealeaf.
2. In the Searchpage, check the search template in use. If it is not the one that you
edited, click the Search Template link and select the edited search template.
3. In theSearch page, the Login ID field should be available. Click the Login ID
field to add it the search criteria.
4. Enter the value for the login identifier that you used to create your session.
5. Click Search.
6. Your created session should be displayed in the Search Results page.
7. If you cannot see the Login ID column, select the session list template that you
modified from the drop-down.
Expected Results:
You are able to search using the Login ID value you used to create your session
and to find the session in the displayed search results.
This scenario is complete.
Next Steps
If required, you can create a dimension to track whether or not the Login ID
Sample event occurred during a session, which can be useful in segmenting your
reports between registered visitors and non-registered ones.
E2E Scenario - Create Conversion Rate Dashboard
An important metric of any web application is the conversion rate of each key
business process. The conversion rate measures the percentage of users that finish
a business process after it is began. For example, in many web e-commerce
applications, the sales conversion process begins when a visitor loads an item into
their shopping cart and proceeds to checkout. The conversion rate for this purchase
process, then, is measured as the visitors who purchase the items in their shopping
cart as a percentage of the visitors who begin the checkout process.
In this scenario, you create the data objects that are required to build a meaningful
report on conversion rates for the checkout process of a web application. For the
example web application, this scenario steps through the process of creating the
objects and the reports necessary to surface conversion rates on the checkout
process.
Then, this report is inserted into an existing dashboard and configured for email
delivery. If emailed on a daily basis, you can quickly generate a snapshot of order
conversion rates and deliver them to stakeholders first thing in the morning.
306
IBM Tealeaf cxImpact: cxImpact User Manual
The steps in this report can be generalized to configure reports and dashboard
components for multiple interrelated events and ratios.
Overview
This section introduces the example Strauss & Presser web application, including
the prerequisites and checkout process.
Example Web Application - Strauss & Plesser
In this scenario, we are going to create objects that are based on the Strauss &
Plesser web application. This fictitious retail site is available on the public Internet
and is maintained by Tealeaf for demonstration purposes.
v For more information, see http://www.straussandplesser.com.
Prerequisites
This scenario requires that extended user agent parsing be enabled in your Tealeaf
solution. Extended user agent parsing enables the capture of user agent
information from the visitor's browser. This string-based information is used to
look up against a public standard, which provides much greater detail.
Extended user agent parsing can already be enabled in your Tealeaf solution.
Extended user agent parsing is a component of the Tealeaf Reference session agent,
which must be deployed in your Windows pipeline.
Related concepts:
“E2E Scenario - Create Top Products Dashboard” on page 340
Example Process - Checkout
Suppose that your web application is an e-commerce site with a simple checkout
process.
Table 34. Example Process - Checkout
Sequence
Page
Description
Add to Cart
Whenever the customer clicks Add to
Cart, this page is displayed. This
page is not part of the checkout
process but can be the referrer to the
Checkout page.
Checkout method
Choose whether to check out as a
registered user or guest. On Strauss
& Plesser, this step can or cannot be
part of the checkout process, as
visitors are not required to select one
of these options; if no option is
selected, then the visitor is
automatically processed as a guest.
For our purposes, this page is not
part of the formal checkout process.
1
Billing
Customer enters billing address.
2
Shipping
Customer enters shipping
information, if different from billing
information.
Chapter 17. Tealeaf End-to-End Scenarios
307
Table 34. Example Process - Checkout (continued)
Sequence
Page
Description
3
Shipping Method
Customer enters preferred shipping
method.
4
Payment
Customer enters billing information.
Check/Money order or credit card
accepted.
5
Order Review
Last chance to review order before it
is submitted. When the customer
clicks Place Order, the order is
processed.
6
Confirmation
Confirmation page with order ID is
presented to customer. Process is
complete.
The flow of pages is a basic business process. In the steps below, you can see the
process steps in detail, followed by the steps to create the Tealeaf data objects to
track this process.
For purposes of this exercise, a conversion rate is measured only for a pair of the
following two events:
v Checkout - Start. The checkout process is began. On Strauss & Plesser, this step
occurs when the customer enters billing information.
v Checkout - Order Confirmation. The order was completed, and a success
message was returned to the visitor. On Strauss & Plesser, this step occurs when
theConfirmation page is displayed, containing an order number.
For more detailed reporting, you might want to create the more events to track all
steps in the process.
Add to Cart: Through the product pages, you can add items to your shopping
cart. In this case, you added a Sony laptop to your Strauss & Plesser shopping cart:
308
IBM Tealeaf cxImpact: cxImpact User Manual
Figure 141. Example site - Add to Cart
URL:
http://www.straussandplesser.com/store/index.php/sonyvaio-vgn-txn27n-b-11-1-notebook-pc-intel-core-solo-processor-u1500-2-gbram-100-gb-hard-drive-dvd-rw-drive-vista-business-charcoal-black.html
When the Add to Cart button is clicked, the item is added to the cart, which is
displayed:
Chapter 17. Tealeaf End-to-End Scenarios
309
Figure 142. Example site - Shopping Cart
URL:
cart
http://www.straussandplesser.com/store/index.php/checkout/
Checkout Method: Depending on whether you login to the site, you mightbe
prompted to choose the account under which you are checking out. In the
following example, you are checking out of Strauss & Plesser as a registered user,
Joe Customer:
Note: The workflow on your web application might not include this site.
Customers might be required to login before they add products to a shopping cart,
for example.
310
IBM Tealeaf cxImpact: cxImpact User Manual
Figure 143. Example site - Checkout Method
URL:
http://www.straussandplesser.com/store/index.php/checkout/
onepage/chooseShippingMethod
1 - Billing: The first formal step of the checkout process is to review or enter your
billing information:
Chapter 17. Tealeaf End-to-End Scenarios
311
Figure 144. Example site - Billing
URL:
http://www.straussandplesser.com/store/index.php/checkout/
onepage/billing/checkout_method/guest
2 - Shipping: Then, you are prompted to enter shipping information, if different,
or to confirm your listed shipping information:
312
IBM Tealeaf cxImpact: cxImpact User Manual
Figure 145. Example site - Shipping
URL:
http://www.straussandplesser.com/store/index.php/checkout/
onepage/shipping
3 - Shipping Method: You can select the method by which your order is shipped.
On Strauss & Plesser, only one option is available for the selected Sony product:
Chapter 17. Tealeaf End-to-End Scenarios
313
Figure 146. Example site - Shipping Method
URL:
http://www.straussandplesser.com/store/index.php/checkout/
onepage/chooseShippingMethod
4 - Payment: In the next screen, you choose how you want to pay for your order.
On Strauss & Plesser, check, money order, or major credit card is "accepted":
Note: Credit card information is not captured on Strauss & Plesser.
314
IBM Tealeaf cxImpact: cxImpact User Manual
Figure 147. Example site - Payment
URL:
http://www.straussandplesser.com/store/index.php/checkout/
onepage/choosePayment
5 - Order Review: After you entere all applicable shipping and billing
information, you can review your order one last time before you place the order.
To place the order on Strauss & Plesser, click Place Order:
Note: Strauss & Plesser is a fictitious web application. No order is actually placed
for products.
Chapter 17. Tealeaf End-to-End Scenarios
315
Figure 148. Example site - Order Review
URL:
http://www.straussandplesser.com/store/index.php/checkout/
onepage/reviewOrder
6 - Confirmation: When the order is "processed," a confirmation page is
displayed, including your confirmation order number:
316
IBM Tealeaf cxImpact: cxImpact User Manual
Figure 149. Example site - Confirmation
URL:
onepage/success
http://www.straussandplesser.com/store/index.php/checkout/
Other Checkout Activities to Track: In addition to the basic checkout activities,
the following activities can be useful to track on your web application. You can see
examples and how they occur on the Strauss & Plesser web application.
Note: Configuring these items is outside the scope of this scenario.
Table 35. Other Checkout Activities to Track
Action
Description
Strauss & Plesser
Clear
shopping
cart
Remove contents of the shopping
cart.
On the Shopping Cart page, set all
values to 0 and click Update
Shopping Cart.
Remove
from
shopping
cart
Remove one selection from the
shopping cart.
On the Shopping Cartpage, click
Remove Product.
Continue
shopping
After the shopping cart is cleared or
a purchase is completed, visitors can
choose to continue looking for things
to buy.
On various pages, click continue
shopping link.
Now, you create the data objects to track this process.
Step 1 - Create Dimension: Browser Platform
This step creates a dimension that is called Browser Platform from an existing hit
attribute Browser OS.
Chapter 17. Tealeaf End-to-End Scenarios
317
v This attribute is provided by Tealeaf.
A dimension is a piece of contextual information that can be recorded when an
event occurs. In this example, when an event associated with this dimension
occurs, the browser platform information, which can include entries for Windows
or Macintosh operating systems, is also recorded with the event for reporting
purposes.
In this step, you create the dimension that is based on a hit attribute, which is a
pattern of text that is detected in either the request or the response of a hit. In this
case, the Browser OS hit attribute is preconfigured to detect the presence of a value
indicating the operating system.
v This value is inserted by extended user agent parsing.
The following steps provide the basics for how to create this dimension. You might
have already created it in another End-to-End Scenario, where more detail is
provided.
v See "E2E Scenario - Create Top Products Dashboard" in the IBM Tealeaf cxImpact
User Manual.
1. In the Tealeaf Event Manager, click the Dimensions tab.
2. Click New Dimension....
3. Enter the following information:
v Name: Browser Platform
v Populated by Hit Attribute: Browser OS.
318
IBM Tealeaf cxImpact: cxImpact User Manual
Figure 150. Add Dimension - Browser Platform
v Click Save Draft.
v See "TEM Dimensions Tab" in the IBM Tealeaf Event Manager Manual.
Expected Results:
The new dimension is listed in the Event Manager, highlighted in red because it is
not yet saved to the server. It is saved in a later step.
Step 2 - Create Dimension: Browser Version
This step creates a dimension from an existing hit attribute Browser Version.
v This attribute is provided by Tealeaf and is captured when extended user agent
parsing is enabled.
This dimension captures the version of the browser that the visitor is using to
browse your web application. This information can be useful for debugging
browser-specific issues, which can directly impact revenue in the checkout process.
Chapter 17. Tealeaf End-to-End Scenarios
319
The steps below provide the basics for how to create this dimension. You may
have already created it in another End-to-End Scenario, where additional detail is
provided.
v See "E2E Scenario - Create Top Products Dashboard" in the IBM Tealeaf cxImpact
User Manual.
1. In the Tealeaf Event Manager, click the Hit Attributes tab.
v Right-click hit attribute Browser Version and select Create Dimension Using
Hit Attribute....
v Enter Name: Browser Version.
Figure 151. Add Dimension - Browser Version
2. Click Save Draft.
v See "TEM Dimensions Tab" in the IBM Tealeaf Event Manager Manual.
Expected Results:
The new dimension is listed in the Event Manager, highlighted in red because it
has not yet saved to the server. It is saved later.
Step 3 - Create Report Group: Browser Platform & Version
This step creates a report group Browser Platform & Version, which contains these
dimensions: Browser Platform, Browser Version.
A report group is an organizing structure for dimensions. In the Tealeaf Report
Builder, you can include multiple dimensions in a report if they belong to the same
report group. This structure enables efficient storage of dimensional data while
maintaining flexibility in reporting.
v A report group can contain up to four dimensions.
v A dimension must belong to at least one report group.
320
IBM Tealeaf cxImpact: cxImpact User Manual
v See "TEM Dimensions Tab" in the IBM Tealeaf Event Manager Manual.
The followingsteps provide the basics for how to create this dimension.
v See "E2E Scenario - Create Top Products Dashboard" in the IBM Tealeaf cxImpact
User Manual.
1. In the Tealeaf Event Manager, press the CTRL key and select both dimensions
Browser Platform and Browser Version.
2. Right-click and select Create Report Group Using Dimension(s)....
3. Enter:
v Name: Browser Platform & Version
4. If the Template drop-down is present, select Standard.
5. Click Add Dimensions?.
a. Add the Browser Platform dimension.
b. Add the Browser Version dimension.
Figure 152. Conversion - Add Report Group
v Click Save Draft.
6. To commit all of your changes to the server, click Save Changes. The changes
are now part of the live event objects.
v See "TEM Dimensions Tab" in the IBM Tealeaf Event Manager Manual.
Expected Results:
The Browser Platform & Version report group is defined with the two new
dimensions in it.
Chapter 17. Tealeaf End-to-End Scenarios
321
Step 4 - Locate Session with Shopping Cart Value
For the next step, you must locate a session in which products have been added to
the shopping cart. Through Browser Based Replay, you can then create a hit
attribute to detect for the presence of a shopping cart value.
1. In the Tealeaf Portal, select Search > Completed Sessions.
2. In the Completed Session Search page, add the following two search terms:
a. Basic Search Fields: Text In Response
v Specify that the response includes a product that has been ordered. In the
Strauss & Plesser site, the Sony VAIO laptop product has been added as
part of the data creation section above.
b. Page Information: Page URL
v Set this value to include the Order Review or Order Confirmation page.
In our example, this URL is the following:
http://www.straussandplesser.com/store/index.php/checkout/
onepage/reviewOrder
v Because of the way URLs are indexed, the entire URL text is not a useful,
searchable item. When you enter URLs in the search fields, you should
enter only the uniquely identifiable component of the URL. In our
example, this text is the following:
reviewOrder
3. Your search fields should look something like the following:
Figure 153. Search for sessions
4. To submit the search, click Search.
5. The list of displayed sessions is a good data set for the following step.
Step 5 - Saving Searches
This list of sessions can be useful for evaluation purposes later in this scenario. You
might want to access this list at a later time. There are multiple ways of retrieving
the search:
1. At the bottom of the session list, you must see a query string that looks like the
following:
(response contains "Sony VAIO") AND (url contains reviewOrder)
This value can be inserted into the All Text field in the search page to
re-execute the same query. Remember to specify the appropriate search scope.
v See "Searching Session Data" in the IBM Tealeaf cxImpact User Manual.
322
IBM Tealeaf cxImpact: cxImpact User Manual
2. Through the search page, you can save configured searches.
v See "Searching Session Data" in the IBM Tealeaf cxImpact User Manual.
3. Depending on your configuration settings, this search may be automatically
saved for you as a session segment. A session segment is a set of sessions that
can be collectively reviewed and analyzed for reporting.
v To review session segments, click Manage Segment in the session list. Or
you may select Analyze > Segments > Manage Session Segments. If IBM
Tealeaf cxImpact has been configured to create a session segment for each
search, your search should be listed in the page. See "Managing Session
Segments" in the IBM Tealeaf cxResults User Manual.
Note: Depending on the products you licensed or the permissions in your
account, the above menu item may not be available. For more information,
please contact your Tealeaf administrator.
v For more information about enabling the auto-creation of session segments,
see "CX Settings" in the IBM Tealeaf cxImpact Administration Manual.
Step 6 - Create Hit Attribute: Shopping Cart Value
This step creates through IBM Tealeaf CX Browser Based Replay a hit attribute that
is called Shopping Cart Value, which is configured to acquire the shopping cart
value whenever it is displayed in your web application.
v See "CX Browser Based Replay" in the IBM Tealeaf cxImpact User Manual.
1. From the list of sessions that are returned in the search from the previous
) icon. Select Browser.
step, click the replay (
2. The session is opened in Browser Based Replay. See "CX Browser Based
Replay" in the IBM Tealeaf cxImpact User Manual.
3. Scan the session to find a page in which the shopping cart value is displayed.
In the following screen, the Cart Subtotal value is the desired figure:
Chapter 17. Tealeaf End-to-End Scenarios
323
Figure 154. Shopping cart value
4. Highlight the value. Remember it. Then, right-click it and select the option
that displays the HTML source of the page. This selection varies between
browsers.
Note: If you choose to create a hit attribute from the selection, the Event
Manager specifies a hit attribute that is looking for the highlighted text,
instead of the patterns of text that surround the value.
5. In the document source, scan for the shopping cart value. On Strauss &
Plesser, the following HTML specifies the shopping cart value in the page:
<p class="subtotal">Cart Subtotal: <strong><span class="nobr">
$ 1,199.99</span></strong>
</p>
6. From the above, we can deduce that the tag that uniquely prefaces the current
value for the shopping cart is:
<p class="subtotal">Cart Subtotal: <strong><span class="nobr">$
v In the above, there is a space after the $.
7. Similarly, we can deduce that the tag that uniquely identifies the conclusion of
the current value of the shopping cart is:
</span></strong>
8. Click Cancel to close the document source.
9. Now, highlight the value of the shopping cart. Right-click and select Create
new hit attribute from selection....
10. The Event Manager opens, displaying a preconfigured hit attribute definition
to identify the specific value of the shopping cart. This hit attribute must be
modified to locate the start tag and end tag that uniquely identify the
presence of the shopping cart value on the page. Please make the following
changes to the properties:
324
IBM Tealeaf cxImpact: cxImpact User Manual
v Name: Checkout - Shopping Cart Value
v Description: Something meaningful to indicate that this is the shopping cart
value from the checkout process.
v Click the Use Start Tag/End Tag radio button.
v For Strauss & Plesser, the Start Tag value is:
<p class="subtotal">Cart Subtotal: <strong><span class="nobr">
v For Strauss & Plesser, the End Tag value is the:
</span></strong>
11. Leave other options as defaults.
Figure 155. Shopping Cart Value hit attribute
12. To save your draft, click Save Draft.
13. To commit all of your changes to the server, click Save Changes.
Chapter 17. Tealeaf End-to-End Scenarios
325
v See "TEM Hit Attributes Tab" in the IBM Tealeaf Event Manager Manual.
Expected Results:
The new hit attribute is displayed in the list in Tealeaf Event Manager.
Step 7 - Create Event: Shopping Cart Value
Now you can create an event that uses the Shopping Cart Value hit attribute as a
condition input.
1. In the Tealeaf Event Manager, select the Events tab.
2. Click New Event.
3. The New Event dialog is displayed. Enter the following information:
v Name: Shopping Cart Value
v Evaluate On: Every Hit.
v Track: Last per Session.
Note: As configured, this event tracks the last value for the shopping cart
value in the session. In most sessions, this value is the value that was
purchased. However, it is possible for the visitor to make two distinct
purchases in a single session. The first one cannot be captured.
v Value Type: Numeric.
v Active: selected.
v Searchable & Reportable: selected.
4. For the Condition step:
v Add Hit Attribute: Shopping Cart Value
v Select Hit Attribute Found IsTrue. The condition parameters are configured.
326
IBM Tealeaf cxImpact: cxImpact User Manual
Figure 156. Add Event - Shopping Cart Value
5. For the Value step:
v Click Select Item to Record. Select the Hit Attribute: Shopping Cart Value.
Set the value to Last Match per Hit.
v Leave other options as defaults.
6. For the Report Groups step:
v Add the URL/Host/App/Server report group.
7. You do not make any changes in the More Options tab.
8. Click Save Draft.
9. To commit your changes to the server, click Save Changes.
v See "TEM Events Tab" in the IBM Tealeaf Event Manager Manual.
Expected Results:
The Shopping Cart Value event is added to the list in the Event Manager.
Note: The value that is recorded is the last value per session.
Step 8 - Create Dimension: Shopping Cart Value
In this step, you create a dimension to capture the Shopping Cart Value. To match
the values generated by the event, which tracks the last instance in the session,
you must base this dimension off of the event Shopping Cart Value, instead of the
hit attribute.
Chapter 17. Tealeaf End-to-End Scenarios
327
1. In the Tealeaf Event Manager, click the Dimensions tab.
2. Click New Dimension....
3. Configure the following properties:
v Name: Checkout - Shopping Cart Value.
v Description: Add a user-friendly description.
v Populated By: Click Select.... Navigate to select the Checkout - Shopping
Cart Value event.
v Populated With: Select Last Value in Session.
Figure 157. Add Dimension - Shopping Cart Value
4. Click Save Draft.
v See "TEM Dimensions Tab" in the IBM Tealeaf Event Manager Manual.
Expected Results:
The new dimension is displayed in the Event Manager highlighted in red because
it has not yet been saved to the server. It will be saved in a later step.
Step 9 - Create Event: Checkout - Start
Now you can create the events to identify the checkout process. These events are
then used in the dashboard as milestones for purposes of calculating the
conversion rate.
This step creates an event from BBR to mark the start of the checkout process:
Checkout - Start.
1. To begin, you must find a session in which the visitor began the checkout
process and was able to complete the order.
v If you saved your previous search, you can be able to use it to find an
appropriate session. See “Step 5 - Saving Searches” on page 322.
328
IBM Tealeaf cxImpact: cxImpact User Manual
2. Open the session in BBR. Go to the page where the visitor began the checkout
process.
3. To switch to request mode in BBR, click Request in the toolbar.
v Highlight the entire URL name/value pair in the request: In our Strauss &
Plesser example:
TLT_URL=/store/index.php/checkout/onepage/defaultpage
v Right-click and select Create New Event From....
4. The New Event dialog in the Event Manager is displayed with some fields
populated. Populate the following fields.
a. For the Event Summary:
1) Event Name: Checkout - Start.
2) Evaluate On: Every Hit.
3) Track: First per Session.
4) Value Type: Count Only.
5) Active: selected.
6) Searchable & Reportable: selected.
b. For the Condition step:
1) Verify that the Hit Attribute condition is set to URL (Normalized)
including the correct value.
2) Select First Value and Includes from the drop-downs.
Figure 158. Add event - Checkout Start
c. For the Value step, no additional parameters require configuration.
d. For the Report Groups step:
1) Add the report group: Browser Platform & Version.
Chapter 17. Tealeaf End-to-End Scenarios
329
e. For the More Options step, no additional parameters require configuration.
5. Click Save Draft. The new event is shown in the list in the Event Manager,
highlighted in red.
6. To commit your changes to the server, click Save Changes.
v See "TEM Events Tab" in the IBM Tealeaf Event Manager Manual.
Expected Results:
The event Checkout - Start is created.
Step 10 - Create Event: Checkout - Order Confirmation
This step creates an event from BBR to identify when the order is completed,
which indicates a complete sales conversion: Checkout - Order Confirmation.
1. You can use the session from the previous section, if it includes the order
complete step.
v Otherwise, you might have to search again. See “Step 5 - Saving Searches”
on page 322.
a. Restore the browser window where the session is opened.
b. In the toolbar, click Replay.
c. Scroll through the pages until you see the order confirmation page.
Highlight an indicator on the page that identifies for the visitor that the
purchase is completed. For example, in Strauss & Plesser, this confirmation
is displayed in the following URL as recorded in the request:
TLT_URL=/store/index.php/checkout/onepage/success/defaultpage
Note: In some cases, there can be a uniquely identifiable message in the
response, such as Thank you for your purchase. However, if someone
makes the minor change to Thanks for your purchase, your event does not
capture the change. You must configure it to track the uniquely identifiable
object that is least likely to change without notice.
2. Right-click this message and select Create New Event From.... The New Event
dialog is displayed, with fields populated. Configure the following properties:
a. For the Event Summary:
1) Enter Name: Checkout - Order Confirmation
2) Evaluate On: Every Hit.
3) Value Type: Count Only
4) Tracked: Last Per Session.
b. For the Condition step:
1) Verify that the Hit Attribute condition is set to URL (Normalized)
includes the correct value.
2) Select First Value and Includes from the drop-downs.
330
IBM Tealeaf cxImpact: cxImpact User Manual
Figure 159. Add event - Checkout Order Confirmation
c. For the Value step, no additional configuration is required.
d. For the Report Groups step:
1) Add the report group: Browser Platform & Version
e. For the More Options step, no additional configuration is required.
3. Click Save Draft. The event is shown in the list in the Event Manager,
highlighted in red.
4. To commit your changes to the server, click Save Changes.
v See "TEM Events Tab" in the IBM Tealeaf Event Manager Manual.
Expected Results:
The new event Checkout - Order Confirmation is added.
Step 11 - Create Other Events in Checkout Process
For higher fidelity reporting, you might want to create events for the intermediate
steps in the checkout process. Already, you create the events to track the start and
end of the process. Following are the steps in the checkout process, as reflected in
Strauss & Plesser.
Table 36. Step 11 - Create Other Events in Checkout Process.
Step
Number
Step Name
Description
2
Shipping
Customer enters shipping
information, if different from billing
information.
Chapter 17. Tealeaf End-to-End Scenarios
331
Table 36. Step 11 - Create Other Events in Checkout Process (continued).
Step
Number
Step Name
Description
3
Shipping Method
Customer enters preferred shipping
method.
4
Payment
Customer enters billing information.
Check/Money order or credit card
accepted.
5
Order Review
Last chance to review order before it
is submitted. When customer clicks
Place Order, the order is processed.
Depending on the structure of the checkout process of your web application, it
may be a good idea to create the events to detect these pages. Below, a set of steps
are provided to identify when the customer has visited the Order Review page.
1. In the Event Manager, click New Event....
2. The New Event dialog appears, with fields populated. Configure the following
settings:
v For the Event Summary:
– Enter Name: Checkout - Order Review
– Value Type: Count Only
– Track: Last Per Session.
v For the Condition step:
– Hit Attribute: URL (Normalized)
– Select First Value and Includes from the drop-downs.
– For Strauss & Plesser, the URL to enter is the following:
332
IBM Tealeaf cxImpact: cxImpact User Manual
Figure 160. Add Event - Order Review
v For the Value step, no additional configuration is required.
v For the Report Groups step:
– Add the report group: Browser Platform & Version
v For the More Options step, no additional configuration is required.
3. Click Save Draft. The event is shown in the list in the Event Manager,
highlighted in red.
4. To commit your changes to the server, click Save Changes.
v See "TEM Events Tab" in the IBM Tealeaf Event Manager Manual.
The above steps can be repeated for each step in the checkout process, changing
the Name, Description and URL for each event as needed.
Expected Results:
Events to monitor the occurrence of all steps in the checkout process have now
been created.
Step 12 - Create Report
Before you continue, all of the previous steps must be completed.
Note: Allow sufficient time for the events to fire and to record data that can be
captured in reports. This time can vary between 1 hour and 24 hours, depending
on the volume of traffic to your website.
In this step, you create a simple report that tabulates the sum of completed orders,
as reported by the event Checkout - Order Confirmation.
Chapter 17. Tealeaf End-to-End Scenarios
333
1. In the Tealeaf Report Builder, click the New button to clear the report.
2. Click Add Event.
3. Select the event Checkout - Order Confirmation. The Complete Order event is
added to the report.
4. In the Event drop-down menu, select Rename.
v Enter the name as: Transaction Counts. The event display name is changed.
Note: This renaming only changes the name of the event as it is displayed in
this report. It does not affect the name of the event elsewhere in Tealeaf.
5. In the event drop-down, click Add Function > Previous Days Average.
6. The function is added. Select the function drop-down. Then, select Function
Period > 7. The chart displays the last 7 Day Average.
v See "Tealeaf Report Builder" in the IBM Tealeaf Reporting Guide.
Expected Results:
Figure 161. Report Builder - Transaction Counts report
The report is created, including the event Checkout - Order Confirmation, which
is renamed for display purposes to Transaction Counts. A function is added to
calculate the average value for the event over the preceding 7-day period.
Step 13 - Add Conversion Rate Ratio (Checkout - Order Start
to Checkout - Order Confirmation)
In this step, you create and add a ratio to the report, which tabulates the ratio of
completed orders to those that began the checkout process.
334
IBM Tealeaf cxImpact: cxImpact User Manual
In the Tealeaf Report Builder, you can create a ratio between recorded values of
events. In this example, you are dividing the number of order completions by the
number of order starts to yield the conversion rate. Ratios in the Report Builder
enable simple rate calculations.
v See "Tealeaf Report Builder" in the IBM Tealeaf Reporting Guide.
1. In Report Builder, click Add Ratio. Select the Checkout - Order Confirmation
event as the numerator (count). Select the Checkout - Start event as the
denominator (count).
2. Click Add to Report. The Report shows the ratio of count values.
3. In the Ratiodrop-down menu, click Rename. Enter Conversion Rate. The ratio
name is changed to Conversion Rate.
4. In the toolbar, click Options. Click the Advanced tab.
v Select the Y-axis checkbox.
v Scale: 100%
v Auto Zoom: Enabled
v Select the metric to which the scaling applies.
v Click Apply. The chart now shows a second Y-axis called percentage, and the
conversion rate bar follows these ticks.
5. In the ratio drop-down, click Add Function > Previous Days Average.
6. The function is added. Select the function drop-down. Then, select Function
Period > 7. The chart displays the last 7 Day Average.
v See "Tealeaf Report Builder" in the IBM Tealeaf Reporting Guide.
Expected Results:
Figure 162. Report Builder - Transaction Counts and Conversion Ratio report
Chapter 17. Tealeaf End-to-End Scenarios
335
The conversion rate appears as a ratio in the report, along with a function to
calculate the average value for the ratio over the preceding 7-day period.
Note: Since you just created the events, there may not be seven days of data from
which to provide accurate comparisons. Within a week, the averaging function
should contain meaningful data. Values of zero are not factored.
Step 14 - Segment by Browser Platform
You can use segments to filter the entire report based on a dimension. For
example, your Customer Support department reported that some users of
Windows XP-based systems are unable to complete the checkout process. You can
add the Browser Platform dimension as the segment of the report and then filter to
display only the Windows XP data, which can help you in identifying the issue
and its impacts.
In this step, you add the Browser Platform dimension as the segment of the report
and then filter the report by the WinXP value of the dimension.
1. Add the dimension Browser Platform as the segment for the report.
2. From the segment drop-down, select Filter.
3. From the Filter By Value drop-down, select Include Only Selected Values.
4. Click All Values.
5. Select WinXP.
Figure 163. Filtering report by WinXP operating system
v See "Tealeaf Report Builder" in the IBM Tealeaf Reporting Guide.
336
IBM Tealeaf cxImpact: cxImpact User Manual
Expected Results:
The report is modified to display only data for the WinXP browser platform.
Step 15 - Set Y-Axis as Browser Version
Adding a dimension to the Y-axis allows you to create stacked bar charts, in which
you can see how the vertical value is affected by each detected value in the added
dimension.
In this step, you configure the Y-axis of the report to be the Browser Version
dimension.
Note: If the X-axis contains multiple events and ratios, the chart cannot be
displayed after adding the Y-axis dimension. The detail table shows specific
transaction counts and conversion rates for each detected browser type for
Windows XP. For purposes of this scenario, this step is optional.
Steps: #Add the dimension Browser Version to the Y-axis of the report.
Note: Since multiple items are charted on the Y-axis, the Tealeaf Report Builder
does not support charting of reports containing multiple series.
The report must automatically update. If it does not, click the Refresh button in the
toolbar.
v See "Tealeaf Report Builder" in the IBM Tealeaf Reporting Guide.
Expected Results:
The report now shows data in the Y-axis for the browser version.
Step 16 - Save/Clear/Reopen Report
Save the report and re-open it.
1. In the toolbar, click the Save icon.
2. Enter name: Checkout - Conversion Rate and click Save.
3. The report is saved with the entered name, and name is displayed at top of the
chart.
4. In the toolbar, click the New icon. The report becomes blank.
5. In the toolbar, click the Open icon. Select Checkout - Conversion Rate.
v See "Tealeaf Report Builder" in the IBM Tealeaf Reporting Guide.
Expected Results:
The Checkout - Conversion Rate report is re-loaded.
Step 17 - Add Report to Dashboard
Now, you can add the configured report as a component to a dashboard. For this
example, the report can be added to a dashboard called Conversion Rates.
v For more information about creating dashboards, see "Configuring Dashboards"
in the IBM Tealeaf cxView User Manual.
Chapter 17. Tealeaf End-to-End Scenarios
337
1. With the Checkout - Conversion Rate report loaded in the Report Builder, click
) icon. The Add Report to Dashboard
the Add Report to Dashboard (
pop-up window appears.
2. Click <Select a dashboard tab.
3. Select the Conversion Rates dashboard. Select the Default tab. Click Select. The
target tab shows Conversion Rates - Default.
4. Verify that Drilldown is set to Enabled.
Figure 164. Adding report to dashboard
5. Click Add. The report is added as a component to the Conversion Rates
dashboard.
v See "Tealeaf Report Builder" in the IBM Tealeaf Reporting Guide.
6. To verify, select Dashboards. If Conversion Rates is available, select it. Else,
click More.... Select the dashboard from the pop-up menu.
7. Click the Default tab.
v See "Using Dashboards" in the IBM Tealeaf cxView User Manual.
Expected Results:
The report is displayed as a component of the Default tab of the Conversion Rates
dashboard.
Step 18 - Email Dashboard Daily
You can email the dashboard to yourself as a test.
1. From the Portal menu, select Configure > Dashboards. The Configure
Dashboards page is displayed.
2. Select Dashboard Schedules. Click <Create Schedule.
3. The New Schedule form is displayed.
4. Enter the following:
338
IBM Tealeaf cxImpact: cxImpact User Manual
v Description: Conversion Rates
v Send At: Select the top of the next hour.
v Recipient: Enter your email address.
v Click <Select dashboard. Select the dashboard.
5. Click Save.
v See "Configuring Dashboards" in the IBM Tealeaf cxView User Manual.
Expected Results:
The Dashboard Schedule is saved. When the next hour arrives, you should receive
an emailed version of the dashboard.
After the dashboard has been successfully received, you can reconfigure the
dashboard schedule so that the dashboard is emailed to stakeholders each
morning.
Step 19 - Drill Down to the Report
When the dashboard arrives via email at the top of the next hour, you can test the
drill-down capabilities of the dashboard.
1. In the received email, click the Default tab. A browser window opens to display
the dashboard tab.
2. For the dashboard component, click the View Report Data icon.
v See "Using Dashboards" in the IBM Tealeaf cxView User Manual.
Expected Results:
The Report Builder is loaded with the Checkout - Conversion Rate report.
Step 20 - Drill Down to the Sessions
From the Report Builder, you can perform a drill-down search to retrieve the
sessions that comprise the report data.
1. When the report has been loaded in the Report Builder, click the link in the
detail table.
2. A session list shows the matching sessions.
v See "Tealeaf Report Builder" in the IBM Tealeaf Reporting Guide.
Expected Results:
The sessions underlying the report are displayed in the default session list.
This scenario is complete.
Extra:
You can use this scenario as the basis for building the conversion rates for other
business processes. When the reports are created in the Report Builder, they can be
added to the Conversion Rates dashboard that you've already created.
Now that you've created the Shopping Cart Value hit attribute, event, and
dimension, you can build quite a bit of value-based reporting off of these objects.
Chapter 17. Tealeaf End-to-End Scenarios
339
E2E Scenario - Create Top Products Dashboard
A common use of Tealeaf reporting data is to derive information on products that
customers are adding to their shopping cart, as segmented by information about
the visitor's browser.
In this End to End scenario, you can step through the process of creating the hit
attributes, dimensions, and events that capture this visitor information and the
products added to their shopping carts.
After the data has been captured, you can follow a few simple steps to create a
report in which the data is segmented using the dimensions you created. This
report can then be added to an existing dashboard.
Overview
The following steps outline the basic process for this tutorial.
Basic Steps
1. Enable Extended User Agent Parsing in the Tealeaf Reference session agent that
is deployed in your Windows pipeline.
2. Create the hit attributes and dimensions for the following visitor information:
v Browser Platform
v Browser Version
v Added Product
3. Create a report group to hold the three dimensions.
4. Create an event that is called Add Product to count the number of added
products and associated with the configured report group
5. Find a session with the Add Product event in it.
6. Test the session for the presence of the other hit attributes and dimensions that
were created.
7. Create a report with the new event.
8. Apply dimensional filters from the report group to restrict the data to only
show:
v Top 5 products.
v Requested from a single operating system
v Broken down by operating system version
9. Add the report to an existing dashboard.
Example Web Application - Strauss & Plesser
In this scenario, we are going to create objects that are based on the Strauss &
Plesser web application. This fictitious retail site is available on the public Internet
and is maintained by Tealeaf for demonstration purposes.
v For more information, see http://www.straussandplesser.com.
Prerequisites
As a prerequisite you must enable extended user agent parsing.
Enable Extended User Agent Parsing
Browser platform and version information is collected from the visitor's browser
based upon the detected user agent string. A user agent is any device or entity that
340
IBM Tealeaf cxImpact: cxImpact User Manual
accesses your web application. Example user agents could be fixed desktop
browsers, mobile devices, or bots, which may be crawling your web application for
searching engine indexing purposes.
A string identifying the user agent is reported in each request submitted to your
web application. This string can then be used to look up additional information
about the device contacting your web application. This additional information is
maintained and published as a public standard, which Tealeaf utilizes to capture
and store information about individual visitors and their devices. There are two
public standards that Tealeaf uses:
v Browscap: This standard is utilized for fixed desktop user agents.
v WURFL: This standard is used for mobile devices.
Note: The capture of mobile device information is a component of cxImpact, a
separately licensable component of the Tealeaf CX platform. For more
information, please contact your IBM Tealeaf representative.
Before you begin this end-to-end scenario, you must verify that your Tealeaf
solution has been enabled and configured to capture user agent information and to
utilize the public standards to acquire the additional information. Please verify the
following:
v Tealeaf Reference session agent has been deployed and enabled in your
Windows pipeline.
v For the Tealeaf Reference session agent, extended user agent parsing has been
enabled.
Acquire Start and End Tags for Added Products
In our Strauss & Plesser example, the name of the product added to the shopping
cart always displayed between two uniquely identifiable bits of HTML. The hit
attribute is populated by a consistent pattern in the response that is displayed
between a Start tag and an End tag that you identify for Tealeaf. For the Strauss &
Plesser site, the tags are the following.
Start tag:
<ul class="messages"><li class="success-msg"><ul><li>
End tag:
was successfully added to your shopping cart.
Note: There is a space before was.
If you are attempting to build this scenario for your own web application, your
site is likely to have a different set of tags that appear in the response that bracket
the product information.
Note: Before you continue, you must identify the response tags that bracket the
product name when added to the shopping cart of your site. If you do not know
this information, your event is unlikely to fire, and no reporting data will be
present.
Step 1 - Create Dimension: Browser Platform
A dimension is a piece of contextual information that can be recorded when an
event occurs. In our example, the browser platform information, such as Win XP
can be configured to be recorded when an event occurs.
Chapter 17. Tealeaf End-to-End Scenarios
341
v Later in the scenario, you will create an event that is triggered when a product
is added to the shopping cart on the Strauss & Plesser web application.
In this step, you create a dimension called Browser Platform. This dimension is
populated by the Browser OS hit attribute, which is provided by Tealeaf. A hit
attribute is a pattern of text that is detected in either the request or the response of
a hit. In this case, the Browser OS hit attribute is preconfigured to detect the
presence of a value indicating the operating system.
v This value is inserted into the request by extended user agent parsing.
When this hit attribute is detected, the detected value is recorded in the dimension
that is configured in this step.
1. To open the Tealeaf Event Manager, select Configure > Event Manager.
2. In the Event Manager, click the Dimensions tab.
Figure 165. Tealeaf Event Manager - Dimensions tab
3. Click New Dimension.
4. Configure the following properties and values.
a. Name: Browser Platform
b. Click Select?. In the Select Item selector, expand the Hit Attributes category.
Open System Hit Attributes. Select the Browser OS hit attribute.
342
IBM Tealeaf cxImpact: cxImpact User Manual
Figure 166. Select hit attribute
c. In the Populated With drop-down, select First Value on Page/Hit.
d. Leave the other values at their default settings.
Chapter 17. Tealeaf End-to-End Scenarios
343
Figure 167. Add dimension Browser Platform
5. To save your draft, click Save Draft.
6. To commit your changes, click Save Changes in the toolbar.
Expected Results:
The Browser Platform dimension is created.
Step 1 - Create Dimension: Browser Platform
This step creates a dimension that is called Browser Platform from an existing hit
attribute Browser OS.
v This attribute is provided by Tealeaf.
A dimension is a piece of contextual information that can be recorded when an
event occurs. In this example, when an event associated with this dimension
occurs, the browser platform information, which can include entries for Windows
or Macintosh operating systems, is also recorded with the event for reporting
purposes.
344
IBM Tealeaf cxImpact: cxImpact User Manual
In this step, you create the dimension that is based on a hit attribute, which is a
pattern of text that is detected in either the request or the response of a hit. In this
case, the Browser OS hit attribute is preconfigured to detect the presence of a value
indicating the operating system.
v This value is inserted by extended user agent parsing.
The following steps provide the basics for how to create this dimension. You might
have already created it in another End-to-End Scenario, where more detail is
provided.
v See "E2E Scenario - Create Top Products Dashboard" in the IBM Tealeaf cxImpact
User Manual.
1. In the Tealeaf Event Manager, click the Dimensions tab.
2. Click New Dimension....
3. Enter the following information:
v Name: Browser Platform
v Populated by Hit Attribute: Browser OS.
Chapter 17. Tealeaf End-to-End Scenarios
345
Figure 168. Add Dimension - Browser Platform
v Click Save Draft.
v See "TEM Dimensions Tab" in the IBM Tealeaf Event Manager Manual.
Expected Results:
The new dimension is listed in the Event Manager, highlighted in red because it is
not yet saved to the server. It is saved in a later step.
Step 3 - Create Hit Attribute: Add Product
In this step, you create a new hit attribute from scratch. This hit attribute (Add
Product) is configured to gather the name of any product that is added to the
shopping cart.
In a previous step, you should have acquired the uniquely identifiable HTML
snippets that bracket products added to the shopping cart of your web application.
346
IBM Tealeaf cxImpact: cxImpact User Manual
The example below is designed for the Strauss & Plesser web application. Please
modify the properties below to reflect the response pattern appropriate for your
web application.
1. To open the Tealeaf Event Manager, select Configure > Event Manager.
2. In the Event Manager, click the Hit Attributes tab.
Figure 169. Tealeaf Event Manager - Hit Attributes tab
3. Click New Hit Attribute.
4. Configure the following properties and values.
a. Name: Add Product
b. Search In: Response
c. Click the Use Start Tag/End Tag button.
d. Following tags need to be modified for your web application:
1) Start tag for our example: <ul class="messages"><li
class="success-msg"><ul><li>
2) End tag for example: was successfully added to your shopping cart.
Note: There is a space before was.
e. Leave the other values as their default values.
Chapter 17. Tealeaf End-to-End Scenarios
347
Figure 170. Add Product hit attribute
5. To save your draft, click Save Draft.
6. To commit your changes, click Save Changes in the toolbar.
Expected Results:
Hit Attribute Add Product is created.
Related concepts:
“Acquire Start and End Tags for Added Products” on page 341
348
IBM Tealeaf cxImpact: cxImpact User Manual
Step 4 - Create Dimension: Added Product
Now that you create the hit attribute Add Product, you can create a dimension to
capture this information.
Create a dimension that is called Added Product, which is populated by the Add
Product hit attribute. This dimension contains the list of products that are added to
the shopping cart.
1. To open the Tealeaf Event Manager, select Configure > Event Manager.
2. In the Event Manager, click the Dimensions tab.
3. Click New Dimension.
4. Configure the following properties and values.
a. Name: Added Product
b. Populated by: Add Product hit attribute
c. Leave other values as their defaults.
Figure 171. Add dimension Added Product
5. To save your draft, click Save Draft.
6. To commit your changes, click Save Changes in the toolbar.
Expected Results:
The Added Product dimension is created.
Step 5 - Create Report Group: Browser Platform, Version, &
Product
At this point, you create three dimensions to capture three sets of information from
different hit attributes:
Chapter 17. Tealeaf End-to-End Scenarios
349
Hit Attribute
Populated Dimension
Browser OS
Browser Platform
Browser Version
Browser Version
Add Product
Added Product
To help organize this information, you can create a report group to contain the
three dimensions.
A report group is an organizing structure for dimensions. In the Tealeaf Report
Builder, you can include multiple dimensions in a report if they belong to the same
report group. This structure enables efficient storage of dimensional data while
maintaining flexibility in reporting.
v A report group can contain up to 4 dimensions.
v A dimension must belong to at least one report group.
v See "TEM Dimensions Tab" in the IBM Tealeaf Event Manager Manual.
In this step, you create a new report group that contains the dimensions Browser
Platform, Version, and Product.
1. To open the Tealeaf Event Manager, select Configure > Event Manager.
2. In the Event Manager, click the Dimensions tab.
3. Select Browser Platform, Browser Version and Added Product on the list of
dimensions.
4. Right-click and select Create Group using Dimensions.
5. Configure the following properties and values.
a. Name: Browser Platform, Version, & Product
*Figure: Report group Browser Platform, Version, & Product.
6. To save your draft, click Save Draft.
7. To commit your changes, click Save Changes in the toolbar.
350
IBM Tealeaf cxImpact: cxImpact User Manual
Expected Results:
The Browser Platform, Version, & Product report group is created with three
dimensions in it.
Step 6 - Create Event: Add Product
Now, you can create the event Add Product, which is triggered whenever the hit
attribute Add Product is detected. So, whenever a visitor adds a product to the
shopping cart, this event is triggered, which allows you to track the number of
products added. The value to record is the count of these products.
When the event is associated with the Browser Platform, Version, & Product
report group, the contextual information that is contained in those dimensions is
also written into the session whenever the event is recorded. So, that contextual
information is available for reporting purposes.
1. To open the Tealeaf Event Manager, select Configure > Event Manager.
2. In the Event Manager, click the Events tab.
3. Click New Event.
4. Configure the following properties and values.
a. For the Event Summary:
1) Name: Add Product
2) Evaluate On: Every Hit
3) Value Type: Count Only
b. For the Condition step:
1) Select Hit Attribute: Add Product
2) Verify that Hit Attribute Found and IsTrue are selected.
Figure 172. Add Product Event - Condition step
c. For the Value step, no additional configuration is required.
Chapter 17. Tealeaf End-to-End Scenarios
351
Figure 173. Add Product Event - Value step
d. For the Report Groups step:
1) Select Report Group: Browser Platform, Version, & Product
Figure 174. Add Product Event - Report Groups step
e. For the More Options step, no additional configuration is required.
5. To save your draft, click Save Draft.
6. To commit your changes, click Save Changes in the toolbar.
Expected Results:
The new event is added to the list.
Step 7 - Find Sessions with New Objects
You have created all of the data objects for this scenario.
As new hits are being processed, these objects are being identified in them and
stored in the database. However, it takes at least an hour before the data can
appear in a report. A full day of data won't be available until the following day.
352
IBM Tealeaf cxImpact: cxImpact User Manual
In the interim, you can locate sessions containing the Add Product event and then
test for the presence of these objects in the session.
1. In the Portal, select Search > Active Sessions.
2. The Active Session Search screen is displayed.
3. In the left panel, click the Basic Search Fields panel.
4. Click the Events link. An event search criterion is added to the search terms.
a. Click <Select an event.
b. In the Event Selector, expand the event label containing the Add Product
event. Click the event and then click Select. The event is added to the
search term.
c. Do not select a dimension value. Leave it as <Any Dimension>.
Figure 175. Searching active sessions for Add Product event
5. Click Search.
Expected Results:
The search results include all currently active sessions in which the Add Product
event has been detected.
Note: If no search results are returned, it is possible that no visitor has added a
product to their shopping cart since the event was created. You may need to wait a
while. Or, you can navigate the site to add your own product to your shopping
cart.
Step 8 - Test Session for Presence of Other Objects
After you have located a session where the Add Product event is located, you can
send the event to the Event Tester to check for the presence of the other objects
that you created.
The Event Tester is a Portal-based tool for testing for the presence of events and hit
attributes against actual session data captured by Tealeaf. To use the Event Tester,
you locate a valid test session through the Portal, mark the events and hit
attributes for which you wish to test, and then view the results.
1. In the list of returned active sessions, find a session that contains at least a few
) icon.
hits. In the session row, click the Event Tester (
2. In the dialog, you might want to change the Description to something easier to
locate, such as Test Session - Add Product. Click Send to Event Tester. Click
OK to go immediately to the Event Tester.
Chapter 17. Tealeaf End-to-End Scenarios
353
3. In the Event Tester, click the From Session radio button and verify that your
session has been selected. Click Next.
4. In the Select Events tab, click the event label containing the Add Product event.
Double-click the event to add it to the list of tested events. Do not select any
other events.
Figure 176. Event Tester - Add Product event selected
5. Click the Hit Attributes tab.
6. Add the following hit attributes:
a. System Hit Attributes > Browser OS
b. System Hit Attributes > Browser Version
354
IBM Tealeaf cxImpact: cxImpact User Manual
Figure 177. Event Tester - New hit attributes selected
7. Click the View Results tab.
a. Expand the Events node to display the Add Product event.
b. Expand the node for one of the pages where the event fired.
c. Open the Browser Platform, Version, & Product report group.
d. The values for the Browser Platform, Browser Version and Added Product
dimensions are displayed.
e. Similarly, you can expand the Hit Attributes node to display the detected
instances of the three underlying hit attributes, which are used to populate
the dimensions.
Chapter 17. Tealeaf End-to-End Scenarios
355
Figure 178. Event Tester - Test results
Expected Results:
The hit attributes, dimensions, and events that you created are firing properly in
the captured sessions.
Step 9 - Create Report: Added Product
After you validate the data objects you created and wait for data to accumulate for
reporting purposes, you can create a report that uses the Add Product event in the
Tealeaf Report Builder.
The Tealeaf Report Builder enables Tealeaf users to create ad-hoc reports from the
events, dimensions, and ratios that they create through the Portal. This easy-to-use
tool provides drag-and-drop capabilities for report creation, filtering, and
drill-down analysis.
1. To open the Tealeaf Report Builder, select Analyze > Report Builder from the
Portal menu.
2. In the Report Builder, click the Create Newbutton in the toolbar.
3. Add the Add Product event:
a. In the left panel, click Add Event.
b. In the Event Selector, expand the event label where the Add Product event
is stored.
c. Click the check box next to the Add Product event.
356
IBM Tealeaf cxImpact: cxImpact User Manual
Figure 179. Adding Add Product event
4. In Report Builder, Click Add Event,Select Add Product
Expected Results:
The Add Product event data is added to a new report.
Step 10 - Put Added Product on x-axis
After the report is created, you can use the associated dimensions in the Browser
Platform, Version, & Product report group to filter the results to show the added
products that are based on browser platform, browser version, and specifically
added products for your visitors.
To filter based on product, add the Added Product dimension to the X-axis.
1. In the Report Builder, click the Dimensions tab in the left panel.
2. Click the Add Product dimension and drag it to the X-axis.
Chapter 17. Tealeaf End-to-End Scenarios
357
Figure 180. Report Builder - Added Product dimension
Expected Results:
The Report changes to include the Add Product dimension.
Step 11 - Set Added Product dimension to show Top 5
You can now filter the dimension to show only the top dimension values. Since we
are most interested in the behaviors of the top products, this filtering allows us to
remove the minor products from the report so that we can focus on the most
important products in our portfolio.
1. Click the Added Product drop-down menu and select Filter.
2. For the Filter Mode, select Top N.
3. Set the dimension filter: Include only the top values by occurrence.
4. Set Maximum Number of Values to Display: 5.
Figure 181. Report Builder - Filter Added Product dimension
5. Click Apply.
Expected Results:
358
IBM Tealeaf cxImpact: cxImpact User Manual
The Report shows only the Top 5 values.
Step 12 - Segment to only show browser platform WinXP
You can filter the report on a global level by applying a dimension as the segment
of the report.
v In the Report Builder, a segment can be applied to filter the data at a global
level.
Suppose that you are interested in the top products that are sold to uses of
Windows XP. In the steps below, you apply a segment to the report to display only
the shopping cart additions that were initiated by visitors using Windows XP.
1.
2.
3.
4.
5.
In the Report Builder, click the Dimensions tab in the left panel.
Click the Browser Platform dimension and drag it to the Segment.
The Browser Platform is added as the report segment.
Click the Browser Platform drop-down menu and select Filter.
For the Filter Mode, select Filter by Value.
6. Select Include only Selected Values.
7. Click Add Values.
8. Select All Values.
9. All values are available for selection. Select WinXP.
Figure 182. Selecting WinXP platform
10. Click Apply.
Chapter 17. Tealeaf End-to-End Scenarios
359
Expected Results:
The report now shows data for WinXP browser platform only.
Step 13 - Put Browser Version on Y-axis
You can also apply dimension that are filtering to the Y-axis of the report, as well.
This filtering creates stacked charts, in which the displayed data is broken up
based on the dimensional values that are included in the y-axis.
In the steps below, the Browser Version dimension is applied to the Y-axis to show
stacked breakouts of the individual browser versions that are used when you add
products.
1. In the Report Builder, click the Dimensions tab in the left panel.
2. Click the Browser Version dimension and drag it to the Segment.
3. The Browser Version is added as the Y-axis dimension.
Figure 183. Report Builder - Finished Report
360
IBM Tealeaf cxImpact: cxImpact User Manual
4. Before you can add the report, you must save it. In the toolbar, click the Save (
) icon. Enter a title for the report and click Save.
Expected Results:
The report now shows data with Browser Version data as the y-axis dimension.
Step 14 - Add the Report to a Dashboard
After the report are saved in the Report Builder, you can add the report you
created as a component to an existing dashboard. This step allows you to surface
in the Portal this report for easy review and, if necessary, drill-down to the report
and its underlying data and sessions.
1. If not done already, click the Save icon in the toolbar to save the report.
2. When the report is configured to your liking in the Report Builder, click the
) icon in the toolbar.
Add Report to Dashboard (
3. In the Add Report to Dashboard dialog, configure the following properties and
values:
a. Display: Select Chart to show the graphical chart or Table to show the data
grid.
b. Drilldown: Select Enabled to allow dashboard viewers to drill down to
display the report in the Tealeaf Report Builder.
c. Target Tab: In the Selector, navigate to select a dashboard and the tab within
it to which you want to add the report.
Figure 184. Adding report to a dashboard
4. Click Create.
Expected Results:
Chapter 17. Tealeaf End-to-End Scenarios
361
The report is added as a component to the selected dashboard tab.
Figure 185. Top Products in Dashboard
As needed, dashboards can be exported from the system and emailed to selected
recipients.
E2E Scenario - Getting Value out of Tealeaf in One Hour
This information is intended to provide the beginning Tealeaf user with a simple,
clear scenario for getting started with Tealeaf. By stepping through this scenario,
you can acquire valuable information about your web application, which you can
publish to other stakeholders in your organization. You do not require have prior
experience with Tealeaf to follow this scenario.
This scenario is intended to be read from start to finish. In another browser
window, you can run the steps through the Tealeaf Portal to complete the scenario.
The Eventing Basics Series
This section is part of a series on eventing and reporting in Tealeaf, which explores
the data objects used to create events and how events are the fundamental markers
for reporting on your web application.
Note: These sections should be reviewed in the order listed below.
Table 37. The Eventing Basics Series
362
1
E2E Scenario - Getting Value out of
Tealeaf in One Hour
For novice users, this scenario
describes how to use the Tealeaf
Portal to explore events provided by
Tealeaf, which are already tracking
activities on your web application.
Note: New Tealeaf users should
begin here.
Order
Section
Description
2
"Attribute Basics" in the IBM Tealeaf
Discovering Tealeaf Guide
Overview of hit attributes and
session attributes, which are basic
mechanisms for tracking data in
sessions of your web application.
3
"Event Basics" in the IBM Tealeaf
Discovering Tealeaf Guide
Overview of how to create events,
which rely in part on attributes, to
record activities in session data.
IBM Tealeaf cxImpact: cxImpact User Manual
Table 37. The Eventing Basics Series (continued)
1
E2E Scenario - Getting Value out of
Tealeaf in One Hour
For novice users, this scenario
describes how to use the Tealeaf
Portal to explore events provided by
Tealeaf, which are already tracking
activities on your web application.
Note: New Tealeaf users should
begin here.
4
"Dimension Basics" in the IBM Tealeaf
Discovering Tealeaf Guide
Overview of how to create and use
dimensions, which are contextual
data objects stored when an event
occurs.
5
"Reporting Basics" in the IBM Tealeaf
Discovering Tealeaf Guide
When all of the above scenarios have
been completed, you can apply these
objects to reports through the Tealeaf
Report Builder.
Pre-Requisites
v No prior experience required
You can find it useful to read about the basics of Tealeaf.
v Tealeaf must be operational and gathering data for at least a day before you
begin this scenario.
v You must have a user account to the Tealeaf Portal. This account requires access
to the following features.
1. Tealeaf Report Builder
2. Event Activity report
3. Browser Based Replay
4. Drill-down searches
– For more information, contact your Tealeaf administrator. If you have an
account but are unsure of its permissions, they are explained in detail in the
scenario.
Goals of the Scenario
This scenario is designed to identify instances of one or more kinds of major errors
that your web application can be issuing. You can use Tealeaf to track counts of
these errors over time, generate reports that are measuring counts, narrow the
criteria, locate affected sessions, and then replay them to see what actually
happened during the visitor's session. This information can be provided to
developers to assist in measuring the impact and locating the source of the issue.
v Through Tealeaf, you can also monetize the impact. At the end of the scenario,
more information is provided on how to do that.
Whenever a request is made from a browser to a server, the server returns a
response that includes the HTTP status code, which indicates the category of the
response. For example, if you enter http://www.tealeaf.com and see the home
page of the Tealeaf corporate website, then the status code that is returned in the
response is 200 OK, which means that the request successfully resulted in a valid
and complete response. Here are some other status codes of interest:
Status Code:
Description
200
All is well.
Chapter 17. Tealeaf End-to-End Scenarios
363
404
The content that was request was not found
500
Internal server error. Something happened on the server-side that
prevented the response from being delivered.
There are many more HTTP status codes, but the above ones are of interest for
purposes of this scenario.
The 404 and 500 errors are of interest to your web development team. A 404 error
means that content was requested yet cannot be found by the browser and
returned for display to the visitor. These errors can be caused by a number of
issues, all of which your developers must be made aware.
v You might have the experience of visiting a web page and receiving a "Page Not
Found" error. These pages are categorized as HTTP 404 status code pages.
Similarly, a 500 error indicates that something internal to the server failed. It could
be some part of the web server application, a piece of code that your developers
created, or other problem.
While Tealeaf cannot peer into the web server to decipher the issue, you can use
Tealeaf to track the occurrences of these errors over time, generate reports that are
measuring counts against narrower criteria, locate affected sessions, and then
replay them to see what actually happened during the visitor's session. This
session can then be provided to developers to help locating the issue.
At the end of this scenario, you must have useful information to provide to your
developers about these error codes and their frequency as experienced by visitors
to your website.
Let us get started.
Logging in to the Portal
For most Tealeaf users, the portal is the place to go for all things Tealeaf. The
Portal is a web-based application, through which you can interact with Tealeaf
applications and databases. This interface enables to complete most common
Tealeaf user activities.
Through the Portal, you can perform the following basic actions:
v Report: Review or generate reports, scorecards, dashboards, and alerts.
v Search: Search for sessions that meet a specified set of criteria.
v Replay: Replay a session that you select, experiencing it as the visitor who
created the session originally experienced it.
In this scenario, you'll perform all of the above through the Tealeaf Portal.
Steps: Complete the following steps to log in to the Portal.
1. In your web browser, enter the address of the Tealeaf Portal for your enterprise.
This address is in the following pattern:
http://TealeafPortalServer/portal
where
TealeafPortalServer is the machine hosting the portal web application.
v If you do not know this information, contact your Tealeaf administrator. You
might want to read to the end of this section, which also describes the
permissions needed for your account.
364
IBM Tealeaf cxImpact: cxImpact User Manual
2. Enter the username and password for your Tealeaf account. Click Login.
Note: Depending on how your Portal is configured, you may be automatically
logged into the Portal whenever you visit it from your work desktop.
3. The Portal is displayed. It should look similar to the following. The displayed
page can differ for your Portal.
Figure 186. Tealeaf Portal
You are now logged in.
Related concepts:
“Logging in to the Tealeaf Portal” on page 21
Required Permissions
Before continuing with this scenario, you must verify that you can access all of the
following menu items from the Portal menu, which is displayed at the top of the
above image:
v Analyze > Event Activity
v Analyze > Report Builder
If you do not see these menu items, contact your Tealeaf administrator about
enabling access to them.
Check Event Activity
The Portal provides access to many Tealeaf and user-created reports on web
application activities and performance, as well as Tealeaf system use and activities.
For this scenario, we begin with the Event Activity report. This report indicates the
number of occurrences of all currently active events for a selected time period. To
begin, select Analyze > Event Activity from the Portal menu.
Note: Later, feel free to explore the contents of the Dashboards, Active, Analyze,
and Tealeaf menus.
v Some of these menus cannot be available to you, due to permissions and license
limitations.
Chapter 17. Tealeaf End-to-End Scenarios
365
In Tealeaf, an event is an occurrence of a pattern of data in the captured data
stream. In this scenario, we are looking for the occurrence of the HTTP 404 - Not
Found event, which looks for a specified pattern of data. If that pattern is found,
the count of occurrences increments.
You can see the counts in the Event Activity report.
Steps: To review the Event Activity report, complete the following steps.
1. In the Portal menu, select Analyze > Event Activity.
2. The Event Activity report is displayed.
Figure 187. Event Activity
3. In the toolbar, click the View by Labels check box.
4. Under the list of Labels, open the Tealeaf Standard Events label.
5. Look for an entry for Http 404 - Not Found. In the Event Count column on the
right side, the number of occurrences of the event during the selected period is
displayed.
6. If the Event Count value is 0 (zero), you can do one of the following steps:
a. Locate a Http 4xx event that contains a non-zero count. These can include
the following values:
v Http 400 - Bad Request
v Http 401 - Unauthorized
v Http 403 - Forbidden
v Http 404 - Not Found
b. Use the Http 500 - Internal Server Error event.
c. Change the reporting period. By default, the Event Activity report is
configured to display event counts from the current date (today). Click the
date in the corner of the report.
366
IBM Tealeaf cxImpact: cxImpact User Manual
Figure 188. Select Focus Period
v You can select a range of dates. You might try to expand the range to the
beginning of the month or even further. Select the first date. Press SHIFT
and select the second date.
v After you have specify your date or dates, click Apply. The report is
updated.
7. Continue making adjustments until you see a non-zero value in the Event
Column for an Http 4xx event. Of these, Http 404 can be the most valuable to
your developers.
Related concepts:
“Portal Navigation” on page 22
A little detail on events
Note: This section provides further detail on events, specifically how Status Code
events are stored in sessions. Some novice users might not be interested in this
technical detail. To skip to the next section, see “Explore the Report” on page 369.
In this scenario, we are relying on an event that is provided by Tealeaf. This event
and other events that are provided by Tealeaf are called Tealeaf Standard Events
and are grouped in the Portal under this label.
The HTTP Status Code events rely on the presence of some data that is inserted by
Tealeaf. When data is captured and passed through Tealeaf, the Canister inserts
Chapter 17. Tealeaf End-to-End Scenarios
367
some pre-configured data in each request that is part of the session. This inserted
data is then part of the session that is retained.
Pertaining to the Status Code events, data is inserted in the [env] section of the
request, which Tealeaf creates. Here is an example that is set of data:
[env]
REMOTE_ADDR=63.194.158.150
REMOTE_PORT=40177
LOCAL_ADDR=206.169.17.19
LOCAL_PORT=80
SERVER_NAME=206.169.17.19
SERVER_PORT=80
HTTPS=off
CONNECTION_ID=13144
PCA_NAME=jupiter
PCA_ADDR=127.0.0.1
PCA_UNAME_RELEASE=2.6.9-55.EL
PCA_UNAME_SYSNAME=Linux
REQ_BUFFER_ENCODING=UTF-8
REQ_BUFFER_ORIG_ENCODING=ISO-8859-1
REQUEST_METHOD=GET
URL=/store/index.php/placeholder
SERVER_PROTOCOL=HTTP/1.1
ResponseType=text/html; charset=UTF-8
StatusCode=404
StatusCodeText=Not Found
In the sample, the last two entries (called name-value pairs) contain Status Code
information that is inserted by the Canister. These name-value pairs are variable
names and their values.
Variable Name
Value
StatusCode
404
StatusCodeText
Not Found
This event, which is evaluated for each request that is passing through the
Canister, detects the presence of this StatusCode entry in the request. If the entry is
set to 404, the event fires, and all actions that are configured for the event are
taken. The number of occurrences in the Event Activity report is incremented by
one.
To go into a bit more detail, the event relies on the Status Code hit attribute,
which is a Tealeaf-defined data object that performs the actual checking for the
matching pattern in the request. According to the definition of the event, if the
Status Code hit attribute is present and its value is 404, then the event fires.
Tealeaf provides a number of events, and Tealeaf administrators can create events
specific to your web application. You can create events that count occurrences. You
can create events that detect the absence of specified patterns. Based upon the
detection of events, a number of different kinds of actions can be triggered.
Event creation is a large topic and exceeds the scope of this scenario. Events can be
created by Tealeaf administrators or individuals who are given access to the Tealeaf
Event Manager.
368
IBM Tealeaf cxImpact: cxImpact User Manual
Explore the Report
In the Event Activity report, you can now click the hyperlink for the non-zero
Event Count to explore further.
When the link is clicked, a report is automatically generated and displayed in the
Tealeaf Report Builder. This report displays the Http 404 - Not Found event for the
selected period.
Figure 189. Tealeaf Report Builder
In the report, you can see the breakdown of counts for the selected event by day (if
the focus period is greater than 1 day) or by hour (if the focus period is a single
day). Since the above report was generated for today's date, the hourly data is
incomplete. But it does have enough to begin work.
Chapter 17. Tealeaf End-to-End Scenarios
369
Working with Dimensions
If you presented the report to your web developers, it would not be terribly
informative. They might immediately ask, "This is interesting, but where did all of
these errors occur? Is it one problem? Or multiple problems? How are we expected
to find the problem in our code?"
What is missing is any sense of context. When the error occurred, what were other
characteristics of the session that can be of interest and, in this case, can help to
locate the source of the problem?
Tealeaf defines this contextual data and associate it with events through
dimensions. A dimension is a value that is recorded when an event occurs. At the
moment when the event fired, for example, what is the URL where it occurred?
Tealeaf provides example dimensions, which you can apply to your reports to filter
the data. Among the provided dimensions is the URL (Normalized) dimension,
which captures the normalized value for the URL where the event occurred.
v The URL value is automatically normalized by Tealeaf. In a typical web site, the
number of URLs can explode into the thousands, often because variable
information, such as query parameters or timestamps, is inserted at the end of
the URL. For purposes of identifying locations on the web site, this information
is rarely useful.
Apply a dimension:
In the following steps , you add the provided URL (Normalized) dimension to the
report to filter the display to show only the URLs where these errors most
frequently occur.
1. In the Report Builder, click the Dimensions tab in the left panel.
2. You should see a list of items similar to the following:
370
IBM Tealeaf cxImpact: cxImpact User Manual
Figure 190. Dimensions tab
3. In the left panel, locate the URL (Normalized) dimension. Click and drag this
dimension to the <Add X-Axis> box.
4. You are likely prompted with a dialog box indicating that adding this
dimension may create a very large data set. Go ahead and click OK. The result
may look something like the following:
Chapter 17. Tealeaf End-to-End Scenarios
371
Figure 191. Added URL dimension
Filtering a dimension by Top-N:
In the , image, you can see that the data is hard to read, in part because the scale is
skewed by the large column tower. We can improve the chart display by filtering
the dimension values down to the ones where the event has the highest values.
This filtering also helps us to identify the URLs where the HTTP 404 error occurs
most frequently.
To filter the dimension, complete the following steps.
1. In the chart, click the drop-down icon (
the dimension name in the chart (URL (Normalized)).
) next to
2. From the drop-down menu, select Filter.
3. In the Dimension Filter dialog, select Top N from the Filter Mode drop-down.
4. For the Maximum Number of Values to Display, enter 10. This entry means
the chart is configured to display only the dimension values that were recorded
most frequently when the event fired.
372
IBM Tealeaf cxImpact: cxImpact User Manual
Figure 192. Top-N Dimension Filter
5. Click Apply.
6. The report is updated to show only the event counts for the 10 most frequently
recorded dimensions.
Figure 193. Top-10 Report
Chapter 17. Tealeaf End-to-End Scenarios
373
7. Now is a good time to save your report. To save it, click the Save (
) icon
in the toolbar. Enter a name, such as http 404 - not found, and click Save.
In the figure, the chart is still hard to read because of the one outlier. In the detail
table, you can see the actual data values that are displayed in the chart. The outlier
dimension values, called dimension constants, have a high number of counts. The
dimension constants are recorded occurrences of limits on the number of permitted
dimension values. For purposes of this scenario, ignore these values and focus on
the actual captured and recorded values.
Drilldown Search
The event + dimension combination is written into the request primarily for search
purposes. When you run a search that looks for event occurrences, event values, or
dimension values, you are instructing Tealeaf to effectively look into the request
records for this specific data.
Let's look at our report. In the detail table, you must see ten items, similar to the
following figure:
Figure 194. Report Builder - detail table
Of these values, we can ignore the following values:
Values Description
others and [Limit]
These entries may be related with how dimension data is defined and are
not currently actionable.
all *.js URLs
These entries apply to the IBM Tealeaf CX UI Capture for AJAX solution,
which may not be properly installed. These would be worth exploring, if
the IBM Tealeaf CX UI Capture for AJAX solution is implemented.
/opinionlab and /tl_img.html
These entries pertain to the OpinionLab integration supported by Tealeaf.
Outside the scope of our scenario.
That leaves the following two URLs of interest:
v /store/index.php/placeholder
v /services/customer-portal.phplogout_frame.asp
374
IBM Tealeaf cxImpact: cxImpact User Manual
The placeholder item may or may not be of interest. If this was a production
system, you might be inclined to share that with your developers. The second one ,
though, looks like the URL that must not return an HTTP 404 - Not Found error.
In the Count column, you can see hyperlinks for each entry. When you click a link,
you are actually running a search for the underlying sessions that compose the
data in the metric. In our example, if you clicked the link for the
/services/customer-portal.phplogout_frame.asp entry, you would instruct the
Report Builder to query the set of stored sessions for any session where the Http
404 - Not Found event occurred on the listed page on the date(s) specified for the
focus period.
v These search queries are run just like you would perform a search for an ad hoc
set of sessions. How you specify ad hoc searches for terms of your choosing is
different and covered in a different scenario.
Session List
The returned sessions are displayed in a session list, such as the following:
Figure 195. Session List
In the session list, the matching sessions are displayed by default in revise order of
the number of hits in them. In the Events column, you can see the icon for the
Http 404 - Not Found event is listed. Since this session list is displaying the results
of searching for this event only, no other events are listed in the column.
v If you move your mouse over one of the icons, additional information about the
event is displayed.
v At the bottom of the session, you can see the search query that was specified to
execute the search. Search queries do not need to be specified in this
hard-to-read format, but you can copy and paste that text to save it for later use,
if desired.
There's quite a bit to explore and do in a session list. For now, we want to focus on
the icons in the second column.
Chapter 17. Tealeaf End-to-End Scenarios
375
Table 38. Session List
Icon
Command
Description
Replay
Replay the session.
Page List
Show the page list for all pages in the
session.
QuickView
Open QuickView, which shows
events, dimensions, and attributes
recorded in the session.
Session Info
Display information useful for
locating the storage location for the
session.
Send to Event Tester
Use the session as test data for the
Event Tester.
Related reference:
“Search Results - Session List” on page 68
QuickView
At this time, we narrowed our search to just sessions where the HTTP 404 error
occurred on the /services/customer-portal.phplogout_frame.asp page in the
specified timeframe. But for this information to be of use to developers, we should
provide a specific session example and, potentially, the exact page where the event
occurred.
v In the set of icons, click the QuickView (
) icon for one of the sessions.
Figure 196. QuickView
In the displayed QuickView, you can see the page where the event was triggered.
Expanding the entry displays all of the dimensions that were recorded when the
event fired.
v If you click the Page hyperlink, you can review the contents of many of the
sections in the request of the selected page in the Page Detail. Use the
breadcrumb trail to return to the QuickView page.
In the above example, you can see that the URL (Normalized) dimension has
recorded the value of /services/customer-portal.phplogout_frame.asp. The other
values may be of value to retain for your developers.
Related concepts:
376
IBM Tealeaf cxImpact: cxImpact User Manual
“QuickView” on page 76
Replay
From QuickView, you can jump to the page where the issue occurred. In
QuickView, click the Replay icon. In the dialog, click Browser.
Figure 197. Opened in BBR
In Browser-Based Replay, you can replay captured sessions through your web
browser. This replay method enables all Tealeaf users to have immediate access to
replay capability.
In our scenario, BBR has been opened to display the selected session at the page
where the issue occurred. On Page 25, the last of the session, the Page Not Found
error page was displayed. The Tealeaf event Http 404 - Not Found occurred on
this page.
This page itself can not be particularly informative. In fact, it can be the page that
is universally served to all visitors of your web application when the HTTP 404
Status Code error occurs.
Chapter 17. Tealeaf End-to-End Scenarios
377
The page that is useful is likely to be the preceding one, where the visitor made
the selection or performed another action that resulted in the web application
generating the Page Not Found error page.
v In the left navigation panel, click the page immediately preceding the Page Not
Found page.
Related concepts:
Chapter 11, “cxImpact Browser Based Replay,” on page 165
BBR Views
What you must see now is the Replay view for the previous page. In Replay view,
you can see the page as it is displayed to the visitor during the session.
For developers, though, the data, not the visual presentation is more important. In
the toolbar, click Request.
Figure 198. Request View
In Request view, you can review the contents of the request for the page. This data
includes the data that was submitted to the web server to ask for the delivered
content, as well as additional data inserted by Tealeaf during processing.
378
IBM Tealeaf cxImpact: cxImpact User Manual
In the above image, you can see a section of the request ([appdata]) has been
highlighted. This section typically includes application-specific information that is
valuable for search purposes. All of this content is indexed for search.
Of the specific value in the [appdata] section is the TLT_URL value, which is the
exact value that is recorded in the URL (Normalized) dimension. In this case, the
value is /services/login-frame.php. This relative path indicates the location in the
website's domain (in this case, http://www.tealeaf.com) where the page is located.
This provides to your developers the location of the page from which some action
was taken to generate the Page Not Found error page.
Sending the email
Now, you are prepared to submit your report to the developers. Here are some
recommended steps:
1. In Request view, highlight all of the [appdata] section and copy it. Paste it into
a text editor.
2. Optional: In the toolbar, click Response. Response view shows the content that
was sent by the web server to the client, based on the request. Your developers
can be interested to know what was served. Click in the main pane, press CTRL
+ A to select all. Copy and paste this content into the text editor.
3. From the drop-down menu in the toolbar, select Send Link by Email.
In the dialog, you might compose your email as follows:
v Recipients: Enter a comma-separated list of email addresses. Aliases are allowed.
v Session Title: For session title, you might enter HTTP 404 - Not Found error.
v Message: For the message, you could enter:
Dev Team-Using Tealeaf, we have discovered a number of occurrences of HTTP 404 errors.
Many of these errors occur when a request is made from the
/services/login-frame.php page.
Use the link in this email to open an example session.
The Page Not Found error page is the last page of the session.
The previous page generates the error. This error was detected
9 times on this page alone today by Tealeaf.
Hope that this is helpful.
Chapter 17. Tealeaf End-to-End Scenarios
379
Figure 199. Sending session by email
To send, click OK.
What You Have Discovered
This concludes our scenario.
In a relatively short period, you devise an easy means of monitoring and reporting
a serious error in your web application. Tealeaf is good at helping finding and
fixing errors of this sort.
As part of this scenario, you have toured a number of features in Tealeaf, including
the following features:
v Logging in to the Tealeaf Portal
v Event Activity
– Drill-down searches
v Tealeaf Report Builder
– Adding Dimensions
v Search Results - Session List
– Session list icons
– QuickView
v BBR replay
–
–
–
–
Replay View
Request View
Request variables
Options Menu
Well done.
Related concepts:
“Logging in to the Tealeaf Portal” on page 21
Chapter 11, “cxImpact Browser Based Replay,” on page 165
“QuickView” on page 76
380
IBM Tealeaf cxImpact: cxImpact User Manual
Related reference:
“Search Results - Session List” on page 68
“Request View” on page 193
“Options Menu” on page 184
Discovering More
Feel free to review the following sections for additional ideas and approaches to
extend this scenario.
Characterizing the Problem
You provide compelling evidence to your development team that a problem exists
with your web application. Well done.
However, that is a code-level issue. At the business level, the impacts cannot be
immediately known.
What would be useful to know that to people beyond the development team is
how often these error codes are correlated with abandonment. For example, what
percentage of users who encounter an HTTP 404 error end up abandoning the site
without completing a transaction? And how much in potential revenue that is left
with them?
The answers to these questions exceed the scope of this scenario. However, the
generalized approach is listed . The process of "checkout" here is generalized; it
represents the general case of when a visitor to your web application begins the
process to complete a funnel or goal for which you designed the web application.
That goal can indeed be to checkout of a retail site with a purchase. It can also be
to download a document. It can be to complete a banking transaction.
Note: These steps require the creation of new events specific to your web
application, which might require more permissions in your Tealeaf Portal account.
For more information, contact your Tealeaf administrator.
General Steps:
1. Define an event that identifies when a person begins the process to check out:
Checkout - Begin.
2. Define an event that identifies when a person is successfully completed
checkout: Checkout - Success.
3. Define an event (Checkout - Abandoned) that combines the two events.
a. Checkout - Begin AND
b. NOT (Checkout - Success)
4. Define an event that combines two events:
a. Checkout - Abandoned AND
b. Http 404 - Not Found
The steps result in creation of an event that monitors general abandonment
(Checkout - Abandoned) and the final one, which tracks abandonment when an
HTTP 404 error occurs.
Chapter 17. Tealeaf End-to-End Scenarios
381
These session-level events can be used to track real losses to your business through
your web application. By supplying the identifying the problem to enable fixing it,
those losses can be turned into gains.
Monetizing the Problem
To apply a monetary figure to these losses, you can create a shopping cart event,
which captures the value stored in the "shopping cart" for your web site. In a retail
site, this value may be statically reported on each page. In other sites, this value
may be tracked through different means.
v As a substitute, your enterprise might have calculated average transaction
values, which can be used for this computation.
For each occurrence of the Abandoned + Http 404 event, you can report the value
of the shopping cart. When the occurrences of this value are summed in the
Tealeaf Report Builder, you have provided an accurate measurement of the actual
lost revenue due to the Http 404 error. This same methodology can be applied to
any other event.
Tealeaf provides a scenario that describes how to monetize these losses.
Related concepts:
“E2E Scenario - Create Conversion Rate Dashboard” on page 306
Next Discoveries
Now that you know how to locate actionable information and sessions that are
based on events, you can use other scenario ideas to expand your understanding
of Tealeaf and to make new discoveries.
Other Scenario Ideas
You can use the following ideas to expand your understanding of Tealeaf and to
make new discoveries.
v The Event Activity report provides a good entrance to exploring events and their
behaviors through detailed, drill-down reporting. You might revisit this scenario
by starting again the Event Activity report.
1. You can check other error events in the Tealeaf Standard Events, such as the
Http 500 - Internal Server Error for similar issues to the described
scenario. The HTTP 500 error information would be of interest to developers.
2. You can explore the One Hit Session Count event that is provided by
Tealeaf, which tabulates the number of sessions that contained a single hit.
These sessions are often sourced by bot traffic. You can add the dimension
Traffic Type to the X-axis report to see the break-down of one-hit sessions
by type of traffic.
v Other events tabulate generation, network, and round trip times, which feed into
the Performance reports. These reports provide a good way for exploring large
or otherwise anomalous values in these key performance metrics. Like the Event
Activity report, you can explore these metrics by URL.
v Tealeaf provides a special event to help tracking user identifiers. The Login ID
Sample event must be configured to reflect how user identifiers are displayed in
your web application. This event can be used as the basis of exploring
individual user activities through IBM Tealeaf cxImpact.
382
IBM Tealeaf cxImpact: cxImpact User Manual
– This event must be configured as part of your initial IBM Tealeaf cxImpact
configuration. Contact your Tealeaf administrator to find out whether the
Login ID event is populated.
– The IBM Tealeaf cxImpact User Manual contains a scenario that describes
how to configure the login identifier event for your web application.
– Using IBM Tealeaf cxResults, you can track visitor activities over repeat visits
to your web application.
v When you are ready, you can begin creating your own events to track activities
specific to your web application.
– Event creation is considered an administrative-level feature.
Related concepts:
“E2E Scenario - Configure Login ID to be Searchable” on page 296
Documented Scenarios
v E2E Scenario - Auditing Page Counts
v E2E Scenario - Build Top IPs and Top IPs by Referrer dashboard reports
v
v
v
v
v
E2E
E2E
E2E
E2E
E2E
Scenario
Scenario
Scenario
Scenario
Scenario
-
Configure Login ID to be Searchable
Create Conversion Rate Dashboard
Create Top Products Dashboard
Getting Value out of Tealeaf in One Hour
Tracking User Agent Information in Tealeaf
Related concepts:
“E2E Scenario - Auditing Page Counts” on page 269
“E2E
“E2E
“E2E
“E2E
“E2E
278
“E2E
Scenario
Scenario
Scenario
Scenario
Scenario
-
Configure Login ID to be Searchable” on page 296
Create Conversion Rate Dashboard” on page 306
Create Top Products Dashboard” on page 340
Configure Login ID to be Searchable”
Build Top IPs and Top IPs by Referrer dashboard reports” on page
Scenario - Getting Value out of Tealeaf in One Hour” on page 362
E2E Scenario - Configure Login ID to be Searchable
For web applications that use or require user authentication, capturing Login ID's
can be a useful means for tracking visitor behavior. While a Login ID is not a
guaranteed indicator of a unique visitor, it does provide insight into the activities
on your web application that are engaged through specific user accounts, which is
useful for addressing customer service issues.
v Tealeaf recommends using the Tealeaf Cookie Injector to generate unique,
persistent cookies for individual visitors.
As part of the installation, Tealeaf provides a number of pre-defined data objects
that you can use for tracking basic activities, metrics, and other useful information
about your web application. Among these are two objects for capturing Login IDs.
This End-to-End Scenario describes how to configure the provided Login ID data
objects for your web application's needs and then to surface that information in
search through the Tealeaf Portal.
Chapter 17. Tealeaf End-to-End Scenarios
383
Note: For customers who have upgraded from Release 7.2 or earlier, the existing
Login ID values in your system have been migrated to be stored in the Login ID
session attribute in your upgraded system. However, you must still complete these
steps in order to configure the hit attribute and event for tracking Login IDs.
As part of the set of provided data objects, Tealeaf includes a hit attribute, an
event, and a session attribute for detecting the Login ID displayed in your web
application.
v A hit attribute is used to define the hit attributes in request or response data
that demarcate an element of data that you wish to track through an event.
v An event is triggered by a condition. In this case, the condition is the presence
of the Login ID hit attribute. When this hit attribute is detected, the event is
fired, which stores the Login ID value in the session attribute Login ID.
v A session attribute is a session-level variable that can be populated and updated
based on events. The Login ID session attribute is the first one in your system.
Tealeaf supports the creation of up to 64 session attributes.
v When the hit attribute for Login ID is detected, the event is triggered, and the
session attribute Login ID is updated with the value.
The scenario begins with how to configure the Login ID hit attribute and test if the
session attribute is being properly populated.
Pre-requisites
Note: Before you begin, you must familiarize your self with user agents and the
Tealeaf tools for managing them.
1. Acquire public standards: User agent detection relies on two user agent public
standards:
v Browscap: This public standard is used to track fixed desktop and bot user
agents.
v WURFL: This public standard is used to track mobile user agents for Mobile
Web sessions.
2. Extended user agent parsing: To capture user agent information, extended user
agent parsing must be enabled.
Note: Extended user agent parsing is enabled by default in the Tealeaf
Reference session agent, which is included in the default Windows pipeline.
This session agent must be included in each Canister pipeline that processes
session data in your Tealeaf environment.
3. Mobile Web: To track sessions sourced from a mobile web browser, you must
download, convert, and deploy the WURFL public standard for use by the
Tealeaf Reference session agent.
Note: Mobile user agent detection is a component of the IBM Tealeaf CX
Mobile component. please contact your IBM Tealeaf representative.
v Mobile Web sessions are captured by using the IBM Tealeaf CX UI Capture
for AJAX solution.
4. Mobile App: To track sessions that are sourced from mobile native applications,
you must deploy one of the Tealeaf client frameworks.
Note: Mobile user agent detection is a component of the IBM Tealeaf CX
Mobile component. please contact your IBM Tealeaf representative.
384
IBM Tealeaf cxImpact: cxImpact User Manual
Background on User Agents
Before you begin, you must familiarize yourself with user agents and how they are
managed in Tealeaf.
Creating the Data Objects to Monitor User Agent Information
To capture and store the data for use in eventing, complete the steps in the
following sections.
Download Report Templates
In the following sections, you create the Tealeaf data objects to track the values in
the session data.
Edit or Create Data Objects to Store User Agent Values
To include user agent information with your session data, you must create the data
objects to locate, track, and record the information.
Available hit attributes:
A hit attribute is the data object that is used to gather patterns of data from the
request or response of each hit passed through the event engine.
Tealeaf provides several hit attributes that are configured to look for the
name-value pairs that are inserted into the request that contains user-agent data. In
the table below, you can review the request variables that are mentioned and the
name of any applicable hit attribute that is provided by Tealeaf.
Table 39. Available hit attributes
Request Variable
Common
Mobile
Web
Mobile
App
Default Hit
Attribute
Description
TLT_TRAFFIC_TYPE
Y
Y
Y
Traffic Type
Type of traffic. See
TLT_TRAFFIC_TYPE request
variable in Request data.
TLT_BROWSER
Y
Y
Y
Browser
Visitor browser type. Example:
IE
TLT_BROWSER_VERSION
Y
Y
Y
Browser
Version
Visitor browser type and
version. Example: IE7.0
TLT_BROWSER_PLATFORM
Y
Y
Y
Browser OS
Visitor browser operating
system. Example: WinXP
TLT_BROWSER_JAVASCRIPT
Y
None
TLT_BROWSER_COOKIES
Y
None
TLT_BROWSER_VERSION
Y
Y
None
TLT_SCREEN_WIDTH
Y
Y
None
TLT_COLOR_DEPTH
Y
Y
None
TLT_PICTURE_SUPPORT
Y
None
TLT_VIDEO_SUPPORT
Y
None
TLT_STREAMING_SUPPORT
Y
None
TLT_BRAND
Y
None
TLT_MODEL
Y
None
Related concepts:
“Request data” on page 402
Chapter 17. Tealeaf End-to-End Scenarios
385
Tutorial steps:
For purposes of this tutorial, one of the most useful attributes to surface in
reporting is the Browser Version attribute. This attribute is provided by Tealeaf. It
pulls data from the TLT_BROWSER_VERSION request variable.
Since this data is already created for you, the following steps describe how you can
review this information, highlighting the key values to specify.
v You can modify these steps to create new hit attributes for the other request
variables that are inserted in extended user agent parsing.
After you review the Browser Version hit attribute, you complete the following
steps:
1. Create an event to capture and record the hit attribute value.
2. Create a dimension to record the event value for contextual reporting.
3. Link the dimension to the Http 404 - Not Found event, so that when the event
occurs, the dimension value is recorded.
4. Create a report to segment the Http 404 - Not Found event by the browser
version that is recorded in the session where the event occurred.
In this manner, you can use the user agent information to provide segmented
detail on key metrics of your web application.
Create hit attributes:
There are some user agent variables that are not captured by any default hit
attribute. However, creating these hit attributes is a simple process.
1. Log in to the Portal.
2. From the Portal menu, select Configure > Event Manager.
3. Click the Hit Attributes tab.
4. In the left navigation panel, click the System Hit Attributes label.
5. In the steps below, you review the configuration for the Browser Version hit
attribute.
a. In the main panel, locate and right-click Browser Version. Select Edit Hit
Attribute....
b. The hit attribute definition must look like:
386
IBM Tealeaf cxImpact: cxImpact User Manual
Figure 200. Browser Version hit attribute to track TLT_BROWSER_VERSION
6. For purposes of creating hit attributes to capture request variable data, the
following values are important to specify:
Setting Description
Name
Name that is displayed in the Event Manager
Description
User-friendly description that is displayed in the Event Manager
Search in
User agent values are stored in the Request.
Chapter 17. Tealeaf End-to-End Scenarios
387
Use Start Tag/End Tag
Select this value to specify the start and end patterns of text that
define the beginning and end of the value to capture.
Start Tag
Enter:
\r\n<request_variable_name>=
where <request_variable_name> is the corresponding TLT_ value in
the preceding table.
Note: Be sure to include the terminating equals sign (=) in the Start
Tag.
End Tag
Enter:
\r\n
Case Sensitive
Select this check box.
a. Since this object is a system hit attribute, it cannot be altered.
v For a hit attribute that you create, click Save Draft now. The draft is
saved.
7. Repeat the preceding steps for other request variables you want to track.
Instead of reviewing the values, you must create new values for each setting.
8. You can locate test data and test your drafted hit attributes in the Event Tester
before you save it.
9. To commit your changes to the server, click Save Changes.
10. The hit attributes are now detecting user agent information that is written to
the associated request variables.
Notes on data sources:
v Experienced event designers notice that it is possible to create a dimension that
is populated directly from the source hit attribute. Tealeaf does not recommend
this approach.
v By creating an event that is populated from the hit attribute first, you can apply
modifications to the conditions and states in which the event is triggered,
limiting the processing.
v If the dimension is populated directly from the hit attribute, the dimension is
updated with each hit, which is not necessarily in most cases.
v Particularly for user agent data, which can not change from hit to hit, it is a best
practice to create an event source from the hit attribute, which is used in turn as
the source of the dimension.
Create event to fire in the presence of user agent values:
After you create the hit attributes to locate user agent information in the request,
you must create events to record this information.
In this step, you create an event to record the value of the browser version, which
is tracked in the Browser Version hit attribute created in the previous example.
The hit attribute, in turn, is populated by values in the TLT_BROWSER_VERSION
request variable, which is inserted by Tealeaf.
1. Log in to the Portal.
388
IBM Tealeaf cxImpact: cxImpact User Manual
2. From the Portal menu, select Configure > Event Manager. The Tealeaf Event
Manager is displayed.
3. Click the Events tab.
4. Click New Event.
5. In the Add Event window, you specify the definition of your new event
through a series of tabs. In the image below, the Summary section is specified:
Figure 201. Event to record TLT_BROWSER_VERSION - Summary
Setting Notes
Name
The user-friendly name for the event.
Note: For easiest identification, use the same name for the hit
attribute, event, and dimension that use the same source data, if
possible.
Description
The user-friendly description of the event
Labels You can use event labels to organize your events. An event can have
multiple labels that are associated with it.
Note: You can create and use the label User Agent to store all of your
user agent-related events. You can also add this event label to the
standard user agent events provided by Tealeaf.
Evaluate
This value defines the trigger when the event is checked. For this one,
you must check this event on the first hit of the session.
Note: Some bot traffic is known to switch user agent strings during a
session, so you can choose to make this event fire on every hit.
However, depending on the data volume, this configuration change
could significantly increase the data storage requirements. To begin,
set this event to be evaluated once per session.
Note: Since the browser version of a device does not change during a
session, there is no need to check for this event on any hit other than
the first one, unless for some reason user agent information is not
reported in the first request of the session. For data that changes from
request to request, you can change the trigger for the event.
Track
Your selection identifies the instance or instances of the event
occurrence that are recorded for the event. This value is set to be
First Per Session for the event to be evaluated on the first hit of the
session. No other configuration is permitted.
Value Type
This setting defines the type of value to record.
Chapter 17. Tealeaf End-to-End Scenarios
389
Note: The count of the event is always recorded.
Note: For the User Agent - Browser Version event, the data that is
captured is text data.
Active check box
Select this check box. When selected, the event is used to process
session data as soon as the event is committed to the server.
Searchable & Reportable check box
Select this check box. When selected, the event can be used for search
and reporting purposes in the Tealeaf Portal.
6. Condition Step: Click the Condition tab. This area is used to configure the
condition or conditions that are evaluated when the event is evaluated. When
the conditions in this step collectively evaluate to true, then the event fires.
a. For the User Agent - Browser Version event, you add the Browser
Version hit attribute as the condition.
b. Click the Hit Attributes panel.
c. Click the System Hit Attributes category.
d. Select the Browser Version hit attribute as the condition for your event.
e. Set the hit attribute to be tested when Hit Attribute Found and is true.
This configuration means that whenever the hit attribute is detected, the
event fires. Since the request data is written only when a corresponding
user agent is matched, you can build the condition to detect only for the
presence of the request variable.
Figure 202. Event to record TLT_BROWSER_VERSION - Condition step
7. Value Step: In the Value step, you define the value that is recorded.
a. The values to record are dependent on the Value Type selection you made
in the Summary.
b. For each Value Type selection, the event count is always recorded.
c. In the User Agent - Browser Version example, the Value Type is
configured to be Text, which means that data that is recorded is defined as
text data.
d. In the Value step, click Select Item to Record....
e. In this case, you want to record the browser version value, which is stored
in the Browser Version hit attribute. Select this hit attribute.
390
IBM Tealeaf cxImpact: cxImpact User Manual
f. The hit attribute is selected. From the drop-down, select First Match per
Hit, if it is not already selected.
g. The Value step must look like:
Figure 203. Event to record TLT_BROWSER_VERSION - Value step
8. Report Groups Step: In the Report Groups step, you can specify any report
groups whose contextual data is recorded with each instance of the event.
a. In Tealeaf, a report group is a collection of dimensions. A dimension is a
contextual piece of data that is recorded when the event is recorded. The
data is stored with the event in the session.
b. For the User Agent - Browser Version event, you can record the
URL/Host/App/Server report group, which is provided by Tealeaf. This
report group records the URL, host name, application name, and server
name at the time that the event is triggered.
Note: For events that are evaluated on every hit and record values on
most of them, adding report groups can affect the volume of recorded
data. Add report groups only as needed.
c. Click Add Report Group.
d. Click URL/Host/App/Server.
e. The Report Groups step must look like:
Figure 204. Event to record TLT_BROWSER_VERSION - Report Groups step
Chapter 17. Tealeaf End-to-End Scenarios
391
9. More Options Step: In the More Options step, you can specify additional
actions that are completed when the event fires.
10. For the User Agent - Browser Version event, verify that the following settings
are specified.
v These options are specified in greater detail elsewhere. For this event, the
default settings must be applied.
Setting Value
Display in Portal check box
Selected
Display in Session List check box
Selected
Flag Every Occurrence in Replay check box
Selected
Send to Event Bus check box
Clear this item, unless you deploy the Event Bus and want to send
user agent data to the external system.
Minute Data On check box
Cleared
Update Session Attribute?
There is no need to update a session attribute with these values.
Update Session Timeout check box
Cleared
Additional Actions
Select None.
Include Event in IBM Tealeaf cxResults check box
Select this item to include the event in IBM Tealeaf cxResults. Even
if you have not installed IBM Tealeaf cxResults, you must select it
so that the event is automatically included if the product is ever
installed.
IBM Tealeaf cxResults Session Filter
Select No Action.
11. The More Options step must look like:
Figure 205. Event to record TLT_BROWSER_VERSION - More Options step
12. You are done specifying the event. Click Save Draft.
392
IBM Tealeaf cxImpact: cxImpact User Manual
13. Before you commit events to the server, you must test them in the Event
Tester. Draft versions of event-related objects can be tested.
Create dimension to store user agent values:
You have now reviewed or created the objects necessary to report the values for
the TLT_BROWSER_VERSION request variable, which captures browser versions
reported from the client. Now, you can report on the counts of the number of
instances where the User Agent - Browser Version event occurred. You can also
generate reports on the different recorded values (IE7.0, and so on). Collectively,
this information is not useful.
What is more useful is how this data can be used to segment reports. For example,
you can create a report in which the counts for a different event, such as one
tracking your application's errors, is segmented based on the recorded browser
versions. This report would create a chart in which each detected browser version
is represented by a vertical bar that indicates the occurrences of the event in the
reporting period
Here, you create the dimension object to store the browser version information so
that it can be used for this report segmentation.
1. Log in to the Portal.
2. From the Portal menu, select Configure > Event Manager. The Tealeaf Event
Manager is displayed.
3. Click the Dimensions tab.
4. Click New Dimension.
5. In the Add Dimension dialog, populate the following properties:
a. Name: User Agent - Browser Version
b. Click the Populated By button. Click the Hit Attributes tab. Open the
group that contains the hit attribute that you created. Select the Browser
Version hit attribute.
c. Populate With: First Value in Session
d. Click the Advanced Options caret.
e. For the Values to Record entry, select Whitelist + Observed Values.
6. The dimension must look like:
Chapter 17. Tealeaf End-to-End Scenarios
393
Figure 206. Dimension to record User Agent - Browser Version event
7. Click Save Draft.
You have now configured the dimension to capture data from the capture
stream.
Before the dimension is operational, you must:
a. Associate the dimension with a report group.
b. Associate the report group with an event.
Related tasks:
“Associate the report group with an event” on page 395
394
IBM Tealeaf cxImpact: cxImpact User Manual
Associate the dimension with a report group:
The dimension that you just created must be associated with a report group.
1. In the Dimensions tab, click New Report Group.
2. In the Add Report Group dialog, enter a user-friendly name and description.
These entries must reflect the function of the report group. For our example,
enter the following code: User Agent - Browser Version.
v More dimensions can be added as needed, and you can change the name of
the report group then without affecting reporting.
3. For the Template value, select Standard.
Note: Depending on your Tealeaf version, the Template selector may not be
present. The Standard template is automatically selected for you.
4. Click Add Dimensions....
5. Select User Agent - Browser Version.
6. The Report Group definition must look like:
Figure 207. User Agent report group
7. Click Save Draft.
Associate the report group with an event:
Now, the newly created report group must be associated with an event. When the
event occurs, the contextual data that is captured in the dimensions within the
report group is recorded at the same time.
1. Click the Events tab.
2. Select the event with which you would like to record the User Agent - Browser
Version dimension.
v In our example, you might associate it with the Http 404 - Not Found event
that is provided by Tealeaf. This event is stored in the Tealeaf Standard
Events event label.
3. Select the event. Right-click and select Edit Event....
Chapter 17. Tealeaf End-to-End Scenarios
395
4. Click the Report Groups step.
5. Click Add Report Group.
6. Select the User Agent - Browser Version report group.
Figure 208. Associating Http 404 - Not Found event with the new report group
7. Click Save Draft.
Saving changes
Now, you must save the events objects that you create. Click Save Changes.
Managing Dimension Values
The hit attribute is scanning for occurrences of the TLT_BROWSER_VERSION request
variable. When it occurs, the event fires, recording the request variable value as a
numeric value.
v When the Http 404 - Not Found event occurs, the current value of the event is
recorded as the value for the User Agent - Browser Version dimension.
The dimension values are being gathered directly from the capture stream. Each
value that is detected in the capture stream is recorded into the database, which
presents some issues.
For the TLT_BROWSER_VERSION request variable, the range of value is extensive. For
each browser known through the browscap public standard, there can be multiple
versions. For example, values can be:
v IE6.0
v IE7.0
v IE8.0
v IE9.0
But each detected value can be a repeat of a value that is already known to Tealeaf
through previously recorded dimension values. As a result, a great deal of
replicated data is being recorded. Each time a session is captured from a device
that is using Internet Explorer 7.0, another instance of the dimension value IE7.0 is
recorded in the database. For high-volume dimensions, this unnecessary recording
is expensive.
396
IBM Tealeaf cxImpact: cxImpact User Manual
As an alternative to this recording method, you can create a whitelist of values,
which contains the values that are allowed to be recorded for the dimension.
Recording instances from the whitelist requires a much smaller volume of data.
Note: Over time, a dimension that is configured to record Whitelist + Observed
Values grows without bound. For data storage purposes, you must always try to
convert these dimensions to Whitelist Only.
Note: For user agent data, the landscape of available browsers is constantly
changing. As a result:
v You must regularly update your browscap and WURFL (if IBM Tealeaf CX
Mobile is licensed) standards so that you have the latest user agent information.
v You must review your dimension data regularly to see whether new values are
being recorded.
These habits are good workflow habits to apply to your dimensional data.
There are two ways to create a whitelist:
v Specify the whitelist manually: If you know the acceptable values for a
dimension, you can specify the list through the Event Manager. This method is
useful only for dimensions with a limited number of dimensions.
v Upload list of values: If you know the acceptable values for a dimension, you
can create a whitelist of values in a local file and upload it to the Portal.
v Gather whitelist values from dimension logs: Through the Event Manager, you
can enable logging of dimension values in to a database log. After enough
values are captured, you can download the logged values to a local text file, edit
it, and then load it into the dimension as the whitelist through the Event
Manager.
This last method is the easiest to manage and is described in the following
sections.
Enabling logging:
First, you must enable logging on the dimension.
1. In the Event Manager, click the Dimensions tab.
2.
3.
4.
5.
6.
Select the User Agent - Browser Version dimension.
Right-click and select Edit Dimension?.
Click the Advanced Options caret.
Click Turn On Logging.
Click Save Draft.
7. Click Save Changes.
Detected values for the dimension are now stored in the dimension logs.
Note: After you enable dimension logging, you must wait for a sometime to
collect a sufficient volume and range of values to populate your dimension
whitelist. For this exercise, wait 1 hour.
Download log file:
After sufficient time, you can download the logs to your local workstation, where
you build the whitelist of values.
1. In the Event Manager, click the Dimensions tab.
Chapter 17. Tealeaf End-to-End Scenarios
397
2.
3.
4.
5.
6.
Select the User Agent - Browser Version dimension.
Right-click and select Edit Dimension?.
Click the Advanced Options caret.
Click Edit Whitelist?.
In the Edit Whitelist window, click Download Log Values.
7. Save the file locally.
8. Click Cancel twice.
Build whitelist and upload:
After you create the value lists, you must reformat them into single-column text
files and then import them as whitelisted values in a dimension you create in the
Tealeaf Event Manager.
Import the data into the Tealeaf Event Manager:
The following steps outline the general workflow for importing value lists into the
Tealeaf Event Manager.
1. Click the Dimensions tab.
2. Select the User Agent - Browser Version dimension.
3. Edit the dimension.
a. Click Edit Whitelist....
b. In the Edit WhiteList window, click Import File....
c. In the Import WhiteList dialog, click Browse.... Navigate your local
environment to select the text file you created. Click Open.
d. To import the selected file, click Import.
e. The imported files are displayed in the whitelist.
f. You may edit the values and their properties or add additional values as
needed.
4. Click Done. Click Save Draft to save a draft of your new dimension.
5. To save the changes to the server, click Save Changes.
6. After 10 minutes or so, some completed sessions should be populated based on
this dataset.
Note: If you are satisfied with your whitelist, you should switch over to Whitelist
Only for the dimension. Any values that are detected but do not appear in the
whitelist are recorded as [others] for the dimension. When this dimension value
begins recording counts, you can revise the whitelist to capture the newly detected
values.
Repeat Steps
You can now use the User Agent - Browser Version event and the associated
dimension in search and reporting.
If you want, repeat the steps to create other hit attributes, events, dimensions, and
dimension values for the other fields in the user agent data set.
Using User Agent Data in Tealeaf
Now that data objects are capturing and recording your user agent data, you can
begin by using it elsewhere in the Portal.
Related concepts:
398
IBM Tealeaf cxImpact: cxImpact User Manual
“Search for user agent data”
“User agent data in replay” on page 401
“User agent data in reporting” on page 403
Search for user agent data
Through the Portal, you can search for the events and dimensions you created.
Search for User Agent - Browser Version event:
In the earlier example, you created the User Agent - Browser Version event. You
can search for:
1. The existence of this event in a session
2. Specific values for this event
Search for the event:
To search for sessions in which the event occurred, complete the following steps.
1. From the Portal menu, select Search > Completed Sessions.
Note: You can also complete this search against active or all sessions.
2. Clear all of the search fields.
3. Select the default completed search template.
4. Under the Basic Search Fields category, click the Events link.
5. In the main panel, click Select Event.
6. In the Event Selector, click the event label under which the User Agent Browser Version event was stored.
7. Select the event. Click Select.
8. The search terms must look like:
Figure 209. Search for user agent event
9. To run the preceding search, click Search.
10. Results are displayed in the session list.
Related concepts:
“Searching Session Data” on page 37
Chapter 17. Tealeaf End-to-End Scenarios
399
Search for specific values for the event:
To search sessions in which specific values of the event occurred, complete the
following steps.
1. From the Portal menu, select Search > Completed Sessions.
2.
3.
4.
5.
6.
7.
8.
9.
Note: You can also complete this search against active or all sessions.
Clear all of the search fields.
Select the default completed search template.
Under the Basic Search Fields category, click the Event Values link.
In the main panel, click Select Event.
In the Event Selector, click the event label under which the User Agent Browser Version event was stored.
Select the event. Click Select.
The event is added to the search criteria.
To search for a specific value for this event:
a. Set the operator to includes, if it is not already selected.
b. Set the value for the event for which you want to select. You might enter
IE7.0.
10. The search terms must look like:
Figure 210. Search for user agent event value
11. To run the preceding search, click Search.
12. Results are displayed in the session list.
Related concepts:
“Searching Session Data” on page 37
Search for User Agent - Browser Version event:
In the earlier example, you created the User Agent - Browser Version event. You
can search for:
1. The existence of this event in a session
2. Specific values for this event
Locating instances in returned results:
When the sessions are returned in the search results, you can locate the instances
of the event or (event + dimension) combination by using QuickView.
400
IBM Tealeaf cxImpact: cxImpact User Manual
1. To locate, click the QuickView (
) icon next to the session of interest to you
in the search results.
2. In QuickView, from the Order By drop-down, select Event Name.
3. If there are too many event names to review, click the link next for the Event
Label. Select the event label that contains the event for which you searched.
4. Locate the event. In the image below, the Http 404 - Not Found event is
displayed.
Figure 211. QuickView
5. The following information is of interest:
v The 1 link indicates the page number. You can select this link to review page
details about the page in question.
v Beneath the listed event (Http 404 - Not Found), you can review all of the
dimension values that were recorded when the event occurred.
– If it is present, the [Others] value is a dimension constant that is recorded
when the detected value does not match any values on a listed whitelist.
– For the User Agent - Browser Version dimension, you can see that a
value of IE8.0 was recorded.
Related concepts:
“Searching Session Data” on page 37
User agent data in replay
To begin replay of the session on the page where the event occurred, click the
) icon next to the event name. From the dialog, select Browser to
Replay (
replay the session in your web browser through Browser Based Replay.
Chapter 17. Tealeaf End-to-End Scenarios
401
User agent information bar:
When the session is loaded in BBR, it is displayed in Replay view. At the top of
the screen, you can see an extra bar is added with additional information about the
session:
Figure 212. User Agent information in BBR
The preceding information is extracted from the user agent information that is
submitted from the client. When a user agent match is found, these properties are
displayed in BBR to help identifying the source of the session.
User Agent Property
Source Request Variable
Browser
TLT_BROWSER
Browser Platform
TLT_BROWSER_PLATFORM
Best Replayed Using
TLT_BROWSER_VERSION
Note: This data source corresponds to the source for the User Agent Browser Version event and dimension objects that you created in this
tutorial.
Traffic Type
TLT_TRAFFIC_TYPE
Screen
TLT_SCREEN
Note: Screen data is only visible if you have an IBM Tealeaf CX Mobile
license.
Replay Renderer
TLT_REPLAY_RENDERER
Mobile skins:
For mobile-based sessions, user agent information can be used to determine the
surrounding trim (or skin) to apply during replay. A skin is applied during BBR
replay to emulate the sizing of how the visitor experienced your web application
through a mobile device.
Note: This option is only enabled if you have an IBM Tealeaf CX Mobile license.
Request data:
To see user agent information in BBR, you must be in Request view. Select Request
in the BBR toolbar.
402
IBM Tealeaf cxImpact: cxImpact User Manual
In Request view, you can review the raw request data for the hit you selected.
Tealeaf augments the raw request with additional data, including the user agent
information that is retrieved if a user agent string submitted in the request is
matched in one of the public standards.
User agent information in inserted in the [ExtendedUserAgent] section of the
request.
v This information is inserted by the Tealeaf Reference session agent.
[ExtendedUserAgent]
TLT_BROWSER=IE
TLT_BROWSER_VERSION=IE8.0
TLT_BROWSER_PLATFORM=Windows
TLT_TRAFFIC_TYPE=BROWSER
TLT_BROWSER_JAVASCRIPT=true
TLT_BROWSER_COOKIES=true
User agent data in reporting
You can include user agent data in a report as a dimension.
Dimensional user agent data:
The most interesting use of user agent data in reporting is including it as a
dimension. In our example, we created the User Agent - Browser Version
dimension and associated it with the Http 404 - Not Found event.
In the steps below, you create a report in the Report Builder on the Http 404 - Not
Found event, which is filtered by the User Agent - Browser Version dimension.
You can determine these HTTP Status Code 404 errors from this report, which
indicate that a resource was not found by the dimension added to it. In this case,
you can review the counts of these 404 errors by the browser versions of devices
that access your web application.
1. In the Portal menu, select Analyze > Report Builder.
2. The Report Builder is displayed. Click the New icon in the toolbar.
3. From the left panel, click the Events tab.
4. Click Add Event.
5. In the Event Selector, select the Tealeaf Standard Events label.
6. From the Tealeaf Standard Events, select the Http 404 - Not Found event.
Click Select.
7. The Report Builder must look like:
Chapter 17. Tealeaf End-to-End Scenarios
403
Figure 213. Report Builder - User agent as dimension report
8. The reporting data is incomplete in the chart. By default, the Report Builder
displays data from the current date.
v If you created these data objects before today, you can review data from a
previous date. Click the date that is displayed in the toolbar, and select the
last business day before the current date.
9. Now, you can apply the dimension to it. In the left panel, click the
Dimensions tab.
10. The dimensions that are listed in the Dimensions tab are the only ones that
are compatible with the currently displayed set of events.
11. Click and drag the User Agent - Browser Version dimension to the <Add
X-Axis> box below the chart in the report display.
12. The report must now look like:
404
IBM Tealeaf cxImpact: cxImpact User Manual
Figure 214. Report Builder - User agent as dimension report
13. In the preceding figure, the chart is somewhat obscured by the fact that there
are so many instances of [Null] values. In dimensional report, a null value is
recorded if the specific item of data is not recorded when the event was
recorded. In these cases, the user agent information is not available.
v If you created the dimension and began recording values to it at some point
during the day, all recorded instances of the Http 404 - Not Found event
recorded null values for the dimension.
14. To make the chart more meaningful, you might want to filter out the null
values. You can use the following steps to filter out values in general from a
displayed dimension.
a. Next to the dimension that is added to the X-axis, select the Down caret to
open the context menu for the dimension. From the context menu, select
Filter.
b. In the Dimension Filter dialog, click the Filter By Value check box at the
top.
c. From the drop-down, select Exclude Only Selected Values.
d. Click Add Values. Select All Values.
e. From the Dimension Value Selector, click the check box next to [Null].
Chapter 17. Tealeaf End-to-End Scenarios
405
f. The Dimension Filter must look like:
Figure 215. Report Builder - Filtering dimensions
15. Click Apply.
16. The Report Builder is updated to remove the null values from the report. It
must look like:
406
IBM Tealeaf cxImpact: cxImpact User Manual
Figure 216. Report Builder - Filtering dimensions
In the preceding report, you can now visually identify that HTTP Status Code 404
errors are divided among various browser version values.
If this report is useful to you, click the Save icon in the toolbar to save the report.
Modifications:
v If you want to see the counts of the HTTP 404 - Not Found event for the
dimension as it is configured, click the dimension entry in the X-axis and drag it
to the <Add Segment> box at the top of the screen. In our example, this report
now shows just the Http 404 - Not Found event counts for the selected date in
which the User Agent - Browser Version dimension is not null.
v To segment the vertical counts of the event by the dimension values, click and
drag the dimension as it is configured to the Y-axis box.
Event report
To see how often the user agent event that occurred, do the following:
1. Click the New icon in the toolbar.
2. In the left panel, click the Events tab.
3. Click Add Event.
Chapter 17. Tealeaf End-to-End Scenarios
407
4. In the filter box, enter User Agent or other string to help locating your user
agent event or events.
5. Select the event. In our example, the event was User Agent - Browser Version.
6. Click Select.
7. The report is displayed.
Note: The displayed report shows all instances when the event was fired, even
instances when a null value was recorded for the dimension. Using this
particular event for making assessments is not meaningful.
408
IBM Tealeaf cxImpact: cxImpact User Manual
Chapter 18. IBM Tealeaf documentation and help
IBM Tealeaf provides documentation and help for users, developers, and
administrators.
Viewing product documentation
All IBM Tealeaf product documentation is available at the following website:
https://tealeaf.support.ibmcloud.com/
Use the information in the following table to view the product documentation for
IBM Tealeaf:
Table 40. Getting help
To view...
Do this...
Product documentation
On the IBM Tealeaf portal, go to ? > Product
Documentation.
Help for a page on the IBM Tealeaf Portal
On the IBM Tealeaf portal, go to ? > Help
for This Page.
Help for IBM Tealeaf CX PCA
On the IBM Tealeaf CX PCA web interface,
select Guide to access the IBM Tealeaf CX
PCA Manual.
Available documents for IBM Tealeaf products
Use the following table to view a list of available documents for all IBM Tealeaf
products:
Table 41. Available documentation for IBM Tealeaf products
IBM Tealeaf products
Available documents
IBM Tealeaf CX
v IBM Tealeaf Customer Experience Overview
Guide
v IBM Tealeaf CX Client Framework Data
Integration Guide
v IBM Tealeaf CX Configuration Manual
v IBM Tealeaf CX Cookie Injector Manual
v IBM Tealeaf CX Databases Guide
v IBM Tealeaf CX Event Manager Manual
v IBM Tealeaf CX Glossary
v IBM Tealeaf CX Installation Manual
v IBM Tealeaf CX PCA Manual
v IBM Tealeaf CX PCA Release Notes
© Copyright IBM Corp. 1999, 2014
409
Table 41. Available documentation for IBM Tealeaf products (continued)
IBM Tealeaf products
Available documents
IBM Tealeaf CX
v IBM Tealeaf CX RealiTea Viewer Client Side
Capture Manual
v IBM Tealeaf CX RealiTea Viewer User
Manual
v IBM Tealeaf CX Release Notes
v IBM Tealeaf CX Release Upgrade Manual
v IBM Tealeaf CX Support Troubleshooting
FAQ
v IBM Tealeaf CX Troubleshooting Guide
v IBM Tealeaf CX UI Capture j2 Guide
v IBM Tealeaf CX UI Capture j2 Release Notes
IBM Tealeaf cxImpact
v IBM Tealeaf cxImpact Administration Manual
v IBM Tealeaf cxImpact User Manual
v IBM Tealeaf cxImpact Reporting Guide
IBM Tealeaf cxConnect
v IBM Tealeaf cxConnect for Data Analysis
Administration Manual
v IBM Tealeaf cxConnect for Voice of Customer
Administration Manual
v IBM Tealeaf cxConnect for Web Analytics
Administration Manual
IBM Tealeaf cxOverstat
IBM Tealeaf cxOverstat User Manual
IBM Tealeaf cxReveal
v IBM Tealeaf cxReveal Administration Manual
v IBM Tealeaf cxReveal API Guide
v IBM Tealeaf cxReveal User Manual
IBM Tealeaf cxVerify
IBM Tealeaf cxVerify Administration Manual
IBM Tealeaf cxView
IBM Tealeaf cxView User Manual
IBM Tealeaf CX Mobile
v IBM Tealeaf CX Mobile Android Logging
Framework Guide
v IBM Tealeaf Android Logging Framework
Release Notes
v IBM Tealeaf CX Mobile Administration
Manual
v IBM Tealeaf CX Mobile User Manual
v IBM Tealeaf CX Mobile iOS Logging
Framework Guide
v IBM Tealeaf iOS Logging Framework Release
Notes
410
IBM Tealeaf cxImpact: cxImpact User Manual
Notices
This information was developed for products and services offered in the U.S.A.
IBM may not offer the products, services, or features discussed in this document in
other countries. Consult your local IBM representative for information on the
products and services currently available in your area. Any reference to an IBM
product, program, or service is not intended to state or imply that only that IBM
product, program, or service may be used. Any functionally equivalent product,
program, or service that does not infringe any IBM intellectual property right may
be used instead. However, it is the user's responsibility to evaluate and verify the
operation of any non-IBM product, program, or service.
IBM may have patents or pending patent applications covering subject matter
described in this document. The furnishing of this document does not grant you
any license to these patents. You can send license inquiries, in writing, to:
IBM Director of Licensing
IBM Corporation
North Castle Drive
Armonk, NY 10504-1785
U.S.A.
For license inquiries regarding double-byte (DBCS) information, contact the IBM
Intellectual Property Department in your country or send inquiries, in writing, to:
Intellectual Property Licensing
Legal and Intellectual Property Law
IBM Japan, Ltd.
19-21, Nihonbashi-Hakozakicho, Chuo-ku
Tokyo 103-8510, Japan
The following paragraph does not apply to the United Kingdom or any other
country where such provisions are inconsistent with local law: INTERNATIONAL
BUSINESS MACHINES CORPORATION PROVIDES THIS PUBLICATION "AS IS"
WITHOUT WARRANTY OF ANY KIND, EITHER EXPRESS OR IMPLIED,
INCLUDING, BUT NOT LIMITED TO, THE IMPLIED WARRANTIES OF
NON-INFRINGEMENT, MERCHANTABILITY OR FITNESS FOR A PARTICULAR
PURPOSE. Some states do not allow disclaimer of express or implied warranties in
certain transactions, therefore, this statement may not apply to you.
This information could include technical inaccuracies or typographical errors.
Changes are periodically made to the information herein; these changes will be
incorporated in new editions of the publication. IBM may make improvements
and/or changes in the product(s) and/or the program(s) described in this
publication at any time without notice.
Any references in this information to non-IBM Web sites are provided for
convenience only and do not in any manner serve as an endorsement of those Web
sites. The materials at those Web sites are not part of the materials for this IBM
product and use of those Web sites is at your own risk.
© Copyright IBM Corp. 1999, 2014
411
IBM may use or distribute any of the information you supply in any way it
believes appropriate without incurring any obligation to you.
Licensees of this program who wish to have information about it for the purpose
of enabling: (i) the exchange of information between independently created
programs and other programs (including this one) and (ii) the mutual use of the
information which has been exchanged, should contact:
IBM Bay Area Lab
1001 E Hillsdale Boulevard
Foster City, California 94404
U.S.A.
Such information may be available, subject to appropriate terms and conditions,
including in some cases, payment of a fee.
The licensed program described in this document and all licensed material
available for it are provided by IBM under terms of the IBM Customer Agreement,
IBM International Program License Agreement or any equivalent agreement
between us.
Any performance data contained herein was determined in a controlled
environment. Therefore, the results obtained in other operating environments may
vary significantly. Some measurements may have been made on development-level
systems and there is no guarantee that these measurements will be the same on
generally available systems. Furthermore, some measurements may have been
estimated through extrapolation. Actual results may vary. Users of this document
should verify the applicable data for their specific environment.
Information concerning non-IBM products was obtained from the suppliers of
those products, their published announcements or other publicly available sources.
IBM has not tested those products and cannot confirm the accuracy of
performance, compatibility or any other claims related to non-IBM products.
Questions on the capabilities of non-IBM products should be addressed to the
suppliers of those products.
All statements regarding IBM's future direction or intent are subject to change or
withdrawal without notice, and represent goals and objectives only.
This information contains examples of data and reports used in daily business
operations. To illustrate them as completely as possible, the examples include the
names of individuals, companies, brands, and products. All of these names are
fictitious and any similarity to the names and addresses used by an actual business
enterprise is entirely coincidental.
COPYRIGHT LICENSE:
This information contains sample application programs in source language, which
illustrate programming techniques on various operating platforms. You may copy,
modify, and distribute these sample programs in any form without payment to
IBM, for the purposes of developing, using, marketing or distributing application
programs conforming to the application programming interface for the operating
platform for which the sample programs are written. These examples have not
been thoroughly tested under all conditions. IBM, therefore, cannot guarantee or
imply reliability, serviceability, or function of these programs. The sample
412
IBM Tealeaf cxImpact: cxImpact User Manual
programs are provided "AS IS", without warranty of any kind. IBM shall not be
liable for any damages arising out of your use of the sample programs.
Trademarks
IBM, the IBM logo, and ibm.com® are trademarks or registered trademarks of
International Business Machines Corp., registered in many jurisdictions worldwide.
Other product and service names might be trademarks of IBM or other companies.
A current list of IBM trademarks is available on the Web at “Copyright and
trademark information” at www.ibm.com/legal/copytrade.shtml.
Privacy Policy Considerations
IBM Software products, including software as a service solutions, ("Software
Offerings") may use cookies or other technologies to collect product usage
information, to help improve the end user experience, to tailor interactions with
the end user or for other purposes. A cookie is a piece of data that a web site can
send to your browser, which may then be stored on your computer as a tag that
identifies your computer. In many cases, no personal information is collected by
these cookies. If a Software Offering you are using enables you to collect personal
information through cookies and similar technologies, we inform you about the
specifics below.
Depending upon the configurations deployed, this Software Offering may use
session and persistent cookies that collect each user's user name, and other
personal information for purposes of session management, enhanced user usability,
or other usage tracking or functional purposes. These cookies can be disabled, but
disabling them will also eliminate the functionality they enable.
Various jurisdictions regulate the collection of personal information through
cookies and similar technologies. If the configurations deployed for this Software
Offering provide you as customer the ability to collect personal information from
end users via cookies and other technologies, you should seek your own legal
advice about any laws applicable to such data collection, including any
requirements for providing notice and consent where appropriate.
IBM requires that Clients (1) provide a clear and conspicuous link to Customer's
website terms of use (e.g. privacy policy) which includes a link to IBM's and
Client's data collection and use practices, (2) notify that cookies and clear gifs/web
beacons are being placed on the visitor's computer by IBM on the Client's behalf
along with an explanation of the purpose of such technology, and (3) to the extent
required by law, obtain consent from website visitors prior to the placement of
cookies and clear gifs/web beacons placed by Client or IBM on Client's behalf on
website visitor's devices
For more information about the use of various technologies, including cookies, for
these purposes, See IBM's Online Privacy Statement at: http://www.ibm.com/
privacy/details/us/en section entitled "Cookies, Web Beacons and Other
Technologies."
Notices
413
414
IBM Tealeaf cxImpact: cxImpact User Manual
Printed in USA