1
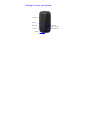
WCDMA Digital Mobile Handset
User Guide
Contents
Let’s get started........................................................................................ 6
Getting to know your phone ................................................................... 7
Onscreen icons
9
Power on/off
11
Switch to sleep mode
12
Wake up your phone
13
Screen control
13
Open and switch applications
14
Home Screen
15
Making and receiving calls ................................................................... 19
Making a call
19
Receiving a call
20
Reject a call
21
End a call
21
Adjusting the volume
21
Turn the speaker on or off
22
Conference call
22
Open the dialer
22
Contacts ................................................................................................. 23
Add new contact
23
Delete a contact
24
Delete contacts
24
Edit contact details
24
Search contacts
25
Add to favorites
25
Accounts
25
Import/Export contacts
26
Share a contact
26
Messaging............................................................................................... 27
Send messages
27
Receive messages
28
Message thread
28
Settings
29
Email........................................................................................................ 31
Set up Email account
31
Send Emails
33
Check Emails
33
Network Applications ............................................................................ 34
Network connection
34
Network connection mode
34
Wi-Fi
35
Browser
36
Bluetooth
38
Settings ................................................................................................... 40
Airplane mode
40
USB tethering
Mobile networks
Call settings
Sound
Display
Location & security
Applications
Accounts & sync
Privacy
SD card & phone storage
Search
Language & keyboard
Accessibility
Date & time
About phone
41
41
42
44
45
46
47
48
49
50
51
52
52
53
53
Experiencing Multimedia ...................................................................... 54
Camera
54
Video Recorder
55
Music
Videos
Gallery
Sound Recorder
57
60
60
61
More Applications .................................................................................. 62
File manager
62
Clock
63
Calculator
64
Calendar
65
Manage applications
66
Input Method........................................................................................... 68
Android Keyboard
69
XT9 text input
70
Appendix ................................................................................................. 72
Battery saving tips
72
Problems and their solutions
73
Let’s get started
Thanks for choosing the Karbonn_A1. It’s a WCDMA Digital Mobile
Handset, which we’ll simply call ‘phone’ from now on. Under Android
operating system, the phone supports 3G high-speed Internet access,
which brings you brandnew experiences.
If you’d like your phone to live a long and fruitful life, please read this guide
carefully.
And don’t worry if the pictures we use to demonstrate your phone’s
functions look a little different from what you see on its screen. It’s the
functions they show that matter.
This user guide is to introduce the phone’s functions. For detailed
precautions, installation descriptions, authentication information, please
refer to the Quick Start Guide.
Back to top
Getting to know your phone
Side keys
Menu key
Home key
Send key
Enter key
Back key
Navigation keys
End/power key
Menu key
Press it to open a menu with items that affect the
current screen or application.
Home key
Press it to open the home screen. If you’re viewing
the left or right extended home screen, press it to
open the central home screen.
Press and hold the key to open the most recently
used applications screen.
Back key
Press it to open the previous screen you were
working in.
If the onscreen keyboard is open, press it to close
the keyboard.
Send key
Make or receive a call.
In idle mode, press the key to enter Call log.
End/power key
Press the key to turn on/off the display.
Press and hold the key to open a menu with options
for Airplane mode, for Silent mode, and for
powering off the phone
Side keys
Adjust the volume.
Press and hold the key to quickly increases the
ringtone volume to maximum or minimum.
Navigation keys
Press these keys to select options or programs. On
the home screen, press the left/Right key to switch
screens.
Note:
Please don't block up the microphone with your fingers during the conversation.
Back to top
Onscreen icons
Icons
Descrriptions
Icons
Descriptions
Signal strength
No
o signal
Battery is full
In charging
Battery is low
w
In call
3G connected
d
GP
PRS connected
Edge conneccted
Yo
ou have unread messsage.
Speakerphon
ne is on
Yo
ou have unheard voicce mail.
Call forwardin
ng is on
Yo
ou have unread emaiil.
Call on hold
Co
onnected to a PC
Vibrate mode
e
Mu
usic playing
Ringer is silen
nced
Ne
ew calendar reminder
Flight mode
A clock
c
alarm is active..
Missed call
WLAN function on
Bluetooth® is on
Re
eceiving location data
a from
GP
PS
Roaming
Back to top
Power on/off
Power on
Press the power key until the power-on animation appears.
When you turn your phone on, it’ll automatically check the SIM and show
the following information on screen:
-Enter PIN code: If you’ve set card lock.
-Draw unlock pattern: if you have set unlock pattern.
Note:
The PIN is supplied with your SIM. Please replace it with your own PIN code as soon
as possible. Enter the wrong PIN three times, and your SIM will be locked. Then
you’ll need to contact your network service provider to ask for a PUK code to unlock
it.
-Searching: The phone will search for the available network.
Power off
Long press the Power key to display the menu Phone options and then
select Power off.
Back to top
Switch to sleep mode
Sleep mode is a kind of power-saving mode, which prevents against
inadvertent operations.
If your phone has been in idle mode for a while, it will automatically switch
to the sleep mode.
You can also press the End key to turn off the screen and enable the sleep
mode.
Back to top
Wake up your phone
After the phone switches to the sleep mode, the screen will be turned off
and locked. In this case please awake your phone and unlock the screen if
you want to use your phone.
1. Press the End key to turn on the screen.
2. Drag the icon
to the right to unlock the screen.
If you’ve set unlock pattern, you need draw the unlock pattern to unlock.
(for details, please see Settings > Location & security >Set up screen
lock > Pattern).
Back to top
Screen control
You can control your phone through a series of operations on the screen.
- Press: you can press the items on the screen to select, open the
applications, or use the keyboard to input characters.
- Slide: you can scroll up/down the page or scroll the page left/right by
sliding vertically or horizontally on the screen.
- Long press: you can long press some items to get its available menu.
Long press the application icons to add the shortcuts of these applications
to the home page.
- Drag: you can drag some items on the screen to realize some operations.
- Switch between landscape mode and portrait mode: you can switch to
the landscape mode by rotating your phone to the left. The landscape
mode is only valid under some interfaces, such as text input interface,
message viewing interface, etc.
Back to top
Open and switch applications
Open and close the Launcher
On the home screen,, press the
icon to open the Launcher. If you
ons than can fit on
o the Launcher in one view, yo
ou can
have more applicatio
t Launcher up
p or down to vie
ew more.
slide the
After opening
o
the Lau
uncher, press th
he icon to enter the corresponding
appliccation, press the
e Back key to re
eturn to the prevvious screen.
Presss the
icon or
o the Home keyy to close the La
auncher.
Switch
h to a recently used
u
application
n
Presss and hold the Home
H
key, a win
ndow opens with
h icons of appliccations
that you’ve used rece
ently.
n its application
n.
Presss an icon to open
Back to top
Hom
me Screen
Notification bar
Status bar
Display area
Notification bar
Open and close notification panel
When a new notification appears in the notification bar, you can drag the
status bar down to open the notification panel.
On the home screen, you can also press the Menu key and then press
Notifications to open the notification panel.
Press a notification to open it in its application.
To close the notification panel, drag the tab at the bottom of the notification
panel to the top of the screen.
Clear all notifications
1. Open the notification panel.
2. Press Clear at the top right of the panel.
Display area
The home screen can be extended to exceed the screen’s width in order to
provide more space for newly added shortcuts, small kits, etc.
On the home screen, slide your finger on the screen to extend to the left or
right.
Small dots at the lower left and right of the screen indicate which screen
you’re viewing. You can press the dots to open the extended screen.
Press and hold the small dots to view thumbnails of the home screen and
its extensions, which you can touch and open.
Add items on the home screen
Long press the empty area on the home screen to pop up Add to Home
screen menu. Select Shortcuts, Widgets, Folders, etc.
You can
n add icons from
m the Launcher to the home sccreen by long prressing
an icon in the Launche
er until the icon enlarges
e
and th
he phone vibrate
es.
a item on the home screen
Move an
1. Press and hold the item until the ite
em enlarges and
d the phone vibrrates.
g the item to you
ur desired position and then release.
2. Drag
Tip:
Pause at
a the left or right edge
e
of the screen
n to drag the item onto another hom
me
screen.
Delete items on the ho
omepage
g press an item until the item en
nlarges and the phone vibratess.
1. Long
2. Drag
g the item into
at the lower part
p of the scree
en to delete.
Change
e wallpaper
1. On th
he home screen
n, press the Men
nu key and then press Wallpapers.
2. Selecct wallpaper from Gallery / Liv
ve wallpapers / Wallpapers.
3. Selecct one image an
nd press Set wa
allpaper.
Back to top
Making and receiving
g calls
Makking a call
Directtly make a call
On the home screen,, press the butto
on
to displa
ay the dialing ke
eypad,
uttons to input th
he telephone nu
umber and presss the
press the numeric bu
b
button
to make a call.
Makin
ng a call from Co
ontacts
In the Launcher, presss the Contacts
s icon to displayy the list of conta
acts,
button to make a call.
selectt the desired contact and presss
Makin
ng a call from Ca
all log
In the Launcher, press Contacts > Call log to select the desired call log
and press
button or the Send key to make a call.
Make an international call
Long press “0” key until “+” appears on the screen, and then dial the
country code or region code, city code and phone number.
Dial from Messaging
1. In the Launcher, press the Messaging icon to open the message
interface.
2. Select and open one message or conversation.
3. Long press the message text to pop up the Message options. If the
message contains other numbers, the Message options will list all
numbers. You can select the number you want to dial.
Receiving a call
Your phone will ring or vibrate (depends on the current mode and settings)
upon an incoming call.
- Press the Send key to answer.
- On the incoming call reminder interface, drag the
button to the right
to answer the call.
- If the earphone is inserted, press the key on the earphone to answer the
call.
Reject a call
- Press the End key to reject an incoming call.
- You can also drag the
button to the left to reject the call.
End a call
- Press the End key to hang up the call during the conversation.
- You can also press the
button to hang up the call.
Adjusting the volume
In a call, you can raise or lower the volume by using the side keys.
Turn the speaker on or off
In a call, press the
button to tu
urn on the speaker, and press itt again
ore the normal conversation.
c
to resto
Confe
erence call
button to have a conferencce call.
In a call, press the
This fun
nction requires the
t support of network
n
operato
or.
Open
n the dialer
In a call, you can presss the
nal numbers.
addition
o top
Back to
butto
on to open the dialer
d
for enterin
ng
Contacts
In Contacts you can view or manage your contacts.
In the Launcher, press the Contacts icon to open Contacts.
The contacts interface can be divided into the following tab pages:
- Phone: display the dialing keypad.
- Call log: view all call logs.
- Contacts: view the list of contacts.
- Favorites: display the list of favorites.
All of your contacts are displayed alphabetically in a scrolling list.
You can slide your finger up or down to scroll quickly. A tab briefly appears
to the right of the list, which you can drag up and down to scroll very
quickly.
Add new contact
1. In Contacts, press the Menu key to select New contact.
2. Input all contact information. Use the navigation keys or slide down to
move to the next field.
Press the button
to add more than one entry for that category.
3. Press the icon
to select a picture for the contact.
4. Press Done to save your contact.
Delete a contact
1. In Contacts, touch the contact you want to delete.
2. Press the Menu key and then select Delete contact.
3. Press OK on the pop-up window.
Tip:
You can also long press the contact you want to delete and then select Delete contact
from the pop-up window.
Delete contacts
1. In Contacts, press the Menu key and then select Delete contacts.
2. Select the contacts you want to delete, and press the Menu key > OK.
Edit contact details
1. In Contacts, press and hold the contact whose details you want to edit.
2. In the menu that opens, press Edit contact.
3. Edit the contact information.
Search contacts
1. In Contacts, press the Menu key and then select Search.
2. Input the key word of contacts’ names, the phone will automatically list
all matched contacts.
Add to favorites
1. In Contacts, scroll the list to search your desired contact.
2. Long press the contact until the contact’s shortcut menu appears.
3. Press Add to favorites.
Tip:
You can also press the contact you want to add to favorites in the Contacts interface,
and then press
in the right up corner to add it to favorites directly.
Accounts
You can sync contacts information to your phone from multiple Google
Accounts, Microsoft Exchange ActiveSync accounts or other kinds of
accounts, depending on the applicatons installed on your phone.
Import/Export contacts
1. In Contacts, press the Menu key to select Import/Export to pop up the
contact’s shortcut menu.
2. You can select Import from SIM card/Export to SIM card/ Import from
SD card/Export to SD card.
Share a contact
You can share a contact with someone.
1. In Contacts, touch the contact you want to share.
2. Press the Menu key and then press Share.
3. Then select share the contact with message or application (Bluetooth,
Email, Gmail).
Back to top
Messaging
In Messaging, you can send or receive text messages and multimedia
messages.
On the home screen or in the Launcher, press the Messaging icon to
open.
Send messages
1. In Messaging, press New message.
2. Input your desired telephone number in To.
You can also press the
button to select a phone number from the
Contacts.
3. Input some text in “Type to compose”. You can press the Menu key to
select:
- Add subject: convert to multimedia message and add a subject for the
message.
- Attach: convert to multimedia message and add an attachment to the
message. You could send Pictures, Videos, Audio, Slideshow, etc.
- Insert phrases: insert the preset message.
- Insert smiley: insert the smiley.
4. After that, press Send to send the message.
Receive messages
1. In idle mode, you will be reminded by the new messages in the
notification area. Slide down to open the notification panel to view.
2. Directly input the text to reply the message.
3. Long press the text to pop up the Message options menu to directly call
back, call the number in the text message, delete the message, etc.
Message thread
The messages from one same contact or number will be aligned in one
message thread in chronological order. You can manage these threads in
the messaging interface.
Press one thread on the Messaging screen, and press the Menu key to
select:
- Call: call the sender’s number.
- Add subject: to add a messagesubject.
- Attach: to open a munu where you can touch the kind of media file to
attach to the message.
- Insert phrases: insert the preset message.
- Insert smiley: insert the smiley.
- More: you can select to delete thread, delete all threads, etc. If the
sender’s number is not saved in your contacts, you can add the number to
Contacts.
Settings
In Messaging, press the Menu key and then press Settings to perform
relevant settings.
Storage settings
Delete old messages: delete old messages as limits are reached.
Text message limit: limit the maximum number of text messages in each
conversation.
Multimedia message limit: limit the maximum number of multimedia
messages in each conversation.
Text message (SMS) settings
Delivery reports: request a delivery report for each text message you
send.
Manage SIM card messages: manage messages stored on your SIM
card.
Modify phrases: modify and look over phrases.
Multimedia message (MMS) settings
Delivery reports: request a delivery report for each multimedia message
you send.
Read reports: request a read report for each multimedia message you
send.
Auto-retrieve: automatically retrieve messages.
Roaming auto-retrieve: automatically retrieve messages while roaming.
Notification settings
Notifications: display message notifications in status bar.
Select ringtone: select the notification ringtone upon the receipt of
messages.
Vibrate: select Vibrate on upon the receipt of messages.
Back to top
Email
You can receive and send Emails.
On the home screen or in the Launcher, press the Email icon to open
Email.
Set up Email account
Set up an Email account for the first time
You need set up an Email account when you use the Email for the first
time.
1. Input the Email address and password.
2. Press Next. Or, if you need to enter email account settings the wizard
can’t configure for you, press Manual setup.
- If you touch Next, Email attempts to communicate with your emial service
provider to validate your account for sending and receiving mail, using just
your email address and password. This is sufficient for most emil services.
- If the wizard determines that your service provider requires additional
information, you’re prompted to enter your email account details.
3. Select POP3, IMAP or Exchange.
4. Set the relevant parameters for the receiving server according to the
prompts.
5. Create a name for Emails and set the display name of sending Emails.
6. Press Done.
Note:
Different mail server may have different configuration parameters when you manually
set a mail server. Please consult your mail service provider for detailed configuration
parameters.
Set multiple Email accounts
After you set an Email account in the Email interface, you can also set
multiple Email accounts.
1. Press the Menu key and then press Accounts.
2. Press the Menu key and then press Add account to enter the Email
account setting interface.
3. Please refer to the settings in Set up an Email account for the first
time.
Send Emails
After the setting of an Email account is completed, your phone will
automatically enter the inbox of this Email account.
1. Press the Menu key and then press Compose.
- Press To to input the Email address of a recipient.
- Press Subject to input a subject.
- Press Compose mail to input contents of the mail.
- Press the Menu key and then press Add Cc/Bcc address to input the
Cc/Bcc address.
- Press the Menu key and then press Add attachment, you can add
images, videos, music or sound recorder files in SD card.
2. Press Send.
Check Emails
1. Open Email.
2. Select the mail box you want to check.
3. Press the Menu key and then select Refresh to update the new mails
into the inbox.
4. Press the mails to view.
Tip:
When checking Emails, press the Menu key to delete, forward, reply or reply all the
mail, or mark it as unread.
Back to top
Network Applications
Network connection
Your phone can connect to the Internet. You need pay for some network
services because they are involved with some data service. For details,
please consult your network service provider.
Network connection mode
There are two kinds of network connection methods: GSM/WCDMA or
Wi-Fi.
Your phone’s default network is GSM/WCDMA. You can use it directly
without any settings. WLAN mode is disabled by default.
If you do not need to get access to the Internet, use your finger to slide on
the home screen to the right side, and press the
button to disable the
network to avoid unnecessary network charges. Press the
enable the network if necessary.
button to
Wi-Fi
Turn on/off Wi-Fi
1. On the home screen, press the Menu key and then press Settings >
Wireless & networks.
2. Tick the box behind Wi-Fi to turn on Wi-Fi. Cancel the tick to turn off
Wi-Fi.
Connect to Wi-Fi
1. On the home screen, press the Menu key and then press Settings >
Wireless & networks > Wi-Fi settings.
2. Your phone will automatically search all nearby Wi-Fi networks which
might be found.
3. Select the network to connect from the list.
- If you’ve selected an open network, your phone will automatically
connect.
- If you’ve selected a security network, you need input the password.
Back to top
Browser
You can use Browser to view webpages and to search for information on
the web.
Open Browser
1. On the home screen or in the Launcher, press the Browser icon to open
Browser.
2. Press the URL field at the top to input a web address.
3. Pre
ess
.
You can press the Me
enu key > Book
kmarks to selecct the bookmarkk you
t open, or presss Most visited or History to open
o
other web pages.
want to
Browsse web
After opening
o
the web pages, you co
ould use the navvigation keys orr slide
your finger
f
on the scrreen to view oth
her parts of the page.
Zoom
m in or out
1. Slid
de your finger sllightly on the sccreen to reveal the
t Zoom contro
ol
.
2. Pre
ess the plus or minus
m
side of the Zoom control to zoom in or out.
o
Quickkly zoom
1. Dou
uble-tap on the section of the webpage,
w
the we
ebpage zooms in.
2. To return to de deffault zoom level, double-tap aga
ain.
Browsse options
When
n you browsing the
t web pages, press the Menu
u key to select:
- New window: open a new window.
- Exit: close all windows.
- Bookmarks: enter the bookmarks interface and add the web pages to
bookmarks.
- Windows: view opened windows.
- Refresh: refresh the currently opening web pages.
- More: you can perform more operations such as Add bookmark, Find
on page, Select text, Page info, Share page, etc.
Settings
You can set page content, privacy and security preferences to suit your
browse style.
On the Browser screen, press the Menu key > More > Settings to enter
the setting interface.
Back to top
Bluetooth
Via Bluetooth function, you could exchange data with other Bluetooth
devices within short distance. Because the Bluetooth devices
communicate through radio wave, the interference might exist due to some
obstacles or other electronic devices.
Turn on/off Bluetooth
1. On the home screen, press the Menu key and then press Settings >
Wireless & networks.
2. Check or uncheck Bluetooth to turn it on or off.
Change your phone’s Bluetooth name
1. On the home screen, press the Menu key and then press Settings >
Wireless & networks > Bluetooth settings.
2. If the Bluetooth function is not turned on, tick the box behind Bluetooth.
3. Press the Device name to set the name of your device.
4. Tick the box behind Discoverable in order that other Bluetooth devices
can search your device.
Pairing
1. In Bluetooth settings menu, press Scan for devices, your phone will
scan and displays all searched Bluetooth devices.
2. Press the ID of the desired device to pair.
3. If you are prompted to enter a passcord, try entering 0000 or 1234 (the
most common passcodes), or consult the documentation that came with
the device to learn its passcode.
4. If the pairing is successful, your phone connects to the device.
Back to top
Settings
Airplane mode
In areas where the use of mobile devices is restricted, you can activate the
Airplane mode to disable the phone function but still use other functions of
your phone such as calendar, music and games. You will not be able to
make/receive calls, send/receive messages, or browse the Internet in
Airplane mode.
1. On the home screen, press the Menu key and then press Settings >
Wireless & networks.
2. Tick the box behind Airplane mode. The phone will turn off all wireless
connections after Airplane mode is enabled.
USB tethering
1. Connect the phone to the PC with the data cable.
2. Select Settings > Wireless & networks > Tethering & portable
hotspot.
3. Tick the box behind USB tethering. Your computer can get access to
the Internet using the phone’s network after USB tethering is enabled.
Mobile networks
1. Connect the phone to the PC with the data cable.
2. Select Settings > Wireless & networks > Mobile networks. You can
set options for roaming, networks, APNs, etc.
Back to top
Call settings
s
Fixed Dialing
D
Numberss
If your SIM
S card suppo
orts, only the sellected numbers could be dialed
d. After
this function is activate
ed, you are onlyy allowed to dial the numbers in
n the
(
fixed dialing numbers (FDN).
ed input PIN2 code
c
to turn on/o
off fixed dial function. Please co
ontact
You nee
your ne
etwork provider to get PIN2 cod
de.
Voicem
mail
When you
y are unable to
t answer the ca
all, you can let the
t caller leave a
messag
ge for you on vo
oicemail to listen
n to later.
This se
ervice requires network
n
support so please makke sure you applly for
this it before use.
d
keypad, press
p
the
key to dial the voicemail
v
numb
ber.
In the dialing
Your ca
an edit the Voice
email number un
nder Settings > Call settings >
Voicem
mail settings me
enu.
o top
Back to
Phone Firewall
The incoming call from the Blacklist will be barred after Phone Firewall is
enabled.
Call Blacklist
Press the Menu key and then press New to add contacts to Blacklist.
Call forwarding
The Call forwarding service enables you to divert an incoming call from a
service to a specified telephone number in preset conditions. You can
contact the network provider to activate this service.
You can set the Call forwarding service so that voice calls and data calls
are diverted to a preset number under different conditions.
1. Press Settings > Call settings > Call forwarding.
2. Set the type of call forwarding based on your needs.
Additional settings
After ticking the box behind Call waiting, the call waiting function is
enabled.
After this function is enabled, the system will inform you if there is another
incoming call. Please contact your network provider for details.
Back to top
Sound
Silent mode: check to silence all sounds (including call and notification
ringtones) except the audio from music, videos, and other media and any
alarms you have set.
Vibrate: set vibration in Silent mode.
Volume: set volume for Ringtone, Media, alarm and notifications.
Phone ringtone: select the ringtone to sound when you receive a call.
Notification ringtone: select your default notification ringtone.
Audible touch tones: check to hear tones when you use the phone to dial
a number.
Audible selection: check to play a sound when you touch buttons, icons
and other onscreen items.
Screen lock sounds: check to play sounds when locking and unlocking
the screen.
Haptic feedback: check to vibrate when pressing soft keys and on certain
UI Interactions.
Back to top
Display
Press Settings > Display.
Brightness: adjust the brightness of the screen.
Auto-rotate screen: switch orientation automatically when rotating phone.
Breath light: check to turn the breath light on.
Animation: check to enjoy animated transitions when navigating from
screen to screen.
Screen timeout: adjust the delay before the screen automatically turns off.
Calibration: adjust the screen alignment.
Back to top
Location & security
My Location
Use wireless networks: see location in applications (such as Maps) using
wireless networks.
Use GPS satellites: check to use your phone’s GPS satellite receiver to
pinpoint your location to within an accuracy as close as several meters.
Screen unlock
Set up screen lock: lock screen with a pattern, PIN, or password .
SIM/RUIM card lock
Set up SIM/RUIM card lock: you can configure the phone to require
entering the SIM PIN to use the phone, and where you can change the SIM
PIN.
Password
Visible passwords: show password as you type after it’s selected.
Device administration
Select device administrators: add or remove device administrators.
Credential storage
Use secure credentials: allow aaplications to access secure certificates
and other credentials.
Install from SD card: install encrypted certificates from SD card.
Set password: set or change the credential storage password.
Clear storage: clear credential storage of all contents and reset its
password.
Back to top
Applications
Unknown sources: allow install of non-market applications after it’s
selected.
Manage applications: manage and remove installed applications.
Running services: view and control currently running services.
Development: set options for application development.
Back to top
Accounts & sync
General sync settings
Background data: applications can synchronize, send and receive data at
any time after it’s selected.
Auto-sync: applications sync data automatically after it’s selected.
Manage accounts
Manage accounts: manage the added accounts.
Back to top
Privacy
Backup and restore
Back up my data: back up my settings and other application data.
Automatic restore: if I reinstall an application, restore backed up settings
or other data
Personal data
Factory data reset: If you reset your phone to the factory settings, alll data
from your phone, including your Google Account, system and application
data and settings, and downloaded applications will be erased.
Resetting the phone will not erase current system software and bundled
applications or any files on your SD card, such as music or photos.
Back to top
SD card & phone storage
To copy files between PC and your phone’s SD card, you should set the
SD card as USB mass storage.
1. Connect your phone to your PC with the USB cable.
2. Open the notification panel, and then press USB connected.
3. Press Turn on USB storage.
During this time, you can’t access the SD card from your phone, so you
can’t use applications that rely on the SD card, such as Camera, Gallery
and music.
Safely remove the SD card
1. On the home screen press the Menu key and then press Settings.
2. Press SD card & phone storage > Unmount SD card.
Check space of the SD card
1. On the home screen press the Menu key and then press Settings.
2. Press SD card & phone storage > Total space or Available space.
Format the SD card
1. On the home screen press the Menu key and then press Settings.
2. Press SD card & phone storage > Format SD card.
Check the available space of your phone
1. On the home screen press the Menu key and then press Settings.
2. Press SD card & phone storage > Internal phone storage.
Back to top
Search
Web
Google search: after selecting Show web suggestions, your phone will
show suggestions from Google as you type.
Phone
Searchable items: choose what to search on the phone.
Clear shortcuts: clear shortcuts to recently chosen search items.
Back to top
Language & keyboard
Select language: you can choose the language.
Text settings
XT9 Text Input: set your text input languages & settings, and change your
text input preferences.
Android keyboard: set sound on keypress and perform word suggestion
settings.
User dictionary: add & remove words from user dictionary.
Back to top
Accessibility
Accessibility: check to enable all installed accessibility plug-ins.
Power button ends call: after this function is selected, during a call,
pressing Power key ends call instead of turning off screen
Date & time
You can set the format of date and time.
Back to top
About phone
You can check the phone’s status, battery use, version, etc.
Back to top
Experiencing Multimedia
Camera
Your phone has a camera, which can be used to take photos. You can set
the photo you’ve just taken as wallpaper, or send it through MMS or Email.
Note:
Please respect others’ rights and abide by the local regulations and customs when
taking photos.
Open the camera
On the home screen or in the Launcher, press the Camera icon to open
the camera.
Take photos
1. Focus your lens on the object.
2. Press
to take photos after the view is satisfactory.
After a photo is taken, you can press the frame at the right-down corner to
view the photo. You can perform the following operations:
- Press Delete to delete the photo.
- Press Share to share the phone with your friends through Messaging,
Email or Bluetooth etc.
- Press More > Set as to set the phone as your wallpaper or certain
contact’s picture.
Camera settings
On the camera screen, press the
icon to zoom, press the
icon to
change white balance, press the
icon to change Color effect,
Saturation, Picture size, Picture quality, Camera settings.
Back to top
Video Recorder
Your phone can record video clips. On the camera screen, you can drag
to switch to video recorder.
Note:
Please respect others’ rights and abide by the local regulations and customs when
recording video clips.
Record videos
Focus your lens on the object, press
to start recording and press
to end.
After a video is recorded, you can press the frame at the right-down corner
to view the video.
Video recorder settings
On the Video recorder screen, press the
icon to change video
quality, press the
icon to change white balance, press the
icon
to change Color effect, Video quality, Video duration, Picture quality,
Camera settings.
Back to top
Music
You can listen to the music saved in the SD card through the music player.
Open the music player
Please copy the music files to the SD card before playing them.
On the home screen or in the Launcher, press the Music icon to open the
music player.
Listen to music
1. Press Artists / Albums / Songs / Playlists to find the music file you
want to play.
2. Press the file to start playing.
Create playlists
In order to manage your music files conveniently, you can create some
playlists.
1. Press Songs.
2. Select the music file you want to add to playlist, and long press it until
the shortcut menu pops up.
3. Press Add to playlist.
4. Press New.
5. Input the name of new playlist.
6. Press Save. In this case, the music files you selected will be
automatically added to the newly created playlist.
Manage playlists
1. In Music, press Playlists.
2. Select the playlist you want to edit or play from the list, and long press it
until the shortcut menu pops up.
- Play: play the music in the playlist.
- Delete: delete the playlist. You can delete self-created playlists only.
- Rename: change the name of the playlist. You can rename self-created
playlists only.
Add music to playlists
1. In Music, press Songs.
2. Select the music file you want to add to playlist, and long press it until
the shortcut menu pops up.
3. Press Add to playlist.
4. Select the playlist you want to add to.
Set music as phone ringtone
1. In Music, press Songs or Playlists.
2. Select the music file and long press it until the shortcut menu pops up.
3. Press Use as phone ringtone.
Tip:
You can also press the Menu key > Use as ringtone when playing the music.
Back to top
Videos
You can watch the video files saved in the SD card through the video
player.
Open the video player
1. On the home screen or in the Launcher, press the Videos icon to open
the list of video files.
2. Select the video file you want to play, and press it to play it.
Back to top
Gallery
On the home screen or in the Launcher, press the Gallery icon to check all
photos and videos saved in the SD card.
The videos can be played through the video player.
Back to top
Sound Recorder
You can record audio files through sound recorder.
Open the sound recorder
Before opening the sound recorder, please insert the SD card.
On the home screen or in the Launcher, press the Sound Recorder icon to
open it.
Record audio files
1. Put the microphone close to your mouth and press
recording.
2. Press
to start
to stop recording.
3. Press
to play back the recording.
4. Press Save this recording to save the recording and press Discard not
to save it.
After saving the recordings, you can go to Music > Playlists > My
recordings to view your recordings.
Tip:
You can also set the recording as your phone ringtone.
Go to My recordings, long press the recording until the shortcut menu pops up, and
then press Use as phone ringtone.
Back to top
More Applications
File manager
On the home screen or in the Launcher, press the File Manager icon, you
can view all files saved in the phone or SD card.
Back to top
Clock
On the home screen or in the launcher, press the Clock icon to set up
clocks.
When Clock is running, it switches to screen-saver mode after a few
minutes. Simply touch the screen or a phone button to wake the phone up
again.
To return to the home screen, press the icon
screen.
at the bottom of the
Adding an Alarm
1. Press the icon
at the bottom of the screen.
2. Press Add alarm.
Turning on/off an Alarm
On the alarm lists screen, press the
icon next to an alarm to turn it on
or off. Alarms that are set are underlined in green.
Playing music
You can play music while the Clock is displayed, press the icon
at the
bottom of the Clock screen.
Playing a slideshow
You can play a slideshow of the pictures in your Gallery albums, in place of
the date and time.
Press the icon
at the bottom of the Clock screen.
Back to top
Calculator
On the home screen or in the launcher, press the Calculator icon.
On the Calculator screen, slide the screen to the right or left to switch
between Advanced panel and Basic panel.
Tip:
Touch and hold the Calculator’s display to open a menu where you can copy what
you’ve entered and access other tools.
Back to top
Calendar
Opening the Calendar
Press the Calendar icon on the home screen or in the Launcher.
Creating a new Event
1. On the calendar screen, press the Menu key and then press More >
New event.
2. Enter the event name.
3. Set the duration for the event, press From and To.
4. Enter the event location and description.
5. If you have more than one calendar, select the calendar where you want
to save the event.
6. Enter email addresses to invite guests.
7. Select the Repetition.
8. Set the time of reminder in Reminders.
9. Press Done.
On the calendar screen, press an event to view its details.
Changing your calendar view
On the calendar screen, press the Menu key and then press Agenda, Day,
Week, Month or Today.
Displaying and synchronizing calendars
Initially, all calendars that you create or subscribe to in Google Calendar on
the web are also displayed in Calendar on your phone. You can select
which calendars to show and which to keep synchronized.
1. On the calendar screen, press the Menu key and then press More >
Calendars.
2. Press the calendar to choose displaying and synchronizing calendars.
Back to top
Manage applications
You can view and manage the applications installed in your phone.
Install new applications
You can install the applications in the Market or not in the Market. When
installing the applications not in the Market, make sure the software is
suitable for your phone.
Installing the applications in the Market
1. In the Launcher, select Market and search for the applications you want
to install.
2. Press Install.
Installing the applications not in the Market
1. On the home screen, press the Menu key and then select Settings >
Applications.
2. Tick Unknown sources.
3. Copy the application to the SD card and find the file from File manager.
4. Press the file and complete the installation according to the wizard.
Uninstall applications
Uninstall the applications in the Market
1. Open the application and enter the download interface;
2. Press Uninstall and complete the uninstallation according to the wizard.
Uninstall the applications not in the Market
1. On the home screen, press the Menu key and then select Settings >
Applications > Manage applications.
2. Scroll the list and press the application you want to uninstall.
Back to top
Input Method
Your phone supports XT9 text input method and Android keyboard input
method.
Android keyboard only supports English input; XT9 text input method
supports the handwriting input and English input.
On the text screen, touch and hold the space where you usually write your
text until the Edit text menu is displayed, press Input method and select the
input method.The keyboard will be displayed automatically.
Android Keyboard
Input letter
Touch once to capitalize
the next letter you type.
Touch & hold for all caps.
Change to symbol/number
mode. Touch again to
change back.
Press the icon to enter
text by speaking.
Insert a space.
Delete a character before the cursor
Carriage return
Input full stop
Press space or a punctuation mark
to enter the red suggestion.
Back to top
XT9 text
t
input
Under XT9
X text input method,
m
press
to show thesse icons
. Pre
ess the
ico
on and
ico
on to switch amo
ong
the han
ndwriting input and
a keyboard wo
ord input metho
od.
Input letter
Touch on
nce to capitalize
the next letter you type.
Touch & hold for all caps.
Delete a charactter before the cursor.
Change to
t symbol/number
mode. To
ouch again to
change back.
b
Carriage return
Inpu
ut full stop
Input comma
Inp
put space
Back to top
Appendix
Battery saving tips
The longevity of battery power depends on the network that you connect to,
and how you use your phone.Try the following to save battery power:
- When your phone is not in use, switch off the screen.
- Lower the screen brightness.
- Turn off Bluetooth when you are not using it.
- Turn off Wi-Fi when you are not using it.
- Turn off your phone connection to GPS satellites when you are not using
it.
- Lower the volume.
- Close power-draining programs, when you do not need them.
- Turn off the data service.
Back to top
Problems and their solutions
Symptoms
Phone won’t turn on
Phone turns itself off
Poor standby time
Can’t connect to the
network
Possible Causes
Solutions
The battery is flat
Charge the battery
Poor contact
Reinstall the battery
Battery very low
Deceasing of battery
performance
Weak network signal
Charge the battery
Weak network signal
Out of the service area
Calls keep cutting off
Weak network signal
Phone doesn’t ring
when I receive
incoming calls
Phone is set to ‘Mute’ or
minimum volume.
Replace the battery
Turn off the phone
Move to where the signal
is stronger
Make sure you’re in a
network service area.
Move to where the signal
is stronger
Enter ‘Settings > Sound’
to set the ring volume.
Symptoms
Possible Causes
Solutions
Received prompt
asking me to input
PUK
SIM locked because
wrong PIN entered
three times.
Unable to connect to
the Internet
Network connection
closed
Contact your network
operator and ask for a
PUK.
Check if the network
connection is closed.
Please refer to “Network
Applications” to open the
network connection.
Please consult your
network operator for the
service area.
You are not in the
network service area.
Back to top