1
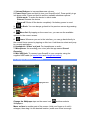
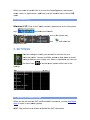
SmartQ T7 ENGLISH USER MANUAL version 1 Dear Users, Many thanks for selecting our product. We sincerely hope you enjoy and get best multimedia experience from our product. All information on this manual is correct during publishing. However, due to continuous update and improvement on our products, there might be tiny difference on appearance and function between the software of your device and the description on this manual. 1. GENERAL INSTRUCTIONS 1.1. Product care Notice This manual contains important safety precautions and information of correct use. Please be sure to read this manual carefully before use so as to avoid any accidents. ¾ Please do not place the product in hot, wet or dusty environment. ¾ Please do not place the product in hot environment. Especially in summer, do not place it in a car with all windows closed. ¾ Avoid dropping or clashing the product and not shake the TFT screen violently, or it may cause a damage or abnormal display to the screen. ¾ Please select a suitable volume and avoid loud sound while using earphones. Please turn down the volume or stop using if you get a roaring in your ears. ¾ For following situations, please charge the product. A. The icon of the battery shows without power B. System automatically shut down, and it turns off soon after restart. C. Operation key shows no reaction. [Notes]: Chargers of other models cannot be used for this device because it may cause a burn out, which we are not responsible for. Please contact with our relevant department if you need original chargers. ¾ Please do not disconnect the device while formatting, downloading and uploading, or it may cause application errors. ¾ We are not responsible for any memory erase loss caused by damage or maintain the product, or other personal reasons. Please do not disassemble the product personally, and avoid cleaning the product with ethyl alcohol, thinner, or benzene. ¾ Do not use this product in the areas which prohibit use of electronic devices, for f example e, on an aiirplane. ¾ Please do o not use this t producct while drriving or walking w in th he street, or it might cau use a car accident. a ※ We W reserve e the right to improve e the produ uct. Specification and d design off the product are su ubject to change with hout prior notice! n ★ This T device e do not su upport wate erproof fun nction. [No otes]: All im mages on this manu ual are only for referrence! Spe ecification and app pearance of o the produ ucts are su ubject to ch hange with hout prior n notice! 1.2. First step ps 1.2.1. CHARGIN NG THE BAT TTERY Beffore using your y SmarrtQ T7 for the t first tim me, comple etely charge e its batterry. 2. PRESE ENTAT TION 2.1. SmartQ Descriptio D on 1. Volume Buttons: to increase/decrease volume. 2. Power Keys Press and hold to turn your SmartQ on/off. Press quickly to go into sleep mode. Press and hold to see the available shutdown options. - Silent mode: To make the device in silent mode Reboot: Restarts the device Power off: Shuts off the device completely. No battery power is used. 3. Go Back: You can always go back to the previous screen by pressing this button. 4. Menu list: By tapping on the menu icon, you can see the available options for the current screen. 5. Home: Wherever you are in the interface, you can go back directly to the central Home screen by tapping on this icon. Hold down to select and jump to a recent application. 6. Headphone / Video* out jack: For headphones or audio 7. Microphone: for recording your voice (see the app named Sound Recorder). 8. Mini USB jack: To connect your SmartQ to your computer using the supplied USB cable (to transfer files and charge the battery). 2.2. Using the SmartQ T7 interface Upward Slip Taping the Icon Change the Wallpaper taps on the menu icon and then selects Wallpapers. Move an item to another part of the screen. Hold your finger on it until it enlarges, then drag it to the desired location (make sure there is enough spa ace), and re elease it. Make an app p shortcut:: Open the e Applicatio ons Tab an nd press an nd hold down on one o of the application ns. It will enlarge e and d jump to the home sscreen. Slid de it to an a empty place p on on ne of the fivve home screens and d then let g go. Make a shorttcut or a bookmark: b : Hold your finger on the screen n at an em mpty loca ation and then t choosse from the e list. Dellete a scre een item: Hold H down on o the item m until it en nlarges and d then drag g it to the Applica ations Tab which has become a trash bin.. 3. MAKIN NG CONNECT TION When you do not need the t WiFi, please p rem member to deactivate e them in order to save s batterry power. The T Powerr con ntrol widgett found on the far leftt hom me screen allows you u to turn the WiF Fi on and off o (WiFi, Sync, S and Brig ghtness) ass needed. To config gure a WiF Fi connection, you ne eed to be in na WiF Fi zone tha at will allow w you to co onnect to itt. Every tim me the Sma artQ is in range r of a network th hat you havve already con nfigured on nce, it will attempt a to make a co onnection (so long ass the WiFi settting is enabled). *Th he SmartQ T7 is not equipped e w Blueto with ooth®. 3.1. Enabling g WiFi hing an Inte ernet application suc ch as the web w browse er, check to o Beffore launch see e if you alre eady have a connection. The ic con in th he top rightt of the scrreen is on o when yo our device is connectted to a WiiFi networkk. If not con nnected, you firstt need to activate a the e WiFi and configure a WiFi nettwork. 1. Go G to the Home H scree en, tap on the Menu icon and then selectt Settings. 2. In the Settiings scree en, select Wireless W & network settings. 3. Iff the WiFi is off, tap on o the Wi-F Fi line to tu urn it on. Then T selectt Wi-Fi setttings. The e SmartQ T7will T scan n automatic cally for avvailable WiFi network ks and d show all the t wirelesss networks in range of your de evice. The list is refrreshed con ntinuously. 4. Tap T on the network you y want to o connect to. t Networkks shown w with the ico on are securred connecctions (requires a pas ssword). If it is a secured netw work, tap the passw word field to o make the e keyboard d* appear, enter the rrequired network information** and then tap on Connect. Your SmartQ will now attempt to establish a connection to that WiFi access point with the network parameters you entered *Turn the device sideways to go to landscape view in order to have bigger keys to type on. ** For free access WiFi points, there is no need to enter any special information. For secured networks, you will need either a key (a series of numbers and/or letters) of the type WEP, WPA, or WPA2, or you will need to have a WiFi access point that uses the WiFi protection standard WPS (WiFi Protected Setup). Check with the person who manages the WiFi network to obtain the exact connection parameters required. 3.1.1. ADVANCED CONNECTION To manually scan for available WiFi networks, go to the Wi-Fi settings screen, tap on the Menu icon, then tap on Scan. 3.2.1. POSSIBLE SOLUTIONS 1. Check your WiFi router/modem documentation to see if it has a pairing button that needs to be pressed. Some modems have such a button that must be pressed the very first time you try to make a WiFi connection with a new device. 2. If you have to enter a password (a security code of type WEP or WPA) be very careful that you do not confuse a 1 and I (one and letter “I”), a 0 and O (zero and letter “O”), or U and V. These are common mistakes. 3. When entering a security code for your WiFi access, check the box Show password which will allow you to see exactly what you are typing in. This will avoid any mistakes. 4. Try temporarily shutting off the encryption system of your WiFirouter/modem to see if the problem has to do with the encryption system you are using. The preferred encryption system is the WPA2. 3.2. Enabling 3G dial Click "Settings"-> "Wireless and network"->" 3G dial " select the 3G dial. After the successful dial the upper right status bar, will display 3G connectivity icon. 4. TRANSFERRING FILES When you wa ant to transsfer files to or from the SmartQ((photos, do ocuments, u can transsfer them vvia the USB B mussic, video, or applications (.apkk files)) you cab ble. 4.3. Disconne ecting Win ndows® XP: Click on the "saafely removve" green arrow a icon in the system trayy and sele ect the Sm martQ. Win ndows® 7: Click on the "safeely removee" icon in thhe system tray then and sele ect the Rem movable Disk D . 5. SETTINGS Usse the setttings to mo odify your SmartQ S to function fo or your pa articular ne eeds. You can c scroll the t screen n up and do own to reveal se ettings thatt you don’t initially see. When it is possible e, you can use the Menu ico on to o access more m option ns within o one of the setttings. 5.1. Wireless s & networrk settings s When you do not need the t WiFi orr Bluetooth h® connecttions, you ccan deactiv vate them in order to save ba attery powe er. Wi--Fi: Tap on n this line to o enable or o disable the WiFi co onnection. Wi-Fi settings: Allows you to set up and manage your WiFi networks. See: Making a WiFi Connection. 5.2. Sound & Display Sound > Audio settings: Sets the sound's overall level of bass, treble, 3D, and balance. Sound > Volume: Sets the volume for music and videos. You can also adjust the sound by using the volume buttons on the device. Sound > Notification ringtone: Sets the sound type for system notifications. Audible selection: Enables/disables the touch-screen click sound. Orientation: Allows you to set the orientation of the screen to a fixed position or based on the physical orientation of the device. Animation: Enables/disables the display of animations when opening and closing applications. Brightness: Allows you to adjust the brightness of the screen. Reducing the brightness will reduce battery consumption. Screen timeout: Allows you to adjust the delay before the screen automatically turns off and the device locks itself. To turn the screen back on, press the Power button once, and press it again to unlock the screen. 5.3. Location & security Use wireless networks: This screen gives you the possibility to allow certain Android™ applications to determine your current location via the WiFi connection. Visible passwords: Enables/disables passwords to be shown as they are typed. Install from SD card: Install encrypted certificates from an SD card. Set password: Set or change the credential storage password. 5.4. Applications Unk known sources: Allo ow the insttallation of non-Andro oid™ Markket app plications. Man nage appllications: You Y can view information abou ut all the ap pplications insttalled on yo our device or uninsta all the application. Run nning serv vices: View w and control currently running g services. Dev velopment: Advance ed options for softwa are develop pers. Includ des a scre eenshot se etting (scre een image saved to the root). 5.5. Accounts and syn nc Setttings to ma anage data a synchron nization. 5.7. Languag ge & keybo oard Sett your prefe erred langu uage and region, r and d configure e the text ssettings for fastter and mo ore accuratte text inpu ut. 5.8. Date & tiime Auttomatic: Enable E this option if you y want to o set the clock autom matically wh hen you ur SmartQ is connectted to a WiFi network k. Disable this t option to set the currrent date & time man nually. CAUTION: If the time & date are not n correcttly set, you might not be able to o acccess certain n web pages. 6. INTER RNET NAVIGA N ATION Be efore launcching any application a n that need ds to make a connecttion to the Internet, make sure s that yo ou are con nnected to a WiFi ne etwork ( icon on th he top righ ht of the screen). You u can use your y fin nger to scro oll the currrent web page horizo ontally or ve ertically. 6.1 1. WEB BRO OWSER MEN NU ITEMS New Window: Opens a new browser window. Bookmarks: You can also just tap on the bookmark icon on the top right of each page. Here you can see your list of bookmarks. Just tap on one of them to open it in the current window. Holding down on a bookmark will give you access to several options (you will be able to edit it, rename it, delete it, etc.). To add a new bookmark, tap on the top left box that shows * Add. The two other tabs allow you to access your Most visited sites and your History. In the History tab, the Menu icon allows you to clear the history. Windows: When you have several windows currently opened, tap on Windows to display the list of currently open windows. Tap on one to open it. Refresh / Stop: Will stop loading the web page, if it is currently loading. Will refresh the current web page once it has stopped loading. Forward: Will go to the next page that you browsed. More: Will give you access to other options (Find on page to search for a specific word on the current page, Select text to select a section of text to put into the system clipboard -- which you can then paste into another application such as an e-mail by holding down your finger in a text field), Page info to get information about the current web page, Downloads to view the list of items you have downloaded from the Internet. Go to Home > Files > Downloads to see the actual files that are saved on your device. SETTINGS ALLOWS ADJUSTING how the navigator works. Please note that some Web features requiring special plug-in software or Active X controls may not work in this special version of the Web Browser. 7. APPSLIB AND APPLICATIONS 7.1. Downloading and installing applications Tap on this icon (WiFi Internet connection needed) to go to the online Apps Market. This online library of free and purchasable applications has hundreds of fun games and useful applications to download and use. 7.2. Deleting an application Tap on this icon (found in the applications tab) and you'll see a list of all the applications that have been installed on your device. Scroll down to the application that you want to delete and then tap on it. The application will be permanently deleted. 8. VIDEO Copy the Video file into your TF card, put into the device TF card slot, Press ES File Explore to enter into your TF card, select file as , click the video file, then you can enjoy your video. 9. MUSIC Click Music Icon in the main menu to enjoy your music on your TF card 10. GALLERY The gallery organizes your photos for you by the folders you have put them into and by the date the photos were taken. 11. FILES Use e “ES File Explore” to o see the document d on o your TF F card; click the doccument to enter e into it. ( click the .apk file to install th he applicattion) 12 2. EMAIL & CO ONTAC CTS The ese are sta andard ema ail and con ntacts appliications tha at you will need to se et up you urself. You will need to t che eck with yo our Internett servvice provid der to find the t paramete ers needed to o set up bo oth incoming and outgoing mail. Typ pically there e are "Help p" pag ges on servvice provid der's web bsite for se etting up em mail for various emaiil programss. This will give you the t inco oming and outgoing mail m server names and other in nformation that you will w nee ed to enter into the mail m setup. If you have e a Google e Gmail™ a account, th he entire email setup only requires r yo our user na ame and password. p 13 3. CLOC CK This appliccation is more m than a simple clo ock. It disp plays a styllish digital clocck on the screen, s plays a rando om slide sh how that flo oats on the screen, givess access to o your music, and let'ss you set alarms (he eadphoness needed to o hear them m). If you ur device is s in Deep Slee ep mode (lo ong press on power button > P Power off > Dee ep sleep), the alarm will not bring it out of o this sleep p mode. Ju ust press th he on/o off button once o to pu ut it in regular sleep mode. m 14 4. LOCA AL SLIDESHO OWS WiFi: Turn T on/offf the WiFi m module. Sync: Shut off th he synchronizing thatt often goes g out to o the web to o synchron nize applica ation data. Brighttness: Allo ows three le evels of screen n brightness. 15 5. UPGR RADE THE DEVICE Som me standard USB de evices mayy not functio on if they consume c to oo much pow wer. 1. Please P bacckup personal data sa aved in the e T7. 2. Make M sure there is su ufficient spa ace on the e Micro SD card, and format the e SD card d by FAT3 32. 3. Please P dow wnload the firmware file f on yourr computerr, after you u unzip the file, cop py the "SmartQT7_AD D" file to yo our SD carrd root dire ectory. 4. In n Shutdow wn mode, connect c the e charger press p and hold h the T7 7 3G in the “M” keyy, in the me eantime press the po ower key, until u you se ee the upgrrade interfa ace, don n’t take the SD card out o until the e device firrst time succcessfully entering in n the sysstem. 16 6. ACCE ESSOR RIES AND PLUG-INS S USB Host ca able This cable will allow yourr SmartQ to o have a USB U Hostt port. 17 7. CALIBRATE E THE TOUCH H SCREEN To calibrate th he touch screen, the system starts when the boot A Android icon app pears, presss the “ ” ke ey until the screen ca alibration appears, follo owed f cross center c tap to complete the calib bration. Ca alibration iss complete e, by five SmartQ T7 will automattically boot.