1
Initial Tests
Re-install the Control board, and plug in the KAF2 module if applicable.
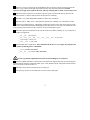
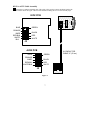
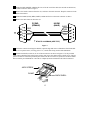
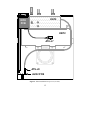
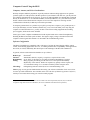
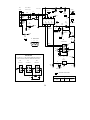
Plug the AUX2 board into the K2 Control board at P4 (the Aux I/O connector) as shown in Figure 6.
When the AUX2 board is correctly installed, it will be about 0.1" (2.5 mm) below the top edge of the
control board. Do not proceed until the AUX2 board is correctly installed, with all 10 pins mated.
CABLE TO KIO2 BOARD
S1
P1
AUX2 BOARD
J2
J1 ON AUX2 BOARD
PLUGGED INTO P4
ON CONTROL BOARD
U6
K2 CONTROL BOARD
Figure 6
Lay the KIO2 board over to the right side of the K2 so that it cannot contact the chassis.
Turn on the K2. If you see or smell smoke, or if the K2 does not turn on, turn power off and refer
to Troubleshooting.
The sidetone may not be working at this point, due to the Control board modifications. Tap M E N U
and locate the S T L (sidetone volume) menu entry, then hold E D I T to edit the parameter. Tap D I S P L AY
to change the sidetone source to U 8 - 4 (default is U 6 - 2 5 ). Use headphones or speaker to verify that the
sidetone can be heard. Then tap M E N U twice to return to the frequency display.
Set up a voltmeter for DC volts. Connect the (-) lead of the meter to K2 ground. Touch the (+) lead to
pin 8 of U1 on the KIO2 board. You should see a negative voltage reading of between -6 and -12 VDC.
Turn off the K2, but leave the KIO2 connected to the Control board.
11