1
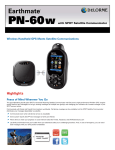
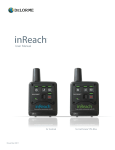
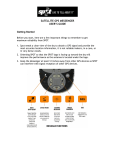
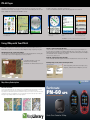
PN-60 Pages
The pages on the PN-60 give you an easy way to get the info you need, when you need it.
Start with the Home Page—see the pages to choose from as well as battery life info. To view
a page, highlight its icon and then press ENTER to select it.
Home Page—Quickly choose the page
to use, switch between pages, and view
GPS fix and battery info.
Map Page—View maps, imagery, and
data. Track progress and follow a route.
Satellites Page—Check GPS signal and
elevation.
A sample of the pages on the PN-60 is shown below.
See the User Manual for detailed info about all of the pages and how to use them.
Compass Page —Use the digital
compass to determine your bearing or
follow a heading.
Waypoints Page—Use XMap Forms
to view, modify, and gather GIS data in
the field.
SPOT Communicator Page—Manage
your SPOT device through the PN-60w.
Check in, send messages, get help.
FCC Certification—On the PN-60w, go to Settings > About This Device or see the User Manual.
Using XMap with Your PN-60
Use XMap to create projects containing GIS layers, tracks, routes, and maps to send to your
PN-60. After you gather info in the field, send it to XMap and manage everything in one place.
Handheld Export tab—create map packages
Select the layers—including GIS layers—to include in the map package and then click the grids
on the map to create a custom map package to send to your device.
GIS tab—create and manage GIS layers
Use the GIS tab to create and manage your GIS layers. The GIS layers in your workspace for
the active project are available in the Handheld Export tab when you are ready to cut your map.
Transfer point layers directly from the GIS Workspace to the PN-60. Develop a form* in XMap to
allow field data collection and editing on the device.
*XMap GIS Enterprise database required.
Draw tab—manage waypoints and tracks
For detailed information, see the User
Manual and the Help in XMap.
Visit the DeLorme Wiki at wiki.delorme.com.
Use the Draw tab to transfer waypoints and tracks downloaded from the device to the GIS tab.
Exchange maps, routes, and more with your device
The Exchange dialog sends and receives maps, routes,
waypoints, and tracks between XMap and your device.
DE LORME
Map Library Subscription
For a low-cost annual $29.95 subscription, get unlimited access to the online Map Library. Easily download maps to use with both
DeLorme Topo North America and to layer over the topographic and street maps on your Earthmate PN-Series GPS.
To get started, click the NetLink tab in Topo North America and follow the simple on-screen instructions. Use the download certificate
included with your purchase to try the Map Library—when you’re ready to subscribe, purchase a subscription right from NetLink.
Many types of imagery and data are available—see the sample maps below!
Topo North America maps
Earthmate
®
Subscribe and SAVE!
High-Resolution imagery
USGS and Canada topos
PN-60 GPS
with SPOT Satellite Communicator
NOAA charts
Quick Start Guide for XMap
®
Set Up Your PN-60
What's in the box
Insert the batteries and SD card
➤ Earthmate PN-60 or PN-60w
Unscrew the D-rings on the battery cover and remove it.
➤ SPOT Satellite Communicator (optional)
To use an SD card (not included), gently press the SD card slot latch in the
battery compartment, insert the card, and press down the slot to latch it.
➤ Quick Start Guide and User Manual
Insert the batteries according to the polarity symbols in the battery
compartment, and then replace the back cover and screw in the D-rings.
➤ XMap 7 GIS DVD and User Manual
➤ XMap North America Topographic DVD
➤ Regional GPS maps on 5 DVDs
Copy detailed topo and street maps
➤ USB cable
➤ 2 Energizer Ultimate Lithium AA batteries
The Regional GPS DVDs have detailed topo and street maps
from the XMap North America Topographic Data in the correct
format for your device.
®
Insert the DVD for your region in your computer and follow the
on-screen instructions to copy the maps to your PN-60w.
Connect the PN-60 to your computer with the USB cable and
copy maps to the internal drive (to make best use of the device’s
memory) or an SD card inserted in the device.
For fastest map transfer, copy the maps to an SD card using an SD card
reader in your computer.
Set Up Your SPOT Satellite Communicator
Go Outside
Create an account and activate the SPOT Communicator
Get a GPS fix for the PN-60
1. Go to findmespot.com and click Activate Your SPOT. Then, click the picture of the SPOT device.
1. Go outside to a place where you have a clear view of
the sky.
2. If you already have a SPOT account, log in. If not, click New Account and create one.
You’ll provide device details, personal and emergency contact info, and select and pay for
your services.
The device ESN (serial number) and Authorization Code are in the device’s battery compartment. To remove the
cover, unscrew the D-ring on the back of the device and swing the belt clip aside.
2. Press and hold the POWER button until you see the
Welcome screen.
3. Wait while the PN-60 determines your location.
It may take up to 10 minutes to obtain the initial GPS
fix as the PN-60 determines its worldwide location.
Pair a SPOT Communicator
Log in and set up your contacts, predefined messages, and social networks
1. Log in to your account at findmespot.com and click the My SPOT Device tab. Rename the
default profile—you can also create new profiles at any time.
2. Under Contact Details, click View/Edit. To get started, add some contacts and create a
contact group. Tip For testing, create a “Test” contact group and add yourself as a contact.
3.Click Predefined Messages and add some messages to your account. If you want to
connect to Facebook, Twitter, Geocaching.com, or Fire Eagle, click Social Networks.
4. Connect your PN-60w to your computer and click Export to PN-60w to transfer contact and
message info.
1. On the PN-60w, open the SPOT Communicator Page.
2. Press and hold the Power button on the SPOT
Communicator until the blue Wireless light turns on.
3. On the PN-60w, press ENTER. When Wireless light
flashes rapidly, the devices are paired.
4. Send a test message to yourself to verify
everything is working correctly.
You can also use the SPOT Communicator
in independent mode.
PN-60 Interface
SPOT Satellite Communicator Interface
Earthmate PN-60 Buttons
GPS
Power
ARROW KEYPAD—Move the
cursor, pan maps, and navigate
the keyboard, menus, and lists.
IN/OUT—Zoom the
map in or out.
Message
Sending
Buttons
PAGE—Move forward
through pages.
MENU—Press twice
for Home Page. From
any page, press once
for options.
QUIT—Cancel an action
or move backward
through pages.
FIND—Search for 4 million
POIs, addresses, waypoints,
and more.
ENTER—Select a
menu, option, or field.
Get info about a place
on the map.
MARK—Mark a waypoint at your
GPS location or the cursor location
when panning the map.
POWER—Press and hold
to turn on or off. Press once
to lock buttons or adjust
the backlight.
SOS
Light Indicators
Power—Green when device
is on and passed self-test. Red
when batteries are low.
Power
GPS—Blinks green or red,
depending on fix.
SOS
Message Sending—Green
when any SPOT message is
being sent.
(button under cover)
SOS—Green when device in
SOS mode. Red when canceling.
Wireless—Blue when device
and PN-60w are paired.
For more info about light indicators
and buttons, see the User Manual.
Wireless