1
POS-58M Mini Thermal Receipt Printer
USER’S MANUAL
Our honorific customers,
Thank for your choosing our POS-58M series thermal receipt printer. Please read the
manual carefully before use it!
POS-58M series mini printers including: POS-58MU (USB interface), POS-58MB
(Bluetooth interface).
POS-58M series mini thermal printer could be used in mobile office site such as traffic,
post, transportation and commercial receipt printer such as supermarket, tobacco, clothing and
so on.
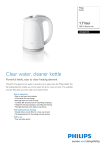
This product has the following characteristics: easy paper loading, lightweight, attractive
appearance, easy maintenance. Low power consumption, low running costs. High printing
speed, high quality, low noise and so on. You can choose Bluetooth or USB communication
mode freely. Bluetooth mode should be used together with handheld POS terminals, Android
phones, table PC, etc. This printer has a paper source sensor, could detects the paper loaded
status automatically.
Please keep this manual well for future reference!
- 1/26 -
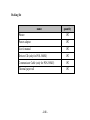
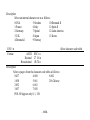
Packing list
name
quantity
Printer
1PC
Power adaptor
1PC
User’s manual
1PC
Drivers CD (only for POS-58MU)
1PC
Communicate Cable (only for POS-58MU)
1PC
Thermal paper roll
1PC
- 2/26 -
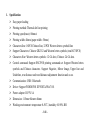
1. Specification
Easy paper loading
Printing method: Thermal dot line printing
Printing speed(max): 80mm/s
Printing width: 48mm (paper width: 58mm)
Characters/line: 16PCS Chinese/line, 32PCS Western letters symbols/line
Support Characters: Chinese GB2312 and Western letters symbols (total:8178PCS)
Characters Size: Western letters symbols: 12×24 dots; Chinese: 24×24 dots.
Control command: Support ESC/POS printing command set. Support Western letters
symbols and Chinese characters. Support Negative, Mirror Image, Upper line and
Underline, row distance and word distance adjustment function and so on.
Communication: USB / Bluetooth
Driver: Support WINDOWS XP/VISTA/Win7 OS.
Power adapter: DC9V/1A
Dimension: 115mm×84mm×46mm
Working environment: temperature 0-50℃, humidity:10-90% RH
- 3/26 -
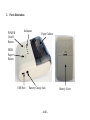
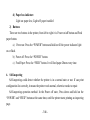
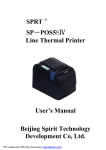
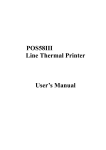
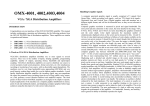
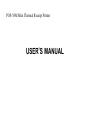
2. Parts illustration
POWER
On/off
Button
Indicators
Paper Cabinet
FEED
Paper
Button
USB Port
Battery Charge Jack
- 4/26 -
Battery Cover
3. Driver
To POS-58MU (USB Communication Port), before using this printer, you need to install
the driver for USB to PL2303 first. The driver support Windows XP/VISTA/Win7 OS.
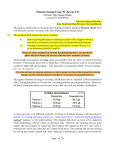
4. Thermal paper loading
Open the printer’s paper cabinet, put the thermal paper into it and close the paper cabinet
cover. Press the POWER on/off button to power on the printer, if the sensor detects paper less,
the red indicator will light on, and waiting for loading paper. During the process of loading
paper, while the paper sensor detects the paper again, the red indicator light will turn off.
After paper installed correctly, if feed paper does not reach ideal effect, you can press
“FEED” button to adjust manually.
This printer is easy paper loading structure. Put one paper roll into the paper cabinet and
makes sure the smooth side of thermal paper face to the print head, then covered with printer
paper deck lid.
Attention: Do not use the paper roll which stick to core roll, otherwise, the printer cannot
detect the correct end of the paper, it will damage the printer!
- 5/26 -
5. Indicators and keys functions description
1) Indictors
There are four indicators in the printer, from left to right it is: Power (red), Bluetooth
(green), Battery Charge (green), Paper less (red).
a) Power indicator:
Full battery (4 cells): power indicator long bright
3 cells: flash every 2 seconds
2 cells: flash every second
1 cells: flash every 0.5 second
b) Bluetooth indicator:
Search status: flash quickly, every 0.1 second
Standby status: flash slowly, every 2 second
Connected status: long bright
c) Battery charge indicator:
Light on: charging
Light off: charge over or does not connected with adaptor
- 6/26 -
d) Paper less indicator:
Light on: paper less; Light off: paper installed
2) Buttons:
There are two buttons in the printer, from left to right it is: Power on/off button and Feed
paper button.
a)
Power on: Press the “POWER” button and hold on till the power indicator light
on or flash.
b) Power off: Press the “POWER” button.
c) Feed Paper: Press the “FEED” button. It will feed paper 20mm every time.
6. Self-inspecting
Self-inspecting could detect whether the printer is in a normal state or not. If can print
configuration list correctly, it means the printer work normal, otherwise needs to repair.
Self-inspecting operation method: In the Power off state, Press down and hold on the
“POWER” and “FEED” buttons at the same time, until the printer starts printing an inspecting
page.
- 7/26 -
7. Printing by Bluetooth
POS-58MB Mini Bluetooth thermal printer supports Android and WINCE operating
system for mobile phones, MID and other handheld devices, methods of operation are as
following:
Connect the printer to terminal device via Bluetooth. Bluetooth name of the printer is:
POS58MB, pairing code is: 0000. After connected normally, you can execute printing work
by the terminal device Print function.
Tips:
If something happened as following, please deals with it follow the instructions:
1) Cannot find the printer by Bluetooth?
Power off the printer, then power on it and search again, if found the printer then
operating following above items.
2) Found and connected to the printer by Bluetooth but could not print normally?
Following above items to Power on and connect to printer again, if still cannot print
normally, please check the application software which running on terminal device is
work normally.
- 8/26 -
8. Printing by USB (Just for POS-58MU)
Connect the communication cable between the printer (USB interface) and the computer
or other device (USB interface), then power on the printer to execute printing work. (Before
using the printer to execute printing work, you need to install the special driver first. (The
driver and illustration of install operation in attached CD).
9. FQA(frequently question answer)
If the printer can’t work normally, please inspect it as following first. If the fault still,
please contact to your seller or customer service center.
a) All the indicators on the panel are not lit?
Please check the battery is installed correctly or not and then press the POWER button
try to power on the printer.
b) Press the “FEED” key does not feed the paper, the printer dose not print?
Power off the printer and check if there is paper jam or the print head is overheated.
After confirmed that do not exist these phenomena, power on the printer and try again. If
still not print, please contact to your seller or customer service center.
- 9/26 -
c) Indicator work normal, but the printer does not print?
Restart the printer and do Self-inspecting operation, if the Self-inspecting runs normal,
check following items:
Check the communication cable between printer and computer meets the
specifications.(POS-58MU)
Check the both interfaces that connect with cable are well or not. (POS-58MU)
Check the connection between printer and device is normal by Bluetooth.
(POS-58MB)
d) The printer has a print action, but did not print the data?
Check the thermal paper installed correctly or not, makes sure the smooth side of
thermal paper face to the print head.
10. Precaution
1) The printer should be installed in a stable place to avoid vibration and impact printer.
2) Do not use or store the printer in heat, humidity and polluted circumstance.
3) Connect the printer's power adapter to a properly grounded outlet, avoid to use
- 10/26 -
together with large motors or other devices that could lead to power supply voltage
fluctuations.
4) Avoiding water or conductive materials into the inside of the printer, in the event, turn
off the power immediately.
5) If long time does not use the printer, please disconnect the power adaptor.
6) Users are not allowed to disassemble the printer for repairing or modifying.
7) Use the power adapter that matched with the printer.
8) To ensure print quality and life, it is recommended to use high quality thermal paper.
9) When plug cable, make sure the power is turned off. Do not pull the soft part of the
cable directly when pulling the cable.
- 11/26 -
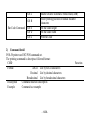
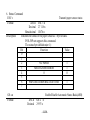
11. Part ESC/POS printing command illustration
1 ) Command set
Type
Print Command
Line spacing
Command
Character Command
Bit Image Command
Init Command
Status Command
Command
LF
ESC J
ESC 2
ESC 3 n
ESC a n
ESC ! n
ESC { n
ESC B n
ESC R n
ESC t n
ESC *
GS *
GS /
ESC @
ESC v
ESC u
Name
Print and line feed
Print and Feed n dots paper
Select default line spacing
Set line spacing
Select justification
Select print mode(s)
Turn upside-down printing mode on/off
Turn inverting printing mode on/off
Select and internation character set
Select character code table
Select bit-image mode
Define downloaded bit image
Print downloaded bit image
Initialize printer
Transmit paper sensor status
Transmit peripheral device status
- 12/26 -
GS a
GS H
Bar Code Command
GS h
GS w
GS k
Enable/Disable Automatic Status Back(ASB)
Select printing position of human readable
characters
Set bar code height
Set bar code width
Print bar code
2) Command detail
POS-58 printer use ESC/POS command set.
The printing command is descript as followed format:
CMD
Format
ASCII List by ASCII characters
Decimal List by decimal characters
Hexadecimal List by hexadecimal characters
Description
Command function description
Example
Command use example
- 13/26 -
Function
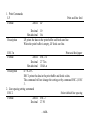
1. Print Commands
LF
Format
Description
Print and line feed
ASCII
LF
Decimal 10
Hexadecimal 0A
LF prints the data in the print buffer and feeds one line.
When the print buffer is empty, LF feeds one line.
ESC J n
Format
Print and feed paper
ASCII ESC J n
Decimal 27 74 n
Hexadecimal 1B 4A n
Description
n = 0-255。
ESC J prints the data in the print buffer and feeds n dots.
The command will not change the setting set by command ESC 2, ESC
3.
2. Line spacing setting command
ESC 2
Select default line spacing
Format
ASCII ESC 2
Decimal 27 50
- 14/26 -
Description
ESC 3 n
Format
Description
ESC a n
Format
Description
Hexadecimal 1B 32
ESC 2 sets the line space to default value (30dots)
Set line spacing
ASCII ESC 3 n
Decimal 27 51 n
Hexadecimal 1B 33 n
n = 0-255
ESC 3 n sets the line spacing to n dots.
The default value is 30
Select align mode
ASCII
ESC a n
Decimal 27 97 n
Hexadecimal 1B 61 n
The command is only used in the standard mode.
0 ≤ m ≤ 2 or 48 ≤ m ≤ 50
Align left: n=0,48
Align middle: n=1,49
Align right: n=2,50
- 15/26 -
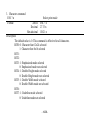
3. Character command
ESC ! n
Format
ASCII
Decimal
Hexadecimal
Select print mode
ESC ! n
27 33 n
1B 21 n
Description
The default value is 0. This command is effective for all characters.
BIT0: 0: Character font 12x24 selected
1: Character font 8x16 selected
BIT1:
BIT2:
BIT3: 1: Emphasized mode selected
0: Emphasized mode not selected
BIT4: 1: Double Height mode selected
0: Double Height mode not selected
BIT5: 1: Double Width mode selected
0: Double Width mode not selected
BIT6:
BIT7: 1: Underline mode selected
0: Underline mode not selected
- 16/26 -
ESC { n
Format
Description
ESC B n
Format
Description
ESC R n
Format
Set/Cancel Character Up down mode
ASCII ESC { n
Decimal 27 123 n
Hexadecimal 1B 7B n
n=1:Enable Updown mode
n=0:Disable Updown Mode
Default value is 0
Turn white/black reverse printing mode on/off
ASCII ESC B n
Decimal 27 66 n
Hexadecimal 1B 42 n
n=1:Enable white/black reverse mode
n=0:Disable white/black reverse mode
Default value is 0
Select an internal character set
ASCII
Decimal
Hexadecimal
ESC R n
27 82 n
1B 52 n
- 17/26 -
Description
Select an internal character set n as follows:
0:USA
5:Sweden
10:Denmark II
1:France
6:Italy
11:Spain II
2:Germany
7:Spain1
12:Latin America
3:U.K.
8:Japan
13:Korea
4:Denmark 1
9:Norway
ESC t n
Format
Select character code table
ASCII
Decimal
Hexadecimal
ESC t n
27 116 n
1B 74 n
Description
Select a page n from the character code table as follows::
0:437
4:860
8:862
1:850
5:861
256.Chinese
2:852
6:863
3:857
7:858
POS-58 Support only 0, 1, 256
- 18/26 -
4. Bit Image Command
ESC * m nL nH d1 d2…dk
Select bit-image mode
Format
ASCII ESC * m nL nH d1 d2 … dk
Decimal 27 42 m nL nH d1 d2 … dk
Hexadecimal 1B 2A m nL nH d1 d2 … dk
Description
This command selects a bit image mode using m for the number of dots specified by
(nL+nH*256)
m =0,1,32,33。
nL=0-255
nH=0-3
dx=0-255
k = nL+256*nH (m=0,1)
k = (nL+256*nH)*3 (m=32,33)
The modes selected by m are as follows:
0:8dots single density,102dpi
1: 8dots double density,203dpi
31:24 dots single density,102dpi
32:24 dots double density,203dpi
The bit image format is the same as user-defined character.
- 19/26 -
GS / n
Format
Print downloaded bit image
ASCII
Decimal
Hexadecimal
GS / n
29 47 n
1D 2F n
Description
This command prints a downloaded bit image using the mode specified by n as
specified in the chart. In standard mode, this command is effective only when there is no data
in the print buffer. This command is ignored if a downloaded bit image has not been defined.
n=0-3、48-51: Specify bit image mode
n
Bit Image Mode
Vertical DPI
Horizontal DPI
0,48
Normal
203DPI
203DPI
1,49
Double width
203DPI
101DPI
2,50
Double height
101DPI
203DPI
3,51
Quadruple
101DPI
101DPI
n=65-68: Print logo 1-4
GS * x y d1…dk
Format
Define downloaded bit image
ASCII
GS * x y d1 … dk
- 20/26 -
Description
5. Init command
ESC @
Format
Description
Decimal 29 42 x y d1 … dk
Hexadecimal 1D 2A x y d1 … dk
This command defineds a downloaded bit image by using x*8 dots in the
horizontal direction and y*8 dots in the vertical direction. Once a
downloaded bit image has been define, it is avaiable until
Another definition is made
ESC & or ESC @ is executed
The power is turned off
The printer is reset
x=1~48(width),y=1~255(height),x×y < 2304, k=x×y×8
Initialize the printer
ASCII ESC @
Decimal 27 64
Hexadecimal 1B 40
Initializes the printer.
The print buffer is cleared.
Reset the param to default value.
return to standard mode
Delete user-defined characters
- 21/26 -
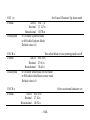
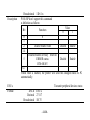
6. Status Command
ESC v
Format
Description
GS a n
Format
Transmit paper sensor status
ASCII ESC v n
Decimal 27 118 n
Hexadecimal 1B 76 n
Transmits the status of the paper sensor as 1 byte of data.
POS-58P not supports this command.
The status byte definition(n=1):
Bit
Function
Value
0
1
2
NO PAPER
1
3
MECHANISM ERROR
1
4
0
0
5
6
PRINTER TEMPERAUTRE OVER
1
7
Enable/Disable Automatic Status Back(ASB)
ASCII
Decimal
GS a n
29 97 n
- 22/26 -
Description
Hexadecimal 1D 61 n
POS-58P don’t support this command
n definition as follows:
Bit
Function
0
1
2
3-4
0
5
Value
0
1
Disable/Enable ASB
Disable
Enable
Disable/Enable set busy when in
ERROR status
RTS=BUSY
Disable
Enable
6-7
When ASB is enabled, the printer will send the changed status to PC
automatically.
ESC u
Format
Transmit peripheral devices status
ASCII
Decimal
Hexadecimal
ESC u
27 117
1B 75
- 23/26 -
POS-58 don’t support this command.
Return status bytes definition:
bit0: Drawer status.
bit4: 0
POS-58 always return 0 back.
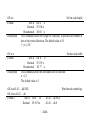
7. Bar Code Command
GS H n
Select printing position of human readable characters
Format
ASCII GS H n
Decimal 29 72 n
Hexadecimal 1D 48 n
Description
0 ≤ n ≤3
48 ≤ n ≤51
This command selects the printing position for human readable characters
when printing a barcode. The default is n=0. Human readable characters
are printed using the font specified by GS fn. Select the printing position
as follows:
n
Printing Position
0,48: Not printed
1,49: Above the barcode
2,50: Below the barcode
3,51: Both above and below the barcode
Description
- 24/26 -
GS h n
Format
Description
GS w n
Format
Description
Set bar code height
ASCII GS h n
Decimal 29 104 n
Hexadecimal 1D 68 n
This command selects the height of a barcode. n specifies the number of
dots in the vertical direction. The default value is 50
1 ≤ n ≤ 255
Set bar code width
ASCII GS w n
Decimal 29 119 n
Hexadecimal 1D 77 n
This command selects the horizontal size of a barcode.
n = 2,3
The default value is 3
GS k m d1 d2 … dk NUL
GS k m n d1 d2 … dn
Format 1
ASCII
Decimal
Print barcode symbology
GS k m
29 107 m
d1 d2 … dk NUL
d1 d2 … dk 0
- 25/26 -
Hexadecimal 1D 6B m
d1 d2 … dk 00
ASCII GS k m n d1 d2 … dn
Decimal 29 107 m n d1 d2 … dn
Hexadecimal 1D 6B m n d1 d2 … dn
Description
m:barcode type
Format 1: 0 ≤ m ≤ 10
Format 2: 65 ≤ m ≤ 75
n: barcode length
m
Barcode system
Number of characters
0,65
UPC-A
11,12
1,66
UPC-E
11,12
2,67
EAN13
12,13
3,68
EAN8
7,8
4,69
CODE39
>1
5,70
I25
>1 even number
6,71
CODEBAR
>1
7,72
CODE93
>1
8,73
CODE128
>1
9,74
CODE11
>1
10,75
MSI
>1
Format 2
- 26/26 -
Remarks
48-57
48-57
48-57
48-57
32,36,37,43,45-57,65-90
48-57
36,43,45-58,65-68
0-127
0-127
48-57
48-57