1
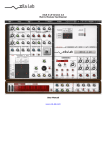
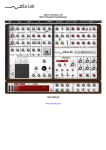
FREQ: Set the frequency of the internal sequencer clock
MIDI S. LED: synchronizes the frequency to the application
host tempo
GATE: set the time the sequencer will sustain the connected
envelopes.
TRACKS: select the voices to be recorded or played.
SEL. VOICE: Assign a voice to the sequencer track. Up to 2
voices can be assigned, letting play the track with a sort of 2
voices unison.
1SHT: When on, this switch allows the one shot mode for the
sequencer, meaning that after trigged, the sequence will be
played only one time.
TRIG: When on, this switch will start the sequencer (in play
mode only) when a note is held. It stops when the note in
released.
TUNE: When on, this switch allows the tuning of the sequences
according to the lowest note played on the keyboard.
REC: Record the selected track.
NXT: go to the next step
DEL: delete the current step of the voices selected. Be careful,
there is no confirmation panel.
PLAY: When on, this switch allows the sequencer to run.
To help with your creative workflow, independent
sequencer presets can be saved and recalled.
[SEQUENCER]: This clickable label opens a menu that
shows you the available sequencer presets for recall:
8.2.1 Sequencer display module
The Syn'X’s sequencer display panel makes it easy to create, verify and modify your sequences.
Three zoom modes can be used to display the internal values, selected by the ‘+’ and ‘–’
buttons. Zoom 1 shows the entire range of values, useful when using the sequencer to
modulate parameters such as filter frequency, oscillator level or shape. Zoom 2 and Zoom 3
show four and two octaves respectively. The slider allows you to move the displayed part inside
the whole range.
The current time slot is shown as a white cursor line at the bottom of the view.
Each of the current sequences is displayed in a different color. The sequences can be
highlighted or hidden by checking or un-checking the corresponding colored boxes to the left of
the event display.
You can also modify the sequencer with the mouse: select the sequence you want to adjust (Ed
check boxes) with the left button, click on the panel to add or modify a step, with the right
button, click to erase a step.
- 32 -