1
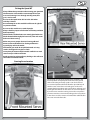
Adjusting the Slipper
Maintenance
In addition to the service needs pointed out in this guide,
you should try to maintain your new Speed-NT for proper
performance and to prevent wear. If dirt gets in the moving
parts it can seriously hinder the performance of the model.
Use compressed air, a soft paint brush and/or a toothbrush
to remove dirt and dust. Avoid using solvents, if possible, as
this can actually wash the dirt into bearings and areas not
accessible without disassembly, causing additional wear. We
suggest you follow these basic guidelines:
•
Remove as much freestanding dirt and dust as noted
above.
•
Never leave fuel in the tank for more than a couple of
hours.
•
When done running for the day or longer, let the engine
run out of fuel. Remove the air cleaner and spray a little
water-displacing lubricant, or quality after-run engine
oil into the carburetor and spin the engine over a few
seconds.
•
If needed, clean and re-oil the air cleaner before installing
it back on the model.
•
Inspect the chassis for worn, broken or binding parts and
repair as necessary.
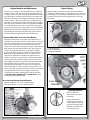
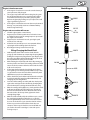
4-Turns Out
Storage
The slipper is a key component of the drivetrain that is
designed to help absorb sudden or large impacts that would
otherwise stress various drivetrain parts. You should never
run the Speed-NT with the slipper locked (completely tight).
The slipper can also be used as a tuning aid for extremely slick
conditions. To adjust the slipper, start by turning the 1/4-inch
adjustment nut clockwise (tighten) until it gets tight and the
spring is compressed. Do not over-tighten as you will strip the
nut. Now turn the adjustment nut counterclockwise (loosen)
four (4) full turns. This should be a good overall setting.
When you are done running the Speed-NT for the day:
•
Blow it off with compressed air and/or use a soft bristle
paintbrush to remove dust and dirt from the chassis.
•
Use your fuel bottle to remove any remaining fuel out of
the fuel tank.
•
If the model is going to be stored for an extended time
period unplug the receiver battery and remove the
batteries from the transmitter.
14