1
Connecting the panel
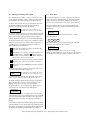
The Power Supply PCB
Primary Fuse: 20 x 5mm 1A HRC Ceramic to IEC 127 (EN60127 Pt 2).
Battery & Output Fuses: 20 x 5mm 3A F to IEC 127 (EN60127 Pt 2).
DO NOT USE ANY OTHER TYPE OR SIZE OF FUSE IN THESE POSITIONS
THIS UNIT MUST BE EARTHED
Standby battery connection
The controller’s PSU combines the functions of a power supply
unit, battery charging unit and battery monitoring unit. It is a
185-265Va.c. 50-60Hz off line switched mode PSU which stores
hazardous voltages of up to 400Vd.c.
The power supply PCB contains circuitry that not only
charges stand-by batteries, but also measures the condition
of them to protect against deep discharge.
Mains connection
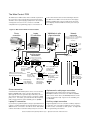
One feature of this circuitry is that it allows the installer to
power the system without connecting the mains supply. For
this to work, two fully charged 12V VRLA batteries should
be connected in series, as shown below (always ensure
correct polarity connection).
DO NOT connect mains to the PSU until the installation is
complete and all the PCBs are correctly attached, the lid/
base connecting cable is in place and all retaining screws are
firmly fastened down.
battery link wire
The general requirement for the mains supply to the controller
is fixed wiring, using three core cable (no less than 0.75mm2
and no more than 2.5mm2) or a suitable three conductor system
that meets the appropriate national wiring regulations.
12V
battery
+
–
–
+
black wire
from controller
The panel should be fed from an isolating switch fuse spur,
fused at 3A. This should be secure from unauthorised operation
and be marked “CALL SYSTEM : DO NOT SWITCH OFF”. This
mains supply must be exclusive to the Quantec controller.
12V
battery
red wire
from controller
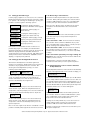
Pressing the 'Battery One Shot Button' for 2-3 seconds allows
the PCB to measure battery voltage and, if everything is okay,
to activate the system circuitry. Checking the LCD display whilst
pressing the button will report any poor battery conditions.
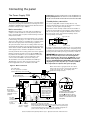
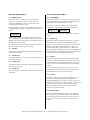
Correctly terminate the incoming cables as shown in figure 4
below. If required, the 5mm connector block (CONN1) can
be pulled from the PCB for ease of installation. Ensure that
the incoming mains earth is connected directly to this
connector block and NOT to the chassis earth point.
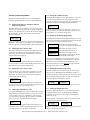
IMPORTANT: When Quantec is powered up for the first
time, the controller may need to reset its Configuration
Data to default values. The message ‘Fit NVM Link, or ‘E’ to
Abort’ will be displayed. When the NVM link is fitted the
message ‘INITIALISING DATA, PLEASE WAIT’ will flash on the
display. This procedure may take up to 1 minute and MUST
be completed before Quantec will operate properly.
The PSU PCB is connected to the Main Control PCB by a
10-Way pitch connector. This connects from PL1 on the
Power Supply PCB to PL5 on the Main Control PCB.
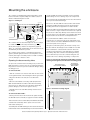
Figure 4 : Mains connection
Mains cable must be segregated from other cables
and should only enter the controller through either
of these two knock-outs. Good quality cable
glands must always be fitted.
PSU earth strap
Do not operate the controller
without this strap connected
Chassis earth point
Do not remove spade
OUTPUT FUSE
3AF
1A HRC
CONN1 L
N
PRIMARY FUSE
Protective cover
This cover protects
against accidental
contact with circuit
components that
may be charged
at up to 400Vd.c.
BATTERY FUSE
3AF
EARTH FAULT LED
Normally lit.
Please ignore earth faults are not
applicable on this
product.
PSU PCB
retaining screw
This must be
secured tightly
before
operation
Battery
one-shot
button
DO NOT
ADJUST
N
E
L
L
Incoming mains cable earth must
be connected to the terminal
marked
and not the chassis
earth point. (The PSU earth strap
connects the earth to the chassis
earth point).
+ -
Battery
back-up
supply
N
Hazardous voltages present LED
When lit red, hazardous voltages will be present on the components
in the shaded area of the PCB. When power is removed, this charge
is bled away. Only when you have seen the red light extinguish can
you be sure the charge has leaked away to a safe level.
Quantec Installation and Programming Manual - Page 6 - Approved Document No. DNU6012001 Rev 1