1
4.2
Re-assemble the Piezometer
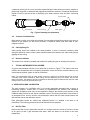
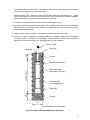
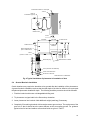
Dip piezometer inside the boiled water and reassemble filter. Ensure water enclosed between
diaphragm and filter does not leak out of sensor when it is tilted or turned around.
4.3
Quick Zero Check
Ideally, this test should be conducted in a draft-free room where the piezometer can be kept at a
constant temperature. At minimum, the piezometer should be placed in a location that is out of
direct sunlight and allowed to reach thermal equilibrium with the surface it is resting on and the
surrounding air. This may take an hour. The piezometer should not be handled during this time or
during the test.
Connect the signal cable to readout and obtain a frequency reading. Readings should be checked
and ensured for their repeatability. Apply calibration factors to convert the frequency to a pressure
reading in Pa.
If the local elevation is above sea level, the pressure reading that obtained will most likely be
negative because the sensor calibration is referenced to one standard atmosphere (sea level). To
calculate an approximate correction for elevation, allow 0.1 kPa for every 10 meter of elevation
above sea level. Add the correction to the reading.
Note: For example, if the elevation is 1,000 meters, add a correction of 10 kPa to the pressure reading.
The working of piezometer may be considered satisfactorily if the difference between the corrected
pressure and zero is within 2 percent of the full scale of the piezometer (2 MPa for a 100 MPa
piezometer). To make a more precise check, corrections should be done for the true altitude, the
barometric pressure, and the temperature.
4.4
Down Hole Pressure Check
This test is conducted in a water-filled borehole or standpipe piezometer. Sensor calibration record
is required for this test.
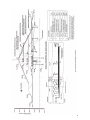
Mark signal cable at two depths, one at a shallow depth and the other as deep as possible (within
the range of the piezometer). Measure from the location of the diaphragm: 23 mm (0.9 inch) from
the tip of the borehole piezometer; 112 mm (4.4 inches) from the tip of the push-in piezometer, and
51 mm (2 inches) from the tip of the embankment piezometer. Pull the filter off the piezometer, fill
it with clean water, and replace the filter. Hold the filter end up until the piezometer is placed in the
water.
Lower the piezometer to the shallowest mark on the signal cable. Clamp the cable in position and
wait at least 30 minutes for the piezometer to adjust to the temperature of the water. Connect the
piezometer signal cable to the readout device. Readings should be checked and ensured for their
repeatability. Record the frequency reading and the temperature reading at the shallow depth.
Lower the piezometer until the other mark on the signal cable is lined up with the same reference
used for the shallow position. Allow the piezometer to adjust to temperature at that depth.
Readings should be checked and ensured for their repeatability. Then record the frequency
reading, and the temperature reading. Convert both readings to units of pressure by applying
calibration factors. Subtract the shallow pressure from the deep pressure.
Note – It is done to avoid having to correcting for altitude.
Convert both pressure values to feet or meters of liquid head and compare to the distance
between the two marks made on the signal cable. There are many variables that can degrade the
7