1
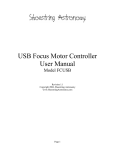
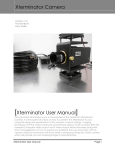
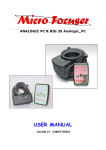
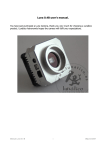
AstroLive Manual
Covers Version 1.x
2/22/2014
Astro Precision Instruments, LLC
Kyle Goodwin
[email protected]
1
Table of Contents
Introduction................................................................................................................................................3
Initial Setup................................................................................................................................................4
Download..............................................................................................................................................4
Installing on Your Computer.................................................................................................................4
Configuration of Devices...........................................................................................................................5
Connecting to a GOTO Mount..............................................................................................................5
Connecting to a Video Camera and Frame Grabber..............................................................................7
Currently Supported Video Cameras................................................................................................7
Currently Supported Frame Grabbers...............................................................................................7
Camera and Grabber Configuration..................................................................................................8
Connecting to a Still CCD Camera.....................................................................................................12
Currently Supported Still CCD Cameras........................................................................................12
Camera Configuration....................................................................................................................12
Connecting to a Motorized Focuser....................................................................................................13
Viewing and Capturing............................................................................................................................14
Video Controls.....................................................................................................................................14
Integration.......................................................................................................................................14
Gain................................................................................................................................................15
Gamma............................................................................................................................................15
On-Screen Menu Controls..............................................................................................................15
Command Sending.........................................................................................................................15
Extra Config...................................................................................................................................16
Display Window.............................................................................................................................17
Saving Snapshots............................................................................................................................17
Still Controls........................................................................................................................................18
Image Preview.....................................................................................................................................18
Post-Processing........................................................................................................................................19
Go To Telescope Control..........................................................................................................................19
Frame and Focus Controls.......................................................................................................................19
Adding Image Overlays...........................................................................................................................19
Managing Targets with the Observation Plan..........................................................................................19
2
Introduction
AstroLive is one-stop tool for controlling everything you need for live or near-live viewing with a
variety of video and still ccd cameras. Using only AstroLive you can capture, process, and view
images in real time, control your computerized GOTO mount, remotely focus your telescope using a
motorized focuser, create informative image overlays with descriptive text about what you're viewing
for broadcast on Night Skies Network, and manage your targets for the night with the Observing Plan.
AstroLive is capable of advanced image post-processing which is applied in real time so you never
have to interrupt your viewing. You can stack multiple exposures (aligning images before stacking,
including rotation), subtract dark frames, and stretch your image using the histogram without ever
having to leave AstroLive.
There are a lot of things that AstroLive can do, but you can use each function independently so that you
can have as much or as little automation as you like. If you don't use a motorized focuser, for example,
all the other functionality will still work just fine, and if you prefer to use some other planetarium
software to cotnrol your GOTO mount you can do that and just use AstroLive for image capture.
Because of the wide range of devices which AstroLive supports some functions may work slightly
differently from device to device, but this manual will give you an overview of the functionality and
examples of how it works on some of the more commonly used devices.
3
Initial Setup
Download
AstroLive is available for download as a 30-day free trial from the product page at
http://astroprecisioninstruments.com/products/astro-live where the latest version of the software and
this manual can always be found. When you are ready to purchase AstroLive simply return to the same
product page, add AstroLive to your shopping cart, and check out. There is no need to re-download
your software and your license key file will arrive in an email along with instructions for adding the
license to your software.
Installing on Your Computer
AstroLive can be installed on any Windows computer which meets or exceeds the following minimum
system requirements:
•
Windows XP/Vista/7/8
•
ASCOM Platform 6SP3 (download at http://download.ascomstandards.org/ASCOMPlatform6SP3.exe)
•
Microsoft .NET 4.0 or higher installed (download at http://www.microsoft.com/enus/download/details.aspx?id=17851)
•
One of the following for image capture:
◦ DirectShow compatible frame grabber/video capture device (almost any Windowscompatible device) plus any native ASCOM Video compatible capture device/camera, or
◦ Any ASCOM Camera compatible still CCD camera
•
1GB RAM
•
CPU requirements will vary based on video integration length and post-processing options
Before you run the AstroLive installer, please ensure that your computer meets the above
requirements and that you have installed both Microsoft .NET 4.0 and the ASCOM Platform
mentioned above.
Once you have downloaded the AstroLive setup.exe file you should run the installer which will install
AstroLive and pop up 3 additional installers to install the ASCOM Video framework, the Astro-Video
Systems Video Camera Driver, and the Mallincam Video Camera Driver. You should complete all of
these installers.
4
Configuration of Devices
Connecting to a GOTO Mount
In order to connect to your mount, it must be ASCOM compatible and you must have first installed the
appropriate ASCOM driver for it. If you have not yet installed the ASCOM driver for your mount,
please consult your mount documentation or the manufacturer's web page for instructions on where to
obtain the driver and how to set it up. Once your ASCOM driver is installed and AstroLive has been
started you may connect to your mount using the “Setup” tab panel on the left side of the application
and choosing the “Choose Mount” button as shown below:
Once you click that button you will be presented with a dialog where you can choose your mount, and a
second dialog is available by clicking the “Properties...” button to configure your mount connection as
shown (the second dialog will be specific to your mount type and may look somewhat different from
the example shown here; you should configure it according to your mount manufacturer's instructions):
5
After you have configured your mount connection appropriately, you can select “OK” in the driver
setup window, and then “OK” again on the ASCOM Telescope Chooser window to return to the
AstroLive setup panel, where your selected mount will now be shown next to the “Choose Mount”
button. You can then connect to your mount by clicking the “Connect” button to the right of the
“Choose Mount” button as show below:
Once you have completed connecting to your mount, you will be able to utilize the Go To tab panel to
enable computerized control of your mount's pointing. This will allow you to enter an object to go to
from AstroLive and then slew the telescope to point at it without having to use your telescope handbox,
all inside the AstroLive software.
6
Connecting to a Video Camera and Frame Grabber
Currently Supported Video Cameras
1. Mallincam Xtreme series cameras, FULLY SUPPORTED using my own ASCOM Video driver,
provided with AstroLive (control, capture, etc.)
2. Mallincam Hyper/other series cameras, PARTIALLY SUPPORTED using my own ASCOM Video
driver, provided with AstroLive (control of same limited settings you can control remotely with the
Mallincam software or Miloslick, capture)
3. Mallincam MICRO-EX, PARTIALLY SUPPORTED using the Astro Video Systems driver (control
limited to menu buttons only and camera menu must be used first to reconfigure camera for 38400
baud serial communication; this camera is only incidentally supported and has not been tested)
4. Mallincam Universe, NO SUPPORT
5. Astro Video Systems Advanced Mk II/III, FULLY SUPPORTED (control of everything except for
integration length which has to be set in menu, capture)
6. Astro Video Systems APU-1, FULLY SUPPORTED (control of everything, capture)
7. Astro Video Systems DSO-1, FULLY SUPPORTED (control of anything which is available in
DSO-1s more limited feature set, capture)
8. Any other video camera with capture card, PARTIALLY SUPPORTED (no control, but capture can
be done using either the forthcoming DirectShow driver or using the AVS driver and just ignoring
the control functionality)
Currently Supported Frame Grabbers
All DirectShow compatible Windows frame grabbers are supported by AstroLive (which includes
nearly every frame grabber made for Windows), however some will have more configuration options
available than others.
7
Camera and Grabber Configuration
Once you have verified that your camera is supported and your frame grabber has been connected and
its software has been installed if required (Windows includes drivers for most grabbers and separate
software install is usually unnecessary, but some grabbers require their software to be installed), then
you are ready to connect your video camera and frame grabber to AstroLive. The process consists of
selecting and configuring your camera type and then selecting which attached frame grabber to use to
capture the video from it. Follow the steps below:
1. Using the “Setup” tab panel on the left side of the application, click the
“Choose Video Camera” button.
2. Select your video camera brand from the dropdown menu and then click the "Properties..." button
to configure the connection.
8
3. Select your frame grabber in the "Video Input" dropdown menu.
4. Select your camera model in the "Camera Model" dropdown menu.
5. Select the COM Port that your camera is connected to (generally via a USB
dongle, consult your camera manufacturer's documentation for how to
determine which COM port to choose).
9
6. Optionally, you may configure settings specific to your frame grabber using
the "Capture Config" button. This dialog will be specific to your model of
frame grabber and you may consult the frame grabber documentation for what
settings you may configure and how they work.
7. Click the "OK" button, and then “OK” again on the “ASCOM Video
Chooser” window to complete configuration and return to the AstroLive Setup
panel.
10
8. Click the "Connect" button to the right of the "Choose Video Camera"
button in order to connect to your video camera and frame grabber and start
capturing frames.
Once you have completed this connection process AstroLive will begin capturing video frames which
you can control using the controls on the right side of the screen. Please see the video capture portion
of the manual for more details. The next time you run AstroLive your configuration will be saved, so
you will not have to configure all your devices each time you run the software.
11
Connecting to a Still CCD Camera
Currently Supported Still CCD Cameras
Any camera with an ASCOM Camera driver provided by the camera manufacturer is supported by
AstroLive. Some common camera brands which provide such a driver include Atik, QHY, Starlight
Xpress, Orion, ASI, etc. Currently no DSLR cameras or Micro 4/3 cameras as known to have ASCOM
Camera driver support. Please contact your camera manufacturer to inquire regarding ASCOM Camera
driver support and availability.
Camera Configuration
Generally still CCD cameras connect to your computer via USB and are therefore very easy to
configure for connection to AstroLive once the driver has been installed. Follow the steps below (but
they may vary slightly depending on your camera type):
1. Select the "Choose Still Camera" button on the Setup tab panel.
2. Select your camera model from the dropdown
menu and perform any necessary (camera specific)
configuration using the "Properties..." button. Once
you have finished, click "OK" to return to the Setup
tab panel.
12
3. Click the "Connect" button next to the "Choose Still Camera" button to
connect to the camera and begin capturing images.
Once you have completed connecting the still camera AstroLive will capture images using the controls
on the right side of the window. Please see the still capture portion of the manual for more details. The
next time you run AstroLive your configuration will be saved, so you will not have to configure all
your devices each time you run the software.
Connecting to a Motorized Focuser
Connecting to a motorized focuser is very straight forward and follows the same procedure as
connecting to a telescope mount except that you will be choosing your focuser driver instead of a
mount driver. Please see the mount connection instructions for details.
13
Viewing and Capturing
Video Controls
Integration
The main control for video is the “Integration” slider which determines how long the camera will
expose each frame. The longer the exposure, the more light which is captured and the bighter dim
objects will appear. On some cameras (such as Astro-Video Systems APU-1, also known as Peltier
Advanced camera) this setting can control the exposure of the camera directly, but on other cameras
(such as the Astro-Video Systems Advanced series) this setting just tells AstroLive how frequently a
frame should be captured to sync up with the exposure length set in the camera menu. In the
screenshot below the exposure length of an Astro-Video Systems Advanced Mk. III camera is being set
via the menu to match the setting in AstroLive as shown:
14
Gain
The “Gain” setting controls the analog gain inside the camera. A higher setting will make the image
brighter, but will introduce more “noise” in the image past a certain point, especially on uncooled
cameras when the temperature is warm. A lower setting will make the image less bright, but it will
limit the digital noise introduced into the image and will lead to more pleasing results.
Usually it is best to first use a longer exposure to get a brighter, cleaner image, then use a combination
of the camera's gain (discussed here) and/or brightness and black level settings (discussed under the
Extra Config section) to get the desired object and background brightness once you've increased the
exposure to the longest your mount tracking accuracy or other constraints will allow. Only once you
have exhausted all these in camera adjustments should you then use the adjustments for you frame
grabber (model specific, discussed under the Extra Config section) or AstroLive post-processing to
stretch the image to brighten it further.
Gamma
The “Gamma” setting controls the non-linear “stretching” of the output of the ccd sensor as it is
converted into a video signal. This control operates differently depending on which camera you have,
but will operate in the same way the camera's native Gamma setting operates via the remote control
box, native control software, or menu system, generally. It is usually safe to not modify this setting
unless you know you need to for a particular reason.
On-Screen Menu Controls
Some video cameras have an on screen menu which can be navigated with these controls. The arrow
buttons navigate the indicated direction in the menu and the central button functions as an “Enter”
button
The “Use Menu Mode” button will temporarily disable post-processing and set frame capture to the full
frame-rate of the frame grabber (NTSC 60 frames per second, PAL 50 frames per second) in order to
allow you to properly see and operate the menu without the image being modified by AstroLive.
Command Sending
The drop-down box below the “Use Menu Mode” button contains a list of custom commands which
your camera model responds to such as enabling an on-screen crosshairs, entering a color bars test
mode, etc. Select the command to send in the dropdown menu and then press the “Send” button to
send the command to the camera.
15
Extra Config
The “Extra Config” button brings up a dialog box which will allow you to configure certain settings
which are not available on all camera models and which vary between different camera manufacturers,
such as Sharpness, Black Level, Color Balance, etc. Please consult your camera documentation for
how these settings operate on your particular camera model as the settings in AstroLive will be adjusted
in the same way as the settings in the on-screen display or remote control box for your camera. In
addition, it also allows access to the “Capture Device Config” dialog which allow you to set the
configuration of your frame grabber. That dialog will be different depending on which frame grabber
you are using and you should consult your frame grabber documentation for which settings are
available and how to use them. Some settings frame grabbers commonly allow adjustment on are
Contrast, Brightness, Color Tint, Capture Gamma (different from Camera Gamma discussed above),
White Point, Black Point, Sharpness, etc.
16
Display Window
The “Display Window” button will bring up a large window which will show what your are currently
capturing, with all post-processing applied. This window can be moved to a second display such as a
TV or projector that you may have connected to your computer for showing others and can be made
full screen (using ALT+ENTER). The image can be scaled to fill the full size of the screen for optimal
display.
Saving Snapshots
The “Set Save Location...” button allows you to choose where saved snapshots of your capture will be
located. To save a snapshot of your current capture press the “Save Snapshot” button.
17
Still Controls
The still image controls operate very similarly to the video controls detailed above except that the
exposure duration is set by typing in any number of seconds rather than being constrained to selecting
via a slider and there are no on-screen menu controls or menu mode. Please see the Video Controls
section for more details on individual settings.
Image Preview
The image preview second of the application is composed of one large image which shows the latest
capture with all post-processing and stacking applied and then underneath at the bottom of the window
several small thumbnail images of the last few raw frames captured from the camera so that you can
see what the post-processing is working with. The large image will always display the captured and
post-processed image at full native resolution.
18
Post-Processing
This section is coming soon.
Go To Telescope Control
This section is coming soon.
Frame and Focus Controls
This section is coming soon.
Adding Image Overlays
This section is coming soon.
Managing Targets with the Observation Plan
This section is coming soon.
19