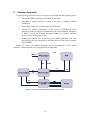
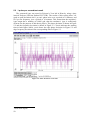
1
Providing accurate time information to
a radio base station
via a GPS receiver emulator
ELHAM KHORAMI
KTH Information and
Communication Technology
Degree project in
Communication Systems
Second level, 30.0 HEC
Stockholm, Sweden
KTH Royal Institute of Technology
Kunglia Tekniska Högskolan
version: 2.1
Date: 2013-02-10
Providing accurate time information to a radio base
station via a GPS receiver emulator
Elham Khorami
<[email protected]>
2013.02.10
Master thesis report
Project performed in the GPS RBS system I&V department at Ericsson
Examiner: Gerald Q. Maguire Jr.
Supervisors: Kjell Fyrvall and Torbjörn Hansson
School of Information and Communication Technologies
KTH Royal Institute of Technology
Stockholm, Sweden
Abstract
In recent years, there has been a significant increase in the use of Global
Positioning Satellite system (GPS) technology, consequently the usage of GPS
receivers has increased. These GPS receivers can be used as a synchronization source
for radio base stations by generating precise 1 pulse per second signals and providing
National Marine Electronics Association (NMEA) data.
The prototype developed in this thesis, implements a GPS receiver emulator to
emulate a GPS receiver which is to be used for radio base station synchronization.
Hardware and software have been used to generate the NMEA messages and to
generate a precise 1 pulse per second signal. A graphical user interface (GUI) has
been created in order to allow the operators of the emulator to input various
parameters to the system used to emulate a GPS receiver.
Using this emulator avoids the need for expensive GPS receivers and their
connection to an antenna with a good view of the GPS satellites. More importantly,
this GPS receiver emulator makes it easier to set up a lab environment for testing
different situations with regard to signaling with NMEA data between the emulated
GPS receiver and the radio base station equipment that is under test. For example, this
allows tests involving incorrect NEMA messages or non-once per second pulses.
i
Sammanfattning
De senaste åren har det skett en significant ökning av användandet av GPS teknik;
följdaktligen har användandet av GPS mottagare ökat. GPS mottagare kan användas
som en synkroniseringskälla för radiobasstationer genom att generera exakt 1 puls per
sekund och därmed förse NMEA datan.
Prototypen som utvecklats i detta examensarbete, implementerar en GPS emulator
för att erbjuda en effektiv lösning till att emulera en GPS mottagare som används för
synkronisering av basstationer. Olika hårdvara och mjukvara har använts för att
simulera NMEA meddelanden och för att generera en precis 1 puls per sekund signal.
Ett grafiskt gränssnitt (GUI) har utvecklats för att tillåta användaren av emulatorn att
mata in olika parametrar till systemet som används för att emulera GPS mottagaren.
Användandet av den här emulatorn tar bort behovet av dyra GPS mottagare, och
gör det enklare att sätta upp en labbmiljö för testandet av olika situationer med hänsyn
till signalering mellan 1 puls per sekund och NMEA datan av den simulerade GPS
mottagaren och basstationshårdvaran som testas.
iii
Acknowledgment
I would thank my Ericsson supervisors Kjell Fyrvall and Torbjörn Hansson for
providing the opportunity to perform my Master’s thesis project in Ericsson in Kista
(Sweden) and in addition I want to thank them for all the technical assistance,
suggestions, and guidance during the thesis project.
I would also like to thank my KTH examiner, Gerald Q. Maguire Jr., for providing
such thorough support throughout the thesis. I would like to mention that it was clear
that Prof. Maguire really made an effort to carefully read the entire thesis and absorb
the concepts, and helped me to improve my thesis through his comments and ideas.
Thanks for your help!
I would also like to thank my thesis colleague Ashar Waseem who always worked
hard and helped me in different parts of the project. Special thanks to James Powell,
who amongst other friends here in Stockholm, helped me to improve my thesis with
intelligent comments.
Lastly I would like to express my gratitude to my family in Iran, who despite the
distance, always showed unconditional support during my education here in Sweden.
Special thanks to Sarwarul Islam Rizvi for showing me his friendship throughout the
master’s program.
v
Table of Contents
Abstract ................................................................................................................................ i
Sammanfattning ................................................................................................................. iii
Acknowledgment ................................................................................................................ v
Table of Contents .............................................................................................................. vii
List of Figures .................................................................................................................... ix
List of Tables ..................................................................................................................... xi
List of Acronyms and Abbreviations ............................................................................... xiii
1 Introduction .................................................................................................................. 1
1.1 Introduction to the problem and initial goals ........................................................1
1.2 Overview of thesis .................................................................................................2
1.2.1
Short introduction to GPS ..............................................................................2
1.2.2
Main Goals .....................................................................................................4
1.2.3
Proposed solution ...........................................................................................4
1.3 Structure of the planned thesis ..............................................................................5
2 Background .................................................................................................................. 7
2.1 GPS Parts...............................................................................................................7
2.1.1
GPS receivers and their applications .............................................................7
2.2 1 Pulse Per Second ................................................................................................8
2.3 NMEA 0183 ..........................................................................................................8
2.3.1
General Introduction to NMEA 0183 ............................................................8
2.3.2
NMEA Sentence Format ................................................................................9
2.4 Available GPS receiver simulators in the market ...............................................10
2.4.1
Software simulators .....................................................................................10
2.4.2
Hardware simulators ....................................................................................11
2.4.3
Comparing available simulators with our GPS emulator ............................11
2.5 Synchronization using GPS.................................................................................11
2.5.1
Technologies utilizing synchronization .......................................................11
2.5.2
RBS Synchronization ...................................................................................12
3 Hardware used in the project ..................................................................................... 15
3.1 Atmel STK 500 development board....................................................................15
3.2 Reasons for selecting this specific hardware.......................................................17
4 Software Approach .................................................................................................... 19
4.1 NMEA implementation .......................................................................................20
4.1.1
NMEA message generation .........................................................................21
4.1.2
NMEA messages ..........................................................................................25
4.1.3
Transferring NMEA messages to the RBS ..................................................33
4.1.4
Control over sending NMEA messages .......................................................33
4.1.5
Receiving information from RBS ................................................................34
4.2 Control Interface .................................................................................................37
4.2.1
GUI features .................................................................................................41
4.2.2
Serial Port features .......................................................................................43
4.2.3
Code description ..........................................................................................43
4.3 Pulse per Second Generator ................................................................................46
5 Analysis ..................................................................................................................... 49
5.1 Outputting NMEA message ................................................................................49
5.2 1 pulse per second test result ...............................................................................50
5.3 Testing the whole prototype ................................................................................51
5.4 Testing the GPS receiver emulator with a GSM RBS ........................................55
vii
6
Conclusion ................................................................................................................. 57
6.1 Future work .........................................................................................................57
6.1.1
Make a single board and integrate the hardware devices ............................57
6.1.2
Design a sine wave convertor ......................................................................57
6.1.3
Integrating a chip scale atomic clock (CSAC) .............................................57
6.1.4
Integrating the GPS receiver emulator into the RBS ...................................58
6.1.5
Generating all of the NMEA messages ........................................................58
6.2 Required reflections ............................................................................................58
References ......................................................................................................................... 59
Appendix A ....................................................................................................................... 63
Appendix B ....................................................................................................................... 65
Appendix C ....................................................................................................................... 67
Appendix D ....................................................................................................................... 69
viii
List of Figures
Figure 1-1: Base Station System showing GPS receivers attached to each RBS ................3
Figure 1-2: GPSS-BTS data interface ..................................................................................3
Figure 1-3: GPS receiver emulator used for RBS synchronization .....................................5
Figure 3-1: System diagram of the hardware used in the project ......................................15
Figure 3-2: Pin-outs for ATmega 644P [32] ......................................................................16
Figure 3-3: STK 500 ..........................................................................................................17
Figure 4-1: Overview of the NMEA generator in the system ............................................19
Figure 4-2: NMEA message generation steps ...................................................................20
Figure 4-3: Format of the instruction for Parameter 1: Number of satellites ....................22
Figure 4-4: Format of the instruction for Parameter 2: satellite information for
each visible satellite........................................................................................22
Figure 4-5: Format of the instruction for Parameter 24: Automatic satellite
information for each visible satellite ..............................................................22
Figure 4-6: Parameter 3: Health conditions for 32 satellites .............................................22
Figure 4-7: Parameter 4: Configuring latitude for GPGGA ..............................................23
Figure 4-8: Parameter 5: Configuring longitude for GPGGA ...........................................23
Figure 4-9: Parameter 6: Configuring GPS status for GPGGA .........................................23
Figure 4-10: Parameter 7: Configuring number of tracking satellites used for
positioning ......................................................................................................23
Figure 4-11 : Parameter 8: Configuring Dilution of Precision (DOP) for GPGGA ..........23
Figure 4-12: Parameter 9: Configuring antenna altitude for GPGGA ...............................23
Figure 4-13: Parameter 10: Configuring Geoid altitude for GPGGA................................23
Figure 4-14: Parameter 11: Configuring operational mode for GPGSA ...........................23
Figure 4-15: Parameter 12: Configuring positioning status for GPGSA ...........................23
Figure 4-16: Parameter 14: Configuring PDOP for GPGSA .............................................23
Figure 4-17: Parameter 15: Configuring HDOP for GPGSA ............................................24
Figure 4-18: Parameter 16: Configuring VDOP for GPGSA ............................................24
Figure 4-19: Parameter 17: Protocol selection (Ericsson or Furuno) ................................24
Figure 4-20: Parameter 13: Configuring GPSS week ........................................................24
Figure 4-21: Parameter 18: Configuring GPSS Second ....................................................24
Figure 4-22: Parameter 19: Configuring GPSS status for GPppr ......................................24
Figure 4-23: Parameter 20: Configuring state mode for GPsts..........................................24
Figure 4-24: Parameter 21: Configuring position hold mode for GPsts ............................24
Figure 4-25: Parameter 25: configuring Antenna port overload ........................................24
Figure 4-26: Parameter 22: Configuring UTC time ...........................................................24
Figure 4-27: Parameter 23: Configuring GPGSV mode ....................................................24
Figure 4-28: GPtps message format ...................................................................................26
Figure 4-29: Gpanc message format ..................................................................................27
Figure 4-30: GPtst message format....................................................................................27
Figure 4-31: GPppr message format ..................................................................................29
Figure 4-32: GPsts message format ...................................................................................30
Figure 4-33: Gpavp message format ..................................................................................30
Figure 4-34: GPGSV message format ...............................................................................31
Figure 4-35: GPGGA message format ...............................................................................32
Figure 4-36: GPGSA message format ...............................................................................33
Figure 4-37: GPset sentence example ................................................................................36
ix
Figure 4-38: GPS receiver emulator GUI ..........................................................................37
Figure 4-39: Manual Satellite Information ........................................................................38
Figure 4-40: Error indicating that the user needs to fill in the Number of Visible
satellite field ...................................................................................................38
Figure 4-41: Automatic Satellites Information ..................................................................39
Figure 4-42: Progress bar indicating the progress of programming ..................................41
Figure 4-43: Error indicating input out of range ................................................................42
Figure 4-44: Error indicating Enter numbers only .............................................................42
Figure 4-45: Error indicating port is already open.............................................................43
Figure 4-46: the first handshake between the microcontroller and control
interface ..........................................................................................................45
Figure 4-47: Handshake for programming the memory ....................................................46
Figure 5-1: Using SSCOM3.2 to observe the generated NMEA messages that
are being sent to the RBS ...............................................................................49
Figure 5-2: Phase deviation versus time ............................................................................50
Figure 5-3: Frequency deviation versus time.....................................................................51
Figure 5-4: Generated NMEA messages by the microcontroller for Furuno
protocol ...........................................................................................................52
Figure 5-5: Curves output by VEE Pro ..............................................................................53
Figure 5-6: Print Errors window ........................................................................................53
Figure 5-7: Polaris plot of the satellite positions during 24 hours .....................................54
Figure 5-8: Generated NMEA messages by the microcontroller for Ericsson
protocol ...........................................................................................................54
Figure 5-9: The synchronization status of the RBS ...........................................................55
Figure 5-10: TF is turned to blue which indicates timing function is
synchronized ...................................................................................................56
x
List of Tables
Table 3-1: Connections from microcontroller to external and on-board devices ..............16
Table 4-1: GPset sentence parameters ..............................................................................36
Table 4-2: GPint sentence parameters ...............................................................................36
Table 4-3. An example of a line in the text file containing information for two
satellites ..........................................................................................................39
xi
List of Acronyms and Abbreviations
ASCII
BTS
CPLD
C/N
CDMA
CS
DOP
DU
GPS
GPSS
GUI
HDOP
NMEA
PCB
PDOP
ppb
pps
PRN
RBS
RTC
RX
SCK
SI
SO
SNR
SPI
TOW
TX
UART
UTC
VDOP
XOR
American Standard Code for Information Interchange
Base Transceiver Stations
Complex Programmable Logic Device
Carrier to Noise
Code Division Multiple Access
(logical not) Chip Select
Dilution of Precision
Digital Unit
Global Positioning Satellite system
Global Positioning System Synchronization Source
Graphical user interface
Horizontal DOP
National Marine Electronics Association
Printed Circuit Board
Positional DOP
Parts per billion
Pulse per second
Pseudo-random number
radio base station
Real-time clock
Receiver
Serial Clock
Serial Input
Serial Output
Signal to Noise Ratio
Serial Programming Interface
Time of Week
Transceiver
Universal Asynchronous Receiver/Transmitter
Coordinated Universal Time
Vertical DOP
Exclusive OR
xiii
1
Introduction
In this thesis a Global Positioning System (GPS) receiver emulator designed and
implemented to emulate a GPS receiver. The GPS receiver emulator will be built as a
prototype and will be tested with a radio base station (RBS). This hardware and
software will be used to test a RBS in a laboratory by providing synchronization and
messages to and from a RBS under test. A microcontroller is used to implement
National Marine Electronics Association (NMEA) 0183 or 2000 messages. A
Complex Programming Logic Device (CPLD) is used to generate 1 pulse per second
(pps) signal. A graphical user interface (GUI) was developed to allow operators to
input various parameters to the emulated GPS receiver. Such an emulated receiver can
be used to test a RBS under practical and repeatable conditions.
1.1 Introduction to the problem and initial goals
Ericsson routinely uses GPS receivers to provide synchronization to RBS;
however, it is expensive and can be complicated to set up a GPS receiver in a lab
environment, hence there is a need for an accurate GPS receiver emulator.
Ericsson, one of the largest telecommunication vendors in the world, is producing
telecommunication equipment for both mobile and fixed network operators. Ericsson
states that more than 180 [1] countries are using their equipment and that more than
40 percent of mobile traffic is sent over Ericsson manufactured equipment and
infrastructure. One factor that makes Ericsson so successful is that they provide endto-end solutions for mobile communication, covering all current mobile
communication standards ranging from GSM to WCDMA to LTE [1]. So the solution
proposed in this project should be compatible with all these standards.
The Radio Base Station Integration and Verification (RBS I&V) department is
responsible for building and integrating RBS hardware and software for GSM,
including functional verification of RBS software, installing RBS, and regression
testing of legacy products with newer software [2].
Base Transceiver Stations (BTS) are called RBS in Ericsson’s terminology, hence
for the rest of this thesis the term RBS* will be used instead of BTS. An RBS is used
to provide communication between wireless user equipment (such as mobile
telephony equipment) and the operator’s core network. There can be more than one
RBS in a given area and these RBS need to be synchronized with each other. One of
the important uses of synchronization is during handoff; a handoff occurs when a
mobile user moves between two RBS and an on-going call or session needs to be
switched from one physical channel to another channel. Another usage of
synchronization between RBS is for transmitting real-time interactive multimedia
traffic† such as multi player online game with strict requirements on delay and timing
[3, 4, 5].
*
In this thesis the term RBS will be used in both a singular and plural sense, meaning
either a Radio Base Station or Radio Base Stations as appropriate in the context.
†
Interactive multimedia traffic is a stream containing video, audio, or a combination
of these.
1
RBS need to meet a carrier frequency accuracy of ± 50 ppb* in order to provide
quality of service and have acceptable handoff performance. There are different
methods and technologies for providing synchronization between RBS. One
technology utilizes an embedded rubidium oscillator which is a solution with long
stability. Another method is to use an embedded quartz oscillator which is a cheaper
solution in comparison to other methods, but there is a larger margin of error over a
long period of time. Another option is to use a GPS receiver in the RBS, which is a
very robust and accurate solution for providing time and location information, but this
solution is expensive and requires line of sight to a set of GPS satellites in order to
work properly [3].
1.2 Overview of thesis
This section begins with an introduction to GPS and how it works, followed by an
explanation and introduction of the main goals and proposed solution for this thesis.
1.2.1
Short introduction to GPS
The Global Positioning System (GPS) is a constellation of 27 operational satellites
orbiting around the earth, of which 24 are active and 3 are reserved for backup. GPS
receivers listen to messages from these satellites. To be effective the receiver needs to
be in the line of sight of at least three satellites in order to perform accurate
trilateration [6]; however, the GPS receiver “measures the distance to a fourth satellite
to synchronize its pseudorandom number code [sequence] with the satellites and
correct for any timing offset”[7].
Knowing exactly where the satellites are at all times is done by using monitoring
stations and ground antennas, which will check the speed, position, and altitude of the
GPS satellites. The monitoring stations also take into account orbital errors caused by
solar radiation pressure and gravitational pull. Therefore the satellites send navigation
data in their signal which is encoded using a long pseudorandom code.
The method to calculate the distance from satellites to the GPS receiver is based
upon the fact that a satellite transmits data using a long pseudo-random code. The
GPS receiver utilizes the same pseudo-random code. When the GPS receiver receives
a signal from the satellite, the time difference between the generated code received
from this satellite and the receiver’s code is used to calculate the signal’s propagation
time. The GPS receiver multiplies this delay by the speed of light in order to calculate
its distance from each satellite. This computation assumes that the signal traveled in a
straight line. For such a calculation a very precise clock is needed in each of the
satellites. Atomic clocks are very precise, but also very expensive†; therefore they are
not economical (or necessary) to include in each GPS receiver.
A solution is to use atomic clocks in the satellites and to use cheaper quartz
clocks in the GPS receivers. The GPS receivers will synchronize themselves with the
GPS satellites to an accuracy of a nanosecond [7]. Ericsson is using a single GPS
receiver in the lab for the synchronization of RBS, but outside the lab environment
separate GPS receivers are used in order to provide time synchronization of different
base stations, as shown in Figure 1-1.
*
†
2
Parts per billion
Note that single chip atomic clocks are currently coming onto the market, such as
those sold by Symmetricom.
Figure 1-1: Base Station System showing GPS receivers attached to each RBS
As shown in Figure 1-2, the GPS receiver provides accurate timing information to
the Global Positioning System Synchronization Source (GPSS) and then GPSS will
use this information to generate a 1 pulse per second (pps) signal and to generate
additional data including GPS time, position, etc. and sends this information to the
RBS. The RBS will use this information for synchronization [8].
Figure 1-2: GPSS-BTS data interface
A request for output might be sent from the digital unit (DU) (a component of the
RBS) to ensure that the specified information together with the corresponding time
intervals have been sent from the GPSS to the DU [9].
3
1.2.2
Main Goals
The main goal of this thesis project is to develop a GPS receiver emulator. This
GPS receiver emulator should generate 1 pps and NMEA-data messages. The DU
inside the RBS may also use the 1 pps and NMEA messages for synchronization with
DUs in other RBS. The GPS emulator is to be used in a test lab environment, since
using an emulator is easier and less expensive setting up than a real GPS receiver and
antenna (especially as this antenna needs to have line of sight to at least three GPS
satellites at all times, thus it is the antenna’s placement and connection to the receiver
that is expensive and not the receiver itself). As a result the test laboratory can use
this GPS receiver emulator to test an RBS by simulating various scenarios.
Additionally, the same GPS receiver emulator could be used to conduct fault testing,
where by corrupting data or unexpected values and signals can be simulated to
investigate how the system (which might include multiple RBS) reacts.
In order to use the GPS emulator as a source of synchronization for an RBS, the
GPS receiver emulator should generate 1 pps and some NMEA-data messages, just as
if it were a real GPS receiver. These NMEA data messages are sent after the positive
edge of each pulse. An RBS can work with different current radio standards such as
GSM, WCDMA, and LTE, and synchronization between RBS in the field is generally
based on GPS, so it is important that the GPS receiver emulator will work with RBS
implementing all current radio standards.
1.2.3
Proposed solution
The NMEA messages can be implemented by using a microcontroller or a
computer and the 1pps signal will trigger the output of NMEA messages. For this
thesis it was decided to use a microcontroller to provide an accurate 1pps as
generating the 1pps signal by a computer would not be sufficiently accurate.
Therefore a hardware-based solution using a dedicated microcontroller was chosen.
Different methods can be used for generating the 1pps signal and a CPLD was used to
generate the 1pps signal. The NMEA data messages include different variables, but
since an actual GPS satellite signal is not available all of the values and data that the
satellite would send need to be calculated, replicated, and ultimately output by the
receiver emulator. Therefore we need a control interface to enable the user to input
various parameters that will be used when emulating the GPS receiver’s data
messages.
Another important aspect is to control when the NMEA data is sent to the RBS or
to ensure that internal timing signals behave as expected. Figure 1-3 shows the system
that will be implemented in this thesis project, illustrating the control data interface (a
personal computer, i.e., a PC), the pulse generator (implemented in an CPLD), the
NMEA data source (implemented by a microcontroller), and the RBS.
4
Some of the benefits of having such a GPS receiver emulator are:
• No installation of a GPS antenna or antenna feed cable are required to have the
equivalent of a functioning GPS receiver (while still having the desired
NMEA data).
• The simulation can be run for any defined time period, test parameters can be
easily configured, and test conditions are repeatable.
• By generating the appropriate control messages, one can determine the
response of the RBS to fault conditions [10].
• GPS computer emulation allows testing without the need of satellites being
available at a particular time and place, and under current conditions. They
also allow easier testing of equipment in remote locations or at high velocities
[11].
Interfaceadapter
1PPS
pulse
generator
Reference:
10 MHz
1Hz / ̄
PW=20 µs
or 200ms
or 500 ms
Reference:
1 HZ
±16ppb
”NMEAdata”
500 ms
Delay to
NMEA
passing
Data
’Config
RBS/RAN
With
interface
for RS422
GPS
1PPS
Control
data
PC /
microcontrolle
r
Figure 1-3: GPS receiver emulator used for RBS synchronization
1.3 Structure of the planned thesis
Chapter 1 has specified the problem and outlined the requirements for a solution.
Chapter 2 provides the background necessary for the reader to understand the rest of
thesis and to understand how this work comparison to that done by others. Chapter 3
covers the hardware approach which was used for this thesis project, while Chapter 4
describes the software approach, including the GUI. Chapter 5 analyzes of results of
testing this GPS receiver emulator prototype. This is followed by conclusions, future
work, reflections, and references.
5
2
Background
In this chapter different parts of the GPS system are described. Following this a
short introduction to the NMEA standard is given. The chapter ends with a review of
some of the available GPS receiver emulators on the market.
2.1 GPS Parts
GPS includes 3 different segments: (1.) space segment, (2.) control segment, and
(3.) user segment. The space segment includes the 27 satellites as described earlier in
section 1.2.1. The signal sent by the satellites contains 3 different parts: two sine
waves (also known as carrier frequencies), two digital codes, and a navigation
message. The sine waves and digital code can be used to calculate the distance of the
GPS receiver from the GPS satellites. The control segment includes a network of
tracking stations on the ground with one being designated as a master control station.
The control segment is used to track the GPS satellites and predict their location, to
check the accuracy of the satellites’ atomic clocks, and to generate the satellite
almanac*. The user segment is divided into two different applications: military and
civilian, for which military and civilian users have different levels of access. The user
segment includes the GPS receiver and antenna in order to receive the signals from
the satellites, and a timing mechanism. The GPS receiver will use the digital code and
sine wave to calculate its distance from the satellites and use the navigation
information to calculate the satellites coordinates [6, 12].
2.1.1
GPS receivers and their applications
GPS receivers are differentiated by the number of channels they implement. These
channels enable the GPS receiver track different numbers of satellites simultaneously,
for example a GPS receiver with four channels can track four satellites at a time.
There are several different architectures for GPS receivers:
Continuous Receivers
Sequential Receivers
Multiplexed Receivers
*
This type of GPS receiver includes five or more channels
and can monitor four satellites at the same time. They
have very high efficiency and are very expensive, so it is
suitable for expensive devices that require good accuracy,
such as a fighter aircraft.
This type of GPS receiver can have one-channel or twochannels, meaning the device can track one or two
satellites at one time. This receiver is less expensive and it
is not as accurate as a continuous receiver.
This type of receiver has the ability to switch between the
satellites it is tracking. Such a receiver is not as expensive
and has lower resistance to jamming as compared to
continuous receivers, so they are more suited for civilian
than military usage.
The GPS almanac is data sent by satellites and includes information regarding the
state of the satellite constellation and data describing each satellite's orbit.
7
In addition to these different GPS receiver architectures, there are different types
of GPS receivers, such as: differential GPS receivers, surveying receivers,
analog/digital receivers, and time transfer receivers. GPS applications are varied. One
of the most common applications is navigation and location without the need for
highly accurate timing. However, GPS applications used for timing purposes are the
focus of this thesis, specifically for providing accurate time synchronization between
RBS.
2.1.1.1 Time transfer receivers
Time transfer receivers can be used for applications requiring precise timing. As
previously mentioned, GPS receivers use 3 satellites for positioning and use one
satellite to get the precise time in order to synchronize the receiver’s clock with the
satellites’ atomic clocks. GPS receivers usually have a crystal oscillator or an
alternative frequency source such as a rubidium or cesium cell. If the GPS receiver
can see a sufficient number of satellites and can gather the required positioning and
timing information, then it will synchronize itself to UTC time, otherwise it will
simply use the internal oscillator or an external frequency source. This type of GPS
receiver can provide timing synchronization with an accuracy of nanoseconds [13].
2.2 1 Pulse Per Second
Generating an accurate 1 pulse per second is one of the goals for this project. The
generated 1 pulse per second should have noise less than 100 ns rms.
1 pulse per second is a pulse with a frequency of 1 Hz that can be generated by the
GPS receivers and synchronized with UTC time [14].
2.3 NMEA 0183
This section gives a general introduction to NMEA0183, and other relevant
NMEA standards. Later in this section the sentence format used in NMEA is
described.
2.3.1
General Introduction to NMEA 0183
NMEA 0183 is a standard for data transfer for maritime communication and
navigation equipment. A NMEA 0183 device has an interface in order to be able to
send or receive data. NMEA is a one way data transmission standard that supports one
talker* and one or more listeners†. This data can include time, speed, and positioning
information, etc.[15].
NMEA 0183 has different versions and version 4.10 is the latest & current version
[16]. NMEA 2000 standard is another interface standard for data transfer in maritime
communications. NMEA 2000 is used with a network of devices, as it can support
multiple transmitter and multiple receivers and it is a multi-master standard [17]. It is
50 times faster than NMEA 0183, but it is not suitable for the high bandwidth
applications, such as video [17].
*
†
8
Any device that sends data within the NMEA standard is known as talker
Any device that receives data within the NMEA standard is known as listener
In the following sections when we use the term NEMA we are referring to the
NMEA 0183 standard unless stated otherwise. NMEA is widely used as an interface
standard for GPS receivers [18].
2.3.2
NMEA Sentence Format
NMEA messages have a specific format including characters and fields that make
up a sentence. In the following subsections we will describes the characters, fields,
and sentences of NMEA messages.
2.3.2.1
Characters
The format of the transmitted data will be ASCII characters.
2.3.2.2
Fields
NMEA messages are compromised of the following fields:
Address
The address field is the first field of each sentence. All messages
start with a “$” or “!” character to denote the start of a sentence.
There are different types of address fields, including: approved
address field, query address field, and proprietary address field.
In this thesis project only the approved address and proprietary
address fields were used. In an approved address field the 5 bytes
following the character “$” are reserved for use as an address
field; of these the first 2 bytes of the address field identify the
talker (which is “GP” indicating that the talker is a GPS device)
and the last 3 bytes identify the type of message in the sentence
(as will be discussed in detail in section 4.1.1). For this thesis,
the address fields GPGSV, GPGGA, and GPGSA are generated
in this way. The proprietary address field starts with character
“P” and is followed by 3 characters indicating the manufacturers’
specific code which has been used. In this thesis the proprietary
address fields are PFEC (Furuno) and PERC (Ericsson).
Data
The data field includes delimiters and valid characters.
Checksum A checksum is a mandatory filed. It is calculated as the XOR of
the whole sentence after the “$”. This field follows the character
“*” which is the checksum field delimiter.
Sequential The sequential message identifier can be used as an identifier in
the case of a multi sentence message. This field was not used in
Message
Identifier this thesis project.
2.3.2.3
Sentences
The maximum length of a sentence is 82 characters, including a one byte start of
sentence delimiter (“$” or “!”), a combination of different fields, and a two byte long
end of sentence marker “<CR><LF>” [15].
9
2.4 Available GPS receiver simulators in the market
There are a number of different types of GPS receiver simulators available in the
market. They are implemented as various combinations of software and hardware
with different features. In the following subsections, we will discuss the software and
hardware available simulator and then make a comparison with our GPS emulator.
These GPS receiver simulators are mainly used for testing in various scenarios. Some
of these simulators and their features are listed below:
2.4.1
Software simulators
Here some of the available software that can be used as a GPS receiver simulators
are described:
• SkyFreeGPS is a GPS receiver simulator. It generates the same data that is
generated by a GPS receiver except for the exact position. At a frequency of
one sentence per second it can generate GPS data in GPA and RMC sentences,
indicate position by showing a latitude and longitude on a map, and this
generated NMEA data can be saved for analysis or future use[12].
• The Skylab GPS simulator is an application which can generate GPGGA,
GPGSA, and GPRMC NMEA sentences. It offers different configuration
options, different input and output methods (such as manually entering data,
importing data from a map, replaying a GPS logfile, etc.), multiplexing GPS
receivers, visualize and output real time data (latitude, longitude, height,
speed, NMEA validity, date, time, etc.)[19, 20, 21].
• Virtual GPS1.40 is an application used for simulating a GPS receiver; it can
generate GPGLL, GPGGA, GPVTG, GPRMC, GPGSA, GPGSV, GPZDA,
GPWPL, GPRTE, and GPAAM NMEA sentences. Two different modes are
available: simulation mode and file mode. In the simulation mode, latitude and
longitude will be incremented based on a defined step, whereas in file mode a
text file of GPS data can be loaded [22].
• ZylGPSSimulator 1.33 is a Delphi GPS receiver simulator component. It is
able to generate GPGLL, GPGGA, GPVTG, GPRMC, GPGSA, GPGSV, and
GPZDA NMEA sentences. It allows the creation of a virtual port, converting
parameters to NMEA 0183 format, and sending sentences via the virtual port
[23].
• GPSsim v2.2.3 is an application for simulating a GPS receiver, it can be used
to generate NMEA data [24].
10
2.4.2
Hardware simulators
There are also other types of simulators to test the GPS system, a single-channel
GPS signal generator which can be used to test a GPS receiver for: a range of signal
levels, that the GPS receiver can identify satellite signals and it can also be used to
test connectivity and assembly of GPS receivers. GPS constellation signal simulators
(GSG5 and GSG6 series) can be used to simulate a number of GPS satellites and
provide multiple channel testing of GPS receivers for: how quickly a GPS receiver
can achieve a position fix, different climates, tracking sensitivity, trajectory and
location testing, elevation masking, and leap second testing[25]. LabSat GPS &
Multi-GNSS simulator, STR4500 Multi-Channel GPS/SBAS simulator, and GSS6700
Multi-GNSS simulation system are some examples of this kind of GPS simulator [26,
27, 28].
2.4.3
Comparing available simulators with our GPS emulator
From a review and analysis of available GPS simulators it was observed that the
receiver simulators offer similar features in terms of generating a limited number of
NMEA messages or signals received from the satellites. All of these simulators are
mainly used for positioning and location determination, most of these simulators do
not offer timing or synchronization outputs, which is one of the outputs of a real GPS
receiver and if they have 1pps output, it is not stable enough to meet the requirements
for RBS synchronization. Most of these simulators are software solutions that cannot
have interaction with an RBS. In addition to the above simulators, there are some
hardware GPS simulators that can be used to simulate receiving signals from satellites
or recording and replaying these signals, some even have the ability to manipulate
different parameters.
The GPS receiver emulator designed, implemented, and tested in this thesis
project, generates a number of different NMEA messages to be sent to the RBS, it is
also able to receive messages would be sent by the RBS to a GPS receiver. Most
importantly the 1 pps signal is generated by the GPS receiver emulator and sent to the
RBS. This signal can be used for timing information and RBS synchronization. The
GPS receiver emulator is also capable of recording and replaying satellite
information, including satellite PRN, azimuth, elevation angle, and SNR.
2.5 Synchronization using GPS
As mentioned in section 1.1, GPS receivers can be used to provide
synchronization for the RBS and certain technologies are needed for synchronization,
such as hand off. In this section some technologies that use synchronization will be
discussed and how synchronization happens in the RBS will be explained in more
detail.
2.5.1
Technologies utilizing synchronization
One of the crucial aspects to be considered in telecommunications networks is
providing timing and frequency synchronization; it is required in order to increase the
quality of service by improving the performance and avoiding packet loss [29].
11
In a wireless infrastructure different technologies and protocols need timing
synchronization with varying levels of precision. In paging a paging signal is sent via
one or more RBS to reach the receiver, so it is possible that when the page is received,
it is from different towers and if there was no timing synchronization, then the
receiver might receive the same page more than once. Paging needs a synchronization
of around a microsecond (this can be easily provided by using a GPS receiver).
Code Division Multiple Access (CDMA) is another technology that needs RBS
synchronization. CDMA is a digital system that shares a frequency channel among
users by using spread spectrum technology, in which multiple users can send, receive,
and broadcast at a same time. Therefore base stations need to be precisely time
synchronized and this also can be achieved by using a GPS receiver.
Enhanced 911 localization requires synchronization between base stations with
high precision and accuracy (100 ns). Enhanced 911 was proposed so that the operator
could pass an estimate of the location of the user of a mobile phone making an
emergency calling to within 125 meters. One method to estimate the location of the
user is called Time Difference of Arrival (TDOA). When a user calls the emergency
service, the signal will be received by two (or more) different RBS. The signal will
arrive to the RBS at different times, the time difference of the arrival of the received
signal can be used to estimate the distance of the user from the RBS, thus enabling the
operator to estimate the exact position of the caller [30].
GPS receivers used for synchronization purposes are not fail proof, as mentioned
in section 2.1, GPS receive signals from satellites and therefore it is possible to
interfere with the wireless communication and GPS signals (e.g. different sources of
electromagnetic radiation can interfere the GPS signals). Such interference can
decrease the accuracy of timing synchronization to different degrees. When the
interference is easy to manage and does not have a severe effect on timing
synchronization the GPS receiver is still able to track satellite signals. If the
interference is greater, then the GPS receiver will loose track of satellite signals, and
the timing output from the GPS receiver will start drifting from the correct time. If
the degree of interference is very severe, then the GPS receiver will loose track of
then satellite signals and will have to derive timing information from its internal
oscillator. This internal oscillator is not so stable and will drift after a short period of
time. Despite these problems many telecom operators rely on a GPS receiver as the
source for synchronization. The reason behind this the high cost for deployment of
alternative solutions, such a cesium oscillators. Another reason is the alternative
solutions are not sufficiently accurate, for example rubidium or crystal oscillators [3].
2.5.2
RBS Synchronization
GPS receivers can be used for base station synchronization by generating 1 pps
and NMEA data, this 1 pps is used to steer the local oscillator and synchronize it with
GPS time. Such a solution combines the long term stability of the GPS receiver with
short term stability of the local oscillator [3].
12
For RBS synchronization two factors should be considered: frequency
synchronization and time/phase synchronization. For GPS there are two
synchronization modes and Timing Function (TF) can be configured for frequency
synchronization or frame synchronization. When TF is frequency synchronized there
is a defined frequency offset between the executive reference source and the internal
oscillator* in the RBS. A frequency synchronized RBS meets the requirement of a
frequency error of no more than 50 ppb defined in GSM. When TF is frame
synchronized, there is a defined time offset between the executive reference source
and the time base counters.
Therefore the goal in order to provide synchronization for the RBS is to keep the
frequency of the Internal Oscillator within requirements when the RBS is Frequency
Synchronized and to keep the frequency of the Internal Oscillator and the generated
timing within requirements when the RBS is Frame Synchronized.
For the frequency synchronization the RBS will get the 1pps from the GPS
receiver emulator compare it with its regulator frequency (including oscillator) and
then it will steer its frequency to adjust it to the frequency of 1 pps. As mentioned
above, frame synchronization is another method of synchronization in which RBS
uses information in NMEA messages (GPppr in Ericsson protocol and GPtps in
Furuno protocol) including GPS week and GPS TOW, to calculate the frame number.
It uses the following formula to calculate the frame number:
Frame number= MOD(((1024+ week number)* 604800+TOW)*650/3;2715648)
The regulator includes an internal oscillator and it compares the calculated frame
number with its own frame number and adjusts it. On the rising edge of 1 pps, the
received NMEA message is time stamped by the regulator and this time stamp
includes the frame number which will be compared to the calculated frame number to
do the adjustment [31].
*
The internal oscillator in the RBS provides the frequency source for the radio
frequency generation and clocking of the time base counters. The internal oscillator
is also called OVCXO.
13
3
Hardware used in the project
In this chapter the hardware used in the thesis will be detailed. In order to achieve
the main goals of the thesis, the following hardware was used to implement the GPS
receiver emulator:
•
Atmel STK500 development board with an Atmel ATmega 644P
microcontroller,
•
Altera MAX II Development Kit (a Complex Programmable Logic Device
(CPLD)), and
•
Atmel AT45DB011D Flash memory.
A diagram of the hardware used and how it is interconnected is shown in Figure
3-1. The ATmega 644P microcontroller is attached to the development board and the
flash memory is also connected to this development board. The memory
configurations and pin-outs of the microcontroller relevant to this thesis project are
shown, specifically: chip select (CS), serial input (SI), serial output (SO), and serial
clock (SCK) to the memory. The control interface is connected to the development
board (and following a voltage level shifter connected to the microcontroller) via an
RS-232 interface. The CPLD is connected between the development board and the
RBS.
1PPS
10MHZ
CPLD
RBS
Enable
1 PPS
TX
RX
CS
RX
SI
ATmega 644P
Control Interface
TX
SCK
Memory
SO
Figure 3-1: System diagram of the hardware used in the project
3.1 Atmel STK 500 development board
An Atmel STK 500 development board, equipped with an Atmel ATmega 644P
microcontroller, has been used for generating the NMEA messages. Figure 3-2 shows
the pin-outs used on the ATmega 644P microcontroller. The pins relevant to this
project are shown in Table 3-1with there purpose described.
15
PDIP
1
40
2
39
(RXD1/AIN0) PB2
3
38
(TXD/AIN1) PB3
4
37
5
36
6
35
7
34
8
33
9
32
10
31
11
30
12
29
13
28
(TOSC1/XCK0/OC3A) PD4
14
27
(OC1A/TOSC2) PD5
PA3 (AD3/PCINT3)
15
26
(|WR) PD6
16
25
(|RD) PD7
17
24
18
23
PC2 (A10/PCINT10)
19
22
PC1 (A9/PCINT9)
20
21
Figure 3-2: Pin-outs for ATmega 644P [32]
Table 3-1: Connections from microcontroller to external and on-board devices
Pin
3
4
14, 15, 16, and 17
22 and 23
36
16
Purpose
connected to the 1pps output pin of the CPLD.
connected to the enable pin on the CPLD.
(RXD0/TXD0 and RXD1/TXD1 respectively) are used
for two serial UART interfaces
connected to an LED to indicate the mode the emulator
is currently in
connected to a switch that can select the emulator’s
mode
Figure 3-3 shows the Atmel STK500 including two serial interfaces, power
output, Atmega 644P [33]. These interface are marked by red numbers in the figure,
as follows: (1) RS232 CTRL interface which is used for transferring configuration
information from the control interface to the microcontroller; (2) RS232 SPARE
interface is used for transmission of NMEA sentences to the RBS; (3) the power
input; and (4) the microcontroller (in this case the Atmel ATmega 644P).
Figure 3-3: STK 500
3.2 Reasons for selecting this specific hardware
The reason for selecting this specific hardware was the STK500’s compatibility
with different Atmel microcontrollers which can be plugged into the board for
development purposes. As mentioned above, STK500 has two serial interfaces which
are important for our thesis; as one interface was needed for the transmission of
NMEA sentences to the RBS and the other can be used for communication with the
control interface on an attached PC. The STK500 board also provides the possibility
to connect the 1 pps signal from the CPLD to it via an external interrupt interface. SPI
was used to connect to an external memory.
Originally an Atmel Atmega 162 was used for developing the system which has
16 KB of flash and 1 KB of SRAM [34]. However, when including the option to
program the microcontroller with positioning information from the memory it was
discovered that the SRAM and FLASH memory were not large enough. Therefore an
Atmega 644P with 64KB of Flash memory and 16 KB of SRAM was selected.
17
4
Software Approach
To achieve the goals of the thesis, the project was divided into the following steps:
•
Generating NMEA messages in the NMEA generator,
•
Designing a control interface in order to be able to configure NMEA
parameters,
•
Generating 1 pulse per second in the 1PPS Generator,
•
Storing the satellite information in the Atmel AT45DB011D Flash
memory in order to send this information to the microcontroller and hence
to RBS by using an External Memory Handler (to emulate satellites
position closer to the reality), and
•
Sending the NMEA data generated by the NMEA generator and 1pps
generated by the 1pps generator to the RBS and receiving some messages
from the RBS.
Figure 4-1 shows the NMEA generator and its relationship to: the control
interface, external memory, the 1pps generator and the RBS.
Figure 4-1: Overview of the NMEA generator in the system
19
4.1 NMEA implementation
As mentioned before, in order to emulate a GPS receiver it is necessary to
generate NMEA messages. In this project many of the standard NEMA messages and
both the Ericsson and Furuno proprietary message protocols have been implemented.
All of these messages are generated by the microcontroller and sent to the DU via a
serial interface (in this case specifically a RS-422 interface - as this what the RBS
expects). An Atmel ATmega 644P [32] microcontroller is to generate these messages.
There are five basic requirements and steps for NMEA implementation. As shown in
Figure 4-2, the first step is to send data via the control interface to configure the GPS
radio emulator, the second step is decoding the information received from the control
interface, the third step is making changes to the parameters in the corresponding
NEMA message, the fourth step is to generate the NMEA message and send the
messages on the rising edge of each 1pps pulse. The fifth step is to receive messages
from the RBS, these messages will be used to make changes in corresponding
messages and further generation of NMEA messages sent to the RBS.
10MHZ
1. Control
Interface
Sending
Data
1PPS Generator
2. Decoding the
configured
information
3. Making the
changes to the
parameters in the
corresponding
messages
5. Receiving data
from RBS
4. Generating
NMEA messages
by using the
microcontroller
and transmit to
DU in RBS
Transmit data to the
GPS emulator
NMEA Generator
Figure 4-2: NMEA message generation steps
20
RBS
4.1.1
NMEA message generation
Some of the parameters in the NMEA messages (which can also be referred to as
sentences) need to be configured with parameters, so there is a need for a control
interface to input those parameters that will be used in the generated NMEA
sentences. This information from the control interface will be sent to the
microcontroller’s UART via a RS-232 serial interface. This serial communication is
done at a baud rate of 9600 bits per second with 1 stop bit and no parity bit. Each time
a byte is received by the Universal Asynchronous Receiver/Transmitter (UART) an
interrupt will occur. The interrupt handler will subsequently process the received byte.
When a command from the control interface has been received this command will
be decoded by a message decoder module. An instruction format was utilized to make
the decoding of these messages easier. Each instruction by the control interface to the
GPS emulator starts with a “#” sign, followed by an instruction number (this acts like
an operation code) and then the information that needs to be included inside the
corresponding NMEA message. The individual instruction formats are shown in the
following paragraphs.
4.1.1.1
Basic Instruction Format
Twenty-four different instructions have been defined in order to allow the user to
configure the configurable parameters of the various different NMEA messages used
in the project. The user can also view the current setting of these parameters and have
the option to reconfigure them. In addition, the user can select either the Ericsson or
Furuno protocol in the General Messages option (shown in Figure 4-19). Another
parameter “Coordinated Universal Time (UTC)” is the 22th parameter (shown in
Figure 4-26), this parameter is used to set the UTC time. This time is specified in the
format “YYMMDDhhmmss”. The parameters sent to the microcontroller control the
NMEA messages that will subsequently be sent to the RBS. Each of these parameters
will be explained below, in conjunction with each of the instructions that have been
implemented. The parameters (indicated in parenthesis after the NEMA command in
this sentence) have been group according to the NMEA message that they are
associated with: GPGSV (1, 2, 24), GPanc (3), GPGGA (4-10), GPGSA (11-12, 1416), GPppr (13, 18-19), GPsts (20-22).
4.1.1.2
GPGSV: Detailed satellite information
The GPGSV sentence contains information about the “Satellites in View”. Each
GPGSV sentence can contain information about up to 4 satellites. There can be
several such sentences, each identified by a numeric sentence number. The format of
this NEMA sentence is:
$GPGSV, number_of_satellites, sentence_number,
total_number_of_satellites_in_view, (satellite_PRN_number, elevation,
azimuth, SNR,)1..4 * check_sum
The elevation and azimuth are given in degrees. The Signal to Noise Ratio (SNR)
is given in dB.
In order to set the parameters for this NEMA sentence 3 instructions are sent to
the GPS radio emulator. Each instruction is used to set one of the relevant parameters.
21
The first instruction sets parameter 1. The 2 character string parameter carried by
this instruction configures the number of visible satellites for the GPGSV sentence.
The characters represent the ASCII encoding of this number. The format of this
instruction from the control interface is shown in Figure 4-3.
#
01
Number of Satellites
(2 chars)
Figure 4-3: Format of the instruction for Parameter 1: Number of satellites
The second instruction sets parameter 2. This instruction is used to manually
configure the information about each visible satellite. Here the acronym PRN means
"pseudo-random number” which represents the code that is used to modulate the L1
carrier (at 1575.42 MHz). A PRN code is assigned by the U. S. Air Force to a GPS
transmitter. The format of the instruction for setting this parameter is shown in Figure
4-4. In this instruction, information for up to 4 satellites can be sent by being repeated
and appended to the message. In addition if there are more than 4 visible satellites
then the sentence can be resent with the additional satellite information. There is
currently no option to remove or reconfigure parameters associated with a given
satellite, other than to re-initialize all information by either static or dynamic method.
# 02
Satellite PRN
number
(2 chars)
ID
(2 chars)
Elevation Angle
(2 chars)
Bearing
Angle (3
chars)
SNR
(2 chars)
Figure 4-4: Format of the instruction for Parameter 2: satellite information for each visible
satellite
The next instruction sets parameter 24. This instruction is used to automatically
configure the information for each visible satellite. It deals with the same as described
above for manually configuring satellite information, however in this case the user is
using the option to program with dynamic satellite information. It has one extra field
to indicate the number of satellites used in tracking the receiver’s position.
#
24
Packet No
(3 chars)
Satellite Information for 16 satellites from three rows
containing IDs, Elevation Angle, Bearing Angle, SNR
(246 bytes)
Figure 4-5: Format of the instruction for Parameter 24: Automatic satellite information for each
visible satellite
4.1.1.3
PFEC, GPanc
The “PFEC, GPanc" NEMA sentence contains the almanac date and each
satellite's health condition. The almanac date indicates the time that the health
conditions for satellites has been recorded and is local date/time. The health of each of
up to 32 satellites is indicated as 0=unknown, 1=unhealthy, and 2=healthy. This
health condition vector is sent with the instruction shown in Figure 4-6.
#
03
Health Condition (32 chars)
Figure 4-6: Parameter 3: Health conditions for 32 satellites
4.1.1.4
GPGGA: current Fix data
The GPGGA sentence provides the latest information about the 3D position of
each satellite. There are seven different instructions that are used to pass this
information to the GPS radio emulator. These instructions are shown in Figure 4-7 to
Figure 4-13.
22
#
04
Degrees
(2 chars)
00-90
Minutes
(2 chars)
00-59
Separator
’.’
Fractional
Minutes
0000-9999
Separator
’,’
Direction
(N or S)
Figure 4-7: Parameter 4: Configuring latitude for GPGGA
#
05
Degrees
(3 chars)
000-180
Minutes
(2 chars)
00-59
Separator
’.’
Fractional
Minutes
0000-9999
Separator
’,’
Direction
(N or S)
Figure 4-8: Parameter 5: Configuring longitude for GPGGA
#
06
Status (1 char), 0,1,2
Figure 4-9: Parameter 6: Configuring GPS status for GPGGA
#
07
No of tracking satellites (2 char),
00-31
Figure 4-10: Parameter 7: Configuring number of tracking satellites used for positioning
#
08
DOP (5 chars)
Figure 4-11 : Parameter 8: Configuring Dilution of Precision (DOP) for GPGGA
#
09
Altitude (8 chars), -999.9-17999.9
Figure 4-12: Parameter 9: Configuring antenna altitude for GPGGA
#
10
Altitude (6 chars), -999.9-9999.9
Figure 4-13: Parameter 10: Configuring Geoid altitude for GPGGA
4.1.1.5
GPGSA: GPS DOP and active satellites
For use in conjunction with the GPGSA sentence, there are six instructions to
configure the DOP and operation status of the satellites. These instructions are shown
in Figure 4-14 to Figure 4-18. In these Figures, instances of the character string
“XX.XX” represents the DOP in units of meters.
#
11
Mode (’M’ or ’A’)
Figure 4-14: Parameter 11: Configuring operational mode for GPGSA
#
12
Status (1 char), 1,2,3
Figure 4-15: Parameter 12: Configuring positioning status for GPGSA
#
14
PDOP (5 char), XX.XX
Figure 4-16: Parameter 14: Configuring PDOP for GPGSA
23
#
15
HDOP (5 char), XX.XX
Figure 4-17: Parameter 15: Configuring HDOP for GPGSA
#
16
VDOP (5 char), XX.XX
Figure 4-18: Parameter 16: Configuring VDOP for GPGSA
4.1.1.6
Parameter 17 – selects which protocol suite will be used
The GPS radio emulator supports both Furuno and Ericsson specific GPS output.
This choice is set with the instruction shown in Figure 4-19.
#
17
Mode (1 char), 0 for Furuno, 1 for Ericsson
Figure 4-19: Parameter 17: Protocol selection (Ericsson or Furuno)
4.1.1.7
GPppr: GPS Week, GPS Second and GPSS status
To set the parameters for GPS Week the 3 instructions shown in Figure 4-20 to
Figure 4-22 are used.
#
13
GPS Week (4 char) 0000-3182
Figure 4-20: Parameter 13: Configuring GPSS week
#
18
GPS Second (6 char) 000000-604800
Figure 4-21: Parameter 18: Configuring GPSS Second
#
19
Status (1 char), 0 = GPS locked, 1 = Free running
Figure 4-22: Parameter 19: Configuring GPSS status for GPppr
4.1.1.8
GPsts: state mode and position hold mode
There are three instructions to set the parameters associated with the NEMA GPsts
sentence. These instructions are shown in Figure 4-23 to Figure 4-27.
#
20
State, 0 = Acquisition Mode, 1 = Survey Mode, 2 = Position-Hold Mode, 3=
Acquisition Mode (Position-Hold mode completed)
Figure 4-23: Parameter 20: Configuring state mode for GPsts
#
21
Pmode, 0 = P hold mode not disabled, 1 = P hold mode disabled
Figure 4-24: Parameter 21: Configuring position hold mode for GPsts
#
25
Antenna Port Overload(1 char)
0 for No overload
1 overload detected
Figure 4-25: Parameter 25: configuring Antenna port overload
#
22
Time (12 chars)
YYMMDDhhmmss
Figure 4-26: Parameter 22: Configuring UTC time
#
23
Mode (1 char)
1 for Dynamic Mode
0 for Static Mode
Figure 4-27: Parameter 23: Configuring GPGSV mode
24
4.1.2
NMEA messages
This section describes the NMEA messages that have been implemented and
tested. A description of each message is given in the following subsubsections.
There are 2 types of proprietary sentences that are requires by the RBS, these
sentences are defined in Ericsson and Furuno protocol. These are different protocols
supported by GPSS which are defined in GPSS product specification. The Du will
identify the protocol used by the connected GPSS base on the received protocol
specific sentence. PFEC is an indication of Furuno protocol and PERC is an
indication of Ericsson protocol.
After the configuration messages are sent via the control interface to the
microcontroller, this information is stored in a number of data structures within the
microcontroller in order to later generate the associated NMEA messages. A total of 8
NMEA messages have been implemented, including some for the Ericsson and
Furuno proprietary protocols.
The various NMEA messages have different periodicities and should be generated
with this periodicity. A variable is associated with each type of message in order to
control its periodicity. This variable is incremented every second until it reaches a
value that is equal to a parameter associated with this type of message. Once the
requisite number of seconds has passed, this type of message will be generated and
the variable reset to 0. The upper limit of this parameter associated with each variable
can be set by editing and recompiling the source code.
4.1.2.1
Furuno Protocol
The user can select between the Furuno or Ericsson protocol via the control
interface. If the Furuno protocol is selected, then the GPS radio emulator will generate
the relevant Furuno messages, each of which starts with the string “#PFEC”. All
messages start with the start of sentence maker (“#”). When using the Furumo
protocol the GPS radio emulator will act as a source of synchronization for the DU
without receiving any setting up by the DU and should generate messages with their
corresponding periodicity. There are three specific types of messages that are
associated with the Furuno protocol: the NEMA GPtps, the GPanc, and the GPavp
messages. Each of these is described in further detail below. Messages that are
generated in Ericsson protocol are described in section 4.1.2.2. Messages that are
common to the Furuno and Ericsson protocols are described in section 4.1.2.3.
4.1.2.1.1
GPtps Generator
GPtps (Time and Pulse output) is a NMEA sentence which is sent from the
microcontroller to the RBS. It has the following different parts:
• Sentence type which is “PFEC, GPtps” indicates the Furuno protocol and
GPtps.
• Current date/time indicates the current time, using UTC as the timing
standard.
• Time standard ID indicates the source of timing (as used for the previous
field) which is current date/time. In this field 1= RTC, 2 = GPS time, and 3 =
UTC time. RTC is a built-in real time clock, GPS time is used when the GPSS
is tracking GPS satellites but no UTC parameter has been collected. Finally,
UTC time is used when the GPSS is tracking GPS satellites and a UTC
parameter has been received. For this thesis project this field is always set to 3.
25
•
•
•
•
•
•
•
•
The 1pps availability field is used by the DU to check on the availability of the
1pps signal. If the value of this field is 0 this means no pulse will be sent after
the sentence, if the value is 1 then a pulse will be sent after the sentence. For
this thesis project the field will always be 1, as the emulator will always
generate a 1pps signal, which will be initiated after selecting the start button in
the control interface (and can be stopped by selecting the stop button).
GPSS Mode indicates the mode of the GPSS and the quality of the 1pps
signal. If this field is equal to 1, then the GPSS position has been estimated
and the jitter of the pps is within 110 ns. At least four satellites are required in
order to estimate the position of the GPSS before the 1pps is output. If this
field is equal to 2, then the GPSS position has been fixed and the jitter of the
pps is within 40 ns and the 1pps signal is output if one or two satellites are
visible depending on the GPSS implementation of Timing Receiver
Autonomous Integrity Monitoring (TRAIM). The information for this field
can be set by using the information received from the RBS in GPset messages.
If Z1 is received from the RBS, GPSS Mode will set to 1 and if Z2 is received
from the RBS, GPSS mode will set to 2.
UTC leap second adjustment is used to show the predicted time and date of the
next UTC leap second. A leap second is required to be added to or subtracted*
from UTC time when the earth’s rotation based time of day and atomic time
has a difference of one or more seconds [35].
UTC leap second, as mentioned above, if this field is equal to “+1” means that
1 second will be added to UTC, if it is “-1” means that 1 second will be
subtracted from the UTC, “00” means that no action will be taken which was
the value considered for this project.
UTC-GPS Time offset indicates the accumulated number of leap seconds in
UTC from the beginning of the operation of the GPS system.
UTC parameter date/time stamp indicates the last time the UTC parameters
were updated.
GPS week indicates the number of GPS weeks. This field is connected to the
GPS TOW (Time of Week) in which the seconds within a GPS week are
calculated. When this number of second reaches 604 799 seconds, the
maximum seconds allowed in one week, the GPS week number will increase.
GPS TOW will be used to calculate the seconds in GPS week. The maximum
number of seconds in one week is 604 799. This requires using a 32bit
variable to store this value, but the sprintf function on the microcontroller can
not be used with 32bit variables, hence two 16bit variables were used to solve
the problem.
The GPtps sentence has a periodicity of 1 second with length of 76 bytes. Figure
4-28 shows an example of a GPtps sentence [8, 9].
$ PFEC,GPtps ,94063012300 ,3 ,1 ,1 ,940701000000 ,+1 ,10 ,940626120000
,0755
,390610
Figure 4-28: GPtps message format
*
Although a leap second can be subtracted from UTC time, it has never actually
happened.
26
4.1.2.1.2
GPanc Generator
GPanc (Almanac date and satellites’ health) is a sentence that has the following
fields:
• The sentence type is “PFEC, GPanc”.
• Almanac Date/Time indicates the local date and time which has the following
format: “YYMMDDhhmmss”.
• Health conditions: the health condition of 32 satellites can be defined in this
field by the user via the control interface: 0 indicates that the almanac is not
collected or that the satellite has not been launched, 1 indicates an unhealthy
satellite which cannot be used for positioning and 2 indicates a healthy
satellite which is usable for positioning.
Total length of this message is 59 bytes with periodicity of 49 seconds. Figure
4-29 shows an example of GPtps.
$ PFEC,GPanc ,940630123000 ,22222200222222222222000000222221
Figure 4-29: Gpanc message format
4.1.2.1.3
GPtst Generator
GPtst (self-test) is a sentence which is sent from the microcontroller to the RBS in
order to check whether the GPint message works properly or not. It has a periodicity
of 0 which means that after receiving GPint message by the GPS receiver, GPtst will
generate and send to the RBS only once.A RBS that does not receive a
PeriodicPPSReport sentence, polls the GPSS for status information via the self-test
results message. This message has the following fields (which are shown in Figure
4-30):
• Field one contains the sentence type which is Pxxx,GPtst
• Field two is Testing Status in which 0=Power-up testing complete and
1=Testing in progress
• Field three contains Program and Version number, the first 7 characters
indicate the program and the last 3 characters indicate the version.
• Field four contains the results of test 1, to indicate the result of the internal
test, 0 means there is no error and 1 means the almanac or some other data is
missing.
• Field five contains the result of test 2, which indicates the result of a vendor
specific internal test: 0 means there is no error and a value in the range hex “1”
to ”f” indicates a manufacturer specific fault code. The manufacturer specific
fault codes indicates that GPSS is not able to operate as a synchronization
source.
Some dummy values were used to make the sentences, as this sentence is only
for test and the values in different field was not used for this project.
$
PXXX,GPtst ,0 ,1234567123 ,0 ,0 <CR><LF>
Figure 4-30: GPtst message format
27
4.1.2.2
Ericsson Protocol
Another NMEA message format is the Ericsson protocol. This protocol can be
selected by the user via the control interface. This protocol has a number of different
sentences and in this thesis only those sentences sent from the GPS to DU have been
implemented. If the user selects the Ericsson protocol then messages will start with
the string “#PERC”.
All messages start with a start of sentence marker “$”. A checksum is a mandatory
field for the Ericsson protocol. The checksum is computed based upon the XOR of the
whole sentence after the “$”.
Three sentences are unique to the Ericsson protocol; they are described in the
following paragraphs. Messages that are common to the Furuno and Ericsson
protocols are described in section 4.1.2.3.
4.1.2.2.1
GPppr Generator
GPppr (Periodic pps report) is one of the most important sentences in the Ericsson
protocol and the following fields:
• The sentence type is “ PERC,GPppr”.
• The GPS TOW (Time of Week) field is used when calculating the number of
seconds in a GPS week. The number of seconds in one week is 604 799. As
noted earlier, this requires a 32bit variable to store it, but as mentioned
previously the sprintf function can not be used with 32 bit variables, so two
16bit variables were used to solve the problem. This value is valid if the GPS
status is “GPS LOCKED” or “Free Running. A further explanation of these
two modes will be discussed in conjunction with the GPS status field below.
• The GPS Week field indicates the number of GPS weeks since the start of the
operations of the GPS system. This value is valid if the GPS status is “GPS
LOCKED” or “Free Running”. The number of weeks ranges between 000 000
and 65 535.
• The GPS TOW Standard Deviation field indicates the standard deviation of
GPS TOW from UTC, which has been set to 50ns rms for the project, as it is
the value when using the real GPS receiver for RBS synchronization.
• The field “GPS used satellites” indicates the number of satellites which were
used to calculate the GPS TOW and GPS week. This value is configurable and
can be selected by using the control interface. This field is valid if the GPS
receiver is up and running.
• The field GPS Status shows the status of the GPS receiver. This field is user
configurable. A value of 0 indicates “GPS Locked” indicating that GPS is
working as a source of timing for the GPSS, as there are a sufficient number of
GPS satellites. A value of 1 indicates “Free running”. This value indicates that
GPS reception is lost, hence could not be used as a source of timing. A value
of 2 indicates “BTS Referenced Time”. This value indicates that GPS
information cannot be used as a source of timing as there are not a sufficient
number of GPS satellites being received; however the RBS (internal) reference
clock can be used as a timing source. A value of 3 indicates “pps not
synchronized” meaning that there is neither enough GPS satellites nor can the
RBS (internal) reference clock be used as a timing source. This field is user
configurable.
28
•
The field GPS Faulty is used to indicate whether the GPS receiver is working
properly or not. A value of 0 indicates that the GPS receiver is working
properly and no fault has been detected, while a value of 1 indicates that an
internal failure of the receiver has been detected. The value of this field
considered 0 for this project.
The total length of this message is 42 bytes. This sentence has periodicity of 1
second. Figure 4-31 shows an example of a GPppr sentence.
$ PERC,GPppr ,322768 ,01025 ,00034 ,06 ,0 ,0 *F4
Figure 4-31: GPppr message format
4.1.2.2.2
GPsts Generator
GPsts (GPSS Status) is part of the Ericsson protocol. This sentence includes a
checksum which is calculated using an XOR over the whole sentence following the
“$”. This sentence has the following fields:
• The sentence type is “PERC,GPsts”.
• The field “1pps state machine mode” indicates one of four different modes.
Mode 0 is “acquisition mode” in which the GPSS is searching to find enough
satellites to calculate both timing and position information. In this mode no 1
pps signal is output. Mode 1 is “survey mode” during which the GPSS has
found a sufficient number of satellites and is outputting the1pps, position, and
time information. Mode 2 is “position hold mode” during which the GPSS
improves its timing information (making it more precise). In this mode the
GPSS outputs the 1 pps signal and position information. Mode 3 is
“acquisition mode (position hold mode completed)”. In this mode the GPSS
has lost communication with the satellites and will not output any 1 pps signal.
This field is a configurable field in this thesis project. By default the GPSS
tries to reach the position hold mode state (which is 2). Note that in the context
of this thesis when we refer to the GPSS, we are referring to our GPS receiver
emulator.
• The field “Position hold mode disable” has 2 different modes. Mode 0 means
position hold mode is not disabled, therefore GPSS can switch to this Position
hold mode, while mode 1 means it is disabled and GPSS can not switch to
Position hold mode.
• The field “Antenna port overload status” indicates the status of the antenna,
whether it is overloaded (1) or not overloaded (0). This field is configurable by
the user via the control interface.
• The “GPSS capability” field indicates which protocols (Furuno, Ericsson, AGPS server, A-GPS client*) are supported by the GPSS. The field contains a
vector of values, one per protocol in the other stated in the previous sentence
in this paragraph. A value of 0 means that the capability for the protocol is
supported, a value of 1 means that the capability is not supported, and a value
*
Aided or Assisted GPS which is known as A-GPS too. A-GPs is a system that
improve the performance of the GPS receiver in terms of positioning solution by the
help of information from reference network. It is called A-GPS client when it
imports the parameters from an external source via the DU and A-GPS server when
it exports the parameters via the DU [36].
29
of 2 means that the capability is supported by the GPSS but not supported by
the intermediate nodes. The value of this field considered 1111.
This message does not have a fixed length as the GPSS capability length is
variable and is generated every second. Figure 4-32 shows an example of a GPsts
sentence.
$ PERC,GPsts
1,
0,
0,
1111,
*hh
Figure 4-32: GPsts message format
4.1.2.2.3
GPavp Generator
GPavp (GPSS Averaged Position) this message is used by the GPSS to report the
position value used in Position-Hold mode. It also includes a checksum which is
calculated based on an XOR over the whole sentence after the “$”.
• The sentence type is “PERC, GPavp”.
• The Latitude field is a geographic coordinate that can be used with other
parameters such as longitude and altitude to define the position of point on the
earth, it defines the north-south position of the point, and includes the
following sub fields: degrees (000 to 180), minutes (00 to 59), fractional
minutes (0000 to 9999), direction (E or W)[37]. This field is configurable by
the user.
• The Longitude field is a geographic coordinate that defines the east-west
position of the point on the earth and includes the following sub fields:
degrees (00 to 90), minutes (00 to 59), fractional minutes (0000 to 9999),
direction (N or S)[37]. This field is configurable by the user.
• The Altitude filed is used to define the height of a point above the sea level, it
has a value range (-00999.9 to 017999.9)[38]. This field is configurable by the
user.
• The Unit of altitude field identifies the unit to be used to measure altitude.
This unit is usually meters, therefore in this thesis this field will always be
“M”.
Figure 4-33 shows an example of a GPavp sentence.
$ PERC,GPavp ,3444.0000,N ,13521.0000,E ,000123.0 ,M *hh
Figure 4-33: Gpavp message format
30
4.1.2.3
Both Furuno and Ericsson Protocol
In addition to the messages unique to the Furuno and Ericsson protocols, both
protocols also have a number of messages in common. These are described in the
paragraphs below.
4.1.2.3.1
GPGSV Generator
GPGSV (GNSS Satellites in View) is sent to indicate the number of visible
satellites and their details. This message has a periodicity of 59 seconds.
• The sentence type is “GPGSV”.
• The “Total number of sentences” field indicates the number of sentences
which will be sent in a sentence sequence. This field has a value in the range
from 1 to 3.
• The “Sentence number” field indicates which sentence is the current sentence
in relation to the sentence sequence. This field has a value in the range from 1
to 9.
• The “Total number of satellites in view” field indicates the total number of
satellites. In this thesis project this value is entered by the user via the GUI and
then transferred to the emulator. This field has a value in the range from 0 to
32.
• The “First satellite” field contains the information for a maximum of four
satellites, as information associated with a maximum of four satellites can be
sent in each sentence. This field contains sub fields with information for each
satellite. These sub fields are: (1.) Satellite vehicle number: which indicates
the satellite id (01-31), (2.) Elevation angle: to a point is an angle in clockwise
from the horizontal line with value range 5 to 90, (3.) Bearing angle: to a point
is an angle in clockwise from the vertical line with value range 0 to 359, and
(4.) SNR: which is signal to noise ratio and defines the ratio of signal to noise,
having a value range from 0 to 99[39, 40].
• The “Second satellite” field has same data fields as the first satellite.
• The “Third satellite” field has same data fields as the first satellite.
• The “Fourth satellite” field has same data fields as the first satellite.
As mentioned above, the GPGSV sentence is used to indicate the number of
visible satellites and additional information about each of these satellites. The number
of visible satellites can be defined by the user via the control interface. After
specifying this number, the user should fill in the additional information associated
with each satellite (satellite vehicle number, elevation angle, bearing angle, and SNR).
This information will then be sent to the microcontroller so a dynamic instruction
code is needed in order to handle a varying number of satellites. In addition, the
length of the sentence is also dynamic as the number of satellites whose information is
being transferred varies, hence the total length of the message will vary. Figure 4-34
shows an example of a GPGSV sentence with four satellites.
$
GPGSV
,2
,1
,06
,1
,01,05,254,56
,04,11,223,44
,01,75,088,32
,01,42,234,48
Figure 4-34: GPGSV message format
31
4.1.2.3.2
GPGGA Generator
GPGGA (GPS Fix Data) is a sentence which is sent every 60 seconds in both the
Ericsson and Furuno protocol. This sentence is used for sending positioning
information. It has some optional fields such as DGPS data time and DGPS station
ID; however these fields were not implemented in this thesis project, as this data and
is optional was not necessary for the RBS.
• The sentence type is “GPGGA”.
• The UTC field contains the UTC time including hours, minutes, and seconds.
The value for this field is set through the control interface to the
microcontroller.
• The Latitude field is same as defined for GPavp (see Section 4.1.2.2.3).
• The Longitude field is same as defined for GPavp (see Section 4.1.2.2.3).
• The Status field indicates the positioning status. The value “0” indicates that
positioning has not started yet, the value “1” it means that standalone GPS
positioning is used, and “2” indicates that Differential GPS positioning* is
used [41, 42]. This field is configurable by the user.
• Number of satellites used for positioning, with the value ranging from 0 to 8.
• The DOP (Dilution of precision) field describes the reduction in precision due
to only having a limited number of satellites available and that these satellites
are close to each other in the sky. At least four satellites are needed for
positioning and timing calculation. If these satellites are far from each other,
then a good position fix can be achieved; but when these four satellites are
close to each other, then the position fix might not be so accurate and this is
described by the DOP value. The value of DOP will be used to multiply the
“errors associated with satellite and receiver clocks, the atmosphere, satellite
orbits, and the environmental conditions that lead to multipath errors”. In the
best case is DOP is equal to 1[43, 44, 45]. This field is configurable field.
• The Altitude field is same as defined for GPavp (see Section 4.1.2.2.3).
• The Unit of Altitude field is same as defined for GPavp (see Section
4.1.2.2.3).
• The Geoid of Altitude field has a range from -999.9 to 9999.9. This is a
configurable field that can be set by the user.
• The Unit of geoid altitude field is always meters and is shown as the value
“M”.
The length of the message is 73 bytes. Figure 4-35 shows an example of a
GPGGA sentence.
$
GPGGA
,0036.0
,123456
,M
,3444.0000,N
,13
,13521.0000,E
,1
,04
,02.00
,000123.0
,M
,0001
Figure 4-35: GPGGA message format
*
Differential GPS positioning provides more accuracy by using an extra reference
receiver and remove some errors by finding the correlation between errors but
standalone GPS positioning has only one GPS receiver.
32
4.1.2.3.3
GPGSA Generator
The GPGSA (GNSS DOP and active satellites) sentence is used to transmit
positioning information. This sentence is sent for both Furuno and Ericsson protocol
and has a periodicity equal to 53 seconds with length of 33 bytes. All the fields in this
message are configurable by the user.
• The sentence type is “GPGSA”.
• The Operational mode field indicates one of two operational modes: “M”
which is 2D mode only and “A” indicating a switch between 2D and 3D
modes* which is a configurable field by the user [40].
• The “Positioning status” field has 3 different modes, “1” means that the
delivery of positioning data was interrupted, “2” means 2D positioning, and
“3” means 3D positioning and can be configured by the user via the control
interface.
• The field “Satellite numbers used for positioning” indicates the number of
GPS satellites used for positioning and has a value ranging from 0 to 3.
• The fields PDOP (Positional DOP), HDOP (Horizontal DOP), and VDOP
(Vertical DOP) can be calculated by considering the mask angle between the
GPS receiver and the geometry of the visible satellites which are configurable
fields in this project [46].
Figure 4-36 shows an example of a GPGSA sentence.
$ GPGSA ,A
,3 ,01 ,02.00 ,03.00 ,04.00
Figure 4-36: GPGSA message format
4.1.3
Transferring NMEA messages to the RBS
NMEA messages are emitted following the 1pps signal. This means that after the
1pps event, a single NMEA message is sent. As noted above it is possible to define
specific periodicities for each of the different types of NMEA messages.
4.1.4
Control over sending NMEA messages
Microsoft Visual C# was used to develop the user interface application that runs
on a PC. Programming of the microcontroller was done using C. The C code
implementing two messages generated by the microcontroller can be found in the
appendix A, while part of the code for the user interface is included in appendix B.
*
As mentioned before, we need at least 3 satellites for positioning, if only 3 satellites
used for positioning this is called 2D position fix and if 4 or more satellites used for
positioning it is called 3D position fix.
33
There is a function to start and stop the simulator via the control interface. In order
to start and stop the GPS emulator, two different modes were implemented:
configuration mode and normal mode. During configuration mode the user can
configure various parameters via the control interface, in this mode no data is sent to
RBS and no 1pps signals will be generated. After configuration the user presses the
“start” button on the control interface, then the GPS emulator will enter normal mode.
In this mode 1pps signals and NMEA messages will be generated and sent to the RBS
with their configured periodicities. In normal mode the user is unable to perform any
configuration. If the user wishes to switch to the configuration mode, they must press
a “change mode” switch on the STK development board. Code has been implemented
within the microcontroller to look for switch 4 (SW4) being pushed, this button is the
fourth button on the left side of the board when the Atmel AVR logo is facing up.
After this button is pressed the software disables the 1pps and NMEA message
generation and then returns to configuration mode. Another mode was added to
program. This mode is called “Test Mode”. NMEA messages will be transferred from
the microcontroller to the RBS every 100ms rather than one per second and messages
will be generated based on their periodicity and independent from 1 pps. This mode
was implemented to check the periodicity and correctness of the sentences in shorter
time and can be chosen by pressing the same switch 2 times when the device is in
“Normal mode” and pressing once if the device is in “Configuration mode”.
It is possible to distinguish the mode based on LED1 and LED 2 (second and third
LED on the left side of the board when the Atmel AVR logo is facing up) on the
board as well. Both LEDs off is an indication of “Normal mode”, LED 1 on is an
indication of “Configuration mode” and LED2 on is an indication of “Test mode”.
The instruction format has no signal termination character at the end of the
instruction. This puts responsibility on the control interface to send the messages
using the correct format and with the exact message length. The control interface has
been designed to check user inputted parameters against the allowed parameter
ranges. This has the advantage of performing a data integrity check before
transmission, as is shown in detail in section 4.2.
4.1.5
Receiving information from RBS
Two sentences (GPset and GPint) are sent from the RBS to the microcontroller.
These sentences will affect the corresponding parameters in subsequent NMEA
messages. A description of these messages is given in paragraphs 4.1.5.1 and 4.1.5.2.
4.1.5.1
GPset
PFEC,GPset (s) is a sentence which is sent by the DU to a GPS receiver. This
sentence is responsible for setting the GPS receiver’s parameters, including Antenna
altitude in GPavp and GPSS mode in the GPtps message. This sentence includes the
following parts:
• The sentence type is “PFEC, GPset”
• The field “Receiver Parameter Definition” consists of one or more parameter
definitions
(shown
in
34
Table 4-1).
35
Table 4-1: GPset sentence parameters
Parameter
Z<nn>
Range
Configured Sentence
Position Mode
Estimated Observation Point (“survey”)
Z1
Z2
H<nnnnnn.n>
GGA<nn>
Fixed Observation Point
(“position hold”)
Altitude for 2D positioning in meters
H-00999.9 to
H017999.9
GGA00-GGA60
GPGGA
The decoder looks for the ’$’ sign to initiate the decoding process and a carriage
return ‘\r’ to signal the end of the message. Once the decoding starts, the decoder
compares the next 10 characters with “PFEC,GPset”. If this comparison comes out to
be true, then the decoder checks the rest of parameters and changes the corresponding
variables (GPtps mode and Antenna altitude). Figure 4-37 shows an example of a
GPset sentence.
$ PFEC,GPset
,Z1
,H000321.3
<CR><LF>
Figure 4-37: GPset sentence example
4.1.5.2
GPint
PFEC,GPint is responsible for setting up the periods of each sentence. The same
steps for generating the message in GPset are used for generating this sentence. The
sentences whose generation periods can be configured in this system are shown in
Table 4-2.
The GPSS is required to support this sentence if the default value for the output
interval differs for one or more of the supported GPSS to RBS sentences.
A sentence interval definition of zero indicates that the corresponding sentence
should be output once after the Request Output sentence is received and then the
output of the corresponding sentence is disabled.
Table 4-2: GPint sentence parameters
36
Parameter
Range
tps<nn>
anc<nn>
GGA<nn>
GSA<nn>
GSV<nn>
tps00-tps60
anc00-anc60
GGA00-GGA60
GSA00-GSA60
GSV00-GSV60
Configured
Sentence
GPtps
GPanc
GPGGA
GPGSA
GPGSV
4.2 Control Interface
In the sentences, which are sent from the microcontroller to the base station, there
are some parameters which were configured by the user. These parameters are
configured using a graphical user interface (GUI). Figure 4-38 shows this GUI. Using
this GUI, the user configures the different parameters and when the user pushes the
“Configure” button these parameters are sent to the microcontroller as a series of
instructions. The details of using the GUI to configure the GPS emulator are described
in the next paragraphs.
Figure 4-38: GPS receiver emulator GUI
As was shown in Figure 4-38, the first configurable parameter is for the GPGSV
messages. As shown in the figure, by using parameter 2 the user has two options to
configure the information for visible satellites. One option is to configure the
satellites’ information manually and the other option is to configure the satellites’
information automatically. If the user chooses to configure the information manually,
this opens a new window named “Manual Satellites Information”. This window is
shown in Figure 4-39. Based on the values entered as parameter 1 in the “Number of
visible satellites” box shown in the previous figure, different numbers of satellites will
be shown in the Manual Satellite Information form.
37
Figure 4-39: Manual Satellite Information
The GUI has been designed so that it is not possible to configure the information
manually without entering a valid value in the “Number of visible satellites” field,
thus if the user attempts to manually configure the satellites’ information without a
valid number of satellites, then an error message indicating “Please first fill in the
Number of visible satellites field” will be shown (as shown in Figure 4-40).
Figure 4-40: Error indicating that the user needs to fill in the Number of Visible satellite field
38
Conversely, if the user wants to automatically configure the information for the
visible satellites, the user should press the “Fetching automatically” button. Pressing
this button opens a new window named “Automatic Satellites Information” as it is
shown in Figure 4-41. This window allows the user to select a file containing the
satellites’ information.
Figure 4-41: Automatic Satellites Information
This automatic option was added to give the user the ability to use different
satellite information for testing purposes. We created a text file containing
information about 16 satellites. It is necessary to carefully format of the data in this
text file. The text file should contain 1440 rows, with each row containing the data for
one minute of the day. Each row is terminated by a new line character. Each row
contains 164 characters without any separators. The first two characters indicate the
total number of satellites visible to the GPS receiver (emulator), followed by two
characters indicating the satellites to be used for position tracking. The next 10
characters contain the positioning information for a satellite (the first two characters
contain the satellite’s ID, the next two its elevation angle, the following four contain
the Bearing Angle, and the last two contain the Signal to Noise ratio for this satellite).
This format of 10 characters is then repeated 15 more times to provide the data for all
16 satellites. An example of a row for two satellites is shown below in Table 4-3, the
same sample will be repeated for the rest of satellites and for the rest of text file.
Table 4-3. An example of a line in the text file containing information for two satellites
Number
of visible
satellites
(2 char)
Number
of
satellites
used for
tracking
(2 char)
Satellit
e ID
(2
char)
Elevatio
n angle
(2 char)
Bearin
g angle
(4
char)
SNR
(2
char)
Satellit
e ID
(2
char)
Elevatio
n angle
(2 char)
Bearin
g angle
(4
char)
SNR
(2
char)
09
08
02
11
0131
44
04
23
0099
46
39
The memory connected to the microcontroller is 1 M-bits in size. Unfortunately, it
is not possible to directly store 1440 rows of 144 characters in this memory, as this
would be 1.62 Mbits and this exceeds the (1 M-bits) storage space of the memory.
There are two potential solutions for this problem: (1) to use a larger memory device
or (2) to compress this data. We chose the second option, thus we compress the data
from the GUI before sending it to the microcontroller. Therefore, rather than
transmitting the data as ASCII character, which would occupy one byte (8 bits) for
each character, each character is converted into its decimal value. For example, the
ASCII value of ‘1’ is 49. We subtract the decimal value of the ASCII character for
“0” (48) from this value to get 1. This compression process halves the amount of the
data by converting two ASCII characters (two bytes) into one byte. Each set of two
ASCII characters are converted into a decimal value. The most significant decimal
digit is multiplied by 10 and then added to the least significant decimal. For example,
instead of sending the string “33” in ASCII we encode this value and send the single
ASCII character “!” (as this has a decimal value of 33).
The user must first connect the computer that they are using to run the GUI to the
correct serial port in order to be able to press the “Fetching automatically” button
(The details of doing this are described in conjunction with parameter 21). If the user
tries to press the button without connecting to a serial port, an error indicating “Error,
first connect to the serial port and then try again!” will alert the user to this problem.
Note that unlike the manual configuration process, the automatic configuration of the
satellite information is immediately sent to the microcontroller. This was done to
reduce the complexity of the code written in C# for the control interface. The
information will be sent after selecting the “Yes” button in the “Automatic Satellite
Information Form” instead of sending this information to the main “GPS Emulator
Form” and sending the information onto the microcontroller after selecting the “Start”
button.
If the user selects the manual configuration option, after filling in the satellite
information for each visible satellite using the “Entering manually” window, the
“OK” button should be pressed. This information will be saved and subsequently
encoded & sent to the microcontroller at the conclusion of the configuration process.
After pressing the “OK” button the GUI returns to the “GPS Emulator” form. If the
user selects the automatic configuration option, after choosing the file and selecting
the “Yes” button in the “Fetching automatically” window, it immediately encoded the
data and starts sending the information to the serial port (connect the microprocessor’s
UART), the data is stored in the memory by the microprocessor using its SPI*
interface to the memory device. A progress bar shows the transfer progress (as shown
in Figure 4-42 ). The text above the progress bar shows “Programming the Memory
Mode” which will change to “Programming the Memory is Done” when data transfer
has finished. Note that this information will remain in this memory device until it is
explicitly replaced by other data by the user.
The user next selects whether the GPS receiver emulator should use “Static
Satellites Information” or “Dynamic Satellites Information”. This informs the
microcontroller which information it should use, thus eliminating the need to program
the memory every time with the same data contained in the text file.
*
Serial Programming Interface
40
Figure 4-42: Progress bar indicating the progress of programming
After filling in all of the information for the different messages the user needs to
explicitly select the COM (communications) port number of the serial port of the
computer where they are running the GUI. This serial port must be the serial port that
the user has connected to the GPS receiver emulator’s serial port. The user makes this
selection by using the ComNum option to connect to the correct serial port of the
control computer. After the user presses the “Connect” button the GUI will switch
from “Not Connected” state to the “Normal mode” state. At this point the user needs
to press switch 4 (the fourth button on the left side of the board when the Atmel AVR
logo is right side up) on the STK 500 board; this will switch the microcontroller to
“Configuration mode”. Now the user can send the configuration information to the
microcontroller.
The last step is to start the emulator by pressing the start button of the GUI. After
the user presses the start button, the microcontroller will start sending 1pps signals
and NEMA messages to the RBS.
4.2.1
GUI features
Each text box has a defined input value range which is shown in gray text above
the text box. If user enters values that are not in the allowed input value range, an
error message will pop up. For example in Figure 4-43, the user entered 35 for the
“Number of visible satellites” which is limited to a value in the range from 1 to 31,
thus a message box indicating “Input out of range” will alert the user.
41
Figure 4-43: Error indicating input out of range
If a given text box only accepts numbers (i.e. the parameter is limited to a
numerical value), then if the user enters some other character an error message will
alert the user, as shown in Figure 4-44.
Figure 4-44: Error indicating Enter numbers only
42
Some text boxes are limited to specific values For example, the field for the
operational mode of the GPGSV messages will only accept the values: “m”, “a”, “M”,
or “A”, therefore other input values will generate an alert message to the user.
If the user does not enter any configure information for a given message, then the
associated message will not be sent to the microcontroller.
The GUI internal software adds “#” as a start of instruction marker and a numeric
identifier to the sentences which are sent to the microcontroller. In this way the
microcontroller will know which parameter should be updated.
4.2.2
Serial Port features
If the user is in “Normal Mode” and wants to start the GPS receiver emulator, a
message box will alert the user, “Error: The device is not in configuration mode.
Please turn on the configuration switch on the device.”
After selecting the ComNum and pressing the “Connect” button, the control
interface software will set the baud rate to 9600 baud (which is the baud rate expected
by the microcontroller).
If the user tries to connect to a COM port which is already open, a message box
indicating “Error: Port Already opened.” will pop up as shown in Figure 4-45[47].
Figure 4-45: Error indicating port is already open
4.2.3
Code description
After selecting the “ComNum” and pressing the “Connect” button, the baud rate
will be set and the serial port will be open. The GUI will send a “*” character to the
serial port. As previously discussed, the user will be alerted if the port number is
already in use by some other application or if the port is already open. The serial port
will be closed if the user presses the “Disconnect button”.
43
After the user has entered all of the desired information into the form and pressed
the “Configure” button, then the GUI software will check whether it is in
configuration mode or not. If it is in configuration mode, then it will check the serial
port. If the serial port is open it will start to send instructions to the microcontroller. If
the port is closed, the GUI will show an error “Port not connected. Please connect and
try again”. If the microcontroller is not in the configuration mode (for example, it is in
Normal mode) then the GUI will show another alert, “Error: The device is not in
configuration mode. Please turn on the configuration switch in the device.”
In order for the control interface GUI to successfully communicate with the
microcontroller, we utilize a handshake protocol between the microcontroller and the
control interface application. After pressing the “Connect” button the GUI sends the
character ‘*’ to the selected serial port, if the microcontroller sends a ‘*’ in response
then the connection will go into “Configuration mode” in which the user can start the
configuration process by pressing the “Configure” button. If the microcontroller sends
a ‘:’, then the GUI will go into "Normal Mode".
When the “Start” button is pressed the GUI sends “@” to the microcontroller, this
starts communication with the RBS, after the GUI receives a “@” from the
microcontroller it will change the “Start” button text to “Stop” to enable the GUI user
to control the emulator. If the user presses the “Stop” button, a “/” will be sent to the
microcontroller from the GUI, this will stop messages being sent from the emulator to
the RBS, The idea for the handshake came from [48]. This process is shown in Figure
4-46.
44
Figure 4-46: the first handshake between the microcontroller and control interface
In addition to the above handshake protocol, another handshake is used for
transferring information when programming the memory device. In this case the GUI
will send a “&” to the microcontroller and after receiving a “&” back from the
microcontroller the software goes into “Programming the Memory Mode” and sends
the first three rows of the file. After sending three rows it waits to receive a “%” from
the microcontroller. When it receives this character it will send the next three rows,
and will continue until it has transferred all of rows and received a “!” from the
microcontroller, When programming of the memory is complete a notice will be
displayed by the GUI saying “Programming the Memory is Done!”. This process is
shown in Figure 4-47. Three rows are sent at a time go in order to efficiently use the
memory, as each memory page is 264 bytes and each row is 82 bytes, so by sending
three rows we are place 246 bytes of data in each page of memory. This make the
process of programming the memory easier and faster as we do not have to use offsets
to find the memory page that was programmed before and the programming involves
less addressing.
45
Control Interface
Microcontroller
Pressing the ”Yes”
button in ”Automatic
Satelites
Information” form
”&”
”&”
Entering the
Programming mode
and start sending the
first 3 rows of the
notepad file
”%”
Sendin the
next 3 rows
.
.
.
Generating the 480th
packet which is the
end of notepad file
and send to the
microcontroller
the microcontroller
will send ”%” at the
end of each 3 rows
”%”
”!”
End of the
notepad file
If the
microcontroller
sends ”&” in
response
Sending ”!” after
receiving the 480th
packet to indicate
the end of file
Figure 4-47: Handshake for programming the memory
Another mode was added to program. This mode is called “Test Mode”. When a
“?” is received by the microcontroller, NMEA messages will be transferred from the
microcontroller to the RBS every 100ms rather than one per second, this is 10 times
faster than Normal Mode.
4.3 Pulse per Second Generator
As mentioned previously, one of the goals of this project is to provide
synchronization between RBS. The highly precise 1pps signal indicates when a new
second occurs. However, because 1pps is only a signal and does not have any
additional timing information the current date and time information is provided by the
NMEA messages. The 1pps signal is also fed to the microcontroller to trigger it to
emit NMEA messages [49].
Several different methods could be used to provide the 1pps signal and timing
information to the RBS. However, because the frequency stability of the 1pps is
critically important in this application we decided to use a Altera MAX II CPLD to
generate the 1pps signal. A very precise 10MHz signal is input to the CPLD. This 10
MHz signal is provided by a Stanford Research Systems SR625 rubidium stabilized
frequency counter which is said by the manufacturer to guarantee “excellent shortterm stability and low long-term drift” [50].
46
The CPLD takes this 10MHz input and generates the 1pps output. The accuracy
and jitter of this 1pps signal is dependent on the master clock and this accuracy could
be improved by using a different stable frequency source. The CPLD will generate
pulses only when enabled by the microcontroller.
47
5
Analysis
This chapter will examine the results of our implementation. This is done by first
examining that the correct NMEA messages are output (see section 5.1). Next we
examine the 1pps signal in section 5.2. The whole system is examined in section 5.3.
Finally the emulator was tested with a real RBS (see section 5.4).
5.1 Outputting NMEA message
To test that the microcontroller works properly and that it generates the desired
NMEA messages with the proper timing, a debugging tool for serial communication
was used. In this case SSCOM3.2 [51] was used. Figure 5-1 shows the different
messages that have been sent - as intercepted on the serial line between the emulator
and the RBS. In the figure it can be seen that different messages are sent with
different periodicities. For example GPtps sentences have been tested with the
periodicity of 3 sec and are shown with red square.
Figure 5-1: Using SSCOM3.2 to observe the generated NMEA messages that are being sent to the
RBS
Unfortunately, this only shows that the correct messages are being generated and
that the ratio of the messages is what they should be according to the periodicities of
the different messages. To see that the messages have the proper timing we must use a
monitor that timestamps the start of when each line of output is generated. This
testing using the VEE Pro software, is described in section 5.3.
49
5.2 1 pulse per second test result
The generated 1pps was tested in Ericsson’s Vera lab in Kista by using a time
interval analyzer (Hewlett Packard E12725B). The results of this testing show 341
(peak to peak deviation) 66.11 ps rms* phase noise over a period of 10 minutes, and
89.3 ps rms frequency over a period of 10 minutes. This means that the emulator’s
1pps output has a stability of 0.0893 ppb, thus the emulator’s 1pps is sufficiently
accurate for the purpose of this thesis project. The phase deviation is shown in Figure
5-2 and the frequency deviation is shown in Figure 5-3. X-axis indicates the running
time in both figures while y-axis shows the edge phase deviation in Figure 5-2 and
edge frequency deviation in the corresponding time in Figure 5-3.
Figure 5-2: Phase deviation versus time
*
Root mean square
50
Figure 5-3: Frequency deviation versus time
5.3 Testing the whole prototype
The prototype was tested in Ericsson’s Vera lab for 90 hours using the VEE Pro
software for both Ericsson and Furuno protocols [52]. For these tests the
microcontroller generated NMEA messages, the control interface was used to set
UTC, and dynamic mode was used to configure satellites information from a file. The
CPLD was used to generate the 1 pps signal. The 10 MHz input to the CPLD was
generated by a Stanford Research Systems SR625 rubidium stabilized frequency
counter [50] as mentioned in section 4.3. This frequency source is widely used to
calibrate base stations and other devices. The 10 MHZ signal was channeled into an
RBS Master and converted from a sine wave into a square wave, and input into the
CPLD [53].
Figure 5-4 shows some of the NMEA messages which are generated by the
emulator with their corresponding periodicity for the Furuno protocol. Note that we
can see part of the timestamp in the left most column in this figure. It is observed that
the time increment is roughly 1 second which is due to the PC’s time drift. As
mentioned above, we are using VEE Pro software for the test and this software gets
the timing from the PC, so we have some timing drift due to the internal interrupts in
the PC.
51
Figure 5-4: Generated NMEA messages by the microcontroller for Furuno protocol
In Figure 5-5 the red line shows whether 1pps is available or not, if the red line is
above 0 it means that the 1pps is available and if the red line is showing -2 it means
that 1pps is not available. The blue line shows the number of available satellites
varying from 0 to 12 (which in this figure has the range 8 to 12), and the green lines
shows the tracking satellites used for positioning from 0 to 12 (which in this figure is
7 to 8). In the lower pane the curves in black show the different Carrier to Noise ratios
(C/N) for the different satellites. As mentioned in section 4.1.2.3.1, GPGSV sentences
include the SNR parameter for four satellites in each sentence. As can be seen in the
figure there are different C/N values which indicates the SNR in a 1 Hz bandwidth,
the strength of the signals are decreased when the number increases, for example the
Blue C/N1 is the strongest “received” signal and Gray C/N5 is the weakest. “Higher
C/N0 results in reduced data bit error rate and reduced carrier and code tracking loop
jitter. Reduced carrier and code tracking loop jitter, in turn, results in less noisy range
measurements and thus more precise positioning.” [54, 55, 56]. If the C/N value is
less than 32 it means that timing to the GPS antenna is lost.
52
Figure 5-5: Curves output by VEE Pro
VEE Pro has a window called “Print-Errors”, an example of this window is shown
in Figure 5-6. This window shows errors that occur and some other additional
information such as “First UTC Time Stamp” (shown in Figure 5-6) which is gained
when 1pps is available and the first message includes UTC is being received, the
second line also shows the information that 18 consecutive pps signals have been
received (“gained”).
Figure 5-6: Print Errors window
In VEE Pro there is a window named Polaris and it displays a polar plot. The
polar plot is used to show the position of satellites over 24 hours by using information
from the GPGSV sentences including Bearing angle, Elevation angle and SNR. This
polar plot is for healthy satellites with value ranging from 0 to 32. This plot was used
for testing whether the positioning information, stored in the memory, was working
correctly or not (if using a real GPS receiver it will generate the same graph after 24
hours). An example of such a plot is shown in Figure 5-7.
53
Figure 5-7: Polaris plot of the satellite positions during 24 hours
Figure 5-8 shows some of the NMEA messages which are generated by the emulator
with their corresponding periodicity for the Ericsson protocol. The VEE program that
was used for the test just shows the generated NMEA messages. As you can see in the
figure, all the sentences have checksum which is a mandatory field in the Ericsson
protocol.
Figure 5-8: Generated NMEA messages by the microcontroller for Ericsson protocol
54
5.4 Testing the GPS receiver emulator with a GSM RBS
The serial port of the microcontroller (RS232) was connected via a RS232 to
RS422 converter available in Vera Lab, and finally from the converter to the GPS port
available in the RBS’s DU. Testing with the RBS was successful and the RBS was
able to successfully synchronize itself to the time output by the emulator.
Software named DVT32-R23HO1 (developed by Ericsson) was used to monitor
the synchronization of the RBS. There is a message called “Sync Status”, if it is equal
to 0 it means there is no synchronization, if it is equal to 1 it means that frequency
synchronization is available and while it is equal to 2 it means that both phase and
frequency synchronization are available. After running the test by using the GPS
receiver emulator, it was seen that SYNC_STATUS was equal to 2 as it is shown in
Figure 5-9 and highlighted with the red rectangle.
Figure 5-9: The synchronization status of the RBS
To monitor the synchronization in the regulator there is an option called TF
(Timing Function). If it shows blue it means that the synchronization is enabled and it
is working fine, this is shown as blue in Figure 5-10 and highlighted with the red
rectangle.
55
Figure 5-10: TF is turned to blue which indicates timing function is synchronized
The emulator was subsequently connected to one RBS, the emulator could receive
output commands from the RBS, and the RBS could receive NMEA and 1pps signal
from the emulator. During testing RBS were shown to be synchronized after a time
period of 5 minutes during a cold start up and after a time period of 2 minutes on a hot
restart (i.e., if the oscillator had already warmed up).
56
6
Conclusion
The main goal of the thesis was to develop a prototype GPS receiver emulator to
be used as a replacement for a GPS receiver in the lab environment and for testing.
This emulator emulates the NMEA data that would be generated by a GPS receiver
along with a 1pps signal and inputted to an RBS. The resulting prototype developed
during this thesis has been proved to work and provide RBS synchronization. All of
the initial goals defined for this thesis have been achieved and in addition two
additional features were added. One addition was programming memory with satellite
positioning information from a text file, which could be real data formatted into a text
file and in fact this feature proved very useful for testing. The other additional feature
was implementing two messages (GPset and GPint) to be sent from the RBS to the
GPS emulator. GPset was used to set the Antenna altitude in GPavp and GPSS mode
in the GPtps sentences and GPint was to set the periodicity of different sentences.
6.1 Future work
Some areas of possible future work which have not been completed due to time
shortage are outlined below.
6.1.1
Make a single board and integrate the hardware devices
Different parts of the GPS receiver emulator are implemented with different
hardware devices. A PCB could be designed in order to integrate all the hardware
devices, thus reducing the number of wires and increasing the stability of the
prototype. This means that the microcontroller, CPLD, and memory would be placed
onto a single board. Having a single board would make the emulator easier to use.
Some pricing information for the main components is given in Appendix C.
6.1.2
Design a sine wave convertor
As mentioned in section 5.3, the CPLD needs 10 MHz square wave signal. For
this reason the 10 MHz signal from the rubidium clock was channeled to a RBS
Master to convert the sine wave into square wave. An approach would be to design
such a converter and place it onto the same PCB as the microcontroller, CPLD, and
memory. This would remove yet another separate hardware component.
6.1.3
Integrating a chip scale atomic clock (CSAC)
As mentioned in section 2.5.1, a GPS receiver solution is not safe from failure as
it is possible to encounter interfere to the system by false or missing GPS signals.
Therefore integrating a chip scale atomic clock (CSAC) onto the circuit board, such as
Symmetricom, Inc.’s Quantum SA.45s, would provide a completely self-contained
GPS receiver emulator and will remove this drawback. By generating 1pps with the
atomic clock it could replace the CPLD and by generating a 10 MHz square wave it
could also be a replacement for an external rubidium clock and RBS master. While an
atomic clock would add substantial costs to a prototype, a breakdown of costs is
provided in Appendix C, the total cost of the emulator would decrease from ~52,000
kr to 20,000 kr for an emulator with an atomic clock. Moreover, such a device would
greatly facilitate testing of a RBS and remove all other dependencies apart from the
emulator being connected to a control interface and the RBS.
57
On the other hand, integrating a CSAC solution (with warm up time less than 110
second) instead of the current oven stabilized crystal clock will eliminate the thermal
warm up of the oscillator (which is a few minutes). Using CSAC also eliminates the
need for the serial interface and 1 pps signal to the DU which still provide good 1pps
+/-15 ns rms ([57], [58], [59]).
6.1.4
Integrating the GPS receiver emulator into the RBS
In the long term, it would be interesting to consider integrating the resulting single
board system directly into an RBS. This would enable the RBS to be independent of
an external GPS receiver, while still providing a very highly accurate time based for
synchronization with other RBS besides it is a cost effective solution. A comparison
of the costs of the GPS receivers which are currently being used in Ericsson with the
costs of the developed GPS emulator is provided in Appendix D.
An alternative to integrating the GPS receiver emulator into the RBS would be to
use the backhaul link to synchronize the RBS, this is being explored in another thesis
project.
6.1.5
Generating all of the NMEA messages
Another enhancement to the emulator would be the ability to generate all possible
NMEA messages that could be sent from a GPS receiver to an RBS.
6.2 Required reflections
Currently the emulator can only be used for testing and as a device to provide
synchronization for RBS in a laboratory environment.
The emulator has an economic advantage as it is cheaper than using a real GPS
receiver in a laboratory. It is also less complex as it eliminates the need for a GPS
antenna on the roof of the laboratory to receive the radio signal from the GPS
satellites; this also leads to environmental advantages.
The ethical aspects of the material provided in this thesis have been considered
and Ericsson has given permission to disclose all of the information contained in this
thesis regarding their involvement in this thesis project and also the location of Vera
Lab in Kista.
During the thesis a great deal of knowledge and experience were gained regarding
GPS, synchronization, and today’s mobile networks.
58
References
[1]
[2]
[3]
[4]
[5]
[6]
[7]
[8]
[9]
[10]
[11]
[12]
[13]
Ericsson,
“Company
Facts
Ericsson.”
[Online].
Available:
http://www.ericsson.com/thecompany/company_facts. [Accessed: 10-Sep2012].
Ericsson, “Roles and responsibilities - Documents.” [Online]. Available:
http://internal.ericsson.com/page/hub_net/unit/unit_01/u_15/org/su_01/roles.js
p?unit=BNET. [Accessed: 10-Sep-2012].
F. A. Khan and A. G. Dempster, “Impacts of GPS-Based Synchronization
Degradation on Cellular Networks,” International Global Navigation Satellite
Systems Society (IGNSS) Symposium 2007, The University of New South
Wales, Sydney, Australia, 4–6 December 2007. Available from:
http://www.gmat.unsw.edu.au/snap/publications/khan%26dempster2007b.pdf
[Accessed: 10-Sep-2012].
S. Das, D. Sarddar, D. Ganguly, S. K. Sikdar, S. Chakraborty, and K. Hui,
“Location Manager based Handover Method for LEO Satellite Networks,”
International Journal of Computer Applications, vol. 44, no. 12, pp. 43–49,
2012.
B. J. Lorentzen, “TCP’s Influence on Interactive Multimedia Traffic.”
Master’s thesis, University of Oslo, Institutt for informatikk, February 2008.
Available from: http://urn.nb.no/URN:NBN:no-19105 [Accessed: 02-Jan2013].
A. El-Rabbany, Introduction to GPS: The Global Positioning System, Second
Edition, 2nd ed. Artech House Publishers, 2006. [Accessed: 10-Feb-2013].
R. Bajaj, S. L. Ranaweera, and D. P. Agrawal, “GPS: Location-tracking
technology,” Computer, vol. 35, no. 4, pp. 92–94, 2002. [Accessed: 10-Feb2013].
Ericsson Internal Interwork Description, “IWD L2 L3 GPS Digital Interface”,
2011. [Accessed: 20-Aug-2012].
A. Borg, Ericsson Internal Interwork Description, “BTS Synchronization
Protocol for GPS Receivers,” 2003. [Accessed: 15-Sep-2012].
Ericsson, “NMEA-data simulator”, Ericsson Internal Document, 2010.
[Accessed: 27-Aug-2012].
Spectracom, “What is a GPS Simulator?” [Online]. Available:
http://www.spectracomcorp.com/ProductsServices/TestandMeasurement/GPS
Simulators/WhatisaGPSSimulator/tabid/1501/Default.aspx. [Accessed: 23Nov-2012].
A. Burca, “SkyFreeGPS-a GPS Receiver Simulator.”, Bachelor’s thesis,
University of Geneva, Faculty of Economics and Social Sciences, Information
Systems and Communication Department, 10-Apr-2008, 37 pages. Available
from:
http://cui.unige.ch/~deriazm/masters/burca/downloads/SkyFreeGPSReport.pdf
[Accessed: 05-Nov-2012].
United States Coast Guard, “NAVSTAR GPS USER EQUIPMENT
INTRODUCTION.” Public report, United States Coast Guard Navigation
Center, September 1996. Available from:
http://www.navcen.uscg.gov/pubs/gps/gpsuser/gpsuser.pdf [Accessed: 01Nov-2012].
59
[14]
[15]
[16]
[17]
[18]
[19]
[20]
[21]
[22]
[23]
[24]
[25]
[26]
[27]
[28]
[29]
60
H. G. Berns and R. J. Wilkes, “GPS Time Synchronization System for K2K.”
IEEE Transactions on Nuclear Science, volume 47, Issue 2, Part 1, April 2000,
pages 340 – 343, doi: 10.1109/23.846177 [Accessed: 02-Jan-2013].
“International Marine Electronics Association, NMEA 0183, Standard for
Interfacing Marine Electronic Devices,” Version 3.01, 2002. Available:
http://caxapa.ru/thumbs/214299/NMEA0183_.pdf. [Accessed: 21-Sep-2012].
National Marine Electronics Association, “NMEA 0183 Standard.” [Online].
Available:
http://www.nmea.org/content/nmea_standards/nmea_0183_v_410.asp.
[Accessed: 04-Nov-2012].
National Marine Electronics Association, “NMEA 2000, Edition 2.20”
[Online].
Available:
http://www.nmea.org/content/nmea_standards/nmea_2000_ed2_20.asp.
[Accessed: 04-Nov-2012].
Richard B. Langley, “NMEA 0183: A GPS Receiver Interface Standard,”
GPS World, pp. 54-57, Department of Geodesy and Geomatics Engineering.
University of New Brunswick, Jul-1995. [Accessed: 04-Nov-2012].
“Skylab GPS Simulator.” Skylab Mobilesystems, [Online]. Available:
http://www.skylab-mobilesystems.com/en/products/gps_sim.html. [Accessed:
08-Nov-2012].
“Skylab GPS Simulator - Download.” Skylab Mobilesystems, [Online].
Available: http://skylab-gps-simulator.en.softonic.com/. [Accessed: 08-Nov2012].
“Skylab GPS Simulator User Manual.” Skylab Mobilesystems, [Online].
Available:
http://www.skylabmobilesystems.com/downloads/gpssim/manual.pdf. [Accessed: 08-Nov-2012].
“Virtual GPS - GPS Simulator.” Zyl Soft, [Online]. Available:
http://www.zylsoft.com/vgps.htm. [Accessed: 25-Nov-2012].
“ZylGPSSimulator - Delphi Component.” Zyl Soft, [Online]. Available:
http://www.zylsoft.com/gpssim.htm. [Accessed: 25-Nov-2012].
“GPSSIM.” GPSsim, [Online]. Available: http://www.lichtenheldmch.de/GPSsim_E.htm. [Accessed: 25-Nov-2012].
Spectracom, “GPS Receiver Testing: GNSS / GPS simulators and GPS signal
generators.” [Online]. Available:
http://www.spectracomcorp.com/Solutions/Applications/GPSReceiverTesting/
tabid/1502/Default.aspx. [Accessed: 25-Nov-2012].
“GPS Recorder, Re-player and Simulator.” LabSat, [Online]. Available:
http://www.labsat.co.uk/attachments/054_RLLSR01_Data.pdf. [Accessed: 20Nov-2012].
Spirent Federal System, “STR4500 Multi-Channel GPS/SBAS Simulator.”
[Online]. Available:
http://www.spirentfederal.com/GPS/Products/STR4500/Overview/.
[Accessed: 25-Nov-2012].
Spirent Federal System, “GSS6700 Multi-GNSS Simulation System | Spirent
Federal Systems.” [Online]. Available:
http://www.spirentfederal.com/GPS/Products/GSS6700/Overview/.
[Accessed: 22-Nov-2012].
Rajendra Nath Datta, “Understanding the concepts of synchronization and
holdover.”, EE Times, 10 March 2011 [Online]. Available:
http://www.eetimes.com/design/communications-
[30]
[31]
[32]
[33]
[34]
[35]
[36]
[37]
[38]
[39]
[40]
[41]
[42]
[43]
[44]
design/4213947/Understanding-the-concepts-of-synchronization-andholdover. [Accessed: 31-Dec-2012].
P. Kuykendall and P. V. W. Loomis, “In Sync with GPS: GPS Clocks for the
Wireless Infrastructure.”, Trimble Navigation, 2008, 8 pages, Available from:
http://www.4timing.com/SyncGPS.pdf [Accessed: 30-Dec-2012].
Ericsson, FD synchronization algorithms, Internal document, 2011-12-13
Atmel, “8-bit AVR Microcontroller with 16K/32K/64K Bytes In-System
Programmable Flash.” Available: http://www.atmel.com/images/doc8011.pdf.
[Accessed: 30-Sep-2012].
Atmel, “AVR STK 500 User Guide.” 2003. [Online]. Available:
http://www.atmel.com/Images/doc1925.pdf. [Accessed: 03-Oct-2012].
Atmel, “8-bit AVR Microcontroller with 16K Bytes In-System Programmable
Flash.” Available: http://www.atmel.com/Images/doc2513.pdf. [Accessed:
10-Dec-2012].
R. A. Nelson, D. D. McCarthy, S. Malys, J. Levine, B. Guinot, H. F. Fliegel,
R. L. Beard, and T. R. Bartholomew, “The leap second: its history and
possible future,” Metrologia, vol. 38, no. 6, p. 509, 2003.
J. Lamanc, J. Desalas, and J. Järvinen, “Assisted GPS, A low-infrastructure
approach.”, GPS World, March 2002, pages 46-51. Available from:
http://www.gpsworld.com/wpcontent/uploads/2012/09/gpsworld_Innovation_0302.pdf
[Accessed:
03.Jan.2013].
D. P. Stern, “Latitude and Longitude.”, Web page, NASA, Goddard Space
Flight Center, Greenbelt, Maryland, 17 September 2004. [Online]. Available:
http://www-istp.gsfc.nasa.gov/stargaze/Slatlong.htm. [Accessed: 17-Sep2012].
“Altitude,” Wikipedia, the free encyclopedia. [Accessed: 18-Nov-2012].
mathsteacher.com Pty Ltd., “Angles of Elevation and Depression.” [Online].
Available:
http://www.mathsteacher.com.au/year10/ch15_trigonometry/12_elevation_dep
ression/23elevdep.htm. [Accessed: 17-Sep-2012].
mathsteacher.com Pty Ltd., “Bearings.” [Online]. Available:
http://www.mathsteacher.com.au/year7/ch08_angles/07_bear/bearing.htm.
[Accessed: 17-Sep-2012].
R. Sabatini and G. B. Palmerini, “Differential Global Positioning System
(DGPS) for Flight Testing.”, NATO, Flight Test Technology Task Group of
the Systems Concepts and Integration Panel (SCI) of Research and
Technology Organization,
RTO AGARDograph 160, Flight Test
Instrumentation Series – Volume 21, report number: AC/323(SCI135)TP/189, October, 2008 [Accessed: 17-Sep-2012].
K. Lakakis, P. Savvaidis, I. M. Ifadis, and D. I. Doukas, “Quality of mapmatching procedures based on DGPS and stand-alone GPS positioning in an
urban area,” FIG Working Week 2004, 2004. [Accessed: 18-Sep-2012].
D. DiBiase, J. A. Dutton, J. Sloan and R. Baxter, “Dilution of Precision | The
Nature of Geographic Information.”, Web page, The Pennsylvania State
University, College of Earth and Mineral Sciences' OER Initiative, [Online].
Available:
https://www.e-education.psu.edu/natureofgeoinfo/c5_p21.html.
[Accessed: 18-Sep-2012].
Andy Walker, “Spirent Blogs - What is Dilution of Precision in GNSS
Receivers?”, Spirent Federal System, 2011. [Online]. Available:
61
[45]
[46]
[47]
[48]
[49]
[50]
[51]
[52]
[53]
[54]
[55]
[56]
[57]
[58]
[59]
[60]
62
http://www.spirent.com/Blogs/Positioning/2011/April/2011-0429_Dilution_of_Precision_in_GNSS_Receivers. [Accessed: 18-Sep-2012].
Richard B. Langley, Dilution of Precision. University of New Brunswick,
1999. [Online]. Available:
http://www.nrem.iastate.edu/class/assets/nrem446_546/week3/Dilution_of_Pr
ecision.pdf. [Accessed: 18-Sep-2012].
“GPS explained: Position Determination,” 19-Apr-2009. [Online]. Available:
http://www.kowoma.de/en/gps/positioning.htm. [Accessed: 18-Sep-2012].
“Simple Serial for Microsoft Visual C# Express.” [Online]. Available:
http://csharp.simpleserial.com/. [Accessed: 28-Aug-2012].
“SerialPort Class (System.IO.Ports).” [Online]. Available:
http://msdn.microsoft.com/en-us/library/system.io.ports.serialport.aspx.
[Accessed: 28-Aug-2012].
“Pulse per second,” Wikipedia, the free encyclopedia. 27-Oct-2012.
[Accessed: 18-Dec-2012].
Stanford Research Systems, “Frequency Counters, SR625-Rubidium stabilized
frequency counter.” Thulby Thandar Instruments Ltd. Glebe Road,
Huntingdon, Cambs. [Accessed: 25-Nov-2012].
Nie Xiao Meng, “sscom3.2.rar,” 4Shared. [Online]. Available:
http://www.4shared.com/rar/7WJfiae8/sscom32.html. [Accessed: 27-Nov2012].
Agilent, “VEE Pro Archive.” [Online]. Available:
http://www.home.agilent.com/agilent/editorial.jspx?ckey=1483590&id=14835
90&nid=-34095.734557.00&lc=eng&cc=IN. [Accessed: 30-Nov-2012].
“ITS
Directory
of
Listed
Products.”
[Online].
Available:
http://etlwhidirectory.etlsemko.com/WebClients/ITS/DLP/products.nsf/a8672
a137605af8d8525686a00461ce7/b55a3affb5d316b785256be30061a1c9?Open
Document. [Accessed: 30-Nov-2012].
M. S. Braasch, A. J. Van Direndonck, “GPS Receiver Architectures and
Measurements,” Proceedings of the IEEE, vol. 87, pp. 48–64, Jan. 1999.
[Accessed: 18-Dec-2012].
S. Hetet, “Signal-to-Noise Ratio Effects on the Quality of GPS Observations,”
University of New Brunswick, Department of Geodesy and Geomatics, Aug.
2000. Available from: http://gauss.gge.unb.ca/papers.pdf/hetet.report.pdf
[Accessed: 18-Dec-2012].
GNSS Solutions, “What about Carrier-to-Noise Density and AI for INS/GPS
Integration? | Inside GNSS.” [Online]. Available:
http://www.insidegnss.com/node/1637. [Accessed: 14-Dec-2012].
Symmetricom, “CSAC GPS Disciplined Oscillator.” Symmetricom, 2011.
[Accessed: 31-Dec-2012].
Wenzel Associates, Inc., “OCXO: Oven Controlled Crystal Oscillators.”,
Wenzel Associates, Inc., Austin, Texas, USA; 15 December 2008. [Online].
Available: http://www.wenzel.com/documents/ocxo.html. [Accessed: 31-Dec2012].
IEEE Ultrasonics, Ferroelectrics and Frequency Control Society, “Frequency
Control | Learning Resources.” [Online]. Available: http://www.ieeeuffc.org/frequency_control/teaching.asp?vig=vigwarm. [Accessed: 31-Dec2012].
“Farnell Sverige | Elektroniska komponenter | Elektroniska delar.” [Online].
Available: http://se.farnell.com/. [Accessed: 15-Dec-2012].
Appendix A
Code used for generating one of the messages for Furuno protocol named GPtps,
which is sent from the microcontroller to the RBS.
// Messages generated in the Furuno protocol
//GPtps including UTC, GPtps mode, leap second,almanac data, GPSWeek,
GPSSecond1 and GPSSecond
void GPtps_Gen(uint8_t gen){
// Time and pulse output
(GPtps)
utc_conv();
msgLength += 76;
if (gen == 1)
sprintf(string,
"$PFEC,GPtps,%s,3,1,%d,%s,00,15,%s,%04d,%04d%02d\r\n", utc,
GPtpsmode, leap, almanac, GPSWeek, GPSSecond1, GPSSecond);
else
sprintf(string,
"%s$PFEC,GPtps,%s,3,1,%d,%s,00,15,%s,%04d,%04d%02d\r\n", string, utc,
GPtpsmode, leap, almanac, GPSWeek, GPSSecond1, GPSSecond);
}
Here is the C code for generating GPint and GPset messages which are sent from
the base station to the GPS emulator.
// Function for implementing the GPint and GPset which are sent from
the base station to the GPS emulator
ISR(USART0_RX_vect){
temp4 = temp3;
temp3 = temp2;
temp2 = temp1;
temp1 = temp;
temp = UDR0;
if (temp == '$'){
flag_RX = 1;
flag_decode = 0;
indexRX = 0;
bufferRX[indexRX] = temp;
} else if (temp == '\r') {
flag_RX = 0;
flag_decode = 0;
indexRX = 0;
} else {
if (flag_RX){
if (flag_decode == 0)
{
indexRX++;
bufferRX[indexRX] = temp;
if (indexRX == 10) {
if (strncmp (bufferRX,"$PFEC,GPint",11) == 0)
{
flag_decode = 1;
indexRX = 0;
}
else if (strncmp (bufferRX,"$PFEC,GPset",11) == 0)
{
flag_decode = 2;
}
}
}
else if (flag_decode == 1){
if (temp4 == 't' && temp3 == 'p' && temp2 == 's'){
tpsPeriod = 10 * AsciiToDec(temp1) + AsciiToDec(temp);
flag_tps = 0;
} else if (temp4 == 'a' && temp3 == 'n' && temp2 == 'c'){
GPANCPeriod = 10 * AsciiToDec(temp1) + AsciiToDec(temp);
63
flag_GPANC = 0;
} else if (temp4 == 'G' && temp3 == 'G' && temp2 == 'A'){
GPGGAPeriod = 10 * AsciiToDec(temp1) + AsciiToDec(temp);
flag_GPGGA = 0;
} else if (temp4 == 'G' && temp3 == 'S' && temp2 == 'A'){
GPGSAPeriod = 10 * AsciiToDec(temp1) + AsciiToDec(temp);
flag_GPGSA = 0;
} else if (temp4 == 'G' && temp3 == 'S' && temp2 == 'V'){
GPGSVPeriod = 10 * AsciiToDec(temp1) + AsciiToDec(temp);
flag_GPGSV = 0;
} else if (temp4 == 't' && temp3 == 's' && temp2 == 't'){
GPtstPeriod = 10 * AsciiToDec(temp1) + AsciiToDec(temp);
flag_GPtst = 0;
}
}
else if (flag_decode == 2)
{
if (temp1 == 'Z' && temp== '1'){
GPtpsmode = 1;
}
else if (temp1 == 'Z' && temp == '2'){
GPtpsmode = 2;
}
indexRX++;
bufferRX[indexRX] = temp;
if (indexRX >= 16)
{
if (indexRX == 16)
sprintf(AntAlt,"%c",bufferRX[indexRX]);
else
sprintf(AntAlt,"%s%c",AntAlt, bufferRX[indexRX]);
}
}
}
}
}
64
Appendix B
Sample of code for the control interface.
namespace WindowsFormsApplication1
{
public partial class frmMain : Form
{
string Rxdata;
string txt = "Not Connected";
string txt1;
string txt2;
bool btn;
bool SatFlag;
bool ProgramMode = false;
bool btnSatInfoclicked;
int Count = 0;
public static List<string> lInfoauto = new List<string>();
int iCounter = 0;
public frmMain()
{
InitializeComponent();
}
string sSatInfo = "";
string infoauto = "";
private void btnPlus_Click(object sender, EventArgs e)
{
if (txt == "Configuration Mode")
{
if (serialPort1.IsOpen)
{
try
{
DateTime SaveNow = DateTime.UtcNow;
String time =
SaveNow.ToString("yyMMddHHmmss");
//GPGSV Message
// Number of visible Satellite
string sSat = "";
if (txtSat.Text.Length == 1)
//checking the length of the data entered
and add "0" if the length is 1
sSat = "#01" + "0" + txtSat.Text;
else if (txtSat.Text.Length == 2)
{
sSat = "#01" + txtSat.Text;
}
if (sSat.Length == 5)
serialPort1.Write(sSat);
}
}
}
}
}
}
65
Appendix C
Calculation of hardware costs for one emulator and development environment.
Additionally the hardware costs for a Chip Scale Atomic Clock (CSAC) and its
programming board are shown. Costs for the hardware are based upon quantity one
pricing from Farnell [60].
Note that if the emulator were to be produced in volume, then the cost per
emulator would be much lower due to the volume pricing available for most of the
parts and only one instance of the frequency counter, developer kit, starter kit, and
CSAC programmer would be needed for development and initial testing. A rough
estimate of the cost of a CSAC based GPS emulator would be under 20,000 Swedish
kronor (even in small quantities).
Quantity
1
Price
Model
Stanford Research Systems SR625 rubidium US$ 6950.00
stabilized frequency counter
(US list price from vendor)
(~50000.00 kr)
1
1
1
1
1
1
Altera DK-MAXII-1270N – Development Kit,
MAX II, CPLD
Altera - EPM1270F256C5N - CPLD, MAX II,
1270 ELEMENTS, 256FBGA
(note that one of these is included in the above
development kit)
Atmel - STK500 – Starter Kit, AVR, MCU
Atmel - ATMEGA644PV-10AU - IC, AVR
MCU, 64K FLASH, 4K RAM, SPI
Atmel - AT45DB011D-SH-B - Memory,
DATAFLASH, 1M, 8SOIC-W
Total (excluding the SR625):
Symmetricom SA.45s CSAC
Board for programming the CSAC
67
1510.93 kr
413.56 kr
762.66 kr
77.96 kr
6.18 kr
2357.73 kr
1800.00 Euro
(15805.80 kr)
1050 Euro
(9220.05 kr)
Appendix D
As was shown in Appendix C, the total cost for the GPS receiver emulator
excluding the SR625 is 2357.73 SEK. The number of GPS receivers being used in
Ericsson for synchronization purposes is 32. These receivers were ordered by HWM.
The price of each is 11000 SEK which is almost 4.6 times the price of the GPS
receiver emulator developed during this project.
69
TRITA-ICT-EX-2013:1
www.kth.se