1
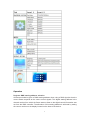
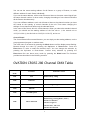
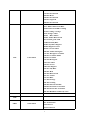
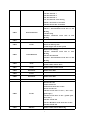
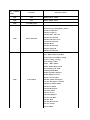
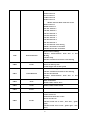
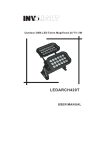
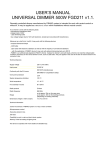
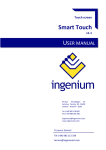
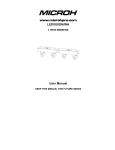
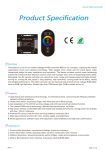
CROSS 280
Caution !
Be careful with your operations. With a dangerous voltage you can suffer a dangerous
electric shock when touching the wires!
Keep this device away from rain and moisture!
Make sure it is grounded when using it!
Unplug mains lead before opening the housing!
For your own safety, please read this user manual carefully before you initial start-up.
Every person involved with the installation, operation and maintenance of this device has
to
- be qualified
- follow the instructions of this manual
Introduction
Thank you for having chosen CROSS 280 . You will see you acquired a powerful and
versatile device. Unpack your item. Before you initial start-up, please make sure that there
is no damage caused by transportation. Should there be any, consult your dealer and do
not use the device.
Safety instructions
This device has left our premises in absolutely perfect condition. In order to maintain this
condition and to ensure a safe operation, it is absolutely necessary for the user to follow
the safety instructions and warning notes written in this user manual. Always disconnect
from the mains, when the device is not in use or before cleaning it. Keep away children
and amateurs from the device! There are no serviceable parts inside the device.
Maintenance and service
operations are only to be carried out by authorized dealers.
Installation
On the rear panel of the item you can find an 3pin XLR-jack (DMX Out) and an 3pin
XLR-plug (DMX In), which can be used for connecting several devices. Choose the device
which is to control the effects. Connect the DMX OUT-jack with the DMX IN-plug of the
next device.
1
DMX-512 connection / connection between fixtures
Occupation of the XLR-connection:
If you are using controllers with this occupation, you can connect the DMX-output of the
controller directly with the DMX-input of the first fixture in the DMX-chain. If you wish to
connect DMX-controllers with other XLR-outputs, you need to use adapter-cables.
Building a serial DMX-chain:
Connect the DMX-output of the first fixture in the DMX-chain with the DMX-input of the
next fixture. Always connect one output with the input of the next fixture until all fixtures
are connected.
DMX-512 connection with DMX terminator
For installations where the DMX cable has to run a long distance or is in an electrically
noisy environment, such as in a discotheque, it is recommended to use a DMX terminator.
This helps in preventing corruption of the digital control signal by electrical noise. The
DMX terminator is simply an XLR plug with a 120 resistor connected between pins 2 and
3,which is then plugged into the output XLR socket of the last fixture in the chain. Please
see illustrations below.
Caution: At the last fixture, the DMX-cable has to be terminated with a terminator. Solder
a 120 resistor between Signal (–) and Signal (+) into a 3-pin XLR-plug and plug it in the
DMX-output of the last fixture.
Connection with the mains
Connect the device to the mains with the enclosed power supply cable.
Control menu map
2
Operation
Projector DMX starting address selection
All fixtures should be given a DMX starting address when using a DMX signal,so that the
correct fixture responds to the correct control signals. This digital starting address is the
channel number from which the fixture starts to listen to the digital control information sent
out from the DMX controller. The allocation of this starting address is achieved by setting
the correct number on the display located on the base of the device.
3
You can set the same starting address for all fixtures or a group of fixtures, or make
different address for each fixture individually.
If you set the same address, all the units will start to listen to the same control signal from
the same channel number. In other words, changing the settings of one channel will affect
all the fixtures simultaneously.
If you set a different address, each unit will start to listen to the channel number you have
set, based on the quantity of control channels of the unit. That means changing the
settings of one channel will affect only the selected fixture.
In the case of this fixture, which is 10/36 channels. When you select the standard channel
mode, you should set the starting address of the first unit to 1, the second unit to
11/37(10+1/36+1), the third unit to 21/47(10+11/10=37), and so on.
Control Board
The Control Board offers several features: you can simply set the starting address, run the
pre-programmed program or make a reset.
The main menu is accessed by pressing the Mode-button until the display starts flashing.
Browse through the menu by pressing the Up-button or Down-button. Press the
Enter-button in order to select the desired menu. You can change the selection by
pressing the Up-button or Down-button. Confirm every selection by pressing the
Enter-button.You can leave every mode by pressing the Mode-button.The functions
provided are described in the following sections.
OVATION CROSS 280 Channel DMX Table
23 Channel
mode
Function
CH1
Pan
CH2
Pan Fine
CH3
Tilt
CH4
Tilt Fine
CH5
Pan/Tilt Speed
CH6
Macro Function
Function Control
0-255: Pan 0°-540°
0-255: Tilt 0°-270°
0-19: No function
20-24: Energy Saving Mode ( 230w )
25-129: No function
130-139 : Light on
140-149: Pan , Tilt reset
150-159: No function
4
160-169: All motor reset
170-199: No function
200-209: Reset
210-229: No function
230-239: Light off
240-255: No function
CH7
Color Wheel
CH8
Color Wheel Fine
0-8: White
9-17: White+Fluorescent Blue
18-26: Fluorescent Blue+Cooling
27-35: Cooling + Orange
36-4: Orange + Blue
45-53: Blue+Amber
54-62: Amber+Dark Green
63-71: Dark green +Red
72-80: Red+Sky Blue
81-89: Sky Blue+Magenta
90-98: Magenta+Green
99-107: Green+Yellow
108-116: Yellow+Deongaree
117-127: Deongaree+Crimson
128-129: Crimson+White
130-134: Crimson
135-138: Deongaree
139+143: Yellow
144-147: Green
148+152: Magenta
153-157: Sky Blue
158-161: Red
162-166: Dark Green
167-171: Amber
172-176: Blue
177-180: Orange
181-185: Cooling
186-189: Fluorescent Blue
190-220: From fast to slow flow
221-250: From slow to fast flow
251-255: Random variation by voice
CH9
CH10
Gobo Wheel
0-87: Fixed Pattern
0-3: No Function
4-9:Pattern 1
10-15: Pattern 2
5
16-21: Pattern 3
22-27: Pattern 4
28-33: Pattern 5
34-39: Pattern 6
40-45: Pattern 7
46-51: Pattern 8
52-57: Pattern 9
58-63: Pattern 10
64-69: Small Beam 1
70-75: Small Beam 2
76-87: Small Beam 3
88-199: Pattern shake from slow to fast
88-95: Pattern 1
96-103: Pattern 2
104-111: Pattern 3
112-119: Pattern 4
120-127: Pattern 5
128-135: Pattern 6
136-143: Pattern 7
144-151: Pattern 8
152-159: Pattern 9
160-167: Pattern 10
168-175: Small Beam 1
176-183: Small Beam 2
184-199: Small Beam 3
200-255: The fixed pattern flowing from
slow to fast
CH11
Gobo Wheel
0-89: Rotation Pattern
0-8: No Function
9-17:Pattern 1
18-26: Pattern 2
27-35: Pattern 3
36-44: Pattern 4
45-53: Pattern 5
54-62: Pattern 6
63-71: Pattern 7
72-80: Pattern 8
81-89: Pattern 9
90-255: Pattern shake from slow to fast
90-97: Pattern 1
98-106: Pattern 2
107-115: Pattern 3
116-124: Pattern 4
125-133: Pattern 5
6
134-142: Pattern 6
143-151: Pattern 7
152-160: Pattern 8
161-169: Pattern 9
171-179: Pattern 9 not moving
180-217: From fast to slow flow
218-255: From slow to fast flow
CH12
Pattern Rotation
0-127: Pattern Change
128-177: Anti-Clockwise from slow to fast
flowing
178-203: Stop
204-255: Clockwise from slow to fast
flowing
CH13
CH14
Prism
0-19: No function
20-75: Six linear prism
76-255: Eight side circular prism
0-127: Prism Change
128-191: Clockwise from fast to slow
flowing
192-193: No function
194-255: Anti-Clockwise from slow to fast
flowing
CH15
Prism Rotation
CH16
Frost
0-64: No function
65-255: 100% Linear Frost
CH17
Zoom
0-255: 0-100% Linear Zoom
CH18
Zoom Fine
CH19
Focus
CH20
Zoom Fine
0-255: Zoom Fine
0-255: Zoom Fine
CH21
CH22
Strobe
CH23
Dimmer
0-31:Strobe Off
32-63: Strobe On
64-95:Strobe from slow to fast
96-127: Strobe On
128-143: From fast to slow ( slow close ,
quick open )
144-159: From slow to fast ( quick open ,
slow close )
160-191: Strobe On
192-223: Random strobe from slow to fast
224-255: Strobe On
0-255: 0-100% linear dimmering
7
16 Channel
mode
Function
CH1
Pan
0-255: Pan 0°-540°
CH2
Tilt
0-255: Tilt 0°-270°
CH3
Pan/Tilt Speed
CH4
CH5
Macro Function
Color Wheel
Function Control
0-19: No function
20-24: Energy Saving Mode ( 230w )
25-129: No function
130-139 : Light on
140-149: Pan , Tilt reset
150-159: No function
160-169: All motor reset
170-199: No function
200-209: Reset
210-229: No function
230-239: Light off
240-255: No function
0-8: White
9-17: White+Fluorescent Blue
18-26: Fluorescent Blue+Cooling
27-35: Cooling + Orange
36-4: Orange + Blue
45-53: Blue+Amber
54-62: Amber+Dark Green
63-71: Dark green +Red
72-80: Red+Sky Blue
81-89: Sky Blue+Magenta
90-98: Magenta+Green
99-107: Green+Yellow
108-116: Yellow+Deongaree
117-127: Deongaree+Crimson
128-129: Crimson+White
130-134: Crimson
135-138: Deongaree
139+143: Yellow
144-147: Green
148+152: Magenta
153-157: Sky Blue
158-161: Red
162-166: Dark Green
167-171: Amber
172-176: Blue
8
177-180: Orange
181-185: Cooling
186-189: Fluorescent Blue
190-220: From fast to slow flow
221-250: From slow to fast flow
251-255: Random variation by voice
CH6
CH7
CH8
Gobo Wheel
0-87: Fixed Pattern
0-3: No Function
4-9:Pattern 1
10-15: Pattern 2
16-21: Pattern 3
22-27: Pattern 4
28-33: Pattern 5
34-39: Pattern 6
40-45: Pattern 7
46-51: Pattern 8
52-57: Pattern 9
58-63: Pattern 10
64-69: Small Beam 1
70-75: Small Beam 2
76-87: Small Beam 3
88-199: Pattern shake from slow to fast
88-95: Pattern 1
96-103: Pattern 2
104-111: Pattern 3
112-119: Pattern 4
120-127: Pattern 5
128-135: Pattern 6
136-143: Pattern 7
144-151: Pattern 8
152-159: Pattern 9
160-167: Pattern 10
168-175: Small Beam 1
176-183: Small Beam 2
184-199: Small Beam 3
200-255: The fixed pattern flowing from slow to
fast
Gobo Wheel
0-89: Rotation Pattern
0-8: No Function
9-17:Pattern 1
18-26: Pattern 2
27-35: Pattern 3
36-44: Pattern 4
9
45-53: Pattern 5
54-62: Pattern 6
63-71: Pattern 7
72-80: Pattern 8
81-89: Pattern 9
90-255: Pattern shake from slow to fast
90-97: Pattern 1
98-106: Pattern 2
107-115: Pattern 3
116-124: Pattern 4
125-133: Pattern 5
134-142: Pattern 6
143-151: Pattern 7
152-160: Pattern 8
161-169: Pattern 9
171-179: Pattern 9 not moving
180-217: From fast to slow flow
218-255: From slow to fast flow
CH9
CH10
Pattern Rotation
Prism
0-127: Pattern Change
128-177: Anti-Clockwise from slow to fast
flowing
178-203: Stop
204-255: Clockwise from slow to fast flowing
0-19: No function
20-75: Six linear prism
76-255: Eight side circular prism
0-127: Prism Change
128-191: Clockwise from fast to slow flowing
192-193: No function
194-255: Anti-Clockwise from slow to fast
flowing
CH11
Prism Rotation
CH12
Frost
0-64: No function
65-255: 100% Linear Frost
CH13
Zoom
0-255: 0-100% Linear Zoom
CH14
Focus
CH15
Strobe
0-31:Strobe Off
32-63: Strobe On
64-95:Strobe from slow to fast
96-127: Strobe On
128-143: From fast to slow ( slow close , quick
open )
144-159: From slow to fast ( quick open , slow
close )
10
160-191: Strobe On
192-223: Random strobe from slow to fast
224-255: Strobe On
CH16
Dimmer
0-255:0-100% linear dimming
Set DMX address
Display the DMX 512 value of each channel.With this function you can display the DMX
512 value of each channel. The display automatically shows the channel with a value
changing.
Synchronization & master /slave mode
Take some items and connect them by DMX cables, disconnect the items from DMX
controller, the items will wok synchronously, one as master, the others as slave.
Auto Program
With this function, you can run the internal program. You can select the desired program
under.You can set the number of steps under .You can edit the individual scenes
under .With this function, you can run the individual scenes either automatically, i.e. with
the adjusted Step-Time.
Specifications
Physical
Length: 385 mm
Width: 365 mm
Height: 589 mm
Weight: 17.5kg without accessories
Dynamic effects
Lamp:SIRIUS HRI 280W
Color Wheel :13+open
Gobo Wheel : Gobo Wheel 1: 14+open
Gobo Wheel 2: 9+open
11
Beam color temperature: CTO, 9300K
Beam color temperature: CTO, 9300K
Electronic dimming: 0-100% linear dimming
Strobe and pulse effects: 1-15 times/second, flicker free
Speed color-wheel: rotation effect and random color
Electronic "shutter" effect: instant open and blackout
Tilt1 : 0-540°
Tilt2 : 0-270°
Control and Programming
Control option modes: DMX, stand alone ,
DMX channels: 16/23CH
Addressing and setting: control panel with LCD display
Control: DMX 512
Optics
Light source: SIRIUS HRI 280W
Minimum LAMP lifetime: 5000 hours
Manufacturer’s figure obtained under manufacturer’s test conditions
Construction
Housing: High-impact, flammable- retardant, excellent
Color: black
IP rate: IP20
Installation
Mounting: Adjustment bracket, surface or truss mount
Orientation: Any
Location: Outdoor/indoor use
Connections
Electrical
DMX data in / through: 3-pin XLR and 5-pin XLR
AC power in/through: 110-240v nominal, 50/60 Hz
Rated power: 280w
Thermal
Cooling System: Forced air (temperature-regulated, low noise)
Temperature: Max ambient 8 degree
Included items
Power cable 1.5m (4.9 )
Mounting bracket
Remark: All information is subject to change without prior notice.
12