1
MausDB
Installation Guide
And
User Manual
Holger Maier1
Version 1.5
March 2010
1
Helmholtz Zentrum München - German Resarch Center for Environmental Health (GmbH)
Institute of Experimental Genetics, Ingolstädter Landstr. 1, D-85764 Neuherberg, Germany
1
Content
1
INTRODUCTION ................................................................................................. 6
1.1
Definition, purpose and intended use.................................................................................................... 6
1.2
Technical information ............................................................................................................................ 6
1.3
MausDB features .................................................................................................................................... 7
1.4
License ..................................................................................................................................................... 8
1.5
Before using MausDB …........................................................................................................................ 8
2
2.1
INSTALLATION .................................................................................................. 9
Before you start ….................................................................................................................................. 9
2.2
Setting up a Linux system as MausDB server ...................................................................................... 9
2.2.1
Standard installation of Ubuntu Linux 8.04 LTS, server edition, from CD ......................................... 9
2.2.2
X server.............................................................................................................................................. 10
2.2.3
ssh installation.................................................................................................................................... 10
2.2.4
Short introduction to apt .................................................................................................................... 10
2.2.5
[maybe required: de-activate the installations CD as a package source]............................................ 11
2.2.6
[may be required: Including the „universe“ package sources] ........................................................... 11
2.2.7
Update the package tree ..................................................................................................................... 11
2.2.8
Update the system .............................................................................................................................. 11
2.2.9
Installation of apache ......................................................................................................................... 11
2.2.10
Installation of mysql...................................................................................................................... 11
2.2.11
Installation of mailx and postfix.................................................................................................... 12
2.2.12
Installation of ntpdate.................................................................................................................... 12
2.2.13
[maybe required: set a password for the Mysql root user] ............................................................ 12
2.2.14
Install some packages neccessary for CPAN ................................................................................ 12
2.2.15
[optional: Create a directory for the mysql binary logs]................................................................ 12
2.2.16
[optional5: Configure MySQL] ..................................................................................................... 13
2.2.17
Configure CPAN........................................................................................................................... 14
2.2.18
Installation of additional packages and Perl modules ................................................................... 14
2.2.19
Installation of packages required for statistics and visualisation................................................... 15
2.2.20
Install xvfb (Virtual Framebuffer ‘fake’ X server)........................................................................ 16
2.2.21
Synchronize the system time to a time server ............................................................................... 16
2.2.22
Switch off log-flushing by the Ubuntu log-rotate service ............................................................. 16
2.3
Installation of MausDB ........................................................................................................................ 17
2.3.1
Download MausDB installation files ................................................................................................. 17
2.3.2
Settings based on a typical Ubuntu installation.................................................................................. 17
2.3.3
Install the MausDB script files........................................................................................................... 18
2.3.4
Configuration of MausDB ................................................................................................................. 18
2.3.5
Create the directories for the backup system ..................................................................................... 18
2.3.6
Installation of the backup script ......................................................................................................... 18
2.3.7
Installation of the checkup script for daily control of database integrity ........................................... 19
3
3.1
SETTING UP A NEW MOUSE FACILITY (FOR ADMIN USERS) .................... 20
Restoring from a backup dump file .................................................................................................... 20
3.2
Starting from scratch............................................................................................................................ 20
3.2.1
Create the MySQL databases ............................................................................................................. 20
2
3.2.2
3.2.3
3.3
Creating database tables and functions using DDL scripts ................................................................ 20
Load initial settings into database ...................................................................................................... 21
Logging in to MausDB as „admin“ ..................................................................................................... 22
3.4
Defining your mouse facility ................................................................................................................ 22
3.4.1
Defining rooms and racks (admin function) ...................................................................................... 22
3.4.2
Defining cages (admin function)........................................................................................................ 23
3.4.3
Defining projects (admin function).................................................................................................... 23
3.4.4
Defining experiments (admin function) ............................................................................................. 23
3.4.5
Defining cost centres (admin function).............................................................................................. 24
3.4.6
Defining users (admin function) ........................................................................................................ 24
3.4.7
Defining genotypes (admin function) ................................................................................................ 25
3.4.8
Configuring email address(es) for admin user(s) ............................................................................... 26
4
WORKING WITH MAUSDB (FOR ALL USERS).............................................. 27
4.1
Some basic concepts.............................................................................................................................. 27
4.1.1
Everything has an ID.......................................................................................................................... 27
4.1.2
How mice get into MausDB: import and weaning............................................................................. 27
4.1.3
Two worlds: „real world“ vs „database world“.................................................................................. 27
4.2
Getting started... ................................................................................................................................... 28
4.2.1
Logging in to MausDB ...................................................................................................................... 28
4.2.2
The „Home“ area ............................................................................................................................... 28
4.2.3
Changing the password ...................................................................................................................... 29
4.3
The Quickfinder tool – find mice and cages ....................................................................................... 30
4.4
Locating mice – browse “racks&cages”............................................................................................. 30
4.4.1
Rack overview ................................................................................................................................... 30
4.4.2
Rack view .......................................................................................................................................... 30
4.4.3
Cage view .......................................................................................................................................... 31
4.4.4
Cage card ........................................................................................................................................... 32
4.5
Collecting and grouping mice – the cart ............................................................................................. 33
4.6
All about a mouse - the “Mouse details” page.................................................................................... 34
4.7
Some more informational views ... ...................................................................................................... 35
4.7.1
Cage history of a mouse..................................................................................................................... 35
4.7.2
Rack history of a cage........................................................................................................................ 36
4.7.3
Ancestor table .................................................................................................................................... 36
4.7.4
Mating details view............................................................................................................................ 37
4.7.5
Litter view.......................................................................................................................................... 38
4.7.6
Import view........................................................................................................................................ 39
4.8
Finding mice by properties – the “search&find” page ...................................................................... 40
4.8.1
Mating overview ................................................................................................................................ 41
4.8.2
Import overview................................................................................................................................. 41
4.9
Managing your phenotyping data – Parametersets ........................................................................... 42
4.10
Scheduling phenotyping assays and common tasks ........................................................................... 42
4.11
Loading phenotype data into MausDB ............................................................................................... 43
4.12
Statistics and visualisation of phenotyping data using the R interface ............................................ 44
4.13
Overviews and reports – the “reports” page ...................................................................................... 46
3
4.13.1
4.13.2
4.13.3
4.13.4
4.13.5
4.13.6
5
Mouse lines overview.................................................................................................................... 46
Mouse strains (genetic backgrounds) overview ............................................................................ 46
[Specific to Helmholtz Zentrum München: TEP report]............................................................... 47
[Specific to Helmholtz Zentrum München: Versuchstiermeldung] .............................................. 47
Snapshot tail count ........................................................................................................................ 48
Cage occupation ............................................................................................................................ 48
DETAILED STEP-BY-STEP INSTRUCTIONS FOR COMMON TASKS .......... 50
5.1
How to set up a mating ......................................................................................................................... 50
5.1.1
Step 1: Defining mating partners ....................................................................................................... 50
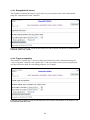
5.1.2
Step 2: Defining mating details.......................................................................................................... 51
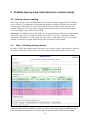
5.1.3
Step 3: Confirmation.......................................................................................................................... 51
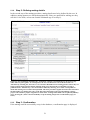
5.2
How to set up an embryo transfer ....................................................................................................... 52
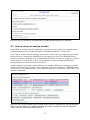
5.3
How to report litter............................................................................................................................... 55
5.4
How to wean litter or report litter loss................................................................................................ 57
5.5
How to import mice .............................................................................................................................. 61
5.6
How to genotype mice........................................................................................................................... 63
5.7
How to change cost centre assignment for mice................................................................................. 65
5.8
How to change experiment status of mice........................................................................................... 66
5.9
How to move a mouse to another cage ................................................................................................ 67
5.10
How to move a cage to another rack ................................................................................................... 69
5.11
How to cull mice.................................................................................................................................... 70
6
MAUSDB ADMINISTRATION........................................................................... 71
6.1
Backup database ................................................................................................................................... 71
6.1.1 Using backup script........................................................................................................................... 71
6.1.2 Manual backups ............................................................................................................................... 71
6.1.3 Restore from backup......................................................................................................................... 71
6.2
Blocking user interaction (“Global lock”) .......................................................................................... 71
6.2.1
Setting a global lock via web user interface....................................................................................... 71
6.2.2
Setting a global lock manually........................................................................................................... 72
6.3
Administrational overviews and settings ............................................................................................ 72
6.4
Administration on database level ........................................................................................................ 72
4
5
1 Introduction
1.1 Definition, purpose and intended use
What is MausDB?
MausDB is a laboratory mouse information and management system (LMIMS). MausDB has
been custom developed for the needs and requirements of the German Mouse Clinic (GMC) 2 .
It has been published 3 and made freely available for the scientific community.
Its purpose is to facilitate all aspects of handling laboratory mice
by storing all relevant data of a mouse facility including animal data in one central
database.
by providing this data to all users simultaneously on a multi-user access platform.
by ensuring that information is up-to-date and all users have access to the same
information (in contrast to working with distributed spreadsheet files).
by providing useful overviews and search functions
Its intended use is to comprehensively manage mouse houses ranging from one rack only up
to large mouse facilites hosting tens of thousands of mice.
1.2 Technical information
MausDB is a web-based CGI application built on Linux, Apache, MySQL and Perl (LAMP).
As MausDB works with database transactions, it makes use of the InnoDB storage engine
provided by MySQL. MausDB should also work with any other transactional storage engine
or transactional database management system (e.g. PostgreSQL) in principle. Though this has
not been tested at all, it might be neccessary to adapt SQL statements in order to fully comply
with SQL standards or RDBMS-specific “SQL dialects”.
In order to avoid dependency from a single database management system, the whole business
logic has been implemented on application level rather than on database level, i.e. stored
procedures.
2
Helmholtz Zentrum München - German Resarch Center for Environmental Health (GmbH),
Institute of Experimental Genetics, Ingolstädter Landstr. 1, D-85764 Neuherberg, Germany
3
Maier, H., Lengger, C., Simic, B., Fuchs, H., Gailus-Durner, V., Hrabé de Angelis, M.
MausDB: an open source application for phenotype data and mouse colony management in large-scale
mouse phenotyping projects. BMC Bioinformatics 2008, 9:169
6
1.3 MausDB features
MausDB covers most aspects of handling laboratory mice for scientific purposes, including:
importing mice from external sources
mouse breeding
o mating
o embryo transfer
weaning
moving mice (cage and/or rack transfers)
cage card printing
locating mice, full rack and cage overview
collecting and grouping mice in so-called “carts” or cohorts (for statistical purposes)
genotyping mice (multiple genotypes possible)
culling mice
manage experiment licenses
manage cost center assignment (multiple cost centers possible)
breeding statistics (per line): sex ratio, litter per mother, average litter size, …
mouse phenotyping
o definition of structured phenotyping workflows
o definition of phenotyping parameters
o definition of phenotyping parameter sets (parameters from one assay)
o schedule phenotyping tasks for single mice or groups of mice on a weekly
basis
o query and manage status of phenotyping tasks
o upload phenotyping results to database from spreadsheet files
o extract and export phenotyping results from database to spreadsheet format
o statistical analysis and visualisation of phenotype data using pre-defined
R 4 scripts via the MausDB web interface
4
export mouse breeding data to spreadsheet files
uploading and attaching custom files to single mice or groups of mice, e.g. image files
or spreadsheet files
http://www.r-project.org
7
1.4 License
MausDB has been made available under the terms of the GNU General Public License (GPL).
See http://www.gnu.org/licenses/gpl.html for more details.
MausDB - a laboratory mouse information and management system
Copyright (C), 2008 Helmholtz Zentrum München, German Research Center for
Environmental Health
This program is free software; you can redistribute it and/or modify it under the terms of the
GNU General Public License as published by the Free Software Foundation; either version 2
of the License, or (at your option) any later version.
This program is distributed in the hope that it will be useful, but WITHOUT ANY
WARRANTY; without even the implied warranty of MERCHANTABILITY or FITNESS
FOR A PARTICULAR PURPOSE. See the GNU General Public License for more details.
You should have received a copy of the GNU General Public License along with this
program; if not, write to the Free Software Foundation, Inc., 51 Franklin St, Fifth Floor,
Boston, MA 02110, USA.
1.5 Before using MausDB …
Carefully read the GNU General Public Licence (see above) under which MausDB has been
made available before using MausDB. Please pay particular attention to what the license says
about warranty, liability and risk of use.
8
2 Installation
2.1 Before you start …
This installation guide is based on the use of Ubuntu Linux, version 8.04 LTS, server edition.
It is possible to install MausDB on other systems as well (succesfully tested with Mac OS X).
Package installation procedures, pathes and settings may vary and must be adapted when
installing MausDB on other systems.
Time required
Following this installation guide, a fully functional MausDB server can be installed on any
machine from scratch within 60 - 90 minutes. This includes a complete installation of Ubuntu
Linux, installation and setup of MausDB and restoring an initial database.
Conventions
In the following instructions, two conventions apply:
\\
indicates that a command needs to be continued on the same line
<>
indicates a variable, for example a user-defined password
2.2 Setting up a Linux system as MausDB server
2.2.1
Standard installation of Ubuntu Linux 8.04 LTS, server edition, from CD
The server version of Ubuntu is recommended. Installation CD ISO-images can be
downloaded from http://www.ubuntu.com. Other Ubuntu versions will most probably work as
well but may require slight modifications as package names may be different.
It is recommended to set up a user „admin“. This user must belong to the group admin, which
is neccessary to obtain root privileges using sudo. When using the sudo command, you will
be asked for a password. Please provide the password of admin here.
When asked for the local time, you may enter “automatic” and enter a time server address.
When using a multiple hard disk system, we recommend the following setup:
disk/device mountpoint description
/dev/sda1
/
operating system
/dev/sdb1
/var
mysql database separated from operating system
After finishing the Ubuntu standard installation, networking must work, unless the
following steps cannot be accomplished.
This installation guide assumes that the following steps are done as user admin.
9
2.2.2
X server
The MausDB R interface requires X to be installed. Either choose X to be installed on your
system at the very beginning [e.g. by installing a desktop version] or install the package
“kubuntu-desktop” (which is quite an excess but will make sure X is running and set up
properly). If you choose a desktop ubuntu version that comes with the default Gnome
Desktop, this will do fine and you can skip the next step.
[optional: install kubuntu-desktop]
# sudo apt-get install kubuntu-desktop
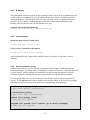
2.2.3
ssh installation
install the open-ssh server and client
# sudo apt-get install ssh
[if neccessary, restart the ssh daemon]
# sudo /etc/init.d/ssh restart
After finishing this step, login to the computer must be possible via ssh from a remote
machine.
2.2.4
Short introduction to apt
Ubuntu Linux makes use of the package management system apt to install and manage
software packages. A package index is maintained on the local machine. Using this index, the
system „knows“ which packages are installed. Prerequisites and dependencies between
packages are known and apt resolves these dependencies or tells you about problems.
Local package index files are synchronised via the internet with so called repositories or
sources. In /etc/apt/sources, it can be defined, which sources have to be used. By including
formerly commented sources, the system can be expanded by other packages.
Search in the package repository
# apt-cache search <searchterm>
Get details about a package
# apt-cache show <packagename>
Update the package index
# sudo apt-get update
Upgrade the system (will install up-to-date packages)
# sudo apt-get upgrade
10
2.2.5
[maybe required: de-activate the installations CD as a package source]
In order to get the latest updates from the remote Ubuntu/debian repositories,
/etc/apt/sources.list must be changed.
# sudo nano /etc/apt/sources.list
comment out the line starting with: deb cdrom: ...
2.2.6
[may be required: Including the „universe“ package sources]
Some packages are only available using the „universe“ package sources.
# sudo nano /etc/apt/sources.list
un-comment (activate) the line starting with: deb ... universe and deb-src ...
universe
2.2.7
Update the package tree
The package index file (package tree) must be updated in order to set up a system, which is as
safe as possible.
# sudo apt-get update
2.2.8
Update the system
All packages that can be updated, will be updated by typing:
# sudo apt-get upgrade
2.2.9
Installation of apache
Install the apache web server by typing:
# sudo apt-get install apache2
2.2.10 Installation of mysql
Install the mysql server by typing:
# sudo apt-get install mysql-server
You may be asked to give a password for the mysql root user during installation. Please be
aware that the mysql root account is different from the system root account.
11
2.2.11 Installation of mailx and postfix
Install the mail system by typing:
# sudo apt-get install mailx
Choose “Internet Site” in the following postfix configuration
dialog.
2.2.12 Installation of ntpdate
Install the ntpdate client to synchronize system time to time servers:
# sudo apt-get install ntpdate
2.2.13 [maybe required: set a password for the Mysql root user]
There is a mysql admin user named root, which is comparable to the user sa in other DBMSs.
Attention: mysql root is different from the linux root user!
Set the password for mysql root (may be skipped if root password has been set at mysql
installation):
# sudo mysqladmin -u root password <new-password>
<new-password> is to be replaced by the new password.
2.2.14 Install some packages neccessary for CPAN
In order to be able to install Perl modules via CPAN, some additional packages must be
installed by typing:
#
#
#
#
#
sudo
sudo
sudo
sudo
sudo
apt-get
apt-get
apt-get
apt-get
apt-get
install
install
install
install
install
ncftp
lynx
unzip
make
gcc
2.2.15 [optional: Create a directory for the mysql binary logs]
Ideally, the binary logs directory should be on a separate hard disk and for this reason
independent from the one which hosts the database. You also can leave everything on
default and skip this step.
If mountpoint / is separated from mountpoint /var:
create a directory for the binary logs, e.g. “/mysql_binlogs”
12
set correct rights for this directory
# sudo chown mysql:adm /mysql_binlogs
2.2.16 [optional: Configure MySQL]
Configuration of mysql is done in the file /etc/mysql/my.cnf
Before making changes to the configuration, stop mysql:
# sudo /etc/init.d/mysql stop
Attention: adapt the entry server-id. Every server needs its own ID!
Change to /etc/mysql
# cd /etc/mysql
Make a backup copy of the config file
# sudo cp my.cnf my.cnf.old
Edit /etc/mysql/my.cnf
# sudo nano /etc/mysql/my.cnf
Add or change the following lines:
[client]
default-character-set=utf8
(add 5 )
[mysqld]
character-set-server=utf8
default-collation=utf8_unicode_ci
init-connect=’SET NAMES utf8’
(add5)
(add5)
(add5)
server-id = 1
log-bin = /mysql_binlogs/mysql-bin.log
binlog-do-db = mausdb
binlog-ignore-db = mausdb_demo
(possibly
(possibly
(possibly
(possibly
change)
change)
change)
change)
Choose binary logging for every MausDB database (but not the blob databases).
After making changes to the configuration, you need to restart mysql:
# sudo /etc/init.d/mysql start
5
if you don’t have to deal with special characters (Umlaut, accents, …) you may skip this
13
2.2.17 Configure CPAN
Using CPAN, Perl modules can be easily downloaded and installed from the CPAN
repository or its mirrors. Prerequisites and dependencies are resolved automatically.
Short introduction to CPAN
Start CPAN
# sudo cpan
or
# sudo perl –MCPAN –e shell
Initial configuration
When starting CPAN for the first time, you need to answer some questions, which are selfexplanatory. If cpan is slow, try using passive ftp:
# sudo env FTP_PASSIVE=1 cpan –i Net::FTP
Attention:
When asked for “Policy on building prerequisites (follow, ask or ignore) [ask]”, answer
“follow”
Installing Perl modules using CPAN
cpan> install Date::Calc
2.2.18 Installation of additional packages and Perl modules
If installation via CPAN fails, pre-compiled modules can be installed from the Ubuntu
package repository:
[Example: # sudo apt-get install libdate-calc-perl]
The following packages are neccessary in order to run MausDB
via apt
perl-GD (pre-compiled Perl-GD-Modul)
# sudo apt-get install libgd-gd2-perl
libgd-devel
# sudo apt-get install libgd2-xpm-dev
14
smbfs
# sudo apt-get install smbfs
DBI with DBD::mysql
# sudo apt-get install libdbd-mysql-perl
CGI.pm
# sudo apt-get install libcgi-perl
[#sudo apt-get install libcgi-pm-perl if above fails]
CGI::Session
# sudo apt-get install libcgi-session-perl
Date::Calc
# sudo apt-get install libdate-calc-perl
Digest::MD5
# sudo apt-get install libmd5-perl
Mail::Sendmail
# sudo apt-get install libmail-sendmail-perl
DBD::Excel
# sudo apt-get install libdbd-excel-perl
via CPAN
GD::Barcode
# sudo env FTP_PASSIVE=1 cpan
cpan> install GD::Barcode
Spreadsheet::WriteExcel::Simple
# sudo env FTP_PASSIVE=1 cpan
cpan> install Spreadsheet::WriteExcel::Simple
Spreadsheet::ParseExcel
# sudo env FTP_PASSIVE=1 cpan
cpan> install Spreadsheet::ParseExcel::Simple
Array::Transpose
# sudo env FTP_PASSIVE=1 cpan
cpan> install Array::Transpose
[remark: this may require installation of modules Test::Pod and
Test::Pod::Coverage]
2.2.19 Installation of packages required for statistics and visualisation
15
Install R
# sudo apt-get install r-base
Install additional CRAN modules via apt
#
#
#
#
#
#
#
#
sudo
sudo
sudo
sudo
sudo
sudo
sudo
sudo
apt-get
apt-get
apt-get
apt-get
apt-get
apt-get
apt-get
apt-get
install
install
install
install
install
install
install
install
r-cran-tseries
r-cran-lattice
r-cran-dbi
r-cran-rmysql
r-cran-gdata
r-cran-gmodels
r-cran-gplots
r-cran-gregmisc
2.2.20 Install xvfb (Virtual Framebuffer ‘fake’ X server)
# sudo apt-get install xvfb
[may be required: add path to xvfb to xvfb-run]
# sudo nano /usr/bin/xvfb-run
Look for line PATH=…, add /bin to the path. It should read:
PATH=$PATH:/usr/bin/X11:/usr/X11R6/bin:/bin
2.2.21 Synchronize the system time to a time server
[remark: the following step can be skipped if synchronization to a time server has been
choosen during installation of Ubuntu].
Set up a cron job to run ntpdate
# sudo crontab –e
Enter the following line:
0 2 * * * /usr/sbin/ntpdate <time_server>
2.2.22 Switch off log-flushing by the Ubuntu log-rotate service
By default, mysql binary logs are flushed once a day. This is done by the log-rotate service.
Binary log files that are generated this way are not copied to a safe place by the backup script.
Comment out everything in /etc/logrotate.d/mysql-server to stop this service.
16
2.3 Installation of MausDB
2.3.1
Download MausDB installation files
Download MausDB_vx.x.tar.gz from http://jupiter.helmholtz-muenchen.de
Extract downloaded file into /home/admin/mausdb:
# tar –xvzf MausDB_vx.x.tar.gz
Please make sure that that the resulting directory structure looks like this (the following
instructions are based on this structure). It may be necessary to rename the directory:
# mv mausdb_v1.5 mausdb
/home/admin/mausdb/SQL
/home/admin/mausdb/SQL/check_consistency
/home/admin/mausdb/SQL/delete
/home/admin/mausdb/SQL/insert
/home/admin/mausdb/SQL/setup_database
/home/admin/mausdb/SQL/select
/home/admin/mausdb/SQL/update
/home/admin/mausdb/code
/home/admin/mausdb/code/var
/home/admin/mausdb/code/var/maus_connect
/home/admin/mausdb/code/var/www
/home/admin/mausdb/code/var/www/mausdb
/home/admin/mausdb/code/var/www/mausdb/css
/home/admin/mausdb/code/var/www/mausdb/images
/home/admin/mausdb/code/var/www/mausdb/maustmp
/home/admin/mausdb/code/var/www/mausdb/static_content
/home/admin/mausdb/code/var/www/mausdb/static_pages
/home/admin/mausdb/code/var/www/mausdb/R
/home/admin/mausdb/code/var/www/mausdb/R/output
/home/admin/mausdb/code/usr
/home/admin/mausdb/code/usr/lib
/home/admin/mausdb/code/usr/lib/cgi-bin
/home/admin/mausdb/code/usr/lib/cgi-bin/mausdb
/home/admin/mausdb/code/usr/lib/cgi-bin/mausdb/files
/home/admin/mausdb/code/usr/lib/cgi-bin/mausdb/logs
/home/admin/mausdb/code/usr/lib/cgi-bin/mausdb/sessions
/home/admin/mausdb/code/usr/lib/cgi-bin/mausdb/uploads
/home/admin/mausdb/info
/home/admin/mausdb/services
2.3.2
Settings based on a typical Ubuntu installation
Assumption made for the following steps:
apache htdocs folder is located at:
apache cgi folder is located at:
connection parameters:
apache system user:
/var/www/
/usr/lib/cgi-bin
/var/maus_connect
‘www-data’ (group ‘www-data’)
17
2.3.3
Install the MausDB script files
Copy the directories and files from the above directories to their target directories (/var,
/var/www, /usr/lib/cgi-bin) and set ownerships to www-data:www-data
# cd /var
# sudo cp –R /home/admin/mausdb/code/var/* .
# cd /var/www
# sudo cp –R /home/admin/mausdb/code/var/www/* .
# sudo chown –R www-data:www-data mausdb*
# cd /usr/lib/cgi-bin
# sudo cp –R /home/admin/mausdb/code/usr/lib/cgi-bin/* .
# sudo chown –R www-data:www-data mausdb*
2.3.4
Configuration of MausDB
adapt connection parameters in /var/maus_connect/DB_connect.pm
# sudo nano /var/maus_connect/DB_connect.pm
enter suitable settings (username & password)
adapt MausDB config files
# sudo nano /usr/lib/cgi-bin/mausdb/config.rc
enter suitable settings
2.3.5
Create the directories for the backup system
Some directories must be created for the backup system:
#
#
#
#
#
#
cd /home/admin
mkdir /home/admin/backup
mkdir /home/admin/backup/daten
mkdir /home/admin/backup/daten/<yourfacility>
mkdir /home/admin/backup/logs
mkdir /home/admin/backup/logs/<yourfacility>
2.3.6
Installation of the backup script
copy backup script and set appropriate ownerships
#
#
#
#
cd /home/admin/backup
cp /home/admin/mausdb/services/backup.pl .
cd ..
sudo chown –R admin:admin backup
18
adapt settings in backup.pl according to your system and paths
# sudo nano backup/backup.pl
Although this should be rather self-explanatory, some help and explanation:
All settings are stored in a 2-dimensional global hash named %backup_data.
The first, numeric key describes the database to be backed up, the second,
text key describes the specific setting for this database.
Sections:
$backup_data{0}{...}
$backup_data{1}{...}
$backup_data{2}{...}
....
global settings for all databases
settings for first database
settings for second database
Below this settings block, there are some if (...) entries. In order to
include a database into the backup script, you need to generate a settings
block and suitable if (...) entry.
setup cron job to run backup.pl automatically
# sudo crontab –e
Enter the following lines (\\ means: into same line)
0 23 * * * /usr/bin/perl /home/admin/backup/backup.pl \\ do_backup=yes >>
/home/admin/backup/backup.log
0 8-18 * * 1-5 /usr/bin/perl /home/admin/backup/backup.pl \\
flush_bin_logs=yes >> /home/admin/backup/backup.log
will run a full dump at 23:00 every night
will flush binary logs every hour at 8:00-18:00 at monday-friday
2.3.7
Installation of the checkup script for daily control of database integrity
copy checkup script and set appropriate ownerships
#
#
#
#
cd /home/admin/backup
cp /home/admin/mausdb/services/checkup.pl .
cd ..
sudo chown –R admin:admin backup
adapt settings in backup.pl according to your system and paths (see above):
# sudo nano backup/checkup.pl
In order to setup cron job to run checkup.pl automatically proceed as
described above for backup script.
At this point, all software needed to run MausDB should be installed and configured on
your system. The following steps describe how to set up a MausDB installation.
19
3 Setting up a new mouse facility (for admin users)
3.1 Restoring from a backup dump file
In case you had MausDB already running and need to restore the database from a dump file
on a different server:
# mysql –u <username> –p<password> mausdb < dumpfile.sql
If all your data is contained in dumpfile.sql – that’s it.
3.2 Starting from scratch
In case you install MausDB for the first time, the following steps describe how to do that.
3.2.1
Create the MySQL databases
login to mysql as mysql-root (remember: this is not the same root as system root)
# mysql –u root –p<password>
Attention: no whitespace between –p and the password!
create database mausdb and blob-database
mysql> create database mausdb;
mysql> create database mausdb_blobs;
create database user for MausDB (\\ means: into same line)
mysql> grant all on mausdb.* to '<user>'@'localhost'
identified by '<password>';
mysql> grant all on mausdb_blobs.* to '<user>'@'localhost'
identified by '<password>';
\\
\\
update privileges table
mysql> flush privileges;
quit the mysql command mode
mysql> quit
3.2.2
Creating database tables and functions using DDL scripts
Create tables by running create table DDL script (\\ means: into same
line):
Create main MausDB tables
# mysql –u <user> –p<password> mausdb <
\\
/home/admin/mausdb/SQL/setup_database/create_tables_mausdb.sql
20
Create MausDB blob database table
# mysql –u <user> –p<password> mausdb_blobs <
\\
/home/admin/mausdb/SQL/setup_database/create_tables_mausdb_blobs.sql
Some user-defined functions
# mysql –u <user> –p<password> mausdb
<
\\
/home/admin/mausdb/SQL/setup_database/mr2string.sql
# mysql –u <user> –p<password> mausdb
<
\\
/home/admin/mausdb/SQL/setup_database/get_number_of_cagemates.sql
# mysql –u <user> –p<password> mausdb
<
\\
/home/admin/mausdb/SQL/setup_database/get_simple_value_for_mouse_p_ps.sql
# mysql –u <user> –p<password> mausdb
<
\\
/home/admin/mausdb/SQL/setup_database/mice-genotypes.sql
Now all tables are defined - but empty. Some initial values need to be in the database in order
to start. This is described in the following steps.
3.2.3
Load initial settings into database
Some initial and essential settings are set in the following steps by loading pre-filled tables
into the database. (\\ means: into same line)
Master data for days
# mysql –u <user> –p<password> mausdb <
/home/admin/mausdb/SQL/setup_database/days.sql
\\
Master data for settings
# mysql –u <user> –p<password> mausdb <
\\
/home/admin/mausdb/SQL/setup_database/settings.sql
Master data for death_reasons
# mysql –u <user> –p<password> mausdb <
\\
/home/admin/mausdb/SQL/setup_database/death_reasons.sql
initial admin user account (username: admin, password: mausdb)
# mysql –u <user> –p<password> mausdb <
\\
/home/admin/mausdb/SQL/setup_database/initial_admin_account.sql
initial mylocks
# mysql –u <user> –p<password> mausdb <
\\
/home/admin/mausdb/SQL/setup_database/mylocks.sql
[optional: examples for phenotype and routine task workflow management and worklist
scheduling]
# mysql –u <user> –p<password> mausdb <
\\
/home/admin/mausdb/SQL/setup_database/parametersets.sql
21
3.3 Logging in to MausDB as „admin“
Assuming you installed MausDB on a computer named „mausdbwww“ following the
instructions given in this manual, you should be able to log in to the inital system.
Just use Mozilla Firefox to access the following URL:
http://mausdbwww.yourdomain/cgi-bin/mausdb/mausdb.cgi
Enter „admin“ as username and „mausdb“ as password (these have been defined in the
previous step, see above). Don’t forget to change the password as soon as possible.
3.4 Defining your mouse facility
In this step, all settings that are specific to your mouse facility need to be defined.
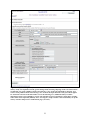
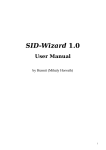
3.4.1
Defining rooms and racks (admin function)
As MausDB manages all rooms, racks and cages of your mouse facility, the racks must be
defined beforehand. As admin, choose settings → new rack.
Figure 1: Defining a new rack by entering rack specific information. Please take care that the total
number of cages corresponds to the total rack capacity.
22
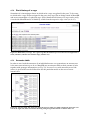
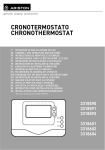
3.4.2
Defining cages (admin function)
As MausDB manages all rooms, racks and cages of your mouse facility, the cages (the cage
pool) must be defined beforehand. MausDB does not manage individual physical cages but a
pool of cages that are tagged with a cage id. Therefore, it is required that the number of cages
defined (i.e. the size of the cage pool) corresponds to the total capacity of all racks defined.
As admin, choose settings → new cages.
Figure 2: Defining new cages. Please take care that the total number of cages corresponds to the total rack
capacity.
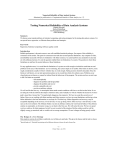
3.4.3
Defining projects (admin function)
MausDB uses projects in two ways. Every user is assigned to one ore more projects. Every
rack and every mating is assigned to exactly one project. In this context, project affiliation
determines the view on racks and matings a user gets after logging in. Per default, a filter is
set so that only those racks are shown that belong to user’s projects. At any time, every user
can decide to view all other racks too. The same is true for matings.
Phenotype results are strictly managed by projects. They are only presented to the user if they
belong to a user’s project or if they are public.
As admin, choose settings → new project.
Figure 3: Define a project – name, short name, description and parent project may be given.
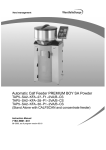
3.4.4
Defining experiments (admin function)
In this context an experiment is a description of examinations that shall be performed on
laboratory animals which require a concession from any kind of regulatory authority. It is
23
recommended to enter the reference number as experiment name. As there are no comment
fields the experiment name should be self-documenting.
In order to track experiment assignment of individual mice, experiment need to be defined.
As admin, choose settings → new experiment.
Figure 4: Define a new experiment – only the experiment name is needed.
3.4.5
Defining cost centres (admin function)
You may want to calculate the sum of days mice were housed in your facility in order to
charge the costs of animal husbandry to someone.
In order to track cost centre assignment of individual mice, cost centres need to be defined.
As admin, choose settings → new cost centre.
Figure 5: Define a new cost centre – name, number and description need to be given.
3.4.6
Defining users (admin function)
Working as a multi-user system with role-specific functionality and account-specific default
views and privileges, MausDB requires the definition of user accounts.
As admin, choose settings → new user.
24
Figure 6: Define a new user account – lots of information can be entered.
3.4.7
Defining genotypes (admin function)
In order to assign genotypes to mice, the distinct genotype flags (e.g. „+/+“,„+/-“,...) need to
be defined.
As admin, choose settings → new genotype.
25
Figure 7: Define a genoype – something like „+/+“, „+/-„, „wildtype“, ... can be entered.
3.4.8
Configuring email address(es) for admin user(s)
In some cases, MausDB automatically sends email notifications to defined recipients, e.g.
upon the generation of new mouse lines via the web user interface.
To this end, email addresses for notification recipients need to be defined in the database.
Start the mysql console
# mysql –u <user> –p<password> mausdb
Define email addresses(es)
mysql> update settings
set setting_value_text = ’<email address>’
where setting_item = ’admin_mail’;
26
4 Working with MausDB (for all users)
4.1 Some basic concepts
There are some basic concepts that you need to understand before working with MausDB. At
least, it makes working with MausDB much easier...
4.1.1
Everything has an ID
Everything needs to have an ID in databases. This is also true for MausDB, since MausDB is
a database application.
Every mouse has an 8 digit numeric mouse ID in MausDB. It is the main and unique identifier
of a mouse in the system. Every mouse-specific data and information is attached to the mouse
ID. In other words: there is no concept of “anonymous” mice in MausDB.
The same is true for all other entities in MausDB, where entity means a data representation of
physical (rooms, racks, cages, ...) or abstract (matings, projects, ...) objects.
4.1.2
How mice get into MausDB: import and weaning
A mouse can enter MausDB in either of three ways:
4.1.3
by import from an external source. All mouse-specific properties have to be
defined at import time.
by weaning litter, where litter is defined as the set of siblings originating from a
mating that has been defined in MausDB. Most properties are inherited
by embryo transfer (which is a special case of mating/weaning)
Two worlds: „real world“ vs „database world“
As every other comparable database application, MausDB uses a structured database model of
the real world (i.e. the physical mice, cages, racks, rooms and other relevant things like users,
projects, genotypes, ...) to store, link and display data.
Of course, a precondition for proper function of MausDB is congruence of information in
both worlds. For example, a mouse is physically moved from cage 1234 to cage 2345. After
that “real world” action, this cage transfer has also to be performed in the “database world”,
i.e. MausDB, in order to reconstitute a proper database.
One basic principle is not to disallow actions in MausDB that can be done in the real/physical
world, but rather only display a warning. Also managing grants to allow/disallow actions (kill,
move, ...) on a user/project base makes no sense if there are no such mechanisms in the real
world. This works well in the German Mouse Clinic.
27
4.2 Getting started...
4.2.1
Logging in to MausDB
In order to work with MausDB, you need to login in to the application. Point your Mozilla
Firexfox browser to the appropriate URL given by your administrator (e.g.
„http://mausdbwww.yourdomain/cgi-bin/mausdb/mausdb.cgi“). Enter username and password
for your account to get access to MausDB.
Figure 8: MausDB authentication screen – login to specific user account is required.
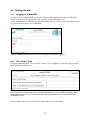
4.2.2
The „Home“ area
Following authentication, a user-specific „Home“ view is displayed. User and project specific
information is displayed here.
Figure 9: User-specific „Home“ area. Area 1 shows login information and the log out button as well as the
cart symbol and cart information. Area 2 is the main navigation bar. Area 3 contains a help link and the
mouse quickfinder form. Area 4 can contain a list of user-assigned litters. Area 5 can contain a list of
scheduled user tasks.
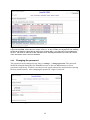
The next figure shows an example where litters and tasks are scheduled:
28
Figure 10: User-specific „Home“ area with examples. Six litters assigned to the user’s project have been
reported to MausDB. Litters that are ready to wean (i.e. 21 days or older) are displayed in red. Clicking
the link in the leftmost column directly leads to the weaning dialog. Two tasks have been scheduled for
the user. The tasks are ordered by their scheduled week. Clicking the link directly leads to the task list
where the task list can be viewed or modified.
4.2.3
Changing the password
The password can be changed at any time via settings → change password. The password
should be changed during the first MausDB session or after an administrator set a new
password, respectively. In either case, the previous password must be entered before entering
the new password twice. After changing the password, a login is enforced.
Figure 11: The „Change password“ - screen.
29
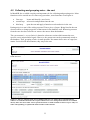
4.3 The Quickfinder tool – find mice and cages
Using the quickfinder input window (upper right corner of the MausDB user interface), you
can access details about a specific mouse or a cage very fast. Just enter the 8 digit mouse ID
or a cage ID into the form and press the “View mouse/cage” button. Alternatively, you may
place the cursor into the form and read a mouse ID or cage ID barcode with a barcode reader
from a printed cage card.
In either case, entering a valid mouse ID from an existing mouse will result in being
forwarded to the “mouse details” or the cage view (see 4.6) of this particular mouse/cage.
4.4 Locating mice – browse “racks&cages”
Locating mice by browsing racks and cages is a straight forward approach since it does not
require prior knowledge about mice such as line, sex, or genotype.
4.4.1
Rack overview
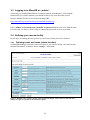
Choose racks&cages from the main menu.
Figure 12: The rack overview lists all user assigned racks per default. The leftmost column contains
clickable rack links, ordered by room. The second column shows the rack capacity (number of cage slots).
4.4.2
Rack view
Following a link from the rack overview an individual rack with all current cages can be
displayed.
30
Figure 13: Rack details view. In this view, all cages of a chosen rack can be viewed showing one cage per
row (condensed view, e.g. cage 0005). A click on the cage id in the first column leads to a detailed cage
view. Clicking the „cage“ link will start a cage transfer dialog (see 5.10), whereas clicking „print card“
will open a cage card preview in a new window (see 4.4.4).
Cages can be expanded using the ‚+’ switch on the left hand side of the cage id in the first column
(expanded view, e.g. cage 0012). Basic information of individual mice is displayed along with a clickable
mouse ID, which leads to a mouse details view (see 4.6). Clicking the „mouse“ link will start a mouse
transfer dialog (see 5.9). Mice can be selected across cages and be put in the cart (see 4.5) by checking the
box in the second column and pressing the „Add selected mice to cart“ button.
Some actions can be applied on selected mice using the buttons in the bottom row, e.g. „kill“ (see 5.11),
„mate“ (see 5.1), „genotype“ (see 5.6).
4.4.3
Cage view
Following a link from the rack view or any other mouse table, an individual cage with all
mice can be displayed.
31
Figure 14: Cage view. Basic details of all mice in a cage are displayed along with their clickable mouse ID,
which will lead to a mouse details view (see 4.6). Clicking the „move mouse“ link will start a mouse
transfer dialog (see 5.9). Again, mice can be selected for actions available on the bottom button bar or for
being put in the cart (see 5.5). Just on top of the mice table, there are links for printing a cage card (see
4.4.4), for starting a cage transfer dialog (see 5.10), or for viewing the history of the cage ID (see 4.7.2).
The color of the cage card color bar can be adjusted as well.
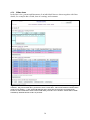
4.4.4
Cage card
Cage cards can be printed by clicking on the respective links in the rack view (see 4.4.2) and
cage view (see 4.4.3).
Figure 15: Cage card. Left part: in the top row, room (1001) and rack (01) are denoted on the left, the
cage ID (0297) is printed on the right, whereas the color bar is centred. Mouse specific rows contain
mouse ID, eartag, sex and date of birth in the first line. Strain (background) and line information are
printed on the second line. Genotype information is given in the third line and comments on the fourth
line. Right part: in the top row, the cage ID is barcoded. Mouse specific rows contain a barcode of the
mouse ID together with sex, mouse ID and eartag. The origin of the mouse (M: mating/weaning; I:
import) with the correspondent mating or import ID is given. IDs of father and mother are printed below.
32
4.5 Collecting and grouping mice – the cart
In MausDB, the so-called cart plays an important role for collecting and grouping mice. Most
functions can be carried out via a three-step procedure, some functions even require it:
first step:
locate and identify a set of mice
second step: select mice and put them into the cart
third step:
open the cart and apply a function on selected mice in the cart
Putting mice in a cart is like writing a mouse ID on a piece of paper. Being listed in the cart
does not affect or change properties of that mouse in the database at all. Removing a mouse
from the cart also does not affect or remove the mouse from the database.
The cart content (i.e. a set of mice) is bound to a browser session which means the userspecific cart is emptied after logout. However, the current cart can be permanently stored to
the database. Thus, grouping of mice is made possible. No matter where mice are caged, no
matter if mice died in the meantime, they stay in the cart.
Figure 16: The cart symbol indicates that there are two mice in the cart. Clicking on the cart symbol leads
to the cart view.
Figure 17: The cart. All mice in the cart are displayed one per row. Mouse ID, room/rack and cage
numbers are clickable and lead to the respective detail views. Cart management functions are available
directly below the mouse table. Mouse specific functions are made available on the lower part .They are
either self-explaining or explained in detail elsewhere in this manual.
33
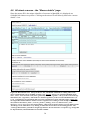
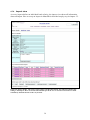
4.6 All about a mouse - the “Mouse details” page
Since the mouse ID is the unique identifier of a mouse in MausDB, it is displayed as a
clickable link almost everywhere. Clicking on the mouse ID will directly lead to the “mouse
details” view.
Figure 18: Mouse details view. On top of the box, the „edit details“ link leads to a dialog where some
mouse specific details can be modified (see Figure 19). Top box: the top row contains individual mouse
data. „GVO“ is the German acronym for„genetically modified organism“. On top of the room/rack/cage
information, the „cage history“ link leads to a detailed cage history of the current individual mouse (see
4.7.1). Assignment to an experiment and cost centre assignment are given with time ranges. Below box:
the origin information indicates whether a mouse origins from a weaning or from an import. For weaned
mice, links to littermates („litter“, see 4.7.5), parents („mating“, see 4.7.4) and ancestors („show
ancestors“, see 4.7.3) are given. For imported mice, a link to the respective import (see 0) is displayed. The
„Breeding record“ table shows every mating, in which the current mouse is/was mating partner. The
„Genotype information“ panel shows all genotype data for the current mouse. Properties (e.g. foreign IDs
for imported mice) and attached files are listed if available.
34
By following the “edit details” link in the previous figure the following page is displayed:
Figure 19: Edit mouse details. Some individual mouse properties (eartag, sex, color and comment) can be
changed here. Other properties like for example date of birth not only affect an individual mouse, but a
whole litter and therefore must be changed by a trained administrator on the SQL level.
4.7 Some more informational views ...
4.7.1
Cage history of a mouse
Sometimes it is not only important to know where a mouse is currently located, but also in
which rack and cage a mouse was housed in the past together with which cage mates. This
kind of detailed cage history can be viewed with MausDB easily:
Figure 20: Cage history of a mouse. The complete cage transfer history of a mouse is recorded and can be
viewed for sanitary purposes, for example. The time range (from-to) of cage allocation is given in a a row
for every cage a mouse has been placed in the past up to present time. Cagemates of the current mouse
are given for the respective cage and time in the fourth column. For every cage, the rightmost column lists
the rack allocation during the respective time range.
35
4.7.2
Rack history of a cage
Sometimes it is interesting to know in which racks a cage was placed in the past. To be exact:
to which racks a cage ID was assigned in the past, since cage IDs are being reused in MausDB
and are not an attribute of a physical cage. Such a detailed rack history of a cage can be easily
viewed with MausDB and is available by a link from the respective cage view (see 4.4.3).
Figure 21: Rack history of a cage. For a given cage ID, the table lists previous and current assignments to
racks (column 1) with the relevant time range (columns 2-3).
4.7.3
Ancestor table
In order to trace back the ancestors of an individual mouse over generations, an ancestor tree
is the most convenient way to do so. MausDB uses an ancestor table to show parents of mice
together with genotype information (see Fig. 22). In case of very wide ancestor trees a link
(more) is given which can be followed to use the particular mouse as the root of a new
ancestor tree.
Figure 22: Ancestor table. The mouse for which the ancestor table was called is displayed on the left. Next
to it on the right side, father and mother ID along with genotype information are shown and so on.
36
4.7.4
Mating details view
In the mating details view, mating partners and litters of a defined mating are shown in an
overview. How to set up a mating in MausDB is described step by step in chapter 5.1.
Figure 23: Mating details. The top table contains the mating partners, i.e. the parents. The second table
shows all litters produced in the course of the mating so far. Clicking on the litter link in the leftmost
column leads to the litter view (see 4.7.5). Additional litters can be reported by clicking on the „report new
litter“ button. The bottom table shows mating details, for example mating start, mating end, line offspring
line, comment.
37
4.7.5
Litter view
In the litter view, parents and littermates of an individual litter are shown together with litter
details, for example date of birth, date of weaning, and comment.
Figure 24: Litter view. The top box shows litter details, for example date of birth, date of weaning, and
comment. The parents table shows parent mice of the current litter. The bottom table lists all littermates
of the current mating. ‘+’ after mouse ID indicates that a mouse has been partner in a mating itself.
Parents as well as littermates can be selected and either put in the cart or used for actions that are made
available by function buttons on the very bottom.
38
4.7.6
Import view
As every import defines an individual batch of mice, the import view shows all information
about an import. How to set up an import in MausDB is described step by step in chapter 5.5.
Figure 25: Import details. The top box shows import specific information. The table lists all mice that
belong to this import. Mice can be selected and either put in the cart or used for actions that are made
available by function buttons on the very bottom.
39
4.8 Finding mice by properties – the “search&find” page
In order to find mice not by their location (i.e. rack and cage browsing), but based on other
properties, the search&find functions of MausDB can be used.
Figure 26: Search&Find page. Top section: Clicking „browse matings“ leads to a mating overview (see
4.8.1), clicking „browse imports“ leads to an import overview (see 4.8.2). Middle section: Mice can be
searched for by different criteria. The result set will always be a list of mice. Optionally, searches in this
section can be restricted to mice currently in the cart, which allows concatenation of different searches.
The input fields „... by mouse ID(s)“ and „... by cage ID(s)“ accept any input, for example a whole
spreadsheet colum copied via the clipboard. IDs contained in this input will be recognized automatically.
Bottom section: Other entities than mice can be searched in this section, for example matings, imports,
carts, and others. Searches in this section cannot be restricted to the cart. Input fields for name or
comment searches accept multiple terms that are combined by logical AND.
40
4.8.1
Mating overview
All matings ever set up in MausDB can be listed in the mating overview.
Figure 27: Mating overview. All matings are shown by default and multiple result pages can be browsed
using the „first“ (= most recent), „previous“, „next“, and „last“ links. Matings can be filtered to show
„only active matings“, which means matings for which no end date is defined. Clickable mating IDs lead
to the detailed mating view of the individual mating.
4.8.2
Import overview
All imports ever defined in MausDB can be listed in the import overview.
Figure 28: Import overview. All imports are shown. Multiple result pages can be browsed using the
„first“, „previous“, „next“, and „last“ links. Clickable import IDs lead to the detailed import view of the
individual import.
41
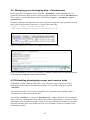
4.9 Managing your phenotyping data – Parametersets
Phenotyping data is organized in pre-definable “Parameters” within MausDB. Sets of
parameters that result from an assay can be grouped/organized in so-called “Parametersets”.
These can be viewed and defined via the user interface (reports → parameters, reports →
parametersets).
Example parameters and parametersets can be generated using the script “parametersets.sql”
that is part of the download repository (\\ means: into same line):
# mysql –u <user> –p<password> mausdb
<
\\
/home/admin/mausdb/SQL/setup_database/parameters.sql
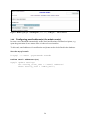
Figure 29: Parametersets overview. Two example parametersets are shown.
Figure 30: Parameterset overview. Two parameters are defined, columns for Excel upload interface are
set up and can be configured via the web user interface.
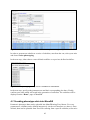
4.10 Scheduling phenotyping assays and common tasks
In MausDB, routine common tasks (mate, wean, ship mice, sperm freeze) as well as
phenotyping assays can be scheduled by scientists or a core team using the so-called
“orderlists”.
An orderlist basically is a list of mice scheduled for a particular task (formally called a
“parameterset”) with a particular due date.
A so-called “workflow” is a series of “parametersets” (tasks) ordered in a given temporal
order. This way, standard multi-step routines like primary phenotyping or cryo-preservation
workflows can be assigned to groups of mice in one step resulting in a number of orderlists.
Worklists currently have to be defined on SQL level. Example scripts are available in the
download repository.
42
Figure 31: Orderlist view. A list of 9 mice is scheduled for sperm freezing for a specific date.
In order to generate an orderlist or a series of orderlists, start from the cart, select your mice
and choose order phenotyping.
In the next step, either choose a user-defined workflow or a previous defined workflow.
Figure 32: Order phenotyping, 1. step. Choose a workflow for selected mice
In the next step, specify tasks/parametersets and their corresponding due dates. Finally,
confirm your order which will result in the generation of orderlists. The orderlists will be
displayed on the “Home” page of MausDB.
4.11 Loading phenotype data into MausDB
Parametric phenotype data can be uploaded into MausDB using Excel sheets. For every
parameterset, columns can be defined interactively via the web interface (see above). Once
defined, data can be uploaded from Excel files starting from a specific orderlist (select mice
43
from orderlist, then press button “upload data for mice from this list”). In the next step, the
file has to be located on your file system and the the sheet can be chosen.
Upon upload, mouse ids from the orderlist and from the specified column in the Excel file are
matched. An example Excel file (home/admin/mausdb/info/example.xls) is available in the
download repository. In order to be able to use this example, mice with corresponding mouse
ids must exist in the database and be part of an “example set” orderlist. You may also adjust
mouse ids and dates (of measurement) in the Excel file (columns A and B).
Figure 33: Uploading phenotype data. Data is matched via mouse id columns in orderlist and Excel file.
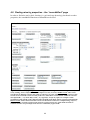
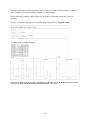
4.12 Statistics and visualisation of phenotyping data using the R
interface
Phenotyping data stored in MausDB can be visualised and statiscally analysed using the
custom R interface of MausDB. Three steps are necessary and are shown on an example
(\\ means: into same line):
a) a specific SQL script needs to be located in /var/www/mausdb/R
# sudo cp /home/admin/mausdb/code/var/www/mausdb/R/example.sql
/var/www/mausdb/R
\\
b) a specific R script also needs to be located in /var/www/mausdb/R
# sudo cp /home/admin/mausdb/code/var/www/mausdb/R/example.r
/var/www/mausdb/R
\\
c) the two scripts need to be “known” by MausDB (\\ means: into same line):
# mysql –u <user> –p<password> mausdb
<
/home/admin/mausdb/SQL/insert/add_settings_R_scripts.sql
44
\\
The entry made here must be the prefix name of the two scripts. In this example, “example.r”
and “example.sql” require adding “example” to table settings.
Please study the example.r and example.sql for further explanations how the system is
working.
In order to run the script, go to the orderlist and press the button “apply R script”.
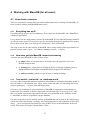
Figure 34: Example of phenotype data visualisation using R scripts via the MausDB web interface. Please
note: data has been generated randomly and must not make sense at all.
45
4.13 Overviews and reports – the “reports” page
4.13.1 Mouse lines overview
In order to get an overview about all mouse lines in MausDB, choose reports → line
overview.
Figure 35: Mouse lines overview. All mouse lines are listed alphabetically. Multiple result pages can be
browsed using the navigation links on top of the table. Clickable line names lead to line specific detail
views. Clickable numbers show current live stock of male, female or total mice per line.
4.13.2 Mouse strains (genetic backgrounds) overview
In order to get an overview about all mouse strains (genetic backgrounds) in MausDB, choose
reports → strain overview.
Figure 36: Mouse strains overview. Multiple result pages can be browsed using the navigation links on top
of the table. Clickable strain names lead to strain specific detail views.
46
6
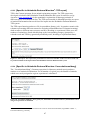
4.13.3 [Specific to Helmholtz Zentrum München : TEP report]
TEP is the German acronym for an animal registration program. The TEP system was
developed on behalf of the Helmholtz Zentrum München and is now licensed for use by
Ascenion (www.ascenion.de) for the quantitative registration of laboratory animals of
different species in an animal facility. The TEP report module in MausDB provides an export
of statistical information that can be used for import into the Helmholtz Zentrum München
TEP system.
The TEP report function produces a file in spreadsheet format (.xls). It contains a matrix with
columns representing different reasons for assigning a MausDB mouse ID (import/weaning),
death reasons or different states a mouse can have (breeding or experiment). In the rows the
numbers of animals are listed which belong to the corresponding category grouped by a
calendar week and TEP key (genetically modified yes/no, breeding or experimental name).
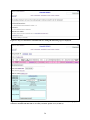
Figure 37: TEP report. The report time period must be selected on calendar week level. An Excel file will
be produced which can be imported into the Helmholtz Zentrum München TEP system.
4.13.4 [Specific to Helmholtz Zentrum München: Versuchstiermeldung]
The “Versuchstiermeldung” (German expression for laboratory animal report) produces
another set of statistical information. For all months of a given year, the number of animals
which were newly assigned to a given experiment is calculated.
Figure 38: Versuchstiermeldung. For a given year, the number of animals used every month in the course
of a given experiment is calculated.
6
Helmholtz Zentrum München, German Research Center for Environmental Health, Ingolstädter Landstr. 1,
D-85764 Neuherberg, Germany
47
4.13.5 Snapshot tail count
The number of animals housed in a given area at a given point in time can be determined
using the “snapshot tail count” function.
Figure 39: Snapshot tail count. A point in time and an area can be chosen. The number of animals will be
calculated within a few seconds.
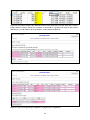
4.13.6 Cage occupation
The number of “mouse days” in a given time period and area can be determined using the
“cape occupation” function. One “mouse day” is the equivalent of one mouse being housed
one day and can be used for cost billing purposes, for example.
Figure 40: Cage occupation. A time period and an area can be chosen. The number of „mouse days“ will
be calculated within short time.
48
Figure 41: Result of cage occupation calculation. For a given time period and area, „mouse days“ are
calculated. Numbers are calculated separately for genetically modified (GVO) and genetically nonmodified mice (non-GVO).
49
5 Detailed step-by-step instructions for common tasks
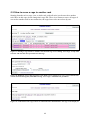
5.1 How to set up a mating
The origin concept of mice in MausDB strictly requires a mating to happen before offspring
can be weaned. It is important to stress that in MausDB, a mating is defined on an abstract
level as the possibility that one male mouse and at least one female mouse can mate and
produce offspring. As soon as such a mating is defined, litter can be reported and weaned.
Litter reporting is a precondition for weaning.
Important: The mating is not at all coupled to co-caging (during a mating the mating partners
do not necessarily have to be housed in the same cage), i.e. there is no automatic mating,
when males and females are moved into the same cage. On the other hand, once a mating is
defined, it will not be stopped automatically upon separation of the animals.
5.1.1
Step 1: Defining mating partners
In order to define the mating partners (one male, one or more females), these must be selected
first either in the rack view (see 4.4.2) or after having collected them in the cart (see 4.5).
Figure 42: Step 1: Defining mating partners. In the expanded rack view (see 4.4.2), mating partners are
selected by checking the box in the first column. The „mate“ button on the page bottom directly leads to
step 2. Alternatively, selected mice can be put in the cart, where the „mate“ button is also available.
50
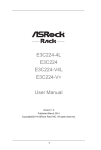
5.1.2
Step 2: Defining mating details
In the second step of the mating procedure, mating details need to be defined by the user. In
addition, mating partners are checked automatically if they are qualified for mating (are they
still alive? One male, at least one female? Minimum age of xx days?).
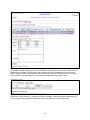
Figure 43: Step 2: Defining mating details. Per default, a mating is automatically set up in a new cage
where mice are put together. As a consequence, the user can choose the rack in the first table row.
Alternatively, checking the „don’t move“ box will cause MausDB to leave mating partners where they are.
Strain (genetic background) of mating offspring needs to be chosen in the second table row from a
pulldown menu. Alternatively, a new strain can be defined by choosing „new strain“ in the pulldown
menu and entering a new strain in the input field. The same procedures applies for mouse line selection in
the third table row. Mating date refers to the date when the mating really started. Defining a mating
project will remember project assigned users about litter weaning. Other fields can be optionally filled by
users. Pressing the „mate!“ button will finally set up the mating and present a confirmation page (see
below).
5.1.3
Step 3: Confirmation
If the mating could be successfully set up in the database, a confirmation page is displayed.
51
Figure 44: Step 3: Confirmation. Clickable links for mating ID and mating cage are displayed.
5.2 How to set up an embryo transfer
In MausDB, an embryo transfer essentially is a special case of a mating. In a normal mating,
both mating partners are already managed by MausDB and thus have a mouse ID.
In an embryo transfer, the real mating event may have taken place even long time ago outside
the facility that is managed by MausDB if frozen embryos are used. The MausDB embryo
transfer procedure records the event of implanting an embryo of whatever origin to a recipient
female mouse. As soon as this is done, an equivalent to a normal mating is defined and
subsequently litters can be reported and weaned.
Embryo transfers only can be started from the cart. Another difference to setting up a normal
mating is that the biological father can be optionally defined if available as a MausDB mouse
or left out if it is an external mouse. The recipient female mouse must have a mouse ID, i.e. be
defined in MausDB.
Figure 45: Step 1: Select a female embryo recipient mouse in the cart. Optionally also select the biological
father mouse (sperm donor) if available in MausDB. Start embryo transfer procedure by clicking the
„embro ytransfer“ button in the bottom task bar.
52
Figure 46: Step 2: Defining embryo transfer details. Embryo transfer date refers to the date when the
embryo really was implanted. Strain (genetic background) of mating offspring needs to be chosen in the
second table row from a pulldown menu. Alternatively, a new strain can be defined by choosing „new
strain“ in the pulldown menu and entering a new strain in the input field. The same procedures applies
for mouse line selection in the third table row. In the following rows, additional embryo transfer
information can be given. Defining a project will remember project assigned users about litter weaning.
Other fields can be optionally filled by users. Pressing the „setup transfer!“ button will finally set up the
embryo transfer and present a confirmation page (see below).
53
Figure 47: Step 3: Confirmation. Clickable links for mating ID and mating cage are displayed.
Figure 48: Mating details view for an embryo transfer. The first row of the second table (Mating type)
contains a clickable link that leads to an embryo transfer specific view (see below).
54
Figure 49: Embryo transfer details view.
5.3 How to report litter
As soon as newborns are observed, they can be reported to the database. Litter reporting is a
precondition for weaning in MausDB. Litter reporting always starts from the mating details
page of the mating where litter has to be reported.
Figure 50: Step 1: Report litter for the correct mating. Between parents table and mating details box, the
button „report new litter“ can be used to report litter for the current mating.
55
Figure 51: Step 2: Specifying litter details. In the upper table, parents have to be assigned to the litter. If,
for example, a double mating (one male, two females) has been setup and there is clear evidence for one
female being the mother of newborns, the other female mouse can be unchecked to state it is not the
mother. In the second box, date of birth has to be entered. Numbers for observed newborns as well as a
litter comment can be entered below. Litter report is finished by pressing „Report litter“.
Figure 52: Step 3: Confirmation. After pressing „Report litter“, the litter has been added to the litters
table in the current mating view. Clicking on the litter (column 1) will lead to the litter details page (see
4.7.5). Using the links in the third column, the litter can be deleted or weaned, respectively.
56
5.4 How to wean litter or report litter loss
As soon litter has been reported to MausDB, it can be weaned. The weaning procedure either
starts from the litters table in the mating view (see Figure 52) or from the litters table in the
Home area (see Figure 10). In either case, a click on the weaning link will start the weaning
dialog.
The weaning procedure in MausDB includes the generation of mouse IDs for all weaned
mice, eartag assignment and rack/cage allocation of these mice.
In the following example, a litter with 3 males is weaned:
Figure 53: Step 1: Starting the weaning dialog from the litter details view (see 4.7.5). An already reported
litter can be weaned by following the „click to wean“ link on the bottom. Alternatively, if pubs are gone,
this can be reported by following the „report litter loss“ link.
57
Figure 54: Step 2: Defining litter details. In the third and fourth row, date of birth and weaning need to be
controlled. In most cases, weaning type should be „regular“. Mice can be weaned as „external“ mice if
they need to be managed by MausDB (e.g. for data completeness or family relationship preservation), but
do live in rooms/racks, that are outside the facility which is managed by MausDB. Important: external
mice are not taken into account when calculating mouse days (see 4.13.6) or numbers for the TEP report
(see 4.13.3). The numbers of males and females are automatically set from previous litter reporting, but
can be changed in this dialog. The maximum number of mice per cage can be selected. If males should be
caged individually, the number would be set to 1. In the course of weaning, eartags are incrementally
assigned starting from the given number. Alternatively, it can be set to consist of the last two digits of the
mouse ID by choosing „by ID“ in the pulldown menu. In order to fill up existing cages (cages currently in
use), the correspondent cage IDs can be entered. Pressing „next step“ will lead to step 2.
58
Figure 55: Step 2: Eartag and cage assignment. The top table shows a preview for weaned mice. Mouse
IDs (first column) will be generated at weaning time, eartags are incremented from the start tag given
before or will be set according to the last two digits of the mouse ID at weaning time. In case no cages
were given to fill up with weaned litter, cage IDs will be determined at weaning time, so they cannot be
displayed here. Instead, a temporary cage ID placeholder („new_1“) will be displayed. This cage ID
placeholder can be edited at this stage. The placeholder can be anything but a number, which would be
interpreted as real cage ID. Mice assigned to the same cage ID placeholder will be caged together. The
second table allows to assign cages to racks. This can be done individually or for all cages (first row).
Pressing „update weaning preview“ will re-check for errors and the availability of cages and racks and
can be repeated again and again. The screen is splitted for male and female pubs. The update procedure
affects both. As soon as every cage is assigned to a rack and no errors are detected, the „next step“ button
occurs at the very bottom, which will lead to the next step.
Figure 56: Step 3: Final preview. A final preview is displayed. Pressing „wean!“ will start the weaning
transaction.
59
Figure 57: Step 4: Confirmation. As the weaning has been completed, mouse and cage IDs are available
and displayed as clickable links. Links to cage cards are displayed for every cage.
60
5.5 How to import mice
Mice that are not weaned within the facility that is managed by MausDB must be imported in
order to get mouse IDs. The import procedure in MausDB includes the generation of mouse
IDs for all imported mice, eartag assignment and rack/cage allocation of these mice.
In the following example, a batch of 3 males is imported:
Figure 58: Step 1: Defining import details. Top Box: In the first row, the date of import needs to be given.
In most cases, import type should be „regular“. Mice can be imported as „external“ mice if they need to
be managed by MausDB (e.g. for data completeness or family relationship preservation), but do live in
rooms/racks, that are outside the facility which is managed by MausDB. Important: external mice are not
taken into account when calculating mouse days (see 4.13.6) or in the TEP report (see 4.13.3). Strain
(genetic background) and line can be choosen from a pulldown menu. Alternatively, new ones can be
defined by selecting „new strain“ or „new line“ from the pulldown menu. In the fifth line, it must be
stated whether imported mice are genetically modified or not. Project and cost centre assigment are
followed by the input field for the mouse provider. All other fields in the top box are optionally.
There are two ways to import mice. a) import of batch mouse data from a spreadsheet file or b) manual
input of mouse data (recommended only for < 5 mice). When using import from spreadsheet file, a
template file must be used (available as link).
Pressing „next step“ will lead to step 2.
61
Figure 59: Spreadsheet template file. Batch mouse data can be imported from a file. Important: column
headers must be exactly as shown here. Columns: A: mouse ID, C: cage ID, E: sex (f/m), F: date of birth
(dd.mm.yyyy), G: ID of father, H: ID of mother1, I: ID of mother2 (optional)
Figure 60: Step 2: Data capture from Excel file. Data can be controlled and edited, if neccessary.
Figure 61: Step 3: Eartag and cage assignment. See Figure 55 for explanation.
62
Figure 62: Step 4: Final preview. A final preview is displayed. Pressing „import!“ will start the import
transaction.
Figure 63: Step 5: Confirmation. As the import has been completed, mouse and cage IDs are available and
are displayed as clickable links. Links to cage cards are displayed for every cage. If import leads to mixed
(males and females) cages, matings can be set up quickly by following optional links.
5.6 How to genotype mice
In MausDB, genotyping a mouse means to assign a locus-related genotype term to a mouse.
As multiple genotypes can be managed by MausDB, a combination of locus/marker (e.g.
“TNFalpha”) and genotype term (e.g. “+/-“) is stored.
In the following example, three mice from the previous import example have been put in the
cart:
63
Figure 64: Mouse selection. In the cart, mice are selected using the checkboxes. Pressing „genotype“ in the
bottom functions bar will lead to the genotyping procedure.
Figure 65: Step 1: Genotype assignment. In the first step, the locus / genetic marker to which the genotype
refers must be chosen from a pulldown menu. In the second step, genotype terms can be assigned
individually (2b) or for the whole set of mice (2a). Important: when assigning genotypes individually,
„ignore“ must be selected in the upper pulldown menu. Pressing „confirm genotypes“ leads to the next
step.
64
Figure 66: Step 2: Preview. After final preview, the genotype procedure can be started by pressing
„genotype!“.
Figure 67: Step 3: Confirmation
5.7 How to change cost centre assignment for mice
During the life of a mouse, the cost centre that has been assigned at weaning or import time,
may change. In the mouse details page (see 4.6) or the cart, the bottom function bar contains a
button “add/change cost centre” (see below).
Figure 68: The standard function bar that is available on the bottom of the mouse details page, the rack
and cage view, and the cart.
65
Figure 69: Changing the cost centre for a mouse. The new cost centre can be selected from a pulldown
menu. The date of cost centre change must be given. The current cost centre assignment is displayed.
Pressing the „confirm cost centre“ button will lead to a preview page, where the procedure can be
finalized.
5.8 How to change experiment status of mice
According to German law, mice that are subject to experiments must be reported. The normal
case in MausDB is defined as “breeding”. When a mouse starts into an experiment, date of
experiment start and the experiment itself must be reported. At any time a mouse can be
assigned to no or one experiment. However, during lifetime of a mouse it can be assigned to
several consecutive experiments
As with cost centre assignment (see 5.7), this can be done for one mouse from the mouse
details page or for multiple mice from the cart, cage or rack view.
Figure 70: Step 1: Defining experiment and start date. The current status of selected mice is shown in the
bottom box. Pressing „confirm experiment“ leads to a preview page, where the procedure can be finalized.
66
Figure 71: Step 2: Final preview. Pressing „add/change experiment!“ will finalize the procedure.
Figure 72: Step 3: Confirmation. The remarks column may contain error messages.
5.9 How to move a mouse to another cage
Starting from the rack or cage view, mice can be transferred to other cages. There a two cases:
a) moving a mouse to an empty cage. A new cage ID must be assigned and a rack must
be assigned to this cage.
b) moving a mouse to a cage with other mice that is already in use. Cage ID and rack
assignment are already defined.
Figure 73: Starting a mouse transfer to another cage from the cage view. Clicking „move mouse“ on the
mostright colum will start the move procedure for that mouse.
67
Figure 74: Target cage definition. In the first step, the user must decide whether to move the mouse into a
new cage or into an existing cage. In the new cage scenario, the second step defines the target rack for the
new cage (which is not neccessary when moving into an existing cage). The third step defines data and
time of the movement.
Figure 75: View into an existing cage. In case an existing cage has been chosen as target cage, a view of
current mice in this cage is displayed as a means of control. Pressing „move mouse!“ will finalize the
procedure.
Figure 76: Confirmation of mouse transfer. Clickable links for target cage and rack as well as for the
target cage card are displayed.
68
5.10 How to move a cage to another rack
Starting from the rack or cage view, a whole rack (with all mice) can be moved to another
rack. Mice in this cage do not change their cage IDs. There is no feature to move all cages of
one rack to another rack in one transaction, the cages have to be moved one by one.
Figure 77: Starting a cage transfer to another rack from the cage view. Clicking „move cage“ on top of the
color bar will start the move procedure for that cage.
Figure 78: Definition of move date and target rack. Racks can be chosen from „own“ project-linked racks
or from all racks managed by MausDB. Pressing „move cage!“ will finalize the procedure.
Figure 79: Confirmation. The cage transfer is confirmed and a clickable link to the cage card is displayed.
69
5.11 How to cull mice
As with other standard procedures, culling of mice can be started for one mouse from the
mouse details page or for multiple mice from the cart, cage or rack view.
Figure 80: Starting from the cage view, mice subject to culling are selected using the checkboxes. Pressing
„kill“ in the bottom functions bar will lead to the next step.
Figure 81: Defining culling date and culling reasons. Pressing „confirm kill“ will finalize the procedure.
Figure 82: Confirmation of culling.
70
6 MausDB Administration
6.1 Backup database
6.1.1
Using backup script
Fully automated backups can be scheduled by using the backup script (described in 2.3.6).
6.1.2
Manual backups
At any time, a full dump of the database can be done manually:
# mysqldump --opt –u <username> –p<password> mausdb > dumpfile.sql
[Please note: this may take some minutes]
6.1.3
Restore from backup
A database can be restored from a full dump
(WARNING: this will overwrite your current database!)
# mysql –u <username> –p<password> mausdb < dumpfile.sql
[Please note: this may take considerable time depending on the size of your database]
For more sophisticated restore scenarios like point-in-time recovery, please check the MySQL
documentation.
6.2 Blocking user interaction (“Global lock”)
There is a mechanism called “global lock” implemented in MausDB that stops user
interaction via the web user interface. It is strongly advised to set a global lock in two
situations:
o when damage to the database occured (e.g. by manipulation on database level).
Immediately after a database damage occured or is noticed, a global lock should be
set. This prevents new data to be written to the database and facilitates database
rollback and point-in-time recovery.
o when the database server needs to be stopped for service or updates.
6.2.1
Setting a global lock via web user interface
Log in using an account with admin rights and choose “set or release global locks” from the
“settings” menu. The web user interface for non-admin accounts will immediately be blocked.
Be aware that the web interface for admin accounts will not be blocked and remains
accessible. As admin, you will be able to work with MausDB and finally release the global
lock again.
71
6.2.2
Setting a global lock manually
In case the web user interface is not accessible you may set a global lock manually:
1) Open /usr/lib/cgi-bin/mausdb/config.rc in an editor
# sudo nano /usr/lib/cgi-bin/mausdb/config.rc
2) set MAUSDB_LOCK from "false" to "true"
3) repair/manipulate the database or run updates on your server ...
4) set MAUSDB_LOCK back to "false"
6.3 Administrational overviews and settings
Users with administrative rights (user_role = ‘ua’) can access many frequently needed
administrative functions via “reports” and “settings” in the main navigation bar.
6.4 Administration on database level
However, some infrequently needed or complex functions are not integrated into the web user
interface. In these cases, database manipulation has to be carried out on database level.
Commented SQL scripts for some frequently used tasks are available from the downloaded
repository and should be located in /home/admin/mausdb/SQL.
WARNING: MANIPULATION ON DATABASE LEVEL IS PRONE TO GENERATE
DATA LOSS OR DATA CORRUPTION!
PLEASE NOTE OUR ADVICES ON SQL-LEVEL DATABASE MANIPULATION:
1) Make a full database dump before manipulating the database
2) set a global lock before manipulating the database (see 6.2).
3) read the commented scripts carefully before running them.
4) make sure you fully understand what the scripts are doing before running them.
5) in case you feel unsure about 4), ask someone with more SQL skills for help.
6) Think twice before executing SQL commands.
7) for update commands: make sure there is a “where” clause in your statement
8) for delete commands: make sure you also delete corresponding entries in other tables
in order to maintain referential integrity.
72