1
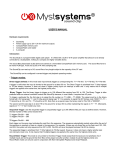
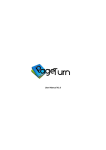
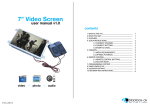
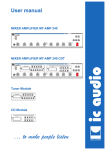
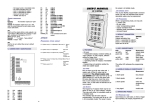
SoundClip-8L
user manual v1
contents
1. WHAT IS THE SC-8L......................................................................
2. SUPPORTED MEDIA FORMATS................................................
3. IN THE BOX.....................................................................................
4. SETUP INSTRUCTIONS................................................................
5. PROGRAMMING CONTENT.......................................................
6. CONTENT CONFIGURATION.....................................................
7. LIGHTING CONFIGURATION.....................................................
8. DELAY AND MASTER VOLUME CONTROL............................
9. STATUS LED’s..................................................................................
x8
x8
8 button audio player with 8 Light Outputs
July 2014
1
1
1
1
2
3
4
5
5
WELCOME
Page 1
3.IN THE BOX
Thank you for purchasing the SoundClip-8Lights.
The SC-8L is one of a range of products we offer specific to the heritage marketplace.
We are confident that we have other products you will find useful and look forward
to hearing from you again soon.
SoundClip-8L
Terminal Blocks
T: +44 (0) 1639 767007
W: www.blackboxav.co.uk
Power Supply
1.WHAT IS THE SC-8L?
The SoundClip-8L is from our range of compact, stand-alone, high quality stereo
audio players. It can be used to present audio through headphones via two 3.5mm
audio jacks or 2 speakers via wired terminal.
Screwdriver
Plug Adapters
MicroSD to USB
converter
MicroSD Card
The SC-8L can present audio in a looping fashion or be activated via 8 buttons with
one button for a single message each. It can also work in a ‘Play all’ function upon
button/PIR activation or in a ‘Next / Previous’ manner with a maximum of 99 tracks.
The SC-8L also has 8 light outputs as standard which can be configured to turn on/off
in a predetermined fashion when each button is pressed / certain tracks are played.
images for illustrative purposes only
4.SETUP INSTRUCTIONS
Setting up your SC-8L is simple and straightforward. You will need the
following:
2.SUPPORTED MEDIA FORMATS
The Soundclip-8L supports audio in two formats;
- .mp3
- .wav
We recommend all files used be in .mp3 format, if you have issues playing any audio
content we recommend you convert your audio using ‘Format Factory’, this can be
downloaded for free here;
http://www.pcfreetime.com/
-
The SoundClip-8L
12V DC Power Adapter
Buttons or PIR (if using button or PIR activated content, not included)
Headphones or speakers (not included)
MicroSD Card with content on (see programming section)
3
Terminal blocks for buttons and speakers
Screwdriver for wiring terminal blocks
Lighting (if using lighting, not included)
Page 2
FRONT VIEW
place with the provided screwdriver.
6. Connecting Lighting
To add lighting (we recommend LED strip lighting) to the SC-8L you must wire
them to the designated terminals. To configure how this lighting is activated
please see section 7. LIGHTING CONFIGURATION.
12V DC in
REAR VIEW
Configuration
Switches
Status LED
Adjust Volume
3.5mm output
Adjust Delay
MicroSD Slot
Volume
Buttons
+
Light Output 1 - 8
Button1 - Button8
Lighting
Configuration Switches
12v Supply
Speaker Speaker
(for PIR or Lighting)
Right
Left
1.Powering Your SC-8L
Connect the supplied 12V DC Adapter to the ‘12V DC in’ to give power to
the device.
2.Connecting headphones to your SC-8L
The SC-8L can support up to 2 headphones with the built in 3.5mm jack,
simply connect them via the headphone 1 and 2 output.
3.Connecting Speakers
Wire speakers to the ‘Speaker Left’ and ‘Speaker Right’ terminal block, follow
the + and - directions if appropriate, insert wires and screw in place with
provided screwdriver.
4. Connecting Activation Buttons
To utilise button activation of the SC-8L you must wire buttons to the
designated terminals. Simply insert button wire ends and screw in place
using the provided screwdriver.
5. Connecting Volume Buttons
The SC-8L has dedicated volume terminals, allowing you to give visitors the
ability to increase or lower the volume. Connect 2 buttons to the
designated terminal to do so. Simply insert button wire ends and screw in
7. Connect PIR (SC-2 pictured)
The SC-8L can be PIR (Passive Infra-red)
activated, to add a PIR you must wire
it into the ‘1’ button terminal with the
power connection wired into the + ‘12v
Out’ terminal (as pictured on a SC-2).
8. Add content to your SC-8L
To add content to your SC-8L you must first transfer it to the supplied MicroSD
Card and insert this into the MicroSD slot: see 5. PROGRAMMING CONTENT
below for more details.
9. Configuring the SC-8L
Deciding how the SC-8L is configured is completed using the ‘Configuration
Switches’, this determines if it’s looping, button activated or has a delay
between content. See 6. CONTENT CONFIGURATION for more details.
5. PROGRAMMING CONTENT
Content for your SC-8L is stored on the supplied MicroSD card. To add content
you will need;
1) Audio Content in .mp3 format (supports up to 99 audio files)
2) A PC or laptop with Windows OS
3) MicroSD Card (supplied)
4) MicroSD to USB convertor (supplied)
How the content you add will be played by the SC-8L will depend on how you
configure it, find out more on this in 6. CONTENT CONFIGURATION.
The name of your audio files when added to the MicroSD card will determine
the order in which they play.
Note: The SC-8L supports up to 99 files, these must be named 001, 002, 003
etc. The order in which files play is determined by their name, the first file
must always be named 001, the second 002 and so on.
6. CONTENT CONFIGURATION
Page 3
Content is added to the SC-8L via MicroSD card, how this content is played is
set via the dip swiitches located on the front of the device.
Properly named files can be added to the MicroSD card in bulk (i.e you can
drag multiple files across onto the card as long as they are properly named).
Step1
Prepare your audio files for transfer, we recommend you use .mp3 files
however .wav files are also supported. Rename them ‘001, 002, 003’ etc.
depending on the order you want them played.
Configuration
Switches
Using a screwdriver click these switches into either a Down or Up position to
turn On or Off.
Step2
Insert the MicroSD card into the MicroSD - USB convertor, and connect to your
PC.
Dip Switch Settings: Down = On, Up = Off
Step3
Transfer all of your content onto the SD card.
1 - Interuptible Playback
When switch 1 is in the Down (on) position the SC-8L is set to uninterruptible
this means when a file starts to play it will finish no matter if an additional
input is activated. When in the Up (off ) position files can be interupted.
2 - Looping Playback
When switch 2 is in the Down (on) position the SC-8L will be in looping mode.
All content on the MicroSD card will play in a sequential manner from power
up and then begin again from the start. The ‘Delay’ control will specify how
long the unit waits between tracks. Tracks must be labelled sequentially.
3 - Play All
When switch 3 is in the Down (on) position the SC-8L will be in ‘Play All’ mode,
this means when triggered via button or PIR it plays through all audio files
once. When in this mode the SC-8L is uninteruptible even with switch 1 set to
Up (off ).
Step4
Insert MicroSD card into the SC-8L, test files play as planned. How files are
acivated is determined by how the dip switches are configured. See following
section.
4 - Next / Previous
When switch 4 is in the Down (on) position the SC-8L is in ‘Next / Previous’
mode. This means users can navigate through all files on the MicroSD card by
pressing button 1 for next and button 2 for
previous.
When powered on in this mode the SC-8L will always start on audio file 001, it
will then remain on the last file it played.
5 - Currently Unassigned
6 - LCD & Button Pad Activation
Put in the down (on) position to place the SC-8L in compatability mode for the
LCD display and Button Pad add-on (not included).
7 - Delay Range
The delay control (see section 8. DELAY AND MASTER VOLUME CONTROL)
allows you to determine how long between the end of an audio file a new file
can be activated. When switch 7 is in the Up (off ) position, the control ranges
from 0 seconds when turned fully anti-clockwise, to 60 seconds maximum
when turned fully clockwise.
When switch 7 is in the Down (on) position, the delay control will range from 0
minutes when turned fully anti-clockwise, to 4 minutes when turned fully
clockwise.
7. LIGHTING CONFIGURATION
Page 4
As standard the lighting outputs will activate according to the track being
played, for example when track ‘001’ is being played, lighting output ‘1’ will
activate, when track ‘002’ is being played lighting output ‘2’ will activate, and
so on.
If in looping mode the above will apply however should you have more than 8
tracks once tracks above ‘008’ are playing, all lighting outputs will activate.
How it works
When programming the lighting outputs you will be programming how the
SC-8L reacts to each track number from 001 to 008. Any tracks above this
number i.e 009, 010, 011 etc. will by default activate all lighting outputs.
This means the lighting outputs will activate in the same manner whether
track ‘001 - 008’ are played via Looping Playback, in Next/Previous mode, Play
All mode or activated via the push of buttons 1 - 8.
Programming the lighting outputs
8 - Lighting Configuration Mode
This switch will put the SC-8L into programming mode for the lighting
outputs. See 7. LIGHTING CONFIGUATION below for further programming
instructions.
8 Button Mode
When all switches are in the Up (off ) Position, the SC-8L is in 8 button mode as
standard, this means Button 1 plays file 001, Button 2 plays file 002 etc.
To program the lighting outputs you will need the number of tracks you wish
to program (001 - 008) uploaded to the MicroSD Card and an equal amount of
buttons connected (1 - 8). Without these tracks button presses will not be
registered when in lighting configuration mode.
With switch 1 in the Up (off ) position files are interuptible, put switch 1 in the
Down (on) position to make playback uninterruptible.
1 - Enter Programming Mode
Enter Light Configuration mode via the configuration
switches located on the FRONT of the SC-8L. Place
dipswitch no. 8 into the ON (down) position with the
remaining dipswitches in the OFF (up) position.
Sequential PIR mode
When switches 1 and 4 are in the Down (on) position the SC-8L will be in
Sequential PIR mode, this means it will activate one audio track at a time via
PIR sensor - moving onto the next audio track in sequence after each
activation.
2 - Enable / Disable Lighting Outputs
Once in Light Configuration mode the lighting configuration switches located
on the REAR of the SC-8L become active. Enable of Disable the lighting
outputs by placing the associated dipswitches to either the ON (down) or OFF
(up) position.
This allows you to activate track 001 then 002 then 003 etc. one at a time.
For example;
Page 5
8. DELAY AND MASTER VOLUME CONTROL
=
1 2 3 4 5 6 7 8
The above configuration sets light outputs 1, 3, 5, and 7 ON, with outputs 2, 4,
6 and 8 OFF.
3 - Store settings for appropriate track
With the light outputs set you need to store the configuration for each
appropriate track. To configure the track simply press the corresponding
button;
Button 1 = 001
Button 2 = 002
Button 3 = 003
Button 4 = 004
Button 5 = 005
Button 6 = 006
Button 7 = 007
Button 8 = 008
Note: you can only configure one track at a time you must press the no. 8
configuration dipswitch located on the FRONT into the UP (off ) position after
each track is configured.
Two controls on the front of the device
allow you to alter the Delay timer and
Master Volume.
Delay
The delay control allows you to specify how long between playing content the
unit must wait before more content can play.
This is mainly used in conjunction with a PIR input, establishing how long
between activation the unit must wait to play more content. However it can
also be used with all other modes if desired.
Switch 7 when Off (up) makes the delay control range from 0-60 seconds,
when On (down) it ranges from 0-4 minutes.
Master Volume
The SC-8L has dedicated volume inputs to allow users volume control. The
Master Volume dictates the maximum volume available to them.
When powered up the SC-8L is set to around half the Master Volume level, this
allows users to reach the maximum volume through the use of dedicated
button controls. Bear this in mind when setting the Master Volume.
So with the above mentioned configuration press Button 1, the Green Status
LED will remain solid when you press Button 1 to indicate it has been
registered. Turn the FRONT dipswitch into the UP (off ) position to store the
setting.
If you are providing users with the ability to adjust the volume themselves we
recommend you set the volume to maximum through button controls when
deciding what volume dial setting you require.
Now when track ‘001’ plays lights 1, 3, 5 and 7 will turn on, whilst the
remaining lights will stay off.
9. STATUS LED
Follow this procedure to program each track from ‘001’ to ‘008’.
Red - On/Off
The red LED will be lit when unit is powered on, and off when unit is powered
down.
Note: Any tracks above ‘008’ will automatically turn all lights on
Green - Status
The Green LED will be lit when content is being played and blink on/off in 1
second intervals when unit is in ‘Delay Mode’
to indicate this.