1
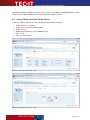
TBarCode/Embedded Barcode Filter for SEH ISD400 / ISD410 V ers ion 9 .1 User Manual 2 F eb ru ar 20 11 TE C -I T Dat en verarb eitung Gmb H W ag n erst ras s e 6 A -4400 S t eyr, Au st ria t ++43 (0 )7 252 7272 0 f ++43 (0 )7 252 7272 0 7 7 offic e@t ec -it . c om www. t ec -it. c om T Bar Co de/ Em be d de d Use r M an ua l 1 Content 1 Content Table of Figures List of Tables 2 2 3 Disclaimer 4 3.1 3.2 3.3 3.4 Introduction About Supported Barcode Symbologies Supported Printers License Restrictions 5 5 5 5 5 4.1 4.2 4.3 4.3.1 4.4 4.4.1 4.5 4.6 4.7 Installation General Information Installation Steps Required Files License File Installation Check Installed Software Modules Assign TBarCode to the Printer Queue How to Update TBarCode/Embedded How to Remove TBarCode/Embedded 6 6 6 6 7 7 8 9 10 10 5.1 5.2 5.3 5.4 Test the Installation Perform a Test-print for Postscript Printers Perform a Test-print for PCL Printers Troubleshooting The Test Document 11 11 11 11 12 6.1 6.2 6.3 6.3.1 6.3.2 6.4 Using TBarCode/Embedded General Information Control Sequence Structure Using TBarCode/Embedded in SAP Background Information Detailed Documentation Alternative Control Sequence Format (v1 Format) 14 14 14 14 14 15 15 7.1 7.2 7.3 7.4 7.5 7.6 7.7 7.8 7.9 Barcode Parameters General Information Sequence Prefix and Suffix Barcode Symbology Barcode Data Barcode Size and Position Barcode Appearance (Quiet Zone, Print Ratio, …) Text Settings Specific PCL/PS Settings More Settings 16 16 16 16 16 17 18 19 20 20 Barcode Symbologies 21 Licensing General Information Temporary License for Testing License Types Purchasing Installing the License File 24 24 24 24 24 24 Contact and Support Information 25 1.1 1.2 2 3 4 5 6 7 8 9 9.1 9.2 9.3 9.4 9.5 10 Appendix A : The CUPS Log 26 Appendix B : TBarCode Debug Information 27 1.1 Table of Figures Figure 1: Install Software – Step 1 Figure 2: Install Software – Step 2 7 8 Page 2 of 27 T Bar Co de/ Em be d de d Use r M an ua l Figure 3: Check Installed Packages 8 Figure 4: Assign Filter to Print Queue – Step 1 9 Figure 5: Assign Filter to Print Queue – Step 2 9 Figure 6: Raw Test Document (First Page) – with Control Sequences Figure 7: Printed Test Document (First Page) – with Barcodes 12 13 Figure 8: CUPS Log – Step 1 26 Figure 9: CUPS Log – Step 2 26 Figure 10: TBarCode Debug Information 27 1.2 List of Tables Table 1: Prefix and Suffix 16 Table 2: Barcode Parameters: Symbology 16 Table 3: Barcode Parameters: Data Table 4: Barcode Parameters: Size and Position 17 18 Table 5: Barcode Parameters: Appearance (Quiet Zone, Print Ratio, …) 19 Table 6: Barcode Parameters: Text Settings 20 Table 7: Barcode Parameters: Specific PCL/PS Settings 20 Table 8: Supported Barcode Symbologies 23 Page 3 of 27 T Bar Co de/ Em be d de d Use r M an ua l 2 Disclaimer The actual version of this product (document) is available as is. TEC-IT declines all warranties which go beyond applicable rights. The licensee (or reader) bears all risks that might take place during the use of the system (the documentation). TEC-IT and its contractual partners cannot be penalized for direct and indirect damages or losses (this includes non-restrictive, damages through loss of revenues, constriction in the exercise of business, loss of business information or any kind of commercial loss), which is caused by use or inability to use the product (documentation), although the possibility of such damage was pointed out by TEC-IT. We reserve all rights to this document and the information contained therein. Reproduction, use or disclosure to third parties without express authority is strictly forbidden. Für dieses Dokument und den darin dargestellten Gegenstand behalten wir uns alle Rechte vor. Vervielfältigung, Bekanntgabe an Dritte oder Verwendung außerhalb des vereinbarten Zweckes sind nicht gestattet. © 1998-2011 TEC-IT Datenverarbeitung GmbH Wagnerstr. 6 A-4400 Austria t.: +43 (0)7252 72720 f.: +43 (0)7252 72720 77 http://www.tec-it.com Page 4 of 27 T Bar Co de/ Em be d de d Use r M an ua l 3 Introduction 3.1 About TBarCode/Embedded is a filter for the Intelligent Spooling Device ISD400 / ISD410 which turns all your PostScript® or PCL® printers into barcode-enabled printers without the need of installing a barcode extension cartridge or a special barcode font. You can print linear barcodes as well as high-density 2D barcodes from within any application (e.g. SAP® R/3®) by embedding control sequences into your print job. This works in a completely transparent way to your applications. Print-jobs without barcodes are not influenced in any way. 3.2 Supported Barcode Symbologies For an overview of currently supported barcodes (linear and 2D) please refer to chapter 8. For additional information on these barcode symbologies, please refer to the TEC-IT Barcode Reference http://www.tec-it.com/download/PDF/Barcode_Reference_EN.pdf. 3.3 Supported Printers The current version supports two large printer families: 3.4 PostScript printers (PostScript Level 2 or higher) PCL printers (PCL 5 or higher, HPGL is required) License Restrictions TBarCode/Embedded may be used in combination with the Intelligent Spooling Device SEH ISD400 / ISD410 (or later versions) only. Please refer to our license terms available on http://www.tec-it.com. Page 5 of 27 T Bar Co de/ Em be d de d Use r M an ua l 4 Installation 4.1 General Information The following pages will guide you through the installation of TBarCode/Embedded on the ISD400 / ISD410. The instructions in sections 4.4 to 4.7 are basically taken from the ISD400 / ISD410 User Manual (sections “How to Uninstall/Install Software Modules” and “How to Assign a Filter Application to a Queue”). For detailed information on maintaining software and setting up printer queues we recommend you to check out the ISD400 / ISD410 User Manual. 4.2 Installation Steps The following steps are required in order to enable barcode printing: Install TBarCode/Embedded on the ISD400 / ISD410 – see section 4.4. Assign TBarCode/Embedded to the required printer queues on the ISD400 / ISD410 – see section 4.5. For testing the installation you can finally perform a test print-out – see chapter 5. 4.3 Required Files For installation the file “TBarCodeEmbedded-XXX-ISD400.zip” is required (XXX stands for the version number of TBarCode/Embedded). You can download this file from http://www.tec-it.com or you can request it from [email protected]. It contains the following files: File Description tbarcode-XXX-filter.bin The TBarCode/Embedded filter software package. Install this package via the ISD400 / ISD410 administration page (see section 4.4) in order to enable barcode printing. tbarcode-enable-debug.bin An optional package to enable debugging. If you want to track down any errors, additionally install this package via the ISD400 / ISD410 administration page (see section 4.4). If installed, TBarCode/Embedded will create extensive trace output for each printed document respectively for each printed barcode. The log can be viewed in the web browser (see Appendix B). seh_test.pcl A test file for PCL printers. You can use this file to test your installation of TBarCode/Embedded (see chapter 5). seh_test.ps A test file for PostScript printers. You can use this file to test your installation of TBarCode/Embedded (see chapter 5). TBarCode_SEH_ISD400_Man.pdf This user manual. Please note: ► The subdirectory “V1Format” contains a version of TBarCode/Embedded which accepts the older v1 parameter format (see also section 6.4). – However, in general we recommend using the default parameter format, because it is more flexible and more intuitive. ® ® ► The v1 parameter format might eventually be relevant for SAP R/3 because of the length limitations in the Print-Controls. The v1 format needs less space than the default format. Page 6 of 27 T Bar Co de/ Em be d de d Use r M an ua l ► Only one version (either the default parameter version or the v1 parameter version) may be installed on one ISD device at the same time! 4.3.1 License File File Description tbarcode-license-XXX.bin The license package for TBarCode/Embedded (on request). Additionally install this package via the ISD400 / ISD410 administration page (see section 4.4) in order to upgrade your demo version of TBarCode/Embedded to the full version. For more details on licensing, please refer to chapter 9! 4.4 Installation In order to install TBarCode/Embedded (filter package, license package and/or debugging package) open the ISD400 / ISD410 administration homepage and login as administrator. Proceed as follows: 1. 2. 3. 4. 5. 6. 7. 8. 9. Select MAINTENANCE . Select Software . Mark the option “Install software” . Click Next . Click Browse… . Select the file “tbarcode-XXX-filter.bin” (or which package you actually want to install). Click Next . Click Next again. Click OK to confirm. Figure 1: Install Software – Step 1 Page 7 of 27 T Bar Co de/ Em be d de d Use r M an ua l Figure 2: Install Software – Step 2 4.4.1 Check Installed Software Modules You can check for installed software modules by following these steps: 1. 2. 3. 4. Select MAINTENANCE . Select Software . Mark the option “Remove software”. Click Next . Figure 3: Check Installed Packages Page 8 of 27 T Bar Co de/ Em be d de d Use r M an ua l All installed software packages are listed in . In order to use TBarCode/Embedded the list must contain an item called “TBarCode XXX Filter” (XXX is the software version). 4.5 Assign TBarCode to the Printer Queue In order to assign the filter to one of the printing queues proceed as follows: 1. 2. 3. 4. 5. 6. Select QUEUES & JOBS . Select Settings for the relevant queue. Select Filter . Mark the filer “tbarcode” in the “Available” list . Click Add . Click OK to confirm. Figure 4: Assign Filter to Print Queue – Step 1 Figure 5: Assign Filter to Print Queue – Step 2 Page 9 of 27 T Bar Co de/ Em be d de d Use r M an ua l 4.6 How to Update TBarCode/Embedded If you want to upgrade to a newer versions of TBarCode/Embedded just install the package as described above. We recommend removing any previous version of TBarCode/Embedded before installing the newer version. 4.7 How to Remove TBarCode/Embedded In order to remove TBarCode/Embedded proceed as follows: 1. 2. 3. 4. 5. 6. Select MAINTENANCE . Select Software . Mark the option “Remove software”. Select the resource “TBarCode XXX-Filter” (or which package you actually want to remove). Click Delete. Confirm with OK. Page 10 of 27 T Bar Co de/ Em be d de d Use r M an ua l 5 Test the Installation 5.1 Perform a Test-print for Postscript Printers In order to test the installation of TBarCode/Embedded you can send the file “seh_test.ps” to any postscript printer queue on the ISD400 / ISD410 which has the “tbarcode” filter assigned. Open a command shell and type the following command: 1 Under Windows : lpr -S hostname -P printerqueue seh_test.ps Under Linux / UNIX: lpr -H hostname -P printerqueue seh_test.ps hostname This is either the host name or the IP address of the ISD400 / ISD410. printerqueue This is the name of the queue on the ISD400 / ISD410. seh_test.ps This is the test file provided by TEC-IT. Please note: If you have installed the TBarCode/Embedded filter package for the v1 parameter format use the file “seh_test_v1format.ps” instead! The expected output is shown in Figure 7 below. 5.2 Perform a Test-print for PCL Printers For PCL printers run the same command as described above but use the file “seh_test.pcl” (or “seh_test_v1format.pcl”) instead of the PostScript file. 5.3 Troubleshooting Problem Solution No barcodes are printed. Please check out, if TBarCode/Embedded is correctly assigned to the printer queue in use (see also section 4.5)! Please make sure that you used the correct test file! There is one test file which uses the default parameter format and one test file which uses the older v1 parameter format. The test file version must match your TBarCode/Embedded filter package installation! Otherwise the control sequences will not be recognized. All barcodes are drawn with an additional horizontal line. Your copy of TBarCode/Embedded is not licensed. For more information, please refer to chapter 9! If none of the solutions above worked for you, please try to identify the exact error using the following methods and contact TEC-IT for support. Examine the CUPS log – see Appendix A Enable the trace file (debugging mode) and check for any error messages – see Appendix B 1 In order to use lpr.exe under Window Vista or Window 7 you have to add the “LPR Port Monitor” (Control Panel ► Programs and Features ► Turn windows features on or off ► Print and Document Services)! Page 11 of 27 T Bar Co de/ Em be d de d Use r M an ua l 5.4 The Test Document The figure below shows the test document with the embedded controls sequences. When printing this document via a queue on the ISD400 / ISD410 using TBarCode/Embedded filter, all control sequences will be replaced by the corresponding barcodes (see Figure 7 below). Figure 6: Raw Test Document (First Page) – with Control Sequences Page 12 of 27 T Bar Co de/ Em be d de d Use r M an ua l Figure 7: Printed Test Document (First Page) – with Barcodes Page 13 of 27 T Bar Co de/ Em be d de d Use r M an ua l 6 Using TBarCode/Embedded 6.1 General Information For adding barcode graphics to your print-out you have to embed special control sequences into your document. These control sequences are used to specify the format of the barcodes you want to print. TBarCode/Embedded processes these control sequences and replaces them by the appropriate barcode graphics. By default the position of the control sequence is used as origin for drawing a barcode. But any other position can be specified as well. The syntax of the control sequences is described below. 6.2 Control Sequence Structure The following control sequence is needed to create a barcode on the print-out: $_tbcs … -d… $_tbce prefix barcode parameters barcode data (prefixed by “-d”) suffix TBarCode/Embedded decodes this control sequences and inserts a barcode into the printer data stream (spool file). Each control sequence starts with $_tbcs followed by barcode parameters (such as size, barcode type, check digit calculation and so on). The barcode data is prefixed by -d and terminated with $_tbce. Examples for barcode control sequences are: $_tbcs $_tbcs $_tbcs $_tbcs –b20 –d"Hello World"$_tbce -b20 –m0.254 -h10.2 -tHIDE –-origin=BOTTOM -d0123456789$_tbce -b71 –m0.508 –dMyBarcodeData$_tbce –b3 -w300 -h100 –d1234567890$_tbce ► For a description of the most common barcode parameters, please refer to chapter 7. ► For more detailed information on barcode parameters, please refer to the product manual of TBarCode for Linux (http://www.tec-it.com/download/PDF/TBarCodeX9_Manual_EN.pdf). ► For additional information on barcode symbologies, please refer to the TEC-IT Barcode Reference (http://www.tec-it.com/download/PDF/Barcode_Reference_EN.pdf). 6.3 Using TBarCode/Embedded in SAP The necessary control sequences can be integrated into SAP by adapting the SAP Print-Controls on device type level. 6.3.1 Background Information SAP R/3 has so-called “system barcodes”. These barcodes are defined globally and can be used within SAP R/3. Page 14 of 27 T Bar Co de/ Em be d de d Use r M an ua l 6.3.2 For each device type (e.g. device type ZPOST2 for Postscript printers or ZHPLJ4 for PCL printers) you can define so-called “printer barcodes”. A printer barcode is a specific PrintControl, which consists of a prefix and a suffix. In the Prefix and in the Suffix of the Print-Control specify the control sequence characters, which are needed by TBarCode/Embedded. Detailed Documentation ► You can request a detailed manual about the integration of TBarCode/Embedded into SAP from TEC-IT. The manual contains step by step instructions with screenshots. ► On demand TEC-IT sends you predefined SAP Device Types, which are ready to use with TBarCode/Embedded for ISD400 / ISD410. Device Types for PCL and PostScript are available. ► Please contact [email protected]. 6.4 Alternative Control Sequence Format (v1 Format) For backward compatibility the TBarCode/Embedded software package is also available for the older v1 parameter format (see also section 4.3). This format differs from the default format in the following points: Less parameters (= not as many adjustment possibilities than in the default format). Shorter syntax (might eventually be relevant for SAP, due to the length limitations for PrintControls). Please note: ► The two different parameter formats (default and v1) cannot be mixed. You can only install one of the packages on the ISD400 / ISD410 at the same time. The example below shows the control sequences for the same four barcodes in both parameter formats. Default parameter format: $_tbcs $_tbcs $_tbcs $_tbcs –b20 –d"Hello World"$_tbce -b20 –m0.254 -h10.2 -tHIDE –-origin=BOTTOM -d0123456789$_tbce -b71 –m0.508 –dMyBarcodeData$_tbce –b3 -w300 -h100 –d1234567890$_tbce V1 parameter format: $_tbcs $_tbcs $_tbcs $_tbcs b20 dHello World$_tbce b20 m0.254 h10.2 n ob d0123456789$_tbce b71 m0.508 dMyBarcodeData$_tbce b3 w300 h100 d1234567890$_tbce Page 15 of 27 T Bar Co de/ Em be d de d Use r M an ua l 7 Barcode Parameters 7.1 General Information This chapter describes all parameters which are available in both, the default parameter format and the v1 parameter format. For a complete list of parameters, please refer to the product manual of TBarCode for Linux (http://www.tec-it.com/download/PDF/TBarCodeX9_Manual_EN.pdf). 7.2 Short Sequence Prefix and Suffix Long Equivalent in Description v1 Format $_tbcs $_tbcs Marks the beginning of the sequence. $_tbce $_tbce Marks the end of the sequence. Table 1: Prefix and Suffix 7.3 Barcode Symbology Short Long Equivalent in v1 Format Description -b --barcode=NUMBER bNUMBER Sets the barcode symbology. For a list of valid NUMBERs, please refer to chapter 8! Examples: -b20 --barcode=20 Table 2: Barcode Parameters: Symbology 7.4 Short Barcode Data Long Equivalent in Description v1 Format -d --data=DATA dDATA Sets the barcode data. Examples: -d12345 --data=12345 -d"ABCD 12345" --data="ABCD 12345" Please note: The data must always be the last parameter before the suffix $_tbce! -c --checkdigit=NUMBER cNUMBER Sets the check-digit calculation method. This parameter is only required if you want to override the default check digit method. For a list of valid NUMBERs, please refer to the TBarCode for Linux user manual. Examples: -c3 --checkdigit=3 --autocorrect=STATE ASTATE Enables or disables auto-correction. Relevant for Code 2of5 Interleaved only. This feature adds a leading zero to the Page 16 of 27 T Bar Co de/ Em be d de d Use r M an ua l barcode data to produce an even number of digits. Possible values are: on off Example: --autocorrect=ON -e --trimwhitespaces W Removes all whitespaces (spaces, tabs, etc.) at the beginning and at the end of the barcode data. --translation=STATE sSTATE Enables or disables the translation of escape sequences. Possible values are: on off --formatstring=FORMAT FFORMAT Sets the format string. For information on the format string syntax, please refer to the TBarCode for Linux user manual. Example: --formatstring="A##B&" Table 3: Barcode Parameters: Data 7.5 Short Barcode Size and Position Long Equivalent in Description v1 Format -w --width=WIDTH wWIDTH Sets the width of the barcode. The unit of measurement is millimeters. Examples: -w25.4 --width=55 -h --height=HEIGHT hHEIGHT Sets the height of the barcode. The unit of measurement is millimeters. Examples: -h15 --height=25.4 -x --xpos=POSITION xPOSITION Sets the (absolute or relative) x-position of the barcode. The unit of measurement is millimeters. The positioning mode (absolute or relative) can be set with -pos. Examples: --pos=abs --xpos=100 --pos=rel --xpos=-10.5 Please note: v1 format always uses absolute positioning! -y --ypos=POSITION yPOSITION Sets the (absolute or relative) y-position of the barcode. The unit of measurement is millimeters. The positioning mode (absolute or relative) can be set with -pos. Examples: --pos=abs --ypos=100 --pos=rel --ypos=-10.5 Please note: v1 format always uses absolute positioning! --origin=ORIGIN ot ob Sets the origin of the barcode. Possible values are: top bottom Page 17 of 27 T Bar Co de/ Em be d de d Use r M an ua l When set to top the current cursor position (respectively the coordinate specified via the optional parameters --xpos and --ypos) is treated as top left corner of the barcode. When set to bottom the current cursor position is treated as the bottom left corner of the barcode. Example: --origin=TOP Please note: In PostScript the default origin is top, in PCL the default origin is bottom. -m --modulewidth=WIDTH mWIDTH Sets the module width. The unit of measurement is millimeters. Example: --modulewidth=0.254 -O --optimalwidth O Optimizes the module width for the given output resolution. This option eliminates aliasing effects. When enabled, the module width will become exactly a multiple of a single printer dot (or pixel). Module widths with fractional parts are avoided. This option is a must for low output resolutions. Please note: Always use this parameter in combination with the parameter --dpi. Example: --dpi=300 --optimalwidth -r --rot=ROTATION rROTATION Sets the rotation of the barcode. The unit of measurement is degrees (counterclockwise, only 90° angles are supported). Possible values are: 0 (default) 90 180 270 Examples: -r90 --rot=180 Table 4: Barcode Parameters: Size and Position 7.6 Short Barcode Appearance (Quiet Zone, Print Ratio, …) Long Equivalent in v1 Format --bearertype=TYPE Description Sets the type of the bearer bar. Possible values are: none topandbottom rectangle top bottom default Bar above and below the barcode. Rectangle around the barcode. Horizontal bar above the barcode. Horizontal bar below the barcode. The former value horizontal is deprecated and has been replaced by topandbottom. Example: --bearertype=TOPANDBOTTOM - -bearerwidth=WIDTH gWIDTH Sets the width of a bearer bar. The unit of measurement is millimeters. Example: --bearerwidth=1.5 Page 18 of 27 T Bar Co de/ Em be d de d Use r M an ua l --notchheight=HEIGHT NHEIGHT Sets the notch height. The unit of measurement is millimeters. Example: --notchheight=2.0 --printratio=RATIO RRATIO Sets the print ratio (ratio of narrow to wide bars and spaces). For information on the print ratio, please refer to the Barcode Reference (see also section 3.2). Example: --printratio="1:2:1:3" --quietzoneh=WIDTH QhWIDTH Sets the width of the horizontal quiet zone. The horizontal quiet zone is the empty space at the left and at the right of the barcode. The unit of measurement is given via --quietzoneunit. (In v1 format: always millimeters.) Example: --quietzoneh=10 --quietzonev=HEIGHT QvHEIGHT Sets the height of the vertical quiet zone. The vertical quiet zone is the empty space at the top and at the bottom of the barcode. The unit of measurement is given via --quietzoneunit. (In v1 format: always millimeters.) Example: --quietzonev=10 Sets the unit in which the quiet zones are given (see -quietzoneh and --quietzonev). Possible values are: none no quiet zone (default). mod module widths. mm millimeters. mils mils (1 mil = 1/1000 inch). inch inches. px pixels. --quietzoneunit=UNIT Example: --quietzoneunit=mod Table 5: Barcode Parameters: Appearance (Quiet Zone, Print Ratio, …) 7.7 Text Settings Short Long -t --text=POSITION Equivalent in v1 Format Description Sets the position of the human readable text or hides it. Possible values are: below Draws the text below the bars. above Draws the text above the bars. h | hide Hides the text (draws only the bars). Examples: -th --text=HIDE a Same as --text=above in the default format. n Same as --text=hide in the default format. Toff --font=NAME fNAME Sets the font that is used for drawing the human readable text. Within PostScript documents the font must be specified via its name, within PCL documents via the PCL font number. Example (Postscript): --font=Helvetica Page 19 of 27 T Bar Co de/ Em be d de d Use r M an ua l Example (PCL): --font=4099 --fontsize=SIZE fSIZE Sets the size of the human readable text. The unit of measurement is points. --textdist=DISTANCE iDISTANCE Sets the distance between the bars and the text. The unit of measurement is millimeters. Table 6: Barcode Parameters: Text Settings 7.8 Specific PCL/PS Settings Short Long Equivalent in v1 Format Description --initgraphics I Calls the initgraphics command in a PostScript document. This may improve the positioning of the barcode if relative positioning is used. --movecursor e Moves the cursor in PCL to end of the barcode. Table 7: Barcode Parameters: Specific PCL/PS Settings 7.9 More Settings In addition to the parameters described above, there are numerous other parameters which allow more detailed adjustments of the barcodes respectively offer additional barcode specific settings. There is a number of specific settings related to 2D barcode symbologies like: PDF417, MicroPDF417, MacroPDF417 Data Matrix MaxiCode QR-Code, Micro QR-Code Codablock-F Aztec Code GS1 DataBar Expanded Stacked (RSS) Composite Barcodes Barcodes Sequences (Multiple Barcodes) ► All these additional parameters are available in the default parameter format only (not in v1 format)! ► For more information, please check out the TBarCode for Linux user manual http://www.tec-it.com/download/PDF/TBarCodeX9_Manual_EN.pdf. Page 20 of 27 T Bar Co de/ Em be d de d Use r M an ua l 8 Barcode Symbologies TBarCode/Embedded supports the following barcode symbologies. To specify the desired symbology use the parameter –bNUMBER with one of the numbers listed below (e.g., use –b20 for Code 128). For detailed information on the single barcode symbologies, please refer to the TEC-IT Barcode Reference http://www.tec-it.com/download/PDF/Barcode_Reference_EN.pdf. Number Barcode Symbology 0 Not a valid symbology 1 Code 11 2 Code 2OF5 Standard 3 Code 2OF5 Interleaved 4 Code 2OF5 IATA 5 Code 2OF5 Matrix (alias 2 of 5 Standard) 6 Code 2OF5 Data Logic 7 Code 2OF5 Industrial 8 Code 3 of 9 (Code 39) 9 Code 3 of 9 (Code 39) Extended 10 EAN-8 11 EAN-8 with 2 Digit Add-On 12 EAN-8 with 5 Digit Add-On 13 EAN-13 14 EAN-13 with 2 Digit Add-On 15 EAN-13 with 5 Digit Add-On 16 EAN-128 (supports AIS) 17 UPC 12 Digits 18 CodaBar 2 Widths 19 RESERVED FOR FUTURE USE 20 Code 128 21 Deutsche Post Leitcode 22 Deutsche Post Identcode 23 RESERVED FOR FUTURE USE 24 RESERVED FOR FUTURE USE 25 Code 93 26 RESERVED FOR FUTURE USE 27 RESERVED FOR FUTURE USE 28 Flattermarken 29 GS1 DataBar (RSS-14) 30 GS1 DataBar Limited (RSS) 31 GS1 DataBar Expanded (RSS) 32 Telepen Alpha 33 UCC / EAN-128 Page 21 of 27 T Bar Co de/ Em be d de d Use r M an ua l 34 UPC-A 35 UPC-A with 2 Digit Add-On 36 UPC-A with 5 Digit Add-On 37 UPC-E 38 UPC-E with 2 Digit Add-On 39 UPC-E with 5 Digit Add-On 40 USPS PostNet5 (ZIP) 41 USPS PostNet6 (ZIP+CD) 42 USPS PostNet9 (ZIP+4) 43 USPS PostNet10 (ZIP+4+CD) 44 USPS PostNet11 (ZIP+4+2) Delivery Point Barcode 45 USPS PostNet12 (ZIP+4+2+CD) Delivery Point Barcode 46 Plessey Code 47 MSI Code 48 SSCC-18 49 RESERVED FOR FUTURE USE 50 LOGMARS 51 Pharmacode One-Track 52 Pharma Zentralnummer (PZN) 53 Pharmacode Two-Track 54 RESERVED FOR FUTURE USE 55 PDF417 56 PDF417 Truncated 57 MaxiCode 58 QR-Code 59 Code 128 (Subset A) 60 Code 128 (Subset B) 61 Code 128 (Subset C) 62 Code 93 Extended 63 Australian Post Customer (Standard) 64 Australian Post Customer 2 65 Australian Post Customer 3 66 Australian Post Reply Paid 67 Australian Post Routing 68 Australian Post Redirection 69 ISBN Code (= EAN13P5) 70 Royal Mail 4 State (RM4SCC) 71 Data Matrix 72 EAN-14 73 RESERVED FOR FUTURE USE 74 Codablock-F 75 NVE-18 76 Japanese Postal Page 22 of 27 T Bar Co de/ Em be d de d Use r M an ua l 77 Korean Postal Authority 78 GS1 DataBar Truncated (RSS) 79 GS1 DataBar Stacked (RSS) 80 GS1 DataBar Stacked Omnidirectional (RSS) 81 GS1 DataBar Expanded Stacked (RSS) 82 Planet 12 83 Planet 14 84 MicroPDF417 85 USPS OneCode (4-State Customer Barcode) 86 Plessey Bidirectional 87 Telepen 88 GS1-128 89 ITF-14 90 KIX 91 RESERVED FOR FUTURE USE 92 Aztec Code 93 DAFT Code 94 Italian Postal 2 of 5 95 RESERVED FOR FUTURE USE 96 DPD Code 97 Micro QR-Code 98 HIBC LIC 128 99 HIBC LIC 39 100 HIBC PAS 128 101 HIBC PAS 39 102 HIBC LIC Data Matrix 103 HIBC PAS Data Matrix 104 HIBC LIC QR-Code 105 HIBC PAS QR-Code 106 HIBC LIC PDF417 107 HIBC PAS PDF417 108 HIBC LIC MicroPDF417 109 HIBC PAS MicroPDF417 110 HIBC LIC CODABLOCK-F 111 HIBC PAS CODABLOCK-F Table 8: Supported Barcode Symbologies Page 23 of 27 T Bar Co de/ Em be d de d Use r M an ua l 9 Licensing 9.1 General Information TBarCode/Embedded can be used immediately after installation. As long as you have not licensed the product an additional horizontal bar will be printed over the barcodes. Usually this horizontal bar does not affect the readability of the barcode for evaluation purposes. The purchase of a license (and applying the license file) removes this restriction. 9.2 Temporary License for Testing ► If you want to test the barcode generation without the demo bars on the output, please contact [email protected]. We can send you a temporary license file. 9.3 License Types There are three possible license modes to choose from: 9.4 Single-Server or Multi-Server Site World / Multi-Site Purchasing For purchasing a license please contact [email protected]. Your order should contain the following information: Host name of the ISD400 / ISD410 (can be found on the display) – for Single-Server licenses only. License Type Licensee (e.g. the name of your company) Number of Licenses 1D or 2D barcodes ► You can find the host name of the ISD400 / ISD410 on the front display of the spooling device or on the ISD administration page. 9.5 Installing the License File After sending your order to TEC-IT you will receive a file with your license data. This file is named “tbarcode-license-XXX.bin”. It must be installed via the ISD400 / ISD410 administration page (see section 4.4) in addition(!) to the filter package. Page 24 of 27 T Bar Co de/ Em be d de d Use r M an ua l 10 Contact and Support Information TEC-IT Datenverarbeitung GmbH Address: Phone: Fax: Email: Web: Wagnerstr. 6 AT-4400 Steyr Austria/Europe +43 / (0)7252 / 72 72 0 +43 / (0)7252 / 72 72 0 – 77 [email protected] http://www.tec-it.com AIX® is a registered trademark of IBM Corporation. HTML, DHTML, XML, XHTML are trademarks or registered trademarks of W3C, World Wide Web Consortium, Laboratory for Computer Science NE43-358, Massachusetts Institute of Technology, 545 Technology Square, Cambridge, MA 02139. JAVA® is a registered trademark of Sun Microsystems, Inc., 901 San Antonio Road, Palo Alto, CA 94303 USA. JAVASCRIPT® is a registered trademark of Sun Microsystems, Inc., used under license for technology invented and implemented b y Netscape. Linux® is a registered trademark of Linus Torvalds in several countries. Microsoft®, Windows®, Microsoft Word®, Microsoft Excel® are registered trademarks of Microsoft Corporation. Navision is a registered trademark of Microsoft Business Solutions ApS in the United States and/or other countries. Oracle® is a registered trademark of Oracle Corporation. PCL® is a registered trademark of the Hewlett-Packard Company. PostScript® is a registered trademark of Adobe Systems Inc. SAP, SAP Logo, R/2, R/3, ABAP, SAPscript are trademarks or registered trademarks of SAP AG in Germany (and in several other c ountries). UNIX® is a registered trademark of The Open Group All other products mentioned are trademarks or registered trademarks of their respective companies. If any trademark on our web site or in this document is not marked as trademark (or registered trademark), we ask you to send us a short message ([email protected]). Page 25 of 27 T Bar Co de/ Em be d de d Use r M an ua l Appendix A: The CUPS Log The CUPS log shows all errors which occurred during printing. TBarCode/Embedded filter errors are prefixed with the string “tbarcode:”. In order to open the error log proceed as follows: 1. Open the ISD400 / ISD410 info page (http://isd400host/info/). 2. Select Event Log . 3. Select Printing Services . Figure 8: CUPS Log – Step 1 Figure 9: CUPS Log – Step 2 Please note: ► The CUPS log level (error, debug, …) can be selected under Advanced CUPS settings . Page 26 of 27 T Bar Co de/ Em be d de d Use r M an ua l Appendix B: TBarCode Debug Information For retrieving detailed information on TBarCode related errors you can create an event log. Therefore proceed as follows: 1. Install the debugging software package “tbarcode-enable-debug.bin” (respectively “tbarcodeenable-debug-v1format.bin”) – see also sections 4.3 and 4.4. 2. Print the document where the error occurred. 3. Open the trace file on the ISD400 / ISD410 (http://isd400host/download/tbtrace.txt). 4. Remove the debugging package, when no longer needed. The debug information gives detailed information on all processed control sequences, on all adjusted parameters, etc. Errors are marked with the keyword “error”. Figure 10: TBarCode Debug Information As long as the debugging software package (see 1.) is installed, TBarCode/Embedded will write extensive trace output for each printed document respectively for each printed barcode: ► If you do not need the debug information any longer, please make sure to remove the TBarCode/Embedded debugging software package! Otherwise a huge amount of tracing information will be created, which a) may slow down printing and b) will continuously fill the hard disk on the ISD. If you have SSH access to the ISD you can delete the trace file as follows: rm /var/ftp/tbtrace.txt Page 27 of 27