1
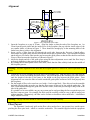
Alignment Figure 3: Key components of the loader. 1. Open the faceplates to a gap of 20 mm. Align the loader so that the ends of the faceplates are 1 to 2 mm from the guide plates and the inside faces of the faceplates line up with the inside edges of the two smaller shims, as shown in Figure 3. There should be enough play in the mounting holes of the loader base plate to achieve this alignment. 2. Insert a piece of fiber from the left through the guide tube, between the first pair of pinch rollers, between the two guide plates and out between the second pair of pinch rollers. Now rotate the left-hand pinch rollers to feed more fiber into the gap between the guide plates so that the fiber buckles and feeds a loop of fiber between the faceplates, as shown in Figure 3. 3. Adjust the height and tilt of the guide plates using the three adjustment screws until the fiber loop is accurately aligned over the grooves in the faceplates. 4. By rotating the left hand pinch rollers some more, check that the fiber reliably feeds into the middle of the faceplate grooves. Warning: Accurate alignment of the fiber and the faceplate grooves is critical for correct operation of the loader. 5. Loosen the set screw clamping the guide tube in its mounting post. Slide the tube to the right until the end is close to but not touching the pinch rollers. Adjust the height of the mounting post with washers until the height of the tube is the same as the height as the gap between the guide plates. Poor alignment here can cause the fiber to buckle outside the guide plates and hence fail to feed properly into the faceplates. 6. Put the length of fiber to be tested on a reel with a 1 inch central hole. Place this reel on the turntable included with the loader in such a way that the fiber comes off the reel in line with the guide tube. The fiber, when threaded through the guide tube into the loader, should not pass through a sharp bend at the inlet of the guide tube. If a suitable reel is not available, any pay out system can be used providing the force required to pay out the fiber is not too great. For example, the fiber could be carefully coiled in a tray so that it can pay out without tangling. Alternatively, the fiber can be fed into a closed box with a small hole – it should not tangle when it is fed out. Warning: The pay out force should be small for the loader to work correctly. Fiber Payout The Automatic Loader only pulls on the fiber with a modest force. Any greater force would require pinching the fiber quite hard – which we consider undesirable. The turntable supplied with the equipment LOADER User's Manual 5 Installation