1
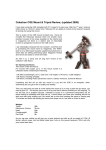
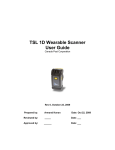
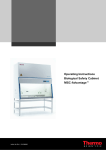
U s er Manual Thermo Scientific™ SampleSeal™ 96-tube Heat Sealer Version 01 April 2014 Table of Contents Chapter 1 Notices. . . . . . . . . . . . . . . . . . . . . . . . . . . . . . . . . . . . . . . . . . . . . . . . . . . . . . . . . . . . . . . . Safety. . . . . . . . . . . . . . . . . . . . . . . . . . . . . . . . . . . . . . . . . . . . . . . . . . . . . . . . . . . . . . . . . . Safety Standards. . . . . . . . . . . . . . . . . . . . . . . . . . . . . . . . . . . . . . . . . . . . . . . . . . . . . . . . . . Safety Labels. . . . . . . . . . . . . . . . . . . . . . . . . . . . . . . . . . . . . . . . . . . . . . . . . . . . . . . . . . . . Warranty. . . . . . . . . . . . . . . . . . . . . . . . . . . . . . . . . . . . . . . . . . . . . . . . . . . . . . . . . . . . . . . . Technical Support Contact Details. . . . . . . . . . . . . . . . . . . . . . . . . . . . . . . . . . . . . . . . . . . . . Chapter 2 Introduction. . . . . . . . . . . . . . . . . . . . . . . . . . . . . . . . . . . . . . . . . . . . . . . . . . . . . . . . . . . . Description. . . . . . . . . . . . . . . . . . . . . . . . . . . . . . . . . . . . . . . . . . . . . . . . . . . . . . . . . . . . . . Overview . . . . . . . . . . . . . . . . . . . . . . . . . . . . . . . . . . . . . . . . . . . . . . . . . . . . . . . . . . . . . . . Chapter 3 Unpacking and installation. . . . . . . . . . . . . . . . . . . . . . . . . . . . . . . . . . . . . . . . . . . . . . . . Unpacking the SampleSeal unit. . . . . . . . . . . . . . . . . . . . . . . . . . . . . . . . . . . . . . . . . . . . . . . Installing the SampleSeal Heat Sealer . . . . . . . . . . . . . . . . . . . . . . . . . . . . . . . . . . . . . . . . . . Operating Conditions. . . . . . . . . . . . . . . . . . . . . . . . . . . . . . . . . . . . . . . . . . . . . . . . . . . . . . . Power. . . . . . . . . . . . . . . . . . . . . . . . . . . . . . . . . . . . . . . . . . . . . . . . . . . . . . . . . . . . . . . . . . Air. . . . . . . . . . . . . . . . . . . . . . . . . . . . . . . . . . . . . . . . . . . . . . . . . . . . . . . . . . . . . . . . . . . . Purge Gas . . . . . . . . . . . . . . . . . . . . . . . . . . . . . . . . . . . . . . . . . . . . . . . . . . . . . . . . . . . . . . Chapter 4 Start up . . . . . . . . . . . . . . . . . . . . . . . . . . . . . . . . . . . . . . . . . . . . . . . . . . . . . . . . . . . . . . . Safety. . . . . . . . . . . . . . . . . . . . . . . . . . . . . . . . . . . . . . . . . . . . . . . . . . . . . . . . . . . . . . . . . . Power Up. . . . . . . . . . . . . . . . . . . . . . . . . . . . . . . . . . . . . . . . . . . . . . . . . . . . . . . . . . . . . . . Selecting labware. . . . . . . . . . . . . . . . . . . . . . . . . . . . . . . . . . . . . . . . . . . . . . . . . . . . . . . . . Sealing Partially Populated Racks . . . . . . . . . . . . . . . . . . . . . . . . . . . . . . . . . . . . . . . . . . . . . Functions. . . . . . . . . . . . . . . . . . . . . . . . . . . . . . . . . . . . . . . . . . . . . . . . . . . . . . . . . . . . . . . Accessing the function screen. . . . . . . . . . . . . . . . . . . . . . . . . . . . . . . . . . . . . . . . . . . . . . Gas Purge. . . . . . . . . . . . . . . . . . . . . . . . . . . . . . . . . . . . . . . . . . . . . . . . . . . . . . . . . . . . Guillotine. . . . . . . . . . . . . . . . . . . . . . . . . . . . . . . . . . . . . . . . . . . . . . . . . . . . . . . . . . . . . Carriage Extend. . . . . . . . . . . . . . . . . . . . . . . . . . . . . . . . . . . . . . . . . . . . . . . . . . . . . . . . Model Information. . . . . . . . . . . . . . . . . . . . . . . . . . . . . . . . . . . . . . . . . . . . . . . . . . . . . . . . . Chapter 5 Loading foil . . . . . . . . . . . . . . . . . . . . . . . . . . . . . . . . . . . . . . . . . . . . . . . . . . . . . . . . . . . . Chapter 6 Sealing 96-format 2D tube racks. . . . . . . . . . . . . . . . . . . . . . . . . . . . . . . . . . . . . . . . . . . Reset. . . . . . . . . . . . . . . . . . . . . . . . . . . . . . . . . . . . . . . . . . . . . . . . . . . . . . . . . . . . . . . . . . Open/Close. . . . . . . . . . . . . . . . . . . . . . . . . . . . . . . . . . . . . . . . . . . . . . . . . . . . . . . . . . . . . . Loading Labware . . . . . . . . . . . . . . . . . . . . . . . . . . . . . . . . . . . . . . . . . . . . . . . . . . . . . . . . . GO. . . . . . . . . . . . . . . . . . . . . . . . . . . . . . . . . . . . . . . . . . . . . . . . . . . . . . . . . . . . . . . . . . . . STOP. . . . . . . . . . . . . . . . . . . . . . . . . . . . . . . . . . . . . . . . . . . . . . . . . . . . . . . . . . . . . . . . . . Cycle Time. . . . . . . . . . . . . . . . . . . . . . . . . . . . . . . . . . . . . . . . . . . . . . . . . . . . . . . . . . . . . . Chapter 7 Maintenance . . . . . . . . . . . . . . . . . . . . . . . . . . . . . . . . . . . . . . . . . . . . . . . . . . . . . . . . . . . User maintenance. . . . . . . . . . . . . . . . . . . . . . . . . . . . . . . . . . . . . . . . . . . . . . . . . . . . . . . . . Waste Bin . . . . . . . . . . . . . . . . . . . . . . . . . . . . . . . . . . . . . . . . . . . . . . . . . . . . . . . . . . . . Cleaning and de-contamination. . . . . . . . . . . . . . . . . . . . . . . . . . . . . . . . . . . . . . . . . . . . . Rack Nest . . . . . . . . . . . . . . . . . . . . . . . . . . . . . . . . . . . . . . . . . . . . . . . . . . . . . . . . . . . . Thermo Scientific 1-5 1-5 1-5 1-6 1-6 1-6 2-1 2-1 2-2 3-1 3-1 3-2 3-2 3-2 3-3 3-3 4-1 4-1 4-2 4-4 4-5 4-6 4-6 4-6 4-6 4-6 4-7 5-1 6-1 6-1 6-1 6-2 6-3 6-3 6-3 7-1 7-1 7-1 7-1 7-2 Thermo Scientific™ SampleSeal™ 96-tube Heat Sealer | 1-3 Table of Contents Sealing pins. . . . . . . . . . . . . . . . . . . . . . . . . . . . . . . . . . . . . . . . . . . . . . . . . . . . . . . . . . . 7-2 Punch and anvil. . . . . . . . . . . . . . . . . . . . . . . . . . . . . . . . . . . . . . . . . . . . . . . . . . . . . . . . 7-3 Touchscreen User Interface. . . . . . . . . . . . . . . . . . . . . . . . . . . . . . . . . . . . . . . . . . . . . . . . 7-3 Non User Maintenance. . . . . . . . . . . . . . . . . . . . . . . . . . . . . . . . . . . . . . . . . . . . . . . . . . . . . 7-4 Punch and anvil replacement . . . . . . . . . . . . . . . . . . . . . . . . . . . . . . . . . . . . . . . . . . . . . . 7-4 Guillotine replacement . . . . . . . . . . . . . . . . . . . . . . . . . . . . . . . . . . . . . . . . . . . . . . . . . . . 7-4 Chapter 8 Troubleshooting. . . . . . . . . . . . . . . . . . . . . . . . . . . . . . . . . . . . . . . . . . . . . . . . . . . . . . . . . 8-1 Messages. . . . . . . . . . . . . . . . . . . . . . . . . . . . . . . . . . . . . . . . . . . . . . . . . . . . . . . . . . . . . . . 8-1 Manual Recovery . . . . . . . . . . . . . . . . . . . . . . . . . . . . . . . . . . . . . . . . . . . . . . . . . . . . . . . . . 8-2 Chapter 9 SampleSeal Remote Control. . . . . . . . . . . . . . . . . . . . . . . . . . . . . . . . . . . . . . . . . . . . . . . 9-1 General Command Syntax. . . . . . . . . . . . . . . . . . . . . . . . . . . . . . . . . . . . . . . . . . . . . . . . . . . 9-1 Command Set Definition. . . . . . . . . . . . . . . . . . . . . . . . . . . . . . . . . . . . . . . . . . . . . . . . . . . . 9-2 Stop. . . . . . . . . . . . . . . . . . . . . . . . . . . . . . . . . . . . . . . . . . . . . . . . . . . . . . . . . . . . . . . . . 9-2 Reset Instrument . . . . . . . . . . . . . . . . . . . . . . . . . . . . . . . . . . . . . . . . . . . . . . . . . . . . . . . 9-3 Go. . . . . . . . . . . . . . . . . . . . . . . . . . . . . . . . . . . . . . . . . . . . . . . . . . . . . . . . . . . . . . . . . . 9-3 Open/Close . . . . . . . . . . . . . . . . . . . . . . . . . . . . . . . . . . . . . . . . . . . . . . . . . . . . . . . . . . . 9-3 Feed foil. . . . . . . . . . . . . . . . . . . . . . . . . . . . . . . . . . . . . . . . . . . . . . . . . . . . . . . . . . . . . . 9-3 Cut foil. . . . . . . . . . . . . . . . . . . . . . . . . . . . . . . . . . . . . . . . . . . . . . . . . . . . . . . . . . . . . . . 9-4 Request status. . . . . . . . . . . . . . . . . . . . . . . . . . . . . . . . . . . . . . . . . . . . . . . . . . . . . . . . . 9-4 Chapter 10 Disposal. . . . . . . . . . . . . . . . . . . . . . . . . . . . . . . . . . . . . . . . . . . . . . . . . . . . . . . . . . . . . . 10-1 1-4 | Thermo Scientific™ SampleSeal™ 96-tube Heat Sealer Thermo Scientific 1 Notices Safety Before using the Thermo Scientific™ SampleSeal™ heat sealer, you should ensure that you are properly trained in: • The correct and safe operation of the SampleSeal instrument • The correct and safe maintenance procedures for SampleSeal if you are involved in the servicing or repair of the instrument Safety Standards The SampleSeal heat sealer is CE compliant, TUV certified, and CSA Certified. Product has been Tested according to CAN/CSA C22.2 No.61010-1:2012 UL 61010-1:2012 EN 61010-1:2010 The product was voluntarily tested according to the relevant safety requirements noted above. It can be marked with the certification mark above. The mark must not be altered in any way. This product certification system operated by TUV SUD “Testing and Certification Regulations”. TUV SUD America Inc. is an OSHA recognized NRTL and a Standards Council of Canada accredited certification body. NOTE: All references to TUV and SUD include the two dots over the “U”. Thermo Scientific Thermo Scientific™ SampleSeal™ 96-tube Heat Sealer | 1-5 Chapter 1 | Notices Safety Labels The SampleSeal unit has a number of safety labels intended to protect the operator from injury, pay attention to these labels at all times. A WARNING notice indicates a potentially hazardous situation which, if not avoided, could result in serious injury or death. Failure to follow WARNING notices may result in serious injury or death. A CAUTION notice indicates a potentially hazardous situation which, if not avoided, may result in injury. Failure to follow CAUTION notices may result in personal injury or damage to labware or the instrument. Warranty Standard warranty is 12 months or 1250 sealing cycles (as recorded by the Cycle Counter) for the cutting tool and guillotine; both of which can be replaced in the field by a qualified technician. Enhanced preventative maintenance and service packages are available. For further details, contact Technical Support. Technical Support Contact Details North America and ROW Technical Support Europe Technical Support Thermo Fisher Scientific Thermo Fisher Scientific 75 Panorama Creek Drive Robert Bosch Str. 1 Rochester, NY 14625 USA 63505 Langenselbold Tel: + 585 586 8800 Germany 1 800 625 4327 email: [email protected] 1-6 | Thermo Scientific™ SampleSeal™ 96-tube Heat Sealer Tel: +49 (0) 6184 906 000 email: [email protected] Thermo Scientific 2 Introduction Description The Thermo Scientific™ SampleSeal™ heat sealer is a laboratory instrument designed for the foil sealing of racks of 2D and non‑2D barcoded storage tubes. This manual describes the function of the 96-format version of SampleSeal only and due to a policy of continuous improvement contents are subject to change without notice. The SampleSeal unit is intended for research use only and for use as a tube sealer. It should not be used for any other purpose. SampleSeal can be used as a standalone device or integrated into robotic platforms. Part Number Labware Compatibility Detail 4220-096 SampleSeal 96-format Foil Heat Sealing and Cutting Instrument 4221-040 SampleSeal 40μm Easy-pierce Foil Compatible Labware Thermo Scientific 3734 Matrix 0.5ml Open Top 2D Barcoded tube NS 3735 Matrix 0.5ml Open Top 2D Barcoded tube S 3731-11 Matrix 0.75ml Open Top 2D Barcoded tube NS 3732 Matrix 0.75ml Open Top 2D Barcoded tube S 3791 Matrix 1.4ml Open Top 2D Barcoded tube NS 3792 Matrix 1.4ml Open Top 2D Barcoded tube S 3742 Matrix 1.0ml UnCapped ScrewTop 2D Barcoded tube S Thermo Scientific™ SampleSeal™ 96-tube Heat Sealer | 2-1 Chapter 2 | Introduction Overview Removable foil cover Waste bin Operator push buttons (x4) Touch screen Service door Rack loading door Electrical panel cover Identification label Services connection point 2-2 | Thermo Scientific™ SampleSeal™ 96-tube Heat Sealer Thermo Scientific 3 Unpacking and installation Unpacking the SampleSeal unit WARNING! The weight of SampleSeal is approximately 51.4kg (113lb). Please ensure that the instrument is handled safely by at least two people and that appropriate lifting methods are employed. Always lift the unit using the recessed lifting handles in the base of the unit. Never lift this equipment by the extended carriage. Failure to follow this instruction may cause the carriage to become detached which may result in serious injury. Check that all tables, safety cabinets, and other equipment are capable of safely supporting the SampleSeal unit. Thermo Scientific Thermo Scientific™ SampleSeal™ 96-tube Heat Sealer | 3-1 Chapter 3 | Unpacking and installation Installing the SampleSeal Heat Sealer The SampleSeal heat sealer is designed for laboratory use. Dimensions are given below: 36.2 cm (14.3 in) 61 cm (24 in) 85 cm (33.5 in) The instrument should be installed on a flat surface in close proximity to electricity, a compressed air supply and a purge gas supply if gas purge is required. NOTE: Ensure that there is sufficient room behind the instrument to access the ON/OFF switch. Do not cover the air vents at the rear of the machine as this may cause overheating. WARNING! For the machine to operated properly after unpacking. Before first use the Anvil Plate must be pushed fully towards the front of the machine (this can be done by hand when loading the foil). Operating Conditions Operating Temperature Humidity Maximum Duty Cycle 15°C to 30°C <75% RH non condensing 30 racks / hour Power The SampleSeal instrument requires an AC main supply. The connection is made at the switched IEC inlet at the rear of the unit. Voltage Frequency 85 to 264V AC 47 to 63 Hz 3-2 | Thermo Scientific™ SampleSeal™ 96-tube Heat Sealer Thermo Scientific Unpacking and installation | Chapter 3 Air The SampleSeal instrument requires a clean, dry, oil free compressed air supply. The air connection is via a 6mm pushfit connector at the rear of the instrument. The installer must ensure that there is a means of safely isolating the air supply, for service or in the event of an emergency. CAUTION! Oil or water in the air supply and or a supply pressure greater than 10bar (140psi) will damage the instrument and invalidate the warranty. Quality Pressure Flow Clean, dry, oil free 5.9 to 8.3 bar (85 to 120 psi) 50 slpm (1.77scfm) Purge Gas The purge gas connection is via a 4mm pushfit connector at the rear of the instrument. The installer must ensure that there is a means of safely isolating the purge gas supply, for service or in the event of an emergency. WARNING! Argon and Nitrogen are odorless, colorless gases that can cause serious injury or death by suffocation. Use only in well ventilated areas and install an oxygen monitor in an appropriate location. WARNING! DO NOT connect flammable or reactive gases to the purge supply. Failure to comply may result in serious injury or death. CAUTION! Oil or water in the purge gas supply and or a supply pressure greater than 10bar (140psi) will damage the instrument and invalidate the warranty. Quality Pressure Flow Clean, dry, inert gas or nitrogen 3.5 to 8.3 bar (50 to 120 psi) 5 slpm (0.18 scfm) CAUTION! Purge gas must always be connected for correct operation of SampleSeal. If inert gas is not available, tee off the air supply line via suitable 6mm-4mm reducing connector. Thermo Scientific Thermo Scientific™ SampleSeal™ 96-tube Heat Sealer | 3-3 Chapter 3 | Unpacking and installation 3-4 | Thermo Scientific™ SampleSeal™ 96-tube Heat Sealer Thermo Scientific Start up 4 Safety The SampleSeal heat sealer contains moving parts and high temperature components that can cause serious injury. The SampleSeal unit is designed to protect users from these hazards under normal operating conditions. WARNING! Do not attempt to override the loading or service door safety interlocks. Failure to comply may result in serious injury. Do not attempt to access the interior of the device through any other openings and do not remove panels – there are no user serviceable components inside. Failure to comply may result in serious injury or death. In an emergency, turn off the SampleSeal unit. The power switch is located at the back of the instrument. Thermo Scientific Thermo Scientific™ SampleSeal™ 96-tube Heat Sealer | 4-1 Chapter 4 | Start up Power Up To power up the instrument, connect the electrical and compressed air supplies and turn on the power switch at the back of the instrument. After a short delay the touchscreen will be illuminated. Press the RESET pushbutton. The instrument will initialize and, if foil is loaded and the compressed air supply is connected, the sealer will start to warm up. 4-2 | Thermo Scientific™ SampleSeal™ 96-tube Heat Sealer Thermo Scientific Start up | Chapter 4 When the temperature is close to set point there is a short delay to allow the temperature of the sealing pins to stabilize. The SampleSeal heat sealer is now ready for use. Thermo Scientific Thermo Scientific™ SampleSeal™ 96-tube Heat Sealer | 4-3 Chapter 4 | Start up Selecting labware The SampleSeal heat sealer supports 4 different types of Thermo Scientific™ Matrix™ 96-way racked tubes: • Matrix 0.5mL 2D barcoded • Matrix 0.75mL 2D barcoded • Matrix 1.4mL 2D barcoded • Matrix 1.0mL screw cap To select a particular labware type, press the labware button highlighted below. WARNING! Use only specified labware. Failure to comply may result in the device being damaged and invalidate the warranty. Select the desired labware by pressing the corresponding button, followed by Save, as shown below: 4-4 | Thermo Scientific™ SampleSeal™ 96-tube Heat Sealer Thermo Scientific Start up | Chapter 4 Sealing Partially Populated Racks CAUTION! It is important that there are no tubes present in columns that have been designated as empty. The SampleSeal operating system assumes that racks are placed on the rack nest with column 1 closest to the instrument. Failure to comply with these conventions will result in a failure to process the rack and manual recovery of the labware will be required. It is possible to configure the SampleSeal unit to seal racks with empty columns at each or either end. On the main screen touch the Columns tab. Using the sliders or the -/+ buttons deselect columns as required. Touch OK, or if the selection has been changed, Save to accept the column selection. NOTE: To retain the settings after a power cycle it is necessary to seal a rack. Thermo Scientific Thermo Scientific™ SampleSeal™ 96-tube Heat Sealer | 4-5 Chapter 4 | Start up Functions The SampleSeal heat sealer has a number of functions that can be enabled/disabled by the user according to requirements. Accessing the function screen Press Func on the main screen to access the function screen. Gas Purge If purge gas is connected to the unit, tubes are automatically purged as the rack moves into the instrument. The gas purge can be disabled at the function screen by pressing the circular button to the left of the text. Guillotine Similarly the guillotine can be disabled. By default SampleSeal automatically cuts the waste foil into thin ribbons for optimum compaction in the waste bin and easy disposal. The user may wish to disable this function and handle the waste using an alternative method – contact Technical Support for advice on suitable waste handling methods. Carriage Extend By default SampleSeal extends the rack loading carriage to its full extent (see section 3.2 for dimensions) for optimum accessibility, especially when integrated with a robotic picker. For manual operation on a laboratory bench, the user may prefer that the rack is only partially extended to save space. This is achieved by disabling the Full extend Enable function. Manual access is unimpaired. 4-6 | Thermo Scientific™ SampleSeal™ 96-tube Heat Sealer Thermo Scientific Start up | Chapter 4 Model Information The info screen is accessed from the main screen and displays build information and the number of racks the SampleSeal has processed. Due to quality control checks during manufacture the cycle count will be greater than zero on delivery. Thermo Scientific Thermo Scientific™ SampleSeal™ 96-tube Heat Sealer | 4-7 Chapter 4 | Start up 4-8 | Thermo Scientific™ SampleSeal™ 96-tube Heat Sealer Thermo Scientific 5 Loading foil WARNING! Do not attempt to access the interior of SampleSeal when the sealing pins are hot. Contact with the hot pins may result in burns. WARNING! For the machine to operated properly. Before first use, the Anvil Plate must be pushed fully towards the front of the machine (this can be done by hand when loading the foil). CAUTION! The edges of the sealing foil are sharp and unless handled carefully may result in minor cuts. Wear latex or nitrile laboratory gloves when handling foil. To load a roll of foil: • Removing the service door will disconnect power to heating pins allowing safe access to internal components • Remove the foil cover from the top of the instrument Thermo Scientific Thermo Scientific™ SampleSeal™ 96-tube Heat Sealer | 5-1 Chapter 5 | Loading foil • Remove the waste bin from the rear of the instrument • From the function screen disable the guillotine • From the function screen go to the foil screen on the user interface • Wait until the sealing pins are at a safe temperature, as indicated at the touch screen, then remove the service door by turning the quarter turn fasteners and lifting the panel from the location tabs at its base. Opening the service door will trigger the safety circuit and remove air from all actuators which will now be raised. • Load the foil roll and thread the foil through the instrument following the instructions on the inside face of the service panel • Index the foil by pressing the >> button on the foil screen (Step 12 on the foil loading instruction label). Approximately 2 meters of foil will be unwound from the reel to ensure the foil used to seal subsequent racks has not been handled by the operator. The foil index may be stopped at any time by pressing the STOP button. • From the function screen enable the guillotine • Replace the foil cover • Replace the waste bin • Replace the service door and reset the SampleSeal instrument • Wait for unit to return to sealing temperature 5-2 | Thermo Scientific™ SampleSeal™ 96-tube Heat Sealer Thermo Scientific 6 Sealing 96-format 2D tube racks Reset Press the RESET button to initialize the SampleSeal unit after it has been switched on and to return the unit to a known state after a STOP or to recover from a fault or to initialize after manual recovery from a fault. Open/Close By default, the instrument leaves the carriage extended at the end of the cycle ready for the next rack. The rack carriage may be retracted or extended between cycles by pressing the OPEN/ CLOSE push button. Thermo Scientific Thermo Scientific™ SampleSeal™ 96-tube Heat Sealer | 6-1 Chapter 6 | Sealing 96-format 2D tube racks Loading Labware WARNING! Do not place your hand inside the SampleSeal unit while loading labware – there are hot components inside the unit. CAUTION! The SampleSeal operating system assumes that racks are placed on the rack nest with column 1 closest to the instrument. It is important that this convention is observed when processing partially populated racks. Check that the rack nest is free from debris. Seal quality may be impaired if the base of the 96W tubes do not sit directly on the base of the rack nest. Place the rack to be sealed in the rack nest. The rack should be oriented so that A1 is located at the back right corner of the rack nest. A red screw indicates the A1 position. A1 Check that the rack is level and within the raised tabs at the corners of the rack nest as shown in the picture below. 6-2 | Thermo Scientific™ SampleSeal™ 96-tube Heat Sealer Thermo Scientific Sealing 96-format 2D tube racks | Chapter 6 GO The GO button initiates a sealing cycle and flashes throughout the sealing cycle. STOP The STOP pushbutton is illuminated throughout a sealing cycle and other operations. Pressing STOP halts the SampleSeal unit immediately. If STOP is pressed mid-cycle then manual recovery of labware may be required and the instrument must be RESET. Cycle Time The SampleSeal unit processes a fully populated rack of 96-format tubes in approximately 100 seconds. Thermo Scientific Thermo Scientific™ SampleSeal™ 96-tube Heat Sealer | 6-3 Maintenance 7 User maintenance Waste Bin CAUTION! If the waste bin is overfilled, waste foil may not be ejected from the instrument, causing the guillotine to fail. The waste bin at the rear of the instrument has sufficient capacity for 100 racks to be processed before emptying. Cleaning and de-contamination The outer surfaces of the SampleSeal unit can be cleaned with typical non abrasive laboratory cleaning agents or 70% alcohol solutions. The system also tolerates decontamination regimes based on hydrogen peroxide (e.g. that offered by Bioquell Inc). CAUTION! Do not use Formaldehyde as a decontamination agent as this may cause permanent damage to components within SampleSeal and invalidate the warranty. Do not use acetone as a cleaning agent as damage to components, especially plastics or painted surfaces, may occur. Internal surfaces may be wiped clean using the same agents. A vacuum cleaner may be used to remove any debris inside the instrument. The system may be used with samples containing DMSO as a cryopreservative but care must be taken to prevent contact with painted surfaces and plastic components. Thermo Scientific Thermo Scientific™ SampleSeal™ 96-tube Heat Sealer | 7-1 Chapter 7 | Maintenance Rack Nest Seal quality may be impaired if the base of the 96-tube rack does sit directly on the base of the rack nest. The rack nest should be regularly inspected and wiped clean or a vacuum cleaner used to remove any debris. Sealing pins The sealing pins are nickel coated to prevent the foil sticking but may need wiping clean periodically (when unit is cool) to ensure optimum seal quality. WARNING! Do not attempt to access the interior of the SampleSeal unit when the sealing pins are hot. Contact with the hot pins may result in burns. CAUTION! Do not use abrasive cleaning agents or scouring pads on the sealing pins as the nickel coating will be damaged. CAUTION! Do not spray cleaning agents directly onto the sealing pins or into other parts of the instrument. This may result in damage to the unit. To clean the sealing pins: • Wait until the platen is at 40°C, as indicated at the touchscreen, then remove the service door by turning the quarter turn fasteners and lifting the panel from the location tabs at its base. Opening the service door will trigger the safety circuit and remove air from all actuators which will now be raised. • Clean the sealing pins with a wet cotton swab. Take care to remove all deposits. DO NOT use abrasive cleaning agents or scouring pads as the nickel coating will be damaged. • For stubborn deposits a solvent may be required; acetone may be used but take extreme care to prevent contact with painted parts. • Wipe the platen dry with a soft dry cloth and inspect for any residue. If there is none replace the service door and reset the instrument • Reset the sealing temperature 7-2 | Thermo Scientific™ SampleSeal™ 96-tube Heat Sealer Thermo Scientific Maintenance | Chapter 7 Punch and anvil The 96-format punch and anvil have a life of at least 1250 racks but may need cleaning periodically before replacement to ensure optimum seal quality. WARNING! Take extreme care when accessing the interior of SampleSeal when the sealing pins are hot. Contact with the hot pins may result in burns. CAUTION! The 96-format punch is sharp; wear laboratory gloves and take care to avoid injury. To clean the punch: • Remove the service door by turning the quarter turn fasteners and lifting the panel from the location tabs at its base. Opening the service door will trigger the safety circuit and remove air from all actuators which will now be raised. • Using a soft bristle brush, remove any debris from the cutting faces and in between the punches. For stubborn debris, an air duster may be required. Do not use any hard or abrasive item to clean the punch as this may cause permanent damage to it. • Replace the service door and reset the instrument Touchscreen User Interface CAUTION! Do not use fluid cleaners on the touchscreen. Failure to comply may result in the device being damaged and invalidate the warranty. To clean the touch screen gently wipe with a microfiber lens cloth or similar lint free cloth. Thermo Scientific Thermo Scientific™ SampleSeal™ 96-tube Heat Sealer | 7-3 Chapter 7 | Maintenance Non User Maintenance The SampleSeal unit is designed to be maintenance free with the exception of the 96-format punch, anvil and guillotine, which are wear parts. Punch and anvil replacement The punch and anvil are wear items. Contact the service team for details if replacement is required. Guillotine replacement The guillotine is also a wear item. Contact the service team if replacement is required. 7-4 | Thermo Scientific™ SampleSeal™ 96-tube Heat Sealer Thermo Scientific Troubleshooting 8 Messages Notifications and error messages are displayed on the messages screen accessed by the Msgs button on the main screen. Selecting an individual message by touching the message text displays further information in the Details section of the screen. To acknowledge and clear a message, select the message and press OK. Press Back to return to main screen. Thermo Scientific Thermo Scientific™ SampleSeal™ 96-tube Heat Sealer | 8-1 Chapter 8 | Troubleshooting Manual Recovery WARNING! Do not attempt to override the loading or service door safety interlocks. Failure to comply may result in serious injury. WARNING! Do not attempt to access the interior of the device through any other openings and do not remove panels – there are no user serviceable components inside. Failure to comply may result in serious injury or death. WARNING! Do not attempt to access the interior of the SampleSeal instrument when the sealing pins are hot. Contact with the hot pins may result in burns. To recover failed labware from the interior of SampleSeal: • Removing the service door disconnects power to the heating pins, resulting in cooling for safe access to internal components • Remove the service door by turning the quarter turn fasteners and lifting the panel from the location tabs at its base. • The actuators will all be raised and it should be possible to move the rack carriage by hand when the power is off. Similarly the foil drive may also be driven by hand if necessary. • Take care not to damage components inside the unit during recovery and remove any debris that may be present. • It is possible to move the anvil along the runners by hand to assist in recovery, as shown in the picture below: 8-2 | Thermo Scientific™ SampleSeal™ 96-tube Heat Sealer Thermo Scientific Troubleshooting | Chapter 8 • Before pressing RESET ensure the anvil is in its home position against the hard stops, as shown in the picture below, failure to do this will result in an anvil not home error message at the GUI. • Reload the foil if required. • Replace the service door and reset the instrument. • Wait for the sealing temperature to return to the original value. • Ensure the drive roller (shown below) is free of debris Thermo Scientific Thermo Scientific™ SampleSeal™ 96-tube Heat Sealer | 8-3 9 SampleSeal Remote Control The SampleSeal instrument can be controlled remotely from a connected computer using simple serial commands. The instrument is provided with a USB connector for remote control operation (USB A female). When connected to a USB port on a computer a virtual serial port will be created on the computer (requires FTDI VCP drivers on the computer). The serial communications parameters required for remote control of the instrument are: • 115200 baud • 8 data bits • 1 stop bit • no parity • no flow control General Command Syntax All commands and responses are expressed in plain ASCII. Any terminal emulator program can conveniently be used to communicate with the instrument (e.g. Hyperterminal or PuTTY). For ease of use it is likely that the user would wish to configure their terminal emulation software with the following features enabled: • local echo enable - so you can see what you type • send carriage return and line feed for enter (add carriage return to newline) - so your typed commands end on a new line • add Linefeed to received carriage return - so responses from the instrument are displayed correctly Thermo Scientific Thermo Scientific™ SampleSeal™ 96-tube Heat Sealer | 9-1 Chapter 9 | SampleSeal Remote Control All commands sent to the instrument must be formatted as follows: • begin with a ‘>’ character (ASCII 62) • a ‘>’ is regarded as the beginning of a command even if it occurs in the middle of another command • the body of the command follows the ‘>’ character • commands may contain an optional checksum after the body of the command. This is represented by characters ‘;xx’, where xx is the hexadecimal sum of all characters before the ‘;’ • commands are terminated with a carriage return (CR) character (ASCII 13) or a line feed (LF) character (ASCII 10) • commands are not case sensitive Responses from the instrument are formatted as follows: • responses from the board start with a ‘<’ character (ASCII 60) • this is followed by a single character digit indicating the type of response 0 Successful end of a command 1 Successful start of a command - only generated if the command does not end immediately 2 Data from an executing command, there will be 0..many of these between the <1 start and <0 end 3 Failed - command was corrupted, probably a bad checksum 4 Failed - not recognized. Command was correctly formatted but does not correspond to a known command or it has bad parameters 5 Failed - generic failure then some optional (response-specific) text checksum represented by characters ‘;xx’, where xx is the hexadecimal sum of all characters before the ‘;’ responses are terminated with a carriage return (CR) character (ASCII 13) Command Set Definition The following sections describe the commands used to remotely operate the instrument, and the responses expected for each command. Stop • stops any currently underway operation (equivalent to pressing Stop button) • command ‘stop’ • normally no response 9-2 | Thermo Scientific™ SampleSeal™ 96-tube Heat Sealer Thermo Scientific SampleSeal Remote Control | Chapter 9 Reset Instrument • resets the instrument (equivalent to pressing Reset button) • command ‘srm’ • normal response is series of messages similar to: • ‘<1’ • ‘<2 Reset’ • ‘<0’ Go • Start a cycle (equivalent to pressing the Go button) • command ‘sgo’ • normal response is series of messages similar to: • ‘<1’ • ‘<2 Seal and Punch’ • ‘<0’ Open/Close • equivalent to using the Open/Close button • command ‘soc’ opens the hatch if presently closed, closes it if presently open (toggle action like button) • command ‘sop’ opens the hatch • command ‘scl’ closes the hatch • normal response is series of messages similar to: • ‘<1’ • ‘<2 Open’ • ‘<0’ Feed foil • equivalent to selecting one of the ‘feed foil’ actions on the touch screen panel • command ‘sin’ feeds small amount of foil • command ‘sfd’ feeds longer length of foil • normal response is series of messages similar to: • ‘<1’ • ‘<2 Inch Foil’ • ‘<0’ Thermo Scientific Thermo Scientific™ SampleSeal™ 96-tube Heat Sealer | 9-3 Chapter 9 | SampleSeal Remote Control Cut foil • equivalent to selecting the ‘cut foil’ action on the touch screen panel • command ‘sct’ • normal response is series of messages similar to: • ‘<1’ • ‘<2 Cut Foil’ • ‘<0’ Request status • this command allows the controlling computer to request the status of the instrument • the status is returned as a text description equivalent to what is displayed on the touch screen panel • the status description may contain internal delimiters represented as ‘|’ characters (ASCII 124) • command ‘?st’ • response ‘<0ST[ status text ]’ 9-4 | Thermo Scientific™ SampleSeal™ 96-tube Heat Sealer Thermo Scientific Disposal 10 SampleSeal is required to comply with the European Union’s Waste Electrical & Electronic Equipment (WEEE) Directive 2002/96/EC, and is marked with the following symbol: Thermo Fisher Scientific has contracted with one or more recycling or disposal companies in the European Union (EU) and these companies will dispose of or recycle this product. Please contact Thermo Fisher Scientific at the address given in the Technical Support Contacts section of this User Manual for further information on compliance with these Directives and the recyclers in your country. Thermo Scientific Thermo Scientific™ SampleSeal™ 96-tube Heat Sealer | 10-1 Thermo Fisher Scientific 75 Panorama Creek Drive Rochester, NY 14625 USA Technical Support: North America Tel: + 585 586 8800 1 800 625 4327 Email: [email protected] Europe Tel: +49 (0) 6184 906 000 Email: [email protected] thermoscientific.com © 2014 Thermo Fisher Scientific Inc. All rights reserved. All trademarks are the property of Thermo Fisher Scientific Inc. and its subsidiaries. Specifications, terms and pricing are subject to change. Not all products are available in all countries. Please consult your local sales representative for details. MNSAMPLESEAL96 0414