1
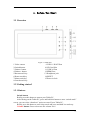
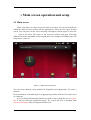
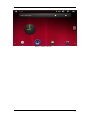
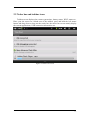
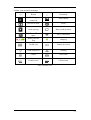
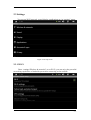
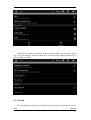
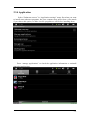
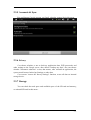
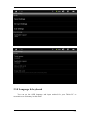
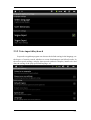
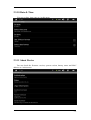
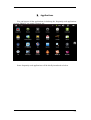
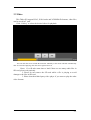
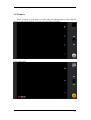
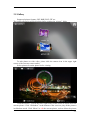
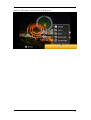
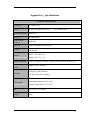
TCC8803 PAD User Manual Important Safety Instructions Please read the following instructions carefully before using this player. Do not remove the T-Flash card while it’s in use to avoid damage to the card or product. Make sure the volume level of headphone/earphone is within the acceptable range to avoid damage to your hearing. Keep the product and accessories away from any source of liquid and Do not expose them to humidity. Do not expose the product to extreme temperatures. Do not place the product close to heating equipment or any heat source, such as fire, burning cigarette. Do not paint over the product. Do not throw out the product. Do not place the product in the place where the temperature may above 60℃, such as car dashboard, windowsill etc.. Do not disassemble the product, do not attempt to service this product/accessories yourself. Make sure the charge voltage is 5.0V before charging. Only use attachments/accessories specified by the manufacturer, use of other charger may be hazardous. Use damp cloth or electrostatic prevention cloth for cleaning. LCD screen is fragile component, please take care to avoid strong shock and vibration. Do not allow children to play with the product or accessories. It may cause danger to children or damage the product or accessories. Uninstalling any application may cause the product or other applications not to work properly. Never spill liquid of any kind on the product/adaptor, do not place any object that filled with liquid, such as vase. -1- Table Of Contents 1. Before you start................................................................................................................ - 3 1.1 Overview........................................................................................................................ - 3 1.2 Getting started ................................................................................................................ - 3 1.2.1 Buttons ................................................................................................................ - 3 1.2.2 Battery................................................................................................................. - 4 1.2.3 SD Card............................................................................................................... - 4 1.2.4 Connectting to your computer............................................................................. - 5 2. Main screen operation and setup.............................................................................................. - 7 2.1 Main screen.................................................................................................................... - 7 2.2 Notice bar and taskbar icons .......................................................................................... - 9 2.3 Settings......................................................................................................................... - 11 2.3.1 Wi-Fi connection............................................................................................... - 11 2.3.2 Sound ................................................................................................................ - 12 2.3.3 Display .............................................................................................................. - 13 2.3.4 Application ........................................................................................................ - 14 2.3.5 Accounts&sync ................................................................................................. - 15 2.3.6 Storage............................................................................................................... - 15 2.3.7 Language&keyboard ......................................................................................... - 16 2.3.8Time&data.......................................................................................................... - 17 2.3.9 About device...................................................................................................... - 18 3. Application........................................................................................................................... - 19 3.1 Music............................................................................................................................ - 20 3.3 Video ............................................................................................................................ - 22 3.4 Camera ......................................................................................................................... - 23 3.5 Gallery.......................................................................................................................... - 24 4. Installation............................................................................................................................ - 26 5. Browser................................................................................................................................ - 27 Appendix 1:Specification........................................................................................................ - 30 Appendix 2:Accessories list .................................................................................................... - 32 - -2- 1. Before You Start 1.1 Overview Figure 1.1 Main unit 1.Video camera 2.Switch button 3.Volume- button 4.Volume+ button 5.Return touch key 6.Home touch key 7.Menu touch key 8.Search touch key 9.USB 1.1 HOST Port 10.SD Card Slot 11.USB 2.0 Port 12.HDMI Port 13.Headphone jack 14.RESET 15.Power-in Jack 1.2 Getting started 1.2.1 Buttons Switch button Briefly press this button to turn on your Tablet PC. After turning on the Tablet PC, press and hold this button to enter “switch mode” screen, you can select “shutdown” option to turn off your Tablet PC; Briefly press this button to enter sleep mode and press and hold it to wake up. Volume- button: Press to decrease the volume level. -3- Volume+ button: Press to increase the volume level. Return (touch key): Press to return to the previous screen, press this key several times to return to the main screen. Home (touch key): Briefly press this key to return to the desktop, press and hold it to display recent tasks. Menu (touch key): Press to display the current menu. Reset key: Press to restart the Tablet PC. Tip: If you Do not know how to use this product during operation, please press “Menu touch key” or “Return touch key” for helps. 1.2.2 Battery This Tablet PC has a built-in li-polymer battery (4000 mA), please pay attention to the following instructions while charging the battery. 1. The charge voltage for this TABLET PC is 5.0V, please confirm it to avoid damage to your Tablet PC or the other dangerous. 2. The Tablet PC will turn off automatically when the battery power gets extremely low, then please charge the battery. It can be charged when the TABLET PC is turned on/off. 3. The battery icon in the task bar will display charging mode when the battery is being charged in turn on mode. 4. The indicator lights red when the battery is in charge; The indicator will turn off when the battery is fully charged in power off mode. 5. Please unplug the power cable and charger after charging. Charge time: It takes 4 hours to fully charged with standard charger in turn off mode, and takes more time in turn on mode. Battery life: It can last 3-4 hours before charging. (It depends on the applications you are using and the settings of your Tablet PC). 1.2.3 SD Card This Tablet PC support up to 16GB SD card, it is recommend to have a SD card since some applications need its support. You can install APK applications (such as games etc.) through SD card: 1. Copy the APK file you want to install to SD card. 2. Turn on the Tablet PC and insert the SD card to SD card slot. 3. Enter the installation (path: /mnt/sdcard), select the APK you want to install -4- and install it follow the prompts. Tips: Do not remove the SD card while it is being accessed to avoid damage to the SD card. Please uninstall the SD card in “settings//storage//SD card” before remove it. 1.2.4 Connecting to your computer You can manage the files in SD card (add/delete files etc.) through USB connection, 1. Connect the Tablet PC to your computer by USB cable. 2. Place the cursor in the upper of the screen, press and hold down the left mouse button to drag the cursor down, then the notice bar will appear. There are two options in this menu: “USB connected”, “USB debugging connected” 3. Click “USB connected” and then Click “Turn on USB storage”, select “Yes” in popup prompt, then you can manage the files in SD card or copy files to SD card. -5- You can install various APK applications, such as games etc., through USB connection. 1. Connect your Tablet PC to the computer by USB cable. 2. Double-click the APK application you want to install(make sure the corresponding drives have been installed to the computer). 3. You can unplug the USB cable after the android icon disappearing, then the installation is completed. -6- 2. Main screen operation and setup 2.1 Main screen Basic operations in a main screen are shown as below, you can scroll up/down within the main screen to browse all the applications. There are five pages in main screen, you can press on the screen and drag left/right to switch pages or press the “..” icon in the lower left corner of the screen to switch, each page will bring different functions depending on the classification. For example, the Media page will bring music, video etc. Figure 2.1 Main Screen Operation You can create shortcut on the desktop for frequently used applications. To create a shortcut: Press and hold an icon and drag it to an appropriate position, then the icon can be used as a shortcut. You can delete the unneeded shortcut on main screen by drag the icon to recycle bin, it will not affect the application usage. The recycle bin icon is changed from screen switch button after pressing the shortcut icon. -7- Figure 2.3 Delete shortcut -8- 2.2 Notice bar and taskbar icons Taskbar screen displays the current system time, battery status, WI-FI status etc., Place your the cursor on a blank area of the taskbar, press and hold the left mouse button and drag down to drag out the notice bar, the notice bar screen mainly display the current applications, USB connection information etc. Figure 2.4 Notice bar screen -9- Taskbar icons and their meanings Return Download USB debugging connected Open HDMI Need to be done Alarm Audio playing Data synchronization Insufficient SD card space Battery monitor icon WI-FI connection charging No SD card Volume level icon USB connection warning Gmail New email Switch screen Callout menu Table 1 Taskbar icons - 10 - 2.3 Settings You can set Wi-Fi network, sound, display, applications etc. in “settings” menu. Figure 2.5 Setup screen 2.3.1 Wi-Fi Enter “settings//Wireless & networks” to set Wi-Fi, you can enjoy the powerful networking capabilities of Android system after connecting to the network. - 11 - Some Wi-Fi settings are different from the initial settings, you can press “Menu key” in “Wi-Fi settings” screen and then enter advanced setup, adjust the Tablet PC to adapt to Wi-Fi network. 2.3.2 Sound You can adjust the volume level and the related options in sound screen, such as mute, libration - 12 - etc.. 2.3.3 Display You can adjust screen brightness, screen timeout etc. in “Display settings” menu. You can connect your Tablet PC to the monitor by HDMI cable, please select “HDMI” in output mode and select corresponding resolution, this Tablet PC supports the resolution of 720P, 1080P. - 13 - 2.3.4 Application Select “Unknown sources” in “Application settings” menu first when you want to install some unknown programs, but your computer may suffer from a virus attack if you choose this option, so make sure the programs are safe before installing them. Enter “manage applications” to check the application information or uninstall unneeded applications. - 14 - 2.3.5 Accounts & Sync You can Manage Google account, set Gmail, calendar, contact list in this menu. 2.3.6 Privacy Can choose whether or not to back up application data, WiFi passwords and other settings to the Google server, after choose "backup my data", also can choose whether "automatic reduction" or not, that means, after reinstall an application, the system would restore backed up Settings or other data. Can execute "restore the factory Settings" function, erases all data on internal storage device. 2.3.7 Storage You can check the total space and available space of the SD card and memory, or uninstall SD card in this menu.. - 15 - 2.3.8 Language & keyboard You can set the OSD language and input method for your Tablet PC or customize user dictionary in this menu. - 16 - 2.3.9 Voice input &keyboard In speech recognition program can choose the default setting in the language, set the degree of security search, whether to screen disadvantages uncivilized words; In the text-to-speech settings, can play short speech synthesis examples, install voice and data, the setting of the play speed and language, etc. - 17 - 2.3.10 Date & Time You can set date, time zone etc. in this menu. 2.3.11 About Device You can check the firmware version, system version, battery status and MAC address etc. in this menu. - 18 - 3. Applications You can browse all the applications in desktop, the frequently used applications on your Tablet PC are: music, browser etc.. Some frequently used applications will be briefly introduced as below. - 19 - 3.1 Music Supported audio file formats: MP3, WAV, OGG etc.. Audio files can be stored on an SD card. Click Music to select artists, albums, playlist etc.. In standby mode or the other module screen, click music application icon in notice bar to enter music playback screen. Notes: 1. It will take some time to load if there are too many audio files in SD card, please wait patiently. 2. Please do not remove the SD card while a file is playing to avoid - 20 - damage to the files in SD card. 3. Please download third-party music player if you want to sync the lyrics. - 21 - 3.3 Video This Tablet PC support H.263, H.264 codec and 3GP/MP4 file formats, video files can be stored in T card. Click “Gallery” to select the desired video for playback. You can click the screen to hide the menu bar manually or the menu will hide automatically after 30 seconds of playing, click the screen again to show it. Notes: 1. It will take some time to load if there are too many audio files in SD card, please wait patiently. 2. Please do not remove the SD card while a file is playing to avoid damage to the files in SD card. 3. Please download third-party video player if you want to play the other video formats. - 22 - 3.4 Camera Enter “Camera” to take photos or video clips, the photographs or video clips are stored on SD card by default, you can view/play them in gallery. Video clip screen - 23 - 3.5 Gallery Supported picture formats: JPG, BMP, PNG, GIF etc.. The picture album list will be displayed after opening the “picture” folder. To take photos or video clips, please click the camera icon in the upper right corner of the screen to enter camera. Select pictures from the photo list for viewing. Click the Zoom+/- icon in the lower right corner of the screen to zoom in/out the current picture. Click “Slideshow” in the bottom of the screen to play all the pictures in slideshow mode. Click “Menu” to edit the current picture, such as delete the picture, - 24 - check the information, set the picture as desktop etc.. - 25 - 4. Installation Click installation to enter the SD card in which apk files have been stored, click the desired apk file to install the apk application. - 26 - 5. Browser Please make sure the WI-FI is connected before using browser. Press “Menu key” in browser main screen to pop up browser menu, shown as below. Figure 5.1 Browser menu screen You can open new window, switch window, turn off window in “Windows” option. The method for setting your Tablet PC browser is similar to setting computer browser, Press “Menu key” in browser screen, select “More//settings” to enter browser setup. You can set browser home page, password management etc. or restore to factory default settings directly. - 27 - Figure 5.2 Browser settings 1. Connect with net card or insert SIM card Please put above external wireless net card to the USB high speed port. If correct, it will be bright lights on the 3G network card, which indicated that it could begin to connect the 3G network. If you insert the SIM card which unifies the Module format with 3G at the poweroff state, as long as you open the device again, the signal icon will display at the right top corner of desktop. 2. Set the connection parameter of local network operators Click the “setting” on desktop, choose the “Wireless network”, select “Mobile network” next, and then select “APN Access Point Name”, the interface show as below: 3. Click the “Menu” key(Note: not the touch key, but the actual “Menu” Key), and it will show below Menu, please select the “New APN”, Then show below option: Please set according to below parameter: China Unicom 3G setting parameter: Name: 3GWAP APN: 3gnet Agency: Not set (2.1, need to input 10.0.0.172) Port: 80 User Name: Not set Password: Not set Server: Not set MMSC: Not set - 28 - MMS agent: Not set MMS port: Not set MCC: 460 MNC: 01 APN style: Not set China Telecom EVDO Name: any name APN:#777 Agency: Not set (2.1, need to input 10.0.0.200) Port: 81 User Name:[email protected] Password:vnet.mobi Server:Not Set MMSC: Not Set MMS agent: Not set MMS port: Not set MCC: 460 MNC: 03 APN style:Not Set 4. Finish the setting, please press the Menu key again, then the 3G icon display at top right corner, which means successfully connected. 5. Please select “Save” - 29 - Appendix 1:Specifications Technical Specifications Processor TCC8803 –M7 Screen Resolution: 800*480 WVGA, Operation system Android 2.3 Memory 7” TFT touch screen 512MB DDR3 Built-in flash memory 4GB MLC SD Card Support standard SDcard 16GB Battery Lithium-ion polymer rechargeable battery 4000mAH Adapter Input:100~240V AC Output:DC 5V,2A Support language Chinese, English, German, French, Spanish, Italian, Hebrew etc. Transmission speed USB2.0 FULL SPEED Indicator Temperature Charging (LED) indicator (Lights red while charging) Operating temperature: 0℃~40℃ Storage temperature: -10℃~60℃ Size 195 x 119.5 x 13.8 mm Weight 380g - 30 - Audio Specification Type Description Audio playback Supported formats: mp3、wav、ogg Video playback Supported formats: 3gp、mp4 Audio Up to 6 hours of continuous playing time Video Up to 4 hours of continuous playing time Playback time - 31 - Appendix 2:Accessories List Please check you have received the following components in your package: Sequence Component Amount 1 Main unit 1 2 package 1 3 Travel charger 1 4 USB cable 1 5 Earphone 1 6 User manual 1 7 Certificate of Approval 1 8 Warranty Card 1 number Notes: Specifications and design are subject to change without notice. - 32 -