1
CONTENTS
IMPORTANT SAFETY & NOTICE
...........................................................................................
E-1
SYSTEM BASICS
Location of Controls - Main Unit .....................................
Location of Controls - Remote .........................................
Power Supply AC Operation..............................................
Back up Batteries ...............................................................
E-2
E-3
E-3
E-3
SYSTEM BASICS & DIGITAL CLOCK
Connection of Speaker Boxes ...........................................
How to Set Correct Time ...................................................
E-4
E-4
DIGITAL CLOCK
Automatic Power on/off Timer Function ...........................
E-5
GENERAL FUNCTION
Wake up to CD ..................................................................
Sleep Function ...................................................................
Snooze Function ...............................................................
Mute Function ..................................................................
Electronic Volume Control ................................................
Music Equalizer .................................................................
iPod Video out ...................................................................
Using the Audio Line in Connection .................................
Connection an External Powered Subwoofer .....................
Automatic Power off Function ..........................................
E-6
E-6
E-6
E-6
E-6
E-7
E-7
E-7
E-7
E-7
RADIO
Operation of Radio ...........................................................
Manual Frequency Adjustment ..........................................
Automatic Frequency Adjustment .....................................
Radio Memory ...................................................................
RDS ...................................................................................
E-8
E-8
E-8
E-8
E-9
CD AUDIO
Compact Discs (CD) Playback .........................................
E-10
Normal CD Operation........................................................
E-10
Programming the CD-Player.............................................. E-10, 11
3-CD P.Mode .....................................................................
E-12
Repeat Playback Function .................................................
E-13
Anti-Skip (Antishock) Function ........................................
E-13
Random Playback Function ...............................................
E-13
CD-MP3
What is MP3? ....................................................................
E-14
Playback of CD-MP3 Discs ............................................... E-14, 15
id3-Tag Text Display .........................................................
E-15
Searching for MP3 Songs by File Name ............................
E-16
Finding (Searching) MP3 Song Files by “Folder Name” ... E-17, 18
USB & SD CARD
USB-Drive & SD-Card MP3 Playback ..............................
E-19
iPod OPERATION
Preparation of iPod Dock...................................................
Operation with the iPod .....................................................
E-20
E-21
SPECIFICATIONS & SET UP
Specifications ....................................................................
Set up procedure ................................................................
E-22
E-22
IMPORTANT SAFETY & NOTICE
The lightning flash and arrowhead within the triangle is a warning sign alerting you of “dangerous
voltage” inside the product.
CAUTION
RISK OF ELECTRIC SHOCK
DO NOT OPEN
WARNING:
To reduce the risk of electric shock, do not remove cover (or back). No user-serviceable
parts inside. Refer servicing to qualified service personnel.
CAUTION:
The exclamation point within the triangle is a warning sign alerting you of important instructions
accompanying the product.
Grounding or polarization. The precautions should be taken so that the wider blade of the AC plug
must match the slot in receptacle “wall socket”.
Do not expose to dripping or splashing liquids!
Invisible laser radiation when open and interlocks defeated. Avoid exposure to beam.
WARNING:
To reduce the risk of fire or electric shock, do not expose this appliance to dripping or splashing liquids.
NOTE:
Caution symbols are printed on rear of unit. Please refer to instruction manual.
PLEASE NOTE:
You will find the caution rating label for this product located on the rear of the unit.
To ensure safe use of this product, please follow the advice below:
1. The apparatus and its accessory AC power adaptor should not be exposed to dripping or splashing, liquids
and no objects containers with liquids should be placed on the apparatus.
2. The on/ standby key does not isolate the product from the power supply. To completely disconnect the
product from the mains power supply you must unplug the power cord by pulling out the plug (do not
pull the cord as this may damage it and create a risk of electric shock).
3. The mains plug is used as the disconnect device and it shall remain readily operable. To completely
disconnect the power input, the mains plug of the apparatus must be disconnected from the mains
completely. The mains plug should not be obstructed and should be easily accessible during use.
4. Under the influence of electrostatic phenomenon, the product may malfunction and power will need to be
reset.
5. Excessive sound pressure from earphones and headphones can cause hearing loss.
6. Danger of explosion if battery is incorrectly installed. Replace only with the same or equivalent type.
7. When electrostatic discharge (ESD) occurs at the front surface (whether metal or plastic) or near any
part or any button of this unit, or at the USB port and/ or SD-card slots, there may be a possibility that
the product may stop operating and/ or shut down immediately. This is a normal condition and intended
to protect the unit and internal components against damage. In such a case, please reset the unit (by
disconnecting and reconnecting the AC-power source) to revert the unit to normal operation.
E-1
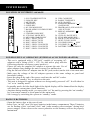
SYSTEM BASICS
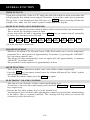
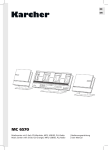
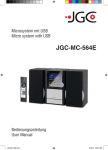
LOCATION OF CONTROLS - MAIN UNIT
3
2
5
4
7
6
8
9
DISC 1
DISC 3
DISC 2
1
47
50
10
11
12
13
14
16
15
18
17
20
19
23
21
22
25
24
27
26
29
28
31
30
33
32
35
34
37
36
48
38
40
41
49
51
42
43
44
45
46
39
1. FM-ANTENNA WIRE
2. BACK UP BATTERY COMPARTMENT
(ON REAR PANEL)
3. CD DOOR (DISC 1)
4. DISC 1 OPEN/ CLOSE KEY
5. CD DOOR (DISC 2)
6. DISC 2 OPEN/ CLOSE KEY
7. CD DOOR (DISC 3)
8. DISC 3 OPEN/ CLOSE KEY
9. AC ADAPTOR POWER CORD PLUG
10. ON/ STANDBY KEY
11. REMOTE CONTROL SENSOR
12. CD PLAY/ PAUSE KEY
13. CD BACK/ TUNE KEY
14. MEMORY / REPEAT/ i-UP KEY
15. MEMORY / RANDOM/ i-DOWN KEY
16. MP3/ RDS SEARCH KEY
17. CD STOP/ RDS-MODE KEY
18. VOLUME KEY
19. VOLUME KEY
20. CD NEXT/ TUNE KEY
21. MULTIFUNCTION DISPLAY
22. DESK STAND (FOR MAIN UNIT)
23. DISC 1 SELECT KEY
24. 3-DISC PLAY MODE (3 CD P-MODE) KEY
25. EQUALIZER (EQ) KEY
26. DISC 2 SELECT KEY
27. id3/ FM MODE KEY
28. DISC 3 SELECT KEY
29. BAND/ FOLDER/ i-MENU KEY
30. TUNER KEY
31. TIMER KEY
32. PROGRAM/ CLOCK ADJUST/
i-SELECT KEY
33. AUX/ iPod KEY
34. SD/ USB KEY
35. SD MEMORY CARD SOCKET
36. USB SOCKET
37. USB/ SD COMPARTMENT DOOR
38. SPEAKERS (LEFT & RIGHT)
39. DESK STANDS
(FOR SPEAKERS LEFT & RIGHT)
40. iPod VIDEO OUT SOCKET
41. DOCK SOCKET
42. AUDIO LINE IN SOCKETS [AUX-IN]
(LEFT & RIGHT)
43. SUBWOOFER OUTPUT SOCKET
44. DC JACK (DC 12V )
45. HEADPHONE SOCKET
46. SPEAKER OUTPUT SOCKETS
(LEFT & RIGHT)
iPod Docking Platform:
47. POWER AND AUDIO SOURCE
INDICATOR LIGHTING
48. CAVITY FOR DOCK ADAPTOR
49. STAND (FOR iPod DOCKING PLATFORM)
50. DOCK ADAPTOR FOR iPod (SEVERAL
DIFFERENT ADAPTORS ARE PROVIDED)
51. iPod DOCKING PLATFORM CONNECTOR
E-2
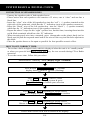
SYSTEM BASICS
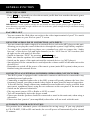
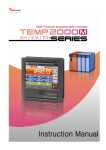
LOCATION OF CONTROLS - REMOTE
1
2
3
4
5
6
7
8
9
10
11
12 13 14
15 16 17
18 19 20
21 22 23
24
25
26
27
28
29
30
1.
2.
3.
4.
5.
6.
7.
8.
9.
10.
11.
12.
13.
14.
15.
16.
17.
ON/ STANDBY BUTTON
SNOOZE KEY
MUTE KEY
TIMER KEY
SLEEP KEY
id3/ FM MODE KEY
BAND/ MENU/ FOLDER UP KEY
EQ KEY
FOLDER DOWN KEY
3CD PLAY MODE KEY
MP3/ RDS SEARCH KEY
DISC 1 SELECT KEY
DISC 2 SELECT KEY
DISC 3 SELECT KEY
DISC 1 OPEN/ CLOSE KEY
DISC 2 OPEN/ CLOSE KEY
DISC 3 OPEN/ CLOSE KEY
18.
19.
20.
21.
22.
23.
24.
25.
26.
27.
28.
29.
30.
USB/ CARD KEY
RADIO TUNER KEY
AUX/ iPod KEY
RANDOM/ MEMORY ( )/
i-DOWN KEY
PROGRAM/ CLOCK ADJUST/
i-SELECT KEY
REPEAT/ MEMORY ( )/
i-UP KEY
CD PLAY/ PAUSE KEY
STOP/ RDS MODE KEY
BACK/ TUNE DOWN KEY
NEXT/ TUNE UP KEY
VOLUME DOWN ( )KEY
VOLUME UP ( ) KEY
BATTERY COMPARTMENT
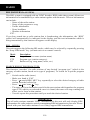
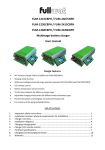
POWER SUPPLY AC OPERATION (EXTERNAL AC-DC POWER ADAPTOR)
- This set is equipped with a “DC-jack” capable of accepting ACadaptors with a rating of DC = 12V, 5A, and with a plug with the
following polarities as shown (center positive) :
- Please use only the supplied AC-adaptor to operate the unit. Use of
other adaptors may damage the unit or cause it to malfunction.
- Plug the tail end of the AC-adaptor into the DC-jack (socket) on the side of the main unit.
- Make sure the voltage of the AC adaptor operates at the same voltage as your local
household voltage.
- Insert the plug at the end of the power cord into the wall AC socket.
- Press the “on/ standby” key to switch on the unit.
- This unit is designed to operate without ever being totally powered “off”. It will either be
“on” or in “standby mode”.
- In standby mode, the blue back-light of the digital display will be dimmed but the display
will show the current time (clock function).
- Anytime during standby mode, you can switch “on” the unit by pressing the “on/ standby”
key (on remote control or front panel of the main unit).
- Save energy by switching the system to “standby” mode.
+
-
BACK UP BATTERIES
- Open the battery door at the rear of unit.
- Insert 2 pcs “aa-cell” (um-3/lr6 type) batteries in the battery compartment. These 2 batteries
are for backup of the “real time clock” and “radio memory preset stations” during brief
power outages. Please observe the correct polarities or the memory will not be properly
maintained.
E-3
SYSTEM BASICS & DIGITAL CLOCK
CONNECTION OF SPEAKER BOXES
- Unwrap the speaker-cords of both speaker-boxes.
- Please notice that each speakers cord consists of 2 wires, one is “clear” and one has a
black line.
- Insert the “clear” wire of the left speaker-box into the “red” ( + ) speaker terminal on the
right side of the main-unit, which has the “l” indication (next to the speaker-connector).
- Insert the “black” wire of the left speaker-box into the “black” ( - ) speaker terminal,
which has the “L” indication (next to the speaker-connector).
- Repeat the above 2 steps for the “right” speaker box, but this time, inserting them into the
red & black terminals which have the “R” indication.
- When inserting each wire into a terminal, press downwards on the plastic knob (red or
black part) & push the exposed metal end of the wire all the way into the hole adjacent to
this knob.
- Place the speaker boxes as far apart as possible for best possible acoustic effect.
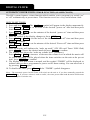
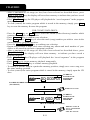
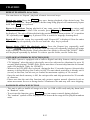
HOW TO SET CORRECT TIME:
- The set has a built-in digital clock, which is displayed when the unit is in “standby mode”
or when you press & hold Prog./Clock Adj. key for two seconds during CD or Radio
operation.
- To set the correct time, follow this procedure:
Switch unit to “Stand-by” mode (Display Light = Dimmed)
Press & hold Prog./ Clock Adj. for 3 seconds
display shows 12 hour or 24 hour (Flashing)
Press Next or Back to select 12-hour
or 24-hour clock display system & press
Prog./ Clock Adj. to confirm your selection
Press Next or Back repeatedly to set the correct
Hour in the display & press Prog./Clock Adj. to confirm
Press Next or Back repeatedly to set the correct
Minute in the display & press Prog./Clock Adj. to confirm
Correct time is now set & will be shown in the display!
E-4
DIGITAL CLOCK
AUTOMATIC POWER ON/OFF TIMER FUNCTION (ALARM CLOCK)
This HiFi system features a timer function which enables you to program it to switch “on”
or “off” automatically at preset times. This function serves as a very useful alarm clock.
HOW TO SET TIMER
1. Press and hold Timer . The On Time symbol will appear in the display momentarily.
2. Press Next or Back to set the hour of the desired “power on” time and then press
timer to confirm.
3. Press Next or Back to set the minutes of the desired “power on” time and then press
Timer to confirm.
4. Now the symbol in the display changes to show Off Time .
5. Press Next or Back to set the hour of the desired “Power off” time and then press
Timer to confirm.
6. Press Next or Back to set the minutes of the desired “Power off” time and then press
Timer to confirm.
7. Now the display will indicate the “wake up mode” (CD/ SD card/ Tuner/ USB/ iPod)
press Next to choose the desired mode & press Timer to confirm
8. The display then shows the “wake up volume level” (loudness).
Press Next or Back to increase or decrease the volume level at which the music will
be played the music will be played when the timer switches on the unit at the pre-set
time, press TIMER to confirm.
9. The display will then return to normal, and the symbol “TIMER” will be displayed, to
indicate that you have programmed a power on/off alarm setting. You can reactivate it
by pressing Timer again
10. To disable the timer, press Timer & the “TIMER” symbol disappears.
(Note : The automatic power On/Off Timer will switch on the unit as if you have manually pressed the
On/Standby key. If you have selected “wake to radio”, the exact preset radio band & station will become
activated when power switches on).
E-5
GENERAL FUNCTION
WAKE UP TO CD
If you have selected the “wake to CD” mode, the unit will switch on at the preset time and
start playing the disc which was last played. Therefore, if you wish to wake up to a particular
CD (eg. Disc 3) you should press that CD select (i.e. CD 3 ) before powering off the unit
at night. Also, make sure the “timer” symbol is indicated in the display
SLEEP FUNCTION (AUTO POWER OFF)
- This set has a special sleep timer function which is able to switch off the unit automatically.
This is useful for sleeping to music at night.
- At any time while the unit is operating, press Sleep key (on remote control) repeatedly
to choose the automatic power off time.
10
MINS
20
MINS
30
MINS
40
MINS
50
MINS
60
MINS
70
MINS
80
MINS
90
MINS
*00
(*00 means sleep timer is deactivated)
SNOOZE FUNCTION
- Whenever the alarm (CD/ SD card/ Tuner/ USB/ iPod) comes on, it can be temporarily
suspended for a short period of approximately 10 minutes, by pressing the “SNOOZE”
key (on remote control) once.
- The alarm will then automatically come on again after the approximately 10 minutes
“SNOOZE” period has ended.
- The procedure can be repeated for approximately an hour.
MUTE FUNCTION
- This set has a mute function to enable you to turn off the volume temporarily.
- Press the Mute key (on remote control) once, the volume will turn off, the “Mute” symbol
will displayed and flash.
- To resume the sound, simply press the Mute key again.
ELECTRONIC VOLUME CONTROL
- This unit uses an electronic volume control (push button type) .
- To increase or decrease the sound output, press and hold Volume Up or Volume Down
keys respectively.
- Release the key when volume level is at the desired level.
- You may hear a series of clicks while adjusting the volume level (particularly when listening
to the radio). This is a normal condition. The clicking will stop when you release the
volume key at the desired level.
E-6
GENERAL FUNCTION
MUSIC EQUALIZER
- Press EQ key repeatedly to select the acoustic profile that best matches the music genre
to which you are listening.
EQ OFF
CLASSIC
ROCK
JAZZ
POP
BASS
PARTY
IMPORTANT: Certain equalizer settings are not suitable for some specific genres/ types of music & may
cause distortion, especially at high volume levels. In such cases, please change the EQ to a different setting
or switch to “EQ off” mode.
iPod VIDEO OUT
- You can connect the iPod video out socket to the video input terminal of your TV to watch
video programs on your iPod on your TV screen.
USING THE AUDIO LINE IN CONNECTION (AUX-INPUT)
- You can connect the audio output of an external device such as an MP3 player to this unit,
allowing you to play the sound of that device through this system’s high fidelity amplifier.
- To connect the external device please use a standard rca cable to connect the “Audio
line-out” of the device (left and right channels) to the “AUX line-in” RCA sockets (left
& right) on the side panel of this unit.
- Switch to function “AUX” by pressing AUX/iPod key.
- Make sure that the speakers are connected to the main unit.
- Switch on the power of the main unit and the external device (eg. MP3-player).
- Start playback of the external device and adjust the volume control of the main unit to the
desired level.
- Remember to switch off the power of the music system (main HiFi system) when you are
finished using the external device.
CONNECTING AN EXTERNAL POWERED SUBWOOFER (NOT INCLUDED)
- This HiFi system is equipped with a subwoofer connector which can be connected to any
standard powered subwoofer.
- Connecting a amplified subwoofer to the HiFi system will greatly enhance the bass (low
frequency) sounds, providing a much richer, deeper & more powerful musical experience.
- To use this facility, simply connect any standard powered subwoofer (easily available from
most music equipment stores) using the rca connector on the rear panel of the main unit.
- Switch on the powered subwoofer.
- Play any music source (CD or Radio or AUX) as usual.
- You will immediately notice the deeper sound.
- Please note that the speakers should be connected as usual to the main unit, when using a
subwoofer.
- Please note that “passive” (non-amplified) subwoofers will not work with this unit.
AUTOMATIC POWER OFF FUNCTION
This product has a automatic power off function for saving energy. If you stop playback
in CD, CD-MP3, USB or SD card mode, the set will power off automatically after around
15 minutes.
E-7
RADIO
OPERATION OF RADIO
- Press the “on/standby” key once to switch on the HiFi system.
- Press the Tuner key to select the radio function.
- Press the band/ folder key to select the radio band am (mw) or FM.
- For am (mw) stations, rotate or reposition the set to improve radio reception.
- To improve FM-radio reception, fully extend the FM-antenna wire and adjust it’s position.
- In FM-radio, use the “id3/ FM mode” key to select the desired mode (FM mono/ stereo).
In locations with poor signal reception, where reception is poor, it may be advisable to
select “mono” mode, for a clearer radio signal.
MANUAL FREQUENCY ADJUSTMENT (SCAN MODE)
- Press (and immediately release) the Next or Back key to “scan” (manually adjust) the
radio frequency by 1-step at a time.
- The radio digital display will indicate the exact frequency at each position.
- When a desired frequency or station is reached, it can be saved into one of the “memory”slots.
(See “radio memory” section).
AUTOMATIC FREQUENCY ADJUSTMENT (SEEK MODE)
- Press and hold Next or Back (for 2 seconds) to “seek” (automatically adjust) the radio
frequency to the next available radio station.
- The radios digital display will indicate the exact frequency of the station that is found.
- When a desired station is reached. It can be saved into one of the “memory” slots. (See
“radio memory” section).
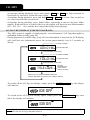
RADIO MEMORY (STATION PRESET MEMORY STORAGE)
- At any time, the current displayed station or frequency can be stored into a memory slot.
- Adjust the frequency (by scan or seek methods as described above) to a desired radio
station.
- Press Prog./Clock Adj. key once (on unit or remote control).
The display will indicate the radio station frequency and the “memory storage position”
(which will be flashing).
MEMORY ((ST))
PRESET MEMORY
POSITION
(10 FOR AM)
(20 FOR FM)
02 92.60
MHz
SELECTED
RADIO STATION
FREQUENCY
- Press Mem. /Repeat / Mem. /Random keys to select desired free memory position.
(There are 10 memory positions for am band & 20 memory positions for FM band).
- Press Prog./Clock Adj. key again to save the selected station into the selected memory
position.
- To recall any saved memory, simply press Mem. /Repeat / Mem. /Random keys &
the saved radio-band will be recalled.
- To erase any particular memory, simply store a new station in the same memory slot.
E-8
RADIO
RDS (RADIO DATA SYSTEM)
This HiFi system is equipped with an “RDS” decoder. RDS (radio data system) allows text
information to be transmitted by a radio station together with the music. This text information
can include:
- Name of the radio station
- Name of the program or song
- Traffic information
- News headlines
- Weather information
ETC...
If you have tuned into a radio station that is broadcasting rds information, the “RDS”
symbol will automatically be indicated in the display, and the text information which is
being transmitted by that station will appear on the display.
RDS - MODES:
This unit supports the following RD modes, which may be selected by repeatedly pressing
the “Stop/ RDS-mode” key (on main unit or on remote control):
Mode
PS
PTY
RT
Description
Program service name (station name)
Program type (station category)
Radio text (eg. song name, artist, etc.)
SEARCH RDS BY PROGRAM TYPE:
This function “searches” for radio stations of any desired “program type” (which is the
category of radio station, based on its type of programs). To search for a specific program
type:
- Switch on the radio (tuner)
- Make sure band is “FM”
- Press “ search RDS/ MP3” key repeatedly to select the desired category of radio
station from the built-in list.
- Press “
next/ tune ” key.
- The tuner will scan forward to search for the next station which matches the program
type (PTY) which you selected & once it is found, the tuner will stop scanning and
allow you to listen to that station.
- You can repeat this procedure until you reach the desired station.
IMPORTANT:
Not all radio stations transmit “RDS” information & this unit will only display RDS
information if a radio station is actively transmitting RDS information in your area. Please
check with your local radio stations to see if they support RDS transmission.
E-9
CD AUDIO
COMPACT DISCS (CD) PLAYBACK
Inserting and removing discs:
Press CD 1 or CD 2 or CD 3 to switch to CD mode.
Press the “ ” (CD-door Open/Close) key (either Disc 1 or Disc 2 or Disc 3 as desired)
to open the CD-door. Carefully place a compact disc (CD or MP3 disc) onto the center spindle
with the label side (printed side of disc) facing outwards (towards you).
Press again the “ ” (CD-door Open/Close) again to close the CD-door. After a few seconds,
the CD-display will momentarily show the total number of tracks and total playing time of
the disc (for CD-MP3 discs, the displayed information will be different.
Please refer to the section “play back of CD-MP3 discs”.)
the CD will now automatically start playing. To remove a disc, press the “ ” (CD-door
Open/Close) key. The door will open allowing the removal of the CD.
IMPORTANT: Always hold a CD by it’s edges. Avoid getting any finger-prints, smudges
or dirt onto the surface of a disc. In case this happens, use a special CD-cleaning cloth or
cleaning kit to remove the dirt or smudges.
NORMAL CD OPERATION
- Press “on/standby” key to switch on the unit.
- Press CD 1 or CD 2 or CD 3 key to select CD mode.
- Press the desired “ ” (CD door Open/Close) key & insert a CD as described.
- The disk will start spinning & the first song (track) will start playing. The display will
indicate the current track no. & playback time.
- At anytime during playback, press Play/Pause to pause the operation. Press Play/Pause
key again to resume.
- At anytime during playback, press Stop to stop the operation. This will reset the CD and
prepare playing from the beginning of the CD.
- At anytime during playback, press and release Next or Back to skip forward or backwards
by one track, as desired.
- At anytime during playback, press and hold Next or Back to fast-forward (cue) or fastreverse (review) the specific track, which is currently playing.
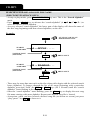
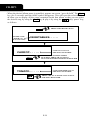
PROGRAMMING THE CD-PLAYER
- The CD player can be programmed in any playing sequence of upto 64 tracks, as desired.
- Always press Stop key before programming.
- Press the Prog./Clock Adj. key once, the display will show the “program” symbol to
indicate that the set is now in “memory programming mode”.
FOR STANDARD CD-AUDIO DISCS:
- Press Next key or Back key to select the track (song) number you wish to be played
first in the desired playing sequence.
- Press Prog./Clock Adj. key to confirm your selection.
- Repeat the last 2 steps, each time selecting the track number that you want to store
(program) in a memory slot.
E-10
CD AUDIO
- After a maximum of 64 songs (or less) have been selected as described above, press
Prog./Clock Adj. key, the display will now show memory to indicate that you have saved
a program-memory.
- Press Play/Pause key, the CD-player will playback the “saved sequence” in the program
memory.
- To clear (cancel) the entire program which is stored in the memory, simply press Stop
key to reset the memory & erase the program.
FOR CD-MP3 DATA DISCS:
- Press the Next key or Back key to select the album (folder directory) number which
contains the song you wish to select
- Press Program key to confirm your selection.
- Press Next key or Back key to select the track (song) number you wish to store in the
current memory (program) position.
- Press the Prog./Clock Adj. key to confirm your selection.
- Repeat the previous 4 steps, each time selecting any album and track number of your
choice to be stored in successive (program) positions.
- After a maximum of 64 songs (or less) have been selected as described above, press
Prog./Clock Adj. , the display will now show memory to indicate you have saved a
program-memory.
- Press Play/Pause , the CD-player will playback the “saved sequence” in the program
memory.
- Press Stop key to escape memory playback temporarily.
- Press Prog./Clock Adj. key to resume memory playback.
- To modify a specific song in a particular memory position, simply save a new song over
the same memory position.
- To clear (cancel) the entire program which is stored in the memory, simply open the CD
door.
00 000P01
CURRENT
POSITION OF
PROGRAM
MEMORY
FOLDER NUMBER
(FLASHING)
PRESS ONCE
PROG./ CLOCK ADJ.
01 000 P01
CURRENT
POSITION OF
PROGRAM
MEMORY
TRACK NUMBER (FLASHING)
PROG./ CLOCK ADJ.
E-11
PRESS ONCE
TO CONFIRM
YOUR
SELECTION.
CD AUDIO
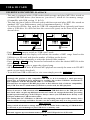
3-CD P.MODE (3-DISC PLAY MODE)
There are 3 different modes to playback the songs on this 3-Disc changer automatically:
1. Single-Disc play mode: This is the normal playback mode of the unit. Only one disc is
played & when playback is completed the unit does not automatically start playing the
other 2 discs.
Single-Disc play mode is indicated by the following symbol in the display:
THIS INDICATES
DISC 1 IS IN USE
NOTE: ALL CIRCLES ARE
WITHOUT BLACK DOTS
IN THIS MODE.
2. 3-Disc continuous play mode: To select this mode, press the 3-CD P.MODE key
repeatedly until the following is displayed:
THIS MEANS THAT THE BLACK
DOT CONTINUOUSLY MOVES
FROM CIRCLE TO CIRCLE IN
ROTATION IN THIS MODE
In this mode, all songs on CD1 are played, then all songs on CD2, then all songs on CD3,
and then the sequence repeats from CD1 again continuously. It means the music will be
played non-stop, as follows.
CD1
PLAYBACK
CD2
PLAYBACK
CD3
PLAYBACK
To cancel the 3-disc continuous play mode, simply press Stop key at any time.
3. 3-disc sequential play mode: To select this mode, press the 3-CD P.MODE key repeatedly
until the following is displayed:
NOTE: IN THIS MODE,
ALL CIRCLES HAVE
BLACK DOTS INSIDE THEM.
In this mode, all songs on CD1 are played, then all songs on CD2, then all songs on CD3,
and then playback will automatically stop. It means each disc will be played only once in
sequence, as follows:
CD1
PLAYBACK
CD2
PLAYBACK
CD3
PLAYBACK
STOP!
To cancel the 3-disc sequential play mode, simply press Stop key at anytime.
E-12
CD AUDIO
REPEAT PLAYBACK FUNCTION
You can choose to “Repeat” playback of music in several ways:
Repeat one song: Press the Repeat key once, during playback of the desired song. The
display will show the “Repeat” symbol, and the song being played will continuously repeat
itself until Stop key is pressed.
Repeat A-B portion: During playback of any song, press the Repeat key twice until
“Repeat a” is displayed. After a few seconds, press Repeat again, and “Repeat AB” will
be displayed. The unit will then playback the portion of music from position “A” to position
“B” repeatedly until Stop key is pressed. This is useful for language learning discs.
Repeat all: Press the repeat key repeatedly until “Repeat All” is displayed. Now the entire
CD will be played repeatedly over & over until the stop key is pressed.
Repeat folder (MP3 file playback only): Press the Repeat key repeatedly until
“Repeat FOLDER ” appears in the display. Now the unit will repeatedly playback all songs
in the currently selected folder. Please note that if no folder is selected, the “ROOT” folder
will be played repeatedly by default. To select a specific folder, use the Folder key.
ANTI-SKIP (ANTISHOCK) FUNCTION [ESP]
- This HiFi system is equipped with a built-in digital anti-skip features which prevents
CD “skipping” when the unit is physically moved or subjected to vibrations for up to 20
seconds when playing CD-MP3 discs. Please note there is no anti-skip function for normal
audio-CD playback. (Only for CD-MP3).
- Whenever any CD-MP3 disc is played , during the first 15 seconds (Approx.) the anti-skip
memory is being filled up (but is not yet full). The anti-shock protection is already active
(in use) at this time, but has not yet reached its maximum capacity of 20 seconds.
- Once the anti-shcok memory is full, the unit provides anti-skip protection for 20 seconds
of vibration.
- Please note that the anti-skip function only protects against normal vibration levels or
minor movement. Severe or strong shocks/ vibrations to the unit may still cause skipping.
RANDOM PLAYBACK FUNCTION
- This unit is able to shuffle all songs on a disc (or USB or SD-card) and play them back
in “Random” order.
- To activate this function, press Random key (on remote control) during playback.
- The “random” symbol will be displayed on the screen & the songs will be played in random
order.
E-13
CD-MP3
WHAT IS MP3?
- MP3 (MPEG 2, layer 3) is a digital file format for audio (music).
- MP3 tracks are available to download from many internet websites (please observe the
copyright regulations of your country).
- MP3 songs are much smaller is memory size compared with normal CD-Audio format
songs. This is called “compression” & it allows much more recording time on a standard
CD than the normal 74 minutes (for normal CD-Audio).
- The exact length of recording time depends on the “compression rate” of the MP3 song
you have downloaded.
- Compression rate is specified in “kbps” (kilobits per second). For example : “128 kbps”:
the higher this number, the bigger the MP3 file size (the better the sound quality) and the
lower the recording time on a CD-R. Normally based on 128 kbps, you should have approx.
250-300 minutes of recording time on a CD-R.
- MP3 songs can be recorded along with some “text information” (called id3 tags) in the
same file. This consists of (among other details:)
- File name (song name)
- Artist name
- Your CD-MP3 player can search songs on an MP3-CD disc by their “file names”, therefore
you should try naming all your MP3 files with the actual name of the song that it contains.
- There are basically 2 methods to compile an MP3-CD with your favorite songs :
- Download MP3 songs from internet & record them on a CD-R disc on your computer.
- Convert CD-Audio files (from a normal music CD) into MP3 format on your computer,
using a kind software utility called “CD-Ripper”. (Available as freeware/shareware
on internet).
IMPORTANT NOTICE:
Please always take care to respect copyright restrictions of all music. MP3 files should
only be downloaded or copied after obtaining permission from the respective copyright
holders.
PLAYBACK OF CD-MP3 DISCS
- Press “on/standby” key to switch on the HiFi system.
- Press CD 1 or CD 2 or CD 3 to select a CD slot for playback.
- Insert an MP3 CD into the CD player (in the selected CD slot) and close the CD door.
- The unit will then read the full “table of contents” of the CD-MP3 disc. This may take
upto 60 seconds since the amount of data on a CD-MP3 disc can be quite large.
- The unit will then momentarily display the number of folders & tracks (songs) on the
entire MP3-CD as follows:
F08 TO40
NUMBER OF FOLDERS
NUMBER OF SONGS (TRACKS)
- Playback will automatically start of the first song (track)in the first folder.
- At anytime during playback, press Play/Pause key to pause and press Play/Pause key
to resume operation at the same track & position.
E-14
CD -MP3
- At anytime during playback, press and release Next or Back to skip forwards or
backwards by one track, within the same folder.
- At anytime during playback, press and hold Next or Back to review (fast rewind) or
cue (fast forwards) the current track.
- At anytime during playback, press band/ folder repeatedly to move to the next folder
number. With each press of band/ folder key the display will show the next folder number
(F01 F02 F03 .. etc.) and the first song in that folder starts playing.
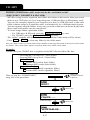
id3-TAG TEXT DISPLAY (FOR MP3 PLAYBACK)
- This HiFi system is capable of displaying the “text information” (id3 Tag) that might be
embedded within an MP3 song file.
- During playback of an MP3 song, if any id3 text information is detected, the LCD display
will scroll this text information across the screen approximately every 4-5 seconds, as
shown:
TRACK NUMBER
CD
003 01 :36
PLAYBACK TIME
AFTER APPROX. 2 SECONDS
FOLDER NUMBER
CD
F06 01 :38
PLAYBACK TIME
AFTER APPROX. 2 SECONDS
CD
TITLE-LOVE..
id3 TEXT
INFORMATION
(SONG TITLE,
ARTIST, ALBUM)
WHEN id3 TAGS HAVE FINISHED SCROLLING
ACROSS THE DISPLAY (SONG TITLE, ARTIST, ALBUM)
- To switch off the id3-Tag text display, simply press the id3/FM-mode key, the display
will indicate:
CD
id3 OFF
- To switch on the id3-Tag text display again, simply press the id3/FM-mode key once
more, the display will indicate:
CD
id3 ON
Note: The id3 text display function only works when playing back “MP3” song files & only if the particular
MP3 file has id3 Tags embedded within it.
E-15
CD-MP3
SEARCHING FOR MP3 SONGS BY FILE NAME
(FOR CD-MP3 PLAYBACK ONLY)
- At stop or play modes, press Search MP3/RDS key once. This is the “Search Alphabet”
mode.
- Press Next or Back keys to advance the “search alphabet” (A
B
C
D...) to
select the desired search alphabet.
- At every selected “search alphabet” the lower part of the display will show the name of
the first song beginning with that selected alphabet, on the disc.
Example:
FIND
SEARCH
ALPHABET
NAME OF SONG
(MP3 FILE)
SEARCH
ALPHABET
NAME OF SONG
(MP3 FILE)
AT "STOP" OR "PLAY"
MODE PRESS ONCE
A -- APPLE . . . . .
NEXT
PRESS ONCE
B -- BANANA . . .
NEXT
PRESS ONCE
ETC...
- There may be more than one track on the disc whose titles begin with the selected search
letter (alphabet). To browse through the list of all songs beginning with a particular
alphabet, press and “hold” the Next or Back keys (for 2 seconds) until the “search
alphabet” starts flashing in the display.
- Once the “search alphabet” starts flashing, press the Next key to display the next song
file-name starting with same alphabet. Repeat until desired song file is located.
- At anytime, when you have located a desired song file (as shown on screen) just press
“play/ pause” key
to listen to it.
E-16
CD -MP3
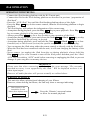
FINDING (SEARCHING) MP3 SONG FILES BY “FOLDER NAME”
(FOR CD-MP3, USB-DRIVE & SD-CARD)
- MP3 files (songs) can be organized into folders also knows as directories when you record
them on to a CD-R disc (or if you copy them onto a USB pen-drive or SD-memory card).
You can (for example) organize your song files on a disc (or USB/ SD-card) so that each
folder contains songs by a particular artist, or alternatively, by a different musical genre.
You can organize songs & folders in any way you wish so that you can locate & play back
those songs with greater ease & convenience.
- To locate songs within a particular folder:
- For USB-drive & SD-card: press the Search MP3/RDS key once
- For CD-MP3: press the Search MP3/RDS key twice
- The “folder” symbols will activate in the display, and the folder name will be shown.
- Press Next or Back to select any folder by the folder name.
Note: the “Root” folder is a virtual folder which contains all the song files stored in the top-level (not inside
any folder). This virtual folder appears as the first folder in the folder search mode.
Example:
Assume that your CD-MP3 disc is organized with MP3 files & folders like this:
- Lovesong.MP3 (in top level = Root folder)
- Jazzsong.MP3 (in top level = Root folder)
- Fruits (Folder)
Apples.MP3 (inside fruits folder)
Bananas.MP3 (inside fruits folder)
- Vegetables (Folder)
Carrots.MP3 (inside vegetables folder)
Tomato.MP3 (inside vegetables folder)
Then, to play the “TOMATO.MP3”
song, this is the procedure:
SEARCH MP3/ RDS
PRESS TWICE
("FOLDER" APPEARS
IN DISPLAY)
ROOT
NEXT
PRESS ONCE
FRUITS ......
NAME OF FOLDER
NEXT
VEGETABLES...
NAME OF FOLDER
E-17
PRESS ONCE
CD-MP3
- When the desired album name (vegetables) appears on screen, “press & hold” The Next
key (for 2 seconds) until the folder symbol disappears. This will open the selected folder
& allow you to display all the songs contained inside that album so that you can select
the desired song by using the Next key & play it by using the
“play/ pause” key,
as follows:
PRESS & HOLD FOR 2 SECS. !
NEXT
FOLDER NAME
(WHICH YOU
WANT TO OPEN)
VEGETABLES. . . . ..
NAME OF 1st SONG IN
THE SELECTED FOLDER
CARROT... . . . ..
NEXT
PRESS & RELEASE REPEATEDLY
TO SCROLL THROUGH ALL SONGS
CONTAINED INSIDE THE SELECTED FOLDER
NAME OF DESIRED SONG IN
THE SELECTED FOLDER
TOMATO... . . . ..
PRESS THE "PLAY PAUSE" KEY TO PLAY
THE SONG DISPLAYED.
E-18
USB & SD CARD
USB-DRIVE & SD-CARD MP3 PLAYBACK
- This unit is equipped with a USB socket which accepts and plays MP3 files stored on
standard USB flash drives (also known as “pen drives”) which are for memory storage.
(Compatible with USB version 1.1 & 2.0).
- This unit also has a built-in SD-card socket which accepts and plays MP3 files stored on
standard “SD” type flash memory cards (of maximum capacity = 4 GB).
- To utilize this facility, first open the USB/ SD compartment door (upwards) and insert
either a USB-drive or a SD-card into the correct slot (port) on the front of the unit as
shown below:
SD-CARD
USB-DRIVE
- Press USB/SD once to switch to “USB--card” mode.
- Within 30-60 seconds the display will indicate the number of MP3 songs found on the
USB-drive or SD-card, and also the number of folders on the device.
- Press the folder key repeatedly to select the desired folder number.
- Press Next or Back to skip forward or backwards to select the desired MP3 file in the
selected folder.
- Press Play/Pause to play or pause the selected song.
- All functions for USB-drive & SD-card MP3 playback are exactly the same as in CD-MP3
mode (as previously described).
- To switch from USB to SD-card, or vice-versa simply press the USB/SD key.
NOTE:
Although this product is fully compatible with USB 1.1 & 2.0 standards, a small percentage
(about 5%) of USB flash drives might not be readable, due to those USB-drive manufacturers
non-compliance with the full (official) USB 1.1 / 2.0 standards.
This unit does not support USB-MP3 player, due to their inherent lack of software compatibility.
Only USB “Pen drives” (flash memory USB drives) can be used, for MP3 playback.
IMPORTANT:
Please do not use a USB extension cable to connect your USB flash drive to the USB port of this
unit. Such cables can pick up additional interference which can corrupt the data flow, preventing
normal operation and usage of the USB port. Always connect your USB flash drive directly to the
USB port without any USB extension cables.
The reading time for a USB-drive or SD-card varies depending on the speed of the memory device
and the number of songs and folders. In some cases the reading time may be as long as 60 seconds.
PRECAUTION
Always switch off the unit or change mode to “CD” or “Radio”before removing a USB flash drive
or SD-card, to prevent damage to your USB device or memory card.
NOTE
This unit supports up to maximum memory size of 4 GB USB pen drives & SD cards.
E-19
iPod OPERATION
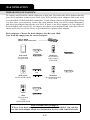
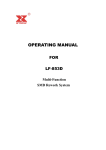
PREPARATION OF iPod DOCK
To connect an iPod with a dock connector to this unit, first insert the dock adaptor that fits
your iPod, and then connect your iPod. Your HiFi includes dock adaptors that work with
several models of iPod with dock connectors. If you want to connect a different model of iPod
at a later time, you can easily remove the dock adaptor from your Hi-Fi using a fingernail,
and insert the adaptor that fits the new iPod. If there is no dock adaptor for your model of
iPod included with your Hi-Fi, an adaptor may have been included with your iPod. Please
check inside the box of the iPod you purchased for a plastic dock adaptor.
Dock adapters: Choose the dock adapter that fits your iPod.
Your iPod fits snugly into the correct adapter.
THE NUMBER
SHOWS WHICH iPod FITS
OR
iPod touch
1st generation
2nd generation
14
iPod nano
5th generation
(video camera)
8GB 16GB
16
9
17
OR
iPod classic
80GB 120GB 160GB
10
18
iPod nano
4th generation (video)
8GB 16GB
9
OR
10
iPod
5th generation
(video)
30GB 60GB 80GB
FOR OTHER iPod MODELS:
If there is no dock adapter for your model of iPod included, you can also
use the dock adapter which was included in the box with your iPod itself.
E-20
iPod OPERATION
OPERATION WITH THE iPod
- Connect the iPod docking platform with the Hi-Fi main unit.
- Connect the iPod to the iPod docking platform as described in pervious “preparation of
iPod dock”.
- Press the “AUX/ iPod” key until the iPod docking platform shows a blue light.
- Press the Play
key on the remote control, then the iPod docking platform to begin
playback.
- The iPod display will indicate the information of the current song.
- At anytime during playback, press the Play
key to pause playback. Press Play
key to resume playback of the same song & position.
- Always press Play
key for a few seconds to stop operation of the iPod.
- At anytime during playback, press and release the Next
or Back
key to skip
forward or backwards by one song, as desired.
- At anytime during playback, press and hold the Next
or Back
key to fastforward (cue) or fast-reverse (review) the specific song, which is currently playing.
- You can operate the iPod using either the remote control or directly with the iPod itself.
- When the iPod has been connected with the unit, it will start charging the battery of the
iPod.
- Never remove (or unplug) the iPod from the set during playback, always hold the
Play
key for a few seconds to turn off the iPod power and then press the “iPod/
AUX” key to switch to “AUX” mode before removing or unplugging the iPod, to prevent
damage to your song files or memory devices.
IMPORTANT
Please note that when connecting a iPod video, the error message “The currently
attached accessory is not supported by this iPod.” Will be displayed as there is no
video input/output.
However, all audio functions will operate normally as outlined above.
IPHONE® PLAYBACK
This unit also allows playback and charging of your iPhone.
However, when docking an iPhone, the unit may show a message indicating:
This accessory is not
intended for use with
iPhone (Non-Airplane mode)
Dismiss
Press the ‘Dismiss’ onscreen button
to allow for normal playback.
E-21
SPECIFICATIONS & SET UP
SPECIFICATIONS
AC-Power Supply
: ......... DC 12V, 5A though built-in DC jack
External AC-DC power adaptor 100V-240V ~ , 50/60 Hz
Remote Control Unit
: ......... 3V (AAA size/ UM-4/ LR03/ R03G x 2 pcs)
(Batteries not included)
Speaker
: ......... 4” x 2 Woofer + 1.5” x 2 Tweeter
Speaker Capacity Power
: ......... @ 4 Ohm
Amplifier Maximum Power : ......... 20 W (10W x 2)
SET UP PROCEDURE
A. As a “shelf system” (table top use)
-
Included 1 pc stand for the main unit.
Included 2 pcs stand for the speakers.
FIXING THE BASE TO THE MAIN UNIT OR SPEAKERS:
1. Place the stand under the main unit or
speakers
2. Slide the stand upward (see diagram
below).
3. Stop when the indicator mark on the stand is aligned with the lock symbol on the
rear cabinet. (To release the stand from the main unit or speakers, slide the stand
downwards (opposite direction) until it becomes releases.
INDICATOR MARK
CLICK
LOCKED
LOCK SYMBOL
When the indicator mark on the stand
is aligned with the lock symbol ,
the base is properly installed.
E-22