1
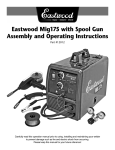
®
Patent
#5,850,976
#6,003,779
263 Shoemaker Rd. Pottstown, PA 19464
1-800-345-1178 International: 610-323-2200
Fax: 610-323-6268
www.eastwood.com
B R AN D
®
Powder Coating System
Part #10198
!
Award Winning
1999 Best New Product
Automotive Restoration Market Organization
Instruction Booklet
Instruction Manual Part #10198Q • Rev. 1/06
© Copyright 2006 Easthill Group, Inc.
1998 PA Governor’s Award for
Environmental Excellence
DESCRIPTION
OF
PRODUCT
Powder Coating provides
a premium coating ideal
for many automotive,
marine, home, and garden
applications. Eastwood’s
HotCoat® Powder Coating
System is a breakthrough
refinishing system for the
home hobbyist providing
professional performance
at a fraction of the cost of
industrial equipment. The
cured finish resists most
chemicals, fuels, acids,
thinners, brake fluid, UV
light, and is much more
durable than liquid coatings (up to ten times). Powder coating is environmentally
friendly! It produces no toxic wastes and uses no solvents. The Eastwood
HotCoat® PowderCoat System allows you to coat a part and return it to service
in less than an hour! Now you can powder coat any metal part that can withstand
the 400˚F (204˚C) cure temperature utilizing an electric oven or our Infrared Light
Cure System.
Want To Start Your Own Powder Coating Business?
Log onto www.eastwood.com for a complete list of commercial powder coating equipment.
HotCoat® LIMITED ONE YEAR WARRANTY
APPLIES TO HotCoat® POWER SUPPLY ONLY
The HotCoat® one year limited warranty applies only to the HotCoat® power supply. The HotCoat®
power supply is warranted to be free from defects of workmanship and materials for the period of ONE
YEAR from the original date of purchase. During this one year period, if the unit should malfunction or
not operate, return the complete unit, freight prepaid, to the Eastwood Company. An R/A # must be
obtained from Customer Service prior to return. Upon receipt, The Eastwood Company will inspect the
power supply and, if the inspection reveals that the trouble is directly related to defective workmanship
or material, the Eastwood Company, at its option, will repair or replace the power supply unit without
charge. The remedy will consist of repair or replacement of the HotCoat® power supply only, at the
company’s sole discretion. This warranty does not apply where:
– it is apparent that others have made repairs, or the power unit has been opened,
– the system has been abused or altered in any way,
– the system has not been operated in accordance with the instructions.
THE EASTWOOD COMPANY SHALL NOT BE LIABLE FOR ANY DAMAGE TO PROPERTY OR PERSONS
ARISING FROM THE USE OF THIS SYSTEM IN ANY WAY WHICH IS NOT DETAILED IN THE INCLUDED
INSTRUCTIONS. Failure to operate the system, as specified, will render any and all warranties, express
or implied, null and void. This warranty may not be applicable in certain states. It is suggested that you
consult your state authorities as to your specific rights. THERE ARE NO WARRANTIES, EXPRESS OR
IMPLIED, WHICH EXTEND BEYOND THOSE PROVIDED FOR HEREIN. This one year limited warranty
only applies to the original purchaser of the warranted product.
2
For technical assistance e-mail: [email protected]
WARNINGS
CAUTION
Read and understand all instructions and precautions before proceeding.
This unit uses high voltage as well as powder which may become flammable
under certain circumstances. Eastwood shall not be held liable
for consequences due to deliberate or unintentional misuse of this product.
Flammability Hazard
Powder coating dust, like common household dust, when confined and
suspended in air, poses a fire and potential explosion hazard if ignited. Good
housekeeping, adequate ventilation, dust control and isolation from potential
ignition sources is required! Sweep up unused powder
from the floor. Do not vacuum unless the vacuum is
equipped with an explosion-proof motor. Never smoke
while powder coating. Do not apply powder coat near
any source of ignition, e.g. open flames, sparks, etc.
Use the same precautions that you would for liquid
solvent based coatings. DO NOT USE A GAS OVEN!
Safety Tip For Coating Internal Surfaces!
When coating internal areas such as boxes, tubing, etc., apply powder in
stages so that a dense dust cloud will not form. Coat small areas at a time and
allow cloud to dissipate before moving to next area. DO NOT TOUCH EMITTER
TO OBJECT! This will create a spark which may ignite dust cloud.
Danger: High Voltage!
DANGER: HIGH VOLTAGE! READ AND UNDERSTAND ALL DIRECTIONS
BEFORE PROCEEDING! The power supply is a sealed unit and contains
no user serviceable parts! Contact with the emitter will result in an unpleasant
shock! To eliminate the shock hazard, touch the emitter to the ground clip after
each use. (If you have a medical condition or pacemaker check with your
doctor before using.)
Contact with the emitter will
result in an unpleasant shock.
DO NOT TOUCH
THE EMITTER BEFORE
CONTACTING IT TO
THE GROUND CLIP!
To order parts and supplies, call 1-800-345-1178 or www.eastwood.com
3
WARNINGS
Electrical Safety Tips
Electrical Safety Dos
• Make sure you, your work area, and your equipment are dry.
• If you are using an extension cord, make sure it is a grounded cord in sound
condition with no damage or frays, and of the correct wire gauge.
Electrical Safety Don’ts
• Never bypass the ground plug. Grounding is important for operation of the
unit and prevents shock.
• Do not touch the emitter until after the activation switch is released and
the emitter has been touched to the ground clip to discharge the emitter.
• Once you are spraying the part with the powder, avoid touching the gun
to the part or other grounded objects.
• Do not step on, kink, or pull the wires. Before using the gun inspect
the condition of all wires.
• Do not touch or hold the part while coating.
REQUIRED ITEMS
Before you begin using the HotCoat™ Powder Coating System make sure
you have the following:
• An electric oven or toaster oven large enough to fit the parts you will be
coating. If you’ll occasionally be coating larger parts, you may want one of
our Infrared Light Curing Systems (#10180 and #10680). Do not use an
oven used for food preparation or located in a living area, as mildly toxic
fumes are given off by the powder during the curing process! Do not use
a gas oven! Used ovens can be obtained very easily for little or no money by
checking your local newspaper classified section or by calling appliance
stores and remodelers in your area.
• An air supply source for the gun. A modest air compressor capable of at least
.5 cfm at 5-8 psi. You can even use a portable air tank with regulator. The air
supply must be dry and the use of a moisture trap is strongly recommended.
• A grounded 110-120VAC outlet or heavy-duty grounded extension cord
to plug in the 6’ power cord. NOTE: Unit must be grounded to work
properly and safely!
• A clean, safe, well-lit, well-ventilated work area.
• An activated charcoal respirator like our Professional Respirator (#34229)
to wear while the coating is being cured.
• A dust mask like our Dust Mask (#13000)
to wear while handling and applying powder.
• Disposable vinyl or Nitrile gloves (#43098 M, L, XL) to handle powder
and cleaned parts.
• A pair of Goggles (#43090) to provide eye protection during coating
and gun cleaning operations.
4
For technical assistance e-mail: [email protected]
DESCRIPTION
OF
PRODUCT PARTS
Before You Begin
Remove all items from the box. Compare with list below to make sure unit is complete.
Contents:
Model 10198 HotCoat™ Powder Coating Gun: applies a wide range of
specially formulated powder coatings.
#34066 Disposable Filter: removes contaminants down to 1 micron from the
air supply. Designed to supplement existing moisture trap on your air supply.
Cup: holds powder (fill 1-2 inches from bottom of cup)
Discharge Tube: fluidizes powder
Pick Up Tube: provides exit of fluidized powder to nozzle
Static Tubes (3): induces static charge to powder
Deflector: deflects powder pattern to assure even deposit
Complete HotCoat™ Power Supply unit with:
•A 6 ft. 120 volt, 15 amp electrical input cord
•A 6 ft. lead with ground clamp which is attached
to the part you are going to powder coat
•A remote activation switch with 6 ft. lead
•An 8 ft. high voltage gun power lead
Converts 110-120VAC to 9KVDC (no user-serviceable parts)
Activation Switch: Applies voltage to Emitter: hold-on, release-off
Model 10198 HotCoat™ Powder Coating Gun
Pick Up
Tube
Deflector
Static Tubes (3)
Discharge Tube
#34066
Disposable
Filter
Complete HotCoat™
Power Supply Unit
with Leads
110V AC
Power Cord
Ground Clip
Cup
Activation Switch
To order parts and supplies, call 1-800-345-1178 or www.eastwood.com
5
ITEMS TO MAKE COATING EASIER
• A sheet of clean glossy paper or spoon for transferring powder
• A roll of aluminum foil
• A roll of High Temperature Masking Tape 1/2” wide (#10027) or 1” wide
(#10115) to mask bolts and other areas where powder build is not desired
(See Masking the Part, page 8)
• High Temperature Silicone Plugs (set of 30, #10078) to seal threaded
holes and close tolerance openings. These plugs also work great to support
parts in the oven during curing (See Masking the Part, page 8)
• A spool of .041” Stainless Steel Safety Wire (#43045) to hold parts while
powder coating and curing. It’s better to use clean wire than coated wire
to prevent contaminants from falling on to
Moisture Filter
the powdered surface
(#43066)
• Clean cotton rags or lint free paper towels
• An extra disposable Moisture Separator
(#34066) It should be replaced monthly
if used daily.
• A pair of leather heat-resistant gloves
• A quick disconnect air coupler
• A timer
• A tarp to collect powder dust for easy clean up
• A can of PRE Painting Prep (#10041Z). Apply
prior to powder coating and allow to air dry. Proper surface preparation is the
most important factor in achieving a durable finish
Other Available Products
Infrared Light Curing Systems (#10180 and #10680)
Used in place of an oven to cure items which have been powder coated.
Electrical sub-assemblies are not replaceable. If you damage any of the
electrical parts call Eastwood at 1-800-227-8321 and a Technical Representative
will gladly assist you in finding the best resolution to the problem.
PREPARING THE PART
As with normal refinishing, powder can only be applied to clean, bare metal
surfaces. Properly clean the part to be coated by removing all traces of old
paint, rust, grease, oil, etc.
Removing Old Coatings
To chemically strip off old finishes use Eastwood’s Paint and Powder Remover
Qt. (#10550ZP), Aer. (#11189Z) or the environmentally-safe Eastwood
DeKote® Qt. (#10410), Gal (#10411), Aer. (#10408Z). To mechanically strip
the old finish use a Cleaning Disc (#31095), wire brush, Radial Bristle Brush
(#31176), Abrasive Blasting Gun (#22009) or sand paper to completely
remove paint. Heavy paint coatings are often more efficiently removed by using
Paint Remover. If removing old powder coating, see page 16.
Abrasive Blast
Gun (#22009)
Paint
Remover
DeKote
Cleaning Disc
(#31095)
Dealing With Rust
Chemical Rust Removal
Once the part is free of paint chemically remove the rust with Eastwood’s
OxiSolv Rust Remover pint (#16025) , gallon (#16027), or 20 oz. spray
(#16026), and Eastwood OxiSolv Super Gel Gallon (#16028).
Mechanical Rust Removal
Rust can be removed with a wire brush, Cleaning Disc (#31095), Radial
Bristle Brush (#31176) or by abrasive blasting. Eastwood has a wide variety
of abrasive blasting equipment, including our blast cabinets and Blast out of a
Bucket Gun (#22009).
Filling Minor Low Spots
Metal-2-Metal Polyester Filler (#10021Z) can be used as a filler for corroded
or pitted areas prior to powder. Apply Metal-2-Metal as you would any body
filler and finish by level sanding and feathering all edges with 180, 220, and 320
grit paper. Do not build filler more than 1/16” or lifting may occur during heat
cure. Filler applications should be pre baked at 400°F for 20 minutes before
final sanding and powder coating to assure against shrinkage. If you prefer a
single stage (non-catalyzed) filler, try Lab Metal 24 oz. net wt. (#10207Z) or
Hi-Temp Lab Metal 24 oz. (10288Z).
Grease and Oil Removal
Metal part must be free of any oil, dirt, or other
contaminants before powder coating. Clean with
Metal Wash (#10120), PRE Painting Prep
(#10041Z), PRE Quarts (#10194ZP) or acetone.
6
For technical assistance e-mail: [email protected]
To order parts and supplies, call 1-800-345-1178 or www.eastwood.com
7
MASKING THE PART
PREPARING FOR CURING
Once the part is thoroughly dry the powder can be applied. Handle the cleaned
part with vinyl or Nitrile Disposable Gloves (#43098 M, L, or XL)
to avoid contamination. Finger prints can affect
adhesion! Determine how the part should be
positioned in the oven before coating. Use the
High Temperature Plugs (#10078) and/or High
Temperature Tape (#10027)
to protect critical tolerance areas.
Both should be left on the part
High
during the coating and curing
Temp Tape
process. Since the powder will
(#10027)
coat around corners,
be sure to mask all
appropriate areas.
Nitrile Disposable
Gloves (#43098)
High Temp Plugs (#10078)
TECH TIP:
Use aluminum foil to mask areas or intricate parts.
Helpful Hint: Practice masking, applying powder, and curing test pieces prior
to coating final parts.
PREPARING FOR CURING
Hanging or Placing the Part for Coating
Bend wire hooks to hold the part during powder application and curing. Our
.041 Stainless Steel Safety Wire (#43045) works well for this application.
Don’t use a coated wire as debris from the wire coating may fall on the part
during the curing process. High Temperature Plugs (#10078) can often
be used to support the parts above the trays, and plug bolt holes.
Stainless Steel Safety Wire
(#43045) suspends part
Preheating the Oven
Before powder coating the part - preheat the oven to 450°F (232°C).
NOTE: Preheat to 350°F for Gloss Clear (#10093). Check temperature with an
oven thermometer or the Non-Contact Infra Red Thermometer (#11476).
Use of Oven Tray
Make sure the oven is clean. Use aluminum foil to keep racks clean. Practice
moving part from area where powder will be applied to inside the oven to avoid
damaging the uncured powder you will soon apply.
TECH TIP: To minimize bumping the piece after its been coated: hang
the piece from the oven rack, clamp it to a bench, apply the powder, and insert
the rack with the piece hanging back into the oven to cure.
Coating Porous Materials
In many cases, contaminants in porous materials will cause pits in the
powder. Porous cast iron, die cast, cast aluminum and magnesium parts trap
contaminants, that, when heated will outgas and cause porosity problems when
the powder is cured. See Preheating the Part, below. NOTE: Die-cast metal
varies widely in formulation, many of which can be difficult to powder
coat and, in some cases may even melt at 400° F. Some aluminum and
magnesium alloys can be weakened by exposure to the cure temperatures.
Check with part manufacturer if unsure.
Preheating the Part
To prevent pits from occurring, preheat the clean part. The time that a part
needs to be preheated varies with size. Preheat the part at 450°F for 20 - 50
minutes, remove from oven. Once part is cooled, use PRE Painting Prep
or acetone to remove the newly exposed contaminants, repeat the same
preheating cycle. Powder may be applied to hot or cool surface (see details
about “Hot Application” on page 15).
PREPARING TO POWDER COAT
Use a clean sheet of glossy paper (to avoid lint), a spoon, or a funnel to pour the
powder into the cup. Fill the cup no more than 1” or 2” with your color of choice.
Attaching the Air Supply to the Gun
TECH TIP: Handle powder as if you were handling liquid paint. Use clean
disposable gloves when handling powder to avoid contamination. Keep powder
containers tightly closed.
High Temperature Plugs (#10078)
support part on tray
8
For technical assistance e-mail: [email protected]
Connect a low pressure air line to the gun. The gun requires .5 or more cfm
at 5 - 10 psi, with 8 psi being ideal. If you do not have an air compressor,
a portable air tank with regulator can be used. The air must be moisture
and oil free. CAUTION: Never exceed the 10 psi!
To order parts and supplies, call 1-800-345-1178 or www.eastwood.com
9
PREPARING TO POWDER COAT
Attach ground
clamp to part
Use a
clean
sheet of
glossy
paper or
spoon to
fill cup
APPLICATION
OF
POWDER
Caution: Before plugging in the unit, make sure that all the cords are uncoiled
and free to move (do not depress the activation switch).
Hold the gun at various positions and angles to get the best application of
powder over the entire part.
Connecting the Ground Clip
Connect the ground clip to the part you are powder coating. Grounding the part
provides a path for static charges to dissipate and attracts the powder. Touch
gun emitter to ground clip after each time activation switch is released!
Checking the
Gun Spray Pattern
Note: Before using the gun
make sure the 3 static tubes
are in place and deflector
installed. Pull the gun trigger
to check the pattern. Unlike
regular paint guns, the
HotCoat™ gun creates
a fog of charged particles.
10
Insert the 3
Static Tubes
into the barrel
Spray
pattern
Mount Deflector
onto emitter
(emitter should extend out
about 3/16” from the front of
the deflector)
For technical assistance e-mail: [email protected]
• Plug the power supply into a grounded outlet.
• Maintain approximately 4 inches between the gun tip and part being coated.
• Depress the activation switch while triggering the gun. Depressing the
activation switch energizes the gun, charging the powder. Releasing the
switch turns the power off. Once the activation switch has been released,
a slight charge will remain in the gun until the emitter is touched to the
ground clip. Be sure to touch the emitter to the ground clamp before
touching the emitter.
• Move the gun in slightly different angles and in a circular motion to ensure
that all areas of the part are covered (as shown above). Be sure to coat
deeper crevices and inside corners first to prevent uneven coating. The
coated surface will have a dull opaque coating of powder. Make sure all
areas of the part are coated evenly. Bare metal should no longer be seen.
• Powder is difficult to apply in deep recessed areas or into corners. Try
repositioning the part to allow gravity to help assure coverage in corners
and reposition the gun. Practice on some scrap pieces of metal to obtain
a uniform coating.
• If you accidentally knock some powder off the part, it is usually best to blow
all the powder off and start over. This is particularly important for the
translucent colors which easily show blemishes.
• Inspect part with a high intensity light to make sure you didn’t miss any
areas. Touch up as necessary.
To order parts and supplies, call 1-800-345-1178 or www.eastwood.com
11
Before Touching or Cleaning the Emitter
The gun becomes less efficient as powder builds up on the
gun emitter. To remove powder build-up from the emitter,
release the activation switch, and momentarily touch the
emitter to the ground clamp (the resulting spark indicates the
system is now discharged). Wipe off the electrode with a dry
cloth. When you are finished applying the powder to the part,
release the activation switch, touch the emitter to the ground
clip, set the gun down and unplug the power unit.
CURING
THE
CLEANUP
TECH TIP: Use clean disposable gloves during all gun cleaning operations.
It is also important to unplug the gun first and keep your dust mask on while
cleaning the gun.
POWDER
Powder coatings cure with heat. The high temperature changes the powder from
it’s dry solid state to a “glossy” liquid state. This is called the “flow out” or “gloss
over”. The time the powder is in this liquid state and “flows” is called the gel time.
To help maximize chip resistance and produce a smooth coating, the substrate
(piece you are coating) must be brought up to the cure temperature quickly and
allowed to stay at that temperature for the specified cure time. To properly cure
the HotCoat powders and achieve full chemical, heat (up to 350°F), and chip
resistance, along with the smoothest possible finish follow the steps below. Note:
Most powders inherently have a slight orange peel (the surface condition and
preparation will affect smoothness). Refer to the troubleshooting section (page
15) for more information, and follow the cure process below:
Blow remaining
powder out of bottle
with air hose
Press trigger and
blow remaining
powder out of the
discharge tube
Clean inside
of lid
Blow remaining powder
out of pick-up tube
Direct air down
nozzle to remove
powder
Blow air
through
static tubes
and deflector
DO NOT USE A GAS OVEN!
• Always preheat the oven to 450°F (350°F for 10093
and 10286 Gloss Clear). All ovens vary; this may take 5-10
minutes to achieve 450°F.
• Carefully place the coated piece into the 450°F oven
and close the door.
• Check the piece every 5 minutes until the entire piece
has flowed out or glossed over. Some edges or thinner
cast sections of the piece may flow out or gloss over
early, but wait until the entire piece has flowed out.
• At this point, set oven temperature to 400°F (350°F for 10093 and 10286
Gloss Clears) and your timer to 20 minutes.
• Always read powder instructions for specific cure temperatures.
• Allow the piece to cure with the oven on for the entire 20 minutes.
• After the 20 minute cure, remove the part from the oven or turn the oven off,
crack the door open and allow the piece to slowly cool.
• Once cool, the piece can be second coated, or the tape, plugs, and other
masking material can be removed, and the part returned to service.
Note: Larger and/or heavy cast pieces may take 10-30 minutes to flow out or gloss
over – this in normal. Simply continue to check the piece until complete flow has
been achieved, then set your temperature and timer as described above for curing.
Also: Gloss should go into an oven preheated to 350° F and allowed to cure at
350° F after complete flow out has occurred. Curing at higher temperatures may
cause yellowing.
Cleaning the Gun
When you are finished using one color you must clean the gun before using
another. To clean the unit, unplug it so no voltage is in the unit. To discharge
the gun, touch the emitter to the ground clip. Disconnect the air supply. Store
powder in the original powder container.
12
To order parts and supplies, call 1-800-345-1178 or www.eastwood.com
For technical assistance e-mail: [email protected]
Now the gun is safe to handle. Unscrew the cup, pour the remaining powder
back into the original powder container. Using compressed air, clean the
discharge and pick up tubes, cup, static tubes, and deflector thoroughly with
no more than 30 psi compressed air. With your gloves on, gently twist off the
deflector and remove the three static tubes.
Do not use solvents when cleaning your powder coating system. The gun and
components are to be cleaned with compressed air only. To make your clean up
easier use our 17 pc. Cleaning Brush Kit (#34109). Using the brushes in this set
allow you to blow the powder right out of the gun. With your blow gun, thoroughly
clean the inside and outside of all the static tubes and deflector. Direct air into the
nozzle and the pick up tube to make sure no powder remains.
The only other cleaning necessary is to clean up the powder
on the floor or workspace. WARNING: Powder dust
in heavy concentrations is potentially flammable!
Due to the possible explosion risk, never use an electric
vacuum, ShopVac or wet/dry vac to clean up powder!
Always sweep up powder.
13
RE-USING POWDER
Recycling powder is not recommended as any debris will result in a rough
surface. Contaminated powder can be safely disposed of in the trash.
CAUTION
Before re-connecting your powder gun be sure to change the air pressure
from 30 psi back to 8 psi! The cup and lid assemblies are designed
for no more than 10 psi. Replace your moisture filter regularly,
as moisture will build up even when the gun is not in use.
PUTTING PARTS BACK INTO SERVICE
Powder coating is an extremely durable flexible coating. However care needs
to be exercised when bolting powder coated components in place. To
avoid chipping use steel or nylon washers under nut and bolt heads. For an
assortment of 1/8” - 1/2” ID Nylon washers order #43191.
Tips on care of powder coated surfaces
Powder coated surfaces easily shed dirt. Wash with a dish soap and water solution. Automotive
(non-abrasive paint polish) may be used to remove water spotting and enhance the gloss.
APPLYING A SECOND COAT
Typically, one coat of powder is all that is needed. However, some finishes such
as Argent Silver Base (#10102), Reflective Chrome (#10285), Chrome Smoke
(#10543) and Gray Metallic (#10341) need to be top-coated with a clear or
translucent finish to protect the metallic coatings from oxidation and dulling over time.
• Once the first cure is complete, allow the part to cool without touching the surface.
Once cool, support it as you did for the first coat, in your spray booth or work area.
• Load the gun with the appropriate color or clear powder about 1/3rd full
(about an 1.5” of powder).
• Attach the ground clip directly to a bare metal area on your part. You can do
this by threading in an old bolt into an existing hole, or simply scraping the
powder from an inconspicuous area, and attaching the clip.
• Apply the second coat in the same manner as the first, concentrating on the
deep recessed areas first. A good cloud of powder is critical in getting a
good coating. If you have difficulty applying the 2nd coat, see troubleshooting
section.
• After the part is properly coated, remove the ground clip. If you have a bare
spot where the ground clip was connected, you can now apply powder with
the gun to cover that spot.
• Cure this second coat in the oven, in the same manner as the first coat.
TROUBLESHOOTING
PROBLEM: Pitted Finish
• Make sure the gun is thoroughly cleaned before changing to another powder.
• Make sure part is completely cleaned of all contaminants (see page 7).
• After cooling, wet sand the areas with 400 grit to level pits. A second coat of powder can
then be applied to the entire part.
PROBLEM: Coating Porous Materials
In some cases, contaminants in porous materials will cause pits in the powder. Porous cast
iron, die cast, cast aluminum, and magnesium parts trap contaminants that, when heated,
will outgas and cause porosity problems as the powder is cured. To avoid this, follow these
Preheating instructions: For large or heavy parts, and to prevent pitting from occurring,
preheat the part to 450°F for 30-60 minutes. The time that a part needs to be preheated
varies with size. Once the part has cooled, use PRE Painting Prep (#10041Z) or acetone
to remove the newly exposed contaminants. Wipe the part repeatedly until no further
contaminants come off on a clean white rag. Let the part cool to room temperature before
applying the powder. NOTE: Die-cast metal and solders vary widely in formulation, many
of which can be difficult to powder coat and, in some cases may even melt at 400° F.
PROBLEM: Orange Peel
“Orange Peel” is when the coated surface resembles the surface texture of an orange. A
certain amount of orange peel is unavoidable especially with polyester based powders.
An orange peel condition can often be removed by sanding the part with 400 grit sand
paper (wet or dry) and compounding as you would conventional automotive finishes.
If you want to buff by hand, use AutoSol Polish (#13170). The main cause of orange
peel is insufficient coating, over-baking, or excessive powder build up. You will know if
powder build up occurs because the powder will start to stand on its end like hair. If this
happens, stop applying powder and with light air pressure blow off some of the powder.
If powder does not apply evenly due to moisture build up, replace moisture trap on gun
and use fresh powder. Cured powder can be finished in the same manner as liquid paint.
PROBLEM: Poor Spray Pattern
If the gun does not spray, the air pressure could be too low. Moisture could be clogging the
Disposable Filter (#34066). Replace if necessary. The level of powder in the cup should
be at least one inch deep from the bottom of the cup to flow efficiently through the gun.
The deflector should be about 3/16” from the end of emitter.
PROBLEM: No Coverage or Poor Coverage in Recessed Areas
Hold the gun so that the side or peripheral discharge of powder goes into crevices,
recesses, and sharp angles. In extreme cases, gun can be used without a deflector and
static tubes. Exercise care to maintain at least 3” from part being coated to avoid a spark.
PROBLEM: Poor Coverage When Applying 2nd Coat (Hot Application)
Powders can be applied to hot surfaces. To use this technique, pre-heat the part to
cure temp. This may take 10-40 minutes depending on size. After pre-heating, remove
part from oven and immediately apply powder. You will notice that powder will flow
immediately upon contact. Exercise care to avoid drips and runs. Place coated part back
into pre-heated oven set at cure temp for an additional 20 minutes to complete the cure.
Note: Gloss Clear (10093) should go into an oven preheated to 350° F and
allowed to cure for 20 minutes at 350° F after complete flow out has occurred.
Curing at higher temperatures may cause yellowing.
14
For technical assistance e-mail: [email protected]
To order parts and supplies, call 1-800-345-1178 or www.eastwood.com
15
REMOVING CURED POWDER
The coating can be removed using Eastwood’s Paint and Powder Remover
Qt. (#10550ZP). Remember powder coatings are more solvent resistant than
other coatings and may require more time than paint to remove. To speed
results, cover the part with a heavy coating of remover and cover the remover
with a plastic bag to prevent evaporation. Plastic Media such as our Poly
Abrasive Material (#22020) also works well in removing powder coating.
Eastwood has a wide selection of abrasive equipment that can use this material.
AVAILABLE HOTCOAT® COLORS
Standard Colors:
Specialty Colors:
Hi-Tech Colors:
10093
10304
10104
10100
10135
10225
10310
10096
10137
10098
10138
10105
10306
10261
10139
10140
10143
10145
10146
10106
10149
10150
10305
10151
10152
10308
10103
Gloss Clear
Semigloss Clear
Satin Clear
Gloss White
Off White
Appliance White
Cream
Bright Yellow
Orange Yellow
Chevy Orange
Vermillion
Bright Red
Red Wagon
Ruby Red
MG Maroon
Dark Purple
Light Magenta
Ford Light Blue
Navy Blue
Ford Dark Blue
Lime Green
Medium Green
J.D. Green
Dark Green
Machine Gray
Dark Gray
Satin Black
10174
10099
10173
10092
10296
10089
10294
10094
10295
10154
10159
10155
10260
10108
Semi Gloss Black
(Under Hood Black)
(Chassis Black)
10107
10161
10153
10318
High Gloss Black
Mirror Black
Black Wrinkle
Midnight Blue
Call for our most
current list of colors!
Black Tint
Stamped Steel
(Detail Gray)
10095
Cast Iron
(Spray Gray)
10163
10102
Gold
Argent Silver Base
(Topcoat with Clear or
Translucent)
10226
10303
Architectural
Bronze
Rally Wheel Silver
Textured Colors:
10210
10211
10212
10213
10214
10215
10216
10217
10218
10220
10221
10224
Gold Vein
Copper Vein
White Silver Vein
Silver Vein
Silver Hammertone
Silver Wrinkle
Pewter Wrinkle
Gray Wrinkle
Ivory Stucco
Slate Web
Moss Green Web
Silver Sparkle
Iridescent Colors:
10320
10321
10322
10323
10324
Amber
Indigo
Aquamarine
Amethyst
Emerald
Chrome Smoke
Anodize Red
Candy Raspberry
Anodize Blue
Candy Teal
Translucent Gold
Candy Orange
Translucent Grape
Translucent Violet
Translucent Green
Red Wrinkle
Super Hi-Tech Colors:
10169
Almost Chrome
Base (Topcoat with
Clear or Translucent)
10263
10264
10265
10266
10160
10097
Fluorescent Yellow
Fluorescent Orange
Fluorescent Green
Fluorescent Pink
Grape Flake
Cast Aluminum
(Aluma Blast)
High-Temp Colors:
10325
10326
10327
10328
Satin Black
Stainless Steel
Factory Gray
Silver
Mirror Colors:
Primer:
10290
10291
10292
10293
10301
Custom Effects:
Corrosion Resistant
Gray Primer
10177
Mirror
Mirror
Mirror
Mirror
Red
Blue
Yellow
Green
Prism Additive
www.eastwood.com
If you have any questions about the use of this product, please contact
The Eastwood Technical Service Department
0 607174 003594
1-800-CAR-TEC1 (1-800-227-8321)