1
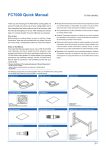
*Please read the manual before installation Professional Wind & Solar Hybrid Controller Manual 1. Notes : Thank you very much for purchasing our controller, please read the user manual carefully before installation and use the product and keep it with due care. Receive the product should first check whether the controller is damaged during the transportation. If you found the problem, please contact our company or the transport company immediately. The installation must be done by experienced technicians .The process must be strictly in accordance with the user manual to ensure that the product can work properly. Controller should avoid long-term corrosive gas and moist environment. Do not put this product in wet, rain, exposure, severe dust, shock, corrosion and strong electromagnetic interference environment. Keep children away from equipment. Do not open the controller to repair it by yourself. 2. Catalogue 3 Technical Specification………………………………………………………………………… 3 4 Universal Function..………………………………………………………………………… ….7 5 Optional Function..……………...…………………..............................................................8 6 Design & Dimension .......................................................................................................10 7 System Schematic...........................................................................................................12 8 Installation ……………………………………………………. .............................................12 9 Electrical Connection.......................................................................................................13 10 Menu Operation ..…………………………………………………………………………….13 10.1 Buttons ...................................................................................................................13 10.2 Default interface......................................................................................................14 10.3 Main menu interface................................................................................................15 10.4 System interface......................................................................................................16 10.5 Wind information .....................................................................................................17 10.6 Solar information .....................................................................................................18 10.7 Date time .................................................................................................................18 11 PC Software Introduction……………………………………………………………………...19 12 The Warranty & Maintenance…………………………………………………………..........23 3. Technical Specification Item No. Rated Battery Voltage TGWS10-24 TGWS10-48 24V 48V Rated Wind Turbine Power 1kW Maximum Wind Turbine Input Power 1.5kW Rated Solar Charge Current 10A Over-discharge Voltage 20.4V(adjustable) 40.8V(adjustable) Over-discharge Recovery Voltage 23.0V(adjustable) 46.5V(adjustable) Over-charge Voltage 29.4V (adjustable) 58.8V(adjustable) Over-charge Recovery Voltage 26.4V(adjustable) 52.8V(adjustable) Floating Voltage 27V (adjustable) 54V(adjustable) Dump-load Start Voltage 100V(adjustable) 100V(adjustable) Dump-load Start Rotate Speed Wind Turbine Charging Voltage 500RPM(adjustable) 10V(adjustable) Wind Turbine Charging Mode MPPT and PWM Solar Charging Mode Control Dump-load Mode 20V(adjustable) PWM Over rotate speed limiting, Over voltage limiting,Over current limiting ,PWM Display Mode LCD wind power , wind voltage , wind current , wind turbine rotate speed ,PV Display Parameters power , PV voltage , PV current , battery voltage , battery power ,charge current, over voltage ,under voltage ,system state ,etc Working Temperature & Humidity -20~+55°C/35~85%RH(Without Condensation) Quiescent Power Drain <3W Solar reverse-charging protection , solar reverse-connection battery over charge protection, battery over-discharge Protection Function battery reverse-connection protection, wind turbine automatic brake, wind turbine manual brake Communication (Optional) RS232 or RS485 Storage (Optional ) USB data logging Controller Size (L*W*H) 423 *450*175MM Package Size (L*W*H) 510*545*250MM Gross Weight 17KGS 3 Item No. Rated Battery Voltage TGWS14-24 TGWS15-48 TGWS20-96 TGWS20-120 TGWS20-220 TGWS20-240 24V 48V 96V 120V 220V 240V Rated Wind Turbine Power Maximum Wind 2kW Turbine 3kW Input Power Rated Solar Charge 10A Current Over-discharge Voltage Over-discharge Recovery Voltage Over-charge Voltage Over-charge Recovery Voltage Floating Voltage Dump-load Start Voltage Dump-load Start 20.4V(adjust 40.8V 80.0V 102V 185V 204V able) (adjustable) (adjustable) (adjustable) (adjustable) (adjustable) 23.0V(adjust 46.5V 92.0V 115V 210V 230V able) (adjustable) (adjustable) (adjustable) (adjustable) (adjustable) 29.4V 58.8V 115.0V 144V 265V 288V (adjustable) (adjustable) (adjustable) (adjustable) (adjustable) (adjustable) 26.4V(adjust 52.8V 105.0V 130V 240V 260V able) (adjustable) (adjustable) (adjustable) (adjustable) (adjustable) 27V 54V 110.0V 135V 250V 270V (adjustable) (adjustable) (adjustable) (adjustable) (adjustable) (adjustable) 100V 100V 200V 200V 300V 300V (adjustable) (adjustable) (adjustable) (adjustable) (adjustable) (adjustable) Rotate 500RPM(adjustable) Speed Wind Turbine Charging Voltage Wind Turbine 10V 20V 40V 50V 100V 100V (adjustable) (adjustable) (adjustable) (adjustable) (adjustable) (adjustable) Charging MPPT and PWM Mode Solar Charging Mode PWM Control Dump-load Mode Over rotate speed limiting, Over voltage limiting,Over current limiting ,PWM Display Mode LCD wind power , wind voltage , wind current , wind turbine rotate speed ,PV power , PV voltage , PV Display Parameters current , battery voltage , battery power ,charge current, over voltage ,under voltage ,system state ,etc Working Temperature & Humidity -20~+55°C/35~85%RH(Without Condensation) Quiescent Power Drain <3W Solar reverse-charging protection , solar reverse-connection battery over charge protection, battery over-discharge Protection Function battery reverse-connection protection, wind turbine automatic brake, wind turbine manual brake Communication (Optional) RS232 or RS485 Storage (Optional ) USB data logging Controller Size (L*W*H) 423 *450*175MM Package Size (L*W*H) 510*545*250MM Gross Weight 17KGS 4 Item No. Rated Battery Voltage TGWS20-48 TGWS20-96 TGWS20-120 TGWS20-220 TGWS20-240 48V 96V 120V 220V 240V Rated Wind Turbine Power 2kW Maximum Wind Turbine Input 3kW Power Rated Solar Charge Current 10A Over-discharge Voltage Over-discharge Recovery Voltage Over-charge Voltage Over-charge Recovery Voltage Floating Voltage Dump-load Start Voltage 40.8V 80.0V 102V 185V 204V (adjustable) (adjustable) (adjustable) (adjustable) (adjustable) 46.5V 92.0V 115V 210V 230V (adjustable) (adjustable) (adjustable) (adjustable) (adjustable) 58.8V 115.0V 144V 265V 288V (adjustable) (adjustable) (adjustable) (adjustable) (adjustable) 52.8V 105.0V 130V 240V 260V (adjustable) (adjustable) (adjustable) (adjustable) (adjustable) 54V 110.0V 135V 250V 270V (adjustable) (adjustable) (adjustable) (adjustable) (adjustable) 100V 200V 200V 300V 300V (adjustable) (adjustable) (adjustable) (adjustable) (adjustable) Dump-load Start Rotate Speed Wind Turbine Charging Voltage 500RPM(adjustable) 20V 40V 50V 100V 100V (adjustable) (adjustable) (adjustable) (adjustable) (adjustable) Wind Turbine Charging Mode MPPT and PWM Solar Charging Mode PWM Control Dump-load Mode Over rotate speed limiting, Over voltage limiting,Over current limiting ,PWM Display Mode LCD wind power , wind voltage , wind current , wind turbine rotate speed ,PV power , PV Display Parameters voltage , PV current , battery voltage , battery power ,charge current, over voltage ,under voltage ,system state ,etc Working Temperature Humidity & -20~+55°C/35~85%RH(Without Condensation) Quiescent Power Drain <3W Solar reverse-charging protection , solar reverse-connection battery over charge protection, battery over-discharge Protection Function battery reverse-connection protection, wind turbine automatic brake, wind turbine manual brake Communication (Optional) RS232 or RS485 Storage (Optional ) USB data logging Controller Size (L*W*H) 423 *450*175MM Package Size (L*W*H) 510*545*250MM Gross Weight 17KGS 5 Item No. Rated Battery Voltage TGWS30-48 TGWS30-96 TGWS30-120 TGWS30-220 TGWS30-240 48V 96V 120V 220V 240V Rated Wind Turbine Power 3kW Maximum Wind Turbine Input 4.5kW Power Rated Solar Charge Current Over-discharge Voltage Over-discharge Recovery Voltage Over-charge Voltage Over-charge Recovery Voltage Floating Voltage Dump-load Start Voltage 10A 40.8V 80.0V 102V 185V 204V (adjustable) (adjustable) (adjustable) (adjustable) (adjustable) 46.5V 92.0V 115V 210V 230V (adjustable) (adjustable) (adjustable) (adjustable) (adjustable) 58.8V 115.0V 144V 265V 288V (adjustable) (adjustable) (adjustable) (adjustable) (adjustable) 52.8V 105.0V 130V 240V 260V (adjustable) (adjustable) (adjustable) (adjustable) (adjustable) 54V 110.0V 135V 250V 270V (adjustable) (adjustable) (adjustable) (adjustable) (adjustable) 100V 200V 200V 300V 300V (adjustable) (adjustable) (adjustable) (adjustable) (adjustable) Dump-load Start Rotate Speed Wind Turbine Charging Voltage 500RPM(adjustable) 20V 40V 50V 100V 100V (adjustable) (adjustable) (adjustable) (adjustable) (adjustable) Wind Turbine Charging Mode MPPT and PWM Solar Charging Mode Control Dump-load Mode PWM Over rotate speed limiting, Over voltage limiting,Over current limiting ,PWM Display Mode LCD wind power , wind voltage , wind current , wind turbine rotate speed ,PV power , Display Parameters PV voltage , PV current , battery voltage , battery power ,charge current, over voltage ,under voltage ,system state ,etc Working Temperature & Humidity -20~+55°C/35~85%RH(Without Condensation) Quiescent Power Drain <3W Solar reverse-charging protection , solar reverse-connection battery over charge protection, battery over-discharge Protection Function battery reverse-connection protection, wind turbine automatic brake, wind turbine manual brake Communication (Optional) RS232 or RS485 Storage (Optional ) USB data logging Controller Size (L*W*H) 423 *450*175MM Package Size (L*W*H) 510*545*250MM Gross Weight 17KGS 6 4. Universal Function 4.1 Adaptive Impedance Matching of Wind Turbine & Load Wind Turbine , battery and load all have internal resistance. According to impedance matching principle, only when Input. impedance equals to output impedance, power utilization would be maximal , The energy utilization will be improved to the utmost extent by adaptive impedance matching of controller . 4.2 Control mode of Wind Turbine Open Circuit & Dump-loading ; Over Rotate Speed Limiting, Over Voltage & Over current Limiting Traditional wind solar hybrid controller : When total current of wind & solar is higher than limiting current, battery power increases . The excess energy will be dumped by PWM. Wind turbine rotate speed lower. And the excess energy is consumed in mosfets or resistance . This leads wind turbine to heat , shortens wind turbine and controller’s working life. This professional wind solar hybrid contoller :When total current of wind & solar is higher than limiting current, battery power increases .PWM duty cycle of charging circuit is decreased until charging is finished .When charging finished. Current circuit disconnected , wind turbine has no load ,In order to prevent wind turbine from a very quick rotate speed , This professional controller provides the function of over rotate speed limiting and over voltage limiting, Once the rotate speed or voltage exceeds what you set on the controller , The controller will start PWM smart dump-loading automatically. Prevent wind turbine from working in unloading state for long time . This is good for both wind turbine and controller . 4.3 Battery Maximum Charging Current Smart Limiting Traditonal wind solar hybrid controller : Different wind solar hybrid systems need different capacity batteries; Different capacity batteries have different maximum current, Traditional wind solar hybrid controller has no settings for batteries maximum charging current , or have wrong settings , leads over current , shortens batteries using life . This professional wind solar hybrid controller : User can set the capacity of battery ,The professional controller can calculate the maximum charging current intelligently according to user’s settings, Protect batteries . 4.4 Manual Brake 4.5 Using or not using wind turbine to charge battery could be set manually User can choose whether use wind turbine to charge the battery ,Set wind “M-SW: ON” . Wind turbine charging is normal .Set wind “ M-SW: OFF” . Wind turbine charging is prohibited . Before connecting the wind turbine , User could first set wind “ M-SW: OFF” manually to prevent sparks . 4.6 Using or not using solar panel to charge battery could be set manually User can choose whether use solar panel to charge the battery ,Set solar “ M-SW: ON”, Solar panel charging is normal . Set solar “ M-SW: OFF” , Solar panel charging is prohibited. Before connecting the solar panels . User could first set solar. “M-SW : OFF ” manually to prevent sparks . 4.7 LCD display multi-level menu ; Intelligent button settings ; The controller with LCD screen supports multi-level menu viewing. Users could set lots of parameters through buttons. The desigh of this controller is humanized . 7 5 .Optional Function 5.1 Optional Function 1 : Boost Function Wind turbine output voltage intelligent boost The boost module starts automatically when the wind turbine voltage is lower than battery voltage , ensure that the wind turbine normally charges the battery. The boost module shuts off automatically when the wind turbine voltage is higher than battery voltage. Impedance matching self-adaption Due to internal resistance of wind turbine, battery, load, According to the impedance matching principle, The wind Turbine will have maximum power utilization rate and maximum power output only when the input impedance equals to output impedance, with impedance matching self-adaption .This controller enhances energy efficiency. 5.2 Optional Function 2 : Buck Function Wind turbine output voltage intelligent buck The buck module starts automatically when the wind turbine voltage is higher than battery voltage , The controller real-time tracks maximum power of wind turbine and real-time limits the current of wind turbine .To solve the problem of overheating of wind turbine. Wind Turbine Max Current Tracking (MCT) and Max Power Point Tracking (MPPT) When wind is in the breeze , load will slow down wind turbine rotate speed, thus reducing wind turbine output power . With MCT and MPPT ,Keep wind turbine output power on the maximum balance point of wind power utilization. Combine with boost-buck circuit, improve the utilization coefficient of wind energy. Impedance matching self-adaption Due to internal resistance of wind turbine, battery, load, According to the impedance matching principle, The wind Turbine will have maximum power utilization rate and maximum power output only when the input impedance equals to Output impedance, with impedance matching self-adaption .This controller enhances energy efficiency. 5.3 Optional Function 3 : Boost & Buck Function Wind turbine output voltage intelligent boost The boost module starts automatically when the wind turbine voltage is lower than battery voltage , ensure that the Wind turbine normally charges the battery. The boost module shuts off automatically when the wind turbine voltage is higher than battery voltage. Wind turbine output voltage intelligent buck The buck module starts automatically when the wind turbine voltage is higher than battery voltage , The controller real-time tracks maximum power of wind turbine and real-time limits the current of wind turbine .To solve the problem of overheating of wind turbine. Wind Max Current Tracking (MCT) and Max Power Point Tracking (MPPT) When wind is in the breeze , load will slow down wind turbine rotate speed, thus reducing wind turbine output power . With MCT and MPPT ,Keep wind turbine output power on the maximum balance point of wind power utilization. Combine with boost-buck circuit, improve the utilization coefficient of wind energy . Impedance matching self-adaption Due to internal resistance of wind turbine, battery, load, According to the impedance matching principle, The wind Turbine will have maximum power utilization rate and maximum power output only when the input impedance equals to Output impedance, with impedance matching self-adaption .This controller enhances energy efficiency. 8 5.4 Optional Function 4 : RS Communication RS232 or RS485 real time communication With serial port communication . User can analyse the data from the software installed in the computer. Procedure could be upgraded by RS232 Some customization functions could be altered through upgrad procedure by serial ports. PC and controller both could set parameters 5.5 Optional Function 5 : USB data logging function All data can be stocked into 8GB USB flash disk . User can check the system information with taking the USB flash disk out of controller. 9 6. Design & Dimension 6.1 Design 10 6.2 Dimension 11 7 System Schematic Solar Panel Wind Turbine PC Battery 8 Installation 8.1 Warning Pls read this chapter carefully before installation. To make sure the whole process is safe . It is important to choose the installation location for controller. Keep the controller away from rain, insolation , put the controller in dry ,ventilated place . Metal material placed around the controller is prohibited, if not. may cause battery short circuit . There should be enough space around the controller for cooling . This controller could only charge to the lead-acid batteries which are in control range of this controller . Not fully connection and corrosive wire will produce lot of heat .Then wire insulation layer may be melted, lead surrounding material combustion ,even fire. So please ensure every connection is secure , to avoid connector loose when moving. 8.2 Installation Steps Step 1 : Select Location Do not install the controller in place where insolate, high temperature and rainy. Pls keep enough free air around the controller . Step 2: Inspect Put the controller on the place where it is easy to install and inspect if there is enough space for connections. Step 3 : Mark Mark with 4 dots on install surface through controller’s 4 open holes. Step 4 : Drill holes Drill 4 holes in the 4 dots which marked in setp 3 . Step 5: Fix controller Aim controller’s 4 open holes towards the 4 holes which were drilled in step 4. Then fix controller Step 6 : Check Make sure the controller is firmly installed . with screw nails . 12 9 Electrical Connection 9.1 Terminal 9.2 Connection steps Pls do the connections safely and strictly according to the steps below Step 1 : Before connection . Pls put “ BATTERY” Switch to “ OFF” . Then , conect battery to Controller’s “ Batttery ”Terminals with cuprum cable which more than 6mm²and less than 1 meter . Although there is reverse connection protection ,But connecting battery reversely is forbidden ! Connection is finished ,Put “ BATTERY” Switch to “ ON”. Step 2 : To prevent producing sparks while connecting, User are supposed to set wind, solar “M-SW: OFF . Step 3 : Connect wind turbine to controller’s “ Wind Input ”terminals ,Make sure positive to positive , negative to negative . Step 4: Connect solar panels to controller’s “ Solar Input ” terminals .Make sure positive to positive, negative to negative . Step 5 : After connecting ,User can do what he wants to do in step 2 to set Wind , Solar “ M-SW : ON” . Or you can do the operations on PC through RS232 . 10 Menu Operation 10.1 Buttons Buttons Menu Description It is used to select menu item and confirm parameter setting It is used for left and right page turning in the screen or increase/ decrease number It is used for left and right page turning in the screen or increase/ decrease number It is used as return/finish function 13 10.2 Display on LCD Screen Default Interface Power on 1 **% V: **V **A Low I: 2 Solar : V: **V I:**A 3 Wind : V: **V **R/min I:**A 4 Wind -Power P: **W I:**A 5 In -Power S: **W **W W:**W 6 Total-Energy : ** W.h 7 TP: Normal TM: Normal **C **C 1 Battery power: * % stands for battery power range Low : Battery low voltage , Normal :Battery normal voltage Full : Battery full voltage , Float : Battery floating voltage Ft **S : The countdown of exiting from floating charging Menu 2 Solar voltage, Solar charging current Menu 3 Wind turbine rotate speed . Wind voltage, Wind charging current Menu 4 Wind power , Wind output current Menu 5 Total input power Solar input power ,Wind input power Menu Menu 6 Total energy generated 7 TP : Controller working temperature , Normal : Temperature normal Error : Temperature detection model fault .OTP : Over-heating protection TM :Mosfet working temperature, Normal : Temperature norm Error : Temperature detection model fault .OTP :Over-heating protection Menu 8 Erro Code B0 : Battery normal , B1 : Battery discharged ,B2: Battery over-charged S0 : Solar panel normal ,S1 : High PV input voltage , S2: PV charge fault S3 : PV charge open circuit fault W0 : Wind turbine normal , W1: manual brake on , W2: Battery fully charged W3 : Maximum RPM protection , W4 :Vmax protection ,W5: Amax protection W6: Brake module short-circuit fault W7: Wind turbine charge module short-circuit fault W8: Wind turbine charge module open-circuit fault W9: Too high wind input voltage 8 ErrCode : B0 S0 W0 T0 T0 :Temperature normal ,T1: Mosfet temperature detection model fault Menu T2:Mosfet Over-Heating Protection,T6:Conteroller elements temperature detection model fault T7 : Controller elements Over-Heating Protection Main Menu 14 1 System Info Main Menu 1 SystemInfo Addition 1 ****-**-** Year-Month-Day USBOK :USB normal, USBNC : USB un-connected USBdERR: USB module fault or un-connected USBFULL : USB flash disk full **-**-** : Hour- Minute-Second A1 ****-**-** USB** **-**-** If you don’t buy the USB data logging function ,Don’t have this menu A2. Decice-Addr: Menu Addition 2 Decice -Address . If you don’t buy the RS485 function , don’t have this menu A3. Wind-Speed: ***m/s Menu Addition 3 : Wind -Speed If you don’t buy the wind speed detection function ,Don’t have this menu 10.3 Display on LCD Screen Menu Main Menu Interface Menu 1 **% V: **V Low I: **A Main Menu 1 .System Info Main Menu 1 System information Menu 10.4 Esc Esc Esc Esc Main Menu 2 .Wind Info Main Menu 3.Solar Info Main Menu 4 .Date Time 15 Main Menu 2 Wind Information Main Menu 3 Solar Information Menu Menu 10.5 10.6 Main Menu 4 Date Time If you don’t buy USB data logging Function ,Don’t have this menu Menu 10.7 10.4 Display on LCD Screen System Information Battery capacity numeric flickers. Menu Main Menu 1 .System Info Press Menu 1 . System Info Batt: ** Ah 1/9 and to increase/decrease the value. Press “Menu” , saved; Press “Esc” , not saved. Esc “ ADD ”or “CLEAR” “ flickers. Esc 1 . System Info Energy: ADD 2/9 Menu Press to select “ADD” or “ CLEAR”. If and choose “CLEAR” and press “Menu”, Total-Energy will be 0. Then it will be“ADD”again. Over-discharge voltage numeric flickers. Menu Esc 1 . System Info Low: ** V 3/9 Press and to increase/decrease the value. Press “Menu”,saved; Press “Esc” , not saved. Over-discharge Esc recovery voltage numeric Menu 1 . System Info RLow: ** V 4/9 flickers.Press and to increase/decrease the value. Press “Menu” , saved; Press “Esc” , not saved. Esc Menu 1 . System Info Full: ** V 5/9 Over-charge voltage numeric flickers. Press and to increase/decrease the value. Press “Menu” saved; Press “Esc” , not saved. Esc Menu 1 . System Info RFull: ** V 6/9 Over-charge recovery voltage numeric flickers. Press and to increase/decrease the value. Press “Menu” , saved; Press “Esc” , not saved. Floating voltage numeric flickers. Esc Menu 1 . System Info Flot: ** V 7/9 Press and to increase/decrease the value. Press “Menu” , saved; Press “Esc” , not saved. Esc Esc Menu 1 . System Info Out: ** V 8/9 This model doesn’t have this function. Menu 1 . System Info Rout: ** V 9/9 This model doesn’t have this function. 16 10.5 Display on LCD Screen Wind Information Menu Main Menu 2. Wind Info 2. Wind Info MPPT : ON Menu 1/9 Esc Wind turbine maximum limiting rotate speed numeric Esc 2. Wind Info Rota : **R Menu flickers. Pres and to increase/decrease the value .Press “Menu” , saved; Press “Esc” , not saved. 2/9 Wind turbine magnetic pole numeric flickers. Esc 2. Wind Info Pole : **D Menu Press 3/9 and to increase/decrease the value. Press “Menu” , saved; Press “Esc” , not saved. “ON” or “OFF” flickers. Press Esc 2. Wind Info Brake: OFF Menu and to select “ON” or “OFF”. Press “Menu” , saved; Press “Esc” , not saved. 4/9 ON: wind turbine brake is on; OFF: wind turbine brake is off. “ON” or “OFF” flickers. Press Esc 2. Wind Info M-SW: ON Menu and to select “ON” or “OFF”. Press “Menu” ,saved; Press “Esc” , not saved. 5/9 ON: Wind charging is on; OFF: Wind charging is off. Wind turbine maximum voltage numeric flickers. Esc Menu 2. Wind Info Vmax : ** V 6/9 Press and to increase/decrease the value. Press “Menu”, saved; Press “Esc”,not saved. Wind turbine maximum current numeric flickers. Esc 2. Wind Info Amax: ** A Menu 7/9 Press and to increase/decrease the value. Press “Menu” ,saved; Press “Esc” ,not saved. Self-dumping time numeric flickers. Press Esc and Menu 2. Wind Info Time :** min 8/9 to increase/decrease the value. Press “Menu” saved; Press “Esc” , not saved. Boost start voltage numeric flickers. Press Esc and Menu 2. Wind Info CutIn: **V 9/9 to increase/decrease the value. Press “Menu” , saved; Press “Esc” , not saved. 17 10.6 Display on LCD Screen Solar Information “ON” or “OFF” flickers. Press Menu Main Menu 3 .Solar Info Menu 3 . Solar Info M-SW : ON 1/1 If you don’t buy USB data logging to select “ON” or “OFF”. Press “Menu” , saved; Press “Esc” , not saved. Esc 10.7 Display on LCD Screen and ON: Solar charging is on; OFF: Solar charging is off. Date Time Function ,Don’t have this menu YEAR Menu Main Menu 4 .Date Time 4. ****-**-** 1-YEAR **-**-** Menu numeric flickers. Press and to increase/decrease the value. Press “Menu” , saved; Press “Esc” , not saved. Esc MONTH numeric flickers. Press Esc 4. ****-**-** 2-MONTH **-**-** Menu Press “Esc” , not saved. Menu 4. ****-**-** 3- DAY **-**-** numeric flickers. Press Esc to Press “Esc” , not saved. 4. ****-**-** 4- HOUR **-**-** Menu numeric flickers. Press to Press “Esc” , not saved. Menu 4. ****-**-** 5- MIN **-**-** and to increase/decrease the value. Press “Menu” , saved; Press “Esc” , not saved. Menu 4. ****-**-** 6- SEC **-**-** and increase/decrease the value. Press “Menu” , saved; MINUTE numeric flickers. Press Esc and increase/decrease the value. Press “Menu” , saved; HOUR Esc to increase/decrease the value. Press “Menu” , saved; DAT Esc and SECOND numeric flickers. Press and to increase/decrease the value. Press “Menu” , saved; Press “Esc” , not saved. 18 11 PC Software Introduction 11.1 Software File : Customer can use this software without installation. The RAR file includes ,database file, user files, detail file and etc. are placed in the same directory. As the picture below: 11.2 Open the software: Step 1 : Customer should connect the controller with battery or power supply to start the controller at first Step 2 : Connect PC and the controller with serial cable . Click and open the RAR file and find the monitoring software. Controller’s current state could be real-time monitoring. Step as follows: 19 11.3 Software Connection configuration : Click “Setting” at first, click “Serial Port Setting” secondly, then serial port number and baud rate could be set. As below: Remark : If workable port of the computer is COM 2 or COM 3 .customer should set the serial port as COM2 or COM 3. Means customer should set the serial port as the real workable port according to their computer. Press OK after setting . 11.4 Parameters Settings: Click “Setting”, and then click “Parameters Setting”, controller parameters could be set from your PC. Just like: Press “Save ” after setting , Or customer can press “ One Key Recover” if he wants to reset to factory defaults 20 11.5 Data maintenance: User could view and analyze the history data by Clicking “File (F)”, then clicking “View History Data”. User could view the data of any time, just by choosing “Start Time” and “End Time”. Also could be used to check more accurate time. 21 Select time then click “OK”, the selected data will be backup to the folder “data”. Data is displayed by table form so that make analysis easier. 11.6 About Controller: Click “Help (H)” and “About (A)”, you will get product’s information. 11.7 Quitting Software: Click “File (F)”, and then click “Exit (X)”. Or click on top right corner. Other exiting operations which usually used on PC could be used here too. 11.8 About Feedbacks: Our products could be improved according to your feedbacks. So we will be very pleased to receive your feedbacks about our product. If you are confused when using our products, do not hesitate to contact us. 22 12 The Warranty & Maintenance 12.1 Warranty We provide one year warranty since delivery. If the product is exceed warranty or damaged by transportation, improper use, human elements, force majeure, it is not under warranty. 12.2 Maintenance The installation and storage should avoid the highly corrosive, high dust, high temperature, and high humidity environment; especially avoid the metals fall into them. Periodically clean the cooling fan and check whether it is normal. Should be completely cut off the previous level power, shut down for 10 minutes or more, and the capacitor is fully discharged before opening the cover to maintain. (Large-capacity electrolytic capacitor discharge need a certain period of time), demolition careful in order not to damage the parts and components, pay attention to the order of connection. Specific requirements are as follows: Periodically clean the dust; Check the terminal screws are tightened or not; Check if there are overheating left traces and damage to the device; Check the wire is aging or not. Note: Controller does not work properly, you should try to solve according to manual, if it is still not resolved, please contact us. Do not disassemble parts 23 Hefei Top Green Energy Technology Co.,LTD Website: www.top-green.cn Tel:86 -0551-65765201 Fax: 86- 0551-65765203 Email : [email protected] Version 2.0