1
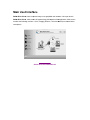
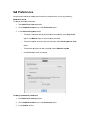
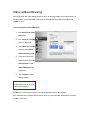
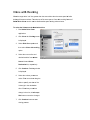
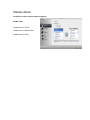
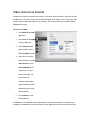
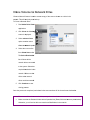
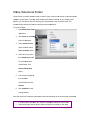
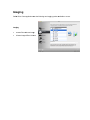
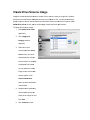
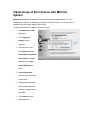
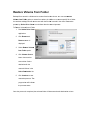
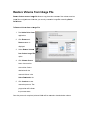
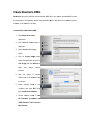
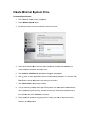
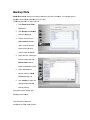
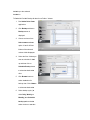
Stellar Drive D Clon ne Vers sion 3 3.5 Userr Guiide Overview Stellar Drive Clone for Mac, creates clone and image of hard drive or volume as well as restores backup and volume image. Clone created can be used as a backup or as a startup disk. Entire content from the source is copied to destination, retaining every details of the original drive which makes the clone drive bootable. The cloning process will erase data from the destination drive beyond recovery. The software creates hard drive or volume image for backup purpose and can recover data from it at any moment. In addition, you can restore volume from a folder or a mountable volume image file to its previous state. Another important feature of Stellar Drive Clone is the ability to create bootable DMG and minimal system, which comes handy when Mac OS crashes or fails to boot. What's new in this version? Support for encrypted volume. Key Features: New look GUI. Creates a complete replica of drive or volume. Can resize the volume of the destination drive to make full use of it. Supports cloning of drive volume to another volume, folder or connected network drive. Creates image of the hard drive or volume for backup purpose. Restores volume from a folder or a mountable volume image. Creates bootable DMG and Minimal System for Mac OS X. Preferences can be set to personalize end task activities and software up dation. Support for Partition Map scheme MBR (Master Boot Record). Support for ExFAT file system. Clones Solid State Drive( SSD ) to Mac Drive. Clones NTFS formatted drive into ExFAT formatted drive in Lion OS. Take backup of your data. Schedule automatic backup of data periodically. Why Stellar Drive Clone? Creates Clone of Hard Drive/Volume Clone of hard drive/volume involves creating a copy of entire drive or volume content. A Clone, created using Stellar Drive Clone, can be used as backup or a boot drive. A clone is useful if there is a need to upgrade hard drive, reboot or restore system or when a full system backup is needed. Stellar Drive Clone can be used to create clone of drive/volume to a drive, volume, folder or a network drive. Capable of Resizing Volumes on Target Drive Stellar Drive Clone creates clone of a drive to another hard drive having size equal or greater than the source drive. If the target drive is of higher capacity, Stellar Drive Clone can resize volumes in the target drive to make full use. By default, drive cloning takes place without any changes. So, if the target drive has more space then the free space left after cloning will be of no use. For making the drive space useful, you need to choose Resize volume(s) of destination drive in the application and specify the new volume size. Creates Image of Hard Drive/Volume Image file contains complete content of the source hard drive or volume. Using image files you can restore the entire disk or a volume in the event of system crash. Stellar Drive Clone supports creating image of both hard drive and volumes. Restores Volume from Folder/Image File Restore feature is used to copy back the data from the cloned folder or an image file to the volume to put it into its original state. Restoration process by Stellar Drive Clone is much faster than the manual process. Creates Bootable DMG Bootable feature of Stellar Drive Clone allows users to create personal bootable DMG for Mac OS X. The bootable Mac DMG can include one or more installed applications into it. Stellar Drive Clone is installed automatically into the bootable DMG. The compatibility of the DMG depends on the machine it is created. This means that if the DMG is created on PowerPC, you can use it to boot PowerPC machine only. Creates Minimal System Drive Stellar Drive Clone can be used to create a minimal system that can be used to boot the system in case of emergency. This feature will copy all the system files from an installed Mac OS X to another volume. The result of the copy is a minimal system with Apple’s default applications and an empty user’s folder containing default folders, preferences etc. Installation Procedure Before installing the software, check that your system meets the minimum system requirements: Minimum System Requirements Processor: Intel Operating System: Mac OS 10.5.0 and above Memory: 1 GB RAM Hard Disk: 50 MB of free space Steps to install Stellar Drive Clone Unpack StellarDriveClone.dmg.zip file. Decompress the zip file and double click the dmg file. This step will mount a virtual volume - StellarDriveClone. Double-click StellarDriveClone volume to open Stellar Drive Clone application window. Drag Stellar Drive Clone file to the Applications folder. To launch the software, double click on Stellar Drive Clone file in Applications folder. This displays License Agreement. If user accepts the License Agreement, then the software is launched; otherwise, it terminates. To remove the software, drag and drop the StellarDriveClone file from Applications folder to Trash. Order and Register Order Stellar Drive Clone The software can be purchased online. For price details and to place an order, click here. Once the order is confirmed, a pre-paid registration key will be sent through e-mail, which would be required to register the software. Register Stellar Drive Clone To Register Stellar Drive Clone application 1. On the Tools menu, click Register. Registration window is displayed. 2. Do one of the following: If you have purchased the product and received registration key, a. Select 'I have a key to register the product' option. Click OK. b. In Registration Key dialog box, type the key. Click OK. If you have to purchase the product, a. Select 'I don't have a key to register the product'. Click OK, to purchase the product. How to Update? To update Stellar Drive Clone, do one of the following: To schedule Stellar Drive Clone to check for updates automatically 1. Run Stellar Drive Clone, click on Preferences button on the main screen or select StellarDriveClone > Preferences. 2. To schedule Stellar Drive Clone to automatically download updates, select Check for updates checkbox and then assign frequency for checking of updates (either Daily, Weekly or Monthly). 3. Click OK. To check for updates manually 1. Run Stellar Drive Clone application. 2. In StellarDriveClone menu, click Preferences... option. 3. Click Check for updates now button. 4. If updates are available, Update screen is displayed. Follow the steps and if, No updates are available, a message that 'There are no updates available' is displayed. Or, Updates are available, application will download and install them and then display a 'Updates successfully installed' message. 5. Click OK. Stellar Support Our Technical Support professionals will give solutions for all your queries related to Stellar Products. You can either Call Us or Go Online to our support section at http://stellarinfo.com/support/. For price details and to place the order, click http://www.stellarinfo.com/mac-software/clonemac/buy-now.php Chat Live with an Online technician at http://stellarinfo.com/support/. Search in our extensive Knowledge Base at http://www.stellarinfo.com/support/kb/. Submit enquiry at http://www.stellarinfo.com/support/enquiry.php. E-mail to Stellar Support at [email protected]. Support Helpline Monday to Friday [ 24 Hrs. a day ] USA (Toll free Pre Sales Queries) USA (Post Sales Queries) UK (Europe) +1-877-778-6087 +1-732-584-2700 +44-203-026-5337 Australia & Asia Pacific +61-280-149-899 Netherlands Pre & Post Sales Support +31-208-111-188 Worldwide Email Orders +91-124-432-6777 [email protected] Starting Stellar Drive Clone Follow any of the following methods to run Stellar Drive Clone on a Mac system. Double click on Stellar Drive Clone file in Applications folder. Double-click on Stellar Drive Clone desktop shortcut (if it is created). Click on Stellar Drive Clone icon in the dock. Ma ain Userr Interfa ace Stella ar Drive Clon ne has a simp ple and easy to t use graphiccal user interfface. Once yo ou launch Stella ar Drive Clon ne, main scree en will appear listing the fe eatures of the e application. Main screen contains the follow wing modules - Clone, Imag ging, Restore , Tools and B Backup menuss and other o user options. Stellar Drive e Clone Main n Screen Menus Stella arDriveClon ne Abou ut StellarDriveClone Use th his option to read r informattion about Ste ellar Drive e Clone. Licen nse Agreeme ent Use th his option to view v the licen nse agreemen nt. Prefe erences... Use th his option to set s preferences for cloning g and perso onalizing the process. p Tools ster... Regis This option o is enab bled when you u are using unreg gistered versio on of Stellar Drive D Clone applic cation. Use it to register yo our product. Help Help Topics... Use th his option to view v Stellar Drive D Clone help h manual. Orderr Stellar Driv ve Clone Use th his option to buy b Stellar Drive D Clone. Email to Stellar Support Use th his option to mail m for suppo ort against an ny proble em. View Support Sec ction Use th his option to visit v support page p of stellarrinfo.com. Subm mit Enquiry Use th his option to submit s enquirry to stellarinffo.com. View Knowledgebase Articles Use this option to visit knowledgebase articles at stellarinfo.com. Tab bs and Button ns Tabs e Tab Clone This tab t is located on the main screen s of Ste ellar Drive Cl one. Click this if you wantt to clone a ha ard drive//volume. Imagiing Tab This tab t is located on the main screen s of Ste ellar Drive Cl one. Click this if you wantt to create an image of a hard drive/volu ume. Resto ore Tab This tab t is located on the main screen s of Ste ellar Drive Cl one. Click this if you wantt to restore a h hard drive//volume from a clone or image. Tools s This tab t is located on the main screen s of Ste ellar Drive Cl one. Click this if you wantt to create a boota able DMG or a minimal sys stem. Backup Tab t is located on the main screen s of Ste ellar Drive Cl one. Click this if you wantt to backup the data This tab of a hard drive/volu ume. Button ns Refrresh Drive ated on the main m screen off Stellar Driv ve Clone. Clicck this to refre esh This button is loca D es. the Drives/Volume elp He This button is loca ated on the main m screen off Stellar Driv ve Clone. Clicck this to launch the appliication's help.. Sto op This button is loca ated on the main m screen off Stellar Driv ve Clone. It is displayed on nly when n a process is s running. Clic ck this to stop p the process. Back This button is loca ated on the main m screen off Stellar Driv ve Clone. Clicck this to movve to previious screen of o application. Continue This button is loca ated on the main m screen off Stellar Driv ve Clone. Clicck this to conttinue to ne ext screen of application. a Sett Preferrences General preference es allow settin ng tasks that will be perforrmed at the end of any pro ocess by Stella ar Drive Clon ne. To ch hange finish ta ask preferenc ces 1. Run Stella ar Drive Clon ne application. 2. On the Ste ellarDriveClo one menu, clic ck Preferenc ces option. 3. In the Afte er finishing ta ask section, o he end of pro To o assign a sou und that will be b played at th ocess, select Play Sound op ption. Click Brrowse button to select a sa aved sound fiile. o To o send the sys stem to sleep p at the end off process, sellect Send sys stem to sleep op ption. o To o shutdown th he system at end e of processs, select Shu utdown syste em o Click OK button n to save the settings. To ch hange update e task preferrences 1. Run Stella ar Drive Clon ne application. 2. On the Ste ellarDriveClo one menu, clic ck Preferenc ces option. 3. In the Upd dates section,, o To assign a frequency for checking of updates, select Check for updates option. o Select the frequency in the list. o Click OK button to save the settings. To check for current updates, click Check for Updates button. Clone Stellar Drive Clone has the following two cloning options available to a user. Clone Disk Clone Volume Clone Disk Clone Disk Clone consists of two advanced options: Disk Clone Clone without resizing Clone with resizing Clo one with hout Re esizing g If the target drive is s of same size e as the sourrce drive, or o of size greaterr than the sou urce drive butt the ex xtra space is not needed th han cloning can be perform med without re esizing the vo olumes of destin nation drive. To Clone Hard Drrive without Resizing R 1. Run Stella ar Drive Clon ne application n. 2. Click Clon ne tab. Clonin ng screen is displayed. d 3. Select Dis sk Clone optio on and then select s Clone without re esizing option n. 4. Select the source drive and destin nation drive fro om Select Source list and Select Des stination list,, respectively. 5. Click Conttinue to start cloning pro ocess. Note: To clone a drive/volume, d estination mu ust be equal or o the de greater than the so ource. efault, the sou urce drive will clone to the destination d drrive without a any changes. By de If the destination drive is larger than the sourrce drive, you u can resize th he destination n drive volume ake full use of it. to ma Clo one with h Resiz zing When n the target drrive is of size greater than the source drrive then the e extra space le eft after clonin ng will become useless. To o make use off the extra sp ace, Clone w with resizing fe eature of Stella ar Drive Clon ne can be use ed to distribute e the space a among other vvolumes. To resize the Volu ume on the destination d drive d 1. Run Stella ar Drive Clon ne application n. 2. Click Clon ne tab. Clonin ng screen is displaye ed. 3. Select Dis sk Clone optio on and then select Clone with resizing option. 4. Select the source drive and destination n drive from Select S Source lis st and Select Destinatio on list, respec ctively. 5. Click Conttinue. Resizin ng window is displaye ed. 6. Select the volume you want w to resize. Entter new size or o drag the slider to sp pecify new siz ze of the Volume(s) in the destina ation drive. Each h time you ma ake a change in the size, click k Accept Size button to save the changes. 7. Click Conttinue button to t start cloning pro ocess. Volume Clone C Clone e Drive consists of three advanced options: Volum me Clone e Volume to Volume V Clone Clone e Volume to Network N Drive e Clone e Volume to Folder F Clo one Vollume to o Volum me Clone e Volume featture is used to o create clone e of a volume e on another vvolume in the same drive o or anoth her drive. The clone would contain all file es and folderss of the sourcce volume. Th his volume ca an be used either as a bootable vo olume or as a backup. The cloning proce ess will overw write existing b recov very. data beyond To Clone to Volum me 1. Run Stella ar Drive Clon ne application n. 2. Click Clon ne tab. Clonin ng screen is displayed. d 3. Select Volume Clone option and d then select Clone to Volume V optio on. 4. Select the source drive and destin nation drive fro om Select Source list and Select Des stination list,, respectively. You get a warning message, that the operation will overwrite existing e data. Make sure e that you hav ve selected th he right sourc ce and destination. 5. Click Conttinue to start cloning pro ocess. This operation o will completely erase the desttination volum me beyond reccovery. If you u select free space e as the destin nation drive, the t applicatio on will first cre eate partition using free space and then perform the clone operation. Note: In volume clone, data within the volume is considered other than volume size. Clo one Vollume to o Netwo ork Driv ve 'Clone e to Network' feature is use ed to create a copy of the source volum me on a drive in the netwo ork. This will work w only as a backup. To Clone to Netwo ork Drive 1. Run Stella ar Drive Clon ne application n. 2. Click Clon ne tab. Clonin ng screen is displayed. d 3. Select Volume Clone option and d then select Clone to Network N optio on. 4. Select the source drive from Selec ct Source listt. The Selec ct Destination n list will sho ow all the network drrives connecte ed to the system. Select th he required de estination in the t network. Make M sure tha at all the othe er network drives are disconnected d. 5. Click Conttinue to start cloning pro ocess. Once the process is completed,, entire data in n the source vvolume will be cloned to th he destination n. ct all the otherr network driv ves, except th he selected on ne. Disconnec Make sure e that the files s and folders have h all perm missions (Read d, Write and E Execute perm missions). Otherwise, you will not be able to access those filles/folders in the network. Clo one Vollume to o Folder 'Clone e Volume to Folder' F feature e is used to create a copy of the source e volume on a folder/volum me locate ed in another drive. The co opy works exa actly as the so ource volume e. So, by cloniing a boot partition, you can use u the clone for booting your y system in n the event off system crash. The n thus be use ed as a backup as well as b boot disk. resulttant folder can To Clone to Folderr 1. Run Stella ar Drive Clon ne application n. 2. Click Clon ne tab. Clonin ng screen is displayed. d 3. Select Volume Clone option and d then select Clone to Folder F option. 4. Select the source drive from Selec ct Source listt. To select destination d volume/folder, click Choose Destination D button. 5. You need to navigate to o the destina ation volume/follder and click Choose. 6. Click Conttinue to start cloning pro ocess. Once the process is completed,, entire data in n the source vvolume will be cloned to th he destination n. ered other tha w the volu ume is conside an volume sizze. In volume clone, data within Disconnec ct all the network drives, be efore cloning the boot drive e or main harrd drive. Ima aging Stella ar Drive Clone e application has h the follow wing two imag ging options available to a user. Imagiing Create C Drive/V Volume Imag ge Create C Image e of Boot Volu ume Cre eate Drive/Volume Im mage Image e file contains s complete co ontent of a hard drive or vo olume. When an image file is created, ded in it. So, it requires lesss storage drive//volume unused space and d bad sectors are not includ space e. Image file can c be used to o restore the entire disk orr volume in th he event of syystem crash. Stella ar Drive Clon ne can be use ed to create im mage of both hard drive an nd volumes. To Crreate Drive/vo olume Image 1. Run Stella ar Drive Clon ne application n. 2. Click Imag ging tab. Imaging screen s is displayed. 3. Select the source drive/volum me from Select Source lis st. If you have e selected th he boot volum me as source drive, a mess sage is displaye ed from where e you can ch hoose to crea ate image of boot b volume with w minimal sy ystem. Click Choose Destination D button to select s destination volume/folder. 4. Navigate to o the destinattion drive/volum me, specify th he name for the image file and click Save. 5. Click Conttinue to start imaging process. Note: Destination path must be on another hard drive. Once the process is completed, image of the drive will be saved to the specified destination. Cre eate Image of Boot Volume V with M Minimal Sys stem Stella ar Drive Clon ne allows crea ating boot volume with a m minimal system m installed in it. This minim mal system run ns like an ope erating system m having min imal functionss. You can ru un allowed progra ams and perfform basic fun nctions with itts help. To cre eate image off the boot volu ume with minimal system 1. Run Stella ar Drive Clon ne application n. 2. Click Imag ging tab. Imaging screen s is displayed. 3. Select the boot volume from Selec ct Source listt. Create Minimal System m of Boot Volu ume message e is displayed. Click Image mal System with minim button. 4. Choose Destination D button to select s destination volume/folder. 5. Navigate to o the destinattion drive/volum me, specify th he name for the image file and click Save. 6. Click Conttinue to start imaging prrocess. Note: Destination path must be on another hard drive. Once the process is completed, image of the drive will be saved to the specified destination. Restore Volume Restore consists of two options: Restore Volume from Folder Restore Volume from Image File Res store Volume V from Folder F Backu up/Clone storred in a folderr can be resto ored back to th he volume. Y You can use R Restore Volum me from Fold der option to restore from a clone in a fo older or to resstore specific file or folder. It overwrites existin ng files with same s name with w the file tha at is saved in the clone. Re estoration proce ess by Stellarr Drive Clone e is much fastter than the m manual processs. To Re estore Volume e from a Folder 1. Run Stella ar Drive Clon ne application n. 2. Click Resttore tab. Restore sc creen is displayed. 3. Select Res store Volume e from Folder option. 4. Click Choo ose Source button icon n to select source driv ve. Select destination n for the restored Volume V in the Select Des stination list.. 5. Click Conttinue to start restoration n process. The e progress bar b will indicatte the proces ss status. Once the process is completed,, the selected folder will be e restored to tthe destinatio on volume. Res store Volume V from Im mage F File Resto ore Volume from f an Imag ge file allows to copy backk the contentss of the volum me stored as image e files to origin nal state. Notte that you ca an only restore e the image ffile created byy Stellar Drive e Clone. To Re estore Volum me from an Im mage File 1. Run Stella ar Drive Clon ne application n. 2. Click Resttore tab. Restore sc creen is displayed. 3. Select Res store Volume e from Volu ume Image Fiile option. 4. Click Choo ose Source button icon n to select source driv ve. Select destination n for the restored Volume V in the Select Des stination list.. 5. Click Conttinue to start restoration n process. The e progress bar b will indicatte the proces ss status. Once the process is completed,, selected fold der will be resstored to the d destination vo olume. Tools Tools consist of two options: Create Bootable DMG Create Minimal System Drive Cre eate Bo ootable DMG Drive e Clone gives s you option to t create boo otable DMG. Y You can use e the bootable e DMG to boo ot your computer, c if the t operating system fails.. Bootable DM MG is also usseful if no ope erating system is load ded, or the ha ard drive is blank. S bootable DMG D To Crreate Mac OS 1. Run Stella ar Drive Clon ne application n. 2. Click Tools tab. Tools screen is displayed. 3. Select Boo otable Disk Im mage option. 4. Click on Create Imag ge button. Select the destination to o save the disk imag ge and click Choose C to begin th he image creation process. 5. After the image is created, ck on the crea ated image double clic to mount itt. 6. Attach ex xternal media a to your computer and open Disk D Utility from '/App plications/Utiilities'. 7. Format ex xternal media a in 'Mac OS Exten nded (journa aled) with 'GUID Parrtition Table'' Partition Map Sche eme'. 8. Select mounted image from left panel of Disk Utility and select Restore tab. 9. Drag mounted image to source and external media to destination and press Restore button. 10. Use your external media to boot your computer after Restore is completed successfully. Note: Do not stop the image creation process in the middle. It may corrupt your hard disk. Cre eate Minimal System S Drive To Crreate Minima al System 1. Click Tools tab. Tools screen is disp played. 2. Select Min nimal System m option. 3. By default,, the boot Volume is selectted in Select Source list. 4. Select the Destination Drive D from the e Select Destitination list an nd click Continue. It is recommen nded to selectt the seconda ary drive. 5. Click Conttinue. Add/Remove applic cations dialog g box is displa ayed. 6. Click button to select applications from the list o of installed prrograms. You can also clicck Find butto on to add an application a by browsing to its location. 7. Click Finis sh Install to start s image crreation. 8. You get a warning mess sage that Cop py of disk pro ocess can era ase data in the e destination drive comp pletely beyond d recovery, so o make sure that you have e taken prope er backup of the importa ant data. Click Continue, to t proceed. 9. The progre ess bar shows s the copying g process. In ccase you wan nt to stop the process in between, click c Stop buttton. 10 0. Once the process p is com mpleted, a window appearrs showing the all the insta alled application ns in the Applications Folde er. 11. Select the desired app plication from m the Applicatiions Installed d list and clickk selected applications will add to the Copies Appliccations list. 12 2. Click Finis sh Install, to complete c the process. button. Th he Bac ckup Data D Stella ar Drive Clon ne allows you to backup da ata from your Mac's hard drive. You can n also set the sched duler to period dically take ba ackup of yourr data. To Ba ackup Data fro om a Folder / Volume 1. Run Stella ar Drive Clon ne application n. 2. Click Back kup tab. Back kup screen is displayed. d 3. Choose a volume from urce volume Select sou option. A liist of all files / folders of the t selected volume willl be displayed d. 4. Select the files / folders s you want to ba ackup and clic ck Backup Now button to select the destination drive. 5. Select des stination for backup da ata from Open n Directory dialog box. 6. Click Choo ose to select the destination n and start the e backup pro ocess. A progress bar will indicate the backu up process sta atus. Once the backup process p is completed, the files s / folders will be backe ed up to the selected destin nation. To Sc chedule Perio odic Backup of o data from a Folder / Volu ume 1. Run Stella ar Drive Clon ne application n. 2. Click Back kup tab button. Backup sc creen is displayed. 3. Choose a volume from Select sou urce volume option. A liist of all files / folders of the t selected volume willl be displayed d. 4. Select the files / folders s you want to schedule for ba ack up and the en click on Schedule Backup button to select th he destination n drive. 5. Click Brow wse button to select desttination for backup da ata. Click Cho oose to select th he destination n. 6. Select bac ckup cycle (i.e e. either Daily, Weekly orr Monthly) from f Schedule backup op ption and also o select the time to start the t scheduled backup process. Click Ok. Once you schedule the backup process, application will automatically backup selected files / folders periodically to the selected destination. Troubleshooting 1. One of my drive is shown as disabled in the Select Source list while trying Drive Clone. When I click the Continue button, Cloning failed message is displayed. How to solve the issue? Your drive is probably not mounted. First mount the drive and then try cloning it. 2. When I try to clone a drive, I get a cloning failed message. The drive is shown as enabled in the Select Source list. What could be the problem? Your drive has probably developed bad sectors in it. Repair your drive for bad sectors and then try to clone it. 3. I have created a clone of my drive on another drive but the volumes of the created drive are not shown any where on the desktop. Where to find them? Sometimes the volumes created after cloning are placed overlapping on the volumes of the source drive. You have to drag and place the volume icons to a different location on desktop. Rename the Volumes after placing to new location for identification. 4. When I try to boot my system from destination drive after cloning the drive, the system does not boot. How to resolve this issue? If you are having trouble in booting your system from destination drive, remove the source drive from your system and then boot your system from destination drive. FAQs 1. Can 'Stellar Drive Clone' create bootable drives? Yes, Stellar Drive Clone can create bootable drives by cloning. The software creates an exact replica of the hard drive on another drive. So the clone can be used as a back up and also as a bootable disk. 2. I need to back up my personal folder to the network drive. Is it possible? Yes, you can. Stellar Drive Clone provides an option Clone Volume to Network Drive in Clone, which will help you to create backup in the network drive. 3. Will I be able to use the free space in the destination drive after cloning the source drive? Yes, you can. When you clone a hard drive, Stellar Drive Clone provides an option to resize the volume of the destination drive. You need to select Resize volume(s) on Destination Drive option before cloning the drive. This will allow you to resize the volume and use the free space fruitfully. 4. Can I use the clone of my old hard drive in my new system? Yes, you can use the clone in your new system as boot drive or as backup. Remember, clone of the main hard drive can only be used as boot drive. 5. How much time is required for cloning a drive? The time required for cloning depends on many factors. Few of them are listed below: Quantity of data Data transfer speed of the source and target drives. Size distribution of files on the source volume. Hardware interface performance. Method used for data transfer. The architecture and speed of the processor speed. 6. I have a backup of my important folder in my network, but I am not able to access it. Why? While cloning to network, make sure that the files and folders have all permissions. Otherwise, you won’t be able to access it. In your case, the folder might not have all the permissions. So please check the read, write and execute permissions of the folder and repeat the cloning process. 7. What is MBR? A master boot record (MBR), or partition sector, is the 512-byte boot sector that is the first sector of a partitioned data storage device such as a hard disk. It is a small program that is executed when a computer boots up. 8. What is SSD drive? A solid-state drive (SSD) is a storage device that use semiconductor chips rather than a magnetic media. Solid state drives have several advantages over the magnetic hard drives. Three distinct advantages are: Less Power Usage Faster Data Access Higher Reliability Mechanically SSD drives are better as there are fewer moving parts to be damaged in any sort of impact, they do have a limited life span. This comes from a fixed number of write cycles that can be done on a drive before the cells become unusable. 9. I am having NTFS file system on one of my Volumes. Can Stellar Drive Clone, clone it? Yes, but NTFS file system will be cloned as ExFAT file system. This way you will be able to access all your important data on the drive, but cannot boot your system using that drive. Legal Notices Copyright Stellar Drive Clone software, accompanied user guide and documentation are copyright of Stellar Information Technology Private Limited, with all rights reserved. Under the copyright laws, this user guide cannot be reproduced in any form without the prior written permission of Stellar Information Technology Private Limited. No Patent Liability is assumed, however, with respect to the use of the information contained herein. Copyright © Stellar Information Technology Private Limited. INDIA. Disclaimer The Information contained in this manual, including but not limited to any product specifications, is subject to change without notice. STELLAR INFORMATION TECHNOLOGY PRIVATE LIMITED PROVIDES NO WARRANTY WITH REGARD TO THIS MANUAL OR ANY OTHER INFORMATION CONTAINED HEREIN AND HEREBY EXPRESSLY DISCLAIMS ANY IMPLIED WARRANTIES OF MERCHANTABILITY OR FITNESS FOR ANY PARTICULAR PURPOSE WITH REGARD TO ANY OF THE FOREGOING STELLAR INFORMATION TECHNOLOGY PRIVATE LIMITED ASSUMES NO LIABILITY FOR ANY DAMAGES INCURRED DIRECTLY OR INDIRECTLY FROM ANY TECHNICAL OR TYPOGRAPHICAL ERRORS OR OMISSIONS CONTAINED HEREIN OR FOR DISCREPANCIES BETWEEN THE PRODUCT AND THE MANUAL. IN NO EVENT SHALL STELLAR INFORMATION TECHNOLOGY PRIVATE LIMITED, BE LIABLE FOR ANY INCIDENTAL, CONSEQUENTIAL SPECIAL, OR EXEMPLARY DAMAGES, WHETHER BASED ON TORT, CONTRACT OR OTHERWISE, ARISING OUT OF OR IN CONNECTION WITH THIS MANUAL OR ANY OTHER INFORMATION CONTAINED HEREIN OR THE USE THEREOF. Trademarks Stellar Drive Clone® is a registered trademark of Stellar Information Technology Private Limited. Mac OS X® is a registered trademark of Apple Computers. All Trademarks Acknowledged. All other brands and product names are trademarks or registered trademarks of their respective companies. License Agreement License Agreement - Stellar Drive Clone. Stellar Drive Clone. Copyright © Stellar Information Technology Private Limited. INDIA. www.stellarinfo.com All rights reserved. All product names mentioned herein are the trademarks of their respective owners. This license applies to the standard-licensed version of Stellar Drive Clone. Your Agreement to this License You should carefully read the following terms and conditions before using, installing or distributing this software, unless you have a different license agreement signed by Stellar Information Technology Private Limited. If you do not agree to all of the terms and conditions of this License then do not copy, install, distribute or use any copy of Stellar Drive Clone with which this License is included, you may return the complete package unused without requesting an activation key within 30 days after purchase for a full refund of your payment. The terms and conditions of this License describe the permitted use and users of each Licensed Copy of Stellar Drive Clone. For purposes of this License, if you have a valid single-user license, you have the right to use a single Licensed Copy of Stellar Drive Clone. If you or your organization has a valid multi-user license, then you or your organization has the right to use up to a number of Licensed Copies of Stellar Drive Clone equal to the number of copies indicated in the documents issued by Stellar when granting the license. Scope of License Each Licensed Copy of Stellar Drive Clone may either be used by a single person or used nonsimultaneously by multiple people who use the software personally installed on a single workstation. This is not a concurrent use license. All rights of any kind in Stellar Drive Clone, which are not expressly granted in this license, are entirely and exclusively reserved to and by Stellar Information Technology Private Limited. You may not rent, lease, modify, translate, reverse engineer, decompile, disassemble or create derivative works based on Stellar Drive Clone nor permit anyone else to do so. You may not make access to Stellar Drive Clone available to others in connection with a service bureau, application service provider or similar business nor permit anyone else to do so. Warranty Disclaimers and Liability Limitations Stellar Drive Clone and all accompanying software, files, data and materials are distributed and provided AS IS and with no warranties of any kind, whether expressed or implied. You acknowledge that good data processing procedure dictates that any program including Stellar Drive Clone must be thoroughly tested with non-critical data before there is any reliance on it and you hereby assume the entire risk of all use of the copies of Stellar Drive Clone covered by this License. This disclaimer of warranty constitutes an essential part of this License. In addition, in no event does Stellar authorize you or anyone else to use Stellar Drive Clone in applications or systems where its failure to perform can reasonably be expected to result in a significant physical injury or in loss of life. Any such use is entirely at your own risk and you agree to hold Stellar harmless from any and all claims or losses relating to such unauthorized use. In no event shall Stellar Information Technology Private Limited or its suppliers be liable for any special, incidental, indirect, or consequential damages whatsoever (including, without limitation, damages for loss of business profits, business interruption, loss of business information, or any other pecuniary loss) arising out of the use of or inability to use the software product or the provision of or failure to provide support services, even if Stellar Information Technology Private Limited has been advised of the possibility of such damages. In any case, Stellar Information Technology Private Limited’s entire liability under any provision shall be limited to the amount actually paid by you for the software product. General This License is the complete statement of the agreement between the parties on the subject matter and merges and supersedes all other or prior understandings, purchase orders, agreements and arrangements. This License shall be governed by the laws of the State of Delhi, India. Exclusive jurisdiction and venue for all matters relating to this License shall be in courts and fora located in the State of Delhi, India and you consent to such jurisdiction and venue. There are no third party beneficiaries of any promises, obligations or representations made by Stellar herein. Any waiver by Stellar of any violation of this License by you shall not constitute nor contribute to a waiver by Stellar of any other or future violation of the same provision or any other provision of this License. Copyright © Stellar Information Technology Private Limited. All rights reserved. About Stellar Stellar Information Technology Private Limited is a trusted name in the field of Data Recovery and Data Protection Software for more than a decade. We provide the widest range of Data Recovery Products. Our range includes Data Recovery Software for almost all Operating Systems and File Systems. Product line: Data Recovery A widest range of data recovery software that helps you recover your valued data lost after accidental format, virus problems, software malfunction, file/directory deletion, or even sabotage!. More Info >> File Recovery The most comprehensive range of file undelete and unerase software for Windows and MS office repair tools. More Info >> E-mail Recovery A wide range of e-mail recovery, e-mail repair and e-mail conversion applications for MS Outlook, MS Outlook Express and MS Exchange useful in instances of data loss due to damages and corruption of E-mail. More Info >> Data Protection A wide range of Prevent Data Loss, Data backup and Hard Drive Monitoring Applications to ensure complete data protection against hard drive crash. More Info >> Data Sanitization Data cleanup and file eraser utility can delete selected folders, groups of files, entire logical drives, System Traces & Internet traces. Once the data have been removed using Stellar Wipe Data File eraser utility, it is beyond recovery limits of any Data Recovery Software or utility. More Info >> For more information about us, please visit www.stellarinfo.com