1
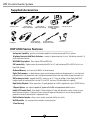
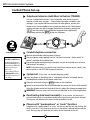
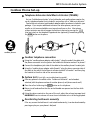
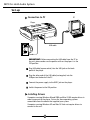
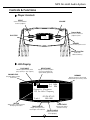
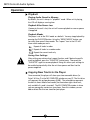
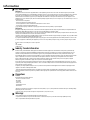
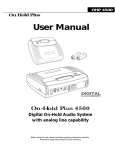
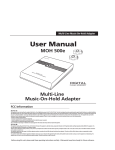
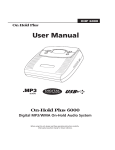
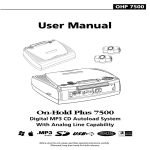
MP3 On-Hold Audio System
User Manual
me
mo
ry
ca
PHONE LIN
rd
IMPEDANC
spe
on
ake
r
ON
of
f
OFF
9V DC
USB
AUDIO
OUT
8Ω
ES
E
16Ω
1/2/3
3./4
POWER
MP3/WMA
Digital On-Hold Audio System
with analog line capability
Before using this unit, please read these operating instructions carefully.
Afterwards, keep them handy for future reference.
MP3 On-Hold Audio System
Supplied Accessories
4" handset cords
"T" Adapters
Cordless phone
adapter cable (male)
USB Cable
Cordless phone
adapter cable (female)
Connector Cable A
(Phono /RCA plugs)
Telephone Extension
Hold Music Activators
(TEHMA)
Connector Cable B
(3.5mm mini to RCA)
6' Phone Line Cords
AC Adapter
OHP 6500 Series Features
Analog Line Capability - provides on-hold audio capability to ordinary analog and KSU-less phones.
Telephone Extension Hold Music Activators - connects to phone extensions for true "hold button activation" of
the on-hold audio function.
MP3/WMA file playback - Plays ordinary MP3 and WMA files.
USB connectivity - Update content by connecting the 6000 to a PC and transferring MP3 or WMA files to its onboard flash memory.
On-Board Memory - unit comes with 16MB of on-board memory
Digital flash memory - on-board memory retains music/message content even during power loss...unit ships with
preloaded audio. Unit automatically starts in playback mode and retains track and volume settings after power loss.
SMC memory card slot - upgrade the 6000's memory to up to 17 hours by adding a Smart Media Card (SMC).
Update content by transferring files from the PC to the SMC card via a USB card reader (not supplied).
High Quality Playback - Player supports best CD quality playback up to 44kHz sampling rate at up to 192KBPS bit rate.
3 Repeat Options- unit supports repeat all, repeat all-shuffle and repeat one track functions.
Backlit LCD Control Panel - 6-line backlit LCD panel displays ID3 tags with descriptive names of tracks for easy
identification and selection. Display also shows a variety of important information so user can choose playback
preferences and easily determine unit's operational status.
Built-In Monitor Speaker - allows user to monitor sound with the flip of a switch.
Wall Mountable - unit can play while mounted in a vertical position.
3-Year Warranty
1
MP3 On-Hold Audio System
Player Set-up
1
step
Connection to analog phone lines
Combined Line Connection
Lines 1 & 2 are combined in one wall jack and lines 3 & 4 are combined in another wall jack
me
mo
ry
ca
PHONE LIN
rd
IMPEDANC
spe
on
ake
r
ON
of
f
OFF
9V DC
USB
AUDIO
OUT
8Ω
ES
E
16Ω
1/2/3
3./4
POWER
Line 1/2
Line 3/4
1 Plug the supplied "T adapter" into any modular phone jack which services line 1 and 2.
(This will allow you to share the phone jack with any phone extension which you have plugged in to the wall jack.)
2 Plug the provided phone cord into the jack marked "Line 1/2/3" on the back of the player.
3 Plug the other end of the phone cord into the "T" adapter which is servicing line 1 and 2.
REPEAT ABOVE IF LINE 3 and/or 4 ARE PRESENT.
NOTE: One OHP 4500 will provide on-hold audio capability to all phone extensions in your office.
IMPORTANT! - Player volume adjustment
Adjust the player's volume control to the half way point before proceeding to the next step.
Excessive volume will cause the on-hold audio to shut off during playback.
2
MP3 On-Hold Audio System
Corded Phone Set-up
Telephone Extension Hold Music Activators (TEHMA)
For true "hold button activation" of on-hold audio, each phone extension
requires a "hold music activator". Two activators have been included in your
package. If you require additional activators for other phones, contact your
reseller or visit www.onholdplus.com to purchase them on-line. Most phones
without activators are able to engage the hold music feature by pressing the
(star key twice) on the telephone keypad and then (optionally)
immediately pressing the HOLD button on the phone.
**
2
to phone
TEHMA P4/2
step
step
Corded telephone connection
corded phones
1
NOTE
GE 2-9450 & 2-9460 Phones
The wiring in the handsets of
GE 9450 and GE 9460 phones is
reversed and your TEHMAs will
require a special crossover
cable to work.
Please contact IntelliTouch
at 800-839-7277 and these
cables will be rushed to you
at no charge.
to handset
2
3
Remove coiled handset cord from base of phone.
Plug short phone cord (supplied) into the "hold music activator" (side marked "to
phone") and other end to phone base.
Plug end of coiled cord (connected to handset) into jack on the hold music activator
(side marked "to handset").
NOTE: After connecting, if you can not hear the dial tone (handset sounds "dead"), slide
polarity switch on side of TEHMA to opposite position.
System test (if test fails, see troubleshooting guide)
1
From any phone in the office with a "hold music activator" attached, dial an
outside phone number (a cell phone works fine).
2
Place the call on-hold using the HOLD button on the telephone.
3
Return to call and confirm that the on-hold audio was present on the line while on-hold.
Using the volume control on the rear of the unit, adjust the volume to proper level.
4
IMPORTANT: Excessive volume will cause the on-hold audio to shut off during playback.
Deactivating hold music manually If, for any reason, the hold music is
activated inadvertently, it can be deactivated by pressing any key on your phone's dial pad.
Pressing a key will deactivate the feature for the remainder of the call.
Phones with "speakerphone" or "mute" functions
Telephones with "speaker phone" or "mute" function can fool the unit into thinking that
the line is on hold. If this occurs press any key on your phone's dial pad to deactivate the
music. Pressing a key will deactivate the feature for the remainder of the call.
3
MP3 On-Hold Audio System
Cordless Phone Set-up
Telephone Extension Hold Music Activators (TEHMA)
For true "hold button activation" of on-hold audio, each cordless phone requires the
use of a telephone headset (not included) in conjunction with a "hold music activator".
Two hold music activators and headset adapter cables have been included in your
package. If you require additional activators for other phones, contact your
reseller or visit www.onholdplus.com to purchase them on-line. Most phones
without activators are able to engage the hold music feature by pressing the **
(star key twice) on the telephone keypad and then (optionally) immediately pressing
the HOLD button on the phone.
2
to phone
step
to handset
TEHMA P4/2
cordless phones
Cordless telephone connection
1
2
3
Using the "cordless phone adapter cable (male)," plug the end of the cable with
the phone connector into the jack on the hold music activator marked “to phone”.
Connect the headphone jack side of the cable to the cordless phone’s headset jack.
Using the "cordless phone adapter cable (female)" plug the phone connector side of
the cable to the end of the hold music activator marked "to headset" and then plug
the headset to the other side of the connector cable.
System test (if test fails, see troubleshooting guide)
1
From any phone in the office with a "hold music activator" and a headset
attached, dial the phone number of another phone (a cell phone works well).
2
Place the call on-hold using the HOLD button on the telephone.
3
Return to call and confirm that the on-hold audio was present on the line while
on-hold.
4
Using the volume control on the rear of the unit, adjust the volume to proper level.
IMPORTANT: Excessive volume will cause the on-hold audio to shut off during playback.
Deactivating hold music manually
If for any reason the hold music is activated inadvertently, it can be deactivated by
pressing any key on your phone's dial pad
4
MP3 On-Hold Audio System
Set-up
Connection to PC
PC
Player
IMPEDA
AUDIO
9V DC
NCE
OUT
USB
POWER
USB cable
IMPORTANT: Before connecting the USB cable from the PC to
the unit, please make sure the power swith on the player is in the
OFF position.
1
Plug USB cable (square socket) into the USB jack on the back
panel of the player.
2
Plug the other end of the USB cable (rectangular) into the
USB port on the back of the PC.
3
Connect the power supply to the 9VDC jack on the player.
4
Switch the power to the ON position.
Installing Drivers
Computers running Windows 98 and 2000 and Mac OS 9.0 require drivers in
order to connect to the player. Drivers for these operating systems
areavailable from the dealer that supplied your system.
Computers running Windows XP and Mac OS X do not require drivers to
connect to the unit.
5
MP3 On-Hold Audio System
Controls & Functions
Player Controls
SELECT
VOLUME
used to select individual
tracks for playback
.MP3
audio
PLAY/STOP
select
Track:
02:36/07:45
002/008
play/stop
Repeat Mode
used to select continuous
playback options
1
Int 16Mb
Ext 0Mb
Acoustic Elegance
123 On-Hold Company
VOL
volume
repeat mode
SPEAKER
turns monitor speaker on/off
Memory Card Slot
used to add
additional memory
LCD Display
PLAY MODE
REPEAT MODE
indicates playback status, either
"play" (arrow) or "stop" (square)
displays continuous playback
mode selected (repeat all,
repeat shuffle, repeat one)
VOLUME LEVEL
MEMORY
bar graph displays relative
volume level
Displays amount of internal and
external memory in memory card slot
1
Int 16Mb
Ext 0Mb
Acoustic Elegance
123 On-Hold Company
VOL
Track:
02:36/07:45
002/008
ID3 TAG
displays name of track and other
identifying information
TOTAL TACKS
TRACK LENGTH
displays running time and
total length of selected track
displays total number
of tracks in memory
TRACK PLAYING
displays current track
selected/playing
6
MP3 On-Hold Audio System
Operation
Playback
Playing Audio Stored in Memory
By default, the unit is always in "playback" mode. When unit is playing,
the LCD will display a running time.
Playback After Power Loss
If power to the unit is lost, the unit will resume playback as soon as power
is reapplied.
Playback Modes
The player is set to the PLAY mode as a default. You may stop playback by
pressing the PLAY/STOP button. Using the "REPEAT MODE" button, you
can select from one of three modes. The "repeat" icon in the LCD will
show which mode you are in:
Repeat all tracks in order
S Repeat all tracks in a random order
1 Repeat the current track only
Saving Your Settings
!
After setting your volume level, repeat function, and if desired a specific
track to playback, press the "PLAY/STOP" button once. Then press the
"PLAY/STOP" again to resume playback. Doing this allows your settings to
be recalled automatically after the unit loses power and then has the
power reapplied.
Copying New Tracks to the Player
Once connected, the player will show up as two removable drives (i.e.
Drive E & Drive F) in the MY COMPUTER window on your PC. The first drive
will represent the on-board memory (8 MB). The second drive represents
the built-in Smart Media Card reader (slot located on right side of unit,
only available if a card is inserted). The MY COMPUTER window is where
you can manage the content on your player. From this window you can
add or delete files that are stored on your player.
7
MP3 On-Hold Audio System
Operation (cont'd)
USB Connection
1
2
3
4
5
6
7
8
9
10
Turn the POWER switch on the back of player to the OFF position.
Plug the USB cable into the USB port on the back of your player
Plug the other end of the cable into the USB port on your computer.
Turn the POWER switch to the ON position (LCD will show an icon of a
computer and a memory card with the word "READY.")
Locate and select any MP3 or WMA audio file(s) or file(s) created and
saved with the MessageStudio software.
Copy the files.
Go to "My Computer" and double click on the player (shown as
"Removable Media"on your PC.)
Paste the files to the player.
Turn the POWER switch on the back of player to the OFF position.
Remove the USB cable and turn the player back to the ON position.
External Smart Media Flash Card
The player is also equipped with a slot for a Smart Media (SMC) flash
card. Files can be copied to the card by putting it into the unit and
connecting the USB cable to a PC. Alternatley, files can be copied to
the card by connecting a smart media card reader to the PC's USB port
and copying files directly to the card. Note: Turn the players power off
whenever connecting a USB cable or inserting or removing an SMC
card.
Using a Smart Media Flash Card
!
The player has an SMC card slot located on the right side of the player.
Before inserting the card, power down the unit. Insert the flash card,
gold foil side up, with the notch on the leading edge.
NOTE: When a smart card is inserted, files stored on the on-board
memory canot be played or viewed. Powering down the unit and
removing the card will allow you to playback content stored on the
on-board memory.
8
Information
FCC Information
FCC Part 15
This equipment has been tested and found to comply with the limits for a Class B digital device, pursuant to Part 15 of the FCC Rules. These limits are designed to provide reasonable
protection against harmful interference in a residential installation. This equipment generates, uses, and can radiate radio frequency energy and, if not installed and used in accordance with
the instructions, may cause harmful interference to radio communications. However, there is no guarantee that interference will not occur in a particular installation. The unit may
malfunction when there is radio interference appeared on the power line/signal line. The unit will revert to normal operation when the interference stops. If this equipment does cause
harmful interference to radio or television reception, which can be determined by turning the equipment off and on, the user is encouraged to try to correct the interference by one or more of
the following measures:
- Reorient or relocate the receiving antenna.
- Increase the separation between the equipment and receiver.
- Connect the equipment into an outlet on a circuit different from that to which the receiver is connected.
- Consult the dealer or an experienced radio/TV technician for help.
You are cautioned that any changes or modifications not expressly approved in this manual could void your authority to operate this equipment.
FCC Part 68
This equipment complies with part 68 of the FCC Rules. On the bottom of the back of this equipment is a label that contains, among other information, the FCC Registration Number and
Ringer Equivalence Number (REN) for this equipment. You must, upon request, provide this information to your telephone company.
The REN is useful to determine the quantity of devices you may connect to your telephone line and still have all of those devices ring when your telephone number is called. In most, but not
all areas, the sum of the RENs of all devices connected to one line should not exceed five (5).
Your telephone company may make changes in its facilities, equipment, operations or procedures that could affect the proper functioning of your equipment. If they do, you will be notified in
advance to give you an opportunity to maintain uninterrupted telephone service.
If you experience trouble with this telephone equipment, the telephone company may ask you to disconnect this equipment from the network until the problem has been corrected or until
you are sure the equipment is not malfunctioning. This equipment may not be used on coin service provided by the telephone company. Connection to party lines is subject to site tariffs.
This device contains no user serviceable parts. For service or repair send to:
SMI
5820 Oberlin Drive,
San Diego, CA 92121
Industry Canada Information
NOTICE: The Industry Canada label identifies certified equipment. This certification means that the equipment meets telecommunications network protective, operational and safety
requirements as prescribed in the appropriate Terminal Equipment Technical Requirements documents(s). The department does not guarantee the equipment will operate to the user’s
satisfaction. The unit may malfunction when there is radio interference appeared on the power line/signal line. The unit will revert to normal operation when the interference stops.
Before installing this equipment, users should ensure that it is permissible to be connected to the facilities of the local telecommunications company. The equipment must also be installed
using an acceptable method of connection. The customer should be aware that compliance with the above conditions may not prevent degradation of service in some situations.
Repairs to certified equipment should be coordinated by a representative designated by the supplier. Any repairs or alterations made by the user to this equipment, or equipment
malfunctions, may give the telecommunications company cause to request the user to disconnect the equipment.
Users should ensure for their own protection that the electrical ground connections of the power utility, telephone lines and internal metallic water pipe system, if present, are connected
together. This precaution may be particularly important in rural areas. Caution: Users should not attempt to make such connections themselves, but should contact the appropriate electric
inspection authority, or electrician, as appropriate.”
An explanatory note on Ringer Equivalence Numbers (see Section 10.0) and their use must be provided for the terminal equipment user in the information accompanying the terminal
equipment. A notice similar to the following would be suitable:
“NOTICE: The Ringer Equivalence Number (REN) assigned to each terminal device provides an indication of the maximum number of terminals allowed to be connected to a telephone
interface. The termination on an interface may consist of any combination of devices subject only to the requirement that the sum of the ringer equivalence Numbers of all the devices does
not exceed 5.”
Precautions
Installation
Never install the unit where it would be subjected to:
- heat sources such as radiators or air ducts.
- direct sunlight.
- excessive dust.
- moisture or rain.
- mechanical vibration or shock.
- unleveled surface.
• When the unit is used with an AC power adapter, do not wrap the unit in a cloth, blanket, etc. If you do so, the temperature inside and outside the unit may rise considerably, resulting in
malfunctioning of the unit or serious accidents.
• For the unit to operate at its best, it should not be subjected to temperatures below 5˚C (41˚F) or above 35˚C (95˚F).
Warnings
• Before operating the unit, please read this manual thoroughly and retain it for future reference.
• To prevent fire or shock hazard, do not expose the unit to rain or moisture. To avoid electrical shock, do not open the cabinet. Refer servicing to qualified personnel only.
• The use of optical instruments with this product will increase eye hazard.
OEM 6500 User's Manual 4/04