1
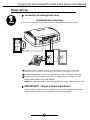
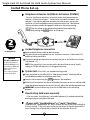
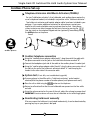
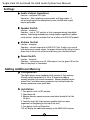
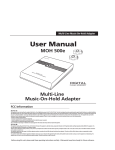
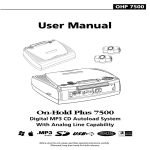
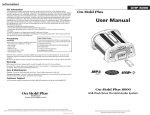
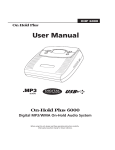
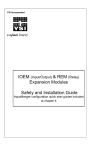
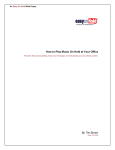
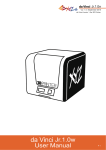
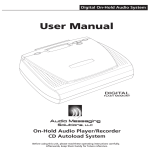
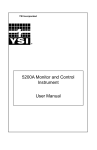
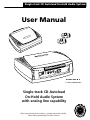
Single-track CD Autoload On-Hold Audio System
User Manual
PHONE
LINES
ON
OFF
ON
OFF
12V DC
SPEAKER
8Ω
600Ω
T
VOLUME
1/2/3
3/4
AUDIO OU
POWER
DIGITAL
FLASH MEMORY
Single-track CD Autoload
On-Hold Audio System
with analog line capability
Before using this unit, please read thes e operating instructions carefully.
Afterwards, keep them handy for future reference.
Single-track CD Autoload On-Hold Audio System User Manual
Supplied Accessories
4" handset cords
"T" Adapters
Cordless phone
adapter cable (male)
Cordless phone
adapter cable (female)
Telephone Extension
Hold Music Activators
(TEHMA)
6' Phone Line Cords
AC Adapter
Player Features
Digital flash memory - design retains music/message
content even during power loss...unit ships with
preloaded audio.
Integrated CD mechanism - quickly and easily record
high quality audio. CD media is easy and inexpensive to
duplicate and distribute.
CD Autoload - drop in a CD with a single track, close
the lid, and the unit automatically records the content.
Built-In Monitor Speaker - allows user to monitor
sound with the flip of a switch.
1
Analog Line Capability - provides on-hold audio
capability to ordinary analog and KSU-less phones.
Telephone Extension Hold Music Activators connects to phone extensions for true "hold button
activation" of the on-hold audio function.
Wall Mountable - unit can be mounted, played, and
recorded in a vertical position.
3-year warranty
Single-track CD Autoload On-Hold Audio System User Manual
Player Set-up
1
step
Connection to analog phone lines
Combined Line Connection
Lines 1 & 2 are combined in one wall jack and lines 3 & 4 are combined in another wall jack
PHONE
LINES
ON
OFF
ON
OFF
12V DC
SPEAKER
8Ω
600Ω
VOLUME
1/2/3
3/4
AUDIO OUT
POWER
1 Plug the supplied "T adapter" into any modular phone jack which services line 1 and 2.
(This will allow you to share the phone jack with any phone extension which you have plugged in to the wall jack.)
2 Plug the provided phone cord into the jack marked "Line 1/2/3" on the back of the player.
3 Plug the other end of the phone cord into the "T" adapter which is servicing line 1 and 2.
REPEAT ABOVE IF LINE 3 and/or 4 ARE PRESENT.
NOTE: One system will provide on-hold audio capability to all phone extensions in your office.
IMPORTANT! - Player volume adjustment
Adjust the player's volume control to the half way point before proceeding to the next step.
Excessive volume will cause the on-hold audio to shut off during playback.
2
Single-track CD Autoload On-Hold Audio System User Manual
Corded Phone Set-up
Telephone Extension Hold Music Activators (TEHMA)
For true "hold button activation" of on-hold audio, each phone extension
requires a "hold music activator". Two activators have been included in your
package. If you require additional activators for other phones, contact your
reseller or visit www.onholdplus.com to purchase them on-line. Most phones
without activators are able to engage the hold music feature by pressing
(star key twice) on the telephone keypad and then (optionally)
immediately pressing the HOLD button on the phone.
**
2
A
TEHMA P4/2
step
step
corded phones
Corded telephone connection
1
2
NOTE
GE 2-9450 & 2-9460 Phones
The wiring in the handsets of
GE 9450 and GE 9460 phones is
reversed and your TEHMAs will
require a special crossover
cable to work.
Please contact your dealer
for these special cables.
B
3
Remove coiled handset cord from base of phone.
Plug short phone cord (supplied) into the "hold music activator" (side marked "B")
and other end to phone base.
Plug end of coiled cord (connected to handset) into jack on the hold music activator
(side marked "A").
NOTE: After connecting, if you can not hear the dial tone (handset sounds "dead"),
unplug the TEHMA and reconnect it in the opposite direction.
System test (if test fails, see troubleshooting guide)
1
From any phone in the office with a "hold music activator" attached, dial an
outside phone number (a cell phone works fine).
2
Place the call on-hold using the HOLD button on the telephone.
3
Return to call and confirm that the on-hold audio was present on the line while on-hold.
Using the volume control on the rear of the unit, adjust the volume to proper level.
4
IMPORTANT: Excessive volume may cause the on-hold audio to shut off during
playback.
Deactivating hold music manually
If, for any reason, the hold music is activated inadvertently, it can be deactivated by
pressing any key on your phone's dial pad.
Phones with "speakerphone" or "mute" functions
Telephones with "speaker phone" or "mute" function can fool the unit into thinking that
the line is on hold. If this occurs press any key on your phone's dial pad to deactivate the
music. Pressing a key will deactivate the feature for the remainder of the call.
3
Single-track CD Autoload On-Hold Audio System User Manual
Cordless Phone Set-up
Telephone Extension Hold Music Activators (TEHMA)
For true "hold button activation" of on-hold audio, each cordless phone requires the
use of a telephone headset (not included) in conjunction with a "hold music activator".
Two hold music activators and headset adapter cables have been included in your
package. If you require additional activators for other phones, contact your
reseller or visit www.onholdplus.com to purchase them on-line. Most phones
without activators are able to engage the hold music feature by pressing the **
(star key twice) on the telephone keypad and then (optionally) immediately pressing
the HOLD button on the phone.
2
A
step
B
TEHMA P4/2
cordless phones
Cordless telephone connection
1
2
Using the "cordless phone adapter cable (male)," plug the end of the cable with
the phone connector into the jack on the hold music activator marked “B”.
Connect the headphone jack side of the cable to the cordless phone’s headset jack.
3
Using the "cordless phone adapter cable (female)" plug the phone connector side of
the cable to the end of the hold music activator marked "A" and then plug the
headset to the other side of the connector cable.
1
From any phone in the office with a "hold music activator" and a headset
attached, dial the phone number of another phone (a cell phone works well).
2
Place the call on-hold using the HOLD button on the telephone.
3
Return to call and confirm that the on-hold audio was present on the line while
on-hold.
4
Using the volume control on the rear of the unit, adjust the volume to proper level.
System test (if test fails, see troubleshooting guide)
IMPORTANT: Excessive volume will cause the on-hold audio to shut off during playback.
Deactivating hold music manually
If for any reason the hold music is activated inadvertently, it can be deactivated by
pressing any key on your phone's dial pad.
4
Single-track CD Autoload On-Hold Audio System User Manual
Settings
Audio Output Impedance
Location -- rear panel RCA jacks
Operation -- Most telephone systems prefer an 8 ohm output. If
you are working with an older phone system, the 600 ohm output
may be preferable.
Speaker Switch
Location -- rear panel
Operation -- turn to "ON" position to listen to program playing from digital
memory. Audio being recorded plays through speaker, regardless of speaker
switch position. Speaker switch position has no effect on AUDIO OUT playback.
Volume Control
Location -- rear panel
Operation -- controls output level of AUDIO OUT jack. To adjust, turn control
knob clockwise to increase volume. Set proper volume level by calling in from a
phone close to the unit (or cell phone) and having your call placed on hold.
Power Switch
Location -- rear panel
Operation -- turns power on or off. When power is on, the green LED on the
front of the player is illuminated.
Adding Additional Memory
Configuration
The digital player comes standard with 8 minutes of flash memory.
Memory can be expanded to 16, 24 or 32 minutes by adding
memory modules in 8-minute increments. Memory modules can be
placed into 3 available memory expansion slots located under the
memory expansion access panel door.
Installation
1. Turn power switch to OFF position.
2. Open player lid.
3. Remove memory expansion access panel door located left of the
CD drive.
4. Carefully insert the 24-pin memory module chip in an open
expansion slot (beginning at the top of the unit).
5. Turn power switch to ON position.
LCD will display the additional memory in the MEM AVAIL counter.
5
Single-track CD Autoload On-Hold Audio System User Manual
Operation
Playback
Playing Audio Stored in Memory
By default, the unit is always in "playback" mode.
Playback After Power Loss
If power to the unit is lost, the unit will resume playback as soon as power
is reapplied. The unit retains its recorded content after power loss.
Recording
Recording Single-Track CDs
1. Open cover
2. Insert CD
3. Close cover
OPERATION – Once cover is closed, the unit will automatically begin
recording the content of the track into the unit’s digital memory. During
the recording process, the contents of what is being recorded to memory
will be heard through the speaker and the red LED on the front of the unit
flashes. The unit automatically switches over to "playback" mode when
recording is complete.
NOTE:
This unit will not record a multi-track CD. If a multi-track CD is placed in
the unit, the red "REC" LED will flash for a few seconds then stop. No
audio will be recorded to memory.
6
Information
FCC Information
This equipment has been tested and found to comply with the limits for a Class B digital device, pursuant to Part 15 of the FCC Rules. These
limits are designed to provide reasonable protection against harmful interference in a residential installation. This equipment generates,
uses, and can radiate radio frequency energy and, if not installed and used in accordance with the instructions, may cause harmful
interference to radio communications. However, there is no guarantee that interference will not occur in a particular installation. If this
equipment does cause harmful interference to radio or television reception, which can be determined by turning the equipment off and on,
the user is encouraged to try to correct the interference by one or more of the following measures:
- Reorient or relocate the receiving antenna.
- Increase the separation between the equipment and receiver.
- Connect the equipment into an outlet on a circuit different from that to which the receiver is connected.
- Consult the dealer or an experienced radio/TV technician for help.
You are cautioned that any changes or modifications not expressly approved in this manual could void your authority to operate this
equipment.
Precautions
Safety
As the laser beam used in this compact disc player is harmful to the eyes, do not attempt to disassemble the casing. Refer servicing to
qualified personnel only. Do not put any foreign objects in the safety slot inside the disc compartment. If you do so, the laser beam may
come out when the lid is opened. Do not put any foreign objects in the DC IN 6V (external power input) jack. Should any solid objects or
liquid fall into the unit, disconnect the power supply and have the unit checked by qualified personnel before operating it any further.
Operation
Since the CD system offers a wide dynamic range, the peaks of the high level inputs are recorded with high fidelity, and the noise level is very
low. Do not turn up the volume while listening to a part of the disc with no audio signals or very low level inputs. If you do so, the speakers
may be damaged when the peak level of the sound is played. The lens on the disc table should be kept clean. Do not touch the lens or poke
at it. If you do so, the lens may be damaged and the unit will not operate properly.
Installation
Never install the unit where it would be subjected to:
- heat sources such as radiators or air ducts.
- direct sunlight.
- excessive dust.
- moisture or rain.
- mechanical vibration or shock.
- unleveled surface.
• When the unit is used with an AC power adapter, do not wrap the unit in a cloth, blanket, etc. If you do so, the temperature inside and
outside the unit may rise considerably, resulting in malfunctioning of the unit or serious accidents.
• If the unit is brought directly from a cold to a warm location, or is placed in a very damp room, moisture may condense on the lens inside
the unit. Should this occur, the unit will not operate. In this case, remove the disc and leave the unit in a warm place for several hours until
the moisture evaporates.
• For the unit to operate at its best, it should not be subjected to temperatures below 5˚C (41˚F) or above 35˚C (95˚F).
Warnings
• Before operating the unit, please read this manual thoroughly and retain it for future reference.
• To prevent fire or shock hazard, do not expose the unit to rain or moisture. To avoid electrical shock, do not open the cabinet. Refer
servicing to qualified personnel only.
• The use of optical instruments with this product will increase eye hazard.
Care & Maintenance
Cleaning -- Do not use volatile chemicals on this unit. Clean by lightly wiping with a soft cloth.
Cleaning the CD -- If the CD skips or will not play, the disc may need to be cleaned. Before playing, wipe the disc from the center out with a
cleaning cloth. After recording CD into memory, store the CD in its sleeve.
Handling the Disc -- Only touch the CD on the edges to avoid fingerprints on its surface.
CD Player Lens -- Do not touch the CD lens with your finger or any other material. If there is dust on the lens, blow lightly or use a camera
lens blower brush.
OEM-5500D User Manual v.3/05