1
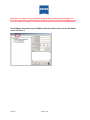
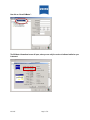
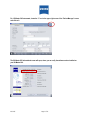
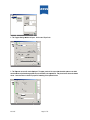
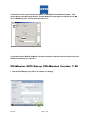
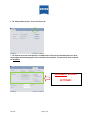
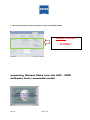
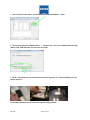
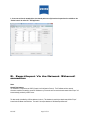
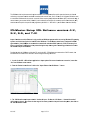
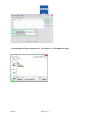
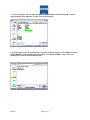
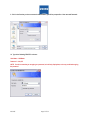
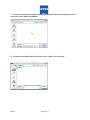
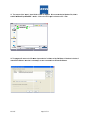
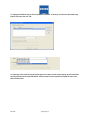
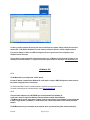
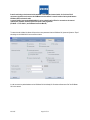
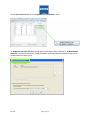
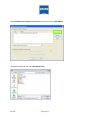
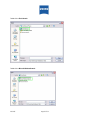
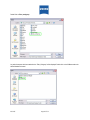
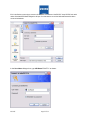
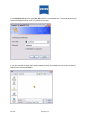
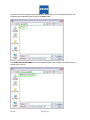
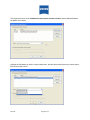
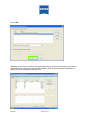
 =
=
Transfer of IOLMaster patient measurements to the Holladay IOL Consultant
Professional Edition program (HIC – PRO)
The IOLMaster® performs biometric measurements for the purpose of intraocular lens power calculation in preparation for
cataract surgery. It also provides on-board lens power calculation capability as well as patient data management and lens
constant personalization (also called optimization.)
The Holladay IOL Consultant Professional Edition (HIC – PRO) is a third-party software program developed, distributed and
supported by Jack Holladay MD that runs on a separate computer and provides intraocular lens power calculation, lens constant
personalization and surgical outcomes analysis. It also contains a proprietary lens power calculation formula called the Holladay
2 formula, which is not available on the IOLMaster. The HIC – PRO program cannot be loaded or run directly on the IOLMaster
instrument at this time.
IOLMaster users wishing to use the HIC – PRO program for IOL power calculation must transfer IOLMaster patient measurement
data into the HIC – PRO program. This document identifies several methods for this data transfer and provides setup and data
transfer guidelines. These methods were developed from a collaborative effort between Carl Zeiss Meditec and Jack Holladay
MD for the benefit of our mutual customers.
Disclaimer: Please Read
Carl Zeiss Meditec, Inc. (CZM) is not responsible for the results provided by the HIC-PRO Program. The HIC-PRO is a thirdparty application; users are advised to contact Jack Holladay MD at ([email protected]) for technical and clinical support.
This document does not represent or imply any commitment for sales, installation and setup, technical or clinical support of the
HIC-PRO program. Our tech support team has very limited knowledge of the HIC-PRO program’s operation. CZM does not
provide sales, installation, setup, configuration, training or troubleshooting support for a customer’s network. This document
provides guidance to assist an IT professional when configuring the Holladay IOL Consultant Professional Edition to access
patient data from an IOLMaster 500 via Ethernet. CZM may provide guidance on a best-effort basis but is not responsible for the
setup and administration of a user’s office network.
IOL.3435
Page 1 of 32
NOTE: Before you attempt to set up your IOLMaster it might be helpful to know what version of software your
instrument is using. Below you will find the process for finding your software version for older IOLMaster systems
(IOL’s 1,2,3, XP systems running 4.X or 5.X software, and for the newer 5.5 system) as well as the IOLMaster 500.
For all IOLMaster instruments except the IOLMaster 500, find the question mark (?) on the “New Patient”
screen, and click on it:
IOL.3435
Page 2 of 32
Now click on “About IOLMaster”:
The IOLMaster informational screen will open, where you can verify the version of software installed on your
instrument:
IOL.3435
Page 3 of 32
For IOLMaster 500 instruments, locate the “I” Icon in the upper right corner of the “Patient Manager” screen
and click on it:
The IOLMaster 500 informational screen will open, where you can verify the software version installed on
your IOLMaster 500:
IOL.3435
Page 4 of 32
Methods for data transfer from the IOLMaster to the HIC – PRO program
A. Export/Import Via Removable Media
B. Export/Import Via Network (Ethernet) connection
^K==bñéçêíLfãéçêí=sá~=oÉãçî~ÄäÉ=jÉÇá~=Ekçå=Ó=
kÉíïçêâÉÇ=póëíÉãëF=
=
The IOLMaster can export via 3 forms of removable media, depending on the model of the IOLMaster.
Floppy Diskette – Limited to older IOLMaster version 1, 2 & 3 (Windows 95/98) that are equipped with a Floppy Disk drive.
CD – RW Disc – Available on IOLMaster version 4 & 5 (Windows XP) that are equipped with a CD – RW drive.
USB Memory Stick – Available on newer IOLMaster systems (Windows XP) that are equipped with USB ports.
flij~ëíÉê=pÉíìé=Eflij~ëíÉê=sÉêëáçåë=
NIOIPIQKuI=RKuI=RKRF=
=
Prior to performing the Export function of the IOLMaster, you must ensure that the instrument is configured properly.
If the instrument is running Windows 95 or Windows 98, you must have the Option A software installed on the IOLMaster.
If the instrument is running Windows XP, you must have the Option A+ software installed on the IOLMaster.
In addition, the type of data and the path for the export must be defined. On IOLMaster systems running Windows 95 or
Windows 98, the path is predetermined to be the Floppy Disk Drive. No other selection is possible. For systems running
Windows XP, the path may be selected to be either the CD – RW drive, or a USB memory stick.
To define the data and path, follow the procedure below:
1. From the New Patient Menu, Click on “Options”, then point to “Setup”, and finally click on “Program Settings”:
IOL.3435
Page 5 of 32
2. The Prog
gram Settings window
w
will open. Click on th
he “Export” tab:
port tab screen will now be dissplayed. The up
pper portion of the screen hass selectable opttions as to whicch
3. The Exp
measuremeents and patien
nt demographiccs are to be inclluded in the exp
ported file. Thee picture below
w shows the deffault
values. Leaave the values as show for proper file formattting of the exp
ported values:
IOL.3435
P
Page
6 of 32
The lower section
s
of the export
e
screen will
w not be preseent on older Windows 95 and Windows
W
98 syystems. These
systems caan only export to
t the floppy disk drive. On neewer Windows XP systems yoou can select eiither the CD – RW
R
drive or a USB
U memory sttick. The other fields should be
b left as is:
OLMaster (All models),
m
follow the instruction
ns for patient fille export which
h may be found in the
To export a file from the IO
IOLMaster User Manual fo
or your instrument.
flij
j~ëíÉê
ê=RMM=pÉíìé=Eflij
j~ëíÉê
ê=sÉêëááçå=TKu
uF=
nch” Icon (Settings):
1. From thee Patient Manager screen, clicck on the “Wren
IOL.3435
P
Page
7 of 32
2. The Settings window will open. Click on the “Export” tab:
3. The Export tab screen will now be displayed. The middle portion of the screen has selectable options as to which
measurements and patient demographics are to be included in the exported file. The picture below shows values that
are INCORRECT:
INCORRECT EXPORT
SETTINGS! IOL.3435
Page 8 of 32
3. The Screen below shows the values set correctly for “export” to the Holladay software.
=
CORRECT EXPORT
SETTINGS! =
=
=
=
=
=
fãéçêíáåÖ=m~íáÉåí=a~í~=áåíç=íÜÉ=ef`=Ó=mol=
ëçÑíï~êÉ=Ñêçã=êÉãçî~ÄäÉ=ãÉÇá~=
=
==================================================
IOL.3435
Page 9 of 32
1. From the “Patient Locator Screen”, click on the “Import Patients from IOLMaster…” button:
2. The program will display the “IOLMaster Import…….” selection screen. Click on the “IOLMaster Data from Floppy,
USB key or CD – ROM radio button, the click on the “OK” button:
3. The HIC – PRO software will now check the various locations (Floppy drive, CD – Rom drive, USB ports) for a file
entitled “export.csv”:
In the example pictured below, we have exported the file onto a Floppy Diskette:
IOL.3435
Page 10 of 32
4. When the HIC – PRO software finds the file, it will display all of the patients it finds within the file. In our example
here, we had just one patient. If multiple records are found, you can select which records to import by checking or
unchecking the box to the left of the record:
5. Once you have selected the patients you wish to import, click on the “OK” button:
IOL.3435
Page 11 of 32
6. As we can see from the example below, the selected patient record(s) have been imported and are available on the
“Patient Locator” tab of the HIC – PRO application:
=
=
_K==bñéçêíLfãéçêí=sá~=íÜÉ=kÉíïçêâ=EbíÜÉêåÉíF=
ÅçååÉÅíáçå=
=
Notes:
Network Requirements
The IOLMaster is configured to use DHCP (Dynamic Host Configuration Protocol). The IP address and other network
information needed to successfully connect the IOLMaster to your network and to access the shared network folder “Export” will
be automatically provided by a DHCP server.
The data transfer is handled by a MS Jet database (version 4). This database is stored in the shared network folder “Export”
located onthe IOLMaster hard disk drive. The name of the export database is “IOLMasterExportData.mdb”.
IOL.3435
Page 12 of 32
The IOLMasster shall only bee connected to private
p
networks, which are proteected from public networks (Inteernet) by firewallss
conforming to the latest techhnical standardss! A standard patch network cable, Cat 5, with tw
wo RJ-45 connecctors should be used
t IOLMaster with
w the network. A network isolator must be placced inbetween IO
OLMaster (NET) and network caable. A
to connect the
network isollator (part number 000000- 04488-931) can be orrdered from Carll Zeiss for conneection to the exteernal network (N
NET).
Attention shhould be paid to the specific safeety regulations (E
EN 60601-1-1 / IEC
I 60601-1 (seee IOLMaster Insstruction Manual).
flij
j~ëíÉê
ê=pÉíìé
é=Efli=pçÑíï
ï~êÉ=îÉ
Éêëáçåë
ë=QKuI=
RKuI=RKRI=~
~åÇ=TKKuF=
=
Import of Patient
P
records via Ethernet is only possible on
o IOLMaster systems
s
which are running Windows XP operrating
systems, and which have Option A+ insttalled on the IOLMaster. The IOLMaster comees factory conffigured for DHC
CP
type netwo
orks. If the IOLM
Master is conneected to a netw
work with other than
t
DHCP pro
otocols, it will be necessary for a
factory trained Zeiss Field
d Engineer to bee present durin
ng the setup tim
me to grant a neetworking profeessional to acceess
the networkk setup of the IOLMaster.
Provided thaat both the IOLM
Master and the host PC running the HIC – PRO software
s
are connnected to a DHCP network, thee
IOLMaster can
c be located on
o the customer’s network using the following insstructions:
P software ap
pplication to im
mport patient files across the Ethernet
E
connection, it must fiirst
1. In order for the HIC – PRO
“find” the IOLMaster on th
he network.
2. From thee “Patient Locaator Screen” cliick on the “Imp
port Patients fro
om IOL Master…
…” button:
3. The “IOL
L Master/Lenstaar Import selecction” window will
w open. Clickk on the “IOL Master….. Netwo
ork Connection”
radio butto
on to select it. Also
A select the date range of the
t exams you wish
w to import from the drop menu,
m
then clicck on
the “Add IO
OL Master”butto
on:
IOL.3435
Paage 13 of 32
4. A Microssoft Windows Explorer
E
window
w will open. Find and Double – Click on “Myy Network Placees”:
IOL.3435
Paage 14 of 32
5. When th
he “My Networkk Places” windo
ow opens, locatte and Double – Click on “Entiire Network”:
6. All of thee various netwo
orks that your system
s
may co
onnect to are dissplayed. Find and
a Double – Click
C
on “Microssoft
Windows Network”:
N
IOL.3435
Paage 15 of 32
7. All of thee “workgroups” which are parrt of your Micro
osoft Windows Network will no
ow be displayed
d. Locate the
workgroup entitled “Zeisss_workgroup”. Double – Clickk on this workgroup:
orkgroup” will now
n be displayed. In our exam
mple, we have two
t
8. All of thee computers which are part off the “Zeiss_wo
different IO
OLMaster’s, and
d the computer that we have th
he HIC – PRO software
s
loaded
d on. Double – Click on the
IOLMaster that you wish to
t connect to an
nd import from:
IOL.3435
Paage 16 of 32
9. If this is the first time you have connected to this IOLMaster, you will be prompted for a User name and Password:
10. Type in the following, EXACTLY as shown:
User Name --- IOLMaster
Password --- Iolm_XP
NOTE: You will not see what you are typing as a password, as it will only display dots, so be very careful when typing
the password.
IOL.3435
Page 17 of 32
11. If you have
h
correctly entered
e
the pro
oper User Namee and Password
d, the software will display thiss screen while it
searches fo
or “shared” fold
ders on the IOL
LMaster:
12. The software should find
f the default shared “Exporrt” folder. Doub
ble – Click on this folder:
IOL.3435
Paage 18 of 32
13. The contents of the “E
Export” shared folder will now
w be displayed. We can see th
he desired database file, which
h is
entitled “IO
OLMasterExporttData.MDB”. Double
D
– Click on
o this file to op
pen it and return to HIC – PRO
O:
ogram will returrn to the “IOL Master
M
Import seelection” windo
ow, and the IOL
L Master will bee shown in the list
l of
14. The pro
networked IOL Masters. Note
N that in ourr example, we have
h
connected
d to two differen
nt IOL Masters:
IOL.3435
Paage 19 of 32
15. Highlight the IOLMaster that you wish to import patient files from. If necessary, also select the desired date range
from the drop menu, then click “OK”:
16. Depending on the number of patients that the system has to import, several minutes might go by while the patients
are being imported from the selected IOL Master. After the import has been completed, the system will return to the
patient selection menu:
IOL.3435
Page 20 of 32
The above procedure assumes that the customer has connected both the computer with the Holladay IOL Consultant
software (HIC – PRO) AND the IOL Master XP to their network, and that the network is a DHCP configured network.
If the network settings are different, a CZMI Field Engineer will have to grant access to the configuration of the
IOLMaster network connection.
This procedure has been presented for informational purposes only. CZMI does not provide technical support for the
Holladay IOL Consultant software. For support of this product, please contact Dr. Holladay at www.docholladay.com
IOLMaster 500
NOTE:
The IOLMaster 500 is pre-configured for a DHCP network.
If a Static IP address is needed for the IOLMaster XP, it will require a visit by a CZMI Field Engineer to obtain access to
the network configuration files in Control Panel.
The Professional Edition of the IOL Consultant program is required for the import feature to work.
For details on obtaining the IOL Consultant program, contact www.docholladay.com
NOTE:
This presentation addresses only a NETWORK type connection between the IOLMaster XP
system and a remote PC that has the Holladay Consultant software installed. Older IOLMasters,
or IOLMasters which are NOT connected to a network, utilize the export features of the IOLMaster to export patient data
to either a floppy diskette, a CD-RW disc, or a USB memory stick, and the import features of the Holladay Consultant
software.
The IOLMaster shall only be connected to private networks, which are protected from public networks (Internet) by
IOL.3435
Page 21 of 32
firewalls conforming to the latest technical standards! A standard patch network cable, Cat 5, with two RJ-45
connectors should be used to connect the IOLMaster with the network. A network isolator must be placed between
IOLMaster (NET) and network cable.
A network isolator (part number 000000-0448-931) can be ordered from Carl Zeiss for connection to the external
network (NET). Attention should be paid to the specific safety regulations
(EN 60601-1-1 / IEC 60601-1 (see IOLMaster Instruction Manual).
To ensure that the Holladay II software will import the correct parameters from the IOLMaster 500, please verify that the “Export”
tab settings on the IOLMaster 500 are set as shown below:
In order to access the patient database on the IOLMaster 500 the Holladay IOL Consultant software must “find” the IOLMaster
500 on the network.
IOL.3435
Page 22 of 32
From the Patient Locator Screen, click on the Import Patient(s) from IOLMaster… button:
The IOLMaster/Lenstar Import selection screen will appear as shown below. Check the radio button for IOLMaster Network
Connection. Note that in this example there is already an IOLMaster that has been added to the Holladay II program. We will
now demonstrate how to add a new one:
IOL.3435
Page 23 of 32
With the IOLMaster/Lenstar Network Connection radio button checked, click on Add IOLMaster:
A Windows file explorer will open. Click on My Network Places:
IOL.3435
Page 24 of 32
Double click on Entire Network:
Double click on Microsoft Windows Network:
IOL.3435
Page 25 of 32
Double Click on Zeiss_workgroup:
Any and all computers which are attached to the “Zeiss_Workgroup” will be displayed. Double click on the IOLMaster where the
desired database is located:
IOL.3435
Page 26 of 32
If this is the first time you are trying to connect to this IOLMaster, the “Connect to iolmXXXXXX,” where XXXXXX is the serial
number of the desired IOLMaster dialogue box will open. You must enter the correct User Name and Password in order to
connect to the database:
In the User Name dialogue box, type IOLMaster EXACTLY as shown:
IOL.3435
Page 27 of 32
In the Password dialogue box, type Iolm_XP EXACTLY as presented here. The actual password you
entered will appear as dots, so be very careful as you type:
If you have entered the User Name and Password correctly, the software will now search for shared
folders on the selected IOLMaster:
IOL.3435
Page 28 of 32
Here we see that the program found a shared folder called “Export.” This is the default folder for the
IOLMaster export database. Double click on the Export folder:
The IOLMasterExportData.MDB is the export database that we wish to import the patient files from.
Double click on this file:
IOL.3435
Page 29 of 32
The program will return to the IOLMaster/Lenstar Import selection window, and the added IOLMaster
will appear in the listing:
Highlight the IOLMaster you wish to import patients from, and also select which exams you wish to import
from the drop-down menu:
IOL.3435
Page 30 of 32
Click on OK:
Depending on the number of patients the system has to import, several minutes might go by while the
patients are being imported from the selected IOLMaster. After the import has been completed, the
system will return to the patient selection menu:
IOL.3435
Page 31 of 32
This process assumes that the customer has connected both the computer with the Holladay IOL
Consultant software AND the IOLMaster 500 to their network, and that the network is a DHCP configured
network.
If the network settings are different, a CZMI Field Engineer will have to grant access to the configuration
of the IOLMaster 500 network connection.
This procedure has been presented for informational purposes only. CZMI does not provide technical
support for the Holladay IOL Consultant software. For support of this product, please contact Dr. Holladay
at www.docholladay.com
IOL.3435
Page 32 of 32