1
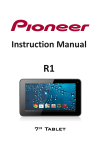
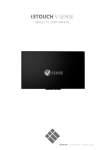
i3TOUCH
OPERATIONS MANUAL
Contents
Contents
Safety precautions...................................................................................................................................................................... 2-4
Basic operation................................................................................................................................................................................ 5
Accessories....................................................................................................................................................................................... 5
•Installation....................................................................................................................................................................................... 6
- Connect monitor......................................................................................................................................................................... 6
- Connect satellite receiver or decoder.................................................................................................................................... 6
• Description for the keys on the front panel.......................................................................................................................... 7
• Rear panel interface................................................................................................................................................................. 8-9
• Remote control description.................................................................................................................................................... 10
• Source list.................................................................................................................................................................................... 11
Screen Menu.................................................................................................................................................................................. 12
- Picture.......................................................................................................................................................................................... 13
- Sound............................................................................................................................................................................................14
- Time.............................................................................................................................................................................................. 15
- Lock.............................................................................................................................................................................................. 16
- Setup............................................................................................................................................................................................ 17
- USB Mode................................................................................................................................................................................... 18
- Film Play....................................................................................................................................................................................... 19
• PC Mode (VGA input) specification........................................................................................................................................ 20
• Trouble shooting........................................................................................................................................................................ 21
• Safety precautions..................................................................................................................................................................... 22
Safety precautions
Note: Please read this instruction manual carefully and place it at a place that is easily avaible. Please obey
below installation and operation instructions.
1. Please read the safety precautions and operating instructions carefully before using the product. Please also
keep this instruction manual for further use.
2. Please follow all the warning signs on both products and instruction manual.
<
> key on the front panel and remote control is unipolar switch, press this key to switch between on and
standby mode when it is powered on: <
<
> to power off, and press <
> key on the rear panel of the monitor is all-pole switch, press
> to power on. Al-pole power switch: it can disconnect all the manual
mechanical switches of network source at all levels except the one that protects grounding conductor. The
contact seperation of each pole of the all-pole power switch. (Note: If there is no all-pole power switch with
the monitor, then the power plug that connects with the monitor shall be used as the device for power off, the
power plug schould be easy to be plugged.)
4. Please power off and unplug immediately when there is abnormal noise or smell inside the product, don’t
uvse if it is coonfirmed to be abnormal and request professionals for maintenance.
5. Turn off the monitor and unplug the power cord when it is left unused for a long period, and disconnect the
antenna in thunderstorm season.
6. Don’t watch monitor during a lightning storm, unplug the plug and antenna before thunderstorm so as to
avoid a lightning strike.
7. Don’t place any flammable and explosive materials on the monitor set, cradles, electric stove, light bulbs, etc.
can not be placed near the monitor set so as to avoid accidents.
8. Don’t let liquid or metal go into the monitor. If liquid or metal fall into the monitor, don’t turn on or use the
monitor, request a professional service person to deal with it.
9. Don’t clean the product with chemical agent as the dissolvant may cause deterioration to the shell and damage the painted surface. If there is any dust or dirt, use a damp cloth to clean after turning off the monitor for
ten minutes. Clean the screen with clean and soft cloth. Unplug the monitor power cord from the wall outlet
before cleaning. Do not use liquid cleaners or aerosol cleaners.
10. Pay attention to water and moisture. Do not use the product near water, such as bathtub, washbasin,
kitchen sink, laundry tub, swimming pool or in a wet basement.
11. Do not expose this product to dripping or splashing. No objects filled with liquids, such as vases, should be
place on the product.
12. The power plug should be easy to be plugged.
This product may be equipped with a polarized
alternating current tine plug (a plug having one
blade wider than the other). This plug will fit into
the power outlet only in one way. This is a safety
feature. If you are unable to inssert the plug fuly
into the outlet, try reversing the plug. If the plug
should still fail to fit, contact your electrician to
2
www.i3-learning.com
replace your obsolete outlet. Do not defeat the safety purpose of the polarized plug. Additional
warning: this product is equipped with a threewire grounding type plug which has grounding pins. This plug
only fits into the grounding type outlet. This is a safety feature. If you are unableto insert the plug into the outlet, please contact your electrician to replace your obsolete outlet. Do not defeat the safety purpse of the plug.
14. The slots and openings in the cabinet are designed for ventilation so as to ensure reliable operation and
protect it from overheating. These slots and openings must not be covered or blocked with newspaper, tablecloth or curtain, etc. Make sure there is some space around the product for sufficient ventilation.
15. This monitor can only be supplied by the power source and power voltage indicated on the marking label.
If you are not sure about the type of power suppy and voltage to your house, please consult the dealer or the
local power supply company.
16. The power,cable of this product in the accessory box is three point plug power cord (with ground protection), please check whether the ground terminal of the wall outlet is grounded before installing. The power
cords should be routed properly to prevent people from stepping on them or objects from resting on them.
17. It is not allowed to put any sundries into the product through any openings, or maybe they will touch any
dangerous voltage points or projecting parts and cause fire or electric shock.
18. Screen uneven aging, because of the physical characteristics of the plasma screen, it is not allowed to play
static images r texts (such as CD-ROM games and connection with PC for a long time or watch monitor in 4:3
mode, or it may cause screen uneven aging, screen burn, remnant shade and even permanent damage to the
display screen. To avoid screen uneven againning, please reduce the brightness and contrast when the monitor displays static images; If above cases appear, your display screen will not bear the guarranty (Pay attention
to this problem for plasma monitor).
19. When the monitor stays at the static images for over 30 seconds and leaves a remnant shade, which is
caused by the physical characteristics of the plasma, let the monitor play dymic pictures for two minutes, and it
is normal if the remnant shade diappears, hereby declared (Play attention to this problem for plasma monitor)!
20. Don’t service the product by yourself. Removing covers can expose you to high voltage and other dangers.
Contact the serviceman specified by the manufacturer if there is any repairs or maintenance.
21. Follow the operating instructions of the manufacturer when installing the product, only the accessories
recommended by the manufacturer can be used.
22. The wall-mounted (if any) installation of this product is only applicable to the normal cement wall, solid wall
or board wall which can bear the weight more than three times as the product, as for hanging and hoisting installation to the special wall (such as steel structure wall, hollow structure wall, glass wall and marble wall, etc.),
the manufacturer recommends you to consider the safety before operating. The installation of thes special
materials must be carried out by professionals, the manufacturer does not undertake these installations.
23. The important part with exclamatory mark on the rating label indicates that only the safety components
(Components with this symbol near the circuit board) specified in the safety test documents can be used for
replacement during the maintenance. Ask the manufacurer for components if there are no same components
for replacement.
i3TOUCH OPTICAL SENSE - operations manual
3
24. I class equipment can touch conductive parts and the protective earthing of the output socket should be
reliably connected with the protective earthing terminal.
25. Protect the monitor from direct sunlight or other heat sources, place the monitor’s back to the sun so as to
reduce the reflected light.
26. Don’t put the monitor together with magnets, motors, transformers, speakers and monitor.
27. Unplug the power plug and contact the distributor or service center when the monitor has smoke,
abnormal noise or odd smell.
28. Don’t knock or scratch the monitor with any hard objects, don’t touch the screen with the fingers so as to
avoid smears or scratches.
4
www.i3-learning.com
Basic operation
• On/Off
1. Use 100-240V AC as monitor power supply.
2. Please press the POWER key on the remote control when the monitor screen is not on.
3. Please press the POWER key on the remote control when you want to turn off the monitor temporarily.
4. Please disconnect the power outlet if you want to completely turn off the monitor.
• Auto power off function
1. In monitor/AV mode, the monitor will switch to standby mode automatically if no signal is input in more than minutes.
2. In PC mode, the monitor will switch to standby mode automatically if it does not word for more than
5 minute.
• Save before shutdown
When PC signal source is used, please set the resolution of PC display card according to below modes;
(1360x768 @60Hz, 1024x768@60Hz, 800x600 @60Hz, 1920x1080@60Hz)
Accessories
i3TOUCH OPTICAL SENSE - operations manual
5
Installation
Connecting antenna or monitor broadcast networks
Each USB touch connecting cable must be connected to interactive touch A port first. Then connect
interactive touch B port. If not follow this active, then touch function will not appear.
Connecting satellite receiver or decoder
To receive the monitor programs of satellite network broadcast, monitor
you must connect a satellite receiver with the LED monitor.
At the same time, you also need to connect a decoder so as to receive the encoded signals.
Use coaxial cable and connect it to:
• Output socket of the decoder
• Input socket of the monitor antenna
If you want to connect the monitor with satellite receiver (or decoder) and video camera, follow below steps:
• Connect the satellite receiver (or decorder) with video camera first
• Then connect the video camera with the LED monitor, or
connect the satellite receiver (or decoder) with the LED
monitor directly.
6
www.i3-learning.com
Descriptions for keys of the front panel
No.
Name
1
( Power )
2
If the menu hides, press this key to display OSD menu; if the menu displays,
Menu
3
Description
Switching key between monitor standby and on mode
Signal source
(monitor/Video)
4
press this key to exit the current menu.
Switch among all the available input signal sources (monitor, Av1, S-VIDEO,
COMPONENT1, COMPONENT2, HDMI1, HDMI2, VGA, USB)
Adjust the sound output level of the speaker (same function as the
<volume
VOL +/-
/
> key on the remote control). In OSD menu, it is used to
move the cursor leftward or rightward, or change the settings (same function as the cursor left/right key on the remote control).
5
Select the previous or next channel , (same function as the
<channel
CH
/
> key on the remote control). In OSD menu, it is used to
move the cursor upward or downward (same function as the cursor up/
down hey on the remote control).
6
Exit (Optional)
7
Remote control
8
Power indicator
Exit the menu or return to the previous menu (Some models do not have
this key)
Receive the signals sent by remote control.
receive window
A red light indicates it is in standy mode;
A green light indicates it is in working mode
Note: For reference only, please subject to the actual model.
i3TOUCH OPTICAL SENSE - operations manual
7
Rear panel interface
3
2
1
10
11
4
12
5
13
6
7
9
8
14
19
20
21
23
22
24
No.
Name
1
HDMI1
Description
2
HDMI2
3
SCART
4
PC Audio
5
VGA IN
Input terminal for pc
6
SPDIF
Digital audio coaxial output
7
HDMI3
Connect to the digital audio/video output terminal of the digital signal source
8
USB
9
CI CARD
10
EARPHONE
11
YPBPR
12
AV IN AUDIO L R
13
AV AUDIO L R
14
ON/OFF
Power on/off
15
POWER
SWITCH power
Connect to the digital audio/video output terminal of the digital signal source
equipment.
Connect to the digital audio/video output terminal of the digital signal source
equipment.
Connect them to the Scart video output terminal.
PC Audio input
equipment.
8
www.i3-learning.com
Multimedia USB, music, pictures and video support.
CI Signal input
Earphone signal output
Connect every terminal to the component video.
Video and Audio signal input.
Video and Audio signal input (L R).
Rear panel interface
No.
Name
Description
16
AC OUT
AC power input port (80W 2A)
17
SOUND BOX L R
Connect the left/right speaker output
18
SW INSIDE OUTSIDE
Switch=for the outer speaker, switch-for built-in speakers, switch O off
19
TOUCH1 TOUCH2
USB1corresponding VGA1;USB2 corresponding VGA2;USB3
TOUCH3
correspondingVGA3;The default status is USB1
20
RS232
RS232 Control interface
21
VGA1
Connect to PC D-Sub terminal
22
VGA2
Connect to PC D-Sub terminal
23
VGA3
Connect to PC D-Sub terminal
24
VGAOUT
Link to the rest of the display device
Note: For reference only, please subject to the actual model.
i3TOUCH OPTICAL SENSE - operations manual
9
Remote Control
POWER : Turn the MONITOR on/standby.
MUTE : Press to mute the sound, press again or press VOL+ to unmute.
NUMBER BUTTONS : Choose channel directely. Press number
buttons and press OK button to play the channel.
: Return to the previous channel viewed.
P.MODE : Select the picture mode.
S.MODE : Select the sound mode.
NICAM : Press this key to select simple tone, stereo or bilingual mode/
only when it`s supported by broadcasting system.
SOURCE : Press to display the input source menu.
MENU : System setup menu.
INFO : Display current mode information.
OK : Confirm button for menu.
EXIT : Exit the OSD menu.
Cursor left/right /up/down : Cursor buttons used in menus.
VOL+/- : Press ”VOL+/-”, you can adjust the volume.
ASPECT : Press to see top half of page double size,
Press again to see the bottom half of page double size.
Press again for normal size.
SLEEP : Standby timer.
FREEZE : Holds the current picture.
USB : Multimedia source signal fast switching.
AUTO : Press to change the auto reduction mode.
FAV : Display the favorite program list.
EPG : Press to display EPG information (Electronic Program Guide).
TEXT : Turn off/on the Teletext display.
MIX : Press to display the picture and the teletext at the same time.
HOLD : Hold on or off the current page display.
INDEX : Press to return to the index/initial page.
SIZE : Change the size of display in Teletext mode.
REVEAL : Reveal or Hide the hidden words.
SUBPAGE : Display a sub-page of upper options.
: Open/Close program
: Play/Pause program
: Stop program
: Fast reverse
: Fast forward
: Previous chapter
: Next chapter
AUDIO : In DVD source voice switching.
GOTO : In DVD source press to cycle to a desired position.
REPEAT : Press to change the playing mode.
A-B : Repeat the segment between A and B.
Colour buttons : Short cuts-follow the coloured links.
Handle the remote control with care. Avoid falling off or being trampled or splashed with liquids.
10
www.i3-learning.com
Source List
Press Source button to show source list.
Press
button to choose the mode.
Press OK button to enter the mode.
i3TOUCH OPTICAL SENSE - operations manual
11
Screen Menu
Press SETUP button to show, Picture, Sound, Time, Lock, Setup menu.
Press OK button to select specific submenu and the adjustable value. In the submenu,
press
or
button to select menu item.
Programme Edit
Press
button to select Programme Edit, and then press OK button to enter menu.
Signal Information
Press
button to select Signal Information, and then press OK button to Signal Information.
CI Information
Press
12
button to select CI Information, and then press OK button to see CI Information.
www.i3-learning.com
Picture Menu
Picture Mode
Press
to select Picture Mode, and then OK button to enter. Press
standard/ personal mode and press
or
button to select dynamic/
to adjust value.
Colour Temp
Press
to select Colour Temp, and then OK button to ener and press
button to slect cool/
normal/ warm mode.
Noise Reduction
Press
to select Noise Reduction mode, and then OK to enter submenu. You can select off/low/middle/
high/default by pressing
button.
i3TOUCH OPTICAL SENSE - operations manual
13
Sound Menu
Sound Mode
Press
to select Sound Mode, and then OK button, press
button to select standard/music/
movie/sports/personal mode.
Balance
Press
to select Balance, and then OK button to enter submenu, press
button to adjust balance
value.
Surround Sound
Press
to select Surround Sound, and then OK button to enter submenu, then press
button to
select off/surround mode.
AD Switch
Press
pressing
14
to select AD Switch, and then OK button to select on/off, and you can adjust AD volume value by
button when AD switch is set to on.
www.i3-learning.com
Time Menu
Clock
Press
to select Clock, and then OK button to set.
Sleep Timer
Press
to select Sleep Timer, and then OK button to enter submenu, and press
timer type.
to select the sleep
Auto Standby
Press
to select Auto Standby and then OK button to set and select off/3h/4h/5h etc.
Time Zone
Press
to select Time Zone, and then OK button to enter submenu, and press
time zone.
or
to adjust the
i3TOUCH OPTICAL SENSE - operations manual
15
Lock Menu
Lock System
Press
to select Lock System, and then OK button to select on/off to open and close the lock function.
Set Password
Press
to select Set Password,and then OK button to input old password 0000° and set new password.
Block Program
Press
to select Block Program, and then OK button to enter the submenu and then green button to
choose lock/ unlock mode.
Parental Guidance
Press
16
to select Parental Guidance, and then OK button to select off/4/5/6/7/8 etc.
www.i3-learning.com
Setup Menu
OSD Language
Press
to select OSD Language, and then OK button. Press
or
button to choose language
choices.
TT Language
Press
to select TT Language, and then OK button to enter submenu, and then press
to select
West/East/ Russian/Arabic/Farsi.
Hearing Impaired
Press
to select Hearing impaired, and then OK button to select on/off.
Aspect Ratio
Press
to select Aspect Ratio, and then OK button to enter submenu, and then press
to select
Auto/4:3/16:9/ Zoom1/Zoom2.
Blue Screen
Press
to select Blue screen and OK button to select on/off.
i3TOUCH OPTICAL SENSE - operations manual
17
USB Mode
Press setup button to show Photo, Music, Film, Text. Press
adjustable value. In the submenu, press
Photo Show
or
button to choose specific menu and the
button to choose menu item.
Select C:\, press OK button to enter submenu.
1. Insert USB Port to USB entry.
2. Press
to select photo, and then OK button to enter submenu.
3. Select C:\ press OK button to enter submenu
4. Select the specific photo, and press
button to play, press
button to play previous one, press
to play next one.
5. Press Exit button to exit.
Music Play
Select C:\, press OK button to enter submenu.
1. Insert USB Port to USB entry.
2. Press
to select music, and then OK button to enter submenu.
3. Select C:\, press OK button to enter submenu
4. Select the specific music, and press
to play next one.
5. Press Exit button to exit.
18
www.i3-learning.com
button to play, press
button to play previous one, press
Film Play
Select C:\, press OK button to enter submenu.
1. Insert USB Port to USB entry.
2. Press
to select film, and then OK button to enter submenu.
3. Select C:\, press OK button to enter submenu
4. Select the specific film, and press
press
button to play, press
button to play previous one,
to play next one.
5. Press Exit button to exit.
Text Show
Select C:\, press OK button to enter submenu.
1. Insert USB Port to USB entry.
2. Press
to select text, and then OK button to enter submenu.
3. Select C:\, press OK button to enter submenu
4. Select the specific text, and press
press
button to play, press
button to play previous one,
to play next one.
5. Press Exit button to exit.
i3TOUCH OPTICAL SENSE - operations manual
19
PC mode (VGA input) specification
Serial
Standard
Resolution
number
20
Refresh
Pixel
Horizontal
Vertical fre-
Horizontal/
rate
frequency
frequency
quency (Hz)
Vertical sync
(Hz)
(MHZz)
(TTL)
1
VESA
640x480
60
25.175
31.5
60.00
N/N
2
VESA
640x480
72
31.500
37.9
72.00
N/N
3
VESA
640x480
75
31.500
37.5
75.00
N/N
4
VESA
800x600
56
36.000
35.1
56.00
P/P
5
VESA
800x600
60
40.000
37.9
60.00
P/P
6
VESA
800x600
72
50.000
48.1
72.00
P/P
7
VESA
800x600
75
49.500
46.9
75.00
P/P
8
VESA
1024x768
60
65.000
48.4
60.00
N/N
9
VESA
1024x768
70
75.000
56.5
70.00
N/N
10
VESA
1024x768
75
78.750
60.0
75.00
N/N
11
VESA
1280x960
60
108.000
60.0
60.00
N/N
12
VESA
1280x1024
60
108.000
64.0
60.00
P/P
13
VESA
1280x1024
75
135.000
80.0
75.00
P/P
14
VESA
1360x768
60
133.200
85.0
47.7
P/P
15
VESA
1920x1080
60
154.000
66.547
59.988
P/P
www.i3-learning.com
Trouble shooting
Trouble shooting: Before contacting the serviceman.
Before contact our after-sales service department, please check the product according to below instructions. If the faults can not be excluded in accordance with these instructions, please write down your TV’s model number and serial number, and contact the local distributor.
• Check whether the power cord is connected to the AC power outlet, the There is no sound or picture.
power outlet is electrified.
• Check whether you press the <POWER> key on the front panel.
• Check the brightness and contrast settings of the picture.
• Check the volume.
• Check the volume.
Picture is normal, but there is
• Check whether you press the <MUTE> key on the remote control.
no sound.
• Check the sound system.
There is no picture, or the
• Adjust the color setting.
picture is black and white.
• Check the color system.
• Find out the devices that cause interference and move them to a place Sound and picture are interfered.
Picture is not clear or deformed.
Remote control is out of work
that is far from the TV.
• Put the TV’s power plug into another socket.
• Check the direction, position and connection of the antenna.
• Replace the batteries.
• Clean the upper edge of the remote control. (Sensor window)
• Check the battery contact
The screen used as display screen contains sub-pixel which is generated by using advanced technology. But
there may be some bright or dark pixels on the screen. These pixels shall not affect the performance of the
products.
Specification
• Product name: LCD/Plasma/LED
• Color system: PAL/SECAM
• Audio system: B/G, D/K, l, l, l’
• Power: AC: 110V-240V
• Frequency: 50/60 Hz
• Maximum audio output power: 10W/8 Ωx2
Television
(Note: Specifications are subject to change without prior notice. All pictures are for reference only.)
i3TOUCH OPTICAL SENSE - operations manual
21
Safety precautions
Requirements for Pollution Control Identification for Electronic Information
Products
The names of each poisonous or harmful substance or element present in this product, along with the symbol
corresponding to the content of each of such substances and elements, are listed in the following table:
Component
name
Poisonous or harmful substances or elements
Lead (Pb)
Mercury (Hg)
Cadmium
Hexavalent
Polybro-
Polybromi-
(Cd)
chrome
minated
nated diphe-
(Cr6+)
biphenyls
nyl ethers
(PBB)
(PBDE)
Casing
Circuit board
assembly
Power cord/
adapter
External
signal cable
LCD panel
* : The circuit board components include a printed circuit board and its constituent parts and components,
such as resistors, capacitors, integrated circuits, connectors, etc.
: This symbol indicates that the content of the corresponding poisonous or harmful substance in all of
the homogeneous materials constituting the corresponding component is below the limit specified in the
Standard for the Content Limits for Poisonous or Harmful Substances in Electronic Information Products.
: It indicates that in at least one homogeneous material of that component the content of this toxic
substance exceeds the limit requirement specified in the Limit Requirements for Toxic or Harmful
Substances in Electronic Information Products (SJ/T11363-2006).
Note on the Environmentally Friendly Use Period
When this electronic information product is used under the operating conditions specified in the operating instructions, the period in which the toxic or harmful substances or elements it contains do not leak out or cause
pollution to the environment or serious damage to individuals or properties, is 10 years.
1. Where the MAINS plug or an appiance coupler is used as the disconnect device, the disconnect device shall remain readily operable.
2. The I class structural device should be connected to the power output socket with protected GND
interlinkage.
22
www.i3-learning.com
i3TOUCH OPTICAL SENSE - operations manual
23
BELGIUM-LUXEMBOURG
NETHERLANDS
FRANCE
Nijverheidslaan 60
Duwboot 91
Parc d’activités de la Vallée
8540 Deerlijk
3991 CG Houten
de l’Escaut Waka 1, n° 9
Belgium
Netherlands
59264 Onnaing France
T +32 (0)56 313 415
T +31 (0)30 6379387
T +33 (0)3 27 45 60 60
F +32 (0)56 313 688
F +31 (0)30 2547927
F +33 (0)3 27 45 60 70
USA
GERMANY
SCANDINAVIA
549 Ionia Ave. SW
Lohrheidestraße 72
Lollandsvej 16
Grand Rapids, MI 49503
44866 Bochum
5500 Middelfart
USA
Germany
Danmark
T +616-451-7800
T +49 (0) 2327 960 50-0
T +45 64 41 04 90
F +616-451-9698
F +49 (0) 2327 960 50-50
F +45 64 41 17 47
AUTHORISED RESELLER
WWW.I3-LEARNING.COM
[email protected]