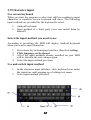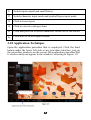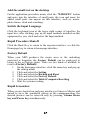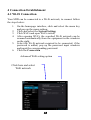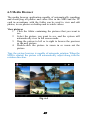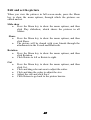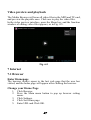
1
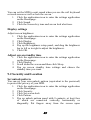
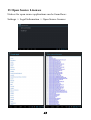
Instruction Manual
R1
7” Tablet
Contents
Contents………………………………………………….......... …
Introduction…………………………………………………...1
1.1 Congratulations…..………………………………….….1
1.2 Precautions……………………………………………...1
1.3 Safety Notice…………………………………………....1
1.4 Abbreviation/term………………………………………3
2
Brief introduction for MID product………………….……….3
2.1 Diagram for MID complete machine …………….……..3
2.2 Introduction to accessories of MID………………..……4
2.3 Use and preparation of MID………………………..…...5
2.4 MID state and notice……………………………….………....5
3
Quick start……………………………………………..…..….7
3.1 Key function……….……………...……..…………..….7
3.2 Starting up and turning off….………...…………….…...7
3.3 Unlocking and closing of the screen…….…………........7
3.4 Use of touch screen……………………….………....…..7
3.5 Homepage interface……………………….……..…….10
3.6 Access to application program…………….………...…12
3.7 USB connection…………………………….………….13
3.8 Memory card……………………………….…………..15
3.9 Character input …………….……………….………….15
3.10 Application Technique…….……………….…………..17
4
Connection Establishment……………………………….......18
4.1 WiFi Connection……….………………….…………..18
5
Communication………………………………….………..…20
5.1 E-mail……………….……………………….………....20
6
Multi-media………………………………………………….21
6.1 Supported File Format…………………….………...…23
6.2 Music……………………………………….………….24
6.3 Camera…………………………………….…………...25
6.4 HDMI……………………………………….………….26
6.5 Media Browser …….……………………….………….27
7
Internet………………………………………….…………...29
7.1 Browser…………….…………………………………..29
8
Other Applications…………………………………………..33
8.1 Alarm clock………………………………………….…33
1
8.2 Calculator……………………………………………....34
8.3 File Management……………………...…………….…34
9
Basic Settings………………………………………..………37
9.1 Sound and Display……………………………………..37
9.2 Security and Location……………………...….……….38
9.3 Storage…………………………………………………39
9.4 Date and Time………………………………………….39
9.5 Language and Input Method………….………………..40
9.6 About Tablet PC…………………………….………….40
10 Installation and Management of Program …………………..41
10.1 Installation……………………………………………..41
10.2 Management and Uninstall…………………………….42
10.3 Update Approach………………………………………42
11 System Upgrade………………………………..……………42
11.1 System Upgrade Preparation……….………………….42
11.2 Restore Factory Settings…………….…………………42
11.3 System Upgrade………………….………………….…43
12 Troubleshooting……………………….……………..………44
13 Open Source Licenses…......................................................45
14 Warranty ………………….…...……………..……………...47
1 Introduction
1.1 Congratulations
Thank you for purchasing the Pioneer R1 Tablet / MID.
1.2 Precautions
Maintenance and Trouble Shooting
•
Please keep the device dry. Please don’t let the device,
battery or charger contact water or water vapor. Do not
operate device or charger with wet hand, so as not to short
circuit of the device, or cause breakdown by corrosion.
This will also prevent electric shock.
•
Please do not let the device, battery or charger receive
strong impact or shock, for fear of breakdown, catching
fire or explosion of device, battery and charger.
•
Please do not place the device, battery or charger in
regions with too high or too low temperature, this may
lead to breakdown, fire or explosion of device.
•
Please do not strike, throw or puncture the MID, and
dropping, puncturing, or bending of MID must be avoided.
•
Please do not dismantle the device and its accessories on
your own, otherwise, the device and its accessories will be
out of the warranty scope by our company.
1.3 Safety Notice
Before using MID, please read information in this section, and
make sure your children understand this information, as well.
•
Please do not use MID when you are driving, for fear of
hindering safe driving.
1
•
In medical places, please observe relevant stipulations and
regulations. And in regions near the medical devices,
please shut down MID.
•
Please shut down MID or enable the airplane mode when
boarding, so that the wireless signals will not interfere
control signal of the airplane.
•
Please shut down MID neighboring electronic equipment
with high accuracy, otherwise, breakdown of electronic
equipment may be brought about.
•
Please don’t dismantle the MID and its accessories on
yourself, and only the authorized agency can maintain this
MID.
•
Please keep MID far away from magnetic equipment,
radiation from MID will erase information stored on the
magnetic equipment.
•
Please don’t use MID in places with high temperature and
inflammable gas (such as nearby gas station).
•
Please put MID and its accessories in places beyond
children’s touch, please don’t let children use MID without
supervision.
•
During using of this MID, please observe related laws and
regulations, respect privacy and legitimate rights of others.
•
Please strictly abide by relevant explanations in this
manual when using USB data line, otherwise, MID or
personal computer may be damaged.
•
Please don’t use the MID in humid environment such as
bathroom, etc., and the MID being soaked or rinsed by
liquid must be avoided.
2
1.4 Abbreviation/Term
2 Brief Introduction for MID product
2.1 Diagram for MID complete machine
3
4
2.3 Introduction to accessories of the MID
Included Items
The following Items are included in your packing box of MID:
•
•
•
•
•
MID/ Tablet
AC Power adaptor
Micro USB Cable
Instruction Manual
Screen Protection Film
2.3 Use and preparation of MID
Battery charging
•
•
•
Before using MID for the first time, the battery must be
charged firstly.
Use power adaptor to charge MID.
In order to guarantee full battery, please charge for over 4
hours.
2.4 MID State and Notice
Iconography for Notification
When a prompt message shows on your notice panel, please click
the column box and slide on the screen with your finger to open the
notice list. Click options needing to check to see detailed
information. Then you may click the message box and slide
upwards to close the message window. The following are
iconography for icons in status bar:
-
5
Notice panel
Notice iconography will show when receiving new message, setting
the alarm clock and odometer as well as inserting SD card, you can
open the notice panel to check detailed information.
Unlock notice panel
When new notice iconography shows on the notice column, please
press the notice column with your finger, then slide downwards to
unlock the notice panel.
6
3 Quick Start
3.1 Key function
Descriptions for key functions:
Power key
•
•
•
•
Press this key for a long time to start up
Under starting up state, press this key for a long
time to pop up shutdown option
Under starting up state, press this key to close the
screen
Under starting up state or when breakdown
appears, press the power key for 7 seconds to
make your device enter into shutdown state
3.2 Starting up and turning off
Starting up
Press the power key for 3 seconds, you can see the starting up
picture. After the system is started, the machine enters into screen
lock state, please unlock according to direction indication of sliding
icon on the interface.
Turning off
1.
2.
After pressing the power key for a long time, the
shutdown option will pop up.
Click OK.
3.3 Unlocking and closing of the screen
The machine will close automatically when the screen is left unused
1.
After the screen being left unused for a period of time, the
machine will close screen automatically, so as to save
battery power.
7
2.
Under screen on state, press the power key, the screen will
close immediately.
Prompt: if you want to inquire how to set turn-off time of screen,
please refer to chapter 9.1.
Turning on under screen off state
If the screen is off, you can unlock the screen by pressing power
key for a short time or the return key for a long time. After opening,
the screen will enter lock state, press “lock” icon by your finger and
slide rightwards, the screen will be unlocked, press “lock” icon and
slide leftwards, you can enter the camera function.
Figure 3-1
3.4 Use of touch screen
Operating mode in MID
There are various ways to skim the main screen, menu and
application program, etc. on your MID.
8
Click to select
When you want to use screen keyboard entry, and you want to
select items on the homepage interface such as application program,
you only use your finger to click.
Press on
If you want to unlock the available option of a certain item (such as
textbox or interlinkage in the webpage), or move shortcut on the
homepage interface and menu of main program, only press the
item.
Slide quickly or slide
Quick sliding or sliding means doing rapid vertical or horizontal
drag movement by using finger on the picture.
Drag
Before you starting to drag, you must press it with your finger and
impose a certain pressure, and don’t loosen the finger before
dragging to the wanted position.
Rotate
Aiming at most of pictures, only turn the MID in side direction, the
screen direction can be shifted from cross direction to vertical
direction. For example, when you input characters, watch cinema,
etc.
Homepage interface
All application programs on the machine will be displayed on the
main menu screen. You may use application program, shortcut and
user-defined mode to set wallpaper of your homepage interface.
9
Note: in any application program, you can press the homepage key
to return the homepage interface.
Outstretched homepage interface
Homepage interface may extend beyond the width of screen, so as
to provide more space, so that you can place the newly increased
shortcut, widget, etc. Press blank of homepage interface, then slide
around quickly in vertical direction by finger to jump to left side or
right side outside the screen. There are more than 2 stretched
pictures on the homepage interface.
10
Custom homepage interface
Change desktop wallpaper
1.
2.
3.
Press the blank region on the homepage interface to pop
up the menu.
When the menu pops up, choose source of homepage
interface wallpaper you want to change.
After clicking source of wallpaper, click picture you want,
and then select “setting wallpaper”.
Add widgets
1.
2.
4.
Please click the application program menu. As shown in
Figure 3-5.
After entering the application program menu, click the
“WIDGETS” button on the top left of the interface.
After pressing the desktop widgets you want, the system
will return back to the main interface, put the selected
widget to the desired place, then release.
11
3.6 Access to application program
How to visit application program of MID:
1.
2.
3.
Click the application program menu. As shown in Figure
3-5.
Select the application program you want to visit.
If you want to exit the program interface, press the return
key to the last interface, or press the homepage key to
return to the homepage interface directly.
12
3.7 USB Connection
Storage setting of MID
Before transmitting a document, you must first set the storage mode
for your MID:
1. Connect your MID with your computer by using USB
transmission line. The Notice bar will show the notice
prompt.
2. Click the status bar, options of the status bar as shown.
3. Among the options of the status bar, click to choose USB
connected, then click to open USB storage device.
4. At this time, USB has already been connected.
Copy the document to storage card
•
•
•
Connect the MID and your computer together with USB
cable.
After setting according to storage of MID, connect with
computer successfully.
Open your computer, in my computer; examine content in
“removable disk (x)”.
13
•
•
Find the document you want to copy, copy it to
“removable disk(x)”.
After completion of copying, click “safely remove
hardware” in taskbar of your computer to unload.
Content of MID storage device
1.
2.
3.
NAND FLASH storage device, space for MID to store
document itself.
TF removable memory card.
The two above-mentioned storage devices both can be
visited through connection with your computer with USB.
Attention: When your MID is connected with the USB cable, if you
start up USB storage device, you will not be able to visit the
memory card through MID, if you want to visit memory card in
MID, disconnect USB cable.
3.8 Memory card
Copy the document to storage card
You can transmit documents between you MID and computer, such
as music and picture, etc. If you want to see documents in MID,
only click the file browser to look through content in the SD card.
Delete documents on the storage card of MID
1.
2.
3.
Find the document you want to delete.
Press the document name you need to delete; a file menu
will pop up.
Click delete.
Removing storage card when the MID is in starting up state
If you need to the remove storage card under starting up state of
MID, you must unload the storage card firstly, for fear of failure or
damage of the storage card.
1.
2.
3.
4.
In the homepage interface, press the menu key, and then
click setting.
Pull the setting menu downwards, and then click storage.
Click SD card setting.
Click to uninstall the SD card.
14
3.9 Character input
Use screen keyboard
When you start the program or select text edit box needing to input
characters or numbers, screen keyboard will show. The following
input methods are provided for the keyboard to select.
1.
2.
Android keyboard
Input method of a third party (user can install them by
himself).
Select the input method you need to use
According to presetting, the MID will display Android keyboard
when you want to input characters.
1.
2.
3.
4.
Press menu key in homepage interface, then click setting.
Click language and keyboard.
All of the input methods already installed on your MID
will be listed in the text setting region.
Select the input method you want.
Use and switch input method
1.
2.
In the character input interface, click keyboard icon under
the status bar, until popping up of editing text menu.
Select input method you need.
15
1
Switch input capital and small letters
2
Switch character input mode and symbol/figure input mode
3
Click to insert space
4
Click to execute carriage return
5
Click and press on to delete characters on the left of the cursor
6
Click here to switch input method
3.10 Application Technique
Open the application procedure that is employed. Click the third
button under the lower left side at any procedure interface, pop up
the procedure windows on the screen, the application procedure that
is used recently can appear in the windows, referring to Figure 3-9.
16
Add the small tool on the desktop
On the application procedure menu, click the “WIDGETS” button
and enter into the interface of small parts, the icon and name for
added small parts can appear on this interface, such as: music,
photo frame, clock and searching.
Switch the Input Language
Click the keyboard icon at the lower right corner of interface for
input box; after clicking, pop up all input methods installed on this
equipment by you, click and select the Input method.
Rapid Procedure Shutoff
Click the Back Key to return to the superior interface, or click the
Homepage key to return to homepage interface.
Factory Default
When your MID produces the major error or the unlocking
password is forgotten, the Factory Default can be employed to
return to the ex-factory status. There are two kinds of methods to
reset to Factory Default:
1.
2.
3.
4.
5.
6.
On the homepage interface, click the menu key and pop up
the setting menu.
Click and select the Setting
Click and select the Backup and Reset
Click and select the Factory Default
Click and select the Tablet Computer Resetting
Wait for system resetting
Rapid Screenshot
When you are located on such any interface as Game or Movies and
intend to serve the wonderful picture as the commemoration, the
desired pictures can be reserved only by pressing Volume Down
key and Power key simultaneously.
17
4 Connection Establishment
4.1 Wi-Fi Connection
Your MID can be connected to a Wi-Fi network, to connect follow
the steps below:
1.
2.
3.
4.
5.
6.
On the homepage interface, click and select the menu key
and pop up the menu setting;
Click and select the System Setting;
Click Wi-Fi and open Wi-Fi switch;
After opening WI-Fi, the searched Wi-Fi network can be
scanned automatically from the equipment in the windows
on the right.
Select the Wi-Fi network required to be connected, if the
password is added, pop up the password input windows
and input the corresponding password.
Click the Connection
Advanced WiFi setting option
Click here and select
WiFi network
18
5 Communications
5.1 E-mail
Setting for E-mail
The E-mail application procedure is attached with the setting guide
for E-mail, the external POP3 or IMAP E-mail account for common
Web E-mail service provider ( such as: Yahoo, Gmail, Hotmail and
163 manufacturers) can be added.
Figure 5-1
Setting guide for E-mail
1.
2.
3.
4.
5.
6.
7.
After clicking and selecting the E-mail icon, the produced
E-mail setting guide will help you perform the setting;
Click and select Next button;
Input E-mail address and password of your E-mail
account;
Click and select Next button to select that your E-mail
type either is POP3 or IMAP.
Click and select Next button again to inspect whether the
send-receive server of E-mail is available.
Input the name of account and display the name of E-mail
to be sent, and then, click and select OK.
If the E-mail is
19
Figure 5-2
Delete the E-mail account
You can delete the account of POP3 or IMAP E-mail that is set
properly from your mobile phone.
1. Click and select the E-mail;
2. Enter into your inbox;
3. Click the menu key;
4. Click and select the Account;
5. Press the account that you want to delete.
6. Pop up the menu list; click and select the Deleted
Account.
7. Click OK to remove it.
Send E-mail information
1.
2.
3.
4.
Click and select the E-mail to show your inbox.
Click inbox to enter, automatically refresh the new e-mail,
click and read it.
Press down the menu key and pop up the menu.
Click and select the Composing to enter into the new
E-mail interface;
20
5.
Input the E-mail address of your recipient in the recipient
bar;
6. Input the theme and information contents;
7. If want to add the attachment, press the menu key and pop
up the menu option.
8. Click and select the Add Attachment.
9. Select the attachment that you will send (such as: picture
and video).
10. After clicking and selecting the “Send”, send out the
E-mail.
Notice: if you have more than one account and hope to send out an
E-mail in a certain account, prior to clicking the main menu and
composing the E-mail, click that account name in advance.
6 Multi-media
6.1 Supported File Format
The MID can play the following formats:
Music File Format
•
•
•
MP3
AAC(AAC、AAC+、AAC-LC)
OGG
Video Play Format
•
•
•
•
•
•
•
AVI(H.26, DivX, XviD)
RM/RMVB
MKV
MP4
VOB
FLV
3GP
21
6.2 Music
Your music can be divided into such 4 types as Artist, Special
Edition, Songs, Play List and Playing. Select a classification to
view the contents in the list therein. If enter into one classification,
always perform the selection until appear the songs that you want to
play. For example, if you select Artist classification, you will see
the name list of artists ranked according to A-Z sequence. If select
an artist, the special edition of artist and song list for special edition
will be presented in the list.
Figure 6-1
Visit and play music
1.
2.
3.
Click and select the music;
Click and select the songs, click and select the Artist,
Special Edition and Song List.
Select one of songs for play.
22
Add songs onto the new play list
1.
2.
3.
4.
5.
6.
7.
8.
Click and select the music
Click and select the songs
Press the songs that you will add onto the play list
Pop up the music setting menu, click and select add onto
the play list
Click and select the Newly-established
Input the name of play list
Click and select the Save
Click and select certain song, serve this song as the ring to
be added
Delete the play list
1.
2.
3.
4.
Click and select the music
Click and select the songs
Press the songs that you will add onto the play list
Pop up the music setting menu, click and select Delete.
6.3 Camera
Camera functions
1.
2.
3.
4.
5.
Click and select the camera;
The system enters into the camera interface;
Click and select the Photo button and easily take the
photos;
Set such functions as photo sixe, storage location, white
balance and focal length regulating;
After completion of taking photo, there is the display for
previewed mini-map.
Figure 6-2
23
Video Recording function
1.
2.
3.
4.
5.
Click the videotape icon and convert it to video recorder
mode;
Click and select the red videotape button to take video;
Set such setting functions as color effect, white balance
and video quality;
Switch 720P and 480P high-definition video recording.
Click and select the video recording button, end the video
recording, and observe the previewed video.
Figure 6-3
6.4 HDMI
High Definition Multimedia Interface
The MID and the high-definition television are connected by a
standard HDMI cable. This interface supports the picture with
highest quality of 1080p resolution ratio.
1.
2.
3.
4.
5.
6.
MID is in the boot status.
The MID and the high-definition television are connected
by a standard HDMI cable.
The system interface on the MID will automatically
synchronize with the high-definition TV screen.
Click Display in the settings menu.
Click Output Select to switch HDMI mode.
Click Resolution to set the resolution ratio of HDTV.
24
6.5 Media Browser
The media browser application capable of automatically searching
and classifying all photos and video files in the MID and the TF
card in accordance with the folder can be used to view and edit
photos, to use photos as desktop and to watch videos.
View pictures
1. Click the folder containing the pictures that you want to
see.
2. Select the picture you want to see, and the system will
automatically view in full screen mode.
3. Drag the picture to left or to right to browse the previous
or the next picture.
4. Double-click the picture to zoom in or zoom out the
picture.
Tips: the picture browser is capable of automatic rotation. When the
MID is rotated, the picture will automatically adjust along with the
rotation direction.
Fig. 6-4
25
Edit and set the picture
When you view the pictures in full screen mode, press the Menu
key to show the menu options, through which the pictures are
edited and set.
Slide show
• Press the Menu key to show the menu options, and then
click Play slideshow, which shows the pictures in all
folders.
Share
• Press the Menu key to show the menu options, and then
click Share.
• The picture will be shared with your friends through the
attachments in the E-mail and Bluetooth.
Rotation
• Press the Menu key to show the menu options, and then
click Rotation.
• Click Rotate to left or Rotate to right.
Cut
•
•
•
•
•
Press the Menu key to show the menu options, and then
click Cut.
Click and drag relevant area to adjust the cutter.
Click and drag the cutter to adjust the size.
Adjust the size and click Save.
Click Return to go back to the picture browse.
26
Video preview and playback
The Media Browser will scan all video files in the MID and TF card,
and preview the playable ones. Click one to play the video files.
In the video preview interface, press the Menu key, and the function
window of editing video files appears, as in Fig. 6-5.
Fig. 6-5
7 Internet
7.1 Browser
Enter Homepage
The browser always opens to the last web page that the user has
visited, and the home page will appear after clicking the browser.
Change your Home Page
1.
2.
3.
4.
5.
Click Browser.
Press the Main menu button to pop up browser setting
menu.
Click Settings.
Click Set Home page.
Enter URL and Click OK.
27
Address bar
Fig. 7-1
Visit web page
1.
2.
3.
Click Browser.
Enter your URL in the address bar.
Click Start on the soft keyboard.
Browse webpages
28
When the page finishes loading, you can slide your finger to browse
and view other parts of the page.
Zoom in or zoom out webpages
The webpage can be zoomed in or out by double-clicking the screen
or by dragging through two fingers.
Find texts within the webpage
1.
2.
3.
4.
5.
While browsing the web, press the Menu key to pop up the
menu options.
Click Find on web.
Enter the item you want to search.
The matched texts are highlighted in green while inputting
the characters.
Click left-to-right arrow before the search bar to move to
the previous or the next matched word.
Manage bookmarks
Set web page bookmark
1.
2.
Go to certain web page in the browser interface.
Click the icon ‘Click here to add a web page as bookmark’
in Fig. 7-2, and a Bookmark this page window pops up,
click OK to set the page you want as the bookmark.
Open bookmark
1.
2.
Enter the interface similar to Fig. 7-3 by clicking the icon
‘Click here to enter the Manage bookmarks’ as in fig. 7-2
in the browser interface.
Click the bookmark that you want to open the web page.
Edit bookmark
29
1.
2.
3.
Enter the interface similar to Fig. 7-3 just like opening the
bookmark in the browser interface.
Click and press down the bookmark to open the menu
options.
Click Edit bookmark to edit and click OK.
Use browser window
Open a new browser window
1.
In the browser window, press the Menu key and click new
window or simply click the + at the top of the address bar
to open a new window.
Switch browser window
1.
2.
In the browser window, the pages you have visited appear
above the address bar.
Click the window that you want to switch to the page you
want.
Set browser
In the browser interface, press the Menu key and click set to set the
browser.
8 Other Applications
30
8.1 Alarm clock
1.
2.
3.
4.
Click clock icon in the main interface.
Enter program interface. (Fig. 8-2)
Click the time periods need to set, and the alarm setup
menu pops up.
After setup, click ‘Done’ on the corresponding clock.
Fig. 8-2
8.2 Calculator
1.
2.
Click Calculator.
Enter the basic panel of the calculator to operate. (Fig. 8-3)
Fig. 8-3
8.3 File Management
31
Browse files
Slide the desktop to locate the File browser.
You can use the file browser to manage, edit and delete the files and
folders, or to create sharing and FTP server to achieve resource
sharing.
Fig. 8-4
Cut and copy files
1. In the file browser, press and select the file you want
to operate.
2. Pop up operating menus, including Cut, Copy, Delete,
Rename, Move to, Copy to, Play music, Select all,
Set home directory and Attributes, etc.
3. Click Cut or Copy file or folder.
4. Click into the folder you want to paste, and pop up
menu by pressing the Menu key.
5. Click Operate and then click Paste.
Delete files
32
1. In the file browser, press the file you want to delete.
2. Click Delete.
3. Click OK to delete file.
Folder setup
1. In the file browser, pop up menu by pressing the
Menu key.
2. Click Create.
3. Click Folder.
4. Click pop-up window and input the name of the new
folder in the text box.
5. Click OK to create the folder.
Quick search
1.
2.
3.
4.
5.
6.
In the toolbar of the file browser
Click Search icon.
Pop up the search panel and enter the keywords you need
to find.
Click OK and the search progress bar will appear in the
notification bar.
When the search is completed, pop up the dialog box to
confirm whether to show the results.
Click OK to show the search results.
Create sharing
33
1.
2.
3.
4.
5.
Load ES file browser. (Fig. 8-5)
Click ‘Local’ at the upper left corner and select ‘Share’ in
the pop-up window.
Click the menu bar ‘Create’, and select ‘Search’ in the
pop-up window.
The system will automatically search all the computers
within the LAN, and each drive of your computer can be
seen by clicking OK.
You can Copy, Delete, Rename here.
Fig. 8-5
9 Basic Settings
9.1 Sound and Display
Volume setting
1.
2.
3.
4.
Click the application icon to enter the settings application
on the Homepage.
Click Sound.
Click Volume to control the volume of the ringtones,
media, alarm clock and notification.
Pop up volume setup panel, and control it by dragging the
progress bar to left or to right.
Screen key tone and screen lock alert tone
34
You can set the MID to emit sound when you use the soft keyboard
or touch screen as well as lock the screen.
1. Click the application icon to enter the settings application
on the Homepage.
2. Click Sound.
3. Click the Screen key tone and screen lock alert tone.
Display settings
Adjust screen brightness
1. Click the application icon to enter the settings application
on the Homepage.
2. Click Display.
3. Click Brightness.
4. Pop up the brightness setup panel, and drag the brightness
bar to left or to right to adjust the brightness.
5. Click OK.
Adjust screen standby time
1.
2.
3.
4.
Click the application icon to enter the settings application
on the Homepage.
Click Display.
Scroll down the screen and then click Sleep.
Pop up screen standby time settings and choose the
standby time you want.
9.2 Security and Location
Set unlock pattern
You can set your own unlock pattern (equivalent to the password)
to protect the privacy of your MID.
1. Click the application icon to enter the settings application
on the Homepage.
2. Click Security.
3. Click Set screen lock.
4. Click Pattern.
5. Pop up unlock pattern panel with 9 contacts, at least four
of which are connected vertically, horizontally or
diagonally. Put fingers away from the screen upon
35
6.
7.
completion and the system will record the pattern you set.
Click Continue.
Draw the screen unlock pattern again when the prompt
appears and click OK.
Note: If you do not want the unlock graphics display on the screen
while unlocking, please clear the check box of use visible pattern.
Fig. 9-1
Other settings
In the security settings, functions such as encryption setup,
equipment management and credential storage can be added to the
tablet PC.
9.3 Storage
View storage settings
1.
2.
3.
4.
5.
Click the application icon to enter the settings application
on the Homepage.
Click Storage.
View storage space of SD card.
View storage space of internal storage.
View USB adaptor settings, which is the storage space of
36
USB storage.
Safe uninstall of SD card
Safe removal of the SD card can effectively protect and prolong the
service life of the SD card.
1.
2.
3.
4.
Click the application icon to enter the settings application
on the Homepage.
Click Storage.
Click Uninstall SD card.
The system prompts that the SD card is safely removed.
9.4 Date and Time
Adjust the date, time and time zone
1.
2.
3.
4.
5.
6.
7.
8.
Click the application icon to enter the settings application on
the Homepage.
Scroll down screen and then click the Date and time settings.
Click Select time zone to select the one you want. Scroll down
the list to see more time zones.
Click Set date, then click the up button or the down button to
adjust the date, month and year, and click Settings when finish.
Click Set time, and then click the up button or the down button
to adjust hours and minutes, click AM or PM to change
between morning and afternoon. Click Settings to complete.
Select 24-hour check box to switch between 12-hour and
24-hour. Selected time format will be applied to the alarm
clock.
Click Select date format and then select the date format to be
displayed on the MID.
You can choose automatically determine date and time, which
automatically uses the time from the network, so network is
required.
9.4 Language and Input Method
37
Select language for the device
1. Press the Menu key to pop up Settings menu on the Homepage.
2. Click Settings.
3. Click Language and Input Method
4. Click Select language areas and choose the language you need.
Keyboard and input method
The default input keyboard is the Android keyboard, and you
can select your favorite keyboard and input method by
installing third-party software.
9.5 About MID
View MID status
1.
2.
3.
Click the application icon to enter the settings application
on the Homepage.
Click About Tablet PC.
Click Status Message to view the Battery status, Network
status, Bluetooth address, Serial number and Running time,
etc.
System Update
1.
2.
3.
4.
5.
Click the application icon to enter the settings application
on the Homepage.
Click About Tablet PC.
Click System Update.
If the window shows this is the latest version, there is no
need to update.
If the window prompts to download the new version, click
Download. (Ensure the device is equipped with the TF
card before download, the system automatically
downloads the update package into TF)
View system version
1.
2.
3.
Click the application icon to enter the settings application
on the Homepage.
Click About Device.
View MID model, Android version, Firmware version and
38
Build-in version, etc.
10 Installation and Management of Program
10.1 Installation
Install third-party applications
You can get third-party applications fit for the Android system from
the Internet and for use on the MID. Copy the application to the SD
card and insert into the MID.
Method 1:
1.
2.
3.
4.
Click File Manager to find the applications need to install
in the SD card.
Click the applications that you want to install.
Pop up installation option and click Install.
Operate after completion in accordance with the
installation guide.
Method 2:
You can download and install your favorite third-party software
according to the Method 1, and after that, you can install the
software you want through this software.
Note: search files with the suffix of .apk for the third-party
programs from the Internet
10.2 Management and Uninstall
Management applications
You can enter the applications and select one to forcibly stop, clear
data, uninstall, and remove storage location.
Uninstall applications
1.
2.
3.
4.
5.
Click the application icon to enter the settings application
on the Homepage.
Click Applications.
Click Management applications, and list all the
applications installed in the system.
Click Uninstall.
Click OK to complete uninstall.
39
11 System Upgrade
11.1 System Upgrade Preparation
Download upgrade program
You can download the software upgrade package from websites,
which is used to upgrade the system version of the MID.
System Upgrade Preparation
1.
2.
Download the system upgrade package from relevant
websites to your computer.
Prepare the system upgrade tool: a TF card with storage
capacity ≥512MB.
11.2 Restore Factory Settings
When significant error occurs or the unlock password is forgotten,
factory settings can be restored by resetting. The restore of the
factory settings will lead to the loss of downloaded applications and
user setups, so do remember to back up your data.
1.
2.
3.
4.
5.
6.
Press the Menu key to pop up Settings menu on
Homepage.
Click Settings.
Click Backup and Reset.
Click Restore Factory Settings.
Click Restore Tablet PC.
Wait for system rebooting.
11.3 System Upgrade
40
Note: Before upgrading, ensure the MID battery capacity is more
than 30% for the upgrade completion. In addition, you also need to
back up your important information, such as applications and
e-mails.
Fig.11-1
Upgrade steps:
•
Copy the needed system upgrade files to the TF root or to
the RAR, which is named as update.zip in the internal
storage.
Note: the file name must be the mentioned one, if not, please
manually change to this name.
1.
2.
3.
4.
5.
6.
7.
Click Settings.
Click About Tablet PC.
Click Install system update.
Click From External Storage.
The update confirmation window will pop up and then
click Install now.
The system will automatically reboot and enter into the
upgrade mode, and then the upgrade progress bar pops up.
Wait for the system upgrade completion and automatic
restart.
41
12 Troubleshooting
1.
2.
3.
4.
5.
Slow initial boot up for your MID
After system upgrade of MID, initial boot needs installation of
the pre-installed software applications, and after about 2-3
minutes, it will start operating faster.
MID cannot be connected to WiFi
o Ensure that the wireless router providing the network
services works properly.
o Ensure the MID and the wireless router are kept with
certain distance, and between which no wall or other
obstacles exist.
o Ensure the user name and the password are correct.
MID feels hot
o When multiple applications are running at the same time,
or the screen is adjusted to the brightest, or it is
recharging, this situation is normal.
System is disordered and does not work properly
o Installation of some third-party applications may lead to
system failure, and you can press the reset button (next to
the power port) to reset the system.
Unable to create e-mail or register applications
o Ensure your network is properly connected to the Internet.
o Ensure the e-mail is set up correctly.
o Ensure your system time and the local time are consistent.
42
13 Open Source Licenses
Notices for open source applications can be found here:
Settings -> Legal Information -> Open Source licenses
43
Limited Warranty
This Pioneer* branded product (“Product”) is manufactured, produced and
distributed by E & S International Enterprises, Inc. (“we” or “us”). The
Product, marketed as new, in the original carton to the original purchaser
(“Purchaser”), is warranted by us against manufacturing defects in
materials and workmanship for a limited warranty period of one (1) year
for parts and labor. This Limited Warranty is the sole and exclusive
warranty for the Product, and the remedies provided herein are sole and
exclusive remedies available to the Purchaser, and only for the stated time
periods. This Limited Warranty is conditioned upon proper use of Product
by the Purchaser.
Proof of purchase in the form of a Bill of Sale, Receipt or Receipted
Invoice is evidence the Product is within the limited warranty period. The
Bill of Sale, Receipt or Receipted Invoice must be presented as a
pre-condition to obtaining the limited warranty service.
This limited warranty begins on the original date of purchase and is valid
only on Products purchased and used in the United States, and its territories,
by the original Purchaser. To receive warranty service, the Purchaser must
first contact the customer service center below for problem determination
and service procedures. The original dated bill of sale, receipt or receipted
invoice must be presented upon request as proof of purchase.
We will repair your Product or if repairs cannot be made, will replace it at
no charge with the same or similar product. If the Product is defective as
specified in this limited warranty during the limited warranty period, we
may use new or remanufactured hardware or products to repair or replace
the Product with a similar product at our sole discretion. All replaced
hardware and products become the property of us and must be returned to
us. Replacement hardware and products assume the remaining original
limited warranty, or ninety (90) days, whichever is longer.
Product freight must be prepaid by original Purchaser and shipped in either
its original packaging or packaging affording an equal degree of protection.
We will not be responsible for or obligated to replace damaged goods.
If the Product is received damaged, it is the responsibility of the Purchaser
to file a claim against the carrier. We will only store the damaged Product
for 30 days and reserve the right, in our sole discretion, to dispose of the
44
damaged Product or ship it back to the Purchaser at the Purchaser’s
expense after 30 days.
We provide no warranty for the third-party software included with the
Product or installed by the Purchaser. We will NOT re-install or back-up
any data, applications or software that have been added to the Product. It is
therefore recommended that a back-up be made of any such data or
information prior to sending the unit to us to avoid the permanent loss of
such information.
This limited warranty covers manufacturing defects in materials and
workmanship encountered in normal, noncommercial use of this Product,
and shall not apply to the following, including, but not limited to: Damage
which occurs in shipment; delivery and installation; applications and uses
for which this Product was not intended; altered product or serial numbers;
cosmetic damage or exterior finish; accidents, abuse, neglect, fire, water,
lightning or other acts of nature; use of products, equipment, systems,
utilities, services, hardware, supplies, accessories, applications,
installations, repairs, external wiring or connectors not supplied or
authorized by us which damage this Product or result in service problems;
incorrect electrical line voltage, fluctuations and surges; customer
adjustments and failure to follow operating instructions, cleaning,
maintenance and environmental instructions that are covered and
prescribed in the instruction book; reception problems and distortion
related to noise, echo, interference or other signal transmission and delivery
problems; or burned-in images. Uninterrupted or error-free operation of the
Product is not warranted.
THERE ARE NO EXPRESS OR IMPLIED WARRANTIES OTHER
THAN THOSE LISTED AND DESCRIBED ABOVE, AND NO
WARRANTIES WHETHER EXPRESS OR IMPLIED, INCLUDING,
BUT NOT LIMITED TO, ANY IMPLIED WARRANTIES OF
MERCHANTABILITY OR FITNESS FOR A PARTICULAR PURPOSE,
SHALL APPLY AFTER THE EXPRESS WARRANTY PERIODS
STATED ABOVE, AND NO OTHER EXPRESS WARRANTY OR
GUARANTY GIVEN BY ANY PERSON, FIRM OR CORPORATION
WITH RESPECT TO THIS PRODUCT SHALL BE BINDING ON LTI.
REPAIR OR REPLACEMENT AS PROVIDED UNDER THIS LIMITED
WARRANTY IS THE EXCLUSIVE REMEDY OF THE CONSUMER.
WE SHALL NOT BE LIABLE FOR ANY INCIDENTAL, OR
45
CONSEQUENTIAL DAMAGES FOR BREACH OF ANY EXPRESS OR
IMPLIED WARRANTY ON THIS PRODUCT; EXCEPT TO THE
EXTENT PROHIBITED BY APPLICABLE LAW, ANY IMPLIED
WARRANTY OF MERCHANTIBILITY OR FITNESS FOR A
PARTICULAR PURPOSE ON THIS PRODUCT IS LIMITED FOR THE
DURATION OF THIS LIMITED WARRANTY. THIS LIMITED
WARRANTY SHALL NOT EXTEND TO ANYONE OTHER THAN THE
ORIGINAL
PURCHASER
OF
THIS
PRODUCT,
IS
NONTRANSFERABLE AND STATES YOUR EXCLUSIVE REMEDY.
Some states do not allow limitations on how long an implied warranty lasts,
or the exclusion or limitation of incidental or consequential damages, so the
above limitations or exclusions may not apply to you. This limited
warranty gives you specific legal rights, and you may also have other rights
which vary from state to state. Any provision contained herein which is
found contrary to state or local laws shall be deemed null and void and the
remaining provisions shall continue in full force and effect.
* Pioneer brand used under license to E & S International Enterprises, Inc.
To obtain warranty service:
Telephone: 888-999-0987
LTI Computer Inc.
398 Lemon Creek Drive Suite L
Walnut, California 91789
46
R1
48