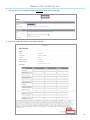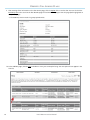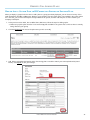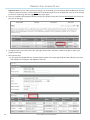
1
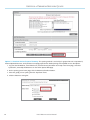
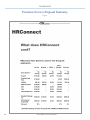
HRConnect User Manual Produced by the LISI Product Department 866.570.LISI (5474) n www.lisibroker.com Copyright © LISI, Inc. Copyright © 2009 by LISI, Inc. All rights reserved. No part of this manual may be used or reproduced in any manner whatsoever without written permission. For information, address LISI, Inc., 1600 West Hillsdale Avenue, San Mateo, CA 94402 LISI’s HRConnect User Manual TABLE OF CONTENTS Overview: What is HRConnect?................................................................................................................................... 5 Sections for Brokers 1. Deploying a Group............................................................................................................................................... 7 2. Getting a Premium Services Quote.................................................................................................................... 13 3. Getting Started................................................................................................................................................... 17 Sections for HR Administrator 4. Home Section..................................................................................................................................................... 19 • Edit Mode & Read-Only Preview................................................................................................................... 20 • Viewing the Training Video............................................................................................................................ 21 • Signing Up for a Web Seminar...................................................................................................................... 22 • Adding Items................................................................................................................................................ 24 • Adding your Company Logo......................................................................................................................... 26 5. Employees Section.............................................................................................................................................. 29 • Manage Employees....................................................................................................................................... 29 • Adding Details....................................................................................................................................... 29 • Designating an Employee Status............................................................................................................ 31 • Assigning Plans...................................................................................................................................... 32 • Deleting an Employee............................................................................................................................ 33 • Employee Access........................................................................................................................................... 34 • Creating an Employee User Account...................................................................................................... 34 • Resetting a User Password...................................................................................................................... 36 • Revoking User Access............................................................................................................................. 36 • Company Directory....................................................................................................................................... 37 • Census.......................................................................................................................................................... 38 6. Benefits Section.................................................................................................................................................. 41 • Setting Up Classes......................................................................................................................................... 42 • Adding Plans................................................................................................................................................. 43 • Contributions................................................................................................................................................ 50 • Assigning Plans............................................................................................................................................. 52 7. Enrollment Section............................................................................................................................................. 55 8. Information Section............................................................................................................................................ 57 9. Reports Section................................................................................................................................................... 59 10. Help Section....................................................................................................................................................... 61 11. Premium Services Sections................................................................................................................................ 63 • Payroll........................................................................................................................................................... 64 • COBRA.......................................................................................................................................................... 65 • FSA/POP....................................................................................................................................................... 66 • EAP............................................................................................................................................................... 67 • HR Resources................................................................................................................................................ 68 Appendix................................................................................................................................................................... 69 Proposal A: Premium Services Detailed Proposal..................................................................................................... 71 Proposal B: Premium Services Proposal Summary................................................................................................... 83 Proposal C: Premium Services Pricing Summary..................................................................................................... 85 LISI’s HRConnect User Manual 3 This Page Left Intentionally Blank 4 LISI’s HRConnect User Manual OVERVIEW What is HRConnect? H RConnect is an online, integrated human resource (HR) management system designed to meet the needs of most employers and their employees. HRConnect includes a benefit plan administration system that is set up and maintained by the insurance agent. It summarizes all benefit plans and provides contact information for all carriers, enrollment forms, and other important information. Surveys of HR managers all draw the same conclusion—the most common employee inquiry is about health and benefit plans; therefore, an effective HR system must have robust benefit plan administration capabilities. HRConnect meets this need by having a system maintained by the local health and benefits expert. HRConnect includes a variety of other capabilities as well, including employee record keeping, company calendar, HR reports, vacation and attendance tracking, and a company information section. A unique feature of HRConnect is that it’s fully integrated with LISI’s QuoteStar™, Powered by Healthconnect, quoting system, enabling transfer of detailed plan information from every major California medical carrier and employee-level benefit data. HRConnect is also seamlessly integrated with leading providers of payroll, COBRA, Section 125, Premium Only Plan (POP)/Flexible Spending Account (FSA), regulatory compliance, and other services that encompass the entire range of employee benefits and HR services. As a result, HRConnect acts as a single hub that can process all of an employer’s HR needs. HRConnect has two levels of access: one for the HR manager, and another for individual employees. The Home section enables users to quickly find the information or function they are seeking. Tabs across the top of the page allow for access to items like payroll, forms and benefits, while the company calendar, important links, and other quick-hit information are available at first glance. Through HRConnect, users can view plan overviews and link to forms or information directly from the carrier, such as enrollment, claims or life changes. Employees can also drill down to specific benefits with just one click. About this Manual: As you will see, HRConnect is a powerful tool with numerous features that will assist companies to manage their HR. Since many of the day-to-day HR functions are managed through the system, a thorough understanding is essential, so that groups and their employees can get the most out of HRConnect. This manual will go over each of the features in HRConnect—from deploying a group to setting up their plans and producing reports. We hope this manual proves to be a useful resource in understanding the value of this system. HRConnect Contact Information: For day-to-day questions about using HRConnect, including deploying groups: Your LISI Regional Sales Manager or Broker Sales Representative (866) 570.5474 For specific information about Premium Services: Teresa Ledbetter (877) 805.2828, extension 202 For technical assistance with entering large groups or custom plans: John Newman (877) 805.2828, extension 251 HRConnect also conducts biweekly Web seminars for all users—groups and brokers. At these sessions, participants can learn more about HRConnect and obtain answers to questions. One can register for a Web seminar anytime by following the directions in the Sign Up for Web Seminar section of this manual. LISI’s HRConnect User Manual 5 This Page Left Intentionally Blank 6 LISI’s HRConnect User Manual Broker Section 1. Deploying a group Before a group can begin using HRConnect, they must first be deployed in the system by their broker. Group deployment is a basic group set-up which defines the group’s basic information and health benefits, and grants access to the designated group administrator. How to Deploy a Group: Step 1: Login. Go to www.lisibroker.com, enter your username and password beneath the left navigation of the Web site. Press the button, Run a Quote! with HealthConnect, or click the Quoting icon in the Toolbox area. On the Online Quotes page, choose the option, QuoteStar™, Powered by HealthConnect. Step 2: Choose HRConnect. Click the HRConnect/Enrollment icon on the main menu. Step 3: Select Group for Deployment. From the drop-down menu, choose the group you wish to deploy. Select the Deploy Group option under the Select Task section, then click Next. Step 4: Complete the Group Information Page. Ensure that the pre-populated group information is correct. Enter any missing information to complete the form. Click Next. LISI’s HRConnect User Manual 7 Deploying a Group Step 5: Complete the Employee Information Page. It is important to make sure the group census is correct and complete. If additions or deletions are necessary, go back to the group’s quote and change the census. Remember, full names must be included on the census, so that plans can be assigned to employees. Additionally, assign one of the employees as the Group Administrator by entering their contact information at the bottom of the Web page. Click Next. Important note: If you prefer the password and username for the group to be e-mailed to you rather than the group’s administrator, enter your e-mail address in the Group Administrator Information section. Step 6: Complete the Agency Information Page. Make sure the brokerage information is correct. Enter any missing data or update any incorrect information. Required step: At the end of the form, specify if you want to be notified of employer changes in the system. Click Next. 8 LISI’s HRConnect User Manual Deploying a Group Please note, HRConnect remembers changes made to the Agency Information page and applies them to all previous groups that have been set up in the system. Step 7: Complete the Carrier Information Page. Select the group’s medical carriers. Make sure you also include all their dental carriers, if applicable. Select the ancillary products your group has purchased, if applicable. Click Next. LISI’s HRConnect User Manual 9 Deploying a Group Step 8: Complete the Plan Selection Pages. Select the plans the employer offers their group. Click Next. On the next page, you can enter the policy numbers for the plans. Click Next. Step 9: Complete the Additional Options Page. Select the Premium Services you wish your group to see—the default is to see all the potential Premium Services. In most cases, you should set the system to transfer the employee rates, therefore keep the Transfer Employee Rates checkbox selected. Then, confirm the effective date of the group’s medical plan(s) and their Risk Adjustment Factor (RAF). Click Next. For more information about Premium Services, please refer to the Getting a Premium Services Quote section of this manual. 10 LISI’s HRConnect User Manual Deploying a Group Step 10: Complete the HRConnect Initialization Submission Page. Confirm that all the information is correct, then click Next to submit the form to HealthConnect. Your group is now deployed! An e-mail with the group’s username and password will arrive soon at the e-mail address designated on the Employee Information Web page (Step 5). Once the Group Administrator receives their login information, they can use the secure HRConnect system, explore Premium Services, add custom plans, and add information, links and documents on the Information section. LISI’s HRConnect User Manual 11 This Page Left Intentionally Blank 12 LISI’s HRConnect User Manual Broker Section 2. Getting a Premium services quote In addition to all the features we will cover in this manual, HRConnect offers Premium Services to address additional HR needs, such as integrated payroll, COBRA, Section 125, and HR Consulting & Employee Handbook-Building. Premium Services are offered through partnerships with industry-leading vendors and they provide seamless integration with HRConnect. For example, when you make a personnel change to an employee’s status, notification is immediately sent to the payroll, COBRA and/or Section 125 vendor, therefore removing unnecessary paperwork and delays. To access Premium Services, you must purchase the requested service through one of HRConnect’s vendors. This can be easily accomplished by calling Teresa Ledbetter at (877) 805.2828, extension 202. You can also visit HRConnect’s Web site, www.reviewmybenefits.com, to request more information. Prices for Premium Services can vary depending on a group’s demographics. To find out the cost of these services, brokers can use any of the three options listed below. End users (your clients) will need to utilize Option 3. If they would like to see a more detailed proposal for Premium Services, they must contact you, their broker, to obtain a quote. How to Obtain a Premium Services Quote: There are three ways to obtain a quote for HRConnect’s Premium Services, and each method will produce a slightly different result. For your reference, there are examples of the three proposals in the Appendix of this manual. The first two methods for obtaining a quote utilize LISI’s QuoteStar™, Powered by HealthConnect, quoting system. Option 1—Premium Services Detailed Proposal. This quoting method is utilized for both new groups and groups already in the quoting system. It will generate an 11-page proposal with detailed pricing and service descriptions. 1. Log onto the LISI Web site, www.lisibroker.com, click the Run a Quote button at the top of the home page, and select QuoteStar™, Powered by HealthConnect on the Online Quotes Web page. 2. On the quoting system home page, click the Small Group Quote button. 3. If you want to create a quote for a new group and they are not in QuoteStar™, Powered by HealthConnect, select Quote a New Group. If the group already exists in the system, select the group name from the drop-down menu. Then, click Next. 4. To create a quote for this group, follow the procedure for running a normal medical and/or dental quote until you reach the Report Options page. 5. On the Report Options page, mark the HRConnect checkbox under the HR Services sub-section (make sure no other checkboxes are selected). Click the Create Proposal button (highlighted on the next page). 6. Deliver the proposal: a. E-mail the proposal to yourself and/or your client. b. View and/or print the proposal by clicking the link, View/Print Proposal. LISI’s HRConnect User Manual 13 Getting a Premium Services Quote Option 2—Premium Services Proposal Summary. This quoting method is used solely for groups that exist in QuoteStar™, Powered by HealthConnect. It will produce a two-page proposal with detailed pricing and simplified services descriptions. 1. Log onto the LISI Web site, www.lisibroker.com, click the Run a Quote button at the top of the home page, and select QuoteStar™, Powered by HealthConnect on the Online Quotes Web page. 2. On the quoting system home page, click the HRConnect/Enrollment button. 3. Select the group you are quoting from the drop-down menu. 4. Click the HRConnect Pricing link. 14 LISI’s HRConnect User Manual Getting a Premium Services Quote Option 3—Premium Services Pricing Summary. This quoting method is produced for groups already deployed in the HRConnect system that would like pricing for Premium Services. This option will produce a one-page detailed pricing sheet with no description of the services provided. 1. Go to the HRConnect Web site, www.reviewmybenefits.com, and login using your username and password. 2. Click the Pricing Tab on the main menu. 3. On the Pricing section, enter in the textbox the number of employees to quote for this group. 4. Click the Generate HRConnect Price Quote button. a. When printing, you can set the orientation of the document in Landscape mode so all the pertinent data shown on the Web page will fit better on the printed page. LISI’s HRConnect User Manual 15 This Page Left Intentionally Blank 16 LISI’s HRConnect User Manual Broker Section 3. Getting Started Once the group is successfully deployed, you (or the Group Administrator) will receive an e-mail containing a link to access the HRConnect Web site, www.reviewmybenefits.com, along with the username and password. The password supplied in the welcome e-mail is a temporary password that will allow you to log onto the HRConnect Web site. LISI’s HRConnect User Manual 17 Getting Started The HRConnect Web site portal: When you enter the HRConnect Web site for the first time, you will be required to change your password. The new password can be any combination of letters and numbers. Please note: Passwords are case-specific, so ‘PASSWORD’ is not the same as ‘password.’ Once you modify your password, you will be directed to the Home section of the HRConnect Web site. 18 LISI’s HRConnect User Manual HR Administrator Section 4. Home Tab After logging onto the HRConnect Web Site, www.reviewmybenefits.com, you will land on the Home section, the system’s starting page. This page will be the most utilized by you and your employees once you set up the system for your group. The Home section consists of five sections (item #1 below): 1. 2. 3. 4. 5. Company Calendar New To You Important Links Announcements Tools Each section can be populated with important information to distribute to your group’s employees. Items or events can be added to any section, except New To You. Geared specifically to the employee, the New To You section spotlights the information from Sections 1 through 4 added by you as the HR Administrator. The next time an employee logs onto the Web site, he/she will see the information that is relevant under this section. You can also navigate to other sections of the HRConnect Web site by using the tabs at the top of the screen (item #2 above). Furthermore, you can sign up to view a training video or attend a Web seminar to familiarize yourself with this Web site and its services by clicking one of the buttons above the tabs (item #3 above). We will provide more information about these services later in this section. LISI’s HRConnect User Manual 19 Home Tab Edit Mode & Read-Only Preview HRConnect offers flexibility to set up screens to suit your needs. Only the designated HR Administrator has access to change the basic setup of the group’s HRConnect Web site. Once you log in as an HR Administrator, you enter the Edit Mode. You can easily modify how the sections appear on the Home section by changing their order. Clicking the single red arrow button (item #1) moves an item up or down by one position, while clicking the double red arrow buttons (item #2) moves an item to the top or bottom of the list. You can also view an example of what your employees will see when they log onto the HRConnect Web site by clicking the Read-Only Preview link, located at the bottom, right corner of the screen. The Web page will refresh and display the Home section without the edit features. You can toggle back to the edit mode at any time by clicking the Edit Mode link. 20 LISI’s HRConnect User Manual Home Tab Viewing the Training Video HealthConnect provides a 17-minute training video about HRConnect, explaining its concept and the services available on both the basic platform and Premium Services. Video topics include: Introduction System Summary Base System Home Section Employees Section Benefits Section Enrollment Section Information Section Reports Section and more Premium Services Payroll COBRA FSA/POP EAP HR Resources Pricing Employee Access Contact Information Two Ways to Access the Video: Option 1. Log onto the HRConnect Web site, www.reviewmybenefits.com, and click the HRConnect Tutorial Video button. Option 2. Enter the following link in your internet browser: http://www.healthconnectsystems.com/hcs/HRCVideo.aspx. You can view the training video in normal sequence or skip and play the sections that interest you by clicking a title on the video navigation. LISI’s HRConnect User Manual 21 Home Tab Signing up for a Web Seminar HealthConnect offers online HRConnect training seminars to help users learn the system and provide details about its Premium Services. Free Web seminars are currently held biweekly, Wednesday and Friday, at 10:00 am to 11:30 am. (Frequency and times are subject to change.) How to Sign Up for a Web Seminar: 1. Login to the HRConnect Web site, www.reviewmybenefits.com, using your username and password. 2. Click the Sign Up for a Web Seminar button at the top, middle section of the Web page. 3. On the next page, a list of available Web seminar dates and times will be displayed. If you are interested in participating in a training seminar, select a date and time that works best for you, and click the Join link next to your choice. 22 LISI’s HRConnect User Manual Home Tab: Signing Up for a Web Seminar 4. A new window will open and display the registration page for your chosen Web seminar. Complete the required registration information, then click the Register Now button to submit the form. 5. You will receive a confirmation message, including information on how to access the Web seminar, at the e-mail address you provided during the registration process. Minimum System Requirements: In order to access the Web seminar, the computer you use must meet the following minimum specifications: PC-based attendees: Windows® 2000, XP Home, XP Pro, 2003 Server, Vista Macintosh®-based attendees: Mac OS® X 10.3.9 (Panther®) or newer LISI’s HRConnect User Manual 23 Home Tab Adding Items HRConnect allows you to incorporate information useful to your organization. In each section of the Home section, items such as calendar events, links, and documents can be added. As an example, let’s add a document, the 2009 Holiday Schedule, to the Important Links section of the group’s Home section. How to Add an Item in the Home Section: 1. Click the Add Item link under the Important Links section. 2. In the Item Type drop-down menu, select the type of item you want to add; in this case, select Document (item #1 below). 3. Under My Documents, select the file you want to add from the drop-down menu (item #2 above). If the file does not appear as an option in the menu, follow this four-step process to add and upload the file: a. Click the Upload and Manage Documents link (item #2a above). b. Create a record in the Documents screen by clicking the Add link. 24 LISI’s HRConnect User Manual Home Tab: Adding Items c. In the Document Upload screen, you must enter a name for your document. A brief description may also be added if applicable. Click the Browse button to locate the Holiday Schedule document in your computer. Then, click the Upload Document link. d. Once the 2009 Holiday Schedule is uploaded, it will appear on the Documents list. Click the Back link to return to the Add Item screen. 4. You must designate a label to the document, then select the appropriate file from the drop-down menu in My Documents. You can also add a description, as well as set a time period for displaying this item on the Home section. You may also leave the effective and expiration dates blank to keep the item visible at all times. Finally, click the Add link. 5. The 2009 Holiday Schedule is now available under the Important Links section of your group’s Home section. LISI’s HRConnect User Manual 25 Home Tab Adding your Company Logo One of HRConnect’s customizable features is the ability to add your company’s logo to the Web site. The logo will display on the upper left corner of every Web page, next to your company’s contact information. How to Upload a Logo: 1. Click the Edit link located right next to your company’s contact information. 2. Click the Upload Logo link located on the right side of the Web page. 26 LISI’s HRConnect User Manual Home Tab: Adding your Company Logo 3. On the Upload Client Logo screen, click the Browse button and find the graphics file of the logo saved on your computer’s hard drive or network. Please note, the maximum size of the logo is 200 x 60 pixels and it must be in .jpeg or .jpg file format. 4. Click the Save link to upload the file to the system. LISI’s HRConnect User Manual 27 This Page Left Intentionally Blank 28 LISI’s HRConnect User Manual HR Administrator Section 5. Employees Tab Manage Employees The primary purpose of HRConnect is to efficiently manage HR data. To facilitate this, employee information must be entered into the system under the Employees section. In the Manage Employees section, you can upload a census list of the group’s employees or register a new hire. You can also add employee details (such as their phone numbers and addresses), designate an employment status, assign plans, and delete a terminated employee from the group list. Adding Details: Gather and enter as much pertinent information as needed for every employee in your group. 1. To edit an employee’s record, select an employee from the list and click the Details link next to their name. LISI’s HRConnect User Manual 29 Employees Tab: Manage Employees 2. Complete the employee record (item #1 below). 3. Click the Update link to save the data (item #2 above). 4. To add dependents or emergency contacts for an employee, click the Add link under the Dependents and/or Emergency Contacts section(s) (item #3 above). a. Enter the required information under the Dependents and/or Emergency Contacts screen(s). Click the Update link to save the data. 30 LISI’s HRConnect User Manual Employees Tab: Manage Employees b. The employee’s dependent (or emergency contacts) information will display on the Employee Details screen. Designating an Employment Status: Under the Employment Status column of the Manage Employees section, you can designate a status—Active, Terminated, Rehired, Inactive—for each employee in your company. 1. To assign an employment status to an employee, select an employee from the list and click the Active link next to their name. LISI’s HRConnect User Manual 31 Employees Tab: Manage Employees 2. In the Employee Employment Status screen, you can set the employee’s status, along with their job type, pay type, job title, and wage. The Status Date text field is used to note when changes to the employee’s record are entered into HRConnect. 3. Click the Update Status link to save your changes to HRConnect (highlighted above). Assigning Plans: After you complete entering information for each employee, you must assign each employee to a plan under each line of coverage—Medical, Dental, Vision, and so on—as applicable. 1. To assign a plan to an employee, click the Assign Plans link next to their name. 2. For each line of coverage listed in the system, assign a plan to an employee by clicking the button next to the employee’s plan choice. 32 LISI’s HRConnect User Manual Employees Tab: Manage Employees 3. After making a plan choice for each line of coverage, click the Update link to save your selections. Deleting an Employee: If an employee leaves your group and you are certain that their information is no longer needed in HRConnect, you have the option to delete the terminated employee’s records. However, please note that the Delete Employee feature is not recommended for use. Instead, it is advisable to set the terminated employee’s status to Inactive to prevent data loss. (This topic will be covered later in this chapter.) Currently, there is no method available to recover this information once you confirm an employee deletion. Please consider your deletions carefully. 1. To delete an employee record, select an employee from the list and click the Delete Employee link next to their name. 2. Once you click the Delete Employee link, a pop-up message will ask you to confirm your request. Click the OK button if you are certain about deleting the employee. LISI’s HRConnect User Manual 33 Employees Tab Employee Access One of the benefits of HRConnect is its accessibility to employees, allowing them to access the system to view their plan information, complete enrollment paperwork, make address changes, and so on. For employees to gain access to HRConnect, they must have a valid e-mail address. Then, the HR Administrator must create employee accounts in HRConnect and grant them access to the system. Creating an Employee User Account: For All Employees: 1. Go to the Employees section and click the Employee Access link on the main menu at the top of the page. 2. In the Employee Access screen, you can efficiently create accounts for all employees by selecting one of the links on the top right menu: Create All, Create and Email All, and Resend All. a. Selecting Create All will create Employee User accounts for all the employees. b. Selecting Create and Email All will create Employee User accounts for all the employees. The system will also send out e-mails to notify all the employees of their HRConnect login information created by the HR Administrator. 34 c. Selecting Resend All will prompt the system to send an e-mail to every employee on the list, notifying them of their login information. LISI’s HRConnect User Manual Employees Tab: Employee Access The system will display a confirmation message once all the user accounts are successfully created. For an Employee: If you have a new-hire employee, you can give this person access to HRConnect by creating a single Employee Access account. 1. Go to the Employees section and click the Manage Employees link on the main menu at the top of the page. 2. In the Manage Employees screen, add the employee. 3. Next, navigate to the Employee Access section. You will find that the new person is now included in the employee list. 4. Click the Create or Create and Email link next to their name. a. Selecting Create will create an Employee User account for the new employee. b. Selecting Create and Email will create an Employee User account, as well as prompt the system to send an e-mail to the new employee, providing this person their HRConnect login information created by the HR Administrator. LISI’s HRConnect User Manual 35 Employees Tab: Employee Access Resetting a User Password: If an employee loses or forgets his/her password, you can reset it and resend the login information via e-mail by respectively clicking the Reset Password and Resend Email links next to his/her name (item #1 below). Revoking User Access: You can also revoke an employee’s access to the HRConnect Web site. Under the Status column, click the Enabled link next to the employee’s name to modify his/her Status to Inactive (item #2 above). This is the recommended procedure for maintaining records of employees who leave the company. 36 LISI’s HRConnect User Manual Employees Tab Company Directory The Company Directory, which can be accessed on the main menu of the Employees section, is available to both HR Administrators and employees. The data on this directory are obtained from the Manage Employees section; you cannot modify any information directly from this section. A read-only page, the Company Directory displays a list of names, office locations, office phone numbers, and business e-mail addresses for each employee entered into HRConnect. Please note: For security purposes, no personal information is available on this page. LISI’s HRConnect User Manual 37 Employees Tab Census You can access your company’s complete census list on the main menu of the Employees section, under Census. It displays a list of all active employees in your group, including their dependent status, birth date, and age (item #1 below). When you modify the employee census in HRConnect, you have the option to notify your agent via e-mail, so that he/she can update the group’s census in LISI’s QuoteStar™, Powered by HealthConnect, quoting system. Once you click the Notify Agent to Synch Census link (item #2 above) on the Census page, the system will send your agent an e-mail, informing him/her that your group’s current census in HRConnect is available for retrieval. The agent can then facilitate a synchronization of information between the two systems, transferring data from HRConnect to QuoteStar™, Powered by HealthConnect. This automated process ensures efficiency and accuracy in quoting. 38 LISI’s HRConnect User Manual Employees Tab: Census Once the system delivers an e-mail to your agent, you will receive a confirmation message. LISI’s HRConnect User Manual 39 This Page Left Intentionally Blank 40 LISI’s HRConnect User Manual HR Administrator Section 6. Benefits Tab In the Benefits section, you can enter and modify your group’s benefit plan information. You can set up classes, add plans, set employer and employee contributions, and assign plans to employees. Click the Benefits Tab on the main menu of the Home section to access the Plans section below. LISI’s HRConnect User Manual 41 Benefits Tab Setting Up Classes Classes are used to carve-out members of a single census into different groups. These different groups may be offered various benefit packages. For example, a company may offer executives a choice of plans, while the rest of the employees may only select from one plan. If you do not intend to offer different benefits to different groups of employees, do not create a new class. How to Set Up a Class: 1. In the Class Name column, enter the name of the class you would like to set up (item #1 below). Please note: The HotKey functionality has been removed from the system; therefore, leave this column blank. 2. Click the Update link (highlighted above). You can enter as many classes as necessary. If you enter a class in error or it is no longer used, mark the checkbox in the Del? column next to the class to delete it from the list (item #2 below). An example of a completed class setup: Important Note: Once you set up classes, you must assign each class to a plan, as well as assign each employee to a class to ensure that the system functionality will work correctly with your class structure. 42 LISI’s HRConnect User Manual Benefits Tab Adding Plans HRConnect stores most small group medical and ancillary benefit plans available in California. However, there may be plans currently not available in the system, so you may need to add a plan. Plans chosen by a group must be entered when the group is deployed in HRConnect. In addition to being able to add medical, dental, life or vision plans, you can also add other plan types such as 401(k)/403(b), Short and Long-Term Disability, and Long-Term Care. You can add both plan benefits and rates for these ancillary plans. How to Add a Plan to HRConnect: 1. Click the Add Plans link on the main menu. 2. In the Add Plan page, mark whether or not you will set up classes for the group (item #1 below), then click the Update link right below. 3. Next, select in the drop-down menu the line of coverage you wish to add (item #2 above). LISI’s HRConnect User Manual 43 Benefits Tab: Adding Plans 4.Your selection will direct you to the Rates page, where you can enter your group’s carrier, plan name and type, effective date, and policy number (item #1 below). 5. Under the Rates section (item #2 above), choose either Tier (Composite) or Employee (Age-Banded) for Plan Type. 6. After making your plan type selection, the system will expand the Rate section, enabling you to manually add rates for your new plan. Click the Update link after you input the rates. 44 LISI’s HRConnect User Manual Benefits Tab: Adding Plans 7.Once the Rates section is updated, click the Plan Details link at the top of the page. 8. Enter your group’s plan benefits on the Plan Details page. LISI’s HRConnect User Manual 45 Benefits Tab: Adding Plans 9. After entering all the information on the Plan Benefits page, click the Update link to save the data. You can also click the Read-Only View link to see how the Plan Benefits page will look when an employee views this page (both highlighted on the previous page). a. The Read-Only Preview mode of a group’s plan benefits: 10.In the Add Plans page, click the Plans link above to view your current plan listing. Your new plan will now appear in the Plans list. 46 LISI’s HRConnect User Manual Benefits Tab: Adding Plans How to Add a Custom Plan to HRConnect by Editing an Existing Plan: When you deploy a group for the first time or add a plan to a group you already deployed, you can choose from any of the Small Group plans available in HRConnect. However, your company may offer a plan that is not available in the system. When this is the case, you can add a similar plan already available in the system, and then edit that plan so that it matches your company’s actual plan. 1. In the previous section titled, How to Add a Plan to HRConnect, follow the steps for adding a plan. a. Make sure you pick a plan from the list of Small Group plans available in the system that is similar to what is currently being offered to your group. 2. Click the Edit Benefits link next to the plan name you wish to modify. 3. Add, delete, and update the benefits within the existing plan as needed to match your current plan benefits (item 1 below). Click Update to save your changes. LISI’s HRConnect User Manual 47 Benefits Tab: Adding Plans Important Note: If you are making numerous changes, we recommend you save frequently because HRConnect will timeout after a period of inactivity. Click the Update link on the bottom right corner of the page after every five to ten changes you make to avoid losing data and logging onto the system again. 4. Once you complete editing the plan benefits to match your group’s current plan, click the Edit Plan/Rates link next to the plan you are changing. 5. Change the name of the carrier, plan name, plan type, effective date, and policy number of the plan to match your group’s current plan. 6.Next, edit the rates. a. If your group has age-banded rates, click the Employee button next to plan type under the Rates subsection. You must enter each person’s employee- and dependent-only rates. 48 LISI’s HRConnect User Manual Benefits Tab: Adding Plans b. If your group has composite rates, click the Tier button next to the plan type under the Rates subsection. You must choose how many rate tiers (two to five) your plan has and enter the associated rate for each tier. 7. Click the Update link at the bottom of the page to save your changes. LISI’s HRConnect User Manual 49 Benefits Tab Contributions In the Contributions section of the Benefits section, you can enter employer or employee contributions for any plans that you set up in HRConnect. How to Add Contributions: 1. Select a line of coverage from the drop-down menu (item #1 below). Then, click the Add New Contribution link (item #2 below). 2. Next, specify who is making the contribution, the Employer or Employee (item #3 below). 50 LISI’s HRConnect User Manual Benefits Tab: Contributions 3. Select a contribution period from the drop-down menu (item #4 on previous page). 4. Choose the method of contribution: Percent, Flat Amount or Percent of a Specific Plan (item #5 on previous page). If you select Percent of a Specific Plan, you must choose a base plan from the drop-down menu. In our example on the previous page, we selected Anthem Blue Cross Lumenos 1500 Plan as the base plan upon which contributions are calculated. 5. Specify the amount of contribution both the employee and dependent will make. We specified in our example that the employer will contribute 80%, with the employee responsible for the remaining 20%. Finally, click the Update link to save the data. Employer and employee contributions are now set for a health plan. LISI’s HRConnect User Manual 51 Benefits Tab Assigning Plans To take advantage of the numerous employee and administrator features in HRConnect, employees must be assigned to plans— medical or ancillary—you set up in the system. There are two ways plans can be assigned to an employee: 1. Assign a plan, one at a time, to each employee. 2. Assign plans to all employees all at once (a faster and more efficient process illustrated below). How to Assign Plans to All Employees: 1. In the Benefits section, click the Assign Plans link on the main menu. 2. Select a type of effective date: Current applies to plans that are already in effect, and Enrolling refers to future enrollments. 3. Specify the type of plans you will assign to the employees by selecting a line of coverage from the drop-down menu. 52 LISI’s HRConnect User Manual Benefits Tab: Assigning Plans 4. Then, specify a plan the employee is currently on or enrolling in by choosing an option in the drop-down menu under the Plan column. On this page, you are able to change an employee’s family status, as well as class, if you have previously set up Classes. Once you change an employee’s plan choice, the system will refresh and display the latest rate information for that employee. 5. After you complete your modifications, click the Update link (highlighted above) to save your selections. The system will display a confirmation message once you complete assigning plans to all employees. LISI’s HRConnect User Manual 53 This Page Left Intentionally Blank 54 LISI’s HRConnect User Manual HR Administrator Section 7. Enrollment Tab In the Enrollment section, you can complete the master group application for medical and dental coverage through a select list of carriers. You can also view the status of the employees’ applications, as well as print copies for their records. It is advantageous to use this section during your groups’ Open Enrollment period—the processes of completing and collecting enrollment applications are expedited. Online enrollment in HRConnect ensures that employees fill in all required information, allowing them to submit complete, signature-ready applications. This reduces processing time and errors in applications. Carriers Currently Available in HRConnect for 2–50 Groups: Medical and/or Dental Aetna Anthem Blue Cross Blue Shield CaliforniaChoice® Health Net Kaiser Permanente Kaiser Permanente Choice Solution PacifiCare Sharp Health Plan United HealthCare Dental Only Safeguard Additional carrier enrollment forms can be added as needed and can be requested by contacting an HRConnect representative. LISI’s HRConnect User Manual 55 This Page Left Intentionally Blank 56 LISI’s HRConnect User Manual HR Administrator Section 8. Information Tab The Information section serves as a repository of information that you can provide to employees to view whenever they access the HRConnect Web site. This section is initially blank, but it can be utilized and filled with any information you choose—there is no limit to what can be added and displayed. Examples of items that can be added include: Benefits Section Benefits Plan Summary Provider List Claims Forms Company Contact Sheets Company Section Company Contact Sheets Merchandise Catalog Employee Handbook How to Add Items to a Section: 1. Click the Add Section link. 2. On the Add Section page, enter a section title (required) and a description (if needed). You can enter a number of items to display in Compact View, as well as effective and expiration dates for displaying the section. Then, click the Add link. LISI’s HRConnect User Manual 57 Information Tab 3. After adding a section, you will return to the Information section. In the new section header, click the Add Item link to specify what information you wish to display in this section. 4. Select the type of item to be added from the drop-down menu. Enter an item label, a description (if needed), and effective dates if you want the item to display for a limited period of time. Finally, click the Add link. Your item is now displayed on the Information section (item #1 below). You can create as many sections as you want, with as many items in each section as you need. At any time, you can edit or delete a section or an item by clicking either Edit or Delete next to the section or item you wish to change or remove (item #2 above). 58 LISI’s HRConnect User Manual HR Administrator Section 9. Reports Tab In the Reports section, you can run instant reports from the data in HRConnect. Each of these reports can be displayed on screen, printed or exported to Microsoft Excel for manipulation and back-up. Reports available in the system: Title Variations Available BirthdayAll months or by specific month Emergency Contacts None Employee DetailsNone Employee Plans By Effective Date (either currently enrolled or future enrollment option) Employee Rates Sort by Name or Coverage Type By Effective Date (either currently enrolled or future enrollment option) Employee StatisticsNone New Hire Select Time Period Service AnniversaryAll months or by specific month Termination Select Time Period How to View a Report: 1. To view a report, select an option in the drop-down menu. As an example, let’s choose the Birthday report. 2. Then, select the option you wish to see and click the View link (item #1 below). An on-screen report will display below. LISI’s HRConnect User Manual 59 Reports Tab 3. To export this report or print a copy for your records, click the Export/Print link above the report information (item #2 on previous page). In the dialogue box, you can select between the option of opening and viewing the report or saving it to your computer. a. If you are exporting the file, it will download in the .xls format and it can be opened in Microsoft Excel. The report options available in the system are based on the needs of current HRConnect clients. If there is a report you need that is currently not available, HealthConnect may be able to create a new report as long as the information you require is being tracked in the system. Please contact HealthConnect to discuss the feasibility of producing additional reports in the system (refer to the Overview of this manual for contact information). 60 LISI’s HRConnect User Manual HR Administrator Section 10. Help Tab The Help section contains pre-populated resources geared toward assisting employees using the system. Under this section, employees can refer to the Website Help and Insurance Term Glossary, as well as access links to download computer tools, such as the Adobe PDF viewer, Spyware protection program, Personal Firewall program, and Pop-Up blocker program. Any of the pre-populated items on the page can be edited or removed at any time by clicking Delete or Edit next to the selected item. LISI’s HRConnect User Manual 61 Help Tab An additional section or item can also be added to this page by clicking the Add Item or Add Section link. You can arrange sections or specific items within a section by clicking any of the red arrows on the page. Clicking the arrows in the blue section bar (item #1 below) will move an entire section up or down, while clicking the arrows right next to an item (item #2 below) will move it up or down within the section. When you complete your modifications in the Help section, you can view how an employee would see this page by clicking the Read-Only Preview link below (item #3 above). If you need to make additional changes to the Help section, you can toggle back to the edit mode by clicking the Edit Mode link. 62 LISI’s HRConnect User Manual HR Administrator Section 11. Premium Services In addition to the basic services provided by HRConnect previously described in this manual, several Premium Services are offered for an additional cost. These services allow a company to integrate payroll, COBRA, FSA/POP, EAP administration, and HR Resources services with HRConnect. HRConnect’s vendor partners have been selected because they offer complete, online integration to keep a company’s HR system running smoothly and efficiently. Current Premium Service vendors and services: SurePayroll—Payroll TASC—COBRA TASC—POP/FSA Ceridian—EAP HRAnswer Link—HR Resources With your HRConnect account, five additional tabs are available to you across the top of the screen that tie to each of these Premium Services. If you need more information about Premium Services or require assistance in setting up any of these services for your company, you will find on each of the Premium Services section a link to submit your contact information, so that an HRConnect representative can be notified to contact you. LISI’s HRConnect User Manual 63 Premium Services Payroll To obtain more information about SurePayroll and see if their service is a good fit for your company, click the link, Learn more about the HealthConnect and SurePayroll solution, and you will be directed to SurePayroll’s Web site. You can enroll online by clicking the link in the Enroll Today section on the upper left corner of SurePayroll’s home page. For additional questions, you can contact HealthConnect SurePayroll at (877) 805.2828, extension 250. 64 LISI’s HRConnect User Manual Premium Services COBRA Under the COBRA section, you can obtain a marketing brochure about COBRA and forms for enrollment. If you require further assistance, click the link, Have a representative contact me about COBRA services. Once you enter your contact information and submit the form, a representative will be notified to contact you. LISI’s HRConnect User Manual 65 Premium Services FSA/POP Under the FSA/POP section, you can obtain a marketing brochure, as well as forms for enrollment in the FSA/POP services. If you would like to talk to a HealthConnect representive about these services, you can contact (877) 805.2828, extension 250. 66 LISI’s HRConnect User Manual Premium Services EAP To obtain more information about the Employment Assistance Program (EAP) and to see if their services are a good fit for your company, you can click the link, Have a representative contact me about the EAP Plan, at the bottom of the page (highlighted below). An e-mail will be sent to a representative, notifying to contact you. LISI’s HRConnect User Manual 67 Premium Services HR Resources Under the HR Resources section, you can obtain information about this product, including the option that helps you build an employee handbook and the Ask an HR Pro feature. If you need more information about the HR Resources service, complete your contact information and click the link, Have a representative contact me about Premium HR Resources. A representive will be notified to contact you, so that he/she may discuss all the benefits of this service. 68 LISI’s HRConnect User Manual Appendix Appendix A: Premium Services Detailed Proposal Utilized for both new groups and groups already in the quoting system, this is an 11-page proposal with detailed pricing and service descriptions. Appendix B: Premium Services Proposal Summary Used solely for groups that exist in QuoteStar™, Powered by HealthConnect, this is a two-page proposal with detailed pricing and simplified services descriptions. Appendix C: Premium Services Pricing Summary Produced for groups already deployed in the HRConnect system, this proposal is generated for groups that would like pricing on HRConnect’s Premium Services. This proposal is a one-page detailed pricing sheet with no description of the services provided. LISI’s HRConnect User Manual 69 This Page Left Intentionally Blank 70 LISI’s HRConnect User Manual Appendix A Premium Services Detailed Proposal Page 1 LISI’s HRConnect User Manual 71 Appendix A Premium Services Detailed Proposal Page 2 72 LISI’s HRConnect User Manual Appendix A Premium Services Detailed Proposal Page 3 LISI’s HRConnect User Manual 73 Appendix A Premium Services Detailed Proposal Page 4 74 LISI’s HRConnect User Manual Appendix A Premium Services Detailed Proposal Page 5 LISI’s HRConnect User Manual 75 Appendix A Premium Services Detailed Proposal Page 6 76 LISI’s HRConnect User Manual Appendix A Premium Services Detailed Proposal Page 7 LISI’s HRConnect User Manual 77 Appendix A Premium Services Detailed Proposal Page 8 78 LISI’s HRConnect User Manual Appendix A Premium Services Detailed Proposal Page 9 LISI’s HRConnect User Manual 79 Appendix A Premium Services Detailed Proposal Page 10 80 LISI’s HRConnect User Manual Appendix A Premium Services Detailed Proposal Page 11 LISI’s HRConnect User Manual 81 This Page Left Intentionally Blank 82 LISI’s HRConnect User Manual Appendix B Premium Services Proposal Summary Page 1 LISI’s HRConnect User Manual 83 Appendix B Premium Services Proposal Summary Page 2 84 LISI’s HRConnect User Manual Appendix C Premium Services Pricing Summary Page 1 LISI’s HRConnect User Manual 85 This Page Left Intentionally Blank 86 LISI’s HRConnect User Manual Copyright © 2009 by LISI, Inc. All rights reserved. No part of this manual may be used or reproduced in any manner whatsoever without written permission. For information, address LISI, Inc., 1600 West Hillsdale Avenue, San Mateo, CA 94402 LISI’s HRConnect User Manual 87